


Finding bottlenecks with cProfile
After assessing the correctness and timing of the execution time of the program, we are ready to identify the parts of the code that need to be tuned for performance. We typically aim to identify parts that are small compared to the size of the program.
Two profiling modules are available through the Python standard library, as outlined here:
- The profile module: This module is written in pure Python and adds significant overhead to the program execution. Its presence in the standard library is due to its vast platform support and the ease with which it can be extended.
- The cProfile module: This is the main profiling module, with an interface equivalent to
profile. It is written in C, has a small overhead, and is suitable as a general-purpose profiler.
The cProfile module can be used in three different ways, as follows:
- From the command line
- As a Python module
- With IPython
cProfile does not require any change in the source code and can be executed directly on an existing Python script or function. You can use cProfile from the command line in this way:
$ python -m cProfile simul.py
This will print a long output containing several profiling metrics of all of the functions called in the application. You can use the -s option to sort the output by a specific metric. In the following snippet, the output is sorted by the tottime metric, which will be described here:
$ python -m cProfile -s tottime simul.py
The data produced by cProfile can be saved in an output file by passing the -o option. The format that cProfile uses is readable by the stats module and other tools. The usage of the-o option is shown here:
$ python -m cProfile -o prof.out simul.py
The usage of cProfile as a Python module requires invoking the cProfile.run function in the following way:
    from simul import benchmark
    import cProfile
    cProfile.run("benchmark()")
You can also wrap a section of code between method calls of a cProfile.Profile object, as shown here:
    from simul import benchmark
    import cProfile
    pr = cProfile.Profile()
    pr.enable()
    benchmark()
    pr.disable()
    pr.print_stats()
cProfile can also be used interactively with IPython. The %prun magic command lets you profile an individual function call, as illustrated in the following screenshot:
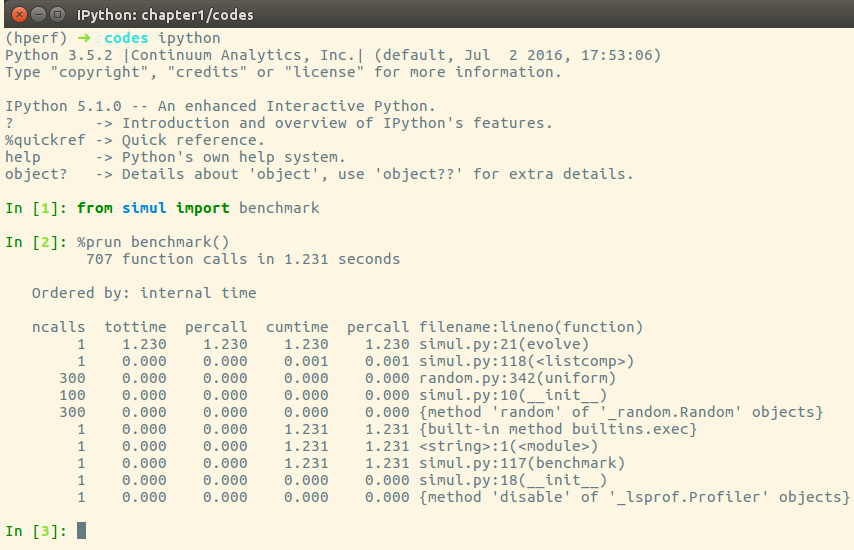
Figure 1.5 – Using cProfile within IPython
The cProfile output is divided into five columns, as follows:
ncalls: The number of times the function was called.tottime: The total time spent in the function without taking into account the calls to other functions.cumtime: The time spent in the function including other function calls.percall: The time spent for a single call of the function—this can be obtained by dividing the total or cumulative time by the number of calls.filename:lineno: The filename and corresponding line numbers. This information is not available when calling C extension modules.
The most important metric is tottime, the actual time spent in the function body excluding subcalls, which tells us exactly where the bottleneck is.
Unsurprisingly, the largest portion of time is spent in the evolve function. We can imagine that the loop is the section of the code that needs performance tuning. cProfile only provides information at the function level and does not tell us which specific statements are responsible for the bottleneck. Fortunately, as we will see in the next section, the line_profiler tool is capable of providing line-by-line information of the time spent in the function.
Analyzing the cProfile text output can be daunting for big programs with a lot of calls and subcalls. Some visual tools aid the task by improving navigation with an interactive, graphical interface.
Graphically analyzing profiling results
KCachegrind is a graphical user interface (GUI) useful for analyzing the profiling output emitted by cProfile.
KCachegrind is available in the Ubuntu 16.04 official repositories. The Qt port, QCacheGrind, can be downloaded for Windows from http://sourceforge.net/projects/qcachegrindwin/. Mac users can compile QCacheGrind using MacPorts (http://www.macports.org/) by following the instructions present in the blog post at http://blogs.perl.org/users/rurban/2013/04/install-kachegrind-on-macosx-with-ports.html.
KCachegrind can't directly read the output files produced by cProfile. Luckily, the pyprof2calltree third-party Python module is able to convert the cProfile output file into a format readable by KCachegrind.
You can install pyprof2calltree from the Python Package Index (PyPI) using the pip install pyprof2calltree command.
To best show the KCachegrind features, we will use another example with a more diversified structure. We define a recursive function, factorial, and two other functions that use factorial, named taylor_exp and taylor_sin. They represent the polynomial coefficients of the Taylor approximations of exp(x) and sin(x) and are illustrated in the following code snippet:
    def factorial(n):
        if n == 0:
            return 1.0
        else:
            return n * factorial(n-1)
    def taylor_exp(n):
        return [1.0/factorial(i) for i in range(n)]
    def taylor_sin(n):
        res = []
        for i in range(n):
            if i % 2 == 1:
               res.append((-1)**((i-1)/2)/
                   float(factorial(i)))
            else:
               res.append(0.0)
        return res
    def benchmark():
        taylor_exp(500)
        taylor_sin(500)
    if __name__ == '__main__':
        benchmark()
To access profile information, we first need to generate a cProfile output file, as follows:
$ python -m cProfile -o prof.out taylor.py
Then, we can convert the output file with pyprof2calltree and launch KCachegrind by running the following code:
$ pyprof2calltree -i prof.out -o prof.calltree
$ kcachegrind prof.calltree # or qcachegrind prof.calltree
The output is shown in the following screenshot:
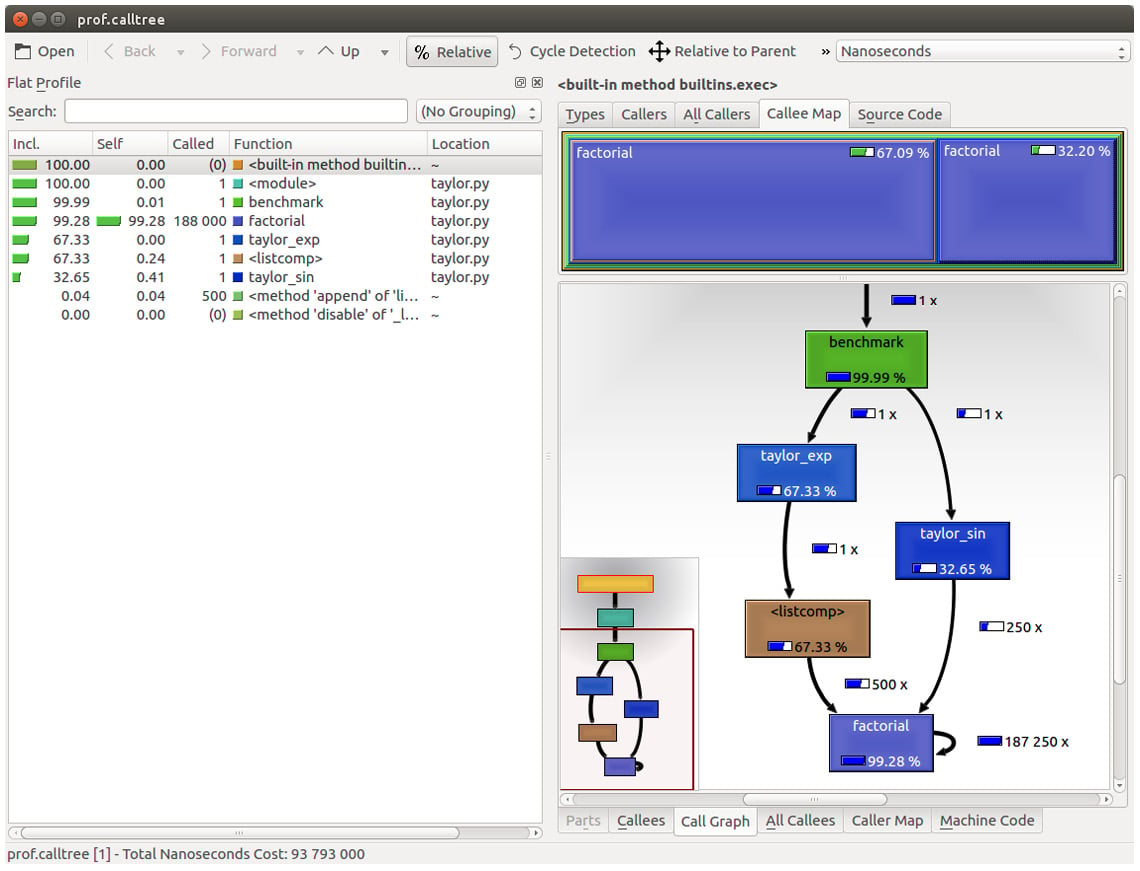
Figure 1.6 – Profiling output generated by pyprof2calltree and displayed by KCachegrind
The screenshot shows the KCachegrind UI. On the left, we have an output fairly similar to cProfile. The actual column names are slightly different: Incl. translates to the cProfile module's cumtime value and Self translates to tottime. The values are given in percentages by clicking on the Relative button on the menu bar. By clicking on the column headers, you can sort them by the corresponding property.
On the top right, a click on the Callee Map tab will display a diagram of the function costs. In the diagram shown in Figure 1.6, the time percentage spent by the function is proportional to the area of the rectangle. Rectangles can contain sub-rectangles that represent subcalls to other functions. In this case, we can easily see that there are two rectangles for the factorial function. The one on the left corresponds to the calls made by taylor_exp and the one on the right to the calls made by taylor_sin.
On the bottom right, you can display another diagram, a call graph, by clicking on the Call Graph tab. A call graph is a graphical representation of the calling relationship between the functions; each square represents a function and the arrows imply a calling relationship. For example, taylor_exp calls factorial 500 times, and taylor_sin calls factorial 250 times. KCachegrind also detects recursive calls: factorial calls itself 187250 times.
You can navigate to the Call Graph or the Callee Map tab by double-clicking on the rectangles; the interface will update accordingly, showing that the timing properties are relative to the selected function. For example, double-clicking on taylor_exp will cause the graph to change, showing only the contribution of taylor_exp to the total cost.
Gprof2Dot (https://github.com/jrfonseca/gprof2dot) is another popular tool used to produce call graphs. Starting from output files produced by one of the supported profilers, it will generate a .dot diagram representing a call graph.
Profiling line by line with line_profiler
Now that we know which function we have to optimize, we can use the line_profiler module that provides information on how time is spent in a line-by-line fashion. This is very useful in situations where it's difficult to determine which statements are costly. The line_profiler module is a third-party module that is available on PyPI and can be installed by following the instructions at https://github.com/rkern/line_profiler.
In order to use line_profiler, we need to apply a @profile decorator to the functions we intend to monitor. Note that you don't have to import the profile function from another module as it gets injected into the global namespace when running the kernprof.py profiling script. To produce profiling output for our program, we need to add the @profile decorator to the evolve function, as follows:
    @profile
    def evolve(self, dt):
        # code
The kernprof.py script will produce an output file and print the result of the profiling on the standard output. We should run the script with two options, as follows:
-lto use theline_profilerfunction-vto immediately print the results on screen
The usage of kernprof.py is illustrated in the following line of code:
$ kernprof.py -l -v simul.py
It is also possible to run the profiler in an IPython shell for interactive editing. You should first load the line_profiler extension that will provide the lprun magic command. Using that command, you can avoid adding the @profile decorator, as illustrated in the following screenshot:
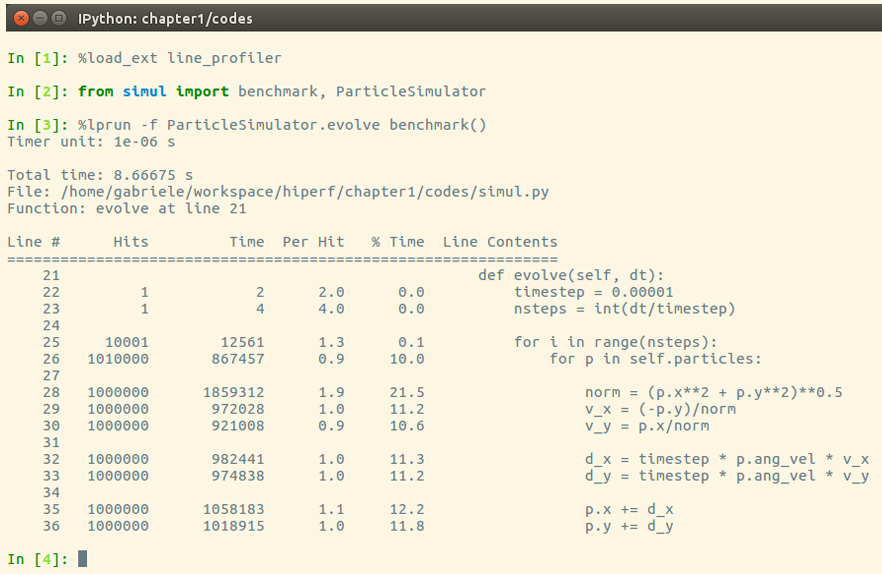
Figure 1.7 – Using line_profiler within IPython
The output is quite intuitive and is divided into six columns, as follows:
Line #: The number of the line that was runHits: The number of times that line was runTime: The execution time of the line in microseconds (Time)Per Hit: Time/hits% Time: Fraction of the total time spent executing that lineLine Contents: The content of the line
By looking at the % Time column, we can get a pretty good idea of where the time is spent. In this case, there are a few statements in the for loop body with a cost of around 10-20 percent each.