Chapter 4. Throttling, Filtering, Testing, and Deploying an API with Django
In this chapter, we will use the additional features included in Django and Django REST Framework to improve our RESTful API. We will also write and execute unit tests and learn a few things related to deployment. We will cover the following topics in this chapter:
Understanding throttling classes
Configuring throttling policies
Testing throttle policies
Understanding filtering, searching and ordering classes
Configuring filtering, searching, and ordering for views
Testing filtering, searching and ordering features
Filter, search, and order in the browsable API
Writing a first round of unit tests
Running unit tests and checking testing coverage
Improving testing coverage
Understanding strategies for deployments and scalability
Understanding throttling classes
So far, we haven't established any limits on the usage of our API, and therefore, both authenticated and unauthenticated users can compose and send as many requests as they want to. We only took advantage of the pagination features available in Django REST Framework to specify how we wanted large results sets to be split into individual pages of data. However, any user can compose and send thousands of requests to be processed without any kind of limitation.
We will use throttling to configure the following limitations of the usage of our API:
In addition, we want to configure a maximum of 100 requests per hour to the game categories related views, no matter whether the user is authenticated or not.
Django REST Framework provides the following three throttling classes in the rest_framework.throttling module. All of them are subclasses of the SimpleRateThrottle...
Configuring throttling policies
We will use a combination of the three throttling classes, discussed earlier, to achieve our previously explained goals. Make sure you quit Django's development server. Remember that you just need to press
Ctrl
+
C
in the Terminal or Command Prompt window in which it is running.
Open the gamesapi/settings.py file and add the highlighted lines to the dictionary named REST_FRAMEWORK with two key-value pairs that configure the global default throttling classes and their rates. The code file for the sample is included in the restful_python_chapter_04_01 folder:
REST_FRAMEWORK = {
    'DEFAULT_PAGINATION_CLASS':
    'games.pagination.LimitOffsetPaginationWithMaxLimit',
    'PAGE_SIZE': 5,
    'DEFAULT_AUTHENTICATION_CLASSES': (
        'rest_framework.authentication.BasicAuthentication',
        'rest_framework.authentication.SessionAuthentication',
        ),
    'DEFAULT_THROTTLE_CLASSES': (
        'rest_framework.throttling.AnonRateThrottle',
 ...
Testing throttling policies
Now, we can launch Django's development server to compose and send HTTP requests. Execute any of the following two commands based on your needs to access the API in other devices or computers connected to your LAN. Remember that we analyzed the difference between them in Chapter 1
,
Developing RESTful APIs with Django.
python manage.py runserver
python manage.py runserver 0.0.0.0:8000
After we run any of the previous commands, the development server will start listening at port 8000.
Now, we will compose and send an HTTP request to retrieve all the player's scores without authentication credentials six times:
http :8000/player-scores/
We can also use the features of the shell in macOS or Linux to run the previous command six times with just a single line. We can also run the command in a Cygwin terminal in Windows. We can execute the next line in a bash shell. However, we will see all the results one after the other and you will have to scroll to understand what...
Understanding filtering, searching, and ordering classes
We took advantage of the pagination features available in Django REST Framework to specify how we wanted large results sets to be split into individual pages of data. However, we have always been working with the entire queryset as the result set. Django REST Framework makes it easy to customize filtering, searching, and sorting capabilities to the views we have already coded.
First, we will install the django-filter package in our virtual environment. This way, we will be able to use field filtering features that we can easily customize in Django REST Framework. Make sure that you quit the Django's development server. Remember that you just need to press
Ctrl
+
C
in the terminal or Command Prompt window in which it is running. Then, we just need to run the following command to install the django-filter package:
pip install django-filter
The last lines for the output will indicate that the django-filter package has been successfully...
Configuring filtering, searching, and ordering for views
Go to the gamesapi/games folder and open the views.py file. Add the following code after the last line that declares the imports but before the declaration of the UserList class. The code file for the sample is included in the restful_python_chapter_04_02 folder:
from rest_framework import filters
from django_filters import NumberFilter, DateTimeFilter, AllValuesFilter
Add the following highlighted lines to the GameCategoryList class declared in the views.py file. The code file for the sample is included in the restful_python_chapter_04_02 folder:
class GameCategoryList(generics.ListCreateAPIView):
    queryset = GameCategory.objects.all()
    serializer_class = GameCategorySerializer
    name = 'gamecategory-list'
    throttle_scope = 'game-categories'
    throttle_classes = (ScopedRateThrottle,)
    filter_fields = ('name',)
    search_fields = ('^name',)
    ordering_fields = ('name',)
The filter_fields attribute specifies...
Testing filtering, searching, and ordering
Now, we can launch Django's development server to compose and send HTTP requests. Execute any of the following two commands based on your needs to access the API in other devices or computers connected to your LAN. Remember that we analyzed the difference between them in Chapter 1, Developing RESTful APIs with Django.
python manage.py runserver
python manage.py runserver 0.0.0.0:8000
After we run any of the previous commands, the development server will start listening at port 8000:
Now, we will compose and send an HTTP request to retrieve all the game categories whose name matches 3D RPG:
http :8000/game-categories/?name=3D+RPG
The following is the equivalent curl command:
curl -iX GET :8000/game-categories/?name=3D+RPG
The following lines show a sample response with the single game category whose name matches the specified name in the filter. The following lines only show the JSON body without the headers:
{
    "count": 1,
    "next": null, ...
Filtering, searching, and ordering in the Browsable API
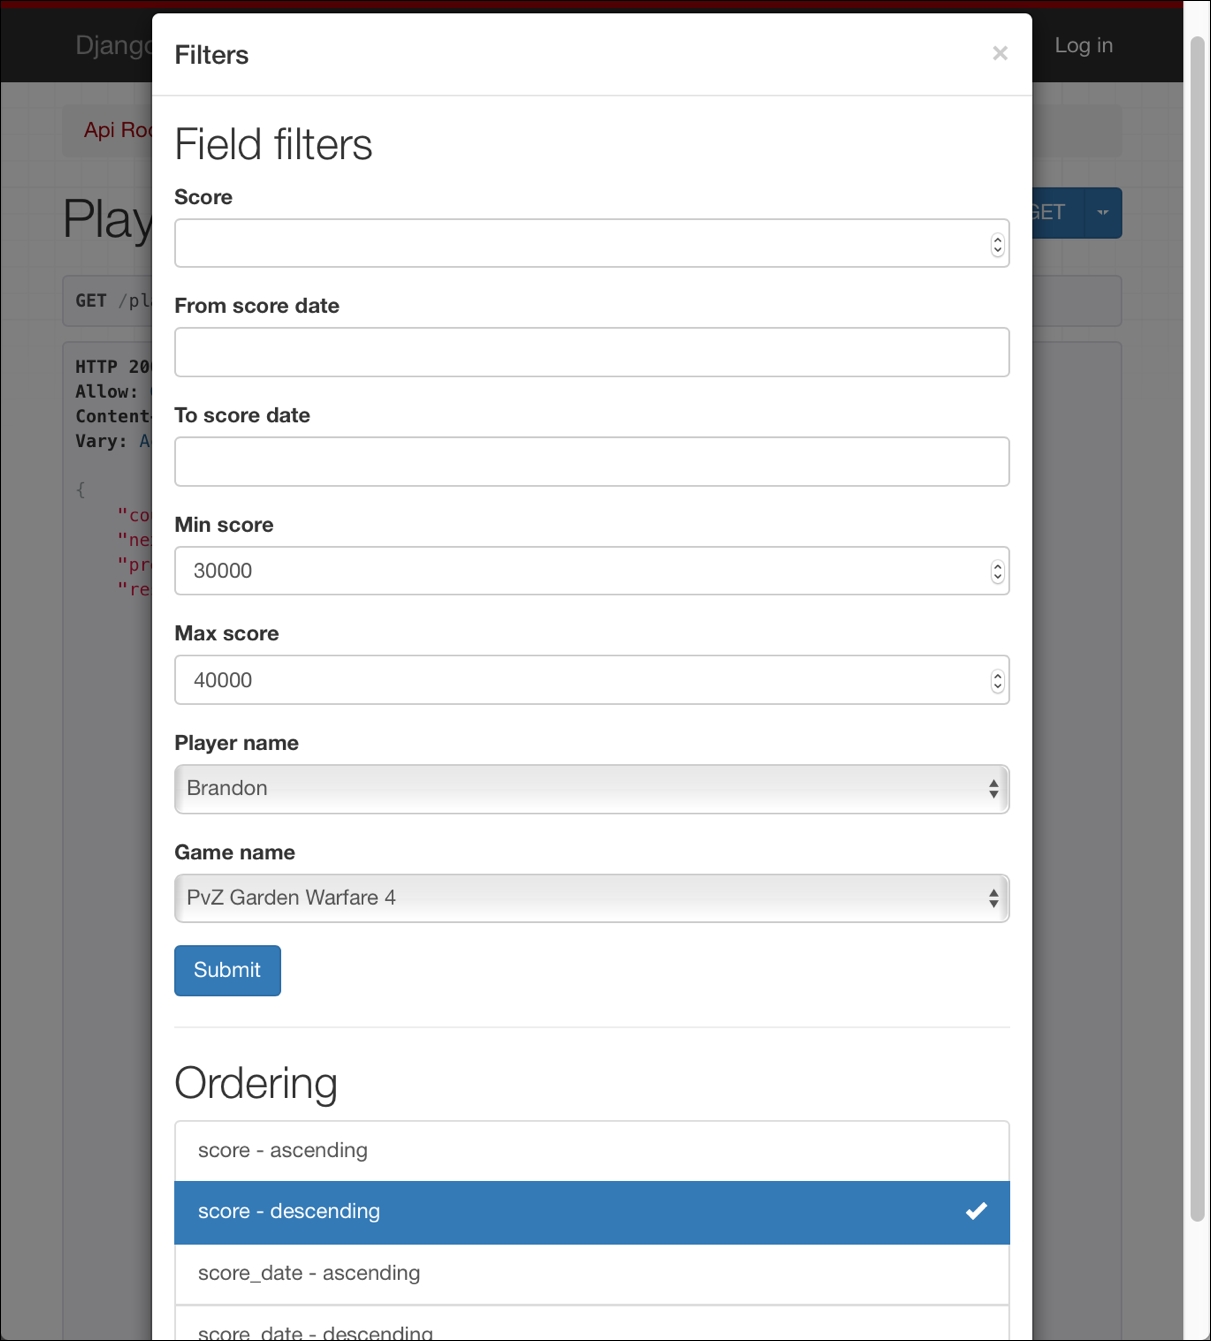
We can take advantage of the browsable API to easily test filter, search, and order features through a web browser. Open a web browser and enter http://localhost:8000/player-scores/. In case you use another computer or device to run the browser, replace localhost with the IP of the computer that is running the Django development server. The browsable API will compose and send a GET request to /player-scores/ and will display the results of its execution, that is, the headers and the JSON player scores list. You will notice that there is a new Filters button located on the left-hand side of the OPTIONS button.
Click on Filters and the browsable API will display the Filters dialog box with the appropriate controls for each filter that you can apply below Field Filters and the different ordering options below Ordering. The following screenshot shows the Filters dialog box:
Both the Player name and Game name dropdowns will only include...
First, we will install the coverage and django-nose packages in our virtual environment. We will make the necessary configurations to use the django_nose.NoseTestRunner class to run all the tests we code and we will use the necessary configurations to improve the accuracy of the test coverage measurements.
Make sure that you quit Django's development server. Remember that you just need to press Ctrl + C in the terminal or the Command Prompt window in which it is running. We just need to run the following command to install the coverage package:
pip install coverage
The last few lines of the output indicate that the django-nose package has been successfully installed:
Collecting coverage
  Downloading coverage-4.1.tar.gz
Installing collected packages: coverage
  Running setup.py install for coverage
Successfully installed coverage-4.1
We just need to run the following command to install the django-nose package:
pip install django-nose
The last few lines of the output...
Writing a first round of unit tests
Now, we will write the first round of unit tests. Specifically, we will write unit tests related to the game category class-based views: GameCategoryList and GameCategoryDetail. Open the existing games/test.py file and replace the existing code with the following lines that declare many import statements and the GameCategoryTests class. The code file for the sample is included in the restful_python_chapter_04_04 folder, as shown:
from django.test import TestCase
from django.core.urlresolvers import reverse
from django.utils.http import urlencode
from rest_framework import status
from rest_framework.test import APITestCase
from games.models import GameCategory


class GameCategoryTests(APITestCase):
    def create_game_category(self, name):
        url = reverse('gamecategory-list')
        data = {'name': name}
        response = self.client.post(url, data, format='json')
        return response

    def test_create_and_retrieve_game_category...
Running unit tests and checking testing coverage
Now, run the following command to create a test database, run all the migrations and use the Django nose test running to execute all the tests we created. The test runner will execute all the methods for our GameCategoryTests class that start with the test_ prefix and will display the results.
Tip
The tests won't make changes to the database we have been using when working on the API.
Remember that we configured many default command-line options that will be used without the need to enter them in our command-line. Run the following command within the same virtual environment we have been using. We will use the -v 2 option to use the verbosity level 2 because we want to check all the things that the test runner is doing:
python manage.py test -v 2
The following lines show the sample output:
nosetests --with-coverage --cover-package=games --cover-erase --cover-inclusive -v --verbosity=2
Creating test database for alias 'default' ('test_games')...
Improving testing coverage
Now, we will write additional unit tests to improve the testing coverage. Specifically, we will write unit tests related to the player class based views: PlayerList and PlayerDetail. Open the existing games/test.py file and insert the following lines after the last line that declares imports. We need a new import statement and we will declare the new PlayerTests class. The code file for the sample is included in the restful_python_chapter_04_05 folder:
from games.models import Player

class PlayerTests(APITestCase):
    def create_player(self, name, gender):
        url = reverse('player-list')
        data = {'name': name, 'gender': gender}
        response = self.client.post(url, data, format='json')
        return response

    def test_create_and_retrieve_player(self):
        """
        Ensure we can create a new Player and then retrieve it
        """
        new_player_name = 'New Player'
        new_player_gender = Player.MALE
        response...
Understanding strategies for deployments and scalability
One of the biggest drawbacks related to Django and Django REST Framework is that each HTTP request is blocking. Thus, whenever the Django server receives an HTTP request, it doesn't start working on any other HTTP requests in the incoming queue until the server sends the response for the first HTTP request it received.
However, one of the greatest advantages of RESTful Web Services is that they are stateless, that is, they shouldn't keep a client state on any server. Our API is a good example of a stateless RESTful Web Service. Thus, we can make the API run on as many servers as necessary to achieve our scalability goals. Obviously, we must take into account that we can easily transform the database server in our scalability bottleneck.
Tip
Nowadays, we have a huge number of cloud-based alternatives to deploy a RESTful web service that uses Django and Django REST Framework and make it extremely scalable. Just to mention a few examples...
In this chapter, we took advantage of the features included in Django REST Framework to define throttling policies. We used filtering, searching, and ordering classes to make it easy to configure filters, search queries, and desired order for the results in HTTP requests. We used the browsable API feature to test these new features included in our API.
We wrote the first round of unit tests, measured test coverage, and then we wrote additional unit tests to improve test coverage. Finally, we understood many considerations for deployment and scalability.
Now that we built a complex API with Django REST Framework and tested it, we will move to another popular Python web framework, Flask, which is what we are going to discuss in the next chapter.