Search icon
Arrow left icon
All Products
Best Sellers
New Releases
Books
Videos
Audiobooks
Learning Hub
Newsletters
Free Learning
Arrow right icon
Implementing CI/CD Using Azure Pipelines

You're reading from  Implementing CI/CD Using Azure Pipelines

Product type Book
Published in Dec 2023
Publisher Packt
ISBN-13 9781804612491
Pages 326 pages
Edition 1st Edition
Languages
Concepts
Authors (2):
Piti Champeethong Piti Champeethong
Profile icon Piti Champeethong
Roberto Mardeni Roberto Mardeni
Profile icon Roberto Mardeni
View More author details

Table of Contents (18) Chapters

Preface 1. Part 1:Getting Started with Azure Pipelines
2. Chapter 1: Understanding Azure Pipelines 3. Chapter 2: Creating Build Pipelines 4. Chapter 3: Setting Variables, Environments, Approvals, and Checks 5. Chapter 4: Extending Advanced Azure Pipelines Using YAML 6. Part 2:Azure Pipelines in Action
7. Chapter 5: Implementing the Build Pipeline Using Deployment Tasks 8. Chapter 6: Integrating Testing, Security Tasks, and Other Tools 9. Chapter 7: Monitoring Azure Pipelines 10. Chapter 8: Provisioning Infrastructure Using Infrastructure as Code 11. Part 3:CI/CD for Real-World Scenarios
12. Chapter 9: Implementing CI/CD for Azure Services 13. Chapter 10: Implementing CI/CD for AWS 14. Chapter 11: Automating CI/CD for Cross-Mobile Applications by Using Flutter 15. Chapter 12: Navigating Common Pitfalls and Future Trends in Azure Pipelines 16. Index 17. Other Books You May Enjoy

Setting up agent pools

Before using Azure Pipelines to build code and deploy code, you need at least one build agent. There are two build agent types: Microsoft-hosted build agent, which is included by default, and self-hosted build agent. Each agent type will be located under an agent pool, which is a collection of build and release agents.

A Microsoft-hosted build agent will be located under an agent pool called Azure Pipelines. You can create a new agent pool for self-hosted build agents and assign them under it.

To create pools, follow these steps:
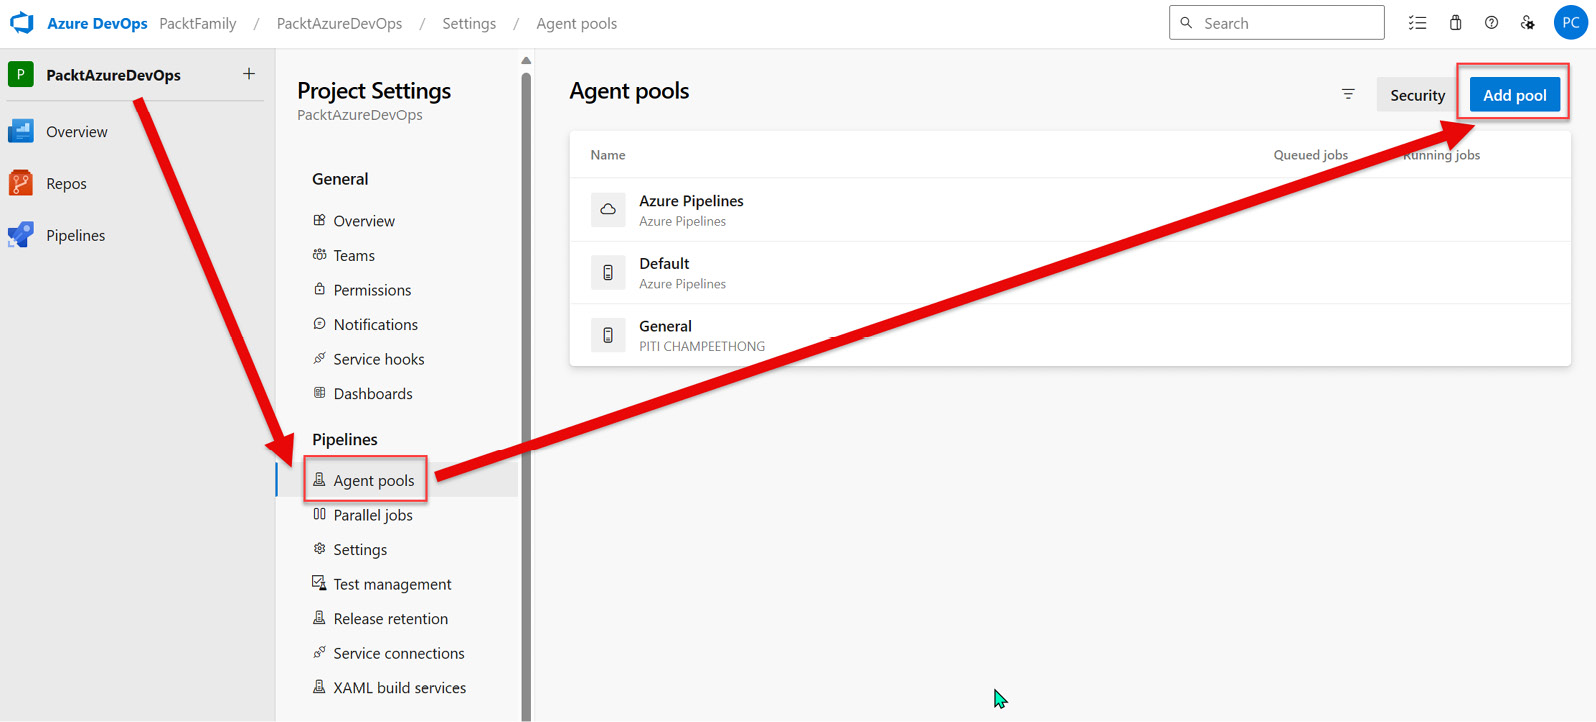
  1. Click on your project name in the web portal and click Project settings | Agent pools | Add pool:
Figure 1.10 – Adding a pool

Figure 1.10 – Adding a pool

  1. Enter the information shown in the following screenshot and then click Create:
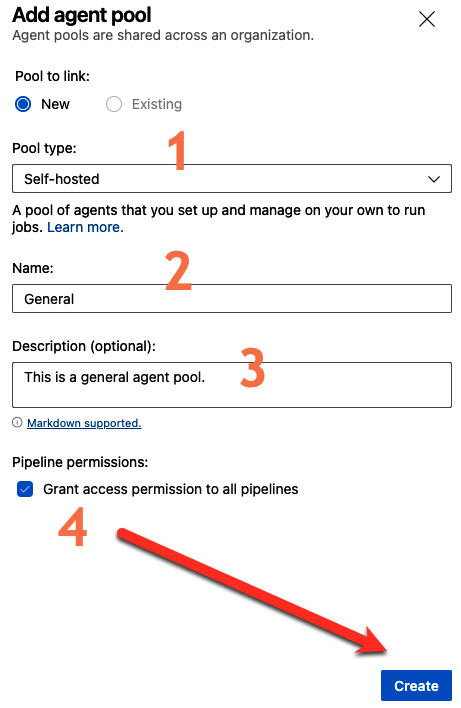
Figure 1.11 – Creating an agent pool
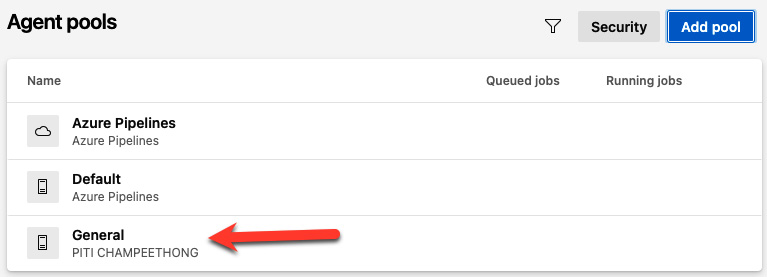
Figure 1.11 – Creating an agent pool

  1. Finally, you will see the new agent pool:
Figure 1.12 – Displaying the new agent pool

Figure 1.12 – Displaying the new agent pool

Once you’ve finished creating the new agent pool, you can start creating and setting up the self-hosted agent under a new agent pool. The following section will show you how to create a personal access token (PAT).

You have been reading a chapter from
Implementing CI/CD Using Azure Pipelines
Published in: Dec 2023 Publisher: Packt ISBN-13: 9781804612491
Register for a free Packt account to unlock a world of extra content!
A free Packt account unlocks extra newsletters, articles, discounted offers, and much more. Start advancing your knowledge today.
Unlock this book and the full library FREE for 7 days
Get unlimited access to 7000+ expert-authored eBooks and videos courses covering every tech area you can think of
Renews at €14.99/month. Cancel anytime}