

Writing the code
For this build, we are going to focus on writing code that allows us to use the Intelligent Hub as a remote control for the arm. This will be a program that allows you to control the robot using the gyro sensor feature of the Intelligent Hub to move the claw left, right, up, and down, and to open and close the claw.
Overall, this program is simple to develop and is created to be easily adaptable for you to remix to meet your needs. Use this sample code to make sure everything works, and then begin to tweak the code to make it work to your desired needs. Make sure you have the proper ports plugged in, and then move on to the code.
Identifying the ports
If you have not plugged in your motors yet, then let's get them plugged into the proper ports. You will plug the large motor that moves the claw to the right and left to motor port E. The medium motor that controls the opening and closing of the claw will plug into port A. The medium motor that controls the arm of the claw to go up and down will use port C. Once you have the motors plugged in, then double-check that the motors are plugged in correctly.
You can check that your motors are properly plugged in by checking the Hub Connection in the software, as seen in the following screenshot:
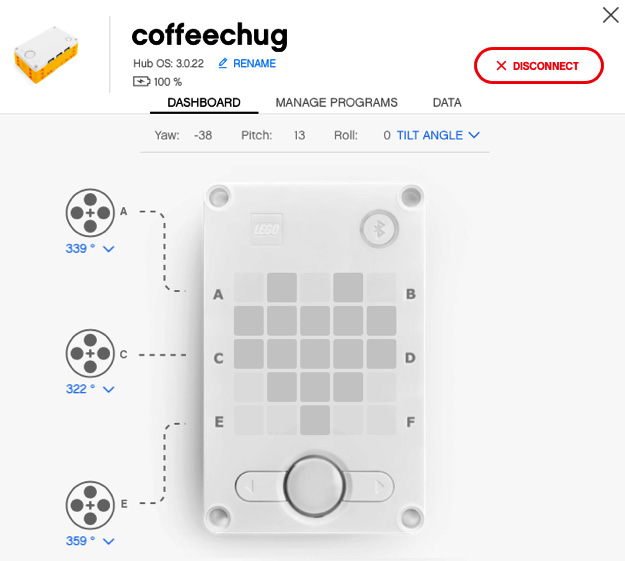
Figure 2.54 – Hub Connection view
It is time to write the program so that you can control the claw.
The Intelligent Hub remote-control robot program
To get started with this program, let's go ahead with the following steps to make the robot come to life:
- Open up the SPIKE Prime software.
Click on New Project at the center of the main screen:

Figure 2.55 – Choosing a new project
- On the New Project window, select the Word Blocks option, give your program name, and click on Create.
- When the coding canvas opens, there is already a default when program starts block provided, as shown in Figure 2.56. Let's begin with this code stack. We will add some code to align all our motors to a common starting point at the beginning of the code. Add a cyan sensor block called set yaw angle to under the when program starts block:

Figure 2.56 – Creating the initial code stack
- Yaw is the orientation of Intelligent Hub turning right or left, as shown in Figure 2.57. In other words, it is the rotation around the z axis:

Figure 2.57 – Yaw is turning Intelligent Hub left and/or right on the z axis
- The last two blocks we will add to this stack are blue motor blocks. Add two of the motor go shortest path to position blocks, as shown in Figure 2.58. Set one block for motor E and the other for motor C:

Figure 2.58 – Set motors E and C to the start position
We are now going to create a new code stack for the claw to close. Go to the Events code block section and select the block when left Button pressed. Change this block to right Button pressed. Add a blue motor block named run for 1 clockwise rotations. Change the settings of the block to motor A and change the settings to 7 degrees:

Figure 2.59 – Set the claw to close
You will now copy this stack and do the opposite to open. Right-click the Event block and you will see an option to Duplicate. Change this stack to left Button on the orange event block. For the blue motor block, change the direction of the turn to counterclockwise:

Figure 2.60 – Set the claw to open
- The final code stack will be created to allow the arm to move in the direction of Intelligent Hub using angle and yaw. Begin by adding an Event block named when program starts.
- Add a blue motor block to adjust the motor C speed to 5%. You can adjust the speed to your liking once you get the arm moving.
- The next block we will add is a Control block named
forever. In this block, add another blue motor block, moving motor E to the shortest path to position the block. Where the number0sits, you will add a cyan sensor block namedPitch Angle. Add that to0and then change the pitch to Yaw. Figure 2.61 will showcase what you should have at this point:
Figure 2.61 – Controlling arm code
- Next, we will create an
If Thenstatement and basically duplicate it two more times to complete the code. This will program the arm to follow the motion of Intelligent Hub. Go to the Control blocks and add an If Then block into theForeverblock of our code. Add a green Operator block ofless than. On the left side, add a cyan Sensor block of Pitch Angle, and to the right of the equation, add-3. Under that block, add a blue motor block, Start Motor, and change to motor C and in a counterclockwise direction:
Figure 2.62 – Arm move to the left
- We will now copy this format, but use different Operator blocks for
greater thanand another Operator block when the pitch is between-3and3. See Figure 2.63 for the rest of the code to complete the sequence:
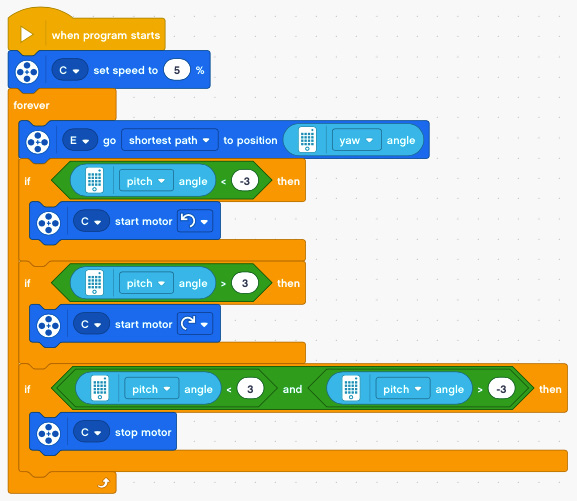
Figure 2.63 – Complete code for arm control
When it is all complete, your code should look like this:

Figure 2.64 – Complete code for this project
And that is it! You did it. You built a nice-looking and working robot claw. Now comes the fun part, which is to remix the claw to make it your own. Let's look at some ideas.