Reader small image

You're reading from  Android High Performance Programming

Product typeBook
Published inAug 2016
Reading LevelBeginner
PublisherPackt
ISBN-139781785288951
Edition1st Edition
Languages
Tools
Right arrow
Authors (3):
Emil Atanasov
Emil Atanasov
author image
Emil Atanasov

Emil Atanasov is an IT consultant with broad experience in mobile technologies. He has been exploring the field of mobile development since 2006. Emil has a MSc in Media Informatics from RWTH Aachen University, Germany and a MSc in Computer Science from Sofia Unversity "St. Kliment Ohridsky", Bulgaria. He has worked for several huge USA companies and has been a freelancer for several years. Emil has experience in software design and development. He was involved in the process of redesigning, improving and creating a number of mobile apps. Currently, he is focused on the rapidly growing mobile sector and manages a great team of developers that provides software solutions to clients around the world. As an Android team leader and project manager, Emil was leading a team that was developing a part of the Nook Color firmware -a e-magazine/ e-book reader, which supports the proprietary Barnes & Nobel and some other e-book formats. He is one of the people behind the "Getting Started with Flurry Analytics" book. He also contributed largely to the book "Objective C Memory Management". "I want to thank my family and friends for being so cool. Thank you for supporting me even though I'm such a bizarre geeky person, who is spending most of the time in the digital world. Thank you, guys!"
Read more about Emil Atanasov

Enrique López Mañas
Enrique López Mañas
author image
Enrique López Mañas

Enrique Lpez Maas is a Google Developer Expert and independent IT consultant. He has been working with mobile technologies and learning from them since 2007. He is an avid contributor to the open source community and a FLOSS (Free Libre Open Source Software) kind of guy, being among the top 10 open source Java contributors in Germany. He is a part of the Google LaunchPad accelerator, where he participates in Google global initiatives to influence hundreds of the best startups from all around the globe. He is also a big data and machine learning aficionado. In his free time he rides his bike, take pictures, and travels until exhaustion. He also writes literature and enjoys all kinds of arts. He likes to write about himself in third person. You can follow him on Twitter (@eenriquelopez) to stay updated on his latest movements.
Read more about Enrique López Mañas

Diego Grancini
Diego Grancini
author image
Diego Grancini

Diego Grancini has a degree in telecommunications and IT engineering from Perugia University. He has developed his skills on Android development for more than six years leading and contributed to several projects, teaching and sharing his skills during his career. He joined Engineering Ingegneria Informatica S.P.A. after his degree, defining his own knowledge about Java and Android development working as the lead Android developer for years. Then he joined J.P. Morgan & Chase, strengthening his skills about security and performance in software development and Android platform in particular.
Read more about Diego Grancini

View More author details
Right arrow

Chapter 9. Native Coding in Android

The Native Development Kit (from now on, NDK) is a toolset provided by Google to allow developers using native code languages (typically, C and C++) on the application. This can allow us to perform tasks that are computationally intense with a more optimized language, or to access third-party libraries to better operate in some tasks (for example, we could use OpenCV to access and operate with images, instead of the native and not very efficient Java API).

Note

The NDK can be a powerful tool, but we advise the reader to evaluate whether it will add a benefit to your project. In many cases, NDK is not required, and a developer should never choose the toolset just because he/she feels more comfortable using it. Besides, using NDK will certainly add complexity to our project in terms of the structure and files to be handled.

Using NDK in Android can certainly bring benefits, but some pitfalls must be considered:

  • Code complexity increases. In addition to our Java...

Getting started – setting up NDK in our system


Android Studio supports, from version 1.3 RC1, the Native Development Kit. Although still limited, it is still functional and will provide most of its users enough features and stability to carry on using it.

To set up NDK, we first need to download it into our system. At the time of writing this book, the latest version of NDK can be downloaded from http://developer.android.com/ndk/downloads/index.html. If a prospective reader cannot find NDK in this location, we encourage them to search Google for the location of its latest version.

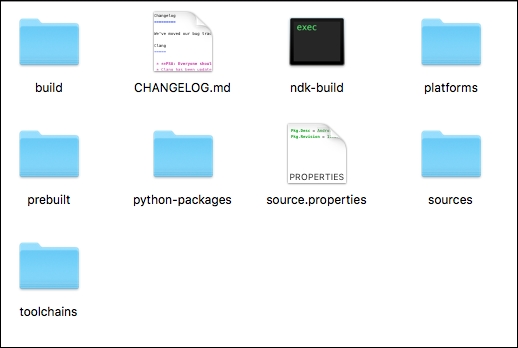
When NDK has been downloaded, uncompress the ZIP file and move it to a location of your choice. The folder will contain something similar to the following:

Each package here contains some different data files:

  • The build folder contains all the tools and packages that are necessary to actually build with the NDK toolset.

  • The ndk-build is the script we will call to use NDK.

  • platforms include the required tools that we...

JNI


JNI stands for Java Native Interface. JNI allows libraries and software written in other languages to access the Java code that is running in the Java Virtual Machine (JVM). This is not something Android-related, but a programming framework that has existed and been used previously in the Java world.

JNI needs files to be declared into either C or C++—it can even connect to Objective-C files. This is what an example in C looks like:

jstring
Java_com_my_package_HelloJni_stringFromJNI( JNIEnv* env,
                                                  jobject thiz )
{
    return (*env)->NewStringUTF(env, "Hello World");
}

Observing the file, we can see that after the return type, jstring, which is equivalent to a string, there is structure with the word Java, the package name, the class name, and the method name. An object, JNIEnv, is always passed as a parameter, as well as jobject—this is required to make the framework interface with Java. The function, written in C, just returns a string...

Initial concepts


Before we start creating our first native application, we would like to introduce some initial concepts to the reader, to ensure easier understanding:

  • ndk-build: This file is the shell script in charge of invoking the NDK build. Automatically, this script checks that the system and the application is right, is generating the binaries that will be used, and copying them to our project structure. Being a shell script, it can be called with a few extra parameters:

    • clean: This parameter makes the script clean all the binaries that have been previously generated

    • –B: Using the –B option, we force the system to perform a rebuild

    • V=1: This releases the build and also displays build commands

    • NDK_DEBUG=X: If we use 1, the build will be debuggable; if we use 0, we will be forcing a release build

    • NDK_LOG=X: Using 1, NDK will log all the messages that are generated during the build

    Keep in mind that all the parameters can be partially combined (for instance, you could use B V=1 if you...

Creating our first HelloWorld-JNI


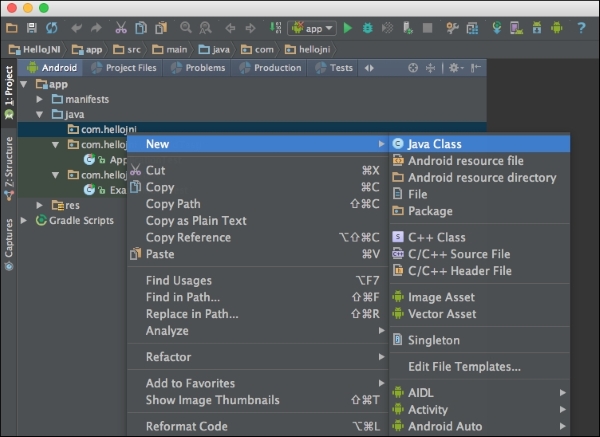
Let´s create a project with Android Studio with a minimal setup. In order to do so, navigate to Project | New | New Project. Create the most minimalistic setup available—typically just a project; do not add Activity from the beginning. This adds a lot of boilerplate code that we do not need at this moment. When the project has been created, add a new Activity by right-clicking on your source folder, and clicking on New | Java Class. Name the class Main Activity:

When the file has been created, add this very basic code for Activity:

public class MainActivity extends Activity { 
    @Override
    protected void onCreate(Bundle savedInstanceState) {
        super.onCreate(savedInstanceState);
    }    
}

And remember to add it to the AndroidManifest.xml as well as your default activity:

<activity 
    android:name="com.hellojni.MainActivity">
    <intent-filter>
      <action android:name="android.intent.action.MAIN" />
        <category android...

Creating a native activity with Android NDK


In the following section, we are going to study how an application can be done entirely using native C code, without any Java code being required at all. Please note that this is done more for study purposes, as there are not many practical cases where developing a purely native application will be useful. However, it will serve as a good example of interaction between the different layers and the Android operational system.

Since we are not using Java code, we need to specify in the AndroidManifest.xml file that our project will contain no Java code. This is done using the following lines:

<application android:label="@string/app_name"
android:hasCode="false">

Applications using only native code are first supported from the API level 9 onwards. At the time of writing this book, this should not be a problem, since the versions comprising under API Level 9 ranked under 0.1% of the total. However, due to the nature of the NDK, you might be using...

Debugging NDK


Debugging source code developed with NDK is not as straightforward as debugging code that has been developed with the standard Android Java DK, but there are tools available for this platform. Android Studio provides, since version 1.3, some built-in tools to debug applications with JNI.

In order to prepare an application to be debugged, we need to modify our build.gradle script. As an example, take the HelloWorldJNI we have written previously. Open the build.gradle file of the app module and add the following lines:

buildTypes {
        release {
            minifyEnabled false
            {…}
            ndk {
                debuggable = true
            }

        }
        debug {
            debuggable = true
            jniDebuggable = true
        }
    }

A new configuration for debugging needs to be created. In order to achieve it, navigate to Edit Configurations, and select New Android Native in the drop-down menu:

When the configuration is released in the Android Native...

Android.mk


We have already seen some basic possibilities that the Android.mk file offers us. In reality, this file is similar to a GNU makefile: it describes the sources and shared libraries to the build system.

In the Android.mk file, we can group all our resources into modules. Modules are static libraries, standalone executables, or shared libraries. The concept is also similar to the modules within Android Studio, which should be familiar to the reader by now. The same source can be used in different modules.

We have seen the following line in the previous script:

include $(CLEAR_VARS)

This value is automatically provided by the build system. This points to an internal makefile that it is in charge of cleaning many of the locals variables used.

We need to add the modules later on:

LOCAL_MODULE := example-module

For the file to work properly, modules need to have a unique name and not have special characters or spaces.

Note

NDK will automatically append the prefix lib to your module when it is...

More variables in NDK


NDK defines a few variables that can be automatically used in the Android.mk file.

TARGET_PLATFORM

This variable defines the target platform to be used by the build system:

TARGET_PLATFORM := android-21

The target is always used in the format android-xx. Not all the platform types are supported by NDK. It's a good idea to check on the NDK website which ones are supported. At the time of writing this book (1Q2016), this is the list of the supported platforms:

Supported NDK API level

Equivalent Android release

3

1.5

4

1.6

5

2.0

8

2.2

9

2.3 to 3.0.x

12

3.1.x

13

3.2

14

4.0 to 4.0.2

15

4.0.3 to 4.0.4

16

4.1 and 4.1.1

17

4.2 and 4.2.2

18

4.3

19

4.4

21

4.4W and 5.0

TARGET_ARCH

This variable specifies the architecture that will be used to build NDK. It could contain values such as x86 or arm. The value of this variable is taken from the APP_ABI file, which is specified in the Android.mk file. At the time of writing this book, this is the list of supported...

NDK macros


Macros are small functions that contain a particular functionality. A few of them are defined by default by NDK. To call them, you must use the following syntax:

$(call <function-name>)

Here are a few of the default macros specified in the NDK:

  • my-dir: This macro returns the current path of the Android.mk file. It can be very useful when, initially, you want to set up LOCAL_PATH in the script:

    LOCAL_PATH := $(call my-dir)
    all-subdir-makefiles

    When this macro is executed, it returns as a list all the Android.mk makefiles that have been found in the folder returned by my-dir.

    By using this command, we can provide a better line of sub hierarchies and a better organization of the package structure.

  • parent-makefile: This returns the path where the parent makefile can be found.

    Tip

    The command grand-parent-makefile also exists, and it returns, as obviously inferred, the path of the grandparent.

  • this-makefile: This macro returns the path of the current makefile.

Application.mk


The Application.mk file is also an existing file in our sample project. It describes the native modules required by the app, and is generally located under the yourProject/jni folder. As with the Android.mk file, there are a few variables that we can include here and will increase the functionality of this file:

  • APP_OPTIM: This is a very useful variable that can be used to decide the optimization level when the application modules are being built. It can be defined as release or debug.

    Basically, when the modules are compiled in the release mode, they are very efficient and provide little information for debugging. The debug mode, on the other hand, contains a bunch of useful information for debugging but is not very efficient for being distributed. The default mode is release.

    Some of the optimization that takes place in the release mode is the naming of variables. They can be renamed and shortened (here you can think of the same optimization taking place when applying ProGuard...

Including existing libraries


One of the main reasons why NDK is extensively used is to include other already existing libraries that provide some set of functionalities in C/C++. Maybe the most obvious example is OpenCV, which was originally written in C/C++. Rewriting it in Java will not only take time, but on top of that it will not be as efficient as its native counterpart.

Alternatively, you might want to create your own libraries and distribute them to third-party developers. It could even be possible to create a prebuilt version of the libraries that can be directly included in our project, so we speed up the build time rather than compiling the library with each build.

There are a set of steps we must follow in order to achieve this. First, each prebuilt library being used must be declared as a single independent module. This is how we achieve it.

The module must have a name. It does not strictly need to be the same as the prebuilt library, but it needs to contain a name:

  1. Go to the Android...

Exporting header files


When dealing with third-party native libraries, it is very common to be able to access headers. For example, in a file using our shared library, we will find includes requiring access to our header files:

#include <file.h>

In this case, we will need to provide the headers to all the modules. Probably the easiest way to achieve this is to use exports in the Android.mk file. Look at the following code example, taken from an Android.mk file requiring some headers. As long as the file.h file, from the preceding line is within the include folder, the module will work properly:

include $(CLEAR_VARS)
LOCAL_MODULE := library-user
LOCAL_SRC_FILES := library-user.c
LOCAL_EXPORT_C_INCLUDES := $(LOCAL_PATH)/include
include $(PREBUILT_SHARED_LIBRARY)

Summary


After reading this chapter, the reader will be able to construct applications using NDK natively or as a hybrid within an Android application. In addition, we recommend the reader checks out some other frameworks, particularly OpenCV. Learning OpenCV itself can be the subject of an entire book. However, if the reader is dealing with heavy image processing, he/she will find this framework very useful.

One of the key points when using NDK is to decide where the correct trade-off between complexity and performance lies. Using NDK can be tempting to solve complex computational problems, and it should be a clear decision when we are dealing with image processing, OpenGL, computer graphics, or animation. It is in fact proven that NDK learners tend to overuse it, and include it in most single tasks. From an efficiency point of view, this could look like a great idea, but software engineering is about handling growing complexity more than anything else. If the software keeps growing without...

lock icon
The rest of the chapter is locked
You have been reading a chapter from
Android High Performance Programming
Published in: Aug 2016Publisher: PacktISBN-13: 9781785288951
Register for a free Packt account to unlock a world of extra content!
A free Packt account unlocks extra newsletters, articles, discounted offers, and much more. Start advancing your knowledge today.
undefined
Unlock this book and the full library FREE for 7 days
Get unlimited access to 7000+ expert-authored eBooks and videos courses covering every tech area you can think of
Renews at $15.99/month. Cancel anytime

Authors (3)

author image
Emil Atanasov

Emil Atanasov is an IT consultant with broad experience in mobile technologies. He has been exploring the field of mobile development since 2006. Emil has a MSc in Media Informatics from RWTH Aachen University, Germany and a MSc in Computer Science from Sofia Unversity "St. Kliment Ohridsky", Bulgaria. He has worked for several huge USA companies and has been a freelancer for several years. Emil has experience in software design and development. He was involved in the process of redesigning, improving and creating a number of mobile apps. Currently, he is focused on the rapidly growing mobile sector and manages a great team of developers that provides software solutions to clients around the world. As an Android team leader and project manager, Emil was leading a team that was developing a part of the Nook Color firmware -a e-magazine/ e-book reader, which supports the proprietary Barnes & Nobel and some other e-book formats. He is one of the people behind the "Getting Started with Flurry Analytics" book. He also contributed largely to the book "Objective C Memory Management". "I want to thank my family and friends for being so cool. Thank you for supporting me even though I'm such a bizarre geeky person, who is spending most of the time in the digital world. Thank you, guys!"
Read more about Emil Atanasov

author image
Enrique López Mañas

Enrique Lpez Maas is a Google Developer Expert and independent IT consultant. He has been working with mobile technologies and learning from them since 2007. He is an avid contributor to the open source community and a FLOSS (Free Libre Open Source Software) kind of guy, being among the top 10 open source Java contributors in Germany. He is a part of the Google LaunchPad accelerator, where he participates in Google global initiatives to influence hundreds of the best startups from all around the globe. He is also a big data and machine learning aficionado. In his free time he rides his bike, take pictures, and travels until exhaustion. He also writes literature and enjoys all kinds of arts. He likes to write about himself in third person. You can follow him on Twitter (@eenriquelopez) to stay updated on his latest movements.
Read more about Enrique López Mañas

author image
Diego Grancini

Diego Grancini has a degree in telecommunications and IT engineering from Perugia University. He has developed his skills on Android development for more than six years leading and contributed to several projects, teaching and sharing his skills during his career. He joined Engineering Ingegneria Informatica S.P.A. after his degree, defining his own knowledge about Java and Android development working as the lead Android developer for years. Then he joined J.P. Morgan & Chase, strengthening his skills about security and performance in software development and Android platform in particular.
Read more about Diego Grancini