


Setting up the lab
To perform the various exercises throughout this book, you will need to have a lab environment setup. In this section, I will walk you through building the lab environment. We will add to this environment as we progress through this book. So, let’s begin with the initial setup.
First, you will need to use a virtualization platform if you are building this locally on your PC. Common virtualization platforms include VirtualBox, which is free and can be downloaded from https://www.virtualbox.org/wiki/Downloads, and VMware Workstation. VMware Workstation has two editions: the VMware Workstation Player, which is free and can be downloaded from https://www.vmware.com/nl/products/workstation-player/workstation-player-evaluation.html, and a paid-for version called VMware Workstation Pro.
Pro tip
I do not recommend using Microsoft Hyper-V since this platform does not allow you to natively interact with hardware. For example, if you had to use a wireless network card for packet capturing, you would not be able to do this with Microsoft Hyper-V.
For this chapter, we will set up the lab as per the following diagram. We will use pfSense as an open source router, which will provide internet access to the lab environment. All devices will have a private IP address in the 192.168.1.0/24 range. The pfSense virtual router will have two network interfaces, one in bridged mode and the other connected to the private subnet of the lab environment.
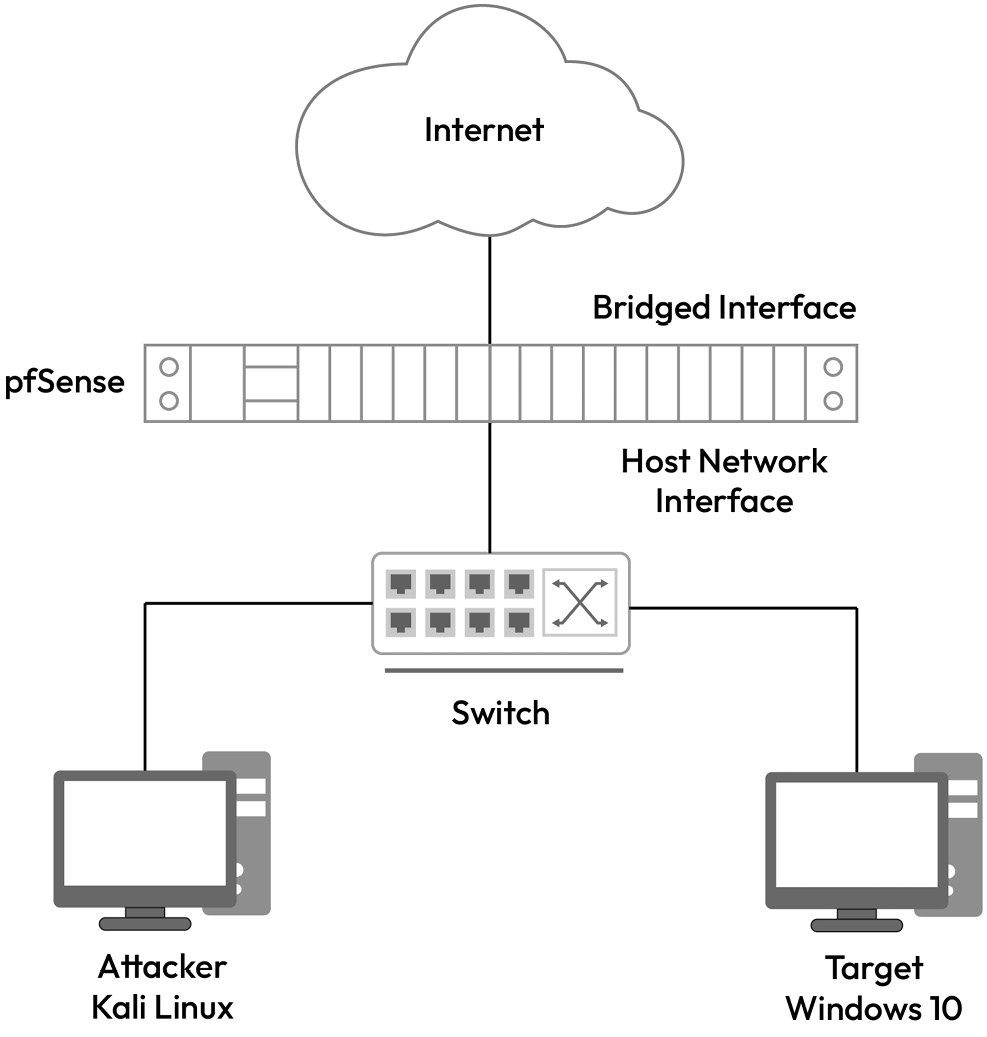
Figure 1.11 – Lab diagram
We will begin by setting up our virtual network within the hypervisor. Within VMware Workstation, this can be done from EDIT | Virtual Network Editor, as per the following figure. Ensure that this is set to Host-only since we want this network to simulate a private subnet of 192.168.1.0/24:
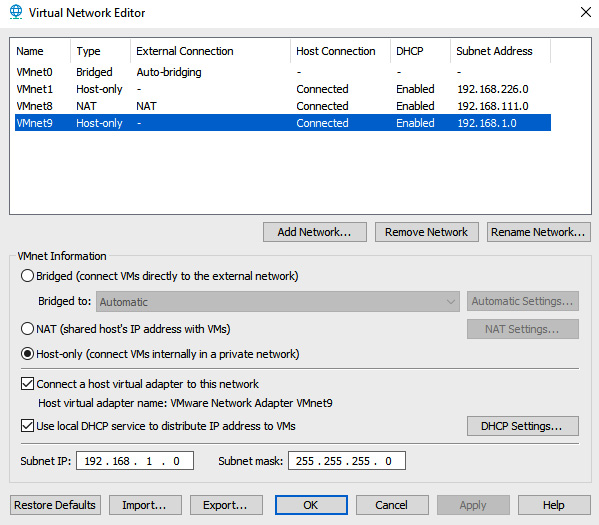
Figure 1.12 – Virtual network configuration on VMware
For VirtualBox, this can be done at File | Host Network Manager, as shown in the following screenshot:
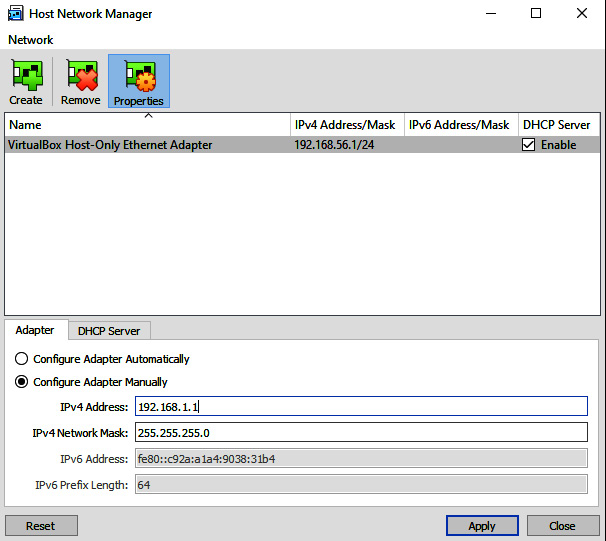
Figure 1.13 – Virtual network editor in VirtualBox
Once you have the networks configured, you can proceed to install pfSense. The installation is straightforward. You will need to download the ISO file from https://www.pfsense.org/download/; remember to select the architecture according to AMD64. Once you have downloaded this, you will proceed to create a new virtual machine on your hypervisor. Remember to set your ISO file as the boot image so that you can install pfSense.
Pro tip
The steps to set up a new virtual machine for VMware are detailed here: https://kb.vmware.com/s/article/1018415.
The steps to set up a new virtual machine for VirtualBox are detailed here: https://docs.oracle.com/cd/E26217_01/E26796/html/qs-create-vm.html#:~:text=To%20create%20a%20new%20virtual,VirtualBox%20command%20in%20a%20terminal.
Ensure that your pfSense setup has two network interface cards – one set to bridged mode (this will enable it to communicate with the internet) and one set to your host-only network. Once you have installed pfSense, ensure that you remove the ISO file from its boot sequence; otherwise, you will have a setup loop. When pfSense boots up, you should see something like what’s shown in the following screenshot – one interface card bridged with your network (WAN) that has internet access and the other connected to your host-only network (LAN):
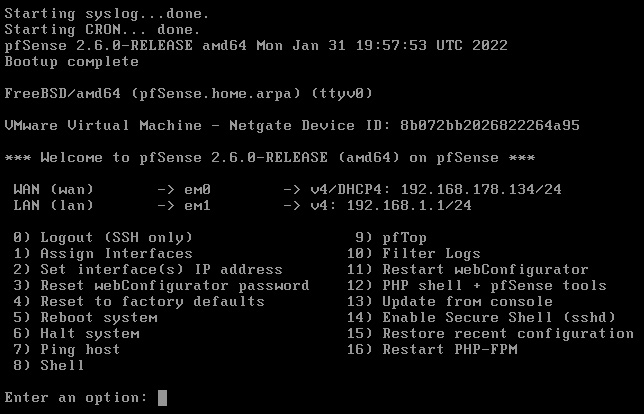
Figure 1.14 – pfSense IP configuration
Once you’ve done this, you can leverage the pre-built virtual machines from Kali Linux. Kali makes both VMware and VirtualBox images readily available for download. Simply download the one that matches the hypervisor you are using. Once extracted and booted up, you should be able to log in using the default username and password of kali/kali. Remember that your Kali Linux network interface card should be set to Host-only.
The last step is to set up Windows 10. I recommend that you make use of Windows 10 Pro throughout this book. Your Windows 10 virtual machine should also make use of the Host-only network.
Note
You may need to manually configure an IP address on the private subnet for both the Kali and Windows virtual machines in case DHCP does not assign any IP address.
At the end of your lab setup, you should have three virtual machines configured. You should be able to ping each of them on their local private IP subnet and be able to browse the internet from the Kali and Windows machines. Now that we have set up the lab, let’s work on some exercises based on what we have covered in this chapter.