


NumPy and MXNet ND arrays
If you have worked with data previously in Python, chances are you have found yourself working with NumPy and its N-dimensional arrays (ND arrays). These are also known as tensors, and the 0D variants are called scalars, the 1D variants are called vectors, and the 2D variants are called matrixes.
MXNet provides its own ND array type, and there are two different ways to work with them. On one hand, there is the nd module, MXNet’s native and optimized way to work with MXNet ND arrays. On the other hand, there is the np module, which has the same interfaces and syntax as the NumPy ND array type and has also been optimized, but it’s limited due to the interface constraints. With MXNet ND arrays, we can leverage its underlying engine, with compute optimizations such as Intel MKL and/or NVIDIA CUDA, if our hardware configuration is compatible. This means we will be able to use almost the same syntax as when working with NumPy, but accelerated with the MXNet engine and our GPUs, not supported by NumPy.
Moreover, as we will see in the next chapters, a very common operation that we will execute on MXNet is automatic differentiation on these ND arrays. By using MXNet ND array libraries, this operation will also leverage our hardware for optimum performance. NumPy does not provide automatic differentiation out of the box.
Getting ready
If you have already installed MXNet, as described in the previous recipe, in terms of executing accelerated code, the only remaining steps before using MXNet ND arrays is importing their libraries:
import numpy as np
import mxnet as mx
However, it is worth noting here an important underlying difference between NumPy ND array operations and MXNet ND array operations. NumPy follows an eager evaluation strategy – that is, all operations are evaluated at the moment of execution. Conversely, MXNet uses a lazy evaluation strategy, more optimal for large compute loads, where the actual calculation is deferred until the values are actually needed.
Therefore, when comparing performances, we will need to force MXNet to finalize all calculations before computing the time needed for them. As we will see in the examples, this is achieved by calling the wait_to_read() function, Furthermore, when accessing the data with functions such as print() or .asnumpy(), execution is then completed before calling these functions, yielding the wrong impression that these functions are actually time-consuming:
- Let’s check a specific example and start by running it on the CPU:
import time
x_mx_cpu = mx.np.random.rand(1000, 1000, ctx = mx.cpu())
start_time = time.time()
mx.np.dot(x_mx_cpu, x_mx_cpu).wait_to_read()
print("Time of the operation: ", time.time() - start_time)
This will yield a similar output to the following:
Time of the operation: 0.04673886299133301
- However, let’s see what happens if we measure the time without the call to
wait_to_read():x_mx_cpu = mx.np.random.rand(1000, 1000, ctx = mx.cpu()) start_time = time.time() x_2 = mx.np.dot(x_mx_cpu, x_mx_cpu) print("(FAKE, MXNet has lazy evaluation)") print("Time of the operation : ", time.time() - start_time) start_time = time.time() print(x_2) print("(FAKE, MXNet has lazy evaluation)") print("Time to display: ", time.time() - start_time)The following will be the output:
(FAKE, MXNet has lazy evaluation)
 Time of the operation : 0.00118255615234375
 [[256.59583 249.70404 249.48639 ... 251.97151 255.06744 255.60669]
 [255.22629 251.69475 245.7591 ... 252.78784 253.18878 247.78052]
 [257.54187 254.29262 251.76346 ... 261.0468 268.49127 258.2312 ]
 ...
 [256.9957 253.9823 249.59073 ... 256.7088 261.14255 253.37457]
 [255.94278 248.73282 248.16641 ... 254.39209 252.4108 249.02774]
 [253.3464 254.55524 250.00716 ... 253.15712 258.53894 255.18658]]
 (FAKE, MXNet has lazy evaluation)
 Time to display: 0.042133331298828125
As we can see, the first experiment indicated that the computation took ~50 ms to complete; however, the second experiment indicated that the computation took ~1 ms (50 times less!), and the visualization was more than 40 ms. This is an incorrect result. This is because we measured our performance incorrectly in the second experiment. Refer to the first experiment and the call to wait_to_read() for a proper performance measurement.
How to do it...
In this section, we will compare performance in terms of computation time for two compute-intensive operations:
- Matrix creation
- Matrix multiplication
We will compare five different compute profiles for each operation:
- Using the NumPy library (no CPU or GPU acceleration)
- Using the MXNet
npmodule with CPU acceleration but no GPU - Using the MXNet
npmodule with CPU acceleration and GPU acceleration - Using the MXNet
ndmodule with CPU acceleration but no GPU - Using the MXNet
ndmodule with CPU acceleration and GPU acceleration
To finalize, we will plot the results and draw some conclusions.
Timing data structures
We will store the computation time in five dictionaries, one for each compute profile (timings_np, timings_mx_cpu, and timings_mx_gpu). The initialization of the data structures is as follows:
timings_np = {}
timings_mx_np_cpu = {}
timings_mx_np_gpu = {}
timings_mx_nd_cpu = {}
timings_mx_nd_gpu = {}
We will run each operation (matrix generation and matrix multiplication) with matrixes in a different order, namely the following:
matrix_orders = [1, 5, 10, 50, 100, 500, 1000, 5000, 10000]
Matrix creation
We define three functions to generate matrixes; the first function will use the NumPy library to generate a matrix, and it will receive as an input parameter the matrix order. The second function will use the MXNet np module, and the third function will use the MXNet and module. For the second and third functions, as input parameters we will provide the context where the matrix needs to be created, apart from the matrix order. This context specifies whether the result (the created matrix in this case) must be computed in the CPU or the GPU (and which GPU if there are multiple devices available):
def create_matrix_np(n):
    """
    Given n, creates a squared n x n matrix,
    with each matrix value taken from a random
    uniform distribution between [0, 1].
    Returns the created matrix a.
    Uses NumPy.
    """
    a = np.random.rand(n, n)
    return a
def create_matrix_mx(n, ctx=mx.cpu()):
    """
    Given n, creates a squared n x n matrix,
    with each matrix value taken from a random
    uniform distribution between [0, 1].
    Returns the created matrix a.
    Uses MXNet NumPy syntax and context ctx
    """
    a = mx.np.random.rand(n, n, ctx=ctx)
    a.wait_to_read()
    return a
def create_matrix_mx_nd(n, ctx=mx.cpu()):
    """
    Given n, creates a squared n x n matrix,
    with each matrix value taken from a random
    uniform distribution between [0, 1].
    Returns the created matrix a.
    Uses MXNet ND native syntax and context ctx
    """
    a = mx.nd.random.uniform(shape=(n, n), ctx=ctx)
    a.wait_to_read()
    return a
To store necessary data for our performance comparison later, we use the structures created previously, with the following code:
timings_np["create"] = []
for n in matrix_orders:
    result = %timeit -o create_matrix_np(n)
    timings_np["create"].append(result.best)
timings_mx_np_cpu["create"] = []
for n in matrix_orders:
    result = %timeit -o create_matrix_mx_np(n)
    timings_mx_np_cpu["create"].append(result.best)
timings_mx_np_gpu["create"] = []
ctx = mx.gpu()
for n in matrix_orders:
    result = %timeit -o create_matrix_mx_np(n, ctx)
    timings_mx_np_gpu["create"].append(result.best)
timings_mx_nd_cpu["create"] = []
for n in matrix_orders:
    result = %timeit -o create_matrix_mx_nd(n)
    timings_mx_nd_cpu["create"].append(result.best)
timings_mx_nd_gpu["create"] = []
ctx = mx.gpu()
for n in matrix_orders:
    result = %timeit -o create_matrix_mx_nd(n, ctx)
    timings_mx_nd_gpu["create"].append(result.best)
Matrix multiplication
We define three functions to compute the matrixes multiplication; the first function will use the NumPy library and will receive as input parameters the matrixes to multiply. The second function will use the MXNet np module, and the third function will use the MXNet nd module. For the second and third functions, the same parameters are used. The context where the multiplication will happen is given by the context where the matrixes were created; no parameter needs to be added. Both matrixes need to have been created in the same context, or an error will be triggered:
def multiply_matrix_np(a, b):
    """
    Multiplies 2 squared matrixes a and b
    and returns the result c.
    Uses NumPy.
    """
    #c = np.matmul(a, b)
    c = np.dot(a, b)
    return c
def multiply_matrix_mx_np(a, b):
    """
    Multiplies 2 squared matrixes a and b
    and returns the result c.
    Uses MXNet NumPy syntax.
    """
    c = mx.np.dot(a, b)
    c.wait_to_read()
    return c
def multiply_matrix_mx_nd(a, b):
    """
    Multiplies 2 squared matrixes a and b
    and returns the result c.
    Uses MXNet ND native syntax.
    """
    c = mx.nd.dot(a, b)
    c.wait_to_read()
    return c
To store the necessary data for our performance comparison later, we will use the structures created previously, with the following code:
timings_np["multiply"] = []
for n in matrix_orders:
    a = create_matrix_np(n)
    b = create_matrix_np(n)
    result = %timeit -o multiply_matrix_np(a, b)
    timings_np["multiply"].append(result.best)
timings_mx_np_cpu["multiply"] = []
for n in matrix_orders:
    a = create_matrix_mx_np(n)
    b = create_matrix_mx_np(n)
    result = %timeit -o multiply_matrix_mx_np(a, b)
    timings_mx_np_cpu["multiply"].append(result.best)
timings_mx_np_gpu["multiply"] = []
ctx = mx.gpu()
for n in matrix_orders:
    a = create_matrix_mx_np(n, ctx)
    b = create_matrix_mx_np(n, ctx)
    result = %timeit -o multiply_matrix_mx_np(a, b)
    timings_mx_gpu["multiply"].append(result.best)
timings_mx_nd_cpu["multiply"] = []
for n in matrix_orders:
    a = create_matrix_mx_nd(n)
    b = create_matrix_mx_nd(n)
    result = %timeit -o multiply_matrix_mx_nd(a, b)
    timings_mx_nd_cpu["multiply"].append(result.best)
timings_mx_nd_gpu["multiply"] = []
ctx = mx.gpu()
for n in matrix_orders:
    a = create_matrix_mx_nd(n, ctx)
    b = create_matrix_mx_nd(n, ctx)
    result = %timeit -o multiply_matrix_mx_nd(a, b)
    timings_mx_nd_gpu["multiply"].append(result.best)
Drawing conclusions
The first step before making any assessments is to plot the data we have captured in the previous steps. For this step, we will use the pyplot module from a library called Matplotlib, which will allow us to create charts easily. The following code plots the runtime (in seconds) for the matrix generation and all the matrix orders computed:
import matplotlib.pyplot as plt
fig = plt.figure()
plt.plot(matrix_orders, timings_np["create"], color='red', marker='s')
plt.plot(matrix_orders, timings_mx_np_cpu["create"], color='blue', marker='o')
plt.plot(matrix_orders, timings_mx_np_gpu["create"], color='green', marker='^')
plt.plot(matrix_orders, timings_mx_nd_cpu["create"], color='yellow', marker='p')
plt.plot(matrix_orders, timings_mx_nd_gpu["create"], color='orange', marker='*')
plt.title("Matrix Creation Runtime", fontsize=14)
plt.xlabel("Matrix Order", fontsize=14)
plt.ylabel("Runtime (s)", fontsize=14)
plt.grid(True)
ax = fig.gca()
ax.set_xscale("log")
ax.set_yscale("log")
plt.legend(["NumPy", "MXNet NumPy (CPU)", "MXNet NumPy (GPU)", "MXNet ND (CPU)", "MXNet ND (GPU)"])
plt.show()
Quite similarly as shown in the previous code block, the following code plots the runtime (in seconds) for the matrix multiplication and all the matrix orders computed:
import matplotlib.pyplot as plt
fig = plt.figure()
plt.plot(matrix_orders, timings_np["multiply"], color='red', marker='s')
 plt.plot(matrix_orders, timings_mx_np_cpu["multiply"], color='blue', marker='o')
 plt.plot(matrix_orders, timings_mx_np_gpu["multiply"], color='green', marker='^')
 plt.plot(matrix_orders, timings_mx_nd_cpu["multiply"], color='yellow', marker='p')
 plt.plot(matrix_orders, timings_mx_nd_gpu["multiply"], color='orange', marker='*')
 plt.title("Matrix Multiplication Runtime", fontsize=14)
 plt.xlabel("Matrix Order", fontsize=14)
 plt.ylabel("Runtime (s)", fontsize=14)
 plt.grid(True)
 ax = fig.gca()
ax.set_xscale("log")
ax.set_yscale("log")
plt.legend(["NumPy", "MXNet NumPy (CPU)", "MXNet NumPy (GPU)", "MXNet ND (CPU)", "MXNet ND (GPU)"])
 plt.show()
These are the plots displayed (the results will vary according to the hardware configuration):
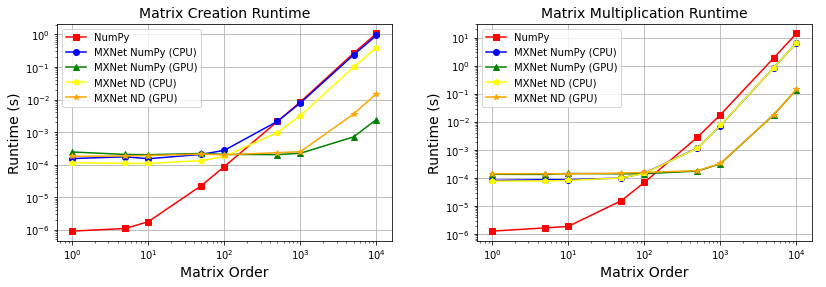
Figure 1.5 – Runtimes – a) Matrix creation, and b) Matrix multiplication
Important note
Note that the charts use a logarithmic scale for both axes, horizontal and vertical (the differences are larger than they seem). Furthermore, the actual values depend on the hardware architecture that the computations are run on; therefore, your specific results will vary.
There are several conclusions that can be drawn, both from each individual operation and collectively:
- For smaller matrix orders, using NumPy is much faster in both operations. This is because MXNet works in a different memory space, and the amount of time to move the data to this memory space is longer than the actual compute time.
- In matrix creation, for larger matrix orders, the difference between NumPy (remember, it’s CPU only) and MXNet with the np module and CPU acceleration is negligible, but with the nd module and CPU, acceleration is ~2x faster. For matrix multiplication, and depending on your hardware, MXNet with CPU acceleration can be ~2x faster (regardless of the module). This is because MXNet uses Intel MKL to optimize CPU computations.
- In the ranges that are interesting for deep learning – that is, large computational loads involving matrix orders > 1,000 (which can represent data such as images composed of several megapixels or large language dictionaries), GPUs deliver typical gains of several orders of magnitude (~200x for creation, and ~40x for multiplication, exponentially growing with every increase of matrix order). This is by far the most compelling reason to work with GPUs when running deep learning experiments.
- When using the GPU, the MXNet np module is faster than the MXNet nd module in creation (~7x), but the difference is negligible in multiplication. Typically, deep learning algorithms are more similar to multiplications to terms of computational loads, and therefore, a priori, there is no significant advantage in using the np module or the nd module. However, MXNet recommends using the native MXNet nd module (and the author subscribes to this recommendation) because some operations on the np module are not supported by
autograd(MXNet’s auto-differentiation module). We will see in the upcoming chapters, when we train neural networks, how theautogradmodule is used and why it is critical.
How it works...
MXNet provides two optimized modules to work with ND arrays, including one that is an in-place substitute for NumPy. The advantages of operating with MXNet ND arrays are twofold:
- MXNet ND array operations support automatic differentiation. As we will see in the following chapters, automatic differentiation is a key feature that allows developers to concentrate on the forward pass of the models, letting the backward pass be automatically derived.
- Conversely, operations with MXNet ND arrays are optimized for the underlying hardware, yielding impressive results with GPU acceleration. We computed results for matrix creation and matrix multiplication to validate this conclusion experimentally.
There’s more…
In this recipe, we have barely scratched the surface of MXNet operations with ND arrays. If you want to read more about MXNet and ND arrays, this is the link to the official MXNet API reference: https://mxnet.apache.org/versions/1.0.0/api/python/ndarray/ndarray.html.
Furthermore, a very interesting tutorial can be found in the official MXNet documentation: https://gluon.mxnet.io/chapter01_crashcourse/ndarray.html.
Moreover, we have taken a glimpse at how to measure performance on MXNet. We will revisit this topic in the following chapters; however, a good deep-dive into the topic is given in the official MXNet documentation: https://mxnet.apache.org/versions/1.8.0/api/python/docs/tutorials/performance/backend/profiler.html.