

Unit Testing
Unit tests are an important part of programming in general. Basically, unit tests are little programs that use our classes in various scenarios with expected results, live in a parallel file hierarchy in our project, and do not end up in the actual executable but are executed separately by us during development to ensure that our code is behaving in expected ways. We should write unit tests for our C++ programs to ensure that they behave as they are supposed to after each change.
Preparing for the Unit Tests
There are several C++ test frameworks that we can use with CMake. We will use Google Test, which has several benefits over other options. In the next exercise, we will prepare our project for unit testing with Google Test.
Exercise 4: Preparing Our Project for Unit Testing
We have installed Google Test but our project is not set up to use Google Test for unit testing. In addition to the installation, there are settings that need to be carried out in our CMake project to have Google Test unit tests. Follow these steps to implement this exercise:
- Open Eclipse CDT and select the CxxTemplate project that we have been using.
- Create a new folder named tests as we will perform all our tests there.
- Edit our base CMakeLists.txt file to allow tests in the tests folder. Note that we already had code to find the GTest package that brings GoogleTest capability to CMake. We will add our new lines just after that:
find_package(GTest)
if(GTEST_FOUND)
set(Gtest_FOUND TRUE)
endif()
if(GTest_FOUND)
include(GoogleTest)
endif()
# add these two lines below
enable_testing()
add_subdirectory(tests)
This is all we need to add to our main CMakeLists.txt file.
- Create another CMakeLists.txt file inside our tests folder. This will be used because of the add_subdirectory(tests) line that we had in our main CMakeLists.txt file. This tests/CMakeLists.txt file will manage the test sources.
- Add the following code in the tests/CMakeLists.txt file:
include(GoogleTest)
add_executable(tests CanTest.cpp)
target_link_libraries(tests GTest::GTest)
gtest_discover_tests(tests)
Let's dissect this code line by line. The first line brings in the Google Test capability. The second line creates the tests executable, which will include all our test source files. In this case, we only have one CanTest.cpp file, which will just verify that the testing works. After that, we link the GTest library to the tests executable. The last line identifies all individual tests in the tests executable and adds them to CMake as a test. This way, various test tools will be able to tell us which individual tests failed and which ones passed.
- Create a tests/CanTest.cpp file. Add this code to simply verify that tests are running, without actually testing anything in our actual project:
#include "gtest/gtest.h"
namespace {
class CanTest: public ::testing::Test {};
TEST_F(CanTest, CanReallyTest) {
EXPECT_EQ(0, 0);
}
}
int main(int argc, char **argv) {
::testing::InitGoogleTest(&argc, argv);
return RUN_ALL_TESTS();
}
The TEST_F line is an individual test. Now, EXPECT_EQ(0, 0) is testing whether zero is equal to zero, which will always succeed if we can actually run the test. We will later add the results of our own classes here to be tested against various values. Now we have the necessary setup for Google Test in our project. Next, we will build and run these tests.
Building, Running, and Writing Unit Tests
Now, we will discuss how to build, run, and write unit tests. The example that we have so far is a simple dummy test that is ready to be built and run. Later, we will add tests that make more sense and view the output of passing and failing tests. In the following exercise, we will build, run, and write unit tests for the project that we created in the previous exercise.
Exercise 5: Building and Running Tests
So far, you have created a project with GoogleTest set up, but you did not build or run the tests we created. In this exercise, we will build and run the tests that we created. Since we added our tests folder using add_subdirectory, building the project will automatically build the tests. Running the tests will require some more effort. Perform the following steps to complete the exercise:
- Open our CMake project in Eclipse CDT.
- To build the tests, simply build the project just like you did before. Here is the output of building the project one more time from Eclipse after a full build using Project | Build All:

Figure 1.20: Build operation and its output
- If you do not see this output, your console may be in the wrong view. You can correct it as shown in the following figures:

Figure 1.21: Viewing the correct console output

Figure 1.22: Viewing the correct console output
As you can see, our project now has two executable targets. They both live in the build folder, as with any other build artifact. Their locations are build/Debug/CxxTemplate and build/Debug/tests/tests. Since they are executables, we can simply run them.
- We ran CxxTemplate before and will not see any extra output now. Run the other executable by typing the following command in the terminal while we are in our project folder:
./build/Debug/tests/tests
The preceding code generates the following output in the terminal:

Figure 1.23: Running the tests executable
This is the simple output of our tests executable. If you want to see whether the tests have passed, you can simply run this. However, testing is so much more than that.
- One of the ways you can run your tests is by using the ctest command. Write the following commands in the terminal while you are in the project folder. We go to the folder where the tests executable resides, run ctest there, and come back:
cd build/Debug/tests
ctest
cd ../../..
And here is the output that you will see:

Figure 1.24: Running ctest
Note
The ctest command can run your tests executable with a number of options, including the ability to submit test results automatically to online dashboards. Here, we will simply run the ctest command; its further features are left as an exercise for the interested reader. You can type ctest --help or visit the online documentation to discover ctest further at https://cmake.org/cmake/help/latest/manual/ctest.1.html#.
- Another way to run the tests is to run them inside Eclipse, in a nice graphical report format. For this, we will create a run configuration that is test-aware. In Eclipse, click on Run | Run Configurations…, right-click C/C++ Unit on the left, and select New Configuration.
- Change the name from CxxTemplate Debug to CxxTemplate Tests as follows:

Figure 1.25: Changing the name of the run configuration
- Under C/C++ Application, select the Search Project option:

Figure 1.26: Run Configurations
- Choose tests in the new dialog:

Figure 1.27: Creating the test run configuration and selecting the tests executable
- Next, go to the C/C++ Testing tab and select Google Tests Runner in the dropdown. Click on Apply at the bottom of the dialog and click on the Run option for the test that we have to run for the first time:

Figure 1.28: Run Configurations
- In the upcoming runs, you can either click the dropdown next to the play button in the toolbar, or choose Run | Run History to choose CxxTemplate Tests:
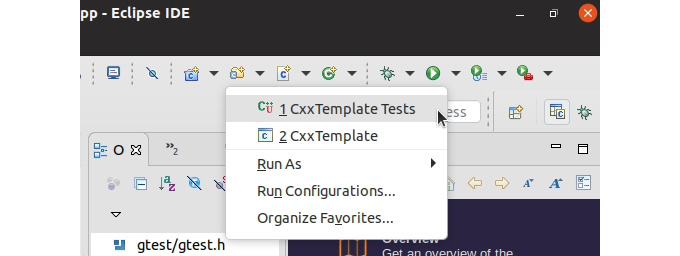
Figure 1.29: Finalizing the run configuration settings and selecting a configuration to run
The result will be similar to the following screenshot:
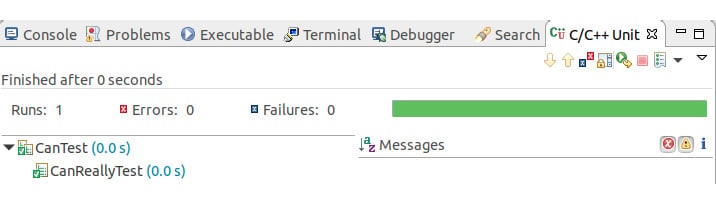
Figure 1.30: Run results of the unit test
This is a nice report that contains entries for all tests—only one for now. You may prefer this if you do not want to leave the IDE. Furthermore, when you have many tests, this interface can help you filter them effectively. Now you have built and run tests that were written using Google Test. You ran them in a couple of different ways, including directly executing the test, using ctest, and using Eclipse CDT. In the next section, we will solve an exercise wherein we will actually test the functionality of our code.
Exercise 6: Testing the Functionality of Code
You have run simple tests but now you want to write meaningful tests that are testing functionality. In the initial activity, we created SumFunc.cpp, which had the sum function. Now, in this exercise, we will write a test for that file. In this test, we will use the sum function to add two numbers and verify that the result is correct. Let's recall the contents of the following files with the sum function from before:
- src/SumFunc.h:
#ifndef SRC_SUMFUNC_H_
#define SRC_SUMFUNC_H_
int sum(int a, int b);
#endif /* SRC_SUMFUNC_H_ */
- src/SumFunc.cpp:
#include "SumFunc.h"
#include <iostream>
int sum(int a, int b) {
return a + b;
}
- Relevant lines of CMakeLists.txt:
add_executable(CxxTemplate
src/CxxTemplate.cpp
src/ANewClass.cpp
src/SumFunc.cpp
)
Also, let's recall our CantTest.cpp file, which has the main() function of our unit tests:
#include "gtest/gtest.h"
namespace {
class CanTest: public ::testing::Test {};
TEST_F(CanTest, CanReallyTest) {
EXPECT_EQ(0, 0);
}
}
int main(int argc, char **argv) {
::testing::InitGoogleTest(&argc, argv);
return RUN_ALL_TESTS();
}
Perform the following steps to complete the exercise:
- Open our CMake project in Eclipse CDT.
- Add a new test source file (tests/SumFuncTest.cpp) with the following content:
#include "gtest/gtest.h"
#include "../src/SumFunc.h"
namespace {
class SumFuncTest: public ::testing::Test {};
TEST_F(SumFuncTest, CanSumCorrectly) {
EXPECT_EQ(7, sum(3, 4));
}
}
Note that this does not have a main() function since CanTest.cpp has one and these will be linked together. Secondly, note that this includes SumFunc.h, which is in the src folder of the project and uses it as sum(3, 4) inside the test. This is how we use our project code in tests.
- Make the following change in the tests/CMakeLists.txt file to build the test:
include(GoogleTest)
add_executable(tests CanTest.cpp SumFuncTest.cpp ../src/SumFunc.cpp) # added files here
target_link_libraries(tests GTest::GTest)
gtest_discover_tests(tests)
Note that we added both the test (SumFuncTest.cpp) and the code that it tests (../src/SumFunc.cpp) to the executable, as our test code is using the code from the actual project.
- Build the project and run the test as before. You should see the following report:

Figure 1.31: Output after running the test
We can add such tests to our project and all of them will appear on the screen as shown in the preceeding screenshot.
- Now, let's add one more test that will actually fail. In the tests/SumFuncTest.cpp file, make the following change:
TEST_F(SumFuncTest, CanSumCorrectly) {
EXPECT_EQ(7, sum(3, 4));
}
// add this test
TEST_F(SumFuncTest, CanSumAbsoluteValues) {
EXPECT_EQ(6, sum(3, -3));
}
Note that this test assumes that the absolute values of the inputs are summed up, which is incorrect. The result of this call is 0 but is expected to be 6 in this example. This is the only change that we have to make in our project to add this test.
- Now, build the project and run the test. You should see this report:

Figure 1.32: The build report
As you can see in the preceding figure, the first two tests passed and the last test failed. When we see this output, there are two options: either our project code is wrong, or the test is wrong. In this case, our test is wrong. This is because our CanSumAbsoluteValues test case expects that 6 is equal to sum(3, -3). This is because we assumed that our function sums up the absolute values of the integers provided. However, this is not the case. Our function simply adds the given numbers, whether they are positive or negative. Therefore, this test had a faulty assumption and failed.
- Let's change the test and fix it. Change the test so that we expect the sum of -3 and 3 to be 0. Rename the test to reflect what this test actually does:
TEST_F(SumFuncTest, CanSumCorrectly) {
EXPECT_EQ(7, sum(3, 4));
}
// change this part
TEST_F(SumFuncTest, CanUseNegativeValues) {
EXPECT_EQ(0, sum(3, -3));
}
- Run it now and observe in the report that all the tests pass:
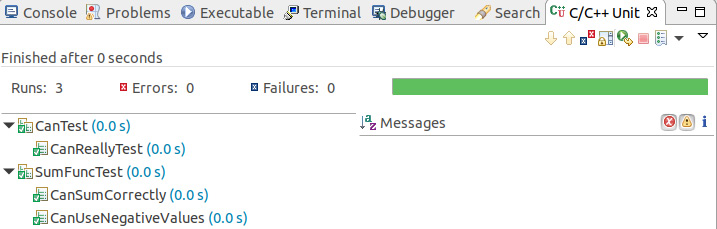
Figure 1.33: Test execution is successful
Finally, we have set up Google Test with CMake both in our system and project. We also wrote, built, and ran unit tests with Google Test, both in the terminal and in Eclipse. Ideally, you should write unit tests for every class and cover every possible usage. You should also run the tests after each major change and make sure you do not break existing code. In the next section, we will perform an activity of adding a new class and its test.
Activity 2: Adding a New Class and Its Test
As you develop a C++ project, you add new source files to it as the project grows. You also write tests for them to ensure that they are working properly. In this activity, we will add a new class that simulates 1D linear motion. The class will have double fields for position and velocity. It will also have a advanceTimeBy() method, which receives a double dt parameter, which modifies position based on the value of velocity. Use EXPECT_DOUBLE_EQ instead of EXPECT_EQ for double values. In this activity, we will add a new class and its test to the project. Follow these steps to perform this activity:
- Open the project that we have created in the Eclipse IDE.
- Add the LinearMotion1D.cpp and LinearMotion1D.h file pair to the project that contains the LinearMotion1D class. In this class, create two double fields: position and velocity. Also, create an advanceTimeBy(double dt) function that modifies position.
- Write tests for this in the tests/LinearMotion1DTest.cpp file. Write two tests that represent motion in two different directions.
- Build and run it in the Eclipse IDE.
- Verify that the tests have passed.
The final test results should look similar to the following:
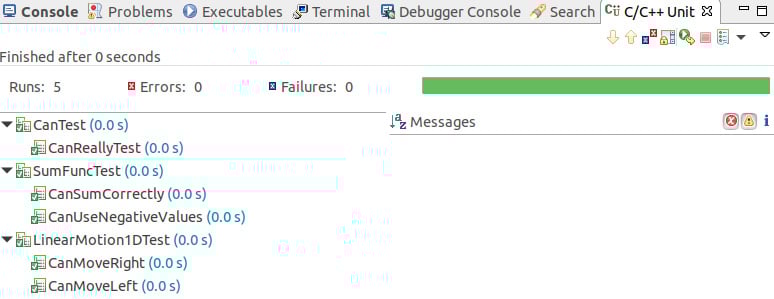
Figure 1.34: Final test results
Note
The solution for this activity can be found on page 622.
Adding new classes and their tests is a very common task in C++ development. We create classes for various reasons. Sometimes, we have a nice software design plan and we create the classes that it calls for. Other times, when a class becomes too large and monolithic, we separate some of its responsibility to another class in a meaningful way. Having this task be practical is important to prevent dragging your feet and ending up with huge monolithic classes. In the following section, we discuss what happens during the compilation and linking stages. This will give us a better perspective of what is happening under the hood of C++ programs.