Search icon CANCEL
Subscription
0
Cart icon
Your Cart (0 item)
Close icon
You have no products in your basket yet
Save more on your purchases! discount-offer-chevron-icon
Savings automatically calculated. No voucher code required.
Arrow left icon
Explore Products
Best Sellers
New Releases
Books
Videos
Audiobooks
Learning Hub
Newsletter Hub
Free Learning
Arrow right icon
timer SALE ENDS IN
0 Days
:
00 Hours
:
00 Minutes
:
00 Seconds
Arrow up icon
GO TO TOP
Learn Robotics Programming

You're reading from   Learn Robotics Programming Build and control cutting-edge AI robots with Raspberry Pi and Python

Arrow left icon
Product type Paperback
Published in Dec 2025
Last Updated in Sep 2025
Publisher Packt
ISBN-13 9781803246987
Length 566 pages
Edition 3rd Edition
Languages
Concepts
Arrow right icon
Author (1):
Arrow left icon
Danny Staple Danny Staple
Author Profile Icon Danny Staple
Danny Staple
Arrow right icon
View More author details
Toc

Table of Contents (9) Chapters Close

Learn Robotics Programming, Third Edition: Build and control cutting-edge AI robots with Raspberry Pi and Python
1 Introduction to Robotics FREE CHAPTER 2 Exploring Robot Building Blocks – Code and Electronics 3 Preparing a Headless Raspberry Pi for a Robot 4 Protecting Robot Code with Git 5 Building Robot Basics – Wheels, Power, and Wiring 6 Drive and Turn – Moving Motors with MQTT and Python 7 Driving the Robot with a Phone and Python 8 Programming Distance Sensors with Python

Attaching and reading a distance sensor

First, we will wire in and secure this sensor to the robot. We will then write some simple test code that we can use to base our behavior code on in the next section. After completing this section, the robot block diagram should look like Figure 8.7:

Figure 8.7 – Robot block diagram after adding the sensor

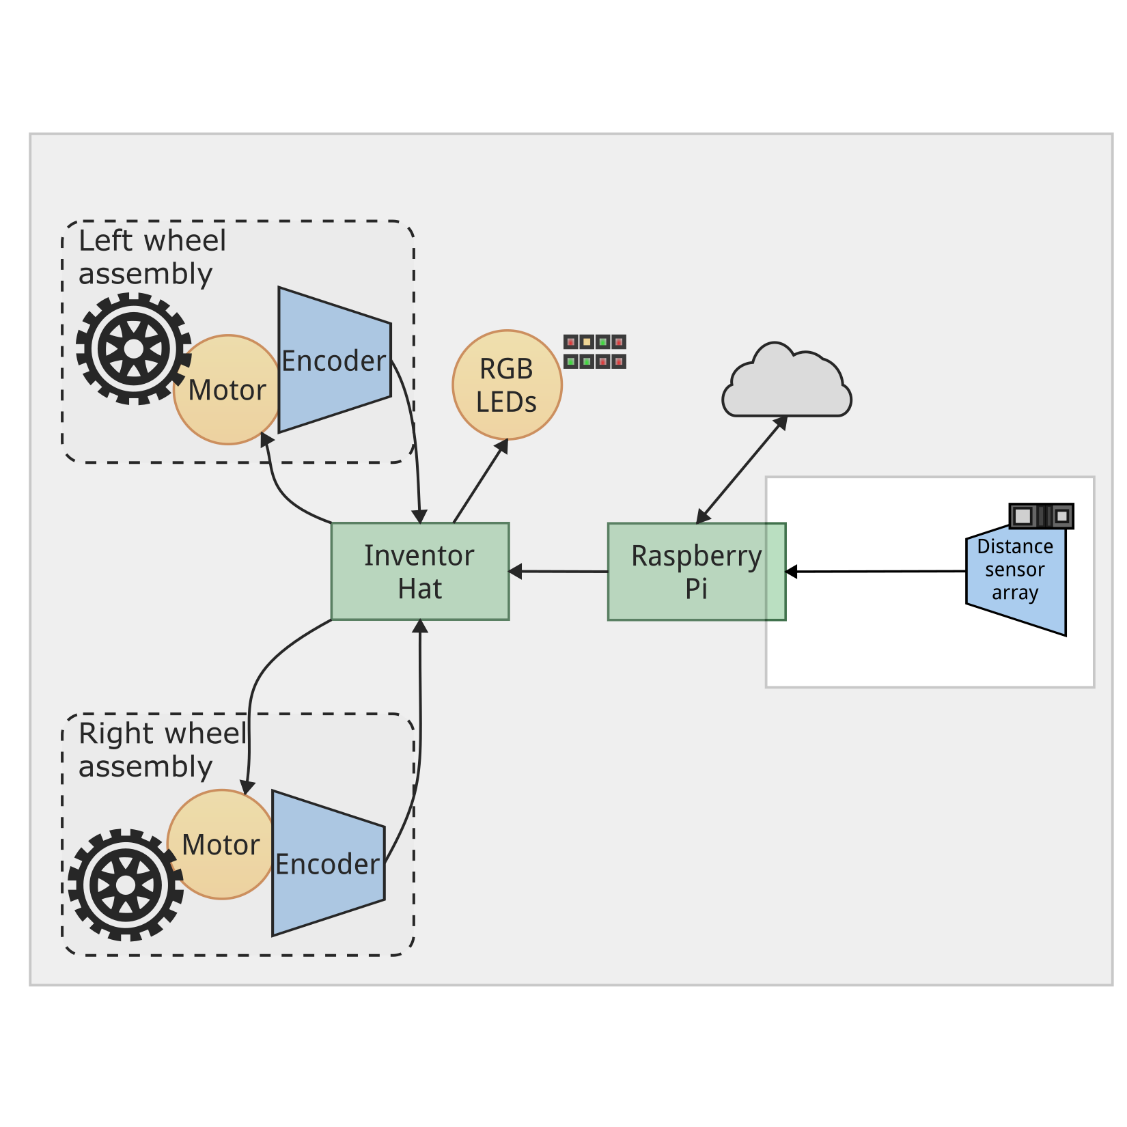
This diagram builds on the block diagram in Figure 5.19 from Chapter 5, Building Robot Basics – Wheels, Power, and Wiring, by adding the sensor. It has an arrow to the Raspberry Pi, since although it is an active sensor, the information from it is logically flowing from the sensor to the Raspberry Pi. In the next section, let's attach the sensor to the robot chassis.

Securing the sensor to the robot

Our sensor needs to be pointed to the front of our robot; it needs to not fall off and move rigidly with the chassis. The chassis doesn’t have front-facing bolt holes; however, in the suggested purchase list, we have the...

lock icon The rest of the chapter is locked
Visually different images
CONTINUE READING
83
Tech Concepts
36
Programming languages
73
Tech Tools
Icon Unlimited access to the largest independent learning library in tech of over 8,000 expert-authored tech books and videos.
Icon Innovative learning tools, including AI book assistants, code context explainers, and text-to-speech.
Icon 50+ new titles added per month and exclusive early access to books as they are being written.
Learn Robotics Programming
Register for a free Packt account to unlock a world of extra content!
A free Packt account unlocks extra newsletters, articles, discounted offers, and much more. Start advancing your knowledge today.
Unlock this book and the full library FREE for 7 days
Get unlimited access to 7000+ expert-authored eBooks and videos courses covering every tech area you can think of
Renews at $19.99/month. Cancel anytime
Modal Close icon
Modal Close icon