Search icon
Arrow left icon
All Products
Best Sellers
New Releases
Books
Videos
Audiobooks
Learning Hub
Newsletters
Free Learning
Arrow right icon
Getting Started with Electronic Projects

You're reading from  Getting Started with Electronic Projects

Product type Book
Published in Jan 2015
Publisher
ISBN-13 9781783554515
Pages 176 pages
Edition 1st Edition
Languages

Assembling the PCB


Assembling the actual PCB is straightforward. Just solder all of the parts except the mercury tilt switch into their locations marked on the silkscreen.

The reed switch is marked SW1. The mercury tilt switch is connected to pads W3 and W4. The terminal marker plus or + of the buzzer (B1) goes to the square pad of the component (pin 1).

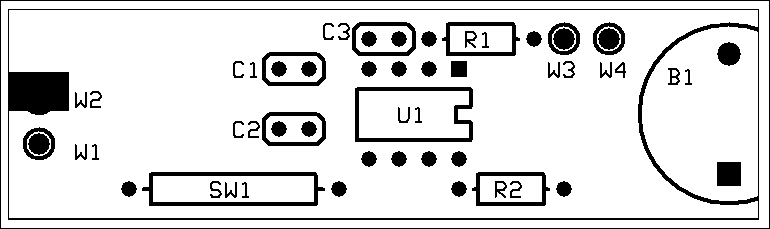
Alarm PCB silkscreen

The mercury tilt switch is installed as shown in the following image. This board is a prototype. Your PCB from the Packt site will have the pads relocated so that you won't need the wire. The switch itself mounts in the same direction as the one in the image, and should be held in place with epoxy or hot glue. The switches I got were designed for car alarms and were extremely sensitive.

Tip

For those of you who don't know how a mercury switch works:

Mercury is the only metal that is liquid at room temperature. As with any liquid, surface tension causes it to form a sphere. This shape makes it roll around easily. If we use...

lock icon The rest of the chapter is locked
Register for a free Packt account to unlock a world of extra content!
A free Packt account unlocks extra newsletters, articles, discounted offers, and much more. Start advancing your knowledge today.
Unlock this book and the full library FREE for 7 days
Get unlimited access to 7000+ expert-authored eBooks and videos courses covering every tech area you can think of
Renews at €14.99/month. Cancel anytime}