


Creating a “Hello World” web app with Django and DRF
As mentioned previously, Django is a Python-based web framework, so we need to write the code using the Python programming language. If you are already using Linux or macOS-based systems, then Python comes preinstalled. However, for Windows systems, you have to install it by following the instructions on the official Python website: https://www.python.org/downloads/.
We shall also use virtualenv as our preferred tool to manage different environments for multiple projects, allowing us to create isolated Python environments.
Important note
We are not going to deep dive into virtualenv since we expect you to know how and why we use virtualenv for different projects. You can find details about virtualenv on its official website: https://virtualenv.pypa.io/en/latest/index.html.
First, let’s create a virtual environment with the latest Python version (preferably >3.12.0). The following commands will work for Linux/Unix/macOS; for Windows, please check the next section:
pip install virtualenv
virtualenv -p python3 v_env
source /path to v_env/v_env/bin/activate
Now, we will break down what the code means:
pip install virtualenvinstallsvirtualenvon the system.pipis the built-in package manager that comes with Python and is already preinstalled on Mac and most Linux environments.virtualenv -p python3 v_envcreates a new virtual environment with the namev_env(this is just the name we have given to our virtual environment; you can give another relevant name). The-p python3flag is used to tell us which interpreter should be used to create the virtual environment.source /path to v_env/v_env/bin/activateexecutes theactivatescript, which loads the virtual Python interpreter as our default Python interpreter in the shell.
Now that the Python virtual environment has been set up, we shall focus on managing the package dependency. To install the latest release of Django, run the following command:
pip install Django==5.0.2
For Windows systems, download Python 3.12 or higher from https://www.python.org/downloads/windows/ and install it by following the wizard. Remember to click the Add python.exe to PATH checkbox in the installation step.
To verify your Python installation, use the following command in the terminal:
C:\Users\argo\> python --version
Python 3.12.0
Once Python has been installed successfully, you can use the following command to set up a virtual environment and install Django:
py -m pip install --user virtualenv
py -m venv venv
.\<path to venv created>\venv\Scripts\activate
// to install Django
pip install Django==5.0.2
The explanation for the Windows-specific commands is the same as what we explained for Linux/MacOS systems.
Important note
We are not using poetry, PDM, pipenv, or any other dependency and package management tools to avoid overcomplicating the initial setup.
Furthermore, we prefer to use a Docker environment to create more isolation and provide a better developer experience. We shall learn more about Docker in Chapter 10.
With the previous command, our local Python and Django development environments are ready. Now, it’s time to create our basic Django project.
Creating our Django hello_world project
We all love the django-admin command and all the boilerplate code it gives us when we create a new project or application. However, when working on a larger project, the default project structure is not so helpful. This is because when we work with Django in production, we have many other moving parts that need to be incorporated into the project. Project structure and other utilities that are used with a project are always opinionated; what might work for you in your current project might not work in the next project you create a year down the line.
Important note
There are plenty of resources available on the internet that will suggest different project structures. One of my favorites is django-cookiecutter. It gives you a lot of tools integrated into the project and gives you a structure that you can follow, but it can be daunting for any new beginner to start since it integrates a lot of third-party tools that you might not use, along with a few configurations that you might not understand. But instead of worrying about that, you can just follow along with this book!
We shall create our own minimalistic project structure and have other tools integrated with our project in incremental steps. First, let’s create our hello_world project with Django:
mkdir hello_world && cd hello_world
mkdir backend && cd backend
django-admin startproject config .
Here, we have created our project folder, hello_world, and then created a subfolder called backend inside of it. We are using the backend folder to keep all the Django-related code; we shall create more folders at the same level as the backend subfolder as we learn more about the CI/CD features and incorporate more tools into the project. Finally, we used the Django management command to create our project.
Important note
Note the . (dot), which we have appended to the startproject command; this tells the Django management command to create the project in the current folder rather than create a separate folder config with the project. By default, if you don’t add ., then Django will create an additional folder called config in which the following project structure will be created. For better understanding, you can test the command with and without . to get a clear idea of how it impacts the structure.
After executing these commands, we should be able to see the project structure shown here:
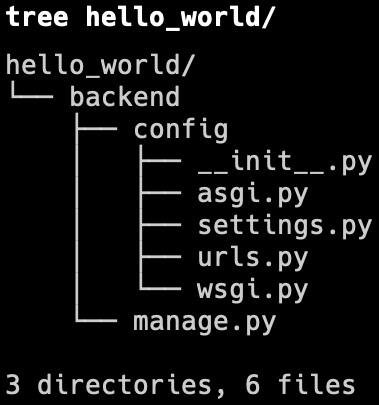
Figure 1.1: Expected project structure after executing the commands
Now that our project structure is ready, let’s run python manage.py runserver to verify our Django project. We should see the following output in our shell:

Figure 1.2: The python manage.py runserver command’s output in the shell
Please ignore the unapplied migrations warning stating You have 18 unapplied migrations(s) displayed in red in the console; we shall discuss this in detail in the next chapter when we learn more about the database, models, and migrations.
Now, go to your browser and open http://localhost:8000 or http://127.0.0.1:8000 (if the former fails to load). We shall see the following screen as shown in Figure 1.3, which verifies
that our server is running successfully:
Please note
You can use http://localhost:8000 or http://127.0.0.1:8000 to open the Django project in your browser. If you face any error for http://localhost:8000, then please try using http://127.0.0.1:8000 for all the URLs mentioned in this book.
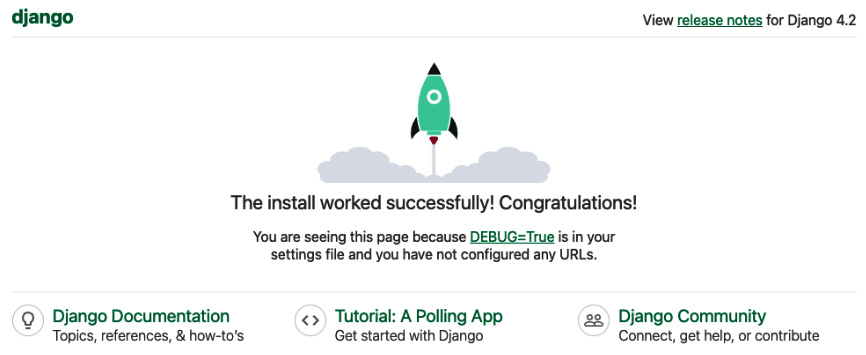
Figure 1.3: Our Django server running successfully with port 8000
Now, let’s create our first hello_world view. To do this, follow these steps:
- Open the
config/urls.pyfile. - Add a new
viewfunction inhello_world. - Link the
hello_worldview function to thehello-worldpath.Our
config/urls.pyfile should look like the following code snippet:from django.contrib import admin from django.http import HttpResponse from django.urls import path def hello_world(request): return HttpResponse('hello world') urlpatterns = [ path('admin/', admin.site.urls), path('hello-world/', hello_world) ] - Open
http://127.0.0.1:8000/hello-world/to get the result shown in Figure 1.4:
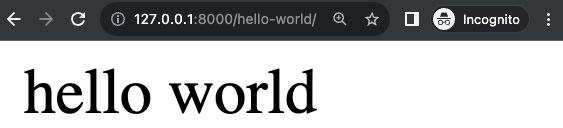
Figure 1.4: http://127.0.0.1:8000/hello-world/ browser response
So far, we have seen how to create the project folder structure and create our first view in Django. The example we have used is one of the smallest Django project examples that doesn’t involve an app. So, let’s see how we can create apps in Django that can help us manage our project better.
Creating our first app in Django
A Django app can be considered a small package performing one individual functionality in a large project. Django provides management commands to create a new app in a project; these are built-in commands that are used to perform repetitive and complex tasks. The Django community loves management commands since they take away a lot of manual effort and encapsulate a lot of complicated tasks, such as migrations and more. We shall learn more about Django management commands in the following chapters, where we will create a custom management command. However, whenever you see a command followed by manage.py, that is a Django management command.
So, let’s create a new demo_app using the Django management command interface:
python manage.py startapp demo_app
Running this command will create the folder structure shown here:
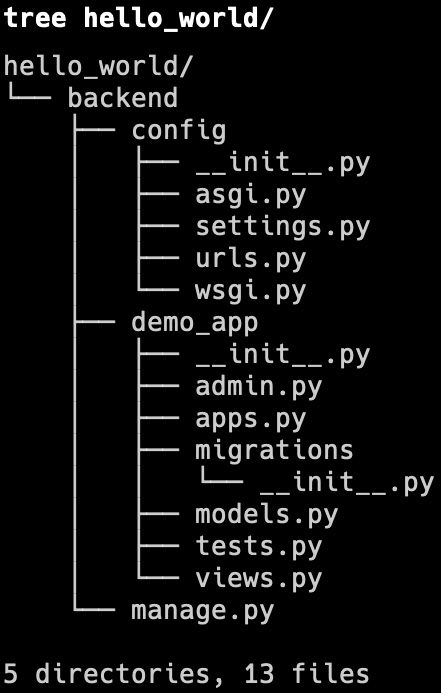
Figure 1.5: Project structure with demo_app added
We can see that a demo_app folder has been created that contains the boilerplate code generated by Django for a new app.
Important note
One important step we must do whenever we create a new app is to tell Django about the new app. Unfortunately, this doesn’t happen automatically when you create a new app using the Django management command. It is a manual process where you need to add the details of the new app in the INSTALLED_APPS list in the settings.py file. Django uses this to identify all the dependency apps added to the project and check for any database-related changes or even register for signals and receivers.
Though adding a new app to the INSTALLED_APPS list is not required for us currently, since we are not using models for Django to automatically identify any database-related changes, it is still good practice to do so. Our INSTALLED_APPS list should look like this:
INSTALLED_APPS = [
    ...
    'django.contrib.staticfiles',
    'demo_app',
]
Remember to put a comma (,) after every entry of a new app; this is one of the most common mistakes developers make and it causes Django to append two app names into one and generate a syntax error before finally correcting it.
Important note
In Django, third-party app integrations are also done via INSTALLED_APPS, so we shall see best practices around how to maintain INSTALLED_APPS in the following sections.
Now that we have created a new Django app with the boilerplate code, we can link the app view with urls.py.
Linking app views using urls.py
In this section, we shall link views.py, which was created by the Django management command. views.py is used to add business logic to the application endpoints. Just like we added the hello_world functional view in the previous section, we can add different functional or class-based views in the views.py file.
Let’s create a simple hello_world functional view in our demo_app/views.py file:
from django.http import HttpResponse
def hello_world(request, *args, **kwargs):
    return HttpResponse('hello world')
As our project grows and the number of apps increases, our main urls.py file will become more and more cluttered, with hundreds of URL patterns in a single file. So, it is favorable to break down the main config/urls.py file into smaller urls.py files for each app, which improves the maintainability of the project.
Now, we will create a new file called backend/demo_app/urls.py where we shall add all the routes related to demo_app. Subsequently, when we add more apps to the project, we shall create individual urls.py files for each app.
Important note
The urls.py filename can be anything, but we are keeping this as-is to be consistent with the Django convention.
Add the following code inside the backend/demo_app/urls.py file:
from django.urls import path
from demo_app import views
urlpatterns = [
    path('hello-world/', views.hello_world)
]
Here, we are defining the URL pattern for the hello-world path, which links to the basic functional view we created earlier.
Opinionated note
We are using absolute import to import our demo_app views. This is a convention we shall follow throughout this book and we also recommend it for other projects. The advantage of using absolute import over relative import is that it is straightforward and clear to read. With just a glance, someone can easily tell what resource has been imported. Also, PEP-8 explicitly recommends using absolute imports.
Now, let’s connect the demo_app/urls.py file to the main project config/urls.py file:
from django.contrib import admin
from django.urls import include
from django.urls import path
urlpatterns = [
    path('admin/', admin.site.urls),
    path('demo-app/', include('demo_app.urls'))
]
Next, open http://127.0.0.1:8000/demo-app/hello-world/ in your browser to make sure our demo-app view is linked with Django. You should be able to see hello world displayed on the screen, just as we saw earlier in Figure 1.4.
So far, we have worked with plain vanilla Django, but now, we’ll see how we can integrate DRF into our project.
Integrating DRF
In the API-first world of development, where developers create APIs day in, day out for every feature they build, DRF is a powerful and flexible toolkit for building APIs using Django.
Important note
If you are not familiar with the basics of DRF, we will be going through the basics in this book. However, you can find more information here: https://www.django-rest-framework.org/tutorial/quickstart/.
Now, let’s integrate DRF into our hello_world project. First, we need to install DRF in the virtual environment:
pip install djangorestframework
Now, go to settings.py and add rest_framework to INSTALLED_APPS. As you may recall, when we were integrating demo_app into the project, we mentioned that as the project grows, the INSTALLED_APPS list will also grow. To manage this better, we shall split our INSTALLED_APPS list into three sections:
DJANGO_APPS: This will contain a list of all the default Django apps and any new Django built-in apps we shall add to the projectTHIRD_PARTY_APPS: Here, we shall maintain all the third-party apps we are integrating into the project, such asrest_frameworkCUSTOM_APPS: We shall add all the apps we are creating for the project to this list – in our case,demo_app
Here is an example of how your INSTALLED_APPS list will look in the settings.py file:
DJANGO_APPS = [
    'django.contrib.admin',
    'django.contrib.auth',
    'django.contrib.contenttypes',
    'django.contrib.sessions',
    'django.contrib.messages',
    'django.contrib.staticfiles',
]
THIRD_PARTY_APPS = [
    'rest_framework',
]
CUSTOM_APPS = [
    'demo_app',
]
INSTALLED_APPS = DJANGO_APPS + CUSTOM_APPS + THIRD_PARTY_APPS
So far, we have been using Django HttpResponse. Now, we shall integrate the DRF response into our view. So, go to the demo_app/views.py file and add the following code:
from rest_framework.decorators import api_view
from rest_framework.response import Response
@api_view(['GET'])
def hello_world_drf(request, *args, **kwargs):
    return Response(data={'msg':'hello world'})
The integration of the DRF function-based view will change the UI completely for our endpoint. If you open http://127.0.0.1:8000/demo-app/hello-world-drf/, it will have a much more verbose UI, giving us a lot more information than before. This is particularly helpful when we start working with HTTP requests other than GET requests.
Here is our basic Django project integrated with DRF:
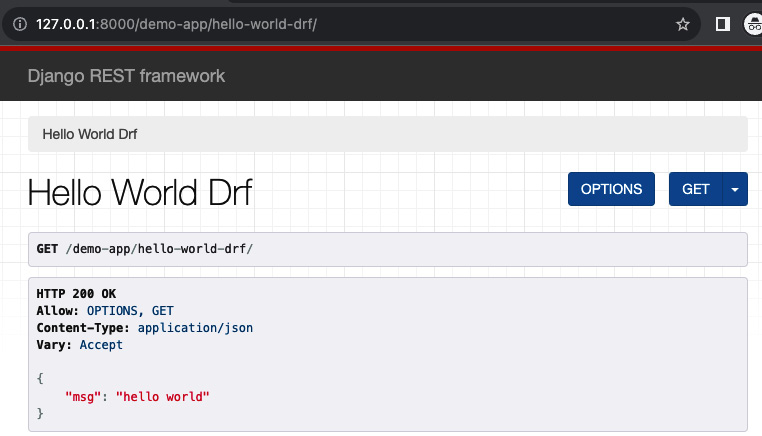
Figure 1.6: Using the DRF response in our hello-world-drf view
Now that we have a working project in Django, let’s learn some good practices that can help you go the extra mile without making mistakes yourself, rather than learning from the ones you have made earlier. DRF is the most popular Django package as it helps developers create REST endpoints. Now, let’s see what some good practices are for creating REST APIs.


