

Displaying blog posts on the home page
We would like our users to see the list of available blog posts as soon as they land on our blog website. According to the default route path that we have defined, ArticlesComponent is the landing page of our blog. Scully provides ScullyRoutesService, an Angular service that we can use in our components to get information about the routes that it will create according to the blog posts. Let’s put this service into action on our landing page:
- Open the
articles.component.tsfile and modify theimportstatements as follows:import { Component, OnInit } from '@angular/core'; import { ScullyRoute, ScullyRoutesService } from '@scullyio/ng-lib'; import { Observable, map } from 'rxjs'; - Add the
OnInitinterface to the list of implemented interfaces of theArticlesComponentclass:export class ArticlesComponent implements OnInit { } - Inject
ScullyRoutesServicein theconstructorof theArticlesComponentclass:constructor(private scullyService: ScullyRoutesService) { } - Create the following component property:
posts$: Observable<ScullyRoute[]> | undefined; - Implement the
ngOnInitmethod:ngOnInit(): void { this.posts$ = this.scullyService.available$.pipe( map(posts => posts.filter(post => post.title)) ); } - Open the
articles.component.htmlfile and add the following HTML code:<div class="list-group mt-3"> <a *ngFor="let post of posts$ | async" [routerLink]="post.route" class="list-group-item list-group-item-action"> <div class="d-flex w-100 justify-content-between"> <h5 class="mb-1">{{post.title}}</h5> </div> <p class="mb-1">{{post['description']}}</p> </a> </div>
There are many Angular techniques involved in the previous steps, so let’s break them down piece by piece.
When we want to use an Angular service in a component, we just need to ask for it from the Angular framework. How? By adding it as a property in the constructor of the component. The component does not need to know anything about how the service is implemented.
The ngOnInit method is part of the OnInit interface, which is implemented by our component. It is called by the Angular framework when a component is initialized and provides us with a hook to add custom logic to be executed.
Angular services that provide initialization logic to a component should be called inside the ngOnInit method and not in the constructor because it is easier to provide mocks about those services when unit testing the component.
The available$ property of ScullyRoutesService is called an observable and returns all the available routes that were generated from Scully when we subscribe to it. To avoid displaying routes other than those related to blog posts, such as the contact route, we filter out the results from the available$ property.
In the component template, we use the *ngFor Angular built-in directive and the async pipe to subscribe to the posts$ observable inside HTML. We can then access each item using the post template reference variable and use interpolation to display title and description.
Finally, we add a routerLink directive to each anchor element to navigate to the respective blog post when clicked. Notice that routerLink is surrounded by []. The [] syntax is called property binding, and we use it when we want to bind the property of an HTML element to a variable. In our case, we bind the routerLink directive to the route property of the post variable.
Now that we have finally completed all the pieces of the puzzle, we can see our blog website in action:
- Run the
buildcommand of the Angular CLI to build our Angular application:ng build - Execute the following command to build Scully and generate our blog routes:
npx scully --project my-blogThe preceding command will create a
scully-routes.jsonfile inside thesrc\assetsfolder. It contains the routes of our Angular application and is needed by the Scully runtime.Running the Scully executable for the first time will prompt you to collect anonymous errors to improve its services.
- Run the following command to serve our blog:
npx scully serve --project my-blog
The preceding command will start two web servers: one that contains the static prerendered version of our website built using Scully and another that is the Angular live version of our application:

Figure 2.5 – Serving our application
If we open our browser and navigate to http://localhost:1668, we will not see any blog posts. A blog post created with Scully is not returned in the available$ property of ScullyRoutesService unless we publish it. To publish a blog post, we do the following:
- Navigate to the
mdfilesfolder that Scully created and open the only.mdfile that you will find. The name and contents may vary for your file because it is based on the date Scully created it:--- title: 2023-06-22-posts description: 'blog description' published: false slugs: - ___UNPUBLISHED___lj738su6_7mqWyfNdmNCwovaCCi2tZItsDKMPJGcG --- # 2023-06-22-postsScully has defined a set of properties between the closing and ending
---lines at the top of the file representing metadata about the blog post. You can also add your own as key-value pairs.
- Delete the
slugsproperty and set thepublishedproperty totrue:--- title: 2023-06-22-posts description: 'blog description' published: true --- # 2023-06-22-posts - Run the following command to force Scully to regenerate the routes of our application:
npx scully --project my-blogWe need to execute the previous command every time we make a change in our blog-related files.
- Execute the
npx scully serve --project my-blogcommand and navigate to preview the generated website.
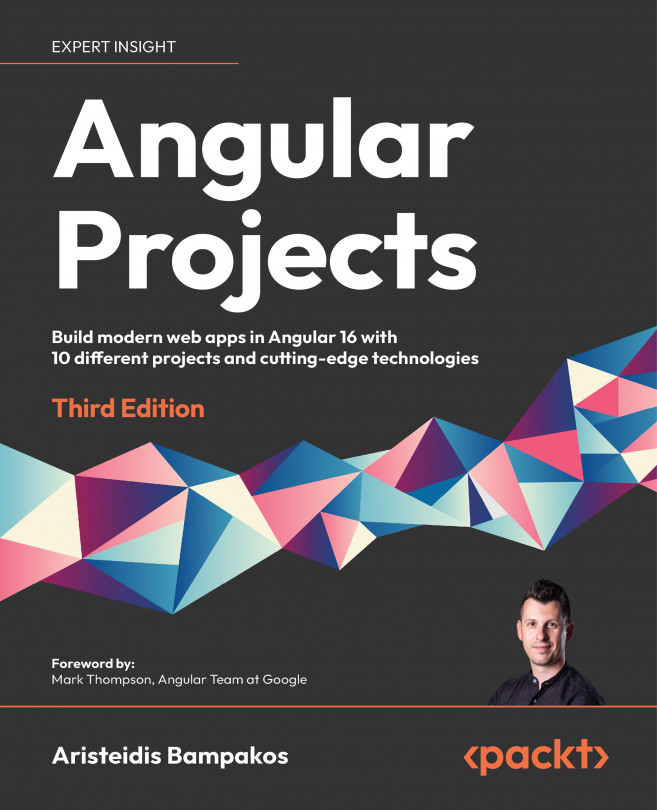
We can now see one blog post, the default one that was created when we installed Scully. Let’s create another one:
- Run the following
generatecommand of the Angular CLI:ng generate @scullyio/init:post --name="Angular and Scully"In the preceding command, we use the
@scullyio/init:postschematic, passing the name of the post that we want to create as an option.
- Set the target folder for the new blog post to
mdfiles:What's the target folder for this post? (blog) - Scully will create a Markdown file named
angular-and-scully.mdinside the specified folder. Open that file and update its content to be the same as the following:--- title: 'Angular and Scully' description: 'How to build a blog with Angular and Scully' published: true --- # Angular and Scully Angular is a robust JavaScript framework that we can use to build excellent and performant web applications. Scully is a popular static website generator that empowers the Angular framework with Jamstack characteristics. You can find more about them in the following links: - https://angular.io - https://scully.io - https://www.jamstack.org - Run
npx scully --project my-blogto create a route for the newly created blog post. Scully will also update thescully-routes.jsonfile with the new route.
If we preview our application now, it should look like the following:
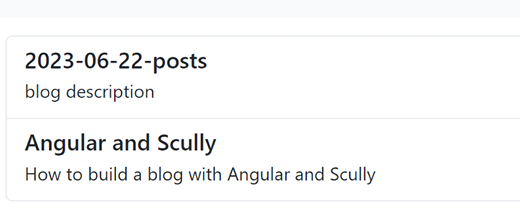
Figure 2.6 – List of blog posts
If we click on one of the blog items, we will navigate to the selected blog post. The content that is currently shown on the screen is a prerendered version of the blog post route:
Figure 2.7 – Blog post details
To verify that, navigate to the dist folder of your Angular project, where you will find two folders:
my-blog: This contains the Angular live version of our application. When we execute theng buildAngular CLI command, it builds our application and outputs bundle files in this folder.static: This contains a prerendered version of our Angular application generated from Scully when we run thenpx scully --project my-blogcommand.
If we navigate to the static folder, we will see that Scully has created one folder for each route of our Angular application. Each folder contains an index.html file, which represents the component that is activated from that route.
The contents of the index.html file are auto-generated by Scully, and behave as if we run our application live and navigate to that component.
Now you can take your Angular application, upload it to the CDN or web server of your choice, and you will have your blog ready in no time! All you will have to do then will be to exercise your writing skills to create excellent blog content.