

Now that you know how to create React components with and without a state, we can start composing React components together and build more complex user interfaces. In fact, it's time for us to start building our web application, called Snapterest, that we discussed in Chapter 1, Installing Powerful Tools for Your Project. While doing this, we'll learn how to plan your React application and create composable React components. Let's begin.
Before you start writing code for your web application, you need to think about the problems that your web application is going to solve. It's very important to understand that defining the problem as clearly and as early as possible is the most important step toward a successful solution—a useful web application. If you fail to define your problem early in your development process, or you define it inaccurately, then later on you'll have to stop, rethink about what you're doing, throw away a piece of the code that you have already written, and write a new one. This is a wasteful approach, and as a professional software developer your time is very valuable, not only to you but also to your organization, so it's in your best interests to invest it wisely. Earlier in this book, I stressed on the fact that one of the benefits of using React is code reuse, which means that you'll be able to do more in less time. However, before we take a look at the React code,...
There are two simple guidelines we need to follow when planning your React application:
Each React component should represent a single user interface element in your web application. It should encapsulate the smallest element possible that can potentially be reused.
Multiple React components should be composed into a single React component. Ultimately, your entire user interface should be encapsulated in one React component.
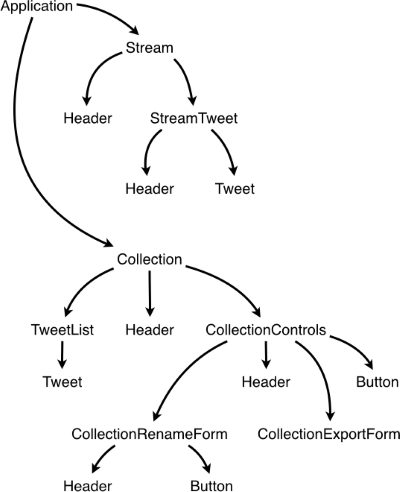
Diagram of our React components hierarchy
We'll begin with our topmost React component, Application. It will encapsulate our entire React application, and it will have two child components: the Stream and Collection components. The Stream component will be responsible for connecting to a stream of tweets, and receiving and displaying the latest tweet. The Stream component will have two child components: StreamTweet and Header. The StreamTweet component will be responsible for displaying the latest tweet. It will be composed of the Header and...
Let's start by editing our application's main JavaScript file. Replace the contents of the ~/snapterest/source/app.js file with the following code snippet:
var React = require('react');
var ReactDOM = require('react-dom');
var Application = require('./components/Application.react');

ReactDOM.render(<Application />, document.getElementById('react-application'));
There are only four lines of code in this file, and as you can guess, they provide document.getElementById('react-application') as a deployment target for the <Application /> component and render <Application /> to the DOM. The whole user interface for our web application will be encapsulated in one React component, Application.
Next, navigate to ~/snapterest/source/components/ and create the Application.react.js file inside this directory. All of our React components will have their filenames ending with react.js. This convention allows us to easily distinguish between React and...
In this chapter, we learned how to solve a problem with React. We started by breaking down the problem into smaller individual problems and then discussed how we can address them using React. Then, we created a list of React components that we needed to implement. Finally, we created our first composable React component and learned how a parent component interacts with its child components. In the next chapter, we'll implement our child components and learn about React's lifecycle methods.
The rest of the chapter is locked
You have been reading a chapter from
React.js EssentialsPublished in: Aug 2015Publisher: PacktISBN-13: 9781783551620
Register for a free Packt account to unlock a world of extra content!
A free Packt account unlocks extra newsletters, articles, discounted offers, and much more. Start advancing your knowledge today.
undefined
Unlock this book and the full library FREE for 7 days
Get unlimited access to 7000+ expert-authored eBooks and videos courses covering every tech area you can think of
Renews at €14.99/month. Cancel anytime