Search icon
Arrow left icon
All Products
Best Sellers
New Releases
Books
Videos
Audiobooks
Learning Hub
Newsletters
Free Learning
Arrow right icon
Frontend Development Projects with Vue.js 3 - Second Edition

You're reading from  Frontend Development Projects with Vue.js 3 - Second Edition

Product type Book
Published in Mar 2023
Publisher Packt
ISBN-13 9781803234991
Pages 628 pages
Edition 2nd Edition
Languages
Authors (4):
Maya Shavin Maya Shavin
Profile icon Maya Shavin
Raymond Camden Raymond Camden
Profile icon Raymond Camden
Clifford Gurney Clifford Gurney
Profile icon Clifford Gurney
Hugo Di Francesco Hugo Di Francesco
Profile icon Hugo Di Francesco
View More author details

Table of Contents (20) Chapters

Preface 1. Part 1: Introduction and Crash Course
2. Chapter 1: Starting Your First Vue Project 3. Chapter 2: Working with Data 4. Chapter 3: Vite and Vue Devtools 5. Part 2: Building Your First Vue App
6. Chapter 4: Nesting Components (Modularity) 7. Chapter 5: The Composition API 8. Chapter 6: Global Component Composition 9. Chapter 7: Routing 10. Chapter 8: Animations and Transitions 11. Part 3: Global State Management
12. Chapter 9: The State of Vue State Management 13. Chapter 10: State Management with Pinia 14. Part 4: Testing and Application Deployment
15. Chapter 11: Unit Testing 16. Chapter 12: End-to-End Testing 17. Chapter 13: Deploying Your Code to the Web 18. Index 19. Other Books You May Enjoy

Routing

In the previous chapter, you learned about sharing common logic between components using mixins, creating app plugins, and other approaches to creating components, such as dynamic and functional components.

This chapter will guide you through how routing and Vue Router work. You will learn how to set up, implement, and manage the routing system in your app with Vue Router. You will look at dynamic routing for passing parameter values and nested routes for better reusability in complex applications. In addition, we will also look at JavaScript Hooks, which are helpful for authentication and error handling.

By the end of this chapter, you will be ready to handle static and dynamic routing in any Vue application.

This chapter covers the following topics:

  • Understanding routing
  • Understanding Vue Router
  • Exploring the RouterView element
  • Defining the routes
  • Setting up a default layout for your app
  • Setting up navigation links with RouterLink
  • ...

Technical requirements

In this chapter, you need to set up a basic Vue project following the instructions in Chapter 1, Starting Your First Vue Project. It’s recommended to create a single file Vue component to practice working with the examples and concepts mentioned easily.

You can find this chapter’s source code here: https://github.com/PacktPublishing/Frontend-Development-Projects-with-Vue.js-3/tree/v2-edition/Chapter07.

Understanding routing

Routing is one of the most essential and primary parts of building dynamic web applications. You may be familiar with the word in its everyday context. It is the process of getting a user to their desired location. Users who enter website.com/about into their URL bar will be redirected to the About page.

In web development, routing is the matching mechanism by which we decide how to connect HTTP requests to the code that handles them. We use routing whenever there is a need for URL navigation in our application. Most modern web applications contain a lot of different URLs, even single-page ones.

Thus, routing creates a navigation system and helps users quickly move around our application and the web. With Single-Page Applications (SPAs), routing allows you to smoothly navigate within an application without the need for page refreshing.

In short, routing is a way for an application to interpret what resource users want based on the URL provided. It is...

Understanding Vue Router

As stated in the Vue.js documentation, Vue Router is the official router service for any Vue.js application. It provides a single-entry point for communication between components with routes and therefore effectively controls the application’s flow, regardless of the user’s behavior.

Installing Vue Router

Vue Router is not installed by default; however, it can easily be enabled when creating an application with Vite. Create a new application by running the following command:

npm init vue@3

Select the Yes option for adding Vue Router to the project as shown in Figure 7.1:

Figure 7.1 – Adding Vue Router during creating a project

Figure 7.1 – Adding Vue Router during creating a project

Note

If you would like to add Vue Router to an existing Vue.js application, you can install it as an application’s dependency with the following command:

npm install vue-router

The next step is understanding how Vue Router synchronizes the browser URL and the...

Exploring the RouterView element

RouterView is a Vue component whose job is to do the following:

  • Render different child components
  • Mount and unmount itself automatically at any nesting level, depending on the route’s given path

Without RouterView, it is almost impossible to render dynamic content correctly for users at runtime. For example, when a user navigates to the Home page, RouterView knows and only generates the content related to that page.

Let’s see how we can pass props to the view through RouterView.

Passing props to view

Since RouterView is a component, it can also receive props. The only prop it receives is name, which is the same name registered in the corresponding route’s record defined in the router object at the initialization phase.

The Vue engine automatically passes any other additional HTML attributes to any view component that RouterView renders.

Take the following RouterView component with a "main-app...

Setting up Vue Router

When we add Vue Router to our project, Vite creates and adds a router folder to the /src directory with a single auto-generated index.js file. This file contains the necessary configurations for our router system, which we will explore in the next section.

In the src/main.js file, we import the defined configuration object and uses the Vue instance method use() to install the router system into the application, as seen in the following code:

import { createApp } from 'vue'
import App from './App.vue'
import router from './router'
const app = createApp(App)
app.use(router)

app.use is an instance method with a built-in mechanism to prevent you from installing a plugin more than once.

After executing app.use(router), the following objects are available for access in any component:

  • this.$router: The global router object
  • this.$route: The current route object points to the element in context

If you are using...

Defining the routes

In a web application, a route is a URL path pattern. Vue Router will map it to a specific handler. This handler is a Vue component, defined and located in a physical file. For example, when the user enters the localhost:3000/home route, if you map the HomeView component to this specific route, the routing system knows how to render HomeView content accordingly.

As seen in Figure 7.2, it is crucial to set up routes (or paths) for navigation within the application; otherwise, your application will display as empty.

Each route is an object literal that uses the RouteRecordRaw interface with the following properties:

interface RouteRecordRaw = {
  path: string,
  component?: Component,
  name?: string, // for named routes
  components?: { [name: string]: Component }, // for named
    views
  redirect?: string | Location | Function,
  props?: boolean | Object | Function,
 &...

Setting up a default layout for your app

For our template to be functional, it should also contain the <RouterView/> element. One standard setup is to have a navigation menu, <nav>, within the template and RouterView underneath. That way, the content changes between pages while the header menu stays the same.

Navigate to App.vue and ensure that your template has the following code:

<template>
  <header>
    <nav>
      <RouterLink to="/">Home</RouterLink>
      <RouterLink to="/about">About</RouterLink>
    </nav>
  </header>
  <RouterView />
</template>

Your output should now contain a static header with two navigation links – Home and About – while the content changes depending on the route:

Figure 7.7 – The Home page’s content

Figure 7.7 –...

Setting up navigation links with RouterLink

As we know, RouterView oversees rendering the correct active view content relative to the URL path; RouterLink, on the other hand, oversees mapping the routes to navigable links. RouterLink is a Vue component that helps users navigate within an app with routing enabled. RouterLink by default renders an anchor tag, <a>, with a valid href link generated by its to prop.

In our example app generated by Vite, since there are two routes pre-populated, there are also two RouterLink instances added to the <template> section of App.vue as the header navigation menu:

<nav>
  <RouterLink to="/">Home</RouterLink>
  <RouterLink to="/about">About</RouterLink>
</nav>

Since we are using the web history mode with createWebHistory(), the to prop of each RouterLink should receive an identical value with the path property declared in the targeted route object (as...

Passing route parameters

Previously we learnt each route was a standalone view and did not need to pass or connect any data to the other routes. But Vue Router doesn’t limit the power of routing to only this. With named routes, we can also easily enable data communication between routes.

In our example app, we want our about page to be able to receive a data string called user as the user’s name from the link triggered. Prior to Vue Router 4.1.4, we can achieve this feature by changing the to prop from a string literal to an object literal with a name and params properties, as shown below:

<RouterLink :to="{ name: 'about', params: { user: 'Adam' }}">
  About
</RouterLink>

This change informs the router to pass the desired parameters to the About page when users click on the targeted link. These additional parameters are not visible on the rendered href link, as shown in the following screenshot:

...

Understanding Router Hooks

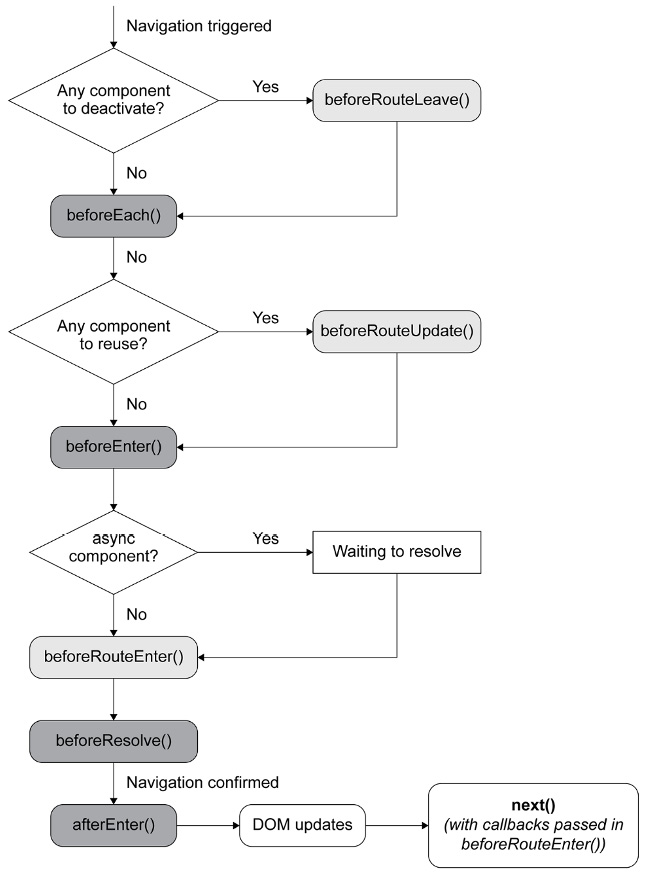
To understand Vue Router Hooks, first, we need to understand the general flow of route navigation as described in the following diagram:

Figure 7.19 – Navigation resolution flow diagram

Figure 7.19 – Navigation resolution flow diagram

Once navigation is triggered for a certain route, Vue Router provides several primary navigation guards, or Hooks, for developers to guard or intercept that navigation process. These guards can be hooked either globally or in the component, depending on the type.

Some examples are as follows:

  • Globally: beforeEach, beforeResolve, and afterEach
  • Per component: beforeEnter
  • In-component: beforeRouteUpdate, beforeRouteEnter, and beforeRouteLeave

For Composition API, those in-component Hooks are available as onBeforeRouteUpdate, and onBeforeRouteLeave. There is no onBeforeRouteEnter since this is equivalent to using the setup() (or script setup) itself.

As seen in Figure 7.19, the Vue engine considers navigation only...

Decoupling Params with Props

In the index.js file, let’s adjust the configuration of the about route with an additional property called props.

By setting this property’s value as a function which accepts a route and returns an object containing an user field of value based on route.query.user, the router will automatically understand and map any route.query parameters into the props of the view component accordingly:

{
    path: '/about',
    name: 'about',
    component: () => import('../views/AboutView.vue'),
     props: route => ({ user: route.query.user || 'Adam' })
}

In the AboutView.vue file, we will define a prop type user as follows:

<script setup>
import { defineProps } from 'vue'
const props = defineProps({
    user: String
})
</script>

And in the <template> section,...

Dynamic routing

If there is a lot of data that follows the same format, such as a list of users or a list of messages, and it’s required to create a page for each of them, so we need to use a routing pattern. With a routing pattern, we can create a new route dynamically from the same component based on some additional information.

For example, we want to render the User view component for every user but with different id values. Vue Router provides us with the ability to use dynamic segments denoted by a colon (:) to achieve dynamic routing.

Instead of using params, which doesn’t persist its value when you refresh the page or appear in the URL, we define the required params directly in the path as follows:

{
    path: '/user/:id',
    name: 'user',
    component: () => import('../views/User.vue'),
    props: true,
  }

In the preceding...

Catching error paths

Other important routes that we always need to remember to handle besides the Home page ('/') include error routes, such as 404 Not found when the URL path doesn’t match any registered path, among others.

For 404 Not found, we can use the Regex pattern, /:pathMatch(.*)*, which stands for matching every other URLs, to collect all the cases that don’t match the definted routes. The router’s configuration should be located at the end of the array routes to avoid matching the wrong path:

{
    path: '/:pathMatch(.*)*',
    name: '404',
    component: () => import('../views/404.vue'),
  }

When we type the wrong path for /users, the output will be as follows:

Figure 7.34 – Redirecting to 404 when the /users path is not found

Figure 7.34 – Redirecting to 404 when the /users path is not found

In this section, we looked at how to use the Regex pattern to create...

Nested routes

Many applications are composed of components that consist of several multiple-level nested components. For example, /user/settings/general indicates that a general view is nested in the settings view and this settings view is nested within the user view. It represents the General information section of a user’s settings page.

Most of the time, we want the URL to correspond to such a structure, as demonstrated in the following screenshot:

Figure 7.36 – User with two nested views – Info and Extra

Figure 7.36 – User with two nested views – Info and Extra

Vue Router makes it easy to achieve this structure using nested route configurations and the RouterView component.

Let’s go back to the User.vue view in our previous example (located in ./src/views/) and add a nested RouterView component in the <template> section:

<div>
  <h1>About a user: {{$route.params.id}}</h1>
  <RouterLink :to="`/user/${$route.params.id}...

Using layouts

There are many ways to implement layouts in a Vue application. One of them is using a slot and creating a static wrapper layout component on top of RouterView. Despite its flexibility, this approach results in a heavy performance cost, both in terms of the unnecessary recreation of the component and in the extra data fetching required for every route change.

In this section, we will discuss a better approach, which is to take advantage of the power of the dynamic component. The components are as follows:

<component :is="layout"/>

Let’s create an src/layouts folder with a default layout component. This component has a simple header navigation, a main slot to render the actual content (which is whatever <RouterView> renders), and a footer:

<template>
  <div class="default">
    <nav>
      <RouterLink to="/">Home</RouterLink...

Summary

Throughout this chapter, we have learned about the most basic and useful functionalities offered by Vue Router for building routing for any Vue.js application in an effective and organized way.

RouterView and RouterLink allow app developers to easily set up the navigation paths to their related views and maintain the SPA concept. The fact that they are Vue components themselves provides us as developers with the benefits of the Vue architecture, giving us flexibility in implementing nested views or layouts.

Defining the route as an object with different properties simplifies the architecture process, including refactoring existing paths and adding a new route to the system. Using router parameters and patterns provides dynamic routing with reusable views and enables communication and data preservation between pages.

Finally, with Hooks, we saw how we can intercept the navigation flow, set up authentication where needed, redirect to the desired path, or even load and...

lock icon The rest of the chapter is locked
You have been reading a chapter from
Frontend Development Projects with Vue.js 3 - Second Edition
Published in: Mar 2023 Publisher: Packt ISBN-13: 9781803234991
Register for a free Packt account to unlock a world of extra content!
A free Packt account unlocks extra newsletters, articles, discounted offers, and much more. Start advancing your knowledge today.
Unlock this book and the full library FREE for 7 days
Get unlimited access to 7000+ expert-authored eBooks and videos courses covering every tech area you can think of
Renews at €14.99/month. Cancel anytime}