

In GROME, scenes are created using combinations of fractal filters, fluid erosion, and hands-on brushing. Making natural looking terrains is easier in Version 3.1 thanks to the addition of flowmaps which simulate nature's process of water erosion. Heightmaps are edited from the Tools panel on the right-hand side via the Modifiers tab.
The drop-down box directly under the Modifier tab selects between three toolsets: Heightmap, Heightmap Brushes, and Procedural Heightmap. We won't go over every tool in detail but instead present a summary of what is available and focus on how some of them can be applied to level design.
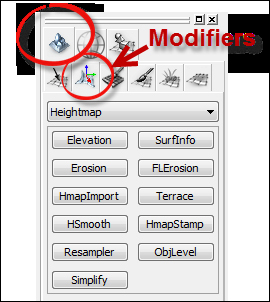
Some of these tools are duplicated for the Heightmap Brush, the only difference being the control of the area and brush shape.
These operations work across selected zones. The sort of things you can do here includes:
Import a heightmap to a specific location
Set elevation to an absolute value, or scale it
Apply surface steps or bevels with a Terrace filter
Smooth out noise
Increase or decrease terrain resolution
Generate a 3D model of terrain for use in mobile platforms
Flatten terrain to fit under placed 3D objects
HmapStamp tool is a clone tool that lets you copy one area to another
We can make use of the Heightmap layer stack to composite different effects, adding Fractal Mountains to one layer, hand painting a river basin in another. For Volcano Island we can add the signature volcano to a separate layer and keep it separate.
To illustrate how these layers interact here's a quick exercise:

Rename the layers by right-clicking and choosing Edit label. Name each layer something like the following:
Base (will contain our empty heightmap)
Fractal (contains procedural content)
Brush (hand-painted elements)
Now make sure that only the top layer Brush is "armed" for drawing because we're going to use a Heightmap Brush to paint directly onto the zone. If we had all three with red-dot arm icons then our brush would write to...
A number of useful operations are available when the Selection button is active (click to toggle the Selection mode). You must have something selected for this to work, a small + will appear to indicate you can navigate the selection.

GROME provides powerful masking tools commonly found in art applications. In the Workspace panel find the layer stack mode's drop-down list; from here choose Selection Masks. Clicking on the "plus page" button adds a new mask layer.
As always we must assign a zone to the layer before we can do anything with it, so make a zone active (press Ctrl and click on the viewport) and right-click on the layer and Assign to selection.
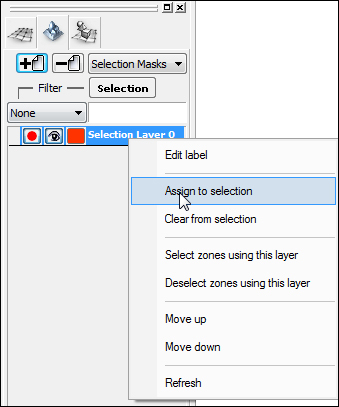
The mask layers needs to be armed for use. Any masked areas will show by default as a red tinted area.
Once we have a layer for a mask we usually want to put something in it. The Tools panel has a Selection tab containing all the tools for creating a mask. A drop-down control under the tab helps choose between Brush and Procedural tools. The interface is nice and consistent in this manner.
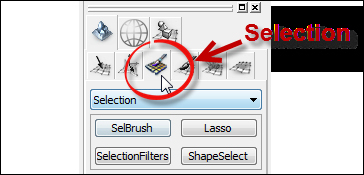
The brush-based selection tools provide methods for painting masks directly onto terrain. As with other brush tools the square bracket keys are handy shortcuts for changing...
Now we've looked at all the pieces we need to create the terrain for our Dr. Yes game project. There's many ways we could approach this but as game developers are keen to say, "There are many ways to skin a cat, but you only get to pick one".
Let's draw up a work plan for our proposed map:
The island positioned around the map center, the terrain resolution is set to 1,024 (for a production map we might increase this to 2,048 or even 4,096 but this will take longer to work with).
Create a mask for the island.
Apply heightmap fractals to one layer, then use a brush to bring out island features we want to enhance.
Create masks for rivers and elevated areas.
Finally, we'll add natural features such as flowmaps and ground noise to the top of the layer stack. We do this in case we make changes lower down.
Let's start by creating two mask layers on our workspace panel. We'll call one "Island" and the other "Rivers". To aid drawing we'll change the color...
Once we're happy with the overall shape of the island we'll start applying the many texture layers. This is the subject of the next chapter and time to start thinking more about the technical capabilities of our destination game engines. In this chapter, we looked at heightmaps and the wide range of tools in GROME. We looked at how layers interact and modify each other then we went through the creation of selection masks and tools.
The rest of the chapter is locked
You have been reading a chapter from
Grome Terrain Modeling with Ogre3D, UDK, and Unity3DPublished in: Feb 2013Publisher: ISBN-13: 9781849699396
Register for a free Packt account to unlock a world of extra content!
A free Packt account unlocks extra newsletters, articles, discounted offers, and much more. Start advancing your knowledge today.
undefined
Unlock this book and the full library FREE for 7 days
Get unlimited access to 7000+ expert-authored eBooks and videos courses covering every tech area you can think of
Renews at €14.99/month. Cancel anytime