Reader small image

You're reading from  Grome Terrain Modeling with Ogre3D, UDK, and Unity3D

Product typeBook
Published inFeb 2013
Reading LevelIntermediate
Publisher
ISBN-139781849699396
Edition1st Edition
Languages
Right arrow
Author (1)
Richard A. Hawley
Richard A. Hawley
author image
Richard A. Hawley

Richard Hawley started programming in the early 1980s at the start of the home computer craze with the Sinclair ZX-81. Before leaving high school he had worked on three game projects for Assassin Software and later worked on conversions of classic strategy board games for 8- to 16-bit machines. He went on to develop end-user tools for popular flight simulations including Empire Interactives Enemy Engaged helicopter series and the highly successful Origin Janes Longbow series (MissioneerPlus). Hes the director of Tricubic Studios, a small UK company dedicated to creating simulation and training environments using off-the-shelf 3D engines including Unity and Leadwerks. Together with technical artist David Hopkinson (Total War: English Civil War conversion) and physics guru Fred Naar (creator of Helicopter Total Realism for Microsoft Flight Simulator X) they are collectively known for their work on helicopter simulations.
Read more about Richard A. Hawley

Right arrow

Chapter 2. GROME Workspace

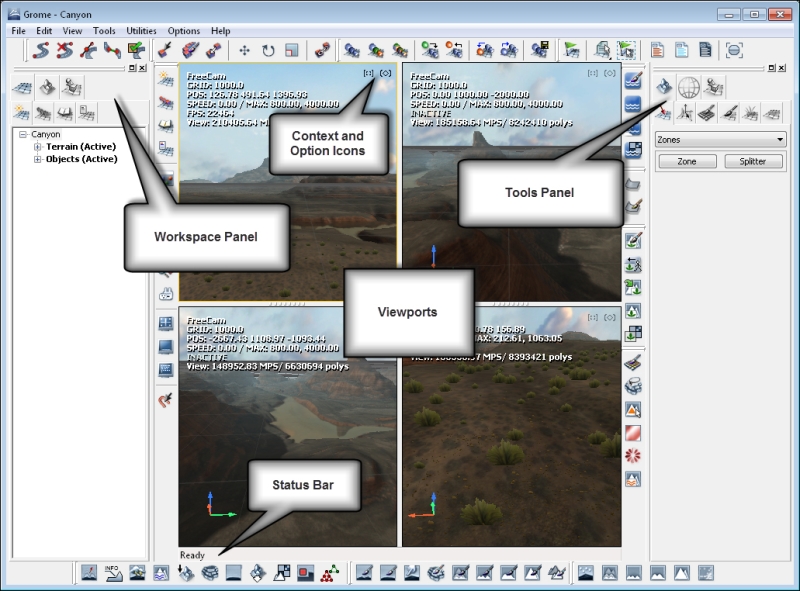
With pencils sharpened and a steaming pot of fresh coffee we're now ready to jump into the GROME interface. The user interface might appear intimidating with dozens of icons framing the window. We're going to focus on the main parts of the interface shown in the image as follows:

Viewports


The viewports have resizable dividers; you can drag them around individually and toggle between the split and tabbed views by double-clicking on them.

Located in the top-right corner of every viewport are two icons shown in the following screenshot. The left icon brings up the "Context" menu, this shows operations applicable to the currently selected object. The second is the "View" menu that displays options for adjusting the camera and rendering modes (textured, wireframe, lit, fog, top, left, perspective, walk, and so on).

When the viewport is active, standard WSAD keys move the camera. Holding down Shift increases the movement speed. To move the camera up and down use the E and C keys respectively. There are many useful keyboard shortcuts for navigating scenes. You can view these by going to Menu Options | Customize Keyboard; choose Group | Application and change the drop-down box that reads Category to Viewport. This will display a list of all keyboard shortcuts for the camera...

Workspace panel


All of the editing functions we'll be using are located in two main areas of the interface; the Tool panel and the Workspace panel. Both of these panels are headed by two rows of tabs which we make good use of, so get familiar with them.

The first row is like a master mode and the second row of tabs gives access to the submode. The Workspace panel is located to the left-hand side of the viewports in the default interface layout.

Workspace tab

Workspace is an overview of what our current scene contains, scene settings, layers, and any objects we're using.

Scene tab

The scene tab allows access to how a scene is rendered and contains settings for the camera field of view (FOV), camera range, lighting, and fog. This is illustrated in the following image:

We can adjust how a fog is rendered by changing the color and range through the scene.

  1. Click on the Workspace master mode (first tab icon).

  2. Select the Scene tab to bring up the scene tree.

  3. Right-click on the Fog node and select Properties...

Tools panel


Located to the right-hand side of the viewport, the tools panel has a lot of features packed into it. Hosting all the content-editing functions, the tools panel is headed by three tabs to select from three kinds of editing. They are given as follows:

  • Terrain

  • World (Roads)

  • Objects (instanced entities)

Most of our work will be done with the Terrain tools. Working from the left-hand side to the right-hand side, the second row of icons are: Create (zone), Modifiers, Selection, Texturing, Details, and Water. This roughly follows the workflow in a GROME project. The Tool panel icons are shown as follows:

Workflow/creation path


Creating landscapes isn't a rigidly defined process. If you had to define a flow through the creation process it would look like the following diagram:

Starting with the creation of zones, we edit our heightmaps, paint and texture the landscape before adding landscape features such as roads, rivers, and vegetation. Finally, we export everything. Depending on our destination platform we might skip one or more of these stages and use native 3D game engine features for them. If the scope of the game is small you might use GROME for heightmap creation and painting everything else in the Unity 3D editor.

It is possible at any time to go back and change the density of a terrain grid if you need more (or less) detail.

Tip

Document the export process

Make notes of all the export settings taking screenshots if necessary. You will forget which settings are needed for a particular build. Someone else might need to export the project and will thank you for it. Artists should have...

Zones


Zones are containers for terrains, objects, masks, and roads, but importantly they define size and terrain resolution. Each one can have its own properties. This allows us to create landscapes with variable amounts of detail according to the needs of a game. You can create zones anywhere in the scene; they don't need to be contiguous. Creating very long narrow terrains that follow the length of a river are possible; an "on-rails" game that follows a long winding path does not have a huge regular terrain grid. However, for simple exporting to game engines it is best if we stick to a square arrangement, as game editors don't natively support asymmetric layouts.

The Zone toolbox tab is shown in the following screenshot:

We can create zones in several ways; the easiest is entering size parameters and using the mouse to define an area called the Active Creation Grid in the scene.

Click on the Zone button to activate the creation process. You'll see the scene divided by a grid (the scale...

Example – volcano island


As we have a blank project ready to roll, the first thing we need for it (or any new project) is some terrain to play with. Terrain grids are constructed from zones and we are going to start with the first button on the toolbar Create. To create terrain for our game we must start with zones.

Our volcano project will need a high level of detail, we're going to make an island of approximately 10 square kilometers. Since we want it to be reasonably detailed, we'll create it with the following values for a 5 square kilometer zone:

Size=5120, Tile no.=512, Tile size=10

Note that our map is not exactly 5 km since we like to use nice computing numbers which are a power of 2. The map measures exactly 5.12 km.

Next we'll mark out a quad of four zones (2 x 2) which will be the base of our map. When we're done with the values and the region we've marked, click on the Create button. A layer is automatically created and armed in the Workspace panel on the right-hand side.

We can...

Summary


In this chapter, we explored the main areas of the interface, the layer-stack and Tool panel. We went through the functions for creating zones including splitting, modifying, using layers and started work on a map for a video game based on an island. In the next chapter, we will look at the heightmap toolset using brushes and procedural functions.

lock icon
The rest of the chapter is locked
You have been reading a chapter from
Grome Terrain Modeling with Ogre3D, UDK, and Unity3D
Published in: Feb 2013Publisher: ISBN-13: 9781849699396
Register for a free Packt account to unlock a world of extra content!
A free Packt account unlocks extra newsletters, articles, discounted offers, and much more. Start advancing your knowledge today.
undefined
Unlock this book and the full library FREE for 7 days
Get unlimited access to 7000+ expert-authored eBooks and videos courses covering every tech area you can think of
Renews at €14.99/month. Cancel anytime

Author (1)

author image
Richard A. Hawley

Richard Hawley started programming in the early 1980s at the start of the home computer craze with the Sinclair ZX-81. Before leaving high school he had worked on three game projects for Assassin Software and later worked on conversions of classic strategy board games for 8- to 16-bit machines. He went on to develop end-user tools for popular flight simulations including Empire Interactives Enemy Engaged helicopter series and the highly successful Origin Janes Longbow series (MissioneerPlus). Hes the director of Tricubic Studios, a small UK company dedicated to creating simulation and training environments using off-the-shelf 3D engines including Unity and Leadwerks. Together with technical artist David Hopkinson (Total War: English Civil War conversion) and physics guru Fred Naar (creator of Helicopter Total Realism for Microsoft Flight Simulator X) they are collectively known for their work on helicopter simulations.
Read more about Richard A. Hawley