iOS 17 Programming for Beginners: Unlock the world of iOS development with Swift 5.9, Xcode 15, and iOS 17 – your path to App Store success, Eighth Edition
Welcome to iOS 17 Programming for Beginners. I hope you will find this a useful introduction to creating and publishing iOS 17 apps on the App Store.
In this chapter, you’ll download and install Xcode on your Mac. Then, you’ll explore the Xcode user interface. After that, you’ll create your first iOS app and run it in Simulator. Finally, you’ll run your app on an iOS device.
By the end of this chapter, you will know how to create an iOS app, how to run it in Simulator, and how to run in on an iOS device.
The following topics will be covered in this chapter:
Downloading and installing Xcode from the App Store
Exploring the Xcode user interface
Running your app in Simulator
Running your app on an iOS device
Technical requirements
To do the exercises for this chapter, you will need the following:
An Apple Mac computer (Apple Silicon or Intel) running macOS 13 Ventura or macOS 14 Sonoma
An Apple ID (if you don’t have one, you will create one in this chapter)
Optionally, an iOS device running iOS 17
The Xcode project for this chapter is in the Chapter01 folder of the code bundle for this book, which can be downloaded here:
You’ll start by downloading Xcode, Apple’s integrated development environment (IDE) for developing iOS apps from the App Store, in the next section.
The size of the download is very large (10.10 GB at the time of writing) so it may take a while to download. Ensure that you have enough disk space prior to downloading.
Downloading and installing Xcode from the App Store
Xcode is Apple’s IDE for developing macOS, iOS, iPadOS, watchOS, tvOS, and visionOS apps. You’ll need to download and install Xcode prior to writing your first app. Follow these steps:
Choose App Store from the Apple menu.
In the search field in the top-right corner, type Xcode and press the Return key.
You’ll see Xcode in the search results. Click Get and then click Install.
If you have an Apple ID, type it in the Apple ID text box and enter your password when prompted. If you don’t have one, click the Create Apple ID button and follow the step-by-step instructions to create one:
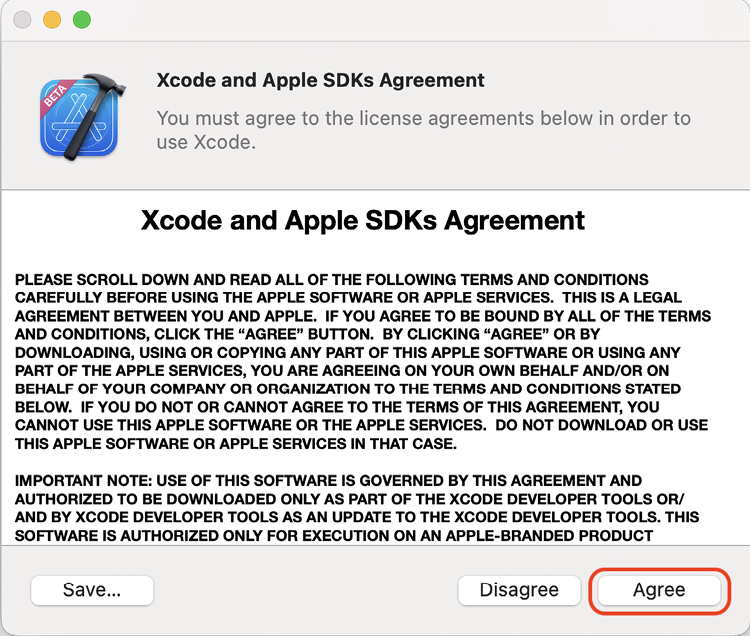
Once Xcode has been installed, launch it. You’ll see a License Agreement screen. Click on Agree:
Figure 1.2: License agreement screen
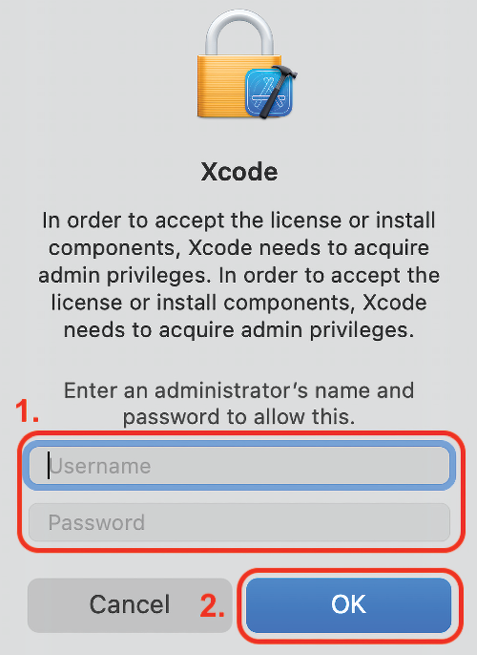
You’ll be prompted to enter your Mac’s administrator username and password. Once you have done so, click OK:
Figure 1.3: Prompt for administrator username and password
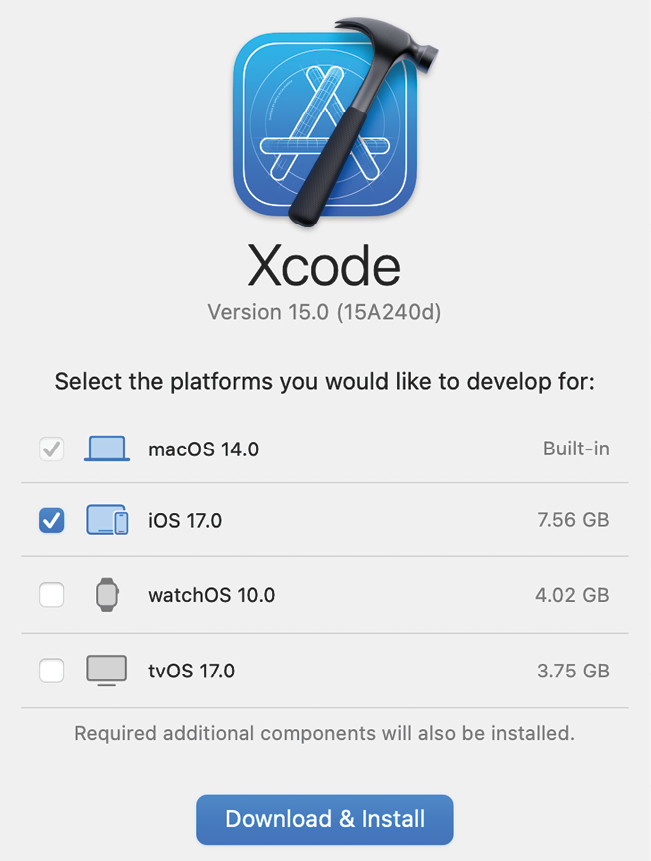
You’ll see a screen showing you the available development platforms. You just need macOS and iOS for now. Leave the settings at their default values and click on Download and Install:
Figure 1.4: Development platforms screen
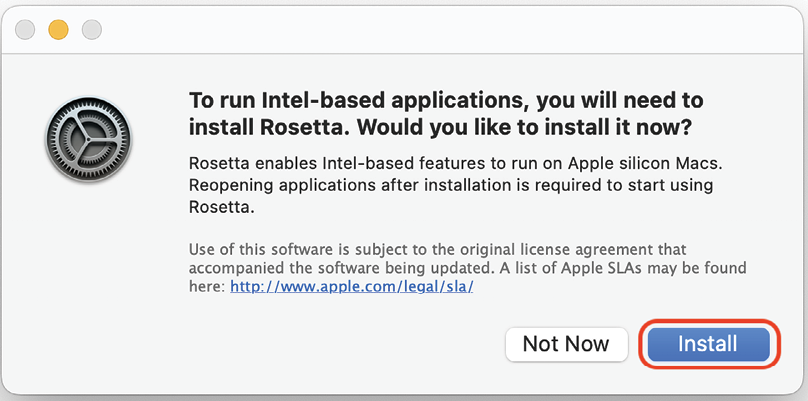
If you are using an Apple Silicon Mac and have not yet installed Rosetta, which allows Intel-based Mac apps to run on Apple Silicon Macs, you’ll be prompted to install it now. Click on Install:
Figure 1.5: Rosetta prompt
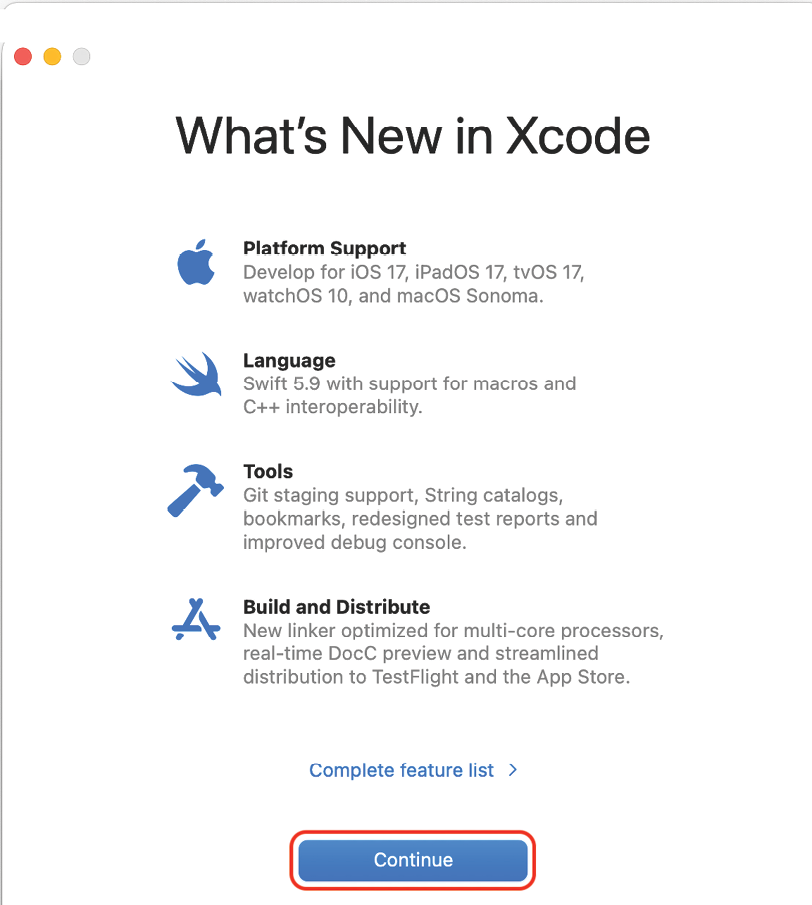
You’ll see a What’s New in Xcode screen. Click on Continue:
Figure 1.6: What’s New in Xcode screen
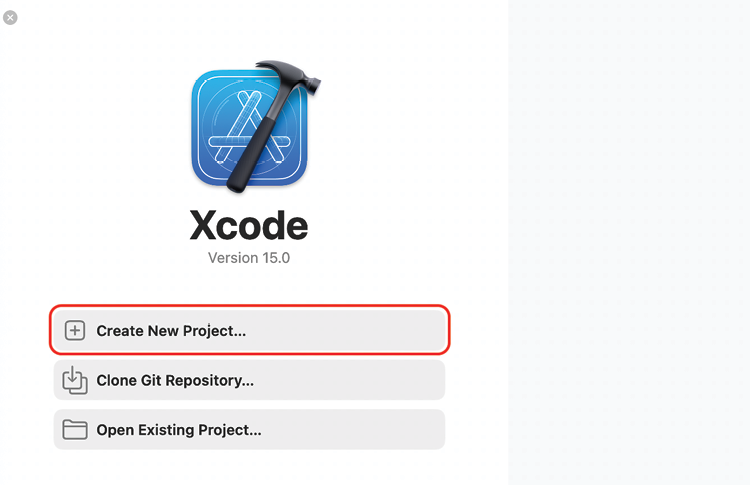
You’ll see the Welcome to Xcode screen. Click on Create New Project... in the left-hand pane:
Figure 1.7: Welcome to Xcode screen
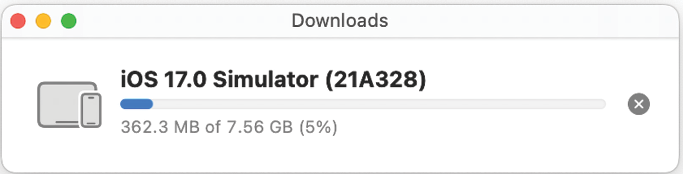
Xcode will start to download iOS 17.0 Simulator automatically. Note that you will not be able to run any apps on Simulator until this process has been completed:
Figure 1.8: Simulator download progress bar
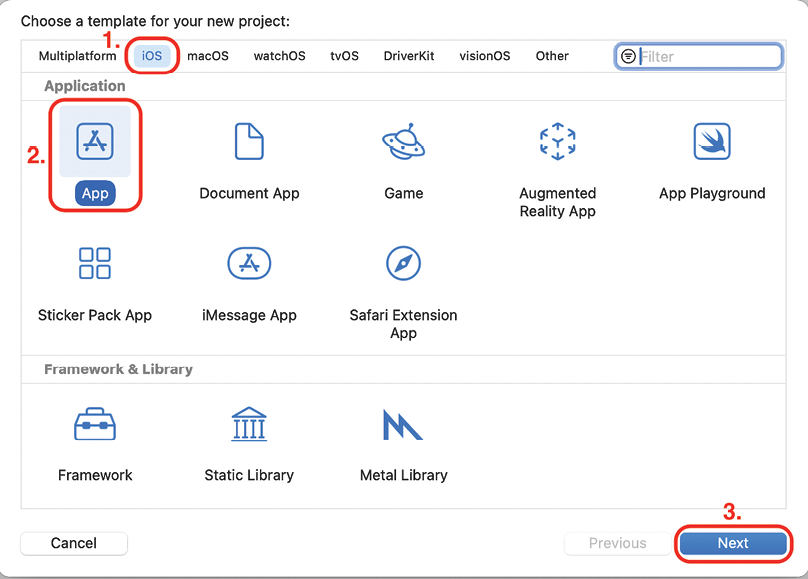
You’ll see the new project screen as follows. In the Choose a template for your new project: section, select iOS. Then choose App and click Next:
Figure 1.9: Choose a template for your new project: screen
You’ll see the Choose options for your new project: screen:
Figure 1.10: Choose options for your new project: screen
Configure the options as follows:
Product Name: The name of your app. Enter JRNL in the text field.
Organization Identifier: Used to create a unique identifier for your app on the App Store. Enter com.myname for now. This is known as reverse domain name notation format and is commonly used by iOS developers.
Interface: The method used to create the user interface for your app. Set this to Storyboard.
Include Tests: Uncheck this check box.
Leave the other settings at their default values. Click on Next when done.
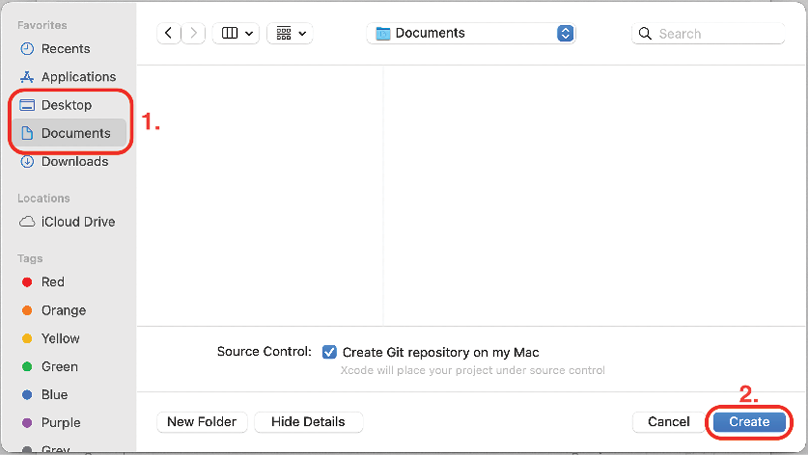
You’ll see a Save dialog box. Choose a location to save your project, such as the Desktop or Documents folder, and click on Create:
Figure 1.11: Save dialog box
You’ll see a dialog box saying Git Repository Creation Failed. Click on Fix.
The reason why you see this dialog box is because the Source Control checkbox in the Save dialog box was ticked. Apple recommends that Source Control be turned on. Source Control is outside the scope of this book but if you wish to learn more about version control and Git, see this link: https://git-scm.com/video/what-is-version-control.
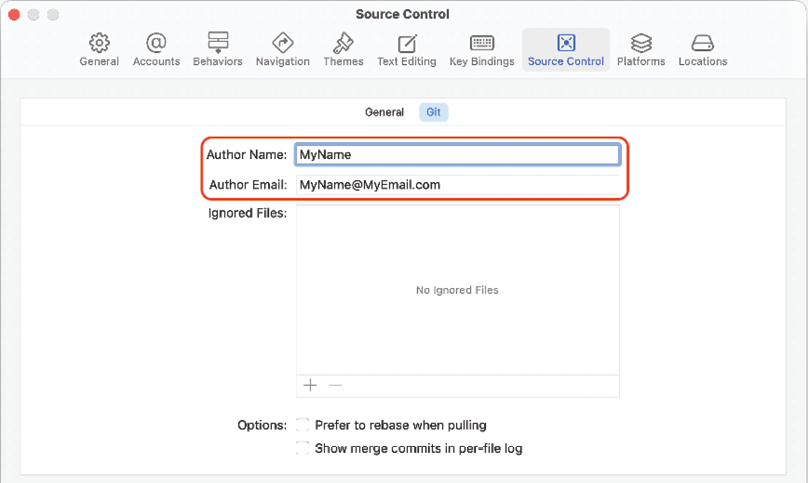
You will see the Source Control screen as follows:
Figure 1.12: Source Control preference screen
Enter the following information:
Author Name: Your own name
Author Email: Your email address
Close the Source Control screen by clicking the close button in the top-left corner when done. The Xcode main window will appear.
Fantastic! You have now successfully downloaded and installed Xcode and created your first project. In the next section, you will learn about the Xcode user interface.
Exploring the Xcode user interface
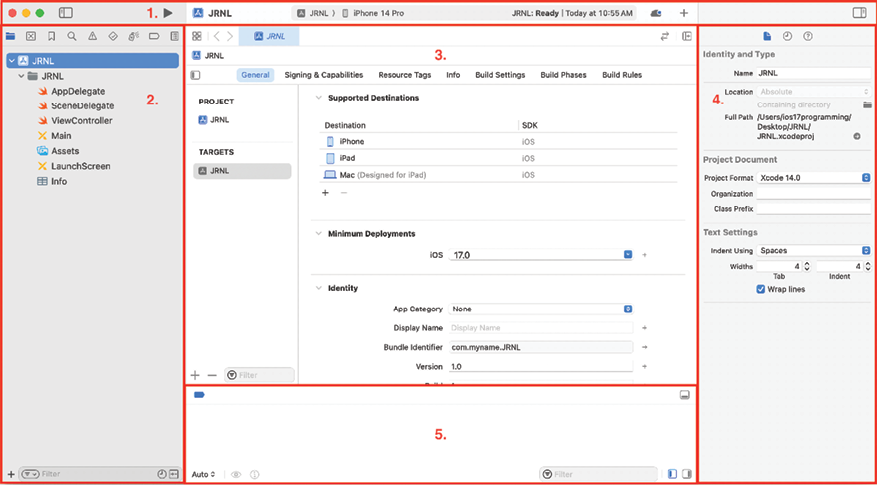
You’ve just created your first Xcode project! As you can see, the Xcode user interface is divided into several distinct parts, as shown here:
Figure 1.13: Xcode user interface
Let’s look at each part in more detail. The following description corresponds to the numbers shown in the preceding screenshot:
Toolbar (1) – Used to build and run your apps, and view the progress of running tasks.
Navigator area (2) – Provides quick access to the various parts of your project. The Project navigator is displayed by default.
Editor area (3) – Allows you to edit source code, user interfaces, and other resources.
Inspector area (4) – Allows you to view and edit information about items selected in the Navigator area or Editor area.
Debug area (5) – Contains the debug bar, the variables view, and the Console. The Debug area is toggled by pressing Shift + Command + Y.
Next, let’s examine the toolbar more closely. The left side of the toolbar is shown here:
Figure 1.14: Xcode toolbar (left side)
Let’s look at each part in more detail. The following descriptions correspond to the numbers shown in the preceding screenshot:
Navigator button (1) – Used to display and hide the Navigator area.
Stop button (2) – Only appears next to the Run button when the app is running. Stops the currently running app.
Run button (3) – Used to build and run your app.
Scheme menu (4) – Shows the specific scheme to build your project (JRNL) and the destination to run your app on (iPhone SE (3rd generation)).
Schemes and destinations are distinct. Schemes specify the settings for building and running your project. Destinations specify installation locations for your app, and exist for Simulator and physical devices.
Activity view (5) – Displays the progress of running tasks.
The right side of the toolbar is shown here:
Figure 1.15: Xcode toolbar (right side)
Let’s look at each part in more detail. The following descriptions correspond to the numbers shown in the preceding screenshot:
Xcode Cloud button (1) – Allows you to sign in to Xcode Cloud, a continuous integration and delivery service built into Xcode
Library button (2) – Displays user interface elements, code snippets, and other resources
Inspector button (3) – Used to display and hide the Inspector area
Don’t be overwhelmed by all the different parts, as you’ll learn about them in more detail in the upcoming chapters. Now that you are familiar with the Xcode interface, you will run the app you just created in Simulator, which displays a representation of an iOS device.
Running your app in Simulator
Simulator is installed when you install Xcode. It provides a simulated iOS device so that you can see what your app looks like and how it behaves, without needing a physical iOS device. It can model all the screen sizes and resolutions for both iPad and iPhone so you can test your app on multiple devices easily.
To run your app in Simulator, follow these steps:
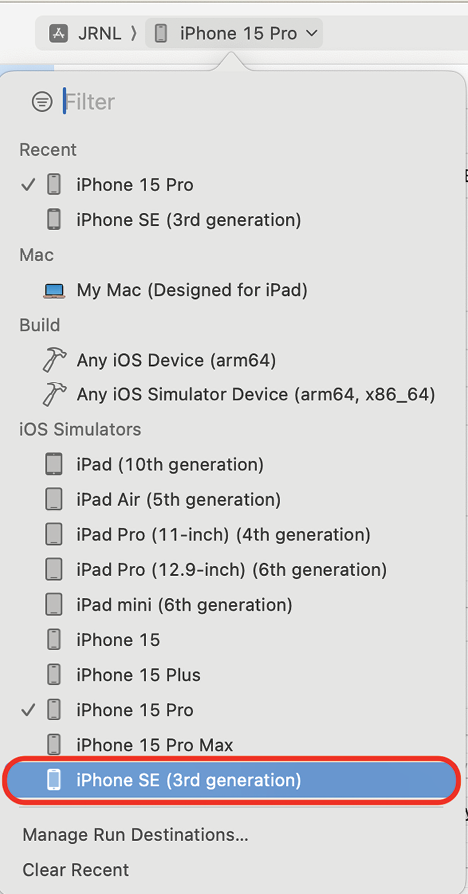
Click the Destination pop-up menu to view a list of simulated devices. Choose iPhone SE (3rd generation) from this menu:
Figure 1.16: Xcode Destination pop-up menu with iPhone SE (3rd generation) selected
Click the Run button to install and run your app on the currently selected simulator. You can also use the Command + R keyboard shortcut.
Simulator will launch and show a representation of an iPhone SE (3rd generation). Your app displays a white screen, as you have not yet added anything to your project:
Figure 1.17: iOS Simulator
Switch back to Xcode and click on the Stop button (or press Command + .) to stop the currently running project.
You have just created and run your first iOS app in Simulator! Great job!
Now, you may be wondering what the Devices and Build sections in the Destination menu are used for. Let’s look at them in the next section.
Understanding the Devices and Build sections
You learned how to choose a simulated device in the Destination menu to run your app in the previous section. In addition to the list of simulated devices, this menu also has Devices and Build sections.
These allow you to run apps on actual iOS devices and prepare apps for submission to the App Store.
Click the Destination menu in the toolbar to see the Devices and Build sections at the top of the menu:
Figure 1.18: Xcode Destination menu showing Devices and Build sections
If you have an Apple Silicon Mac, the Devices section will display text stating My Mac (Designed for iPad), because Apple Silicon Macs can run iOS apps. Otherwise, No Devices will be displayed. If you were to plug in an iOS device, it would appear in this section, and you would be able to run the apps you develop on it for testing. Running your apps on an actual device is recommended as Simulator will not accurately reflect the performance characteristics of an actual iOS device and does not have hardware features that actual devices have.
The Build section has two menu items, Any iOS Device(arm64) and Any iOS Simulator Device (arm64, x86_64). These are used when you need to archive your app prior to submitting it to the App Store. You’ll learn how to do this in Chapter 27, Testing and Submitting Your App to the App Store.
Now let’s see how to build and run your app on an actual iOS device. Most of the instructions in this book do not require you to have an iOS device though, so if you don’t have one, you can skip the next section and go straight to Chapter 2, Simple Values and Types.
Running your app on an iOS device
Although you’ll be able to go through most of the exercises in this book using Simulator, it is recommended to build and test your apps on an actual iOS device, as Simulator will not be able to simulate some hardware components and software APIs.
In addition to your device, you’ll need an Apple ID (used to automatically create a free Apple developer account) or a paid Apple developer account to build and run your app on your device. You can use the same Apple ID that you used to download Xcode from the App Store. To run your app on an iOS device, follow these steps:
Use the cable that came with your iOS device to connect your device to your Mac, and make sure the iOS device is unlocked.
Your iOS device will display a Trust This Computer alert. Tap Trust and key in your device passcode when prompted.
Your Mac will display an Allow Accessory to Connect alert. Click Allow. Your iOS device is now connected to your Mac and will appear in Xcode’s Destination menu.
You can view connected devices by choosing Window | Devices and Simulators in the Xcode menu bar.
In the Destination menu, note that your iOS device has Developer Mode disabled by default:
Figure 1.19: Xcode Destination menu showing iPhone with Developer Mode disabled
Developer Mode was introduced by Apple during their World Wide Developer Conference in 2022 (WWDC 2022), and is required to install, run, and debug your apps on devices running iOS 16 or greater.
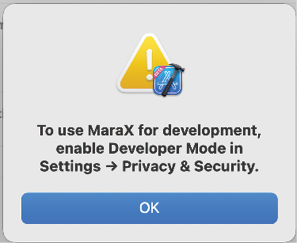
If you attempt to build and run your app on your iOS device, you will see the following alert:
Figure 1.20: Alert showing Developer Mode is not turned on
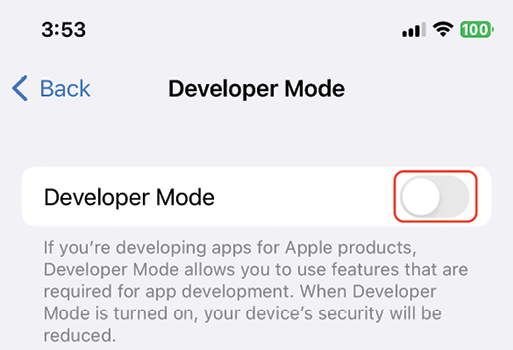
To enable Developer Mode on your iOS device, go to Settings | Privacy & Security, scroll down to the Developer Mode item, and tap it.
Turn the Developer Mode switch on:
Figure 1.21: Developer Mode switch
An alert will appear to warn you that Developer Mode reduces the security of your iOS device. Tap the alert’s Restart button.
After your iOS device restarts and you unlock it, confirm that you want to enable Developer Mode by tapping Turn On and entering your iOS device’s passcode.
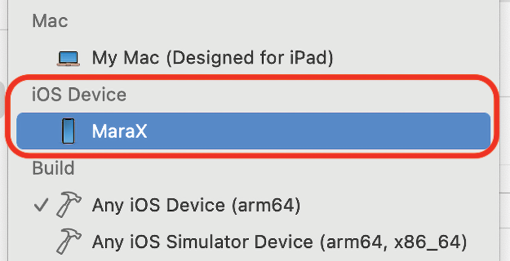
Verify that the (Developer Mode disabled) text no longer appears next to your iOS device in the Destination menu:
Figure 1.22: Xcode Destination menu with an actual iOS device selected
Wait for Xcode to finish indexing and processing, which will take a while. Once complete, Ready will be displayed in the status window. Your iOS device is now ready to install and run apps from Xcode.
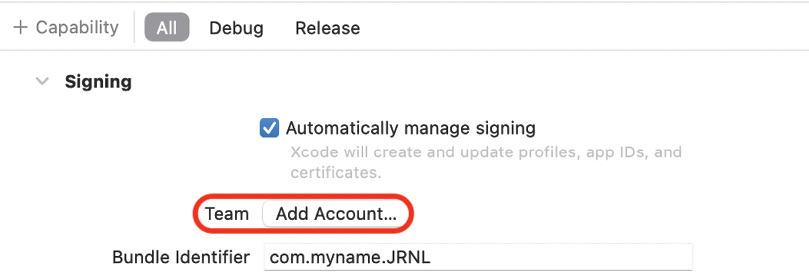
Run the project by clicking the Run button (or use Command + R). You will get the following error in Xcode’s Signing & Capabilities pane, Signing for “JRNL” requires a development team:
Figure 1.23: Xcode Signing & Capabilities panel
This is because a digital certificate is required to run the app on an iOS device, and you need to add a free or paid Apple Developer account to Xcode so the digital certificate can be generated.
Using an Apple ID to create a free developer account will allow you to test your app on an iOS device, but it will only be valid for 7 days. Also, you will need a paid Apple Developer account to distribute apps on the App Store. You’ll learn more about this in Chapter 27, Testing and Submitting Your App to the App Store.
Certificates ensure that the only apps that run on your device are the ones you authorize. This helps to protect against malware. You can also learn more about them at this link: https://help.apple.com/xcode/mac/current/#/dev60b6fbbc7.
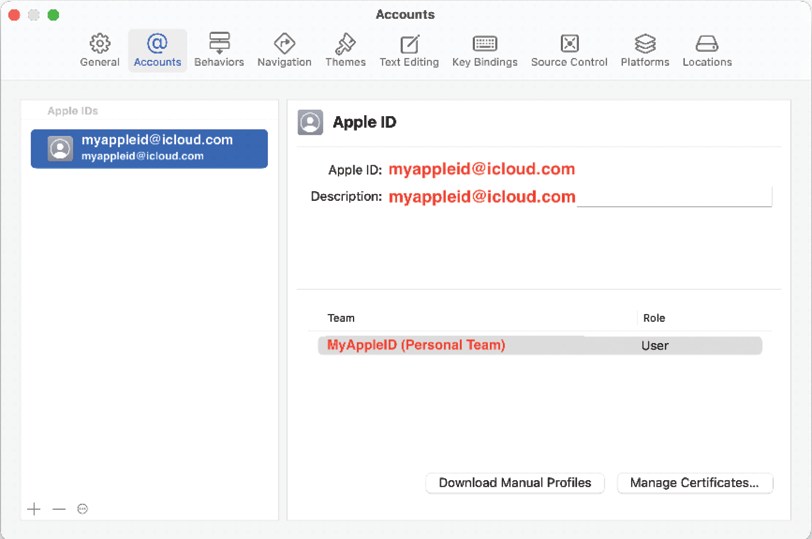
The Xcode Settings window appears with the Accounts pane selected. Enter your Apple ID and click Next:
Figure 1.25: Apple ID creation dialog box
Note that you can create a different Apple ID if you wish using the Create Apple ID button.
You can also access the Xcode settings by choosing Settings in the Xcode menu.
Enter your password when prompted. After a few minutes, the Accounts pane will display your account settings:
Figure 1.26: Accounts pane in Xcode preferences
Close the Settings window when you’re done by clicking the red close button in the top-left corner.
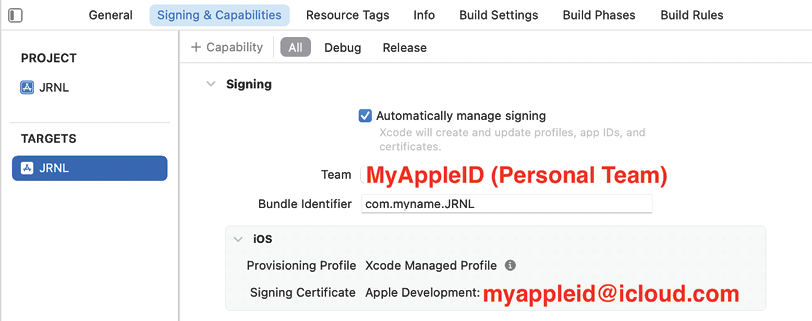
In Xcode’s Editor area, click Signing & Capabilities. Make sure Automatically manage signing is ticked and Personal Team is selected from the Team pop-up menu:
Figure 1.27: Xcode Signing & Capabilities pane with account set
If you still see errors on this screen, try changing your Bundle Identifier by typing some random characters into it, for example, com.myname4352.JRNL.
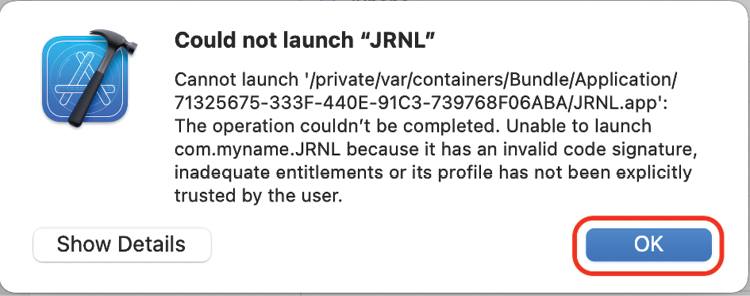
Everything should work now when you build and run, and your app will be installed on your iOS device. However, it will not launch, and you will see the following message:
Figure 1.28: Could not launch “JRNL” dialog box
This means you need to trust the certificate that has been installed on your device. You’ll learn how to do this in the next section.
Trusting the Developer App certificate on your iOS device
A Developer App certificate is a special file that gets installed on your iOS device along with your app. Before your app can run, you need to trust it. Follow these steps:
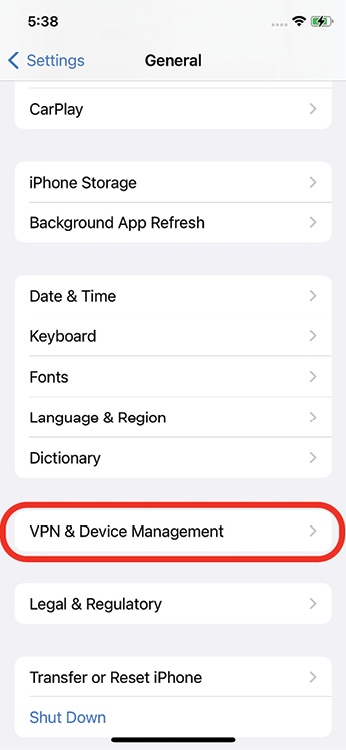
On your iOS device, tap Settings | General | VPN & Device Management:
Figure 1.29: VPN & Device Management setting in iOS Settings
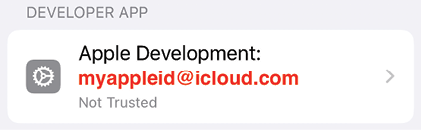
Tap Apple Development:
Figure 1.30: Apple Development section in Device Management settings
Tap Trust “Apple Development:
Figure 1.31: Trust button
Tap Trust:
Figure 1.32: Trust dialog box
You should see the following text, which shows the app is now trusted:
Figure 1.33: Apple Development section with trusted certificate
Click the Run button in Xcode to build and run again. You’ll see your app launch and run on your iOS device.
Congratulations! You have successfully run your app on an actual iOS device!
Summary
In this chapter, you learned how to download and install Xcode on your Mac. Then, you familiarized yourself with the different parts of the Xcode user interface. After that, you created your first iOS app, selected a simulated iOS device, and built and ran the app in Simulator. Finally, you learned how to connect an iOS device to Xcode via USB so that you can run your app on it.
In the next chapter, we’ll start exploring the Swift language using Swift Playgrounds, and learn how simple values and types are implemented in Swift.
Learn more on Discord
To join the Discord community for this book – where you can share feedback, ask questions to the author, and learn about new releases – follow the QR code below:
Dive into the latest iOS 17 features and Swift 5.9 through hands-on projects
Develop robust apps with top design patterns used by professionals
Expand your app's reach by effortlessly converting it for iPad, Mac, and visionOS
Description
In a world with nearly 2 million apps on the App Store, the demand for skilled iOS developers has never been higher. "iOS 17 Programming for Beginners, Eighth Edition" is your gateway to this lucrative and dynamic field. This hands-on guide is tailored for those who are new to iOS and takes you on a journey from learning the Swift language to crafting your own app and seeing it thrive on the App Store.
Our approach is hands-on and practical. Each chapter is designed to be a stepping stone in your development journey, providing step-by-step tutorials, real-life examples, and clear explanations of complex concepts. As you progress, you'll not only be skilled in Swift but also incorporate cutting-edge technologies into your apps. You'll learn how to publish your creations and harness the power of iOS 17 through a straightforward and easy to program example app divided into manageable parts.
By the time you've completed this book, you'll possess the skills and knowledge to not only develop and publish captivating apps but also leverage online resources to continually enhance your app development prowess.
What you will learn
Discover the world of Xcode 15 and Swift 5.9, laying the foundation for your iOS development journey
Implement the latest iOS 17 features through a hands-on example app, ensuring your apps remain innovative and engaging
Build and deploy iOS apps using industry-standard design patterns and best practices.
Implement the Model-View-Controller (MVC) design pattern to create robust and organized applications
Expand your app's reach by effortlessly converting it for iPad, Mac, and visionOS
Dive into UIKit, the essential framework for large-scale iOS projects
What do you get with eBook?
Instant access to your Digital eBook purchase
Download this book in EPUB and PDF formats
Access this title in our online reader with advanced features
DRM FREE - Read whenever, wherever and however you want
Causal Inference and Discovery in Python: Unlock the secrets of modern causal machine learning with DoWhy, EconML, PyTorch and more
May 2023456
Machine Learning with PyTorch and Scikit-Learn: Develop machine learning and deep learning models with Python
Feb 2022774
Machine Learning for Algorithmic Trading: Predictive models to extract signals from market and alternative data for systematic trading strategies with Python, Second Edition
Jul 2020822
Mastering Microsoft Power BI – Second Edition: Expert techniques to create interactive insights for effective data analytics and business intelligence, Second Edition
Jun 2022712
Microsoft Power BI Quick Start Guide: The ultimate beginner's guide to data modeling, visualization, digital storytelling, and more, Third Edition
Nov 2022330
Machine Learning Engineering with Python: Manage the lifecycle of machine learning models using MLOps with practical examples, Second Edition
Aug 2023462
The AI Product Manager's Handbook: Develop a product that takes advantage of machine learning to solve AI problems
Feb 2023250
Et al.: Because not all research deserves a Nobel Prize
Aug 2023230
Python Machine Learning: Machine Learning and Deep Learning with Python, scikit-learn, and TensorFlow 2, Third Edition
Dec 2019772
Data Modeling with Snowflake: A practical guide to accelerating Snowflake development using universal data modeling techniques
May 2023324
People who bought this also bought
5 Items
Mastering Ubuntu Server: Explore the versatile, powerful Linux Server distribution Ubuntu 22.04 with this comprehensive guide, Fourth Edition
Sep 2022584
Mastering Ansible, 4th Edition: Automate configuration management and overcome deployment challenges with Ansible, Fourth Edition
Dec 2021540
Enterprise DevOps for Architects: Leverage AIOps and DevSecOps for secure digital transformation
Nov 2021288
Ansible for Real-Life Automation: A complete Ansible handbook filled with practical IT automation use cases
Sep 2022480
Kubernetes – An Enterprise Guide: Effectively containerize applications, integrate enterprise systems, and scale applications in your enterprise, Second Edition
Dec 2021578
Authors (2)
Mr. Ahmad Sahar
Ahmad Sahar is a trainer, presenter, and consultant at Tomafuwi Productions, specializing in conducting training courses for macOS and iOS, macOS Support Essentials certification courses, and iOS Development courses. He is a member of the DevCon iOS and MyCocoaHeads online communities in Malaysia and has conducted presentations and talks for both groups. In his spare time, he likes building and programming LEGO Mindstorms robots.
Where there is an eBook version of a title available, you can buy it from the book details for that title. Add either the standalone eBook or the eBook and print book bundle to your shopping cart. Your eBook will show in your cart as a product on its own. After completing checkout and payment in the normal way, you will receive your receipt on the screen containing a link to a personalised PDF download file. This link will remain active for 30 days. You can download backup copies of the file by logging in to your account at any time.
If you already have Adobe reader installed, then clicking on the link will download and open the PDF file directly. If you don't, then save the PDF file on your machine and download the Reader to view it.
Please Note: Packt eBooks are non-returnable and non-refundable.
Packt eBook and Licensing When you buy an eBook from Packt Publishing, completing your purchase means you accept the terms of our licence agreement. Please read the full text of the agreement. In it we have tried to balance the need for the ebook to be usable for you the reader with our needs to protect the rights of us as Publishers and of our authors. In summary, the agreement says:
You may make copies of your eBook for your own use onto any machine
You may not pass copies of the eBook on to anyone else
How can I make a purchase on your website?
If you want to purchase a video course, eBook or Bundle (Print+eBook) please follow below steps:
Register on our website using your email address and the password.
Search for the title by name or ISBN using the search option.
Select the title you want to purchase.
Choose the format you wish to purchase the title in; if you order the Print Book, you get a free eBook copy of the same title.
Proceed with the checkout process (payment to be made using Credit Card, Debit Cart, or PayPal)
Where can I access support around an eBook?
If you experience a problem with using or installing Adobe Reader, the contact Adobe directly.
To view the errata for the book, see www.packtpub.com/support and view the pages for the title you have.
To view your account details or to download a new copy of the book go to www.packtpub.com/account
Our eBooks are currently available in a variety of formats such as PDF and ePubs. In the future, this may well change with trends and development in technology, but please note that our PDFs are not Adobe eBook Reader format, which has greater restrictions on security.
You will need to use Adobe Reader v9 or later in order to read Packt's PDF eBooks.
What are the benefits of eBooks?
You can get the information you need immediately
You can easily take them with you on a laptop
You can download them an unlimited number of times
You can print them out
They are copy-paste enabled
They are searchable
There is no password protection
They are lower price than print
They save resources and space
What is an eBook?
Packt eBooks are a complete electronic version of the print edition, available in PDF and ePub formats. Every piece of content down to the page numbering is the same. Because we save the costs of printing and shipping the book to you, we are able to offer eBooks at a lower cost than print editions.
When you have purchased an eBook, simply login to your account and click on the link in Your Download Area. We recommend you saving the file to your hard drive before opening it.
For optimal viewing of our eBooks, we recommend you download and install the free Adobe Reader version 9.
 Argentina
 Australia
 Austria
 Belgium
 Brazil
 Bulgaria
 Canada
 Chile
Chile
 Colombia
 Cyprus
 Czechia
 Denmark
 Ecuador
 Egypt
Egypt
 Estonia
 Finland
 France
 Germany
 Great Britain
 Greece
 Hungary
 India
India
 Indonesia
 Ireland
 Italy
Italy
 Japan
Japan
 Latvia
 Lithuania
 Luxembourg
 Malaysia
 Malta
Malta
 Mexico
 Netherlands
 New Zealand
 Norway
 Philippines
 Poland
 Portugal
 Romania
 Russia
 Singapore
 Slovakia
 Slovenia
 South Africa
 South Korea
 Spain
Spain
 Sweden
 Switzerland
 Taiwan
 Thailand
 Turkey
 Ukraine
 United States