Search icon
Subscription
0
Cart icon
Close icon
You have no products in your basket yet
Arrow left icon
All Products
Best Sellers
New Releases
Books
Videos
Audiobooks
Learning Hub
Newsletters
Free Learning
Arrow right icon
Microsoft Power Apps Cookbook, 2e - Second Edition

You're reading from  Microsoft Power Apps Cookbook, 2e - Second Edition

Product type Book
Published in Aug 2022
Publisher Packt
ISBN-13 9781803238029
Pages 414 pages
Edition 2nd Edition
Languages
Author (1):
Eickhel Mendoza Eickhel Mendoza
Profile icon Eickhel Mendoza

Table of Contents (15) Chapters

Preface 1. Building Pixel-Perfect Solutions with Canvas Apps 2. Building from Data with Model-Driven Apps 3. Choosing the Right Data Source for Your Applications 4. Automating Processes with Power Automate 5. Extending the Platform 6. Improving User Experience 7. Power Apps Everywhere 8. Empowering Your Applications with No Code Artificial Intelligence 9. Discovering the Power Platform Admin Center 10. Tips, Tricks, and Troubleshooting 11. Advanced Techniques with Power Apps Component Framework 12. Reaching Beyond the Organization with Power Pages 13. Other Books You May Enjoy
14. Index

Building a floating action button component

One of the most recognizable features in a mobile design user interface is the Floating Action Button (FAB). They represent the primary action of the active screen. Almost every user will know their purpose because they have seen them in all major applications, such as Microsoft Outlook:

Graphical user interface, text, application  Description automatically generated

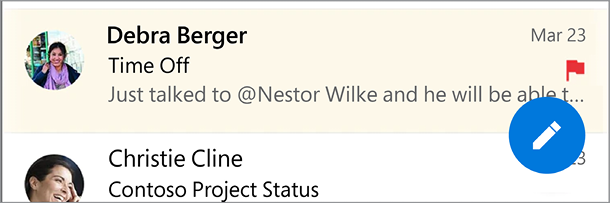
Figure 5.8: Write new email FAB action in Microsoft Outlook

We will learn how to replicate this element using components in this recipe.

How to do it...

  1. Create a new app using the phone layout, and from the Tree view, go to the Components tab and click on New component. From the right pane, name it FABCmp. Set its Width and Height to 95 and its fill color to transparent: RGBA (0, 0, 0, 0)
  2. Go to the Insert panel and click on Add icon. Set its X and Y positions to 5 and its Width and Height to 80. All padding properties should be 20. Lastly, set its Color to White and name this control IconIcn
  3. Using the Insert panel...
lock icon The rest of the chapter is locked
Register for a free Packt account to unlock a world of extra content!
A free Packt account unlocks extra newsletters, articles, discounted offers, and much more. Start advancing your knowledge today.
Unlock this book and the full library FREE for 7 days
Get unlimited access to 7000+ expert-authored eBooks and videos courses covering every tech area you can think of
Renews at $15.99/month. Cancel anytime}