


Getting your work out
This section is super important in order to speed up your workflow with templates, to save your project properly so you never lose any files, and, of course, to export your track so it can see the light of day.
Exporting audio
In order to export your audio from Live’s Arrangement View, take the following steps:
- Select the desired portion of audio (perhaps the whole track). Make sure if it is the whole track that you leave some extra space at the end for any time-based effect tail (such as reverb and delay).
- Then, you can either go to File | Export Audio/Video… or use the Cmd + Shift + R (Ctrl + Shift + R for Windows) key command to bring up the Export Audio/Video window (Figure 1.26).
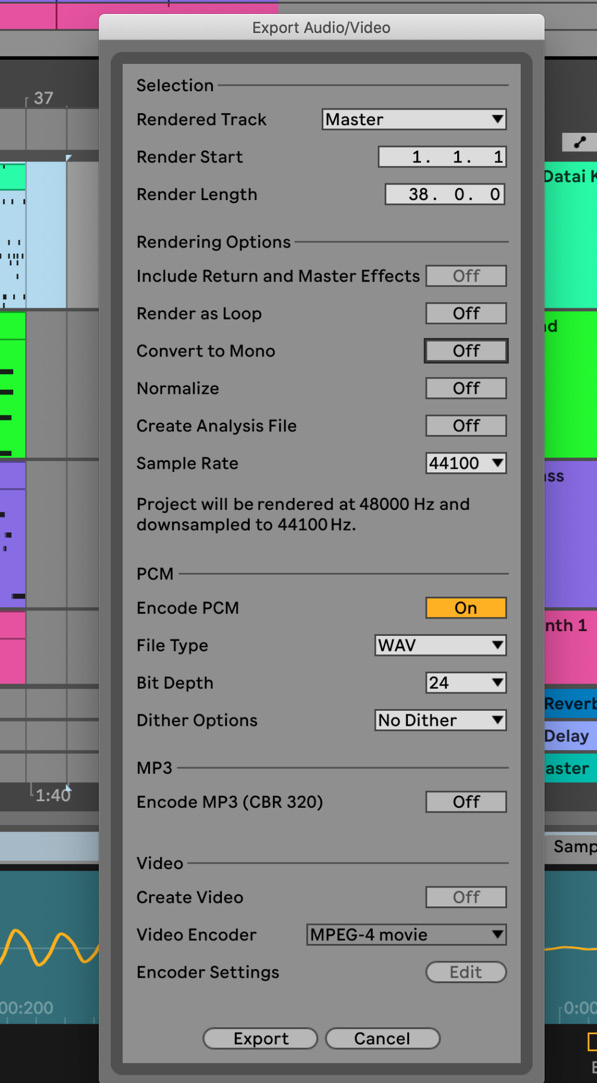
Figure 1.26 – Export Audio/Video window
- Under the Selection section, the first option you can set is Rendered Track. Here, if you’d like to render your whole track, then you’d select Master.
- Make sure that Render Start and Render Length match your desired selection, and that you don’t have any clips selected in Track Display. You can also choose to render any of your Return Tracks, a single track of your project, only selected tracks, or all individual tracks, which allows you to export stems.
- You will also find additional rendering options, such as Include Return and Master Effects, which you can select when you are rendering single, selected, or all individual tracks. You can also enable Convert to Mono. If you are looking to export something as a mono signal, you have control over creating an analysis file with the export, changing the sample rate, rendering as a loop, and normalizing.
- In this window, you can also choose your desired file type, change the bit depth, and set Dither Options if you need to. You can also export an additional MP3 file at the same time.
Live can be used to edit audio for videos, and can actually host video in the timeline. Therefore, you have options for exporting your video work from here too.
- Once you are happy with your settings, just hit the Export button and sit back while the magic happens.
It’s always a good practice to check your exported audio by playing it back, to make sure everything is included that you want to export, because an accidental timeline selection or a muted or soloed track can mess up your exporting.
Saving your work
When you start working in Live, you create a Set, which is an .als file. This file can be found inside the Project folder (Figure 1.27).

Figure 1.27 – Project folder
This will include other crucial media related to your Set (Figure 1.28) or multiple Sets in the Project folder.
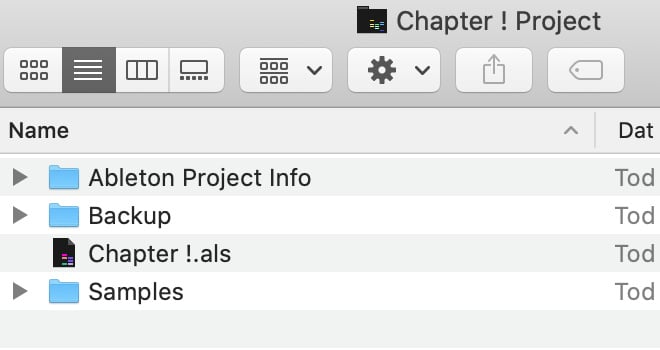
Figure 1.28 – Crucial files in the Project folder
It is extremely important that when you are transferring your work to a USB stick, an external hard drive, or another computer, you move the Project folder, not the Set .als file. If you move the Set, you will end up with loads of offline/missing files. If that happens though, don’t worry; we will cover what to do in Chapter 17, Troubleshooting and File Management. Your project folder will include, of course, the Set(s), the Samples folder (including imported, recorded, and processed files), the Backup folder, and the Ableton Project Info folder.
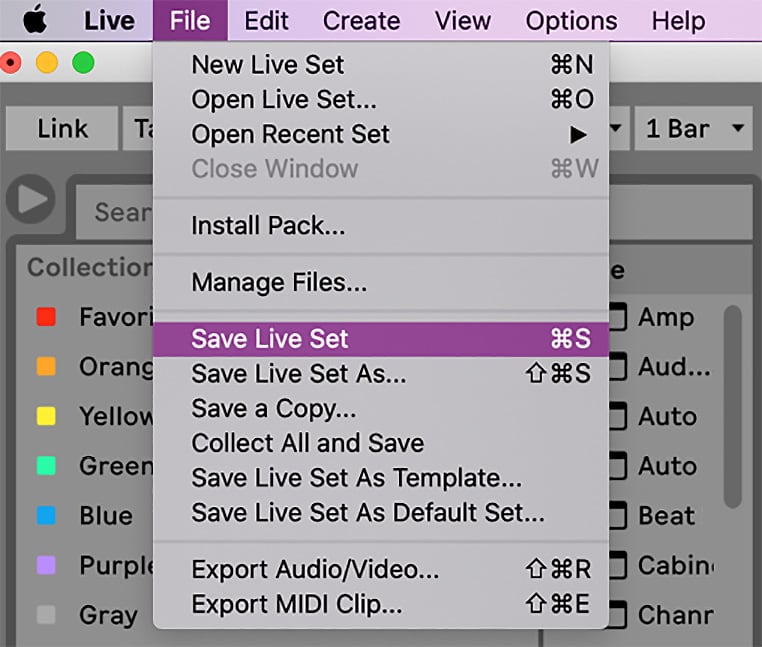
Figure 1.29 – Saving a Live Set
Let’s investigate the saving options (Figure 1.29):
- Save Live Set allows you to save the Set to a location on your computer or portable drive. You can set the location, and a Project folder will be created. However, the samples you are using in your project will not be saved in the Project folder. So, if you move the project, or the folder that holds the samples that you are using in your Set, to a different computer, those files will be missing and will need to be relocated.
Additionally, you can use this option to save minor changes you last made to your already existing project as long as that change didn’t include bringing in any new media into the Set.
- Save Live Set As… allows you to save the current version of your Set to a new location or save it into the same Project folder under a different name, even if you are working on an already existing project. In doing so, you would have two different Sets within the same Project folder.
- Save a Copy… allows you to save a copy of your current Set.
- Collect All and Save is probably the most important saving option. This is the function that will allow you to save your Set and collect all the corresponding media with the Set into its Project folder. In order to avoid missing files, it is recommended to always use Collect All and Save when you finish your work for the day. It is especially important to do this before you try to move your work to portable data storage or send it to someone.
Upon clicking Collect All and Save, the following dialog box will appear (Figure 1.30):
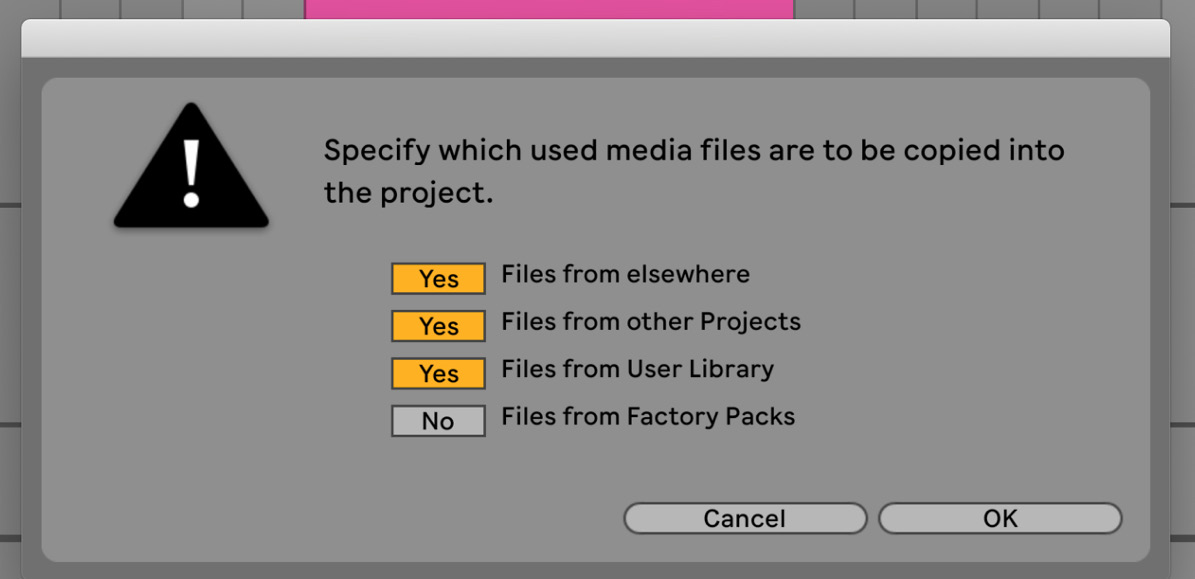
Figure 1.30 – Collect All and Save window
Here, you can select where exactly you’d like to collect the files from.
Saving your work might seem a very easy task but it is definitely something you should do properly to avoid lost work and disappointment. File management is a crucial part of any media work, regardless of whether you are a hobbyist or a professional.


