Reader small image

You're reading from  Building Smart Homes with Raspberry Pi Zero

Product typeBook
Published inOct 2016
PublisherPackt
ISBN-139781786466952
Edition1st Edition
Right arrow
Author (1)
Marco Schwartz
Marco Schwartz
author image
Marco Schwartz

Marco Schwartz is an electrical engineer, entrepreneur, and blogger. He has a master's degree in electrical engineering and computer science from Supélec, France, and a master's degree in micro engineering from the Ecole Polytechnique Fédérale de Lausanne (EPFL), Switzerland. He has more than five years' experience working in the domain of electrical engineering. Marco's interests center around electronics, home automation, the Arduino and Raspberry Pi platforms, open source hardware projects, and 3D printing. He has several websites about the Arduino, including the Open Home Automation website, which is dedicated to building home automation systems using open source hardware. Marco has written another book on home automation and the Arduino, called Home Automation With Arduino: Automate Your Home Using Open-source Hardware. He has also written a book on how to build Internet of Things projects with the Arduino, called Internet of Things with the Arduino Yun, by Packt Publishing.
Read more about Marco Schwartz

Right arrow

Chapter 4. Controlling Appliances fromthe Raspberry Pi Zero

In previous chapters, we mainly focused on using sensors with our Raspberry Pi, to log data, display it graphically, and also to build a nice thermostat based on the Raspberry Pi Zero.

In this chapter, we are going to focus solely on controlling devices using the Raspberry Pi Zero. Indeed, in any smart home, you are going to want to control devices in order to automate your home.

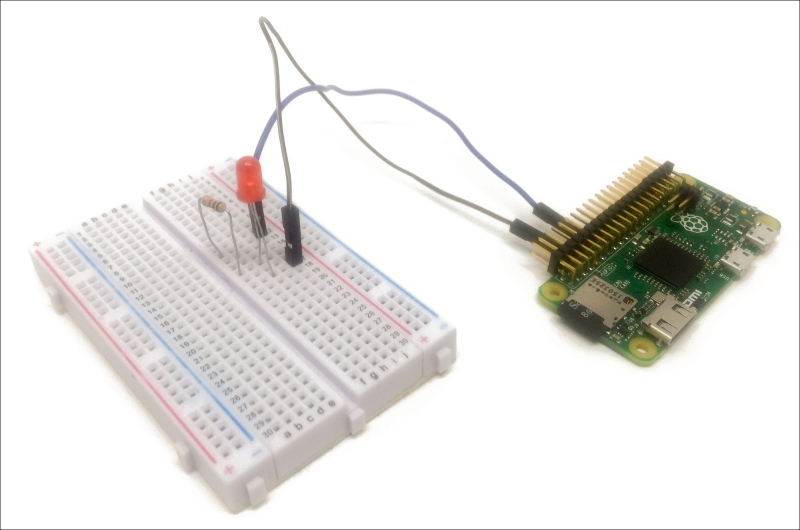
To cover most of the devices you could have in your home, we are going to see three examples in this chapter. First we will learn how to control and dim a simple LED, which means you'll learn how to control any LED-based lighting in your home. Then, we'll see how to control a DC motor using the Raspberry Pi Zero, which can, for example, be applied to control window blinds. Finally, we'll see how to control a lamp and basically, any on/off appliances in your home. Let's start!

Hardware and software requirements


As always, we are going to start with a list of required hardware and software components for the project.

Except for the Raspberry Pi Zero, you will need some additional components for each of the sections in this chapter.

For the LED controller section, you will need a simple LED and a 330-Ohm resistor.

To control a DC motor, you will need a L293D motor driver IC and, of course, a motor to control. For this purpose, I used a simple 5V DC motor.

For the lamp controller section, the most important component will be the PowerSwitch Tail Kit. This component allows your Pi to control electrical appliances such as lamps, heaters, and other appliances that use mains electricity to function.

Finally, you will need the usual breadboard and jumper wires.

This is the list of components that you will need for this whole chapter, not including the Raspberry Pi Zero:

Controlling LEDs


In this first project of the chapter, we are going to see how to control LEDs using your Raspberry Pi Zero. As an example, here we'll see how to control and dim a single LED that we will place on a breadboard. However, the same code can be applied to any kind of LED lighting in your home, or to LED strips.

Let's first see how to assemble this project. Place the LED on the breadboard in series with the 330 Ohm resistor—the longest pin of the LED in contact with the resistor. Then, connect the other side of the resistor to the GPIO18 pin on the Raspberry Pi and the other end of the LED to a GND pin of the Raspberry Pi.

You can, of course, use a cobbler cable kit to easily connect the Pi to the LED. Here, and for the rest of this chapter, I just used two simple jumper wires so you can really see the connections in the images.

This is the final result:

Now that the project is assembled, we are going to test it. To do so, we'll run a simple code that will basically continuously change...

Controlling the speed of a DC motor


In any smart home, chances are you will find a DC motor somewhere that you will need to automate. It could, for example, be on electric window blinds, or on an automated garage door. In this section, we are going to see how to control the speed of a simple DC motor and you will then be able to apply this to any motors you already have in your home.

Let's first see how to connect the DC motor to your Raspberry Pi Zero board. We actually won't connect the motor directly to the Raspberry Pi, as this would require a lot of external components, such as transistors, diodes, and so on. Instead, we'll use the L293D chip, which is a dedicated IC to control DC motors.

First, place the L293D on the board. The following diagram shows the pinout of the L293D:

You basically need to connect the components to the L293D as follows:

  • GPIO14 of the Raspberry Pi to pin 1A

  • GPIO15 of the Raspberry Pi to pin 2A

  • GPIO18 of the Raspberry Pi to pin 1,2EN

  • DC motor to pin 1Y and 2Y

  • 5V of the...

Controlling home appliances


In the final section of this chapter, we are going to see how to control appliances in your home that can only be set to on or off, for example, lamps, but also heaters, coffee machines, and other appliances. In this section, you are going to learn how to control a simple desk lamp using your Raspberry Pi Zero.

Let's first see how to assemble the project. Simply connect the Vin+ pin of the PowerSwitch Tail Kit to the GPIO18 pin on the Raspberry Pi Zero, and the two remaining pins of the PowerSwitch Tail to GND.

The following image shows the final result:

Of course, after this you need to connect a lamp to the project. For that, I used a simple 30W desk lamp. You simply need to connect the appliance you want to control to the female plug of the PowerSwitch Tail, and then connect it to the mains electricity via the male power plug.

We are now going to see how to control the lamp using a simple interface, which will run on our Raspberry Pi. For that, we'll again use...

Summary


In this chapter, we saw how to control devices from the Raspberry Pi Zero board, which is critical in any smart home that you want to automate. First we looked at how to control and dim an LED, which you can use to control LED-based lighting and LED strips in your home. We also looked at how to control the speed of a DC motor, which you can apply to control the motor of a garage door, for example. Finally, we saw how to control any appliances in your home, such as lamps, using a graphical interface running on your Pi.

You can, of course, already use what you learned in this chapter and adapt it to your own projects, for example, by applying everything you learned in this project to control several devices from the same interface running on your Pi.

In the following chapter, we are going to apply what we learned in this chapter by building a smart energy meter based on the Raspberry Pi Zero.

lock icon
The rest of the chapter is locked
You have been reading a chapter from
Building Smart Homes with Raspberry Pi Zero
Published in: Oct 2016Publisher: PacktISBN-13: 9781786466952
Register for a free Packt account to unlock a world of extra content!
A free Packt account unlocks extra newsletters, articles, discounted offers, and much more. Start advancing your knowledge today.
undefined
Unlock this book and the full library FREE for 7 days
Get unlimited access to 7000+ expert-authored eBooks and videos courses covering every tech area you can think of
Renews at €14.99/month. Cancel anytime

Author (1)

author image
Marco Schwartz

Marco Schwartz is an electrical engineer, entrepreneur, and blogger. He has a master's degree in electrical engineering and computer science from Supélec, France, and a master's degree in micro engineering from the Ecole Polytechnique Fédérale de Lausanne (EPFL), Switzerland. He has more than five years' experience working in the domain of electrical engineering. Marco's interests center around electronics, home automation, the Arduino and Raspberry Pi platforms, open source hardware projects, and 3D printing. He has several websites about the Arduino, including the Open Home Automation website, which is dedicated to building home automation systems using open source hardware. Marco has written another book on home automation and the Arduino, called Home Automation With Arduino: Automate Your Home Using Open-source Hardware. He has also written a book on how to build Internet of Things projects with the Arduino, called Internet of Things with the Arduino Yun, by Packt Publishing.
Read more about Marco Schwartz