Chapter 1: A Brief Introduction to Adobe Animate
This chapter provides background information on Animate, what it is used for in the industry, and specifics around the new features in Adobe Animate 2021 and how to put them to use. When new features are released, the software release notes usually just aren't enough, so we'll explore each of the new features in depth so that you can start using them right away, including the new Assets panel, rig management, quick publish options, timeline and symbol features, and even the new capabilities around creating your own in-app tutorials. We'll also cover some resources around keeping up to date with all things Animate. You'll come away from this chapter with a refreshed understanding of Animate as a creative platform for designers, animators, and developers.
After reading this chapter, you'll come away with the following skills:
- Understand the history of Animate and what the software can be used for.
- Learn which features have been added to the software, what their purpose is, and how to put them to use.
- Know where to look for new releases and stay abreast of new resources around Animate, related software, and the industry.
Technical Requirements
You will need the following software and hardware to complete this chapter:
- Adobe Animate 2021 (version 21.0 or above).
- Refer to the Animate System Requirements page for hardware specifications: https://helpx.adobe.com/animate/system-requirements.html.
Understanding Adobe Animate
Adobe Animate has a lengthy history that is full of growth, accolades, disappointments, crushing defeats, pivots, and at least one notable resurrection. To cover the entire history of this software would take a book in itself, so we'll only touch upon certain, relevant points here. It is important to know, however, that beginning a new project in Adobe Animate is now a unique experience that, without certain decisions by Adobe and obvious passion from the community of users, might not be possible today.
A Bit of History
Animate began its journey as a simple vector graphics drawing program called SmartSketch for use on stylus-based devices developed by a company called FutureWave. It soon gained such popularity that it was made available on both Windows and macOS with added motion capabilities and given the name FutureSplash Animator. The blossoming popularity of the World Wide Web at this time led to the software pivoting to target this young medium through the use of a browser-based runtime.
This was the beginnings of both the authoring software that we still use today and what eventually became the Flash Player browser runtime. The idea was that you could author your content using FutureSplash Animator and play back the content through the web browser using an installed extension, often referred to as a plugin. The capabilities of web browsers at the time were such that HTML was a simple markup language for sematic text declaration and hyperlinks. Technologies such as the current iterations of CSS and JavaScript didn't even exist yet; even image files were barely supported! If you wanted a rich media experience on the web, you had to rely on such browser plugins.
Macromedia acquired FutureWave (and FutureSplash Animator) in 1996 and rebranded the software as Flash – sort of a combination of the two names! They made huge investments in the authoring software and web browser plugin, renaming it to Flash Player. Macromedia was also responsible for the ActionScript programming language and the expansion of the Flash Platform across a number of areas, including web, server, and even small steps into mobile.
From FutureWave to Macromedia and now to Adobe, Animate has changed a lot over the years!

Figure 1.1 – 25 years of Adobe Animate
In 2005, Adobe Systems acquired Macromedia and all their properties (including Flash!) and have been holders of this technology ever since. Under Adobe, we've seen both great strides and seriously missed opportunities over the years.
On the one hand, the Flash Platform was greatly expanded upon under a number of proprietary and open source initiatives, ActionScript 3.0 was released, and MXML/Flex was made much more accessible to many developers. We even had Flash Platform technologies integrated into nearly every piece of creative software Adobe distributes directly within the workspace panels of software such as Photoshop and Illustrator. On the other hand, the push for Flash Player on mobile was so bungled that the platform could never recover from the fallout.
While Adobe did release a number of versions of Flash Player for Android and RIM/Blackberry devices, they were never able to get the runtime on Apple devices such as the iPhone and iPad. Adobe eventually gave up on Flash Player on mobile altogether and decided to refocus their efforts on the Adobe Integrated Runtime (AIR), which allowed iOS, Android, and desktop applications and games to be developed with Flash technologies, and Flash Player on desktop browsers with a renewed interest in 3D and gaming technologies in the form of Stage3D.
Adobe made huge efforts with Flash Player at one point, touting Stage3D, concurrency, and more options that appealed to game developers in order to create a blazing-fast experience for the user.
Important Note
If you'd like to learn more about mobile Flash Player and AIR for Android, have a look at the book Flash Development for Android Cookbook by Joseph Labrecque, also from Packt: https://www.packtpub.com/product/flash-development-for-android-cookbook/9781849691420.
During this time, Flash Professional, the authoring software, was neglected quite a bit. The focus on mobile and developers left creative software such as Flash Professional with fewer resources and, once Adobe lost the war for mobile, the association of Flash Player with Flash Professional was one that even they had trouble justifying. Many expected Adobe to abandon the software entirely, but while Adobe was focused on developers during these years, animators were actually using Flash Professional heavily to produce content for television, web, and film projects.
Tip
If you are curious about what television series make use of Adobe Animate, have a look at the following resource: https://en.wikipedia.org/wiki/List_of_Flash_animated_television_series.
In late 2015, following a year or two of a visible increase in both the creative feature set of the software and the inclusion of new target platforms such as HTML5 Canvas, Adobe announced that the next version of Flash Professional would be rebranded as Adobe Animate:
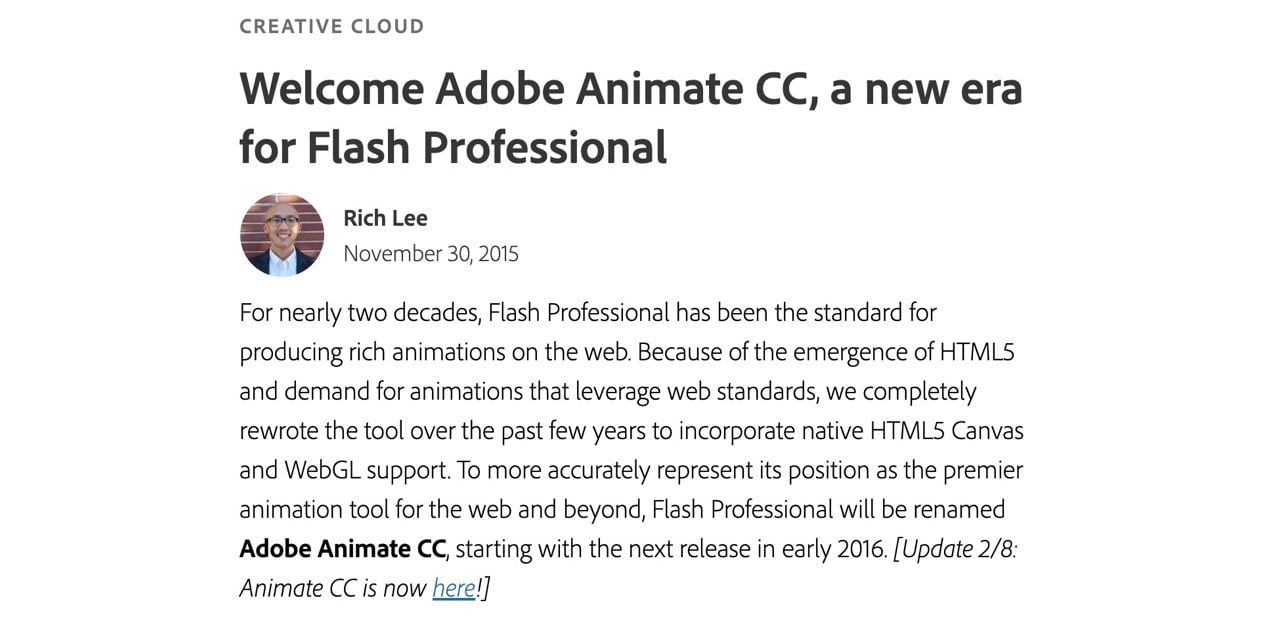
Figure 1.2 – Adobe Animate is announced
The name change was primarily a way to let the world know that the software was no longer bound to a single platform (Flash) and that creative motion was going to be a big focus moving forward. Since that time, Animate has only gotten better and continues to be used by creatives and developers alike to target multiple platforms without restriction:
Note
The year 2021 marks 25 years of Adobe Animate through all its various identities over the years, from FutureSplash Animator to Macromedia Flash and Adobe Flash Professional, all the way to the present with Adobe Animate. A well-deserved milestone!
Figure 1.3 – Adobe Animate 2021
Animate 2021 is the latest release and the major features that have shipped over the past year will be detailed within this chapter.
Familiar uses of Adobe Animate
With 25 years of history behind it, Adobe Animate has been used in all sorts of projects. In recent years, as the focus of the application has moved from a purely Flash-based experience to one that is much more platform-agnostic and increasingly expansive, the possibilities have expanded as well. This is a great time for new users to learn the software and for those who may have used older versions of the software to revisit it and see what is now possible.
Animation and motion design remain two of the biggest uses of the software. People all across the world are exposed to content created in Animate every day and likely do not even realize it! This content is hosted on the web, streamed through subscription services, and can be viewed on a wide assortment of television channels.
Of course, many digital advertisements across the web and mobile are also created with Animate. The software even has a number of presets that conform to such ad standards, making it easy to get going with this platform.
One of the things that makes Animate unique, however, is its dynamic and interactive capabilities. Non-interactive animated features such as Star Wars: Galaxy of Adventures and My Little Pony: Friendship is Magic are all great, but Animate can produce rich, interactive content as well.
Dumb Ways to Die and Angry Birds are two well-known examples of interactive content created with the software. Animate, and Flash before it, has a long history of games and interactive applications hosted on the web with Flash Player and HTML5 Canvas, but also on Android and iOS, as packaged natively for those platforms using AIR. In fact, YouTube got its start and saw such immense popularity thanks to Flash Player and what was made possible through these technologies.
Again, Animate is unique and powerful with its ability to combine both design and development capabilities seamlessly within the same environment.
In this section, we explored the history of Adobe Animate and gained an understanding of the many reasons it has changed identities over the decades. We also had a look at some common uses of the software. Coming up, we'll take a comprehensive look at the new features that were introduced between Animate 2020 and Animate 2021.
Exploring New Features of Animate
With nearly every new Animate release, users receive access to new features and improved workflows. Since the release of Animate 2020 in November 2019, there have been a large number of features added to the software that users should know about. We'll go over each of these features now, and will work with some more thoroughly in subsequent chapters of this book!
Assets Panel
While Animate has had a Library panel for most of its existence, it is just used on a per-document basis to contain assets such as bitmap images, sound files, and internal symbols, and once that document is closed, you'd need to open it back up again to transfer any assets between documents for reuse.
Tip
If the Assets panel is not visible within your chosen workspace, you can enable it by selecting Windows | Assets from the app menu.
The new Assets panel works differently from the Library panel in that it contains a persistent set of assets that exist apart from any single document. When you first use the panel, it is prepopulated with a library of material from Adobe, but the real power of this panel comes into play once you create your own custom collection of assets and include them in the panel. Managing important assets in this way allows quick access to them, no matter what document you might be working in at any one time.
Assets are organized into main categories that include Animated, Static, and Sound clips:
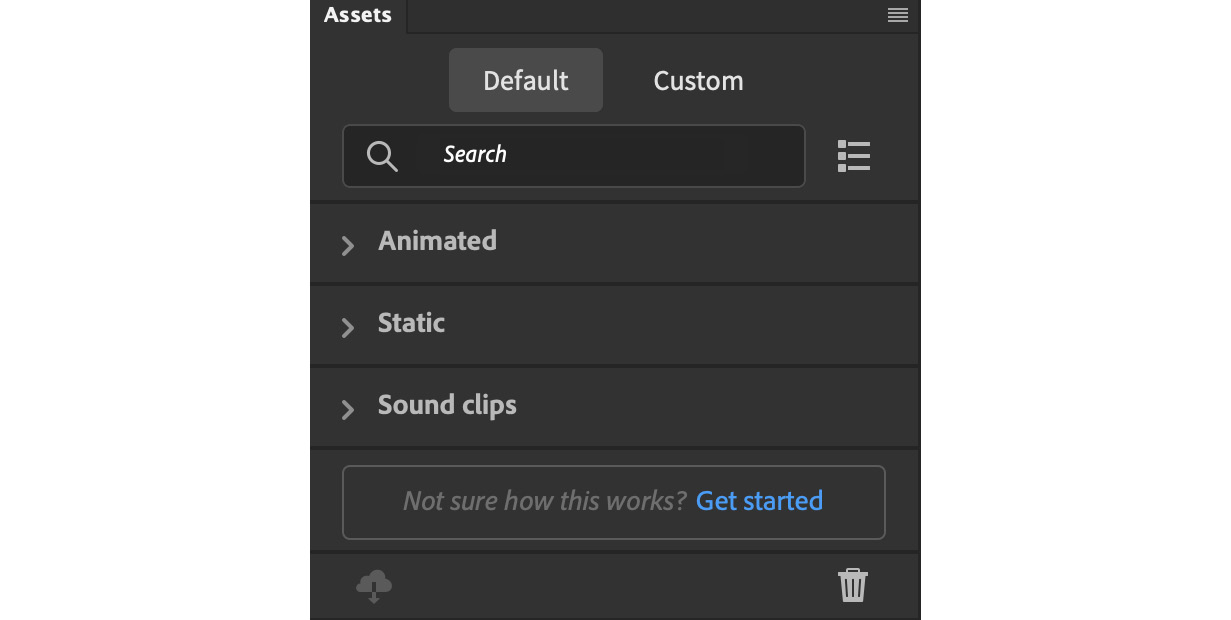
Figure 1.4 – Assets Panel
You can search the panel for keywords and tags or expand a number of subcategories to find what you need.
Managing Animate Assets
Assets are managed externally from the Animate program itself by exporting them as .ana (Animate asset) files. You can generate and export .ana files from any project library and even export a full scene as a single .ana file.
Note
You might expect an Animate authoring file to hold the .ana extension, but the extension for an authoring file is actually .fla! The reason for this is due to Animate formerly being known as Flash Professional.
To export content as an Animate asset file from the library, select the asset you want to export and open the right-click menu:

Figure 1.5 – Asset generation
Choose the Export Asset option and follow the prompts to specify what to include and how to tag your asset for organizational purposes:
Tip
You can also generate assets for use immediately within the Assets panel and avoid the intermediate .ana file format by simply choosing Save as Asset instead of Export Asset from the Library panel.
Upon initial installation, Animate includes a small number of default assets within the Assets panel. Adobe makes additional assets available through a download mechanism available at the bottom of the panel. It appears as a small cloud with a downward-facing arrow. If additional assets are available for download, this icon becomes brightly colored and you can then click on it to download additional assets from Adobe's servers.
Tip
It is also possible to delete assets from the Assets panel that you no longer need. Right-click on the asset you want to remove and choose Delete for the right-click menu that appears. Note that you can also rename assets in this way!
Anyone with a recent copy of Animate can then use the Assets panel to import prepared assets into the Custom area of the Assets panel.
Social Share and Quick Publish
Traditionally, there have been two primary methods for generating distributable content from an Animate document.
The first way would be to publish your content, and what form the published content takes would be tied directly to the document target type. Examples of this would include the following:
- HTML5 Canvas publishes to HTML and JavaScript.
- ActionScript 3.0 publishes to Flash Player.
- WebGL glTF publishes to JavaScript.
- AIR for iOS publishes to an iOS app.
These are just a small set of examples to show a direct relationship between the chosen target platform and the resulting published file types.
The second way would be to export files derived from your Animate document through various export mechanisms found under the File | Export menu. These file types vary quite a bit from one another and are completely independent of the chosen document type. For instance, any document type in Animate can export content as a video file or animated GIF.
The new social share and quick publish options help to get around that confusion and publish directly to some of the most common formats, regardless of the traditional differences between exporting and sharing your Animate content. Both are accessed from the Quick Share and Publish menu at the upper right of the Animate UI, left of both the workspace switcher and the Play Movie button:

Figure 1.6 – Quick Share and Publish appears as a box with an upward arrow emerging from it
When you click this button, you gain access to the Social share (One click social media share) and Publish (Export in multiple formats) options:

Figure 1.7 – Social share
Choosing either option will open a secondary menu of choices. Let's take a look at these options.
Social share
Choosing Social share will bring you to the next step in that process, which presents the choice of sharing directly to Twitter or YouTube, with more social channels coming soon:

Figure 1.8 – Social share
Selecting either of these two options will necessitate an authentication task that allows Animate to publish directly on your behalf.
Once authenticated, Animate generates the media in a format suitable for either channel and allows the inclusion of a small message (with hashtags, of course!) before posting. After the content is successfully posted to the chosen social channel, Animate lets you know through a small confirmation dialog and the media is, at that point, live.
Quick Publish
Choosing Publish provides an alternative set of choices that depends somewhat on your document target platform.
For instance, if you're using HTML5 Canvas, you'll get the option to publish an MP4 video file, an animated GIF file, or a set of files compatible with HTML/JavaScript:

Figure 1.9 – Quick publish
However, if working from an ActionScript 3.0 document type, you'll be presented with only options for video and animated GIF, since a .swf file is no longer appropriate for public distribution.
Note
SWF files can be used in many different ways as part of an authoring workflow across applications such as Animate and After Effects, but are no longer able to be used in public channels due to web browsers no longer supporting Flash Player since December 31, 2020. Adobe no longer supports Flash Player in the web browser, but the format is thankfully still useful for advanced workflows.
Just as with the channel selection for social sharing, the quick publish options will likely change over time, especially as more targets are added to Animate.
Timeline and Symbol Enhancements
Almost every new release of Animate contains not just entirely new features but also quality-of-life improvements, which expand upon existing functionality in meaningful ways. This new version of Animate does an excellent job in this area, expanding and improving workflows across the timeline and symbols.
Converting Layers to a Symbol
Oftentimes when working in Animate, you'll find yourself having created some really engaging content in the main timeline that you then decide should have really been created within a symbol instead. At that point, you'll need to create a new symbol, then manually cut the layers you need as part of that symbol from the main timeline, and finally, paste these layers into the empty symbol itself. It can be a lot of work!
Thankfully, with this new version of Animate, converting layers to a symbol no longer has to be such a manual process.
We now have the ability to select the layers we want to convert to a symbol, open the right-click context menu from the selected layers, and choose the new Convert Layers to Symbol option:
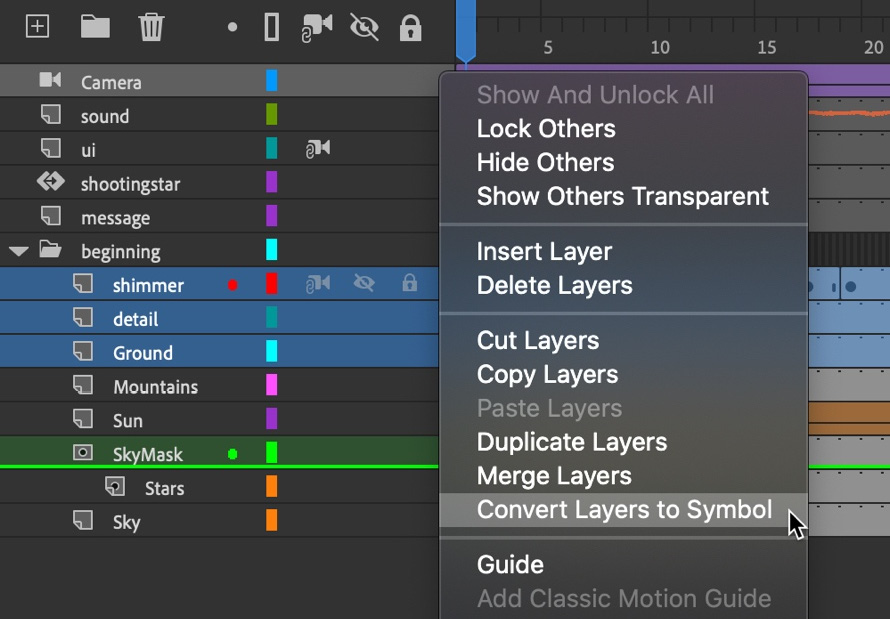
Figure 1.10 – Converting layers to a symbol
The Convert Layers to Symbol dialog will then appear. It looks exactly like the dialog to either create an empty symbol or convert existing assets to a symbol:

Figure 1.11 – Convert Layers to Symbol Dialog
You can provide a symbol name, choose the symbol type, and even set the registration point for your new symbol.
Once you hit OK, the selected layers will be automatically transferred to the symbol's internal timeline and the original layers are replaced with a new layer containing an instance of the new symbol.
Converting Symbols to Layers
In a similar way, you can perform the inverse action on an existing symbol. Simply right-click on a symbol instance and choose Break Apart Symbol to Layers from the menu that appears:

Figure 1.12 – Breaking Apart a Symbol to Layers
New layers will be created, and the contents of the selected symbol will be placed in each layer with all properties intact.
Additional Looping Options for Graphic Symbol Instances
We also have additional looping options when working with graphic symbols. These small options will make long-time users of Animate very happy!
With a graphic symbol instance selected on the Stage, have a look at the Properties panel for Object properties and locate the Looping section:

Figure 1.13 – Graphic Symbol Looping Options
Now, this will only exist for graphic symbols, so any other type of object selected will not include this special section.
Notice the set of five buttons at the top of this section. Previous versions of Animate only included three options here:
- Play Graphic in Loop
- Play Graphic Once
- Play Single Frame for the Graphic
There are now two additional options that will make things so much easier whenever you want to reverse the playback of a graphic symbol instance:
- Play Graphic Reverse Once
- Play Graphic in Reverse Loop
To reverse playback before these options, you'd need to enter the symbol, copy and paste keyframes and associated tweens, and finally, reverse the order of the keyframes to create reverse motion. The same effect can now be accomplished with the click of a button!
Copy and Paste Tween Settings
Animate has also improved the tween management controls in this new version (we will discuss tweening in more detail in Chapter 5, Creating and Manipulating Media Content). You now have the ability to copy and paste tween settings from one tween to another.
With a tween selected in the timeline, look at the Properties panel for Frame properties and locate the Tweening section:

Figure 1.14 – Copy and Paste Tween Settings
At the upper right of that section is now a small gear icon and clicking it gives you access to additional tween options, which allow you to choose Copy settings, Paste settings, or even Reset settings for the selected tween.
Advanced Rigging
Animate includes a variety of ways in which various structures can be bound together in some form of hierarchy to create a rig. The most common of these involve layer parenting through the use of Advanced Layers mode and Inverse Kinematics (IK) through armatures and poses. The expanded rigging system in Animate expands upon the use of IK armatures in order to isolate a rig independently from the visual assets for reuse across additional visual forms.
Note
The rigging process described here is in beta form as of the time of writing this book. Adobe intends to continue improving upon the rigging process, and rigs themselves, for subsequent releases of Animate.
Rig Mapping
The new Rig Mapping panel can be opened from the application menu by choosing Window | Rig Mapping.
This panel will also open automatically when selecting a rig for use within the Assets panel, as you must identify individual movie clip symbol instances to apply to specific bones of the rig armature:
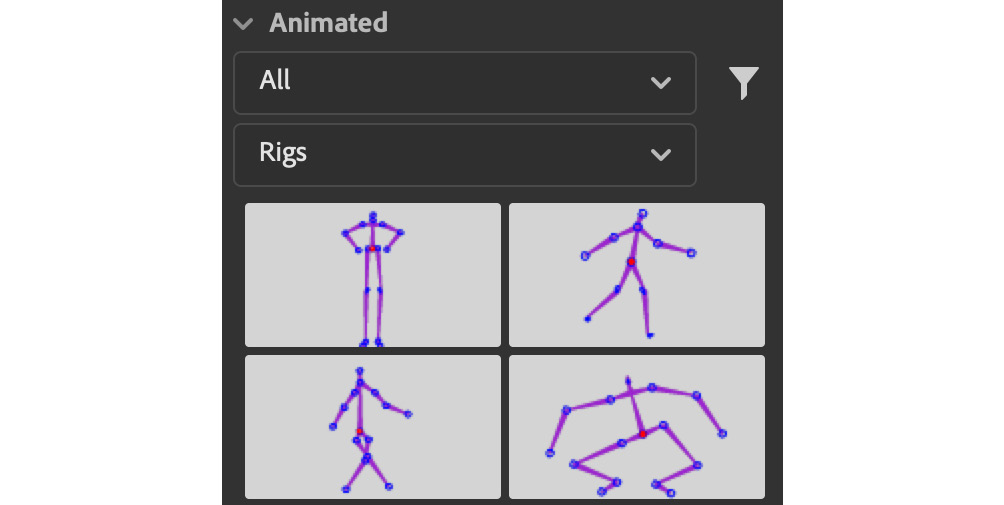
Figure 1.15 – Locating Rigs within the Assets panel
Rig Mapping is, at this point, bound directly to Rigs available through the Assets panel. Of course, you can create and use your own rigs as assets as well!
To apply a rig from the Assets panel to a symbol instance, you must first double-click the instance to enter the symbol itself. Dragging and dropping a rig onto the Stage will then open the Rig Mapping panel and allow you to map certain visual elements, such as torso, arms, and legs, to the rig itself.
You simply click each bone in the Rig Mapping panel and then choose individual movie clip symbol instances within the containing symbol to associate each bone with a symbol instance in order for the system to recreate the armature:
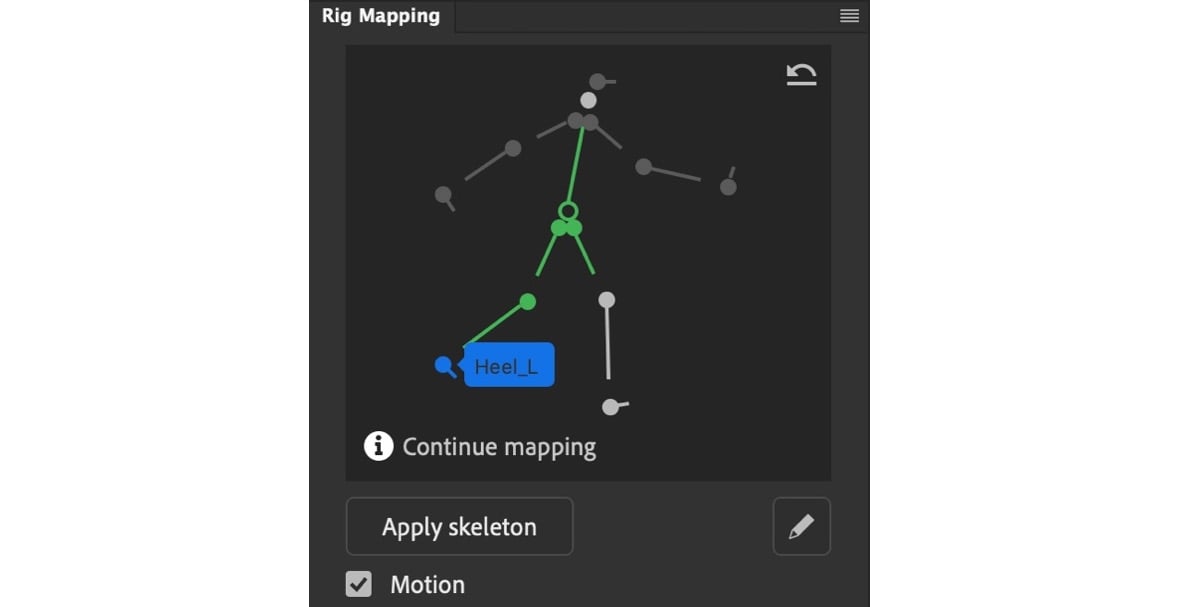
Figure 1.16 – Applying a pre-built rig
Be sure to start with the root node and then branch off from there. Rigged bones will appear green, while unrigged bones are gray in color.
Once you've mapped all the necessary visuals to the rig, choosing ApplySkeleton will create an armature, with full animation if the Motion checkbox is selected, to your symbol instance.
When a skeleton has been completely applied to a set of objects, the rig will appear pink.
Tip
There is also a way to automatically map a rig to your symbol instance and avoid the manual mapping process. For this to work, be sure that each of the movie clip symbol instances that make up your visuals include instance names that are identical to those from the rig itself. This method bypasses the visual Rig Mapping panel workflow altogether but is very specific.
Bone Tool Enhancements
Since the current rigging model is based upon IK armatures, and in an effort to improve how this model functions, improvements have been made to the IK engine itself.
With this particular improvement, we have the ability to further refine our rigs and control constraints at the end of leaf nodes for our armatures. While constraints were available across other node types as part of an armature in the past, this extends that model all the way to the end of each branch.
Auto KeyFrame
Traditionally, when using a Shape Tween or Classic Tween, you had to manually create keyframes before making a change in the object properties on the Stage. This is normally done by selecting a frame location where you'd like to create a keyframe and choosing to insert a new keyframe from the buttons above the timeline, from the right-click menu, from the application menu by selecting Insert | Timeline | Keyframe, or by using the F6 keyboard shortcut. You then select that keyframe and modify the properties of your object on the Stage to create a change between the preceding keyframe and the one just created.
The new Auto KeyFrame option makes Shape and Classic Tweens behave closer to how Motion Tweens work, in that keyframes are created automatically as you adjust object properties across the timeline.
The Auto KeyFrame option can be turned on and off as desired from the Insert Frames Group drop-down menu:

Figure 1.17 – Auto KeyFrame
When enabled, you get a small, circular indicator that appears above any selected frame. This indicates that a keyframe will be created there if any object properties are changed.
Hands-on Tutorial Creator
Beginning with Animate 2020, Adobe began to ship a number of in-app tutorials within Animate. While this began with a set of 2 introductory tutorials, the selection has now grown considerably larger and includes 15 tutorials of varying complexity. These tutorials appear within the application directly, in the form of little card overlays on the application UI.
They can include text instructions, motion previews of the step in action, and the ability to navigate across the various steps of a tutorial:
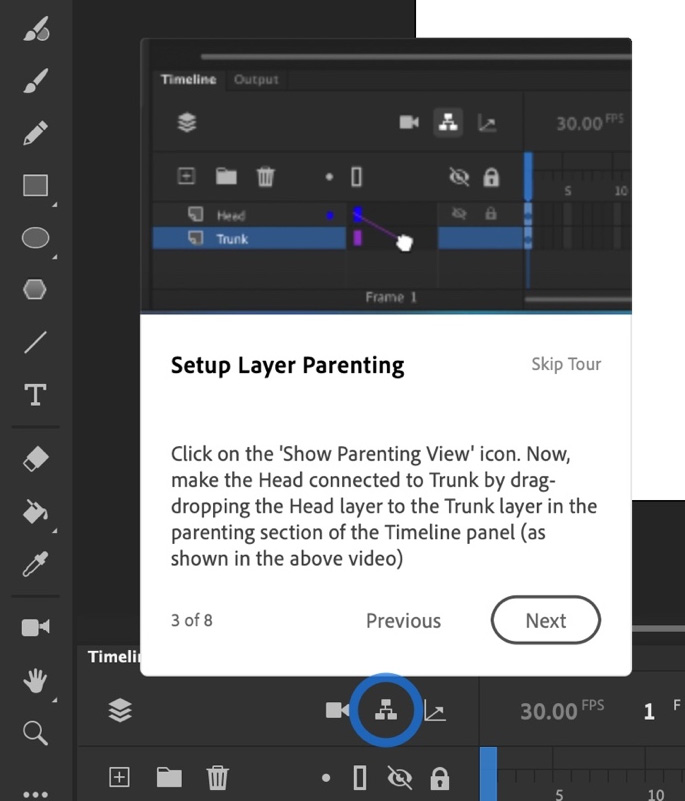
Figure 1.18 – Steps appear as contextual cards within Animate
Each tutorial will contain a curated set of steps prompting the user to perform certain actions in order to provide a step-by-step walkthrough directly within the application.
Adobe-supplied tutorials can be activated under the Help menu by selecting a specific tutorial from the Hands-on Tutorial submenu:
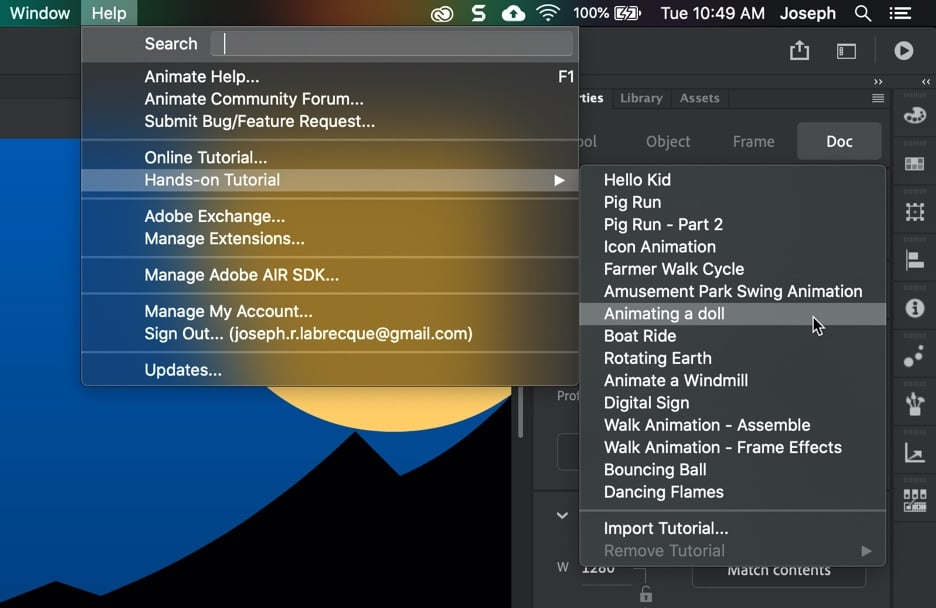
Figure 1.19 – In-app tutorial selection
These tutorials are meant to showcase certain techniques within the application in a way that is visual, engaging, and reliant upon the wilful action of the user. The tools to build these same types of tutorials are now available to any Animate user through a built-in extension.
All you need to do to get started is open Window | Extension | Hands-on Tutorial Creator to access this feature:
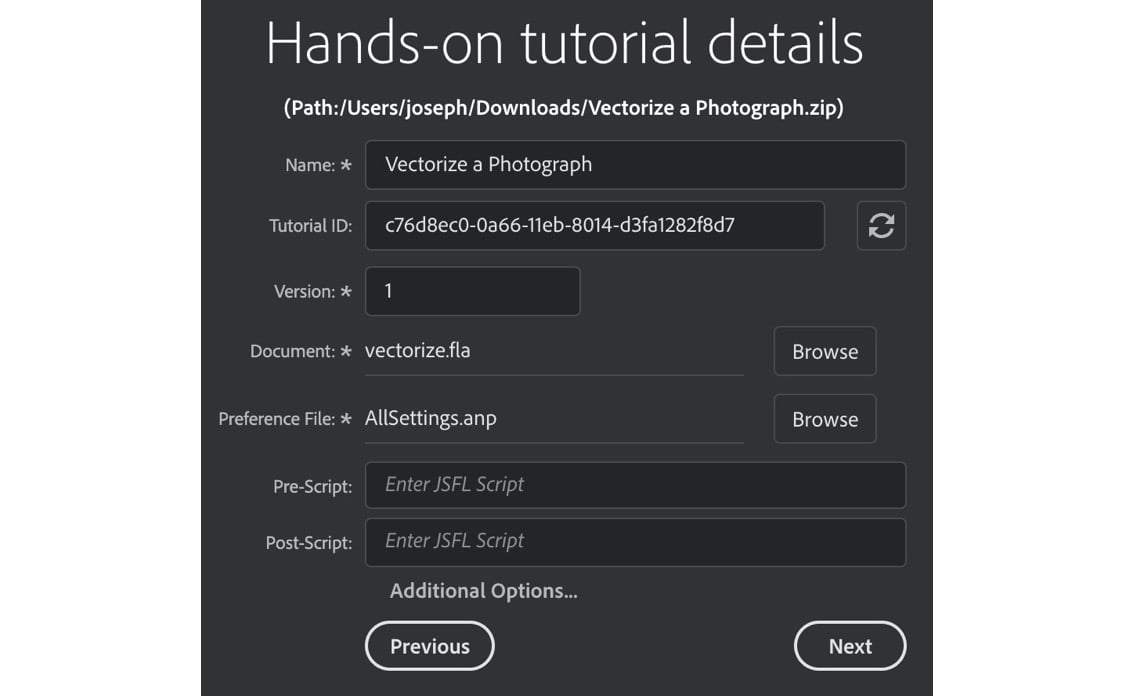
Figure 1.20 – Hands-on Tutorial Creator Panel
With the panel open and ready, you'll then proceed step by step through the process, building out various cards that contain explanatory steps, preview images or animation, and contextual prompts anchored to the application interface.
We'll explore this feature in depth in Chapter 13, Extending Adobe Animate.
Selective Texture Publishing
When using an HTML5 Canvas document, if you select Texture from the Export as dropdown within the Image Settings tab under the publishing options, Animate will process your textures using new optimizations thawt aim to reduce the file size by only converting complex vectors to bitmap textures, while retaining simpler shapes as vector data.
While there are additional export options for images when publishing HTML5 Canvas documents, in order to make use of this feature, you must be sure to choose Texture as the others will not support the new optimizations:

Figure 1.21 – Selective Texture Publishing
Adobe claims that even with such optimizations, runtime performance remains stable.
New Canvas Blend Modes
ActionScript 3.0 remains the most powerful and flexible document type you can choose to work with in Animate. It is a format that grew alongside the software and, for a long time, was the only platform available! Adobe owned the format and could add to or make adjustments however they pleased, making it all very powerful.
HTML5 Canvas is based upon web standards and, as such, does not have a close relationship with Animate, nor the flexibility and power that comes with a proprietary format such as ActionScript 3.0 and Flash. Because of this, things move much more slowly, and HTML5 Canvas still has a long way to go before it gets even close to what a Flash-based SWF can do in many areas. A good example of this is blend mode support. For a long time, there were only a few blend modes that were available to use when authoring content for HTML5 Canvas.
In newer versions of Animate, this has opened up a bit and many more blend modes are now accessible to content authors:

Figure 1.22 – Blend mode selection
The list of blend modes when using HTML5 Canvas is now much closer to what we can use when targeting ActionScript 3.0.
Previously supported blend modes in HTML5 Canvas included Add and Normal; that was it! In the current version of Animate, we have access to Darken, Multiply, Lighten, Screen, Overlay, Hard Light, and Difference, in addition to the two that were previously supported. Even with these additions though, there are a few that will still be disabled when using HTML5 Canvas.
Note
Blend modes in HTML5 Canvas are still quite limited as they cannot be animated across keyframes. Once set, that is what you are stuck with at runtime!
Stream Audio Sync in Canvas
One of the best reasons for choosing the ActionScript 3.0 target platform in Animate is that it provides not one but four sound sync types. Audio is hugely important in many mixed-media projects, and massively important in animation, especially when synchronizing sound with visual motion, event sounds, characters speaking, incidental noises, and so forth. If audio sync is off, the viewer will notice!
The best way to ensure that your audio is perfectly synchronized to the animated content is through the use of the Stream sync type. However, until now, the Event sync type was all that was available when targeting HTML5 Canvas. This meant that the use of audio inside an HTML5 Canvas project was quite limited, as Event sounds simply began playing and only stopped when they were over, making it really common for the audio and video to get out of sync.
When using HTML5 Canvas documents in Animate 2021, you can choose between both sync models!
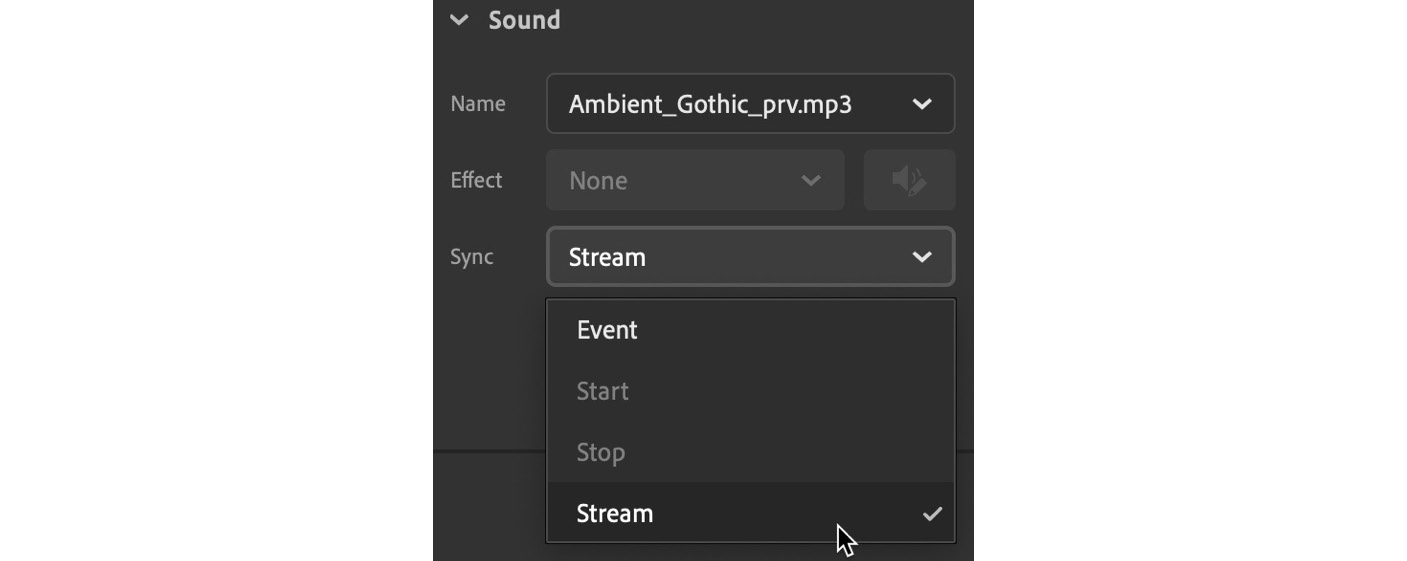
Figure 1.23 – Audio Stream Sync
Stream sounds are actually bound frame by frame to the timeline along with any visual content, ensuring that the sound and visuals always stay perfectly in sync with one another.
Tip
With the Stream sync type enabled in HTML5 Canvas, this means that you can now actually use the new Auto Lip-Sync feature of Animate in these documents as well.
The audio sync type can be chosen from the Frame tab of the Properties panel when an audio file from the project library has been assigned to a frame.
Note
Related to the sync type, you can now split the stream audio embedded on the timeline by choosing Split Audio in the right-click menu. Split Audio enables you to pause the audio when necessary and resume the audio from where it was stopped at a later frame on the timeline.
Enhanced Video Export
The amount of control you now have when exporting your Animate project as a video file has been greatly enhanced. Animate leverages Adobe Media Encoder to process video exports in a similar fashion to Premiere Pro and After Effects.
Many of the options that you once had to choose in Media Encoder are now present directly within the Export Media dialog within Animate. These include Format and Preset. These options are gathered directly from Media Encoder, so are the same across both applications.
There is also the option of specifying a specific start time and duration for your exported video, and you can even export specific scenes, so long as your working publishing targets support them.
Choose File | Export | Export Video/Media from the application menu to view all these new options as part of the Export Media dialog:
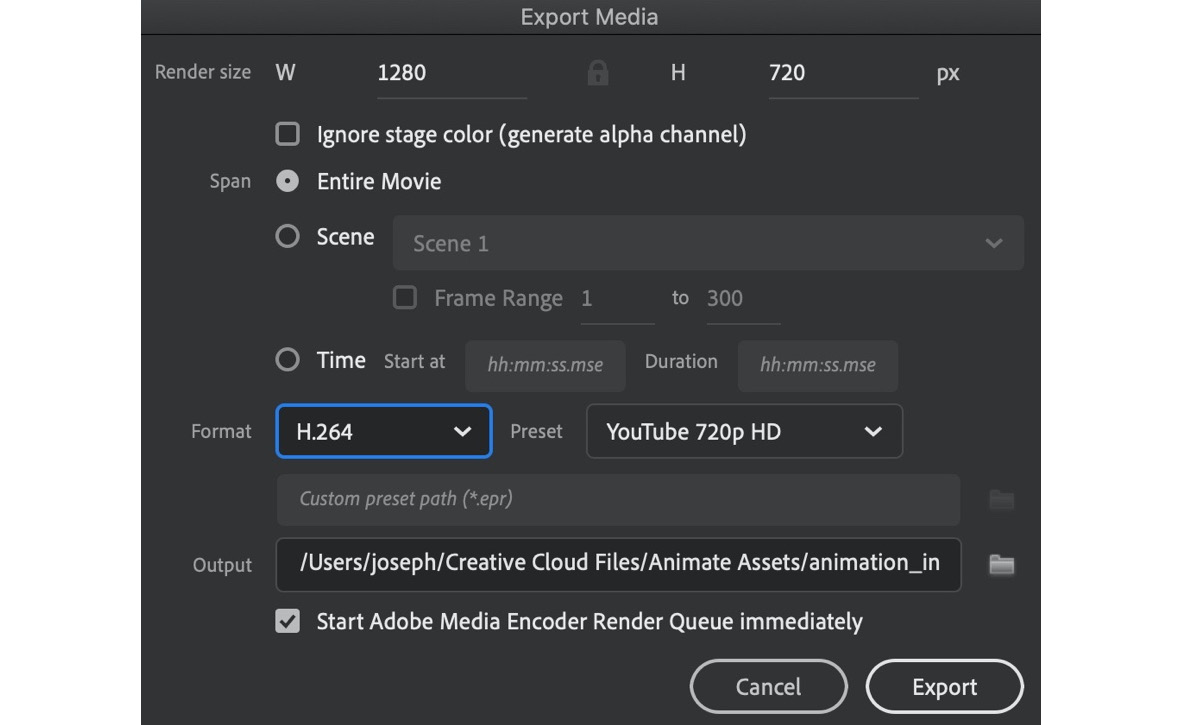
Figure 1.24 – Export Media Dialog
Once you click Export, Media Encoder will open and process the file, but you don't have to interact with that program directly at all any longer.
In this section, we had a comprehensive look at all the new features introduced in Adobe Animate over the past year. Coming up, we'll learn how to keep up to date with new versions of the software and related industry activity.
Keeping Up to Date with Animate Releases
As we have seen, Animate receives a significant amount of features between major versions! It's always a good idea to stay on top of changes with any software for the benefits provided through new features, general improvements, and overall compatibility with other software. Aside from the software itself, it's beneficial to understand how others are using the software and general thoughts around intersections with others in the industry.
Adobe Creative Cloud Desktop
Just like any other Adobe Creative Cloud desktop application, Animate is managed through the Creative Cloud desktop application. You can download the desktop application from https://www.adobe.com/creativecloud/desktop-app.html, either if you need to install it for the first time or if you need to perform a forced update.
The Creative Cloud desktop app will alert you whenever a new version of Animate has been released:
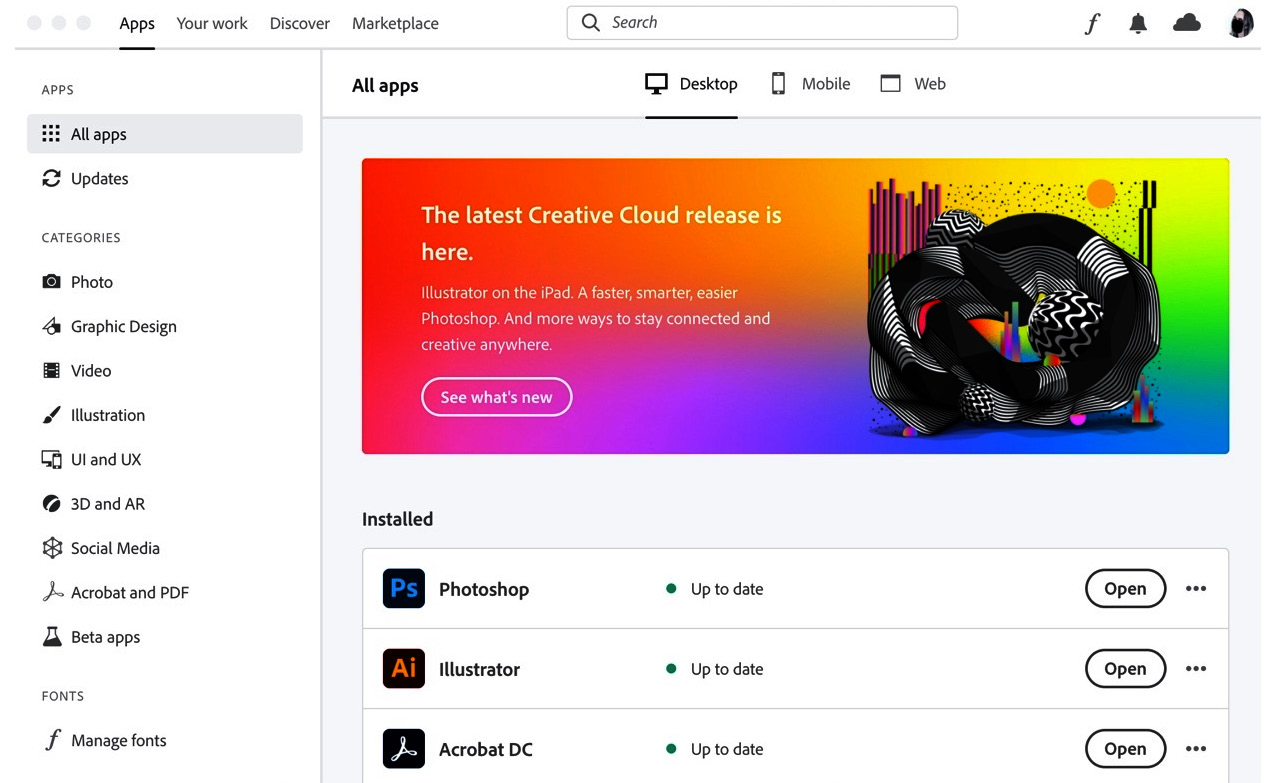
Figure 1.25 – Creative Cloud Desktop
If you have the application installed, you can easily see whether Animate is up to date by viewing your installed applications.
Any that are up to date will indicate this and those that have an update will display that information as well:

Figure 1.26 – Animate is up to date!
It's a great mechanism for staying on top of new updates across all Creative Cloud software.
To manually check for updates, click the Updates tab along the side and locate the More Actions button at the upper right of the screen. Clicking this button allows you to either Enable Auto Update or Check for Updates. With auto-update disabled, you'll need to manually update Animate when a new version is released.
Adobe Blog
The Adobe Blog at https://blog.adobe.com/ is a great resource for keeping up to date on all things Adobe. Of course, articles having to do with Animate are included here as well!
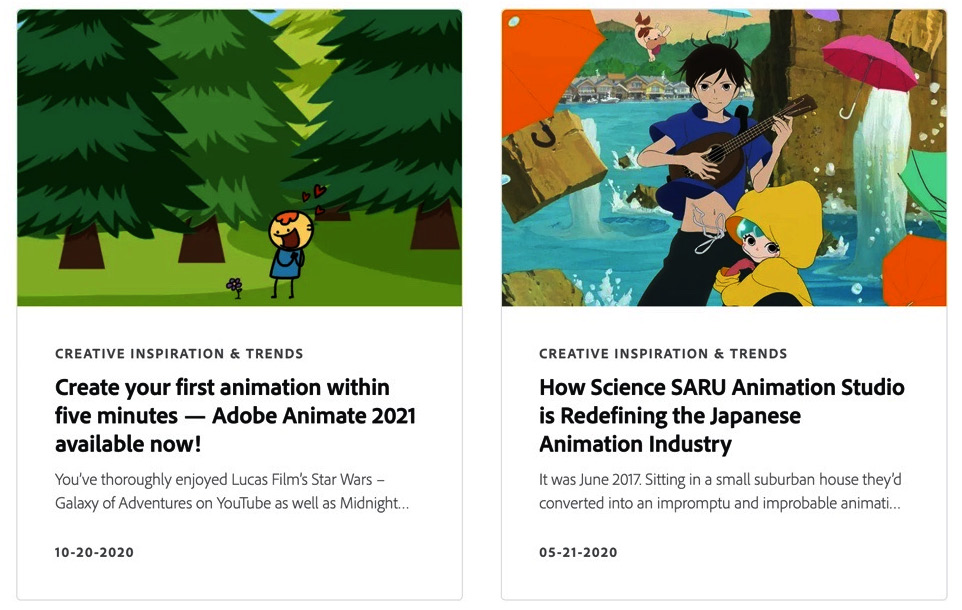
Figure 1.27 – Adobe Animate blog
Subjects range from animator interviews and project showcases to new feature announcements. Many of these are written by Ajay Shukla from the Animate team and can be found under his profile: https://blog.adobe.com/en/authors/ajay-shukla.html.
Adobe MAX
Generally, new versions of Animate (and most other Adobe Creative Cloud software) are released at the annual creativity conference: Adobe MAX. You can learn more about Adobe MAX at http://max.adobe.com/ and even register to attend if it is that time of the year. MAX normally takes place in the autumn and runs for about 3 days.
It is a great opportunity to learn more about Animate and other creative software while being inspired by industry experts:

Figure 1.28 – Adobe MAX Creativity Conference
Adobe Animate 2020 was released at Adobe MAX 2019, and Animate 2021 was released during MAX 2020. You can see how important this conference is to Adobe and their release strategy!
In this section, we examined how to keep Animate updated with the most recent version and explore news and happenings in the wider community.
Summary
We have already gone over a lot of content in this first chapter! You should now have a good understanding of the state of Adobe Animate through the years and can speak of its current capabilities. You also now have an excellent understanding of all the new features that have been released since the previous major version of the software. You know how to use Animate assets, how to manage rigs, and can even create your own custom, in-app tutorials. We also covered some good places to look at so as to ensure that your installation of Adobe Animate remains up to date and that you stay abreast of any changes to the software.
In the next chapter, we'll explore the various target platforms supported by Animate. Get ready to learn about HTML5 Canvas, ActionScript 3.0, AIR for desktop, WebGL glTF, and more!



 Download code from GitHub

