


This chapter will cover the following recipes:
Using Flash Professional CS5.5 to develop Android applications
Targeting AIR for Android with Flash Professional CS5.5
Using Flash Builder 4.5 to develop Android applications
Enabling Flash Builder 4 or Flex Builder to access Flex Mobile SDKs
Using Flash Builder 4 and below to develop Android applications
Using Powerflasher FDT 4.2 to develop Android applications
Enabling Powerflasher FDT 4.1 to access Flex Mobile SDKs
Using Powerflasher FDT 4.1 and below to develop Android applications
Converting a Standard Flex project to a Flex Mobile project
Configuring the AIR SDK to Package AIR for Android applications on Windows
Configuring the AIR SDK to Package AIR for Android Applications on Linux or Mac OS
There are many choices of IDE (Integrated Development Environment) for developing Flash platform projects for Android devices. We will focus on a few of the most popular: Adobe Flash Professional, Adobe Flash Builder, and Powerflasher FDT. This chapter will include recipes geared to getting a new Android project started in each IDE, and making the most of what is available with regard to workflow and toolsets. You will learn how to configure each environment in order to develop for the Android operating system.
Flash Builder and FDT, along with the Flex framework have the most to offer for Android development as there is a streamlined workflow, set of controls, and containers available especially for the development of mobile Android projects using Adobe AIR for Android as a development platform.
Flash Professional provides some workflow tools, but the main benefit lies in potential familiarity with the environment, and the generation of projects not tied to the Flex framework. This IDE is often used for game development because of its open nature.
For the purists or users of alternative IDEs, it is also possible to generate Android applications through a command line interface using the free AIR SDK tools.
Flash Professional is a good choice for building Android applications that are more lightweight than their Flex-based counterparts. There is not as robust a workflow in the case of Flash Professional when compared to what is included with an IDE such as Flash Builder, but depending upon the application being developed, it may be the better tool for the job.
Flash Professional CS5.5 includes everything needed to target Android already baked in!
Setting up an AIR for Android project in Flash Professional CS5.5 is very direct:
1. We will first create a new project by choosing AIR for Android under the Create New section of the Flash Professional welcome screen:

2. We can then verify that we are targeting AIR for Android by taking a look at the document properties under the Properties panel:

3. We can also modify existing Flash documents to target Android by selecting AIR for Android as the Player option.
4. Now, simply build your Flash project as you normally would. Adobe has made the process of targeting Android with Flash Professional CS5.5 absolutely painless.
With Flash Professional CS5.5, we have more compiler options available to us than ever before. Taking the steps outlined in the preceding section will ensure that your project is capable of targeting AIR for Android in place of the desktop Flash Player or AIR for desktop by adding a number of Android-specific compiler options to our publish settings.
Flash Professional is a good choice for building Android applications that are more lightweight than their Flex-based counterparts. There is not as robust a workflow in the case of Flash Professional when compared to what is included with an IDE such as Flash Builder, but depending upon the application being developed; it may be the better tool for the job.
There are two ways of targeting AIR for Android with Flash Professional:
1. Firstly, create a new project by choosing AIR for Android under the Create from Template section of the Flash Professional welcome screen:

2. This will present a choice of several templates targeting AIR for Android. Choose the appropriate template for your device:

3. Alternatively, create a new ActionScript 3.0 project and open your publish settings by going to File | Publish Settings.
4. This will open a dialog allowing you to choose your target platform. In this case, we want to select AIR Android as the appropriate Player:

5. Now you will be able to adjust Application and Installer Settings targeting Android, and compile projects into
.apkfiles.
With recent versions of Flash Professional, we have more compiler options available to us than ever before. Taking the stepsoutlined abovewill ensure that your project is capable of targeting AIR for Android in place of the desktop Flash Player or AIR for desktop by adding a number of Android-specific compiler options to our publish settings.
If developing for the mobile Flash Player for Android, we will not need to configure anything for the AIR runtime. To target Flash Player, we must simply keep in mind the limitations and differences inherent to mobile Android devices.
For more information about compiling AIR for Android applications with Flash Professional, you will want to refer to Chapter 11, Final Considerations: Application Compilation and Distribution
Flash Builder 4.5 already comes equipped with everything, we need to begin developing mobile applications using either ActionScript or the mobile Flex Framework. For those unfamiliar with the differences between ActionScript and Flex, basically, the Flex framework provides a set of components, layouts, and data control that is preconfigured for building Flash applications, whereas when using ActionScript by itself, everything must be written from scratch. Flex 4.5 includes mobile features such as optimized component skins to run very well on devices, a new ViewNavigator application type, which is tailored to the mobile experience, and includes support for touch and gestures across the mobile-optimized component set.
In place of a normal ActionScript project or Flex project, we must specifically create either an ActionScript Mobile project or Flex Mobile project:
1. In the Flash Builder Package Explorer, right-click on some empty space and choose New | Flex Mobile Project or New | ActionScript Mobile Project:

2. We will then provide the mobile project with a name and choose where Flash Builder should store the project files on the local machine.
3. The next step allows us to choose the target platform, in this case, Google Android, and define which application template to use (if you are making use of the mobile Flex framework). We can also set the default
Viewname on this screen through the Initial view title input..4. Additionally, we will choose whether or not the application will reorient based upon device tilt with the Automatically reorient option. We can select to display the application at full screen by selecting the Full screen checkbox.
5. One last selection to make on this screen is whether we would like to use density aware skins in our mobile components by selecting the Automatically scale application for different screen densities checkbox and selecting the appropriate Application DPI setting.

6. The rest of the project setup is really the same as any other project in Flash Builder.
The choices we make when setting up a new project in Flash Builder determine which libraries are imported, and used in an application. Defining a mobile application will not only include specific component skins targeted to mobile, but will also restrict us from using components, which are inappropriate for such use. We will also have full access to mobile-specific application structures such as the mobile ViewNavigator, ActionBar, or TabBar. These additions to the mobile Flex framework can be used to greatly speed up the development of stateful mobile Android applications, as they deal with application structure, navigation controls, and layout.
You don't necessarily need to have the latest version of Flash Builder to write applications for Android. This recipe will demonstrate how to integrate the latest Flex SDK into an older version of Flash Builder (or even Flex Builder) to take advantage of the mobile framework improvements.
Note
Even though we will be able to use the new component sets and streamlined structure for Android, many of the workflow enhancements such as support for a new mobile application view structure, optimized component skins with touch and gesture support, and other niceties found in newer versions of Flash Builder simply will not exist and we will have to compile the application for distribution using the AIR SDK and command line tools.
The following steps are used for getting an older version of Flash Builder configured for Android development:
1. Visit the Adobe Open Source website at http://opensource.adobe.com/ and locate the latest build of the Flex SDK.
2. Download a
ZIPfile of the latest Adobe Flex SDK and extract it to a hard drive to a location you will remember. For instance,C:\SDKs\Flex.3. Launch Flash Builder and go to Window | Preferences.
4. Scroll down the Flash Builder menu item and select Installed Flex SDKs. You will now see a list of each of the SDKs currently available in your copy of Flash Builder:

5. Click the button labeled Add… and browse to the location of the Flex SDK you recently downloaded.
6. Provide the dialog with a meaningful name and click OK. For example,
Flex 4.5. If we want to be very specific, we can always name it the full build name, such as:Flex 4.5.0.16076.
7. The
Flex 4.5SDK will now be available for use in your application. To use it in a project, simply select this SDK when creating a new project or when modifying the Flex Compiler properties in an existing project.
Using a more recent version of the Flex SDK within Flash Builder allows us access to the mobile theming options and other specific APIs not available in previous SDK releases. This will also expose mobile classes to code hinting and other IDE workflow constructs.
If changing the Flex SDK version to be used in a project, we may receive a number of warnings or errors due to changes in the framework from version to version. Simply go through the project files and correct each warning or error that appears within the Problems panel to correct any issues.
If developing projects that target Flash Player on Android, you simply need to be mindful of device and operating system constraints.
It is important to note that versions of Flash Builder prior to Flash Builder 4.5 will not include the ability to compile projects to .APK (the Android application file extension) and you will need to compile your project using the freely available AIR SDK. See Chapter 11, for information on how to do this.
It is also worth a mention that while you can develop your applications for Android using older versions of Flash Builder, you will not receive many of the benefits provided by a newer release, such as code completion.
To develop mobile Android application in Flash Builder 4, we will need to configure Flash Builder to enable access to a mobile Flex SDK. See the previous recipe if you have not yet configured Flash Builder or Flex Builder in this manner.
There is no specific mobile workflow or tooling built into versions of Flash Builder prior to Flash Builder 4.5. By taking the following steps, we can ensure that our project will be mobile-compatible:
1. In Flash Builder, right-click in the Package Explorer panel and choose New | Flex Project. Alternatively, we can choose ActionScript Project, but this will not include any mobile benefits, as the actual Flex SDK components will not be employed. However, it is useful to note that ActionScript projects will generally perform better than their Flex counterparts simply due to the fact that they do not rely on such a heavy framework.

2. The New Flex Project dialog will appear in which you must provide a Project name, and select whether to create the project targeting Web or Desktop. If this project will be compiled for AIR for Android, we will want to make sure to choose Desktop, as this application type will target the Adobe AIR runtime. If creating a project targeting Flash Player in the browser, we will choose Web.
3. When choosing Desktop, we will also want to be sure to choose a mobile-enhanced version of the Flex SDK for our Android project. Flex 4.5 and above include everything we need to begin developing robust Android applications.

4. The last thing we must do is make sure that the mobile-enabled Flex SWCs are going to be used in our project. In order to declare
<s:ViewNavigatorApplication>or<s:TabbedViewNavigatorApplication>for the main container of our project, these specific SWCs must be accessible, else Flash Builder will report errors.5. The final section of the New Flex Project dialog allows us to be sure the mobile SWCs are included. You will notice that
mobilecomponents.swcis not included in our project. Select the tab labeled Library path and click on the button labeled Add SWC…: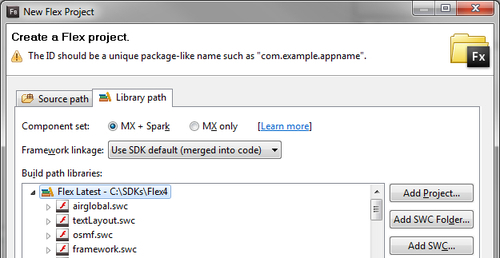
6. When the Add SWC dialog appears, browse to the location of the selected Flex SDK. Assuming we unpackaged the SDK to
C:\SDKs\Flex4we will now browse toC:\SDKs\Flex\frameworks\libs\mobileselect themobilecomponents.swcfile, and click on Open. This will add support for the mobile components to our application.7. Complete the project setup. We are now able to use mobile specific containers and controls without receiving errors from Flash Builder, but we must make a few more adjustments in order to correctly compile our application.
8. Locate the AIR descriptor file in your project. It is normally named something like
{MyProject}-app.xmland resides at the project root. Open this file and change the<visible>attribute to true. It may be necessary to uncomment this node, if it has been commented out.9. Right-click on your project in the Package Explorer and select Properties.
10. Select the Flex Compiler menu option and add the following to the Additional compiler arguments:
theme=C:\{SDK Location}\frameworks\themes\Mobile\mobile.swc11. Finally, switch the root node of your main application file from
<s:Application>to<s:ViewNavigatorApplication>. We can now author and compile applications using the mobile flex framework components.
When specifying which type of project we want to create in Flash Builder, the IDE automatically makes available certain portions of the Flex framework so that we can work with all the components necessary for our project. Flash Builder 4 and earlier do not ship with any mobile-enabled Flex SDK and do not provide a workflow for Android projects. Because of this, we must explicitly tell Flash Builder to make use of these extra framework components.
The application descriptor file mentioned in the steps in the preceding section is used to configure an AIR application in various ways: setting the initial window properties, chrome attributes, and even system icons.
It is important to note that versions of Flash Builder prior to Flash Builder 4.5 will not include the ability to compile projects to .APK (the Android application file extension) and you will need to compile your project using the freely available AIR SDK. See Chapter 11 for information on how to do this.
It is also worth a mention that while you can develop your applications for Android using older versions of Flash Builder, you will not receive many of the benefits provided by a newer release, such as code completion.
Powerflasher FDT is an increasingly popular development environment for authoring projects for the Flash Platform. FDT 4 comes equipped with everything you'd expect to begin developing ActionScript and Flex applications, but FDT 4.1 and below do not support any mobile workflow or ship with the mobile-enabled Flex SDK.
There are only a few steps to getting Powerflasher FDT 4 configured for Android development:
1. Visit the Adobe Open Source website at http://opensource.adobe.com/ and locate the latest build of the Flex SDK.
2. Download a
ZIPfile of the latest Adobe Flex SDK and extract it to a hard drive to a location you will remember. For instance,C:\SDKs\Flex.3. Launch FDT and go to Window | Preferences.
4. Scroll down the FDT menu item and select Installed SDKs. You will now see a list of each of the SDKs currently available in your copy of FD:

5. Click on the button labeled Add and browse to the location of the Flex SDK you recently downloaded.
6. Provide the dialog with a meaningful name and click OK. For example,
Flex 4.5:
7. The
Flex 4.5SDK will now be available for use in your application. To use it in a project, simply select this SDK when creating a new project or when modifying the Flex Compiler properties in an existing project:
Powerflasher FDT 4 is an Eclipse-based IDE (just like Flash Builder) and employs many of the same methods of extending the application and adding SDK packages. Using a more recent version of the Flex SDK within FDT allows us access to the mobile theming options and other specific APIs not available in previous SDK releases.
It is important to note that versions of Flash Builder prior to Flash Builder 4.5 will not include the ability to compile projects to .APK (the Android application file extension) and you will need to compile your project using the freely available AIR SDK. See Chapter 11 for information on how to do this.
It is also worth a mention that while you can develop your applications for Android using older versions of Flash Builder, you will not receive many of the benefits provided by a newer release, such as code completion.
To develop mobile Android application in FDT 4.1, we will need to configure FDT to enable access to a mobile Flex SDK. See the previous recipe if you have not yet configured FDT in this manner.
There is no specific mobile workflow or tooling built into versions of FDT prior to FDT 4.2. By taking the following steps, we can ensure that our project will be mobile-compatible:
1. In FDT, right-click in the Flash Explorer panel and choose NEW | New Flash Project:

2. The New Flash Project dialog will appear in which you must provide a Project name, and select whether to create the project using ActionScript 3 or Flex. We need to make sure to choose Flex 4, as this will include Spark components, which can be mobile-friendly if using a proper version of the Flex SDK.

3. The next section will allow us to choose a specific Flex SDK to use in our project. We should choose a mobile-enhanced version of the Flex SDK for our Android project. Flex 4.5 and above include everything we need to begin developing robust Android applications.

4. The last thing we must do is make sure that the mobile-enabled Flex SWCs are going to be used in our project. In order to declare
<s:ViewNavigatorApplication>or<s:TabbedViewNavigatorApplication>for the main container of our project, these specific SWCs must be accessible, else FDT will report errors.5. The next section allows us to be sure the mobile SWCs are included. Select the tab labeled SDK Library and click on the button labeled Select SWCs…
6. You will notice that
mobile\mobilecomponents.swcis not included in our project. Select the checkbox next to this SWC and press the OK button to continue:
7. Now we will be able to use mobile specific containers and controls without receiving errors from FDT.
When specifying which type of project we want to create in FDT, the program automatically makes available certain portions of the Flex Framework, so that we can work with all the components necessary for our project. FDT 4.1 and earlier do not ship with any mobile-enabled Flex SDK and do not provide a workflow for Android projects. Because of this, we must explicitly tell FDT to make use of the following extra framework components:
ViewNavigatorApplication: This includes a
ViewNavigatorstack structure, in which we can push and pop different views to the top of a stack, exposing the topmost view to the user.TabbedViewNavigatorApplication: This includes the ability to have multiple
ViewNavigatorstacks within an application, controlled through aTabBaruser interface element.
It is important to note that versions of Flash Builder prior to Flash Builder 4.5 will not include the ability to compile projects to .APK (the Android application file extension) and you will need to compile your project using the freely available AIR SDK. See Chapter 11 for information on how to do this.
It is also worth a mention that while you can develop your applications for Android using older versions of Flash Builder, you will not receive many of the benefits provided by a newer release, such as code completion.
There is currently no workflow within Flash Builder (or FDT) to convert an existing application to a mobile Android application. Depending upon the complexity of the application being converted and the version of Flex, it may be undergoing conversion from this task can range from the very simple to one that is inordinately complex. In this recipe, we will demonstrate a simpler example using basic Flex structures.
Create a new mobile project and copy all of the necessary files into it, retaining those portions of code which are used for mobile projects and modifying any unsupported components.
For this example, we'll use a simple Flex project targeting AIR for desktop consisting of nothing but a button component at this stage:
<?xml version="1.0" encoding="utf-8"?>
<s:WindowedApplication xmlns:fx="http://ns.adobe.com/mxml/2009"
xmlns:s="library://ns.adobe.com/flex/spark"
xmlns:mx="library://ns.adobe.com/flex/mx">
<s:Button x="10" y="10" width="300" height="200" label="Button"/>
</s:WindowedApplication>
To convert this to a new Flex Mobile project, take the following steps:
1. Go to the menu and choose File | New | Flex Mobile Project.
2. Provide the project setup dialog with information about the new mobile project.
3. Copy all of your files from the project folder in your original project into this new mobile project excluding your project descriptor file
({myApp }.xml)andDefault Applicationfiles.4. Now, copy everything within your old
Default Applicationfile and paste it into theDefault Applicationfile that was created along with your mobile project. Once everything has been copied over, right-click on the main application file and choose Set as Default Application.5. Change all instances of
<s:WindowedApplication>to<s:ViewNavigatorApplication>(alternatively,<s:TabbedViewNavigatorApplication>).6. Look within your Problems panel to see whether or not any further modifications need to be made.
7. If you are not using any of the old Halo components (mx namespace) it is a good idea to remove the namespace declaration for your opening
<s:ViewNavigatorApplication>tag.8. Add a
firstViewattribute to the<s:ViewNavigatorApplication>tag. This should point to theViewautomatically created when you set up the mobile project.9. Since visual UI elements cannot reside directly within a <s:ViewNavigatorApplication /> node, we must wrap the <s:Button /> instance within a <fx:Declarations> </fx:Declarations> tag set, or move it to a specific View.
Note
Downloading the example code
You can download the example code files for all Packt books you have purchased from your account at http://www.PacktPub.com. If you purchased this book elsewhere, you can visit http://www.PacktPub.com/support and register to have the files e-mailed directly to you.
Your Default Application file should now read as follows:
<?xml version="1.0" encoding="utf-8"?>
<s:ViewNavigatorApplication xmlns:fx="http://ns.adobe.com/mxml/2009"
xmlns:s="library://ns.adobe.com/flex/spark" firstView="views.MobileFlexProjectHomeView">
<fx:Declarations>
<s:Button x="10" y="10" width="447" height="106" label="Button"/>
</fx:Declarations>
</s:ViewNavigatorApplication>
Additionally, a view for this application could appear as such:
<?xml version="1.0" encoding="utf-8"?>
<s:View xmlns:fx="http://ns.adobe.com/mxml/2009"
xmlns:s="library://ns.adobe.com/flex/spark" title="MobileFlexProjectHomeView ">
</s:View>
For more information about how Flex Mobile projects are structured, have a look at the following resource: http://opensource.adobe.com/wiki/display/flexsdk/Developer+Documentation.
When using Flex, the root tag of your application determines largely what APIs and structures are available to you throughout the project. Making sure that we choose the correct root tag is very important in regard to the target platform and capabilities of our project. For AIR on Android, we will want to use either ViewNavigatorApplication or TabbedViewNavigatorApplication. Desktop applications would use the Application or WindowedApplication tags. Chances are, if you are building Flash content with Flex that is to be deployed to Flash Player in the browser, on both mobile and desktop you will use a straight Application tag for your project.
If you don't want to deal with a lot of conversion, and are just starting out with a new project that will share the same codebase across desktop and mobile, you might consider using a Flex Library project to allow different projects to share the same underlying codebase.
Read the documentation on Flex 4 Library usage at: http://help.adobe.com/en_US/flashbuilder/using/WS6f97d7caa66ef6eb1e63e3d11b6c4d0d21-7fe6.html.
If we are using the open source AIR SDK (Software Development Kit) with another IDE or even editing our project in a simple text editor, we can still compile applications for distribution on Android through command line tools.
If you do not already have the Adobe AIR SDK, you must first download it from http://www.adobe.com/products/air/sdk/ and extract the files into a directory on your hard drive, C:\SDKs\AIR, for example. You must also set a PATH variable in your operating system pointing to the bin directory underneath the AIR SDK.
If you are using a Windows system, set the environment variable through the following steps:
1. Open the System Properties dialog. You can reach this dialog in many ways, the most direct being a right-click on My Computer. Then select Properties.
2. Choose Advanced system settings from the left hand menu.
3. Click on the button at the bottom of this window that says Environment Variables…
4. Click upon the PATH variable in this window and select Edit:

5. Now, simply add the location of your
bindirectory into the set of variables: If the last item in your variable value list has not been terminated with a semicolon, you must add one before every new item. For example:C:\SDKs\AIR\bin.
6. That should do it. Hit OK a few times and bring up the command prompt to verify that we've set this up correctly. Type in
adt -versionand hit Enter. If all is well, ADT will spit back a version string that looks something likeadt version "2.5.0.00000".
If we are using the open source AIR SDK with another IDE or even editing our project in a simple text editor, we can still compile applications for distribution on Android through command line tools.
If you do not already have the Adobe AIR SDK, you must first download it from http://www.adobe.com/products/air/sdk/ and extract the files into a directory on your hard drive: /home/joseph/SDKs/AIR, for example. You must also set a PATH variable in your operating system start up script pointing to the bin directory underneath the AIR SDK.
We will set the environment variable through the following steps:
1. Open the Terminal.
2. Now we must create the shell configuration profile. Enter the following into the Terminal window:
cat >> .bash_profileon a Mac orcat >> .bashrcfor Ubuntu (each Linux distribution may have its own particular naming convention for the startup script).3. Next, enter
export PATH=$PATH:/home/joseph/SDKs/AIR/binto set thePATHvariable pointing to the AIR development tools bin directory. Hit Enter.4. Enter Ctrl+Shift+D to end this process.
5. Now we will check to be sure everything was added appropriately. Type
cat .bashrcinto the Terminal and hit Enter. You should see thePATHcommand spit back at you:
6. You may need to log out of your profile and then log back in for the new environment variable to be picked up by the system.
7. Bring up the Terminal again, after logging back into your profile.
8. Type
echo $PATHinto the Terminal and hit Enter. This should display everything that is included in thePATHvariable including the location of our AIRbindirectory.9. That should do it. We will now verify that we've set the AIR SDK up correctly. Type in
adt -versionand hit Enter. If all is well, ADT will spit back a version string that looks something likeadt version "2.5.0.00000":
Setting a PATH variable on the operating system allows us to be able to invoke the AIR Android compiler, ADT, from anywhere in our system without having to traverse file directories and specify long path names.
Note that you may have to log out of your session and then log back in for the new PATH variables to take effect. If using a Windows operating system, you can also set specific environment variables. See the previous recipe, Configuring the AIR SDK to package AIR for Android applications on Windows for an example of this.
