Delphi Basics
In this chapter, we will cover the following recipes:
- Changing your application's look and feel with VCL styles and without any code
- Changing the style of your application at runtime
- Customizing TDBGrid
- Using owner-draw combos and listboxes
- Making an owner-draw control aware of the VCL styles
- Creating a stack of embedded forms
- Manipulating JSON
- Manipulating and transforming XML documents
- I/O in the 21st century—knowing the streams
- Creating a Windows Service
- Associating a file extension with your application on Windows
- Being coherent with the Windows look and feel using TTaskDialog
- The amazing TFDTable—indices, aggregations, views, and SQL
- ETL made easy—TFDBatchMode
- Data integration made easy—TFDLocalSQL
Introduction
This chapter will explain some of the day-to-day needs of a Delphi programmer. These are ready-to-use recipes that will be useful every day and have been selected ahead of others because, although they may be obvious for some experienced users, they are still very useful. Even if there isn't any specific database-related code, many of the recipes can be used when you are dealing with data.
Changing your application's look and feel with VCL styles
Visual Component Library (VCL) styles are a major new entry in the latest versions of Delphi. They were introduced in Delphi XE2 and are still one of the lesser-known features for good old Delphi developers. However, as business people say, looks matter, so the look and feel of your application could be one of the reasons to choose your product over another from a competitor. Consider that, with a few mouse clicks, you can apply many different styles to your application to change the look and feel of it. So, why not to give it a try?
Getting ready
VCL styles can be used to revamp an old application or to create a new one with a non-standard GUI. VCL styles are a completely different beast to FireMonkey styles. They are both styles, but with completely different approaches and behaviors.
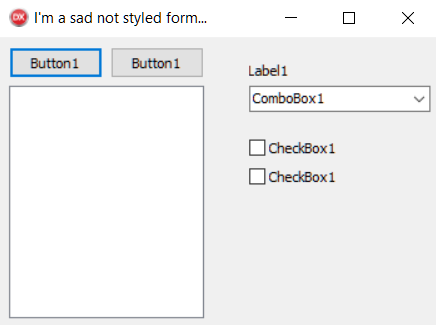
To get started with VCL styles, we'll use a new application. So, let's create a new VCL application and drag and drop some components onto the main form (for example, two TButton controls, one TListBox, one TComboBox, and a couple of TCheckBox).
You can now see the resulting form that is running on my Windows 10 machine:
How to do it...
Now, we've got to apply a set of nice styles by following these steps:
- Go to Project | Options from the menu. Then, in the resultant dialog, go to Application | Appearance and select all the styles that we want to include in our application.
- If you use the Preview button, the IDE shows a simple demo form with some controls, and we can get an idea about the final result of our styled form. Feel free to experiment and choose the style or set of styles that you like. Only one style at a time can be used, but we can link the necessary resources inside the executable and select the proper one at runtime.
- After selecting all the required styles from the list, we've got to select one in the combobox at the bottom. This style will be the default style for our form and it will be loaded as soon as the application starts. You can delay this choice and make it at runtime using code, if you prefer.
- Click on OK, hit F9 (or go to Run | Run), and your application will be styled:

How it works...
Selecting one or more styles from Project | Options | Application | Appearance will cause the Delphi linker to link the style resource into your executable. It is possible to link many styles into your executable, but you can use only one style at a time. So, how does Delphi know which style you want to use when there are more than one? If you check the Project file (the file with the .dpr extension) by going to Project | View Source Menu (for shortcut lovers, Ctrl + V with the project selected in Project Manager), you can see where and how this little bit of magic happens.
The following lines are the interesting section:
begin
  Application.Initialize;
  Application.MainFormOnTaskbar := True;
  TStyleManager.TrySetStyle('Iceberg Classico');
  Application.CreateForm(TMainForm, MainForm);
  Application.Run;
end
When we selected the Iceberg Classico style as the default style, the Delphi IDE added a line just before the creation of the main form, setting the default style for all the applications using TStyleManager.TrySetStyle static methods.
TStyleManager is a very important class when you deal with VCL styles. We'll see more about it in an upcoming recipe, where you'll learn how to change styles at runtime.
There's more...
Delphi and C++Builder 10.2 Tokyo come with 39 VCL Styles available in the folder (with a standard installation) at C:\Program Files (x86)\Embarcadero\Studio\19.0\Redist\styles\vcl\.
Embarcadero provides an additional eight premium styles that are available in the VCL premium style pack: https://cc.embarcadero.com/item/30492.
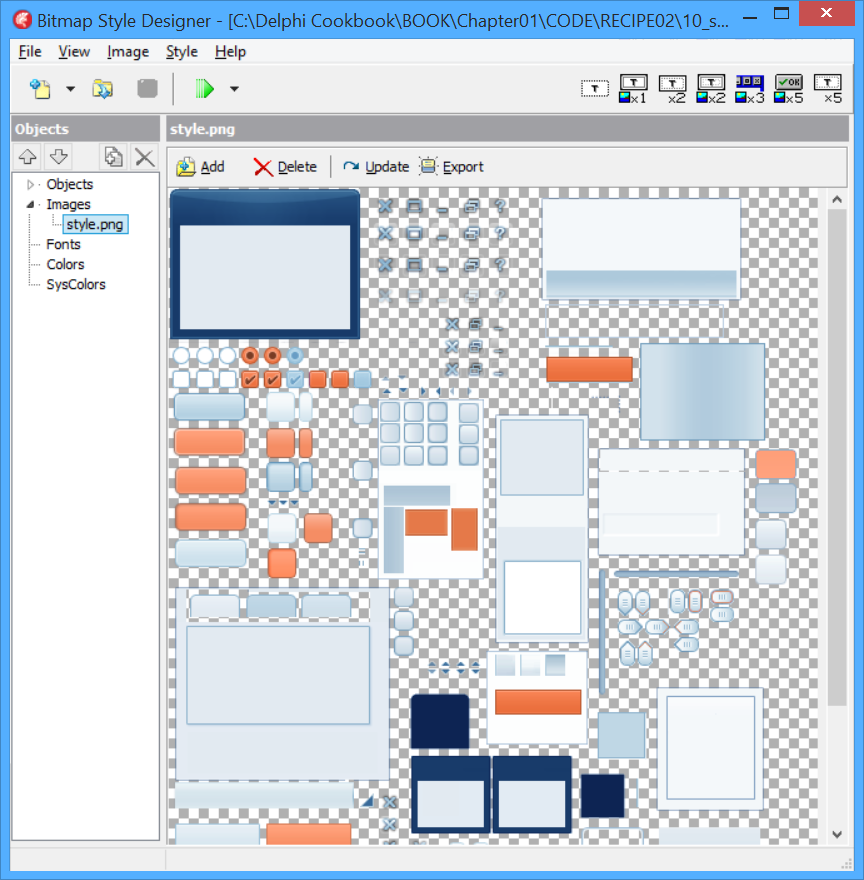
Moreover, it is possible to create your own styles or modify existing ones using the Bitmap Style Designer. You can access it by going to Tools | Bitmap Style Designer Menu.
For more details on how to create or customize a VCL style, visit http://docwiki.embarcadero.com/RADStudio/en/Creating_a_Style_using_the_Bitmap_Style_Designer.
The Bitmap Style Designer also provides test applications to test VCL styles.
Changing the style of your VCL application at runtime
VCL Styles are a powerful way to change the appearance of your application. One of the main features of VCL styles is the ability to change the style while the application is running.
Getting ready
Because a VCL style is simply a particular kind of binary file, we can allow our users to load their preferred styles at runtime. We could even provide new styles by publishing them on a website or sending them by email to our customers.
In this recipe, we'll change the style while the application is running using a style already linked at design time, or let the user choose between a set of styles deployed inside a folder.
How to do it...
Style manipulation at runtime is done using the class methods of the TStyleManager class. Follow these steps to change the style of your VCL application at runtime:
- Create a brand new VCL application and add the Vcl.Themes and Vcl.Styles units to the main form's implementation uses section. These units are required to use VCL styles at runtime.
- Drop on the form a TListBox, two TButton, and a TOpenDialog. Leave the default component names.
- Go to Project | Appearance and select eight styles of your choice from the list. Leave the Default style as Windows.
- The TStyleManager.StyleNames property contains the names of all the available styles. In the FormCreate event handler, we have to load the already linked styles present in the executable to the listbox to let the user choose one of them. So, create a new procedure called StylesListRefresh with the following code and call it from the FormCreate event handler:
procedure TMainForm.StylesListRefresh;
var
  stylename: string;
begin
  ListBox1.Clear;
  // retrieve all the styles linked in the executable
  for stylename in TStyleManager.StyleNames do
  begin
    ListBox1.Items.Add(stylename);
  end;
end;
- In the Button2Click event handler, we set the current style according to the one selected from the ListBox1 using the code that follows:
TStyleManager.SetStyle(ListBox1.Items[ListBox1.ItemIndex]);
- The Button1Click event handler should allow the user to select a style from the disk. So, we have to create a folder named styles at the level of our executable and copy a .vsf file from the default styles directory, which in RAD Studio 10.2 Tokyo is C:\Program Files (x86)\Embarcadero\Studio\19.0\Redist\styles\vcl.
- After copying, write the following code under the Button1Click event handler. This code allows the user to choose a style file directly from the disk. Then, you can select one of the loaded styles from the listbox and click on Button1 to apply it to application:
if OpenDialog1.Execute then
begin
  if TStyleManager.IsValidStyle(OpenDialog1.FileName) then
  begin
    // load the style file
    TStyleManager.LoadFromFile(OpenDialog1.FileName);
    // refresh the list with the currently available styles
    StylesListRefresh;
    ShowMessage('New VCL Style has been loaded');
  end else
    ShowMessage('The file is not a valid VCL Style!');
  end;
end;
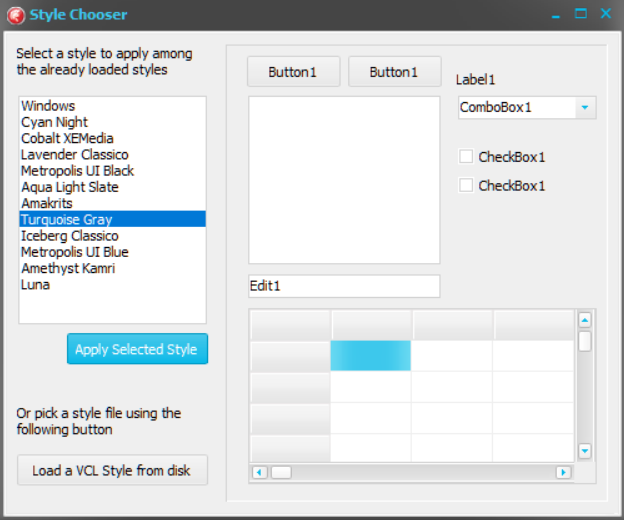
- Just to give you an idea of how the different controls appear with the selected style, drag and drop some controls onto the right-hand side of the form.
- Hit F9 (or go to Run | Run), and play with your application, using and loading styles from the disk. The following screenshot shows my application with some styles loaded, some at design time and some from the disk:
How it works...
The TStyleManager class has all the methods we need to do the following:
- Inspect the loaded styles with TStyleManager.StyleNames
- Apply an already loaded style to the running application using the following code:
TStyleManager.SetStyle('StyleName')
- Check whether a file has a valid style using the following code:
TStyleManager.IsValidStyle('StylePathFileName')
- Load a style file from disk using the following code:
TStyleManager.LoadFromFile('StylePathFileName')
After loading new styles from disk, the new styles are completely identical to the styles linked in the executable during the compile and link phases and can be used in the same way.
There's more...
Other things to consider are third-party controls. If your application uses third-party controls, take care with their style support (some third-party controls are not style-aware). If your external components do not support styles, you will end up with some styled controls (the originals included in Delphi) and some that are not styled (your external third-party controls).
Go to Tools | Bitmap Style Designer. Using a custom VCL Style, we can also:
- Change application colors, such as ButtonNormal, ButtonPressed, ButtonFocused, ButtonHot, and others.
- Override system colors, such as clCaptionText, clBtnFace, clActiveCaption, and so on.
- Font color and font name for particular controls should be familiar to ButtonTextNormal, ButtonTextPressed, ButtonTextFocused, ButtonTextHot, and many others:
Customizing TDBGrid
The adage a picture is worth a thousand words refers to the notion that a complex idea can be conveyed with just a single still image. Sometimes, even a simple concept is easier to understand and nicer to see if it is represented by images. In this recipe, we'll see how to customize TDBGrid to visualize a graphical representation of data.
Getting ready
Many VCL controls are able to delegate their drawing, or part of it, to user code. It means that we can use simple event handlers to draw standard components in different ways. It is not always simple, but TDBGrid is customizable in a really easy way. Let's say that we have a class of musicians that have to pass a set of exams. We want to show the percent of exams already passed with a progress bar and if the percent age is higher than 50, there should also be a check mark in another column. Moreover, after listening to the pieces played at the exams, each musician received votes from an external examination committee. The last column needs to show the mean of votes from this committee as a rating from zero to five.
How to do it...
We'll use a special in-memory table from the FireDAC library. FireDAC is a new data access library from Embarcadero included in RAD Studio since version XE5. If some of the code seems unclear at the moment, consider the in-memory table as a normal TDataSet descendant that holds its data only in memory. However, at the end of the section, there are some links to the FireDAC documentation, and I strongly suggest that you read it if you still don't understand FireDAC:
- Create a brand new VCL application and drop a TFDMemTable, a TDBGrid, a TDataSource, and a TDBNavigator onto the form. Connect all the components in the usual way (TDBGrid connected to TDataSource, followed by TFDMemTable). Set the TDBGrid font size to 18. This will create more space in the cell for our graphical representation.
- Using the TFDMemTable fields editor, add the following fields and then activate the dataset by setting its Active property to True:
|
Field name |
Field data type |
Field type |
|
FullName |
String (size 50) |
Data |
|
TotalExams |
Integer |
Data |
|
PassedExams |
Integer |
Data |
|
Rating |
Float |
Data |
|
PercPassedExams |
Float |
Calculated |
|
MoreThan50Percent |
Boolean |
Calculated |
- Now, add all the columns to TDBGrid by right-clicking and selecting Columns Editor.... Then, again right-click and select Add all fields in the resultant window. Then, rearrange the columns as shown here and give it a nice title caption:
- FullName
- TotalExams
- PassedExams
- PercPassedExams
- MoreThan50Percent
- Rating
- In a real application, we would load real data from some sort of database. However, for now, we'll use some custom data generated in code. We have to load this data into the dataset with the code that follows:
procedure TMainForm.FormCreate(Sender: TObject);
begin
  FDMemTable1.AppendRecord(['Ludwig van Beethoven', 30, 10, 4]);
  FDMemTable1.AppendRecord(['Johann Sebastian Bach', 24, 10, 2.5]);
  FDMemTable1.AppendRecord(['Wolfgang Amadeus Mozart', 30, 30, 5]);
  FDMemTable1.AppendRecord(['Giacomo Puccini', 25, 10, 2.2]);
  FDMemTable1.AppendRecord(['Antonio Vivaldi', 20, 20, 4.7]);
  FDMemTable1.AppendRecord(['Giuseppe Verdi', 30, 5, 5]);
  FDMemTable1.AppendRecord(['John Doe', 24, 5, 1.2]);
end;
- Do you remember we have two calculated fields that need to be filled in some way? Calculated fields need a form of processing behind them to work. TFDMemTable, just like any other TDataSet descendant, has an event called OnCalcFields that allows the developer to do this. Create the OnCalcFields event handler for TFDMemTable and fill it with the following code:
procedure TMainForm.FDMemTable1CalcFields(DataSet: TDataSet);
var
  LPassedExams: Integer;
  LTotExams: Integer;
begin
  LPassedExams := FDMemTable1.FieldByName('PassedExams').AsInteger;
  LTotExams := FDMemTable1.FieldByName('TotalExams').AsInteger;
  if LTotExams = 0 then
    FDMemTable1.FieldByName('PercPassedExams').AsFloat := 0
  else
    FDMemTable1.FieldByName('PercPassedExams').AsFloat := LPassedExams /
      LTotExams * 100;

  FDMemTable1.FieldByName('MoreThan50Percent').AsBoolean :=
    FDMemTable1.FieldByName('PercPassedExams').AsFloat > 50;

end;
- Run the application by hitting F9 (or by going to Run | Run) and you will get the following screenshot:

- This is useful, but a bit boring. Let's start our customization. Close the application and return to the Delphi IDE.
- Go to Properties of TDBGrid and set Default Drawing to False.
- Now, we have to organize the resources used to draw the grid cells. Calculated fields will be drawn directly using code, but the Rating field will be drawn using a five-star rating image from 0 to 5. It starts with a 0.5 incremental step (0, 0.5, 1, 1.5, and so on). So, drop TImageList on the form, and set the Height as 32 and the Width as 160.
- Select the TImageList component and open the image list's editor by right-clicking and then selecting ImageList Editor.... You can find the required PNG images in the recipe's project folder (ICONS\RATING_IMAGES). Load the images in the correct order, as shown here:
- Index 0 as image 0_0_rating.png
- Index 1 as image 0_5_rating.png
- Index 2 as image 1_0_rating.png
- Index 3 as image 1_5_rating.png
- Index 4 as image 2_0_rating.png
- Go to the TDBGrid event and create the event handler for OnDrawColumnCell. All the customization code goes in this event. Include the Vcl.GraphUtil unit, and write the following code in the DBGrid1DrawColumnCell event:
procedure TMainForm.DBGrid1DrawColumnCell(Sender: TObject; const Rect: TRect;
  DataCol: Integer; Column: TColumn; State: TGridDrawState);
var
  LRect: TRect;
  LGrid: TDBGrid;
  LText: string;
  LPerc: Extended;
  LTextWidth: TSize;
  LRating: Extended;
  LNeedOwnerDraw: Boolean;
  LImageIndex: Int64;
begin
  LGrid := TDBGrid(Sender);
  if [gdSelected, gdFocused] * State <> [] then
    LGrid.Canvas.Brush.Color := clHighlight;

  LNeedOwnerDraw := (Column.Field.FieldKind = fkCalculated) or
    Column.FieldName.Equals('Rating');

  // if doesn't need owner-draw, default draw is called
  if not LNeedOwnerDraw then
  begin
    LGrid.DefaultDrawColumnCell(Rect, DataCol, Column, State);
    exit;
  end;

  LRect := Rect;

  if Column.FieldName.Equals('PercPassedExams') then
  begin
    LText := FormatFloat('##0', Column.Field.AsFloat) + ' %';
    LGrid.Canvas.Brush.Style := bsSolid;
    LGrid.Canvas.FillRect(LRect);
    LPerc := Column.Field.AsFloat / 100 * LRect.Width;
    LGrid.Canvas.Font.Size := LGrid.Font.Size - 1;
    LGrid.Canvas.Font.Color := clWhite;
    LGrid.Canvas.Brush.Color := clYellow;
    LGrid.Canvas.RoundRect(LRect.Left, LRect.Top, Trunc(LRect.Left + LPerc),
      LRect.Bottom, 2, 2);
    LRect.Inflate(-1, -1);
    LGrid.Canvas.Pen.Style := psClear;
    LGrid.Canvas.Font.Color := clBlack;
    LGrid.Canvas.Brush.Style := bsClear;

    LTextWidth := LGrid.Canvas.TextExtent(LText);
    LGrid.Canvas.TextOut(LRect.Left + ((LRect.Width div 2) -
      (LTextWidth.cx div 2)), LRect.Top + ((LRect.Height div 2) -
      (LTextWidth.cy div 2)), LText);
  end
  else if Column.FieldName.Equals('MoreThan50Percent') then
  begin
    LGrid.Canvas.Brush.Style := bsSolid;
    LGrid.Canvas.Pen.Style := psClear;
    LGrid.Canvas.FillRect(LRect);
    if Column.Field.AsBoolean then
    begin
      LRect.Inflate(-4, -4);
      LGrid.Canvas.Pen.Color := clRed;
      LGrid.Canvas.Pen.Style := psSolid;
      DrawCheck(LGrid.Canvas, TPoint.Create(LRect.Left,
        LRect.Top + LRect.Height div 2), LRect.Height div 3);
    end;
  end
  else if Column.FieldName.Equals('Rating') then
  begin
    LRating := Column.Field.AsFloat;
    if Frac(LRating) < 0.5 then
      LRating := Trunc(LRating)
    else
      LRating := Trunc(LRating) + 0.5;
    LText := LRating.ToString;
    LGrid.Canvas.Brush.Color := clWhite;
    LGrid.Canvas.Brush.Style := bsSolid;
    LGrid.Canvas.Pen.Style := psClear;
    LGrid.Canvas.FillRect(LRect);
    Inc(LRect.Left);
    LImageIndex := Trunc(LRating) * 2;
    if Frac(LRating) >= 0.5 then
      Inc(LImageIndex);
    ImageList1.Draw(LGrid.Canvas, LRect.CenterPoint.X -
      (ImageList1.Width div 2), LRect.CenterPoint.Y - (ImageList1.Height div 2),
      LImageIndex);
  end;

end;
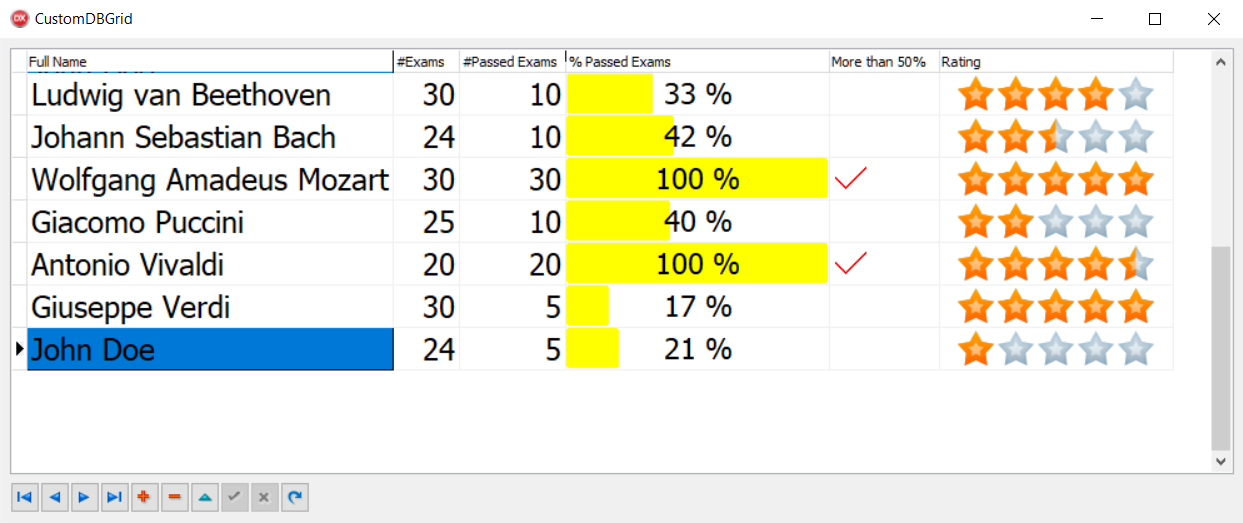
- That's all folks! Press F9 (or go to Run | Run), and we now have a nicer grid with more direct information about our data:
How it works...
By setting the TDBGrid property Default Drawing to False, we told the grid that we wanted to manually draw all the data into every cell. OnDrawColumnCell allows us to actually draw using standard Delphi code. For each cell we are about to draw, the event handler was called with a list of useful parameters to know which cell we're about to draw and what data we have to read, considering the column we are currently drawing. In this case, we want to draw only the calculated columns and the Rating field in a custom way. This is not a rule, but this can be done to manipulate all cells. We can draw any cell in the way we like. For the cells where we don't want to do custom drawing, a simple call method, DefaultDrawColumnCell, passes the same parameters we got from the event and the VCL code will draw the current cell as usual.
Among the event parameters, there is a Rect object (of type TRect) that represents the specific area we're about to draw. There is a column object (of type TColumn), which is a reference to the current column of the grid, and a State (of type TGridDrawState), which is a set of the grid cell states (for example, Selected, Focused, HotTrack, and many more). If our drawing code ignores the State parameter, all the cells will be drawn in the same way, and users cannot see which cell or row is selected.
The event handler uses a Pascal Sets Intersect to know whether the current cell should be drawn as a Selected or Focused cell. Refer to the following code for better clarity:
  if [gdSelected, gdFocused] * State <> [] then
    Grid.Canvas.Brush.Color := clHighlight;
There's more...
Owner drawing is a really large topic and can be simple or tremendously complex, involving much Canvas-related code. However, often, the kind of drawing you need will be relatively similar. So, if you need checks, arrows, color gradients, and so on, check the procedures into the Vcl.GraphUtil unit. Otherwise, if you need images, you could use TImageList to hold all the images needed by your grid, as we did in this recipe for the Rating field.
The good news is that the drawing code can be reused by different kinds of controls, so try to organize your code in a way that allows code reutilization by avoiding direct dependencies to the form where the control is.
The code in the drawing events should not contain business logic or presentation logic. If you need presentation logic, put it in a separate, testable function or class.
Using owner-draw combos and listboxes
Many things are organized in a list. Lists are useful when you have to show items or when your user has to choose from a set of possible options. Usually, standard lists are flat, but sometimes you need to transmit more information in addition to a list of items. Let's think about when you go to choose a font in an advanced text editor such as Microsoft Word or Apache OpenOffice. Having the name of the font drawn in the font style itself helps users make a faster and more reasoned choice. In this recipe, we'll see how to make listboxes more useful. The code is perfectly valid for TComboBox as well.
Getting ready
As we saw in the Customizing TDBGrid recipe, many VCL controls are able to delegate their drawing, or part of it, to user code. This means that we can use simple event handlers to draw standard components in different ways. Let's say that we have a list of products in our store and we have to set discounts for these products. As there are many products, we want to set up the processing so that our users can make a fast selection in terms of the available discount percentages using a color code.
How to do it...
Let's look at the following steps:
- Create a brand new VCL application and drop a TListBox onto the form. Set the following properties:
|
Property |
Value |
|
Style |
lbOwnerDrawFixed |
|
Font.Size |
14 |
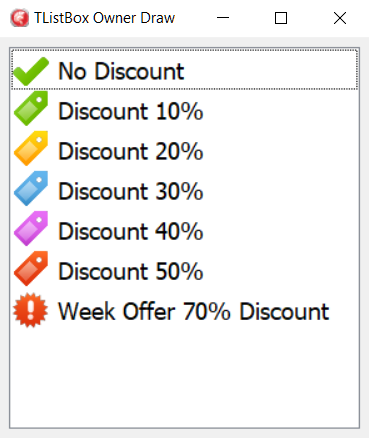
- In the Items listbox property, add seven levels of discount. For example, you can use no discount, 10% discount, 20% discount, 30% discount, 40% discount, 50% discount, 60% discount, and 70% discount.
- Then, drop a TImageList component onto the form and set the following properties:
|
Property |
Value |
|
ColorDepth |
cd32Bit |
|
DrawingStyle |
dsTransparent |
|
Width |
32 |
|
Height |
32 |
- TImageList is our image repository and will be used to draw an image by index. Load seven PNG images (size 32 x 32) into TImageList. You can find some nice PNG icons in the respective recipe project folder (ICONS\PNG\32).
- Create an OnDrawItem event handler for TListBox and write the following code:
procedure TMainForm.ListBox1DrawItem(Control: TWinControl; Index: Integer;
  Rect: TRect; State: TOwnerDrawState);
var
  LBox: TListBox;
  R: TRect;
  S: string;
  TextTopPos, TextLeftPos, TextHeight: Integer;
const
  IMAGE_TEXT_SPACE = 5;
begin
  LBox := Control as TListBox;
  R := Rect;
  LBox.Canvas.FillRect(R);
  ImageList1.Draw(LBox.Canvas, R.Left, R.Top, Index);
  S := LBox.Items[Index];
  TextHeight := LBox.Canvas.TextHeight(S);
  TextLeftPos := R.Left + ImageList1.Width + IMAGE_TEXT_SPACE;
  TextTopPos := R.Top + R.Height div 2 - TextHeight div 2;
  LBox.Canvas.TextOut(TextLeftPos, TextTopPos, S);
end;
- Run the application by hitting F9 (or by going to Run | Run) and you will see the following:
How it works...
The TListBox.OnDrawItem event handler allows us to customize the drawing of the listbox. In this recipe, we've used TImageList as the image repository for the listbox. Using the Index parameter, we've read the correspondent image in TImageList and drawn on the listbox Canvas. After this, all the other code is related to the alignment of image and text inside the listbox row.
Remember that this event handler will be called for each item in the list, so the code must be fast and should not do too much slow canvas writing. Otherwise, your GUI will be unresponsive. If you want to create complex graphics on the fly in the event, I strongly suggest that you prepare your images the first time you draw the item and then put them in a sort of cache memory (TObjectList<TBitmap> is enough).
There's more...
While you are in OnDrawItem, you can do whatever you want with the TListBox Canvas. Moreover, the State parameter (of type TOwnerDrawState) tells you which states the listbox item is in (for example, Selected, Focused, HotTrack, and so on). So, you can use a different kind of drawing, depending on the item state. Check out the Customizing TDBGrid recipe to find out about TDBGrid owner-drawing for an example of the State parameter.
If you want to make your code aware of the selected VCL Style, changing the color used according to the style, you can use StyleServices.GetStyleColor(), StyleServices.GetStyleFontColor(), and StyleServices.GetSystemColor() in the Vcl.Themes unit.
The icons used in this recipe are from the ICOJAM website (http://www.icojam.com). The specific set used is available at http://www.icojam.com/blog/?p=259.
Making an owner-draw control aware of the VCL styles
Owner-draw controls are powerful. They allow you to completely adapt your GUI to the needs of your users and potentially enable your application to display data in a more familiar way. In the end, owner-draw controls improve the user's experience with the application. However, owner-draw controls do not always fit in well with the VCL custom styles. Why? Because if you try to draw something by yourself, you could be tempted to use a fixed color, such clRed or clYellow, or you could be tempted to use the operating system color, such as clBtnFace or clWindow. In doing so, your owner-draw controls will not be style aware and will be drawn in the same way regardless of the current VCL style. In this recipe, you'll learn how to make custom graphics that remain relevant to the selected VCL style.
Getting ready
Let's say you are in charge of developing a control panel for a hotel's lighting system. You have a list of lamps to power on and you, using some hardware, have to power on some lamps by clicking on a button. Customers tell you that buttons should show some additional information about the lamp, for example:
- Served zone (corridor, hall, room number, and so on)
- State (on/off, using some fancy graphics)
- The time the lamp was powered on
- The time when electrical problems were detected, and a red icon to indicate that the lamp is off even when a current supplies the line, so the circuit is interrupted somewhere
- Other custom information not currently known, such as small graphs showing lamp state history during the last 24 hours
The question is how to implement this kind of UI. One of the possible ways is to use TDrawGrid and draw all the required details in each cell, using the cell as a button. Using TDrawGrid, you get a grid of buttons for free. You have also the greatest flexibility in terms of the information displayed because you are using the TCanvas method to custom draw each cell. This is quite a popular solution for this kind of non-standard UI.
However, when you deploy this application, the customers ask about the possibility of changing the style of the application to fit the needs of the current user. So you think about VCL styles, and you are right. However, the graphics drawn into the cells don't follow the currently selected VCL style, and your beautiful application becomes a bad mix of colors. In other words, when users change the selected VCL style, all the controls reflect the new style, but the owner-drawn grid, which is unaware to the selected style, doesn't look as nice as the rest of the UI. How do you solve this problem? How do you draw custom graphics adhering to the selected VCL style? In this recipe, you'll learn how to do it using the lamp control grid example.
How it works...
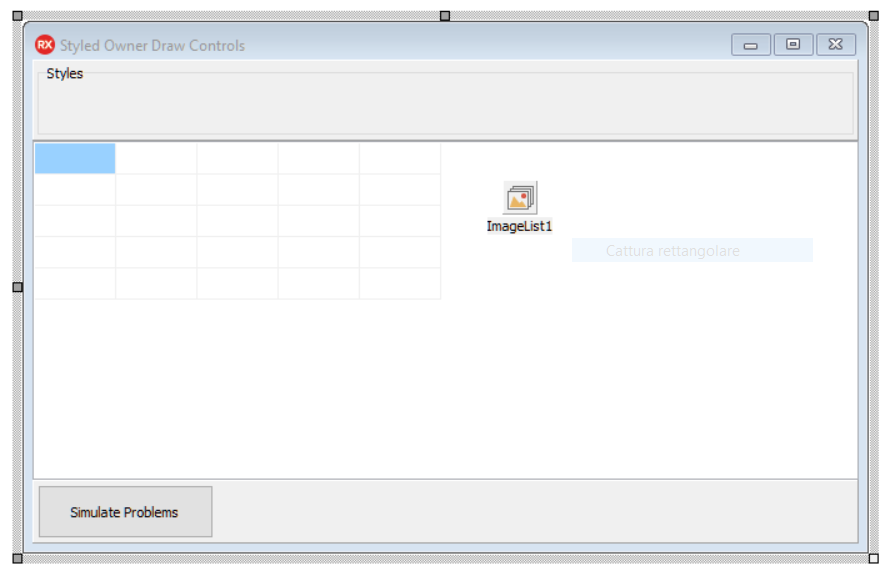
At design time, the form looks like the one shown in the following screenshot:
When the form is created, the list of available styles is loaded in the Radio group using code similar to the following:
  RadioGroup1.Items.Clear;
  RadioGroup1.Columns := Length(TStyleManager.StyleNames);
  for LStyleName in TStyleManager.StyleNames do
    RadioGroup1.Items.Add(LStyleName);
  RadioGroup1.ItemIndex := 0;
  TStyleManager.SetStyle('Windows');
Then, a list of TLampInfo objects is created and initialized using the information contained in the Zones array. After that, the draw grid is initialized according to the LAMPS_FOR_EACH_ROW constant. Here's the relevant code:
  FLamps := TObjectList<TLampInfo>.Create(True);
  for I := 1 to LAMPS_FOR_EACH_ROW * 4 do
  begin
    FLamps.Add(TLampInfo.Create(Zones[I]));
  end;

  DrawGrid1.DefaultColWidth := 128;
  DrawGrid1.DefaultRowHeight := 64;
  DrawGrid1.ColCount := LAMPS_FOR_EACH_ROW;
  DrawGrid1.RowCount := FLamps.Count div LAMPS_FOR_EACH_ROW;
The FormCreate event handler initializes the styles list and the list of lamps (the model) on the form. Now, we'll see how the other event handlers will use them.
The TDrawGrid OnSelectCell event, as the name suggests, is used to address the current lamp from FLamps and to toggle its state. That's it. If the lamp is on, then the lamp will be powered down, otherwise the lamp will be powered on. After that, the code forces the grid to redraw using the Invalidate method:
procedure TMainForm.DrawGrid1SelectCell(Sender: TObject; ACol,
   ARow: Integer; var CanSelect: Boolean);
begin
  FLamps[ACol + ARow * LAMPS_FOR_EACH_ROW].ToggleState;
  DrawGrid1.Invalidate;
end;
Now, really interesting things happened in the DrawThemed method called inside the TDrawGridOnDrawCell event. This method receives information about the coordinates of the cell to draw, and then it draws a button on the canvas using the information contained in the corresponding TLampInfo instance. The code is quite long, but an interesting concept is that no specific colors are used. When it is necessary to draw something, the code asks StyleService to get the correct color according to the current style. This approach is also used for font color and for system colors. Here's a handy table that summarizes these concepts:
|
Method name |
Description |
|
StyleServices.GetStyleColor(Color: TStyleColor) |
Returns the color defined in the style for the element specified by Color |
|
StyleServices.StyleFontColor(Font: TStyleFont) |
Returns the font color for the element specified by Font |
|
StyleServices.GetSystemColor(Color: TColor) |
Returns the system color defined in the current style |
So, when we have to highlight the (pseudo) button if there are electrical problems on the power line, we use the following code:
if LLamp.ThereAreElectricalProblems then
   LCanvas.Brush.Color := StyleServices.GetStyleColor(scButtonHot)
else
   LCanvas.Brush.Color := StyleServices.GetStyleColor(scWindow);
LCanvas.FillRect(LRect);
When we've got to draw normal text, we use the following code:
LCanvas.Font.Color :=
   StyleServices.GetStyleFontColor(sfButtonTextNormal);
LCanvas.TextRect(LRect, LValue, [TTextFormats.tfCenter, TTextFormats.tfVerticalCenter]);
It is clear that the paradigm is this:
- Get the current color for the selected element of the UI according to the style
- Draw the graphics using that color
Clicking on the Simulate Problems button, it is possible to see how the graphics are drawn in the case of problems on the power line. The images are drawn directly from the image list using the following code:
procedure TMainForm.DrawImageOnCanvas(ACanvas: TCanvas;
   var ARect: TRect; ImageIndex: Integer);
begin
  ImageList1.Draw(ACanvas, ARect.Left + 4,
     ARect.Top + ((ARect.Bottom - ARect.Top) div 2) - 16,
     ImageIndex);
end;
Using this approach, the application created in this recipe, which has a lot of custom graphics, behaves very well even for VCL styles. Here are some screenshots:
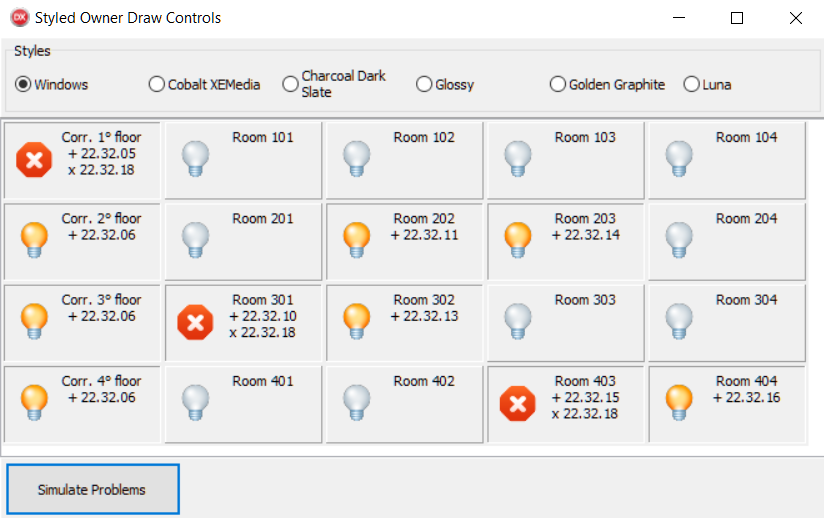
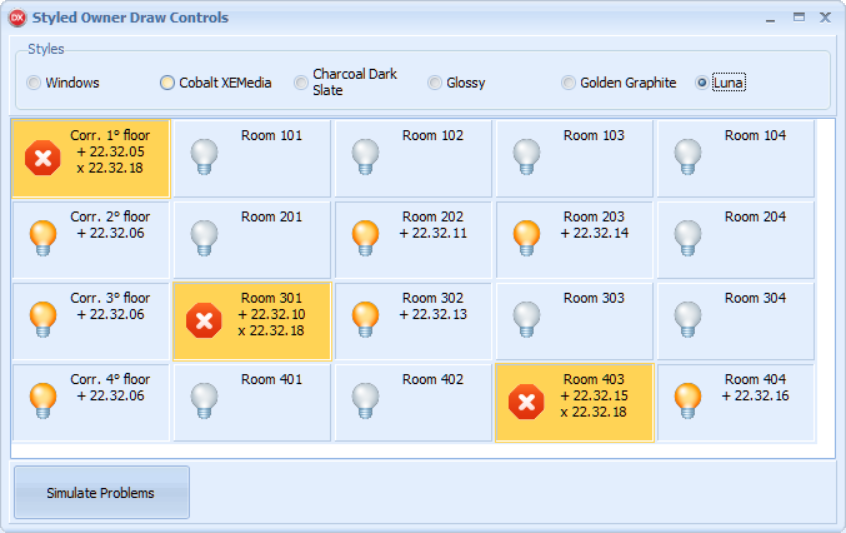
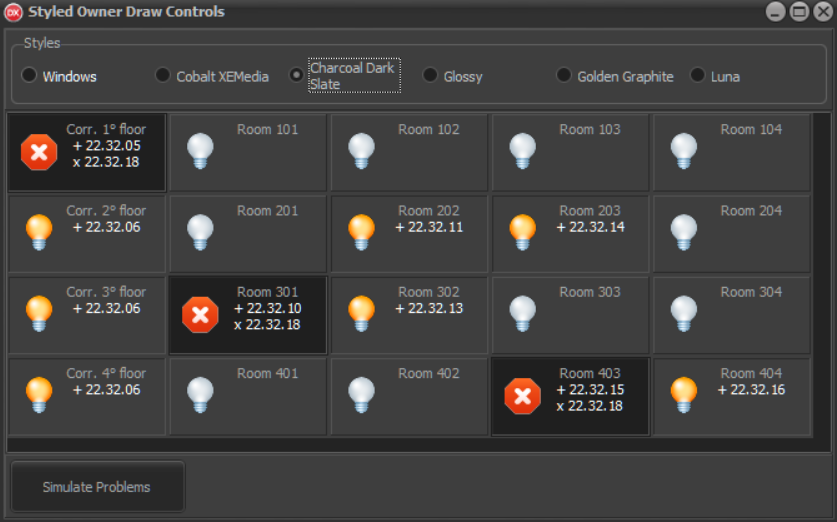
As you can see, the application correctly draws the owner-draw parts of the UI using the right colors from the selected style.
There's more...
The VCL style infrastructure is very powerful. In the case of TWinControl descendants, you can even define specific hooks for your components using TStyleHook. TStyleHook is a class that handles messages for controls acting as a wrapper for the hooked control. If you have a custom control that you want to be style enabled, inherit from TStyleHook and provide custom processing for that control. For examples, see TEditStyleHook and TComboBoxStyleHook. You need to register the style hook class with the style engine using the RegisterStyleHook method, as shown in the following code:
TCustomStyleEngine.RegisterStyleHook(TCustomEdit, TEditStyleHook);
Moreover, the StyleServices function returns an instance of TCustomStyleServices, which provides a lot of customization methods related to VCL styles. Check out the related documentation at http://docwiki.embarcadero.com/Libraries/en/Vcl.Themes.TCustomStyleServices_Methods to see all the possibilities.
Creating a stack of embedded forms
Every modern browser has a tabbed interface. Also, many other kinds of multiple-view software have this kind of interface. Why? Because it's very useful. While you are reading one page, you can rapidly check another page and still come back to the first one at the same point you left some seconds ago. You don't have to redo a search or use a lot of mouse clicks to just go back to that particular point. You simply switch from one window to another window and come back to the first. I have seen too many business applications that are composed of a bunch of dialog windows. Every form is called with the TForm.ShowModal method. So, the user has to navigate into your application one form at time. This is simpler to handle for the programmer, but it's less user friendly for your customers. However, giving a switchable interface to your customer is not that difficult. In this recipe, we'll see a complete example of how to do it.
Getting ready
This recipe is a bit more complex than the previous recipes. So, I'll not explain all the code but only the fundamental parts. You can find the complete code in the book's code repository (Chapter1/RECIPE06).
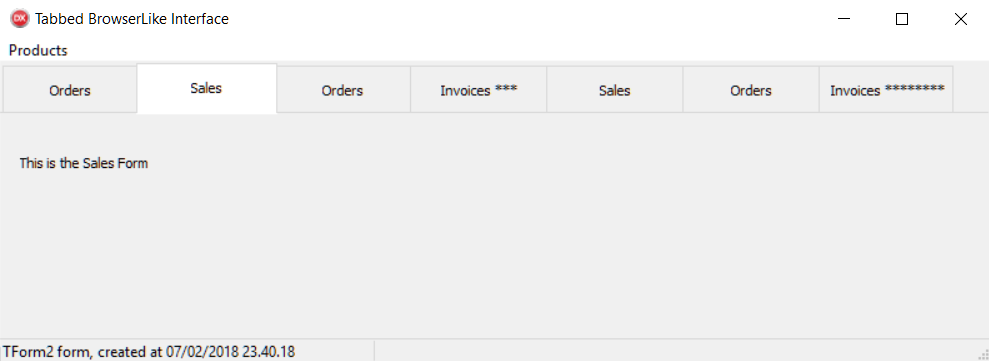
Let's say we want to create a tabbed interface for our software that is used to manage product orders, sales, and invoices. All the forms must be usable at the same time, without us having to close the previous one. Before we begin, the following screenshot is what we want to create:
How it works...
The project is composed of a bunch of forms. The main form has TTabControl, which allows us to switch between the active forms. All embedded forms inherit from EmbeddableForm. The most important one is the Show method shown here:
procedure TEmbeddableForm.Show(AParent: TPanel);
begin
  Parent := AParent;
  BorderStyle := bsNone;
  BorderIcons := [];
  Align := alClient;
  Show;
end;
All the other forms descend from EmbeddableForm and are added to TTabControl on the main form, with a line of code similar to the following one:
procedure TMainForm.MenuOrdersClick(Sender: TObject);
begin
  AddForm(TForm1.Create(self));
end;
The AddForm method is in charge of adding an actual instance of a form into the tabs, keeping a reference to it. The following code shows how it is done:
// Add a form to the stack
procedure TMainForm.AddForm(AEmbeddableForm: TEmbeddableForm);
begin
  AEmbeddableForm.Show(Panel1);
  // each tab show the caption of the containing form and
  // hold the reference to it
  TabControl1.Tabs.AddObject(
     AEmbeddableForm.Caption, AEmbeddableForm);
  ResizeTabsWidth;
  ShowForm(AEmbeddableForm);
end;
Other methods are in charge of bringing an already created form to the front when a user clicks on the Related tab, and then to close a form when the Related tab is removed (check out the ShowForm and WMEmbeddedFormClose methods).
There is a bit of code, but the concepts are simple:
- When we need to create a new form, we add it in the TabControl1.Tabs property. The caption of the form is the caption of the tab, and the object is the form itself. This is what the AddForm method does with the following line:
TabControl1.Tabs.AddObject(AEmbeddableForm.Caption, AEmbeddableForm);
- When a user clicks on a tab, we have to find the associated form by cycling through the TabControl1.Tabs.Objects list and bringing it to the front.
- When a form asks to be closed (sending a WM_EMBEDDED_CLOSE message), we have to set the ParentWantClose property and then call the Close method of the correspondent form.
- If the user wants to close a form by closing the corresponding tab (in the recipe code, there is TPopMenu connected to TabControl, which is used to close a form with a right-click), we have to call the Close method on the corresponding form.
- Every form frees itself in the OnClose event handler. This is done once for
all the forms in the TEmbeddableForm.CloseForm event handler, using the caFree action.
There's more...
Embedding a form into another TWinControl is not difficult and allows us to create flexible GUIs without using TPageControl and Frames. For the end user, this multi-tabbed GUI is probably more familiar because all modern browsers use it, and your user may already know how to use a browser with different pages or screens open. From a developer's point of view, the multi-tabbed interface allows for much better programming patterns and practices. This technique can also be used for other scenarios where you have to embed one screen into another.
More flexible (and complex) solutions can be done involving the use of Observers, but in simple cases, this recipe's solution, based on Windows Messaging, is enough.
More information about the Observer design pattern can be found at http://sourcemaking.com/design_patterns/observer/delphi.
Other interesting solutions that don't rely on Windows Messaging and so are also cross-platform include the following:
- Solultions based on the System.Messaging.TMessageManager class. More information about TMessageManager can be obtained at http://docwiki.embarcadero.com/Libraries/en/System.Messaging.TMessageManager.
- Delphi Event Bus (DEB) is a publish/subscribe Event Bus framework for the Delphi platform. More information can be found at https://github.com/spinettaro/delphi-event-bus or you can take a look at Chapter 5, The Thousand Faces of Multithreading, in the Communication made easy with Delphi Event Bus recipe.
Code in this recipe can be used with every component that uses TStringList to show items (TListBox, TComboBox, and so on) and can be adapted easily for other scenarios.
In the recipe code, you'll also find a nice way to show status messages generated by the embedded forms and a centralized way to show application hints in the status bar.
Manipulating JSON
JavaScript Object Notation (JSON) is a lightweight data-interchange format. As the reference site says, It is easy for humans to read and write. It is easy for machines to parse and generate. It is based on a subset of the JavaScript programming language, but it is not limited to JavaScript in any way. Indeed, JSON is a text format that is completely language agnostic. These properties make JSON an ideal data-interchange language for many uses. In recent years, JSON has become on a par with XML in many applications, especially when data size matters, because of its intrinsic conciseness and simplicity.
Getting ready
JSON provides the following five datatypes—String, Number, Object, Array, Boolean, and Null.
This simplicity is an advantage when you have to read a JSON string into some kind of language-specific structure, because every modern language supports the JSON datatypes as simple types, or as a HashMap (in the case of JSON objects) or List (in the case of JSON arrays). So, it makes sense that a data format that is interchangeable with programming languages is also based on these types and structures.
Since version 2009, Delphi has provided built-in support for JSON. The System.JSON.pas unit contains all the JSON types with a nice object-oriented interface. In this recipe, you'll see how to generate, modify, and parse a JSON string.
How to do it...
Let's look at the following steps:
- Create a new VCL application and drop in three TButton and a TMemo. Align all the buttons as a toolbar at the top of the form and the memo to all the remaining from client areas.
- From left to right, name the buttons btnGenerateJSON, btnModifyJSON, and btnParseJSON.
- We'll use static data as our data source. A simple matrix is enough for this recipe. Just after the start of the implementation section of the unit, write the following code:
type
  TCarInfo = (
    Manufacturer = 1,
    Name = 2,
    Currency = 3,
    Price = 4);

var
  Cars: array [1 .. 4] of
     array [Manufacturer .. Price] of string = (
    ('Ferrari','360 Modena','EUR', '250000'),
    ('Ford', 'Mustang', 'USD', '80000'),
    ('Lamborghini', 'Countach', 'EUR','300000'),
    ('Chevrolet', 'Corvette', 'USD', '100000')
  );
- TMemo is used to show our JSON files and our data. To keep things clear, create a public property called JSON on the form and map its setter and getter to the Memo1.Lines.Text property. Use the following code:
//...other form methods declaration
private
  procedure SetJSON(const Value: String);
  function GetJSON: String;
public
  property JSON: String read GetJSON write SetJSON;
end;

//...then in the implementation section
function TMainForm.GetJSON: String;
begin
  Result := Memo1.Lines.Text;
end;

procedure TMainForm.SetJSON(const Value: String);
begin
  Memo1.Lines.Text := Value;
end;
- Now, create event handlers for each button and write the code that follows. Pay attention to the event names:
procedure TMainForm.btnGenerateJSONClick(Sender: TObject);
var
  i: Integer;
  JSONCars: TJSONArray;
  Car, Price: TJSONObject;
begin
  JSONCars := TJSONArray.Create;
  try
    for i := Low(Cars) to High(Cars) do
    begin
      Car := TJSONObject.Create;
      JSONCars.AddElement(Car);
      Car.AddPair('manufacturer',
         Cars[i][TCarInfo.Manufacturer]);
      Car.AddPair('name', Cars[i][TCarInfo.Name]);
      Price := TJSONObject.Create;
      Car.AddPair('price', Price);
      Price.AddPair('value',
         TJSONNumber.Create(
           Cars[i][TCarInfo.Price].ToInteger));
      Price.AddPair('currency',
         Cars[i][TCarInfo.Currency]);
    end;
    JSON := JSONCars.ToJSON;
  finally
    JSONCars.Free;
  end;
end;

procedure TMainForm.btnModifyJSONClick(Sender: TObject);
var
  JSONCars: TJSONArray;
  Car, Price: TJSONObject;
begin
  JSONCars := TJSONObject.ParseJSONValue(JSON)
as TJSONArray;
  try
    Car := TJSONObject.Create;
    JSONCars.AddElement(Car);
    Car.AddPair('manufacturer', 'Hennessey');
    Car.AddPair('name', 'Venom GT');
    Price := TJSONObject.Create;
    Car.AddPair('price', Price);
    Price.AddPair('value', TJSONNumber.Create(600000));
    Price.AddPair('currency', 'USD');
    JSON := JSONCars.ToJSON;
  finally
    JSONCars.Free;
  end;
end;

procedure TMainForm.btnParseJSONClick(Sender: TObject);
var
  JSONCars: TJSONArray;
  i: Integer;
  Car, JSONPrice: TJSONObject;
  CarPrice: Double;
  s, CarName, CarManufacturer, CarCurrencyType: string;
begin
  s := '';
  JSONCars := TJSONObject.ParseJSONValue(JSON)
                                         as TJSONArray;
  if not Assigned(JSONCars) then
    raise Exception.Create('Not a valid JSON');
  try
    for i := 0 to JSONCars.Count - 1 do
    begin
      Car := JSONCars.Items[i] as TJSONObject;
      CarName := Car.GetValue('name').Value;
      CarManufacturer :=
         Car.GetValue('manufacturer').Value;
      JSONPrice := Car.GetValue('price') as TJSONObject;
      CarPrice := (JSONPrice.GetValue('value') as
         TJSONNumber).AsDouble;
      CarCurrencyType := JSONPrice.GetValue('currency')
      .Value
      s := s + Format(
        'Name = %s' + sLineBreak +
        'Manufacturer = %s' + sLineBreak +
        'Price = %.0n%s' + sLineBreak +
        '-----' + sLineBreak,
        [CarName, CarManufacturer,
        CarPrice, CarCurrencyType]);
    end;
    JSON := s;
  finally
    JSONCars.Free;
  end;
end;
- Run the application by hitting F9 (or by going to Run | Run).
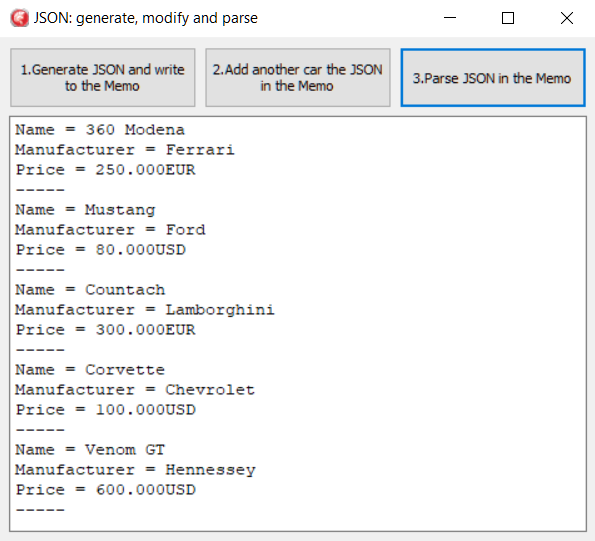
- Click on the btnGenerateJSON button, and you should see a JSON array and some JSON objects in the memo.
- Click on the btnModifyJSON button, and you should see one more JSON object inside the outer JSON array in the memo.
- Click on the last button, and you should see the same data as before, but with a normal text representation.
- After the third click, you should see something similar to the following screenshot:
There's more...
In JSON objects, the Owned property determines whether the parent is responsible for the destruction of the object. This property by default is True, meaning all contained instances are owned by their parent. This is why, usually, if you have a combination of various JSON objects, you free only the last parent.
Although not the fastest or the most standards-compliant on the market, JSON usability is important because other Delphi technologies, such as DataSnap, use it. Luckily, there are a lot of alternative JSON parsers for Delphi, if you find you have trouble with the standard one.
Other notable JSON parsers are the following:
- SuperObject (https://github.com/hgourvest/superobject)
- The one included in Delphi Web Script library can be found at https://bitbucket.org/egrange/dwscript/
- A fast JSON parser from Andreas Hausladen can be found at https://github.com/ahausladen/JsonDataObjects
If your main concern is speed, then check out these alternative JSON parsers.
There are also a lot of serialization libraries that use JSON as a serialization format. In general, every parser has its own way to serialize an object to JSON. Find your favorite. Just as an example, in Chapter 5, The Thousand Faces of Multithreading, in the Using tasks to make your customer happy recipe, you will see an open source library containing a set of serialization helpers using the default Delphi JSON parser.
However, JSON is not the right tool for every interchange or data-representation job. XML has been creating other technologies that can help if you need to search, transform, and validate your data in a declarative way. In JSON land, there is no such level of standardization, apart from the format itself. However, over the years, there has been an effort to include at least the XML schema counterpart in JSON, and you can find more details at http://json-schema.org/.
Manipulating and transforming XML documents
XML stands for Extensible Markup Language (http://en.wikipedia.org/wiki/XML) and is designed to represent, transport, and store hierarchical data in a trees of nodes. You can use XML to communicate with different systems and store configuration files, complex entities, and so on. They all use a standard and powerful format. Delphi has had good support for XML for more than a decade now.
Getting ready
All the basic XML-related activities can be summarized with the following points:
- Generate XML data
- Parse XML data
- Parse XML data and modify it
In this recipe, you will see how to carry out all these activities.
How to do it...
Let's have a look at the following steps:
- Create a new VCL application and drop three TButton and a TMemo. Align all the buttons as a toolbar at the top of the form and the memo on the remaining form client area.
- From left to right, name the buttons btnGenerateXML, btnModifyXML, btnParseXML, and btnTransformXML.
- The real work on the XML will be done by the TXMLDocument component. So, drop one instance of the form and set its DOMVendor property to Omni XML.
- We will use static data as our data source. A simple matrix is enough for this recipe. Just after the implementation section of the unit, write the code that follows:
type
  TCarInfo = (
  Manufacturer = 1,
  Name = 2,
  Currency = 3,
  Price = 4);

var
  Cars: array [1 .. 4] of
     array [Manufacturer .. Price] of string = (
      (
        'Ferrari','360 Modena','EUR', '250,000'
      ),
      (
        'Ford', 'Mustang', 'USD', '80,000'
      ),
      (
        'Lamborghini', 'Countach', 'EUR','300,000'
      ),
      (
        'Chevrolet', 'Corvette', 'USD', '100,000'
      )
    );
- We will use a TMemo to display the XML and the data. To keep things clear, create a public property called Xml on the form and map its setter and getter to the Memo1.Lines.Text property. Use the following code:
//...other form methods declaration
private
  procedure SetXML(const Value: String);
  function GetXML: String;
public
  property Xml: String read GetXML write SetXML;
end;

//...then in the implementation section
function TMainForm.GetXML: String;
begin
  Result := Memo1.Lines.Text;
end;

procedure TMainForm.SetXML(const Value: String);
begin
  Memo1.Lines.Text := Value;
end;
- Now, create event handlers for each button. For btnGenerateXML, write the following code:
procedure TMainForm.btnGenerateXMLClick(Sender: TObject);
var
  RootNode, Car, CarPrice: IXMLNode;
  i: Integer;
  s: String;
begin
  XMLDocument1.Active := True;
  try
    XMLDocument1.Version := '1.0';
    RootNode := XMLDocument1.AddChild('cars');
    for i := Low(Cars) to High(Cars) do
    begin
      Car := XMLDocument1.CreateNode('car');
      Car.AddChild('manufacturer').Text :=
         Cars[i][TCarInfo.Manufacturer];
      Car.AddChild('name').Text :=
         Cars[i][TCarInfo.Name];
      CarPrice := Car.AddChild('price');
      CarPrice.Attributes['currency'] :=
         Cars[i][TCarInfo.Currency];
      CarPrice.Text := Cars[i][TCarInfo.Price];
      RootNode.ChildNodes.Add(Car);
    end;
    XMLDocument1.SaveToXML(s);
    Xml := s;
  finally
    XMLDocument1.Active := False;
  end;
end;
- Now, we have to write the code to change the XML. In the btnModifyXML click event handler, write the following code:
procedure TMainForm.btnModifyXMLClick(Sender: TObject);
var
  Car, CarPrice: IXMLNode;
  s: string;
begin
  XMLDocument1.LoadFromXML(Xml);
  try
    Xml := '';
    Car := XMLDocument1.CreateNode('car');
    Car.AddChild('manufacturer').Text := 'Hennessey';
    Car.AddChild('name').Text := 'Venom GT';
    CarPrice := Car.AddChild('price');
    CarPrice.Attributes['currency'] := 'USD';
    CarPrice.Text := '600,000';
    XMLDocument1.DocumentElement.ChildNodes.Add(Car);
    XMLDocument1.SaveToXML(s);
    Xml := s;
  finally
    XMLDocument1.Active := False;
  end;
end;
- Write the following code under the btnParseXML click event handler:
procedure TMainForm.btnParseXMLClick(Sender: TObject);
var
  CarsList: IDOMNodeList;
  CurrNode: IDOMNode;
  childidx, i: Integer;
  CarName, CarManufacturer, CarPrice, CarCurrencyType:
     string;
begin
  XMLDocument1.LoadFromXML(Xml);
  try
    Xml := '';
    CarsList := XMLDocument1.
       DOMDocument.getElementsByTagName('car');
    for i := 0 to CarsList.length - 1 do
    begin
      CarName := '';  CarManufacturer := '';
      CarPrice := '';  CarCurrencyType := '';
      for childidx := 0 to
         CarsList[i].ChildNodes.length - 1 do
      begin
        CurrNode := CarsList[i].ChildNodes[childidx];
        if CurrNode.nodeName.Equals('name') then
          CarName := CurrNode.firstChild.nodeValue;
        if CurrNode.nodeName.Equals('manufacturer') then
          CarManufacturer := CurrNode.firstChild.nodeValue;
        if CurrNode.nodeName.Equals('price') then
        begin
          CarPrice := CurrNode.firstChild.nodeValue;
          CarCurrencyType :=
             CurrNode.Attributes.
             getNamedItem('currency').nodeValue;
        end;
      end;
      Xml := Xml +
         'Name = ' + CarName + sLineBreak +
         'Manufacturer = ' + CarManufacturer + sLineBreak +
         'Price = ' +
         CarPrice + CarCurrencyType + sLineBreak +
         '-----' + sLineBreak;
    end;
  finally
    XMLDocument1.Active := False;
  end;
end;
- Write the following code under the btnTransformXML click event handler:
procedure TMainForm.btnTransformClick(Sender: TObject);
var
LXML, LXSL: string;
LOutput: string;
begin
LXML := TFile.ReadAllText('..\..\..\cars.xml');
LXSL := TFile.ReadAllText('..\..\..\cars.xslt');
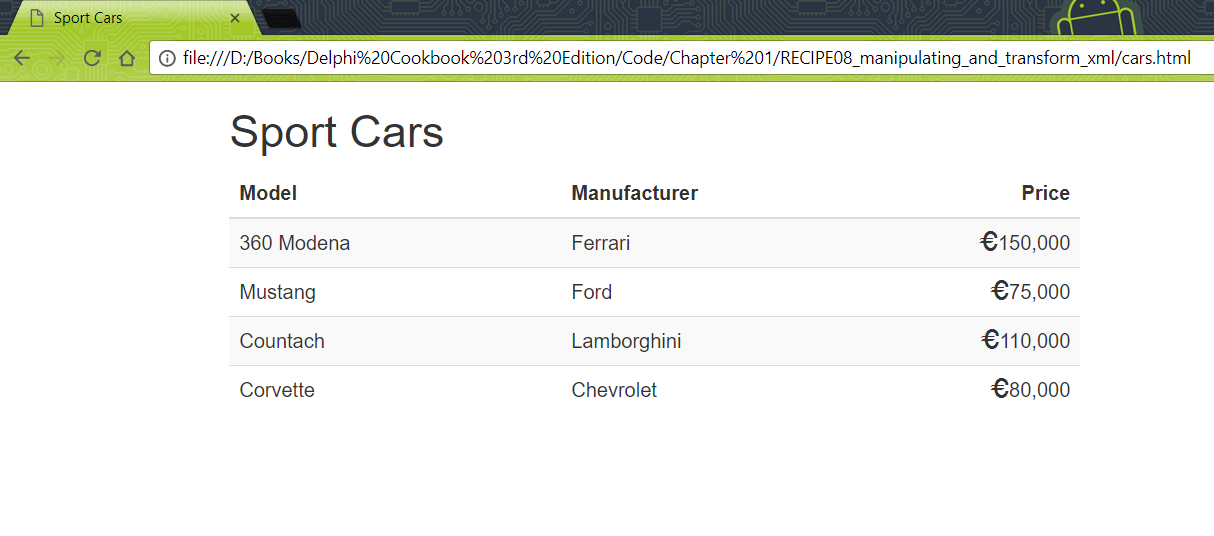
LOutput := Transform(LXML, LXSL);
TFile.WriteAllText('..\..\..\cars.html', LOutput);
ShellExecute(0, PChar('open'),
PChar('file:///' +
TPath.GetFullPath('..\..\..\cars.html')), nil,
nil, SW_SHOW);
end;
- Now, add the following function in your form implementation section:
function Transform(XMLData: string; XSLT: string): String;
var
  LXML, LXSL: IXMLDocument;
  LOutput: WideString;
begin
  LXML := LoadXMLData(XMLData);
  LXSL := LoadXMLData(XSLT);
  LXML.DocumentElement.TransformNode(LXSL.DocumentElement,
     LOutput);
  Result := String(LOutput);
end;
- Run the application by hitting F9 (or by going to Run | Run).
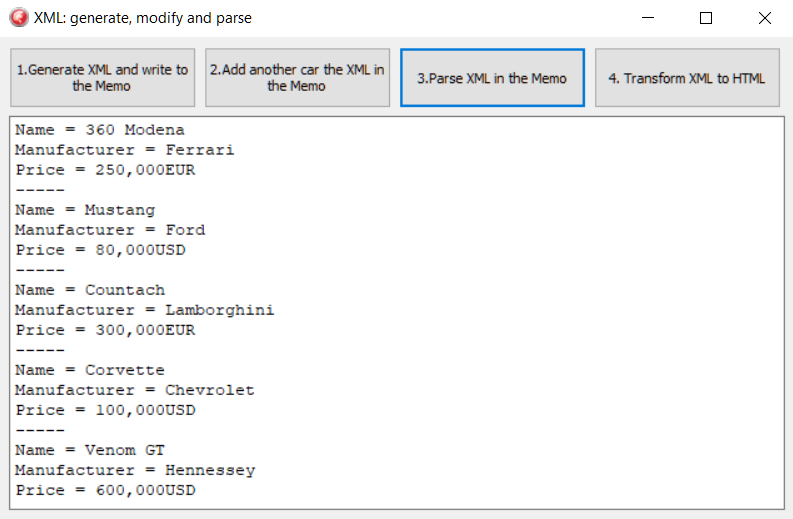
- Click on the btnGenerateXML button, and you should see some XML data in the memo.
- Click on the btnModifyXML button, and you should see some more XML in the memo.
- Click on btnParseXML, and you should see the same data as before, but with normal text representation.
- After the third click, you should see something similar to the following screenshot:
- Now, copy the cars.xml and cars.xslt files from the respective recipe folder to the parent folder of your project folder and click on the btnTransformXML button.
- The system default browser should appear, showing something like the following screenshot:
How it works...
Let's look at these steps now:
- The first button generates the XML representation of the data in our matrix. We've used some car information as sample data.
- To create an XML attribute, there are three fundamental TXMLDocument methods:
- XMLNode := XMLDocument1.CreateNode('node');
- XMLNode.AddChild('childnode');
- XMLNode.Attributes['attrname'] := 'attrvalue';
There are other very useful methods, but these are the basics of XML generation.
- The btnModifyXML button loads the XML into the memo and appends some other data (another car) to the list. Then, it updates the memo with the new updated XML. These are the most important lines to note:
//Create a node without adding it to the DOM
Car := XMLDocument1.CreateNode('car');

//fill Car XMLNode... and finally add it to the DOM
//as child of the root node
XMLDocument1.DocumentElement.ChildNodes.Add(Car);
- The code under the btnParseXMLClick event handler allows us to read the display as normal text as the XML data navigating through XML tree.
- The code under the btnTransformXMLClick event handler uses the XSLT transformation in cars.xslt and the data in cars.xml to generate a brand new HTML page. The XSLT code is as follows:
<?xml version="1.0" encoding="UTF-8"?>
<xsl:stylesheet version="1.0"
  xmlns:xsl="http://www.w3.org/1999/XSL/Transform">
    <xsl:output method="html" version="5.0"
       encoding="UTF-8" indent="yes"/>
  <xsl:template match="cars">
    <html>
      <head>
        <link href="https://maxcdn.bootstrapcdn.com/
           bootstrap/3.3.4/css/bootstrap.min.css"
           rel="stylesheet"/>
        <title>
          Sport Cars
        </title>
      </head>
      <body>
        <div class="container">
        <div class="row">
        <h1>Sport Cars</h1>
          <table class="table table-striped table-hover">
            <thead>
              <tr>
                <th>Model</th>
                <th>Manufacturer</th>
                <th class="text-right">Price</th>
              </tr>
            </thead>
            <tbody>
              <xsl:for-each select="car">
              <tr>
                <td>
                  <xsl:value-of select="name"/>
                </td>
                <td>
                  <xsl:value-of select="manufacturer"/>
                </td>
                <td class="text-right">
                  <span class="glyphicon glyphicon-euro">
                  </span>
                  <xsl:value-of select="price"/>
                </td>
              </tr>
            </xsl:for-each>
          </tbody>
        </table>
      </div>
      </div>
    </body>
  </html>
</xsl:template>
</xsl:stylesheet>
There's more...
There are many things to say about the XML ecospace. There are XML engines that provide facilities to search data in an XML tree (XPath), to validate XML using other XML (XML Schema or DTD), to transform an XML into another kind of format using another XML (XSLT), and many others (http://en.wikipedia.org/wiki/List_of_XML_markup_languages). The good thing is that just like XML, the DOM object is also standardized. So, every library that is compliant with the standard has the same methods, from Delphi to JavaScript and from Python to C#.
TXMLDocument allows you to select the DOMVendor implementation. By default, there are three implementations available:
- MSXML:
- From Microsoft; implemented as COM objects
- Supports XML transformations
- Available only on Windows (so no Android, iOS, or Mac OS X)
- Omni XML:
- Much faster than ADOM and based on the Open Source Project.
- It is cross-platform, so is available on all the supported Delphi platforms. If you plan to write XML handling code on mobile or Mac, this is the way to go.
- ADOM XML:
- A quite old open source Delphi implementation
- Does not support transformations
- Available on all supported Delphi platforms
- For backward compatibility, consider Omni XML instead in Delphi
TXMLDocument uses a Windows-only vendor by default. If you are designing a FireMonkey application that is intended to run on other platforms than Windows, select a cross-platform DOM vendor.
XSLT allows you to transform XML to something else, using other XML as a stylesheet. As we saw in this recipe, you can use an XML file and an XSLT file to generate an HTML page that shows the data contained in the XML, using XSLT to format the data.
The following function loads one XML and one XSLT document from two string variables. Then, we use the XSLT document to transform the XML document. The code that follows shows this in detail:
function Transform(XMLData: string; XSLT: string): String;
var
  LXML, LXSL: IXMLDocument;
  LOutput: WideString;
begin
  LXML := LoadXMLData(XMLData);
  LXSL := LoadXMLData(XSLT);
  LXML.DocumentElement.TransformNode(
    LXSL.DocumentElement, LOutput);
  Result := String(LOutput);
end;
This function doesn't know about the output format because it is defined by the XSLT document. The result could be XML, HTML, CSV, plain text, or whatever the XSLT defines, but the code does not change.
XSLT can be really useful. I recommend that you go and visit http://www.w3schools.com/xml/xsl_languages.asp for further details on the language.
I/O in the 21st century – knowing the streams
Many I/O-related activities handle streams of data. A stream is a sequence of data elements made available over time. Wikipedia says:
At the lowest level, all streams are bytes, but using a high-level interface could obviously help the programmer handle their data. This is the reason why a stream object usually has methods such as read, seek, write, and so on, just to make handling a byte stream a bit simpler.
In this recipe, you'll see some stream utilization examples.
Getting ready
In the good old Pascal days, there was a set of functions to handle the I/O (Assign, Reset, Rewrite, Close, and many more). Now, we have a bunch of classes. All Delphi streams inherit from TStream and can be used as the internal stream of one of the adapter classes (by adapter, I mean an implementation of the Adapter, or Wrapper, design patterns from the Gang of Four (GoF) famous book about design patterns).
There are 10 fundamental types of streams:
|
Class |
Use |
|
System.Classes.TBinaryWriter |
Writer for binary data |
|
System.Classes.TStreamWriter |
Writer for characters to a stream |
|
System.Classes.TStringWriter |
Writer for a string |
|
System.Classes.TTextWriter |
Writer of a sequence of characters; it is an abstract class |
|
System.Classes.TWriter |
Writes component data to an associated stream |
|
System.Classes.TReader |
Reads component data from an associated stream |
|
System.Classes.TStreamReader |
Reader for stream of characters |
|
System.Classes.TStringReader |
Reader for strings |
|
System.Classes.TTextReader |
Reader for sequence of characters; it is an abstract class |
|
System.Classes.TBinaryReader |
Reader for binary data |
You can check out the complete list and their intended uses on the Embarcadero website at http://docwiki.embarcadero.com/RADStudio/en/Streams,_Reader_and_Writers.
As Joel Spolsky says, You can no longer pretend that plain text is ASCII. So, while we write streams, we have to pay attention to the encoding our text uses and the encoding our counterpart is waiting for.
One of the most frequent necessities is to efficiently read and write a text file using the correct encoding:
The point Joel is making is that the content of a string doesn't know about the type of character encoding it uses.
When you think about file handling, ask yourself—Could this file become 10 MB? And 100 MB? And 1 GB? How will my program behave in that case? Handling a file one line at time and not loading all the file contents in memory is usually good insurance for these cases. A stream of data is a good way to do this. In this recipe, you'll see the practical utilization of streams, stream writers, and stream readers.
How it works...
The project is not complex. All the interesting stuff happens in btnWriteFile and btnReadFile. To write the file, TStreamWriter is used. TStreamWriter (similar to its counterpart TStreamReader) is a wrapper for a TStream descendant and adds some useful high-level methods to write to the stream. There are a lot of overloaded methods (Write/WriteLine) to allow easy writing to the underlying stream. However, you can access the underlying stream using the BaseStream property of the wrapper. Just after having written the file, the memo reloads the file using the same encoding used to write it and displays it. This is only a fast check for this recipe; you don't need TMemo at all in your real project. The btnReadFile simply opens the file using a stream and passes the stream to TStreamReader which, using the right encoding, will read the file one line at a time (note that text is stored in the .pas file, which is in this case encoded as UTF-8, while by default Delphi .pas files use ASCII encoding).
Now, let's run some checks. Run the program and with the encoding set to ASCII, click on btnWriteFile. The memo will show garbage text, as shown in the following screenshot. This is because we are using the wrong encoding for the data we are writing in the file:
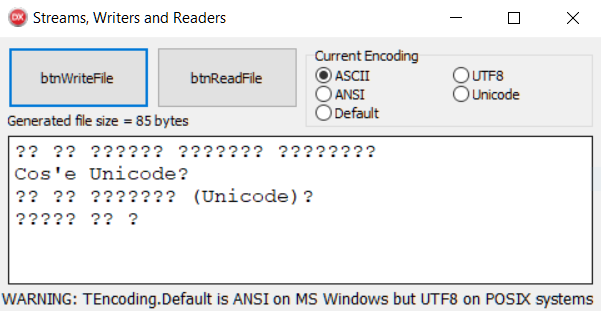
Now, select UTF8 from the radio group and retry it. By clicking on btnWriteFile, you will see the correct text in the memo. Try to change the current encoding using ASCII and click on btnReadFile. You will still get garbage text. Why? Because the file has been read with the wrong encoding. You have to know the encoding beforehand to safely read the file's contents. To read the text that we wrote, we have to use the same encoding. Play with other encodings to see the different behavior.
There's more...
Streams are very powerful and their uniform interface helps us write portable and generic code. With the help of streams and polymorphism, we can write code that uses TStream to do some work, without knowing what kind of stream it is!
Also, a well-known possibility is that if you ever need to write a program that needs to access the good old TD_INPUT, STD_OUTPUT, or STD_ERROR, you can use THandleStream to wrap these system handles with a nice TStream interface using the following code:
program StdInputOutputError;
//the following directive instructs the compiler to create a
//console application and not a GUI one, which is the default.
{$APPTYPE CONSOLE}
uses
  System.Classes, // required for Stream classes
  Winapi.Windows; // required to have access to the STD_* handles
var
  StdInput: TStreamReader;
  StdOutput, StrError: TStreamWriter;
begin
  StdInput := TStreamReader.Create(
THandleStream.Create(STD_INPUT_HANDLE));
  StdInput.OwnStream;
  StdOutput := TStreamWriter.Create(
THandleStream.Create(STD_OUTPUT_HANDLE));
  StdOutput.OwnStream;
  StdError := TStreamWriter.Create(
THandleStream.Create(STD_ERROR_HANDLE));
  StdError.OwnStream;
  { HERE WE CAN USE OURS STREAMS }
  // Let's copy a line of text from STD_IN to STD_OUT
  StdOutput.writeln(StdInput.ReadLine);
  { END - HERE WE CAN USE OURS STREAMS }
  StdError.Free;
  StdOutput.Free;
  StdInput.Free;
end;
Moreover, when you work with file-related streams, the TFile class (contained in System.IOUtils.pas) is very useful, and has some helper methods to write shorter and more readable code.
Creating a Windows Service
Some kinds of application need to be running 24/7. Usually, they are network servers or data transfer/monitoring applications. In these cases, you probably start with a normal GUI or console application. However, when the systems start to be used in production, you are faced with a lot of problems related to Windows session termination, reboots, user rights, and other issues related to the server environment.
Getting ready
The way to go, in the previous scenario, is to develop a Windows Service.
In this recipe, we'll see how to write a good Windows Service scaffold, and this can be the skeleton for many other services. So, feel free to use this code as a template to create all the services that you will need.
How it works...
The project has been created using the default project template accessible by going to File | New | Other | Delphi Projects | Service Application; it has been integrated with a set of functionalities to make it real.
All the low-level interfacing with the Windows Service Manager is done by the TService class. In ServiceU.pas, there is the actual descendant of TService that represents the Windows Service we are implementing. Its event handlers are used to communicate with the operating system.
Usually, a service needs to respond to Windows Service Controller commands independently of what it is doing. So, we need a background thread to do the actual work, while the TService.OnExecute event should not do any real work (this is not a must, but usually is the way to go). The unit named WorkerThreadU.pas contains the thread and the main service needed to hold a reference to the instance of this thread.
The background thread starts when the service is started (the OnStart event) and stops when the service is stopped (the OnStop event). The OnExecute event waits and handles ServiceController commands but doesn't do any actual functional work. This is done using ServiceThread.ProcessRequests(false) in a while loop.
Usually, the OnExecute event handler looks like this:
procedure TSampleService.ServiceExecute(Sender: TService);
begin
  while not Terminated do
  begin
    ServiceThread.ProcessRequests(false);
    TThread.Sleep(1000);
  end;
end;
The wait of 1,000 milliseconds is not a must, but consider that the wait time should not be too high because the service needs to be responsive to the Windows Service Controller messages. It should not be too low because otherwise the thread context switch may waste resources.
The background thread writes a line in a logfile once a second. While it is in a Paused state, the service stops writing. When the service continues, the thread will restart writing the log line. In the service event handlers is the logic to implement this change of state:
procedure TSampleService.ServiceContinue(Sender: TService;
   var Continued: Boolean);
begin
  FWorkerThread.Continue;
  Continued := True;
end;

procedure TSampleService.ServicePause(Sender: TService;
   var Paused: Boolean);
begin
  FWorkerThread.Pause;
  Paused := True;
end;
In the thread, there is actual logic to implement the Paused state, and in this case, it is fairly simple; we pause the writing of the logfile:
Here's an extract:
    Log := TStreamWriter.Create(
      TFileStream.Create(LogFileName,
         fmCreate or fmShareDenyWrite));
    try
      while not Terminated do
      begin
        if not FPaused then
        begin
          Log.WriteLine('Message from thread: ' + TimeToStr(now));
        end;
        TThread.Sleep(1000);
      end;
    finally
      Log.Free;
    end;
The FPaused Boolean instance variable can be considered thread safe for this use case.
Delphi services don't have a default description under the Windows Service Manager. If we want to give them a description, we have to write a specific key in the Windows registry. Usually, this is done in the AfterInstall event. In our service, this is the code to write in the AfterInstall event handler:
procedure TSampleService.ServiceAfterInstall(
Sender: TService);
var
  Reg: TRegistry; //declared in System.Win.Registry;
begin
  Reg := TRegistry.Create(KEY_READ or KEY_WRITE);
  try
    Reg.RootKey := HKEY_LOCAL_MACHINE;
    if Reg.OpenKey(
      'SYSTEM\CurrentControlSet\Services\' + name,
      False {do not create if not exists}) then
    begin
      Reg.WriteString('Description',
        'My Fantastic Windows Service');
      Reg.CloseKey;
    end;
  finally
    Reg.Free;
  end;
end;
It is not necessary to delete this key in the AfterUnInstall event because Windows deletes all the keys related to the service (under HKEY_LOCAL_MACHINE\SYSTEM\CurrentControlSet\Services\<MyServiceName>) when the service is actually uninstalled.
Let's try an installation. Build the project, open the Windows command prompt (with administrator-level privileges), and go to the folder where the project has been built. Then, run this command:
C:\<ExeProjectPath>\WindowsService.exe /install
If everything is okay, you should see this message:

Now, you can check under the Windows Services Console, and you should find the service installed. Click on Start, wait for the confirmation, and the service should start to write to its logfile.
Play with Pause and Continue and check the file activity.
There are many free choices. Here are some links:
There's more...
Windows Services are very powerful. Using the abstractions that Delphi provides, you can also create an application that, reading a parameter on the command line, can act as a normal GUI application or as a Windows Service.
In the respective recipe folder, there is another recipe folder called 20_WindowsServiceOrGUI.
This application can be used as a normal Windows Service using the normal command-line switches used so far, but if launched with /GUI, it acts as a GUI application and can use the same application code (not TService). In our example, the GUI version uses the same worker thread as the service version. This can be very useful for debugging purposes also.
Run the application with the following command:
C:\<ExeProjectPath>\WindowsServiceOrGUI.exe /GUI
You will get a GUI version of the service, as shown here:

Using the TService.LogMessage method
If something happens during the execution of the service that you want to log, and you want to log in to the system logger, you can use the LogMessage method to save a message. The message can be viewed later using the Windows built-in event viewer.
You can call the LogMessage method using an appropriate logging type, like this:
LogMessage('Your message goes here for SUCCESS',
   EVENTLOG_SUCCESS, 0, 1);
If you check the event in the Event Viewer, you will find a lot of garbage text that complains about the lack of description for the event.
If you really want to use the Event Viewer to view your log message (when I can, I use a logfile and don't concern myself with the Event Viewer, but there are scenarios where the Event Viewer log is needed), you have to use the Microsoft © Message Compiler.
The Microsoft © Message Compiler is a tool able to compile a file of messages into a set of RC files. Then, these files must be compiled by a resource compiler and linked into your executable.
More information on Microsoft © Message Compiler and the steps needed to provide the description for the log event can be found at http://www.codeproject.com/Articles/4166/Using-MC-exe-message-resources-and-the-NT-event-lo.
Associating a file extension with your application on Windows
In some cases, your fantastic application needs to be opened by just double-clicking on a file with an extension associated with it. This is the case with Microsoft Word, Microsoft Excel, and many other well-known pieces of software. If you have a file generated with a program, double-click on the file and the program that generated the file will come up, pointing to that file. So, if you click on mywordfile.docx, Microsoft Word will be opened and mywordfile.docx will be shown. This is what we'd like to do in this recipe. The association can be useful when you have multiple configurations for a program. Double-click on the ConfigurationXYZ.myext file and the program will start using that configuration.
Getting ready
The hard work is done by the operating system itself. We have to instruct Windows to provide the following information:
- The file extension to associate
- The description of the file type (it will be shown by Windows Explorer, describing the file type)
- The default icon for the file type (in this recipe, we'll use the application icon itself, but it is not mandatory)
- The application that we want to associate
Let's start!
How to do it...
Let's complete the following steps:
- Create a new VCL application and drop two TButton components and a TMemo component. Align all the buttons as a toolbar at the top of the form and the memo to all the remaining form client area.
- The button on the left-hand side will be used to register a file type, while the button on the right-hand side will be used to unregister the association (cleaning the registry).
- We have to handle some features specific to Microsoft Windows, so we need some Windows-related units. Under the implementation section of the unit, write this uses clause:
uses System.Win.registry, Winapi.shlobj, System.IOUtils;
- In the implementation section, we need two procedures to do the real work; so just after the uses clause, add this code:
procedure UnregisterFileType(
  FileExt: String;
  OnlyForCurrentUser: boolean = true);
var
  R: TRegistry;
begin
  R := TRegistry.Create;
  try
    if OnlyForCurrentUser then
      R.RootKey := HKEY_CURRENT_USER
    else
      R.RootKey := HKEY_LOCAL_MACHINE;

    R.DeleteKey('\Software\Classes\.' + FileExt);
    R.DeleteKey('\Software\Classes\' + FileExt + 'File');
  finally
    R.Free;
  end;
  SHChangeNotify(SHCNE_ASSOCCHANGED, SHCNF_IDLIST, 0, 0);
end;

procedure RegisterFileType(
  FileExt: String;
  FileTypeDescription: String;
  ICONResourceFileFullPath: String;
  ApplicationFullPath: String;
  OnlyForCurrentUser: boolean = true);
var
  R: TRegistry;
begin
  R := TRegistry.Create;
  try
    if OnlyForCurrentUser then
      R.RootKey := HKEY_CURRENT_USER
    else
      R.RootKey := HKEY_LOCAL_MACHINE;

    if R.OpenKey('\Software\Classes\.' + FileExt,
       true) then begin
      R.WriteString('', FileExt + 'File');
      if R.OpenKey('\Software\Classes\' + FileExt + 'File',
         true) then begin
        R.WriteString('', FileTypeDescription);
        if R.OpenKey('\Software\Classes\' +
           FileExt + 'File\DefaultIcon', true) then
        begin
          R.WriteString('', ICONResourceFileFullPath);
          if R.OpenKey('\Software\Classes\' +
             FileExt + 'File\shell\open\command',
               true) then
          R.WriteString('',
             ApplicationFullPath + ' "%1"');
          end;
        end;
      end;
    finally
    R.Free;
  end;
  SHChangeNotify(SHCNE_ASSOCCHANGED, SHCNF_IDLIST, 0, 0);
end;
- These two procedures allow us to register (and unregister) a file type, considering only the current user or all the machine users. Pay attention; if you want to register the association for every user, write your data to:
HKEY_LOCAL_MACHINE\Software\Classes
- If you want to register the association for the current user only, write your data to:
HKEY_CURRENT_USER\Software\Classes
- On the newest Windows versions, you need administrator rights to register a file type for all machine users. The last line of the procedures tells Explorer (the Microsoft Windows graphic interface) to refresh its settings to reflect the changes made to the file associations. As a result, the Explorer file list views will update.
- We've almost finished. Change the left button name to btnRegister, the right button name to btnUnRegister, and put the following code into their Onclick event handlers:
procedure TMainForm.btnRegisterClick(Sender: TObject);
begin
  RegisterFileType(
    'secret',
    'This file is a secret',
    Application.ExeName,
    Application.ExeName,
    true);
  ShowMessage('File type registred');
end;

procedure TMainForm.btnUnRegisterClick(Sender: TObject);
begin
  UnregisterFileType('secret', true);
  ShowMessage('File type unregistered');
end;
- Now, when our application is invoked after double-clicking, we'll get the file name as a parameter. It is possible to read a parameter passed by Windows Explorer (or the command line) using the ParamStr(1) function. Create a FormCreate event handler using the following code:
procedure TMainForm.FormCreate(Sender: TObject);
begin
  if TFile.Exists(ParamStr(1)) then
    Memo1.Lines.LoadFromFile(ParamStr(1))
  else begin
    Memo1.Lines.Text := 'No valid secret file type';
  end;
end;
- Now, the application should be complete. However, nice integration with the operating system requires a nice icon. In the code, the associated file will get the same icon as the main program, so let's change our default icon by going to Project | Options | Application dialog, and choosing a nice icon. Click on the Load Icon button, choose an ICO file, and then select the third item from the resultant dialog:
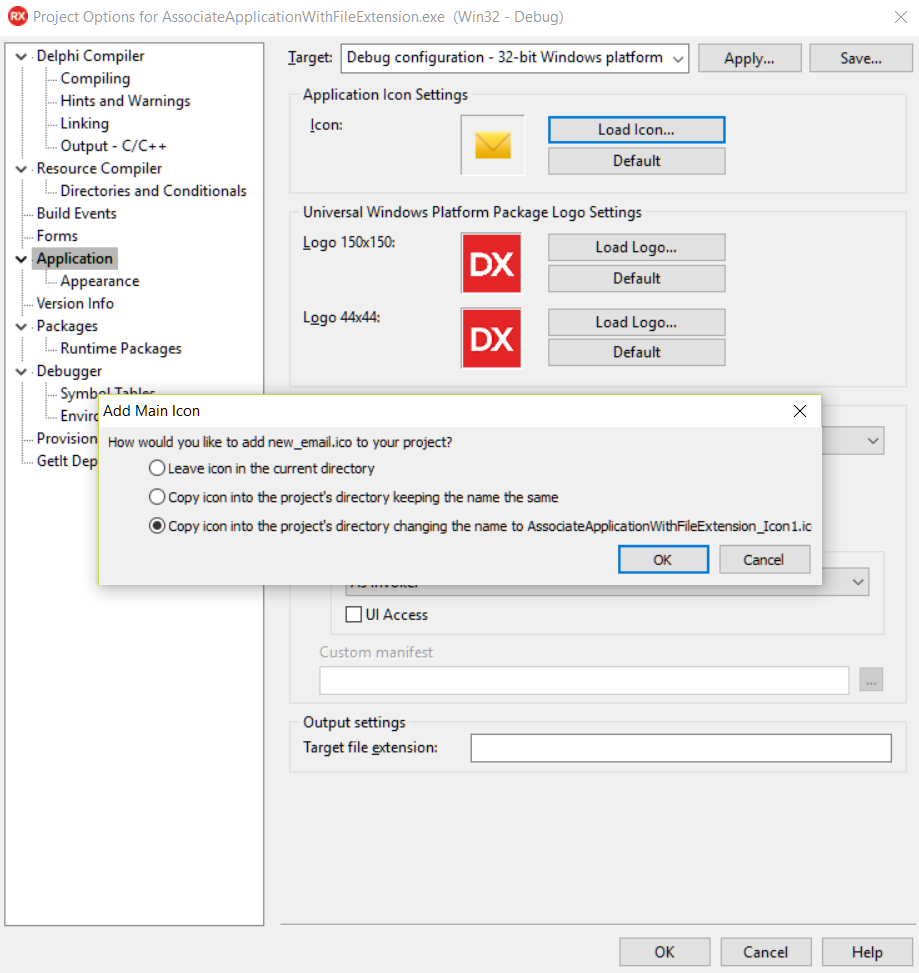
- Now, create some text files with our registered extension, .secret.
- These files will appear with the default Windows icons, but in a few seconds, they will have a brand new icon.
- Run the application by hitting F9 (or by going to Run | Run).
- Click on the btnRegister button and close the application. Now, the files get new icons, as shown here:
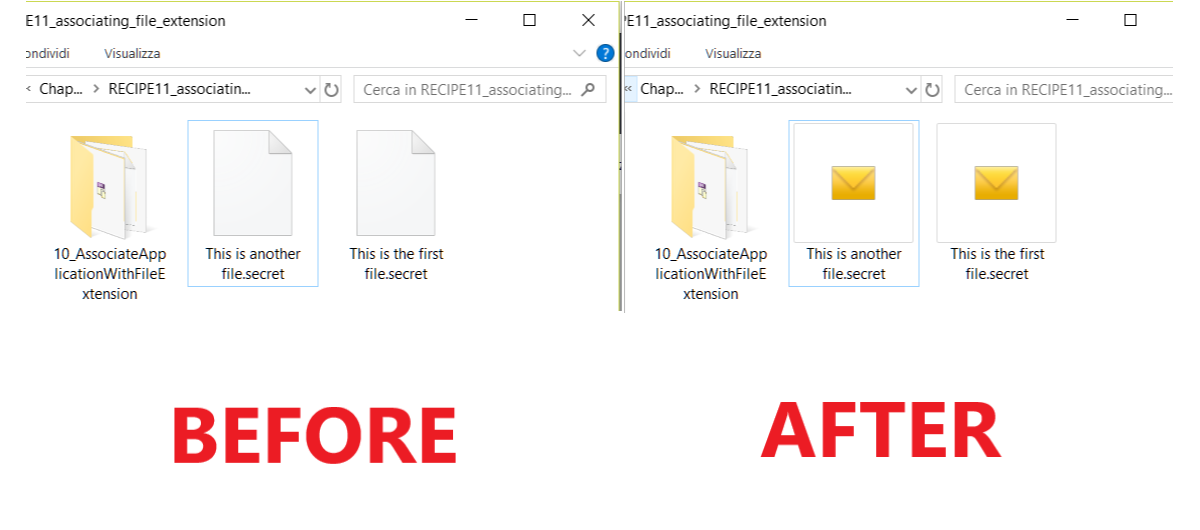
- Now, with the application not running, double-click on a .secret file. Our program will be started by Windows itself, using the information stored in the registry about the .secret file, and we'll get this form (the text shown in the memo is the text contained in the file):
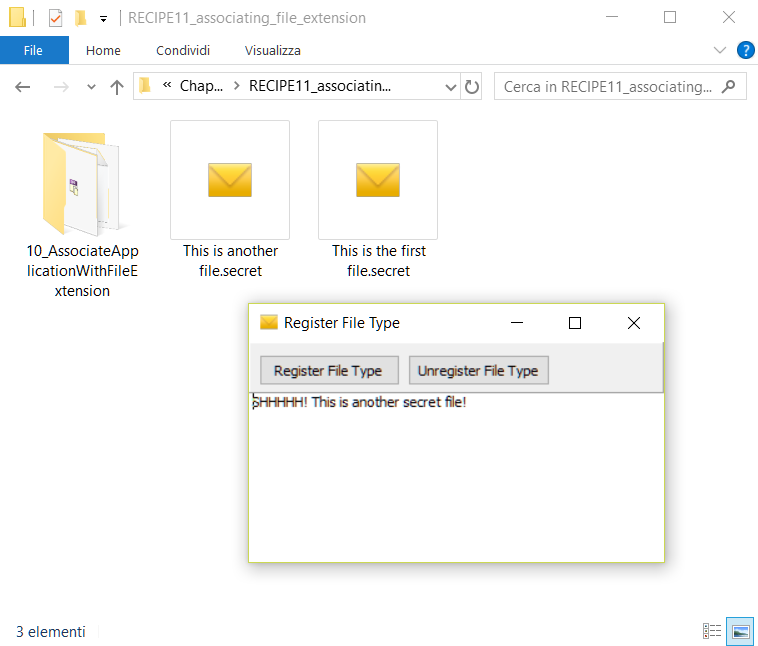
There's more...
One application can register many file types. In some cases, I've used this technique to register some specific desktop database files to my application (Firebird SQL-embedded database files or SQLite database files). So, double-clicking actually creates a connection to that database.
Be coherent with the Windows look and feel using TTaskDialog
Version after version, the Windows OS changed its look and feel a lot from mid-2009 when the first Windows 95 came out. Also, the UX guidelines from Microsoft have changed a lot. Do you remember the Multiple Document Interface (MDI) paradigm? It was very popular in the 90s, but now is deprecated and an application using seems old, even if it has been released. Indeed, many Windows applications seem stuck in the past in terms of UI and UX.
What about dialog? Our beloved ShowMessage and MessageDlg have been there since Delphi 1, but now, the modern Windows versions use different dialogs to communicate to users. Many of the standard dialogs contain more than a question and a simple Yes and No. Some dialogs ask something and provide a list of choices using buttons; others have a nice progress bar; others have a nice button with an extended explanation of each choice just inside the button. How can our Delphi application benefit from the new dialogs offered by the OS? In other words, how can we create a coherent look and feel for our dialog windows so that our application does not look old? This recipe shows you how to use the TTaskDialog component.
Getting started
TTaskdialog is a dialog box, somewhat like the standard call to Application.MessageBox in the VCL, but much more powerful. The Task Dialog API has been available since Windows Vista and Windows Server 2008, and your application must be theme enabled to use it (go to Project | Options | Application | Runtime Themes | Enable Runtime Themes).
Besides the usual default set of buttons (OK, Cancel, Yes, No, Retry, and Close), you can define extra buttons and many other customizations. The following Windows APIs provides Task Dialog:
|
API Name |
Description |
|
TaskDialog |
This creates, displays, and operates Task Dialog. The Task Dialog contains application-defined message text and title, icons, and any combination of predefined push buttons. This function does not support the registration of a callback function to receive notifications. |
|
TaskDialogCallbackProc |
This is an application-defined function used with the TaskDialogIndirect function. It receives messages from the Task Dialog when various events occur. TaskDialogCallbackProc is a placeholder for the application-defined function name. |
|
TaskDialogIndirect |
This creates, displays, and operates Task Dialog. The Task Dialog contains application-defined icons, messages, a title, a verification checkbox, command links, push buttons, and radio buttons. This function can register a callback function to receive notification messages. |
More information about API utilization can be obtained from https://msdn.microsoft.com/en-us/library/windows/desktop/bb787471(v=vs.85).aspx.
While the API can be useful in some border cases, the VCL comes with a very nice component that does all the low-level stuff for us. Let's look at an example program and see how simple it is to create a modern application.
How it works...
Open the TaskDialogs.dproj project so we can examine how it works.
There are six buttons on the form. The first one shows a simple utilization of the Task Dialog API, while the other five show a different utilization of the TTaskDialog component, which wraps that API.
The first button uses the Windows API directly with the following code:
procedure TMainForm.btnAPIClick(Sender: TObject);
var
  LTDResult: Integer;
begin
  TaskDialog(0, HInstance,
    PChar('The Title'),
    PChar('These are the main instructions'),
    PChar('This is another content'),
    TDCBF_OK_BUTTON or TDCBF_CANCEL_BUTTON,
    TD_INFORMATION_ICON, @LTDResult);
  case LTDResult of
    IDOK:
      begin
        ShowMessage('Clicked OK');
      end;
    IDCANCEL:
      begin
        ShowMessage('Clicked Cancel');
      end;
  end;
end;
The TaskDialog function is declared inside the Winapi.CommCtrl.pas unit. So far, you could ask, Why should I use a component for Task Dialogs? Seems quite simple. Yes, it is, if you only want to mimic MessageDlg, but things get complicated very fast if you want to use all the features of the Task Dialog API. So, the second button uses the TTaskDialog component. Let's see the relevant properties configured at design time for the tdSimple component:
object tdSimple: TTaskDialog
  Caption = 'The question'
  CommonButtons = [tcbYes, tcbNo]
  DefaultButton = tcbYes
  ExpandButtonCaption = 'More information'
  ExpandedText =
     'Yes, you have to decide something about this question...' +
       ' but I cannot help you a lot'
  Flags = [tfUseHiconMain, tfUseHiconFooter,
     tfVerificationFlagChecked]
  FooterIcon = 4
  FooterText = 'This is an important question...'
  Text = 'To be or not to be, this is the question. To be?'
  Title = 'William ask:'
end
As you can see, only the minimum properties have been set, just to show the power of the component. This configuration shows a dialog with two buttons labeled Yes and No. The TTaskDialog component can be configured at design time using the Object Inspector, or can be configured at runtime by code. In the first example, the configuration is defined at design time so that at runtime we only have to call the Execute method and read the user response. Here's the code that actually uses the tdSimple instance:
procedure TMainForm.btnSimpleClick(Sender: TObject);
begin
  tdSimple.Execute; //show the taskdialog
  if tdSimple.ModalResult = mrYes then
    ShowMessage('yes')
  else
    ShowMessage('no')
end;
Even in this case, it is quite simple, but let's go deeper with the configuration. Let's say that we need a Task Dialog similar to the following screenshot:
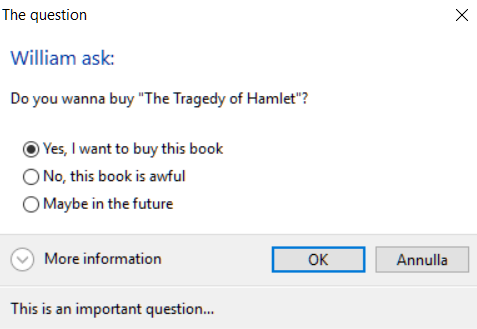
Using the plain API, this is not so simple. So, let's see how to configure the component:
object tdRadioButtons: TTaskDialog
  Caption = 'The question'
  DefaultButton = tcbYes
  ExpandButtonCaption = 'More information'
  ExpandedText =
    'Yes, you have to decide something about this question... ' +
       'but I cannot help you a lot'
  Flags = [tfUseHiconMain, tfUseHiconFooter,
     tfVerificationFlagChecked]
  FooterIcon = 4
  FooterText = 'This is an important question...'
  RadioButtons = <
    item
      Caption = 'Yes, I want to buy this book'
    end
    item
      Caption = 'No, this book is awful'
    end
    item
      Caption = 'Maybe in the future'
    end>
  Text = 'Do you wanna buy "The Tragedy of Hamlet"?'
  Title = 'William ask:'
end
The preceding block of code contains the definition for the three radio buttons. The following code shows the dialog and the retrieval of the result:
procedure TMainForm.btnRadioClick(Sender: TObject);
begin
  tdRadioButtons.Execute;
  if tdRadioButtons.ModalResult = mrOk then
    ShowMessage('Selected radio button ' +
       tdRadioButtons.RadioButton.ID.ToString);
end;
Even in this case, we have defined the properties at design time so that the runtime code is quite simple. Just note that the user's choice is stored in the RadioButton.ID property.
The TTaskDialog.Flags property can greatly change the behavior of the dialog. Here's the meaning of each element of its set:
|
Flag set element name |
If set... |
|
tfEnableHyperlinks |
Content, footer, and expanded text can include hyperlinks |
|
tfUseHiconMain |
Uses the custom main icon |
|
tfUseHiconFooter |
Uses the custom footer icon |
|
tfAllowDialogCancellation |
Permits the Task Dialog to be closed in the absence of a Cancel button |
|
tfUseCommandLinks |
Buttons are displayed as command links using a standard dialog glyph |
|
tfUseCommandLinksNoIcon |
Buttons are displayed as command links without a glyph |
|
tfExpandFooterArea |
Displays expanded text in the footer |
|
tfExpandedByDefault |
Expanded text is displayed when the Task Dialog opens |
|
tfVerificationFlagChecked |
The verification checkbox is initially checked |
|
tfShowProgressBar |
Displays the progress bar |
|
tfShowMarqueeProgressBar |
Displays the marquee progress bar |
|
tfCallbackTimer |
Callback dialog will be called every 200 milliseconds |
|
tfPositionRelativeToWindow |
The Task Dialog is centered with respect to the parent window |
|
tfRtlLayout |
Text reads right to left |
|
tfNoDefaultRadioButton |
There is no default radio button |
|
tfCanBeMinimized |
The Task Dialog can be minimized |
The real power of TaskDialog comes when you build your dialog at runtime. Let's check what the fourth button does under the hood:
procedure TMainForm.btnConfirmClick(Sender: TObject);
var
  LFileName: string;
  LGSearch: String;
const
  GOOGLE_SEARCH = 99;
begin
  LFileName := 'MyCoolProgram.exe';
  tdConfirm.Buttons.Clear;
  tdConfirm.Title := 'Confirm Removal';
  tdConfirm.Caption := 'My fantastic folder';
  tdConfirm.Text :=
    Format('Are you sure that you want to remove ' +
       'the file named "%s"?', [LFileName]);
  tdConfirm.CommonButtons := [];
  with TTaskDialogButtonItem(tdConfirm.Buttons.Add) do
  begin
    Caption := 'Remove';
    CommandLinkHint := Format('Delete file %s from the folder.',
       [LFileName]);
    ModalResult := mrYes;
  end;
  with TTaskDialogButtonItem(tdConfirm.Buttons.Add) do
  begin
    Caption := 'Keep';
    CommandLinkHint := 'Keep the file in the folder.';
    ModalResult := mrNo;
  end;

  if TPath.GetExtension(LFileName).ToLower.Equals('.exe') then
  begin
    with TTaskDialogButtonItem(tdConfirm.Buttons.Add) do
    begin
      Caption := 'Google search';
      CommandLinkHint := 'Let''s Google tell us what ' +
         'this program is.';
      ModalResult := GOOGLE_SEARCH;
    end;
  end;

  tdConfirm.Flags := [tfUseCommandLinks];
  tdConfirm.MainIcon := tdiInformation;

  if tdConfirm.Execute then
  begin
    case tdConfirm.ModalResult of
      mrYes:
        ShowMessage('Deleted');
      mrNo:
        ShowMessage(LFileName + ' has been preserved');
      GOOGLE_SEARCH:
        begin
          LGSearch := Format('https://www.google.it/#q=%s',
             [LFileName]);
          ShellExecute(0, 'open', PChar(LGSearch), nil, nil,
             SW_SHOWNORMAL);
        end;
    end; //case
  end; //if
end;
It seems like a lot of code, but it is simple and can be easily parameterized and reused inside your program. The resultant dialog is as shown:
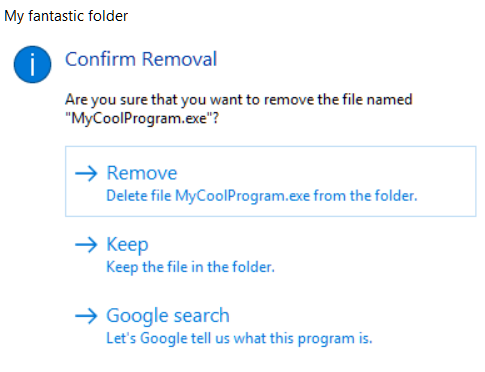
The third choice allows the user to search on Google for the program executable name. This is not a common choice in the MessageDlg dialog where buttons are predefined, but using TTaskDialog, you can even ask the user something strange (such as—Do you want to ask Google about it?).
To achieve a better apparent speed, progress bars are great! The Task Dialog API provides a simple way to use progress bars inside dialogs. The classic Delphi solution relays a custom form with a progress bar and some labels (just like the compiling dialog that you see when you compile a program within the Delphi IDE). However, in some cases, you need some simple stuff done and a Task Dialog is enough. If TTaskDialog has the tfCallbackTimer flag and tfShowProgressBar, the OnTimer event will be called every 200 milliseconds (five times a second), and the dialog will show a progress bar that you can update within the OnTimer event handler. However, the OnTimer event handler runs in the main thread so that all the related advice applies (if the UI becomes unresponsive, consider a proper background thread and a queue to send information to the main thread).
This is the design time configuration of tdProgress:
object tdProgress: TTaskDialog
  Caption = 'Please wait'
  CommonButtons = [tcbCancel]
  ExpandButtonCaption = 'More'
  ExpandedText =
    'A prime number (or a prime) is a natural number greater'+
       ' than 1 that has no positive divisors other than 1 ' +
       'and itself.'
  Flags = [tfAllowDialogCancellation, tfShowProgressBar,
tfCallbackTimer]
  FooterIcon = 3
  FooterText = 'Please wait while we are calculate prime numbers'
  Text = 'Let'#39's calculate prime numbers up to 1000'
  Title = 'Calculating prime numbers...'
  VerificationText = 'Remember my choice'
  OnButtonClicked = tdProgressButtonClicked
  OnTimer = tdProgressTimer
end
There are two event handlers, one to handle clicking on the Cancel button inside the dialog and one to handle the callback:
const
  MAX_NUMBERS = 1000;
  NUMBERS_IN_A_SINGLE_STEP = 50;

procedure TMainForm.tdProgressButtonClicked(Sender: TObject;
  ModalResult: TModalResult; var CanClose: Boolean);
begin
  if not FFinished then
  begin
    tdProgress.OnTimer := nil;
    ShowMessage('Calculation aborted by user');
    CanClose := True;
  end;
end;

procedure TMainForm.tdProgressTimer(Sender: TObject;
   TickCount: Cardinal;
  var Reset: Boolean);
var
  I: Integer;
begin
  for I := 1 to NUMBERS_IN_A_SINGLE_STEP do
  begin
    if IsPrimeNumber(FCurrNumber) then
      Inc(FPrimeNumbersCount);
    tdProgress.ProgressBar.Position := FCurrNumber * 100
       div MAX_NUMBERS;
    Inc(FCurrNumber);
  end;

  FFinished := FCurrNumber >= MAX_NUMBERS;
  if FFinished then
  begin
    tdProgress.OnTimer := nil;
    tdProgress.ProgressBar.Position := 100;
    ShowMessage('There are ' + FPrimeNumbersCount.ToString +
         ' prime numbers up to ' + MAX_NUMBERS.ToString);
  end;
end;
To not block the main thread, the prime numbers are calculated a few at a time. When the calculation is ended, the callback is disabled by setting the OnTimer event handler to nil.
In other words, the real calculation is done in the main thread, so you should slice your process into smaller parts so that it can be executed one (small) piece at time.
The following code fires the progress Task Dialog:
procedure TMainForm.btnProgressClick(Sender: TObject);
begin
  FCurrNumber := 1;
  FFinished := False;
  FPrimeNumbersCount := 0;
  tdProgress.ProgressBar.Position := 0;
  tdProgress.OnTimer := tdProgressTimer;
  tdProgress.Execute;
end;
Here's the resultant dialog:
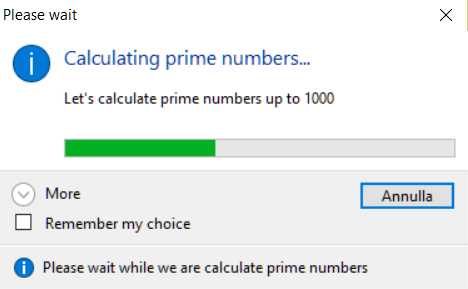
There's more...
The new Task Dialog API can give your application a fresh look, but that comes with a cost because it works only on Vista or better, with enabled themes. So, how do you work around the problem if you need to run the application on Windows XP or on a machine without themes enabled? For button 6, there's simple code to check whether you can safely use the TTaskDialog component or whether you have to go back to the normal ShowMessage or MessageDlg. Here's the event handler for button 6:
procedure TMainForm.btnCheckWinVerClick(Sender: TObject);
var
  LTaskDialog: TTaskDialog;
begin
  if (Win32MajorVersion >= 6) and ThemeServices.ThemesEnabled then
  begin
    LTaskDialog := TTaskDialog.Create(Self);
    try
      LTaskDialog.Caption := 'MY Fantastic Application';
      LTaskDialog.Title := 'The Cook Task Dialog!';
      LTaskDialog.Text :=
        'This is a Task Dialog, so I''m on Vista ' +
           'or better with themes enabled';
      LTaskDialog.CommonButtons := [tcbOk];
      LTaskDialog.Execute;
    finally
      LTaskDialog.Free;
    end
  end
  else
  begin
    ShowMessage('This is an old and boring ShowMessage, ' +
       'here only to support old Microsoft Windows OS ' +
       '(XP and below)');
  end;
end;
Try to disable the themes for your application and click on button 6.
Obviously, it is strongly suggested that you wrap this code in a function so that you do not have to write the same code repeatedly.
The amazing TFDTable – indices, aggregations, views, and SQL
Without question, the software industry is a data-driven environment. All of the IT industry runs on data (we are in the big data era, guys!)—customers, orders, purchases, billings; every day, our applications transform in data interactions between them. Undoubtedly, data is the wellspring of all IT businesses, so we must choose the best programs to interact with it, and fortunately with Delphi we are safe, we have FireDAC.
FireDAC is a unique set of Universal Data Access Components for developing multi-device database applications for Delphi and C++Builder. Here are some features that make this framework special:
- Cross-platform support
- You can use FireDAC on Windows, macOS, Android, iOS, and Linux applications
- Drivers for almost every major relational database, both commercial and open source
In the 90s, the catchphrase in software development was developing database applications. Delphi was the master, thanks to the way it was designed (TDataSet interface, Data Module, and ClientDataSet) and its frameworks (Borland Database Engine). In the spring of 2013, Embarcadero acquired AnyDAC and re-branded it as FireDAC. Now Delphi Database Developers have made an unrivaled framework available again.
Getting ready
The TFDTable component implements a dataset that works with a single database table. What makes this component amazing is a set of additional features—filtering, indexing, aggregation, cached updates, and persistence.
In this recipe, we'll see some of these at work: how to configure an TFDTable, how to manage the indexes to sort an associated grid, and how to collect new information via aggregates.
This recipe uses the DELPHICOOKBOOK database, an InterBase DB prepared for the last three recipes of this chapter. To speed up the mechanisms, I suggest adding it to the FireDAC connections in the Data Explorer:
- Open Delphi.
- Go to the Data Explorer tab.
- Open the FireDAC section.
- Open the InterBase section.
- Right-click on it.
- Click Add New Connection.
- In the opened window, enter the name, DELPHICOOKBOOK.
- Complete the configuration with this data:
- Username: sysdba
- Password: masterkey
- Database: Choose the path of the database in your filesystem (the database is under the data folder)
Follow the same steps to register the EMPLOYEE database; you can find it at C:\Users\Public\Documents\Embarcadero\Studio\19.0\Samples\data\employee.gdb.
How to do it...
Let's look at the following steps:
- Create a new VCL application by selecting File | New | VCL Forms Application.
- Put a DBNavigator (aligned to the top), a DBGrid (aligned to the client), a DataSource, and a PopUpMenu into the form.
- Set the DataSource property of DBGrid1 to DataSource1.
- Select the EMPLOYEE connection in the Data Explorer and then drag and drop it on the form to generate the EmployeeConnection.
- Put a TFDTable in the form and rename it to SalesTable.
- The connection property of SalesTable is automatically set to EmployeeConnection.
- Set the DataSet property of DataSource1 to SalesTable.
- To choose the Table, you have to expand the Table property combobox and select SALES:
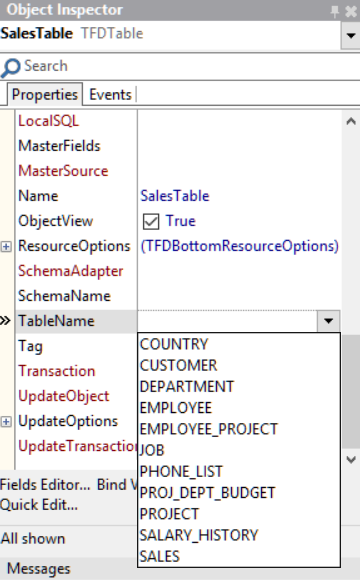
- If you performed all the steps correctly, you should be in this situation:
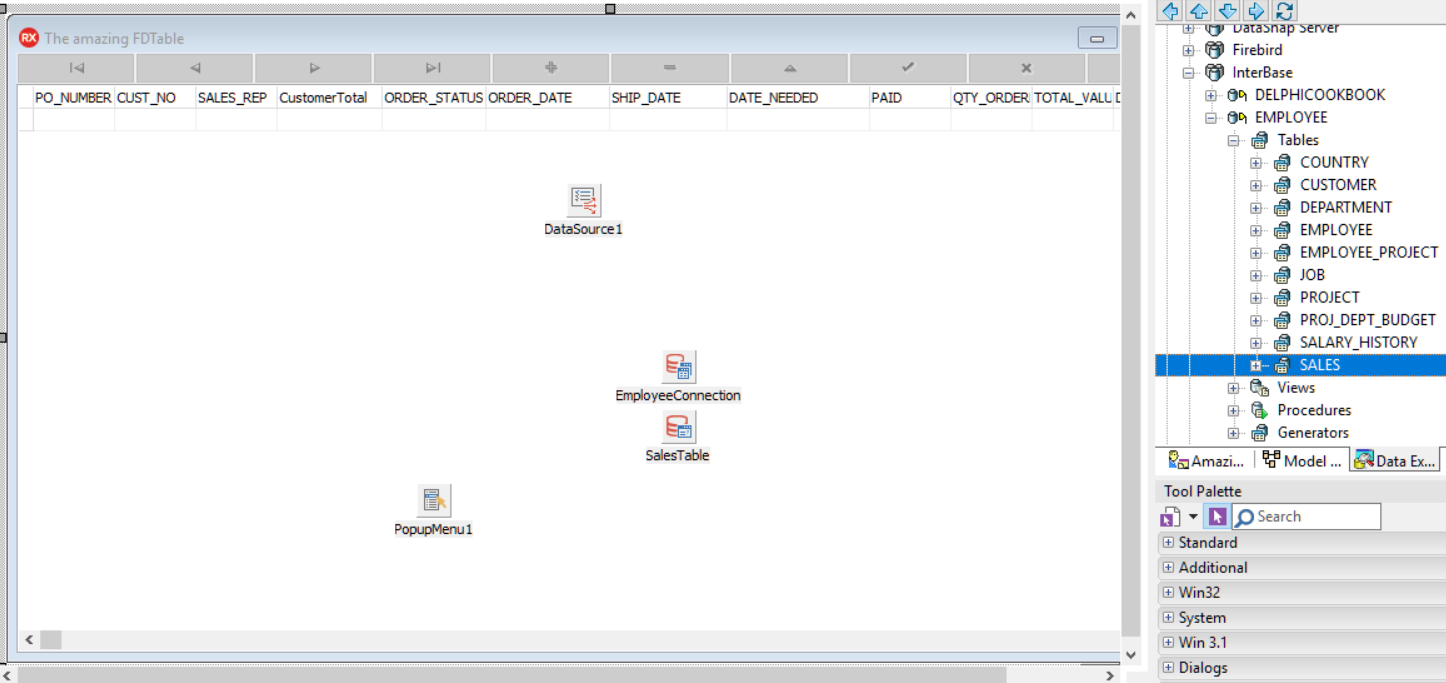
- Declare the CreateIndexes procedure under the private section of the form and implement it with the following code:
procedure TMainForm.CreateIndexes;
var
  LCustNoIndex: TFDIndex;
begin
  LCustNoIndex := SalesTable.Indexes.Add;
  LCustNoIndex.Name := 'MyCustNoIdx';
  LCustNoIndex.Fields := 'Cust_No';
  LCustNoIndex.Active := true;
end;
- Declare the CreateAggregates procedure under the private section of the form and implement it with the following code:
procedure TMainForm.CreateAggregates;
begin
  with SalesTable.Aggregates.Add do
  begin
    Name := 'CustomerTotal';
    Expression := 'SUM(TOTAL_VALUE)';
    GroupingLevel := 1;
    Active := true;
    IndexName := 'MyCustNoIdx';

  end;

  with SalesTable.Aggregates.Add do
  begin
    Name := 'CustomerMax';
    Expression := 'MAX(TOTAL_VALUE)';
    GroupingLevel := 1;
    Active := true;
    IndexName := 'MyCustNoIdx';

  end;

  with SalesTable.Aggregates.Add do
  begin
    Name := 'CustomerLastDate';
    Expression := 'MAX(ORDER_DATE)';
    GroupingLevel := 1;
    Active := true;
    IndexName := 'MyCustNoIdx';

  end;
end;
- Now, we are able to set up the SalesTable component. So, implement the OnCreate event handler for the form and include this code:
procedure TMainForm.FormCreate(Sender: TObject);
begin
  SalesTable.Active := false;
  CreateIndexes;
  CreateAggregates;
  SalesTable.IndexName := 'MyCustNoIdx';
  // index activated
  SalesTable.IndexesActive := true;
  // aggregates activated
  SalesTable.AggregatesActive := true;
  SalesTable.Active := true;
end;
- Now, we have to implement DBGrid1TitleClick to perform the right sorting method when the user clicks on a specific title:
procedure TMainForm.DBGrid1TitleClick(Column: TColumn);
begin

  // if reset the column caption of LastColumnClickIndex, because index could be change...
  if FLastColumnClickIndex > 0 then
    DBGrid1.Columns[FLastColumnClickIndex].Title.Caption :=
      DBGrid1.Columns[FLastColumnClickIndex].FieldName;

  // if the order is descending set the IndexFieldNames to ''.
  if SalesTable.IndexFieldNames = (Column.Field.FieldName + ':D') then
  begin
    Column.Title.Caption := Column.Field.FieldName;
    SalesTable.IndexFieldNames := '';
  end
  // if the order is ascending set it to descending
  else if SalesTable.IndexFieldNames = Column.Field.FieldName then
  begin
    SalesTable.IndexFieldNames := Column.Field.FieldName + ':D';
    Column.Title.Caption := Column.Field.FieldName + ' ▼';
  end
  // if no order is specified I'll use ascending one
  else
  begin
    SalesTable.IndexFieldNames := Column.Field.FieldName;
    Column.Title.Caption := Column.Field.FieldName + ' ▲';
  end;

  // set last column index
  FLastColumnClickIndex := Column.Index;

end;
- It's time to insert the aggregates. The goal is to show some aggregated information through a simple ShowMessage procedure. Add a new menu item to PopupMenu1, rename it to Customer Info, and implement the OnClick event with the following code:
procedure TMainForm.CustomerInfoClick(Sender: TObject);
var
  LOldIndexFieldNames: string;
begin

  // i use LOldIndexFieldNames to reset the index to last user choice
  LOldIndexFieldNames := SalesTable.IndexFieldNames;
  DBGrid1.Visible := false;
  // the right index for aggregate
  SalesTable.IndexName := 'MyCustNoIdx';

  // show some customer info
  ShowMessageFmt('The total value of order of this customer is %m. ' +
    'The max value order of this customer is %m. ' + 'Last order on %s ',
    [StrToFloat(SalesTable.Aggregates[0].Value),
    StrToFloat(SalesTable.Aggregates[1].Value),
    DateTimeToStr(SalesTable.Aggregates[2].Value)]);

  SalesTable.IndexFieldNames := LOldIndexFieldNames;
  DBGrid1.Visible := true;
end;
- Run the application by hitting F9 (or by going to Run | Run):
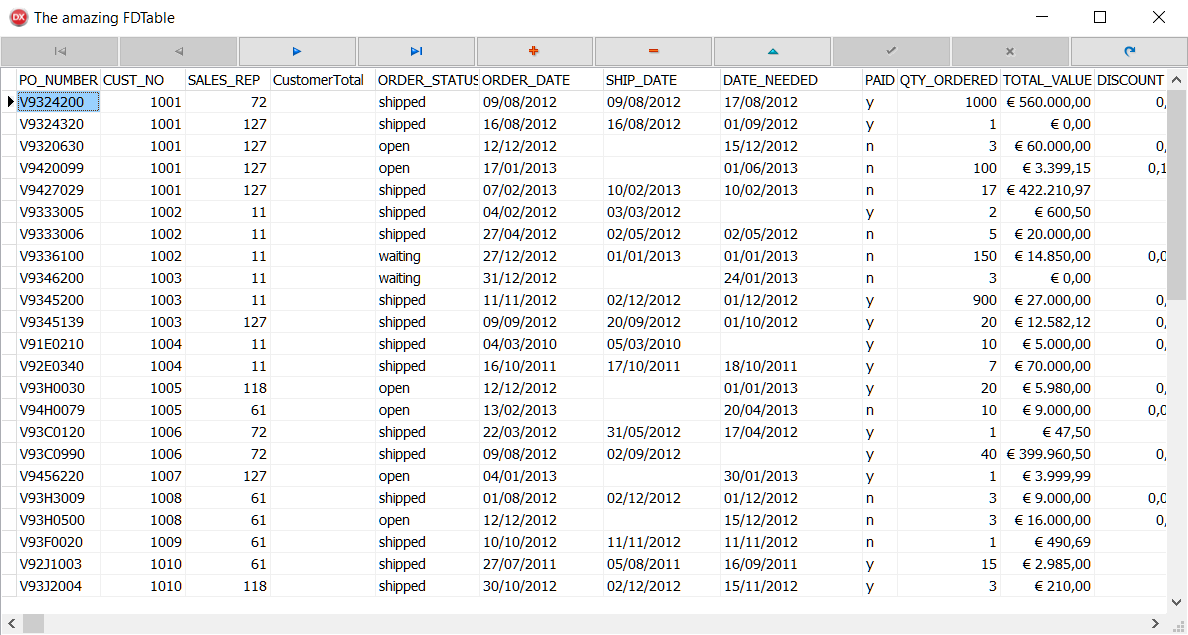
- Click on the Total Value column twice in the descending order:

- Right-click on the first record to bring up the pop-up menu, then click on Customer Info:
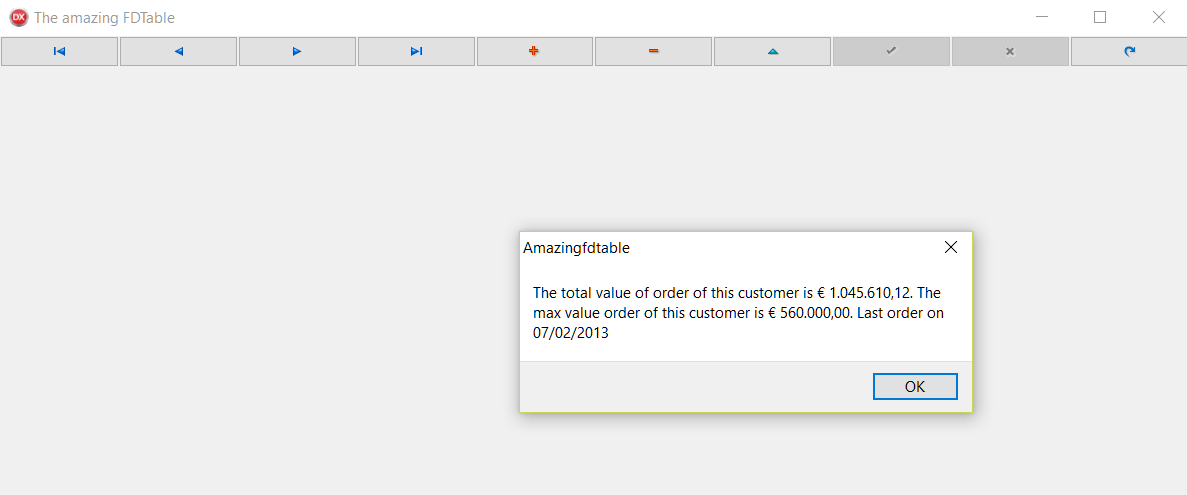
How it works...
The core concepts of this recipe are enclosed in the DBGrid1TitleClick and CustomerInfoClick functions.
In the first procedure, we used the IndexFieldNames property to generate a temporary index to perform sorting based on a field related to the DBGrid column clicked, and also applying a graphical change to the column to better understand the ordering.
In addition, you can also specify the sort order, such as ascending or descending, adding the suffixes :A for ascending and :D for descending.
In the second procedure, we used Aggregate to report some customer info:
- Total Value: This represents the total amount of all orders
- Max Value: This represents the order with the maximum amount
- Last Order: This represents the last date order
Aggregate are created in the CreateAggregates procedure. Here is some more information about the properties used:
- Expression property: This defines the expression to be used to calculate the aggregate.
- GroupingLevel property: This defines the number of indexed fields to use for grouping. By default, its value is set to 0 (no fields and no grouping; all records in a dataset).
- IndexName property: This defines the name of the index to use for grouping. If none is specified, it will use the IndexName property of DataSet.
There's more...
The expression engine provided by FireDAC is a powerful engine used for filtering, indexing, and calculated fields. For more information on how to write powerful expressions, go here: http://docwiki.embarcadero.com/RADStudio/en/Writing_Expressions_(FireDAC).
More information about aggregate and calculated fields can be found here: http://docwiki.embarcadero.com/RADStudio/en/Calculated_and_Aggregated_Fields_(FireDAC).
ETL made easy – TFDBatchMode
In computing, extract, transform, load (ETL) refers to a process where the following applies:
- The Extract process is where data is extracted from homogeneous or heterogeneous data sources
- The Transform process involves in a series of rules or functions applied to the extracted data in order to prepare it for the end target
- The Load process loads the data into the end target
Nowadays, these operations can be everyday operations because we can retrieve information from any source (IoT, big data) and we need to enter this heterogeneous data into our systems. We may simply need to transfer our data to a new and different data source system.
FireDAC provides a component to make these operations really easy: TFDBatchMove.
Getting ready
In this recipe, we will see how to import the old information distributed under heterogeneous sources, CSV and table, into our new data system. We will also be able to export the new data in CSV format.
As already mentioned, TFDBatchMove implements the engine to process the data movement between different types of data sources and destinations. This operation is made possible through reader and writer components. FireDAC provides three types of standard reader and writer:
| Component | Use |
| TFDBatchMoveTextReader | Reader for text file |
| TFDBatchMoveTextWriter | Writer for text file |
| TFDBatchMoveDataSetReader | Reader for TDataSet |
| TFDBatchMoveDataSetWriter | Writer for TDataSet |
| TFDBatchMoveSQLReader | Reader for SQL |
| TFDBatchMoveSQLWriter |
Writer for SQL |
How to do it...
Let's look at the following steps:
- Create a new VCL application and drop these components (every time you add a component, align it to the top)—TComboBox, TButton, TPanel, TDBGrid, TPanel, and TDBGrid (this time, align the component to the client).
- Ensure you perform caption refactoring, adjust the component size, and so on to make your form look like this:
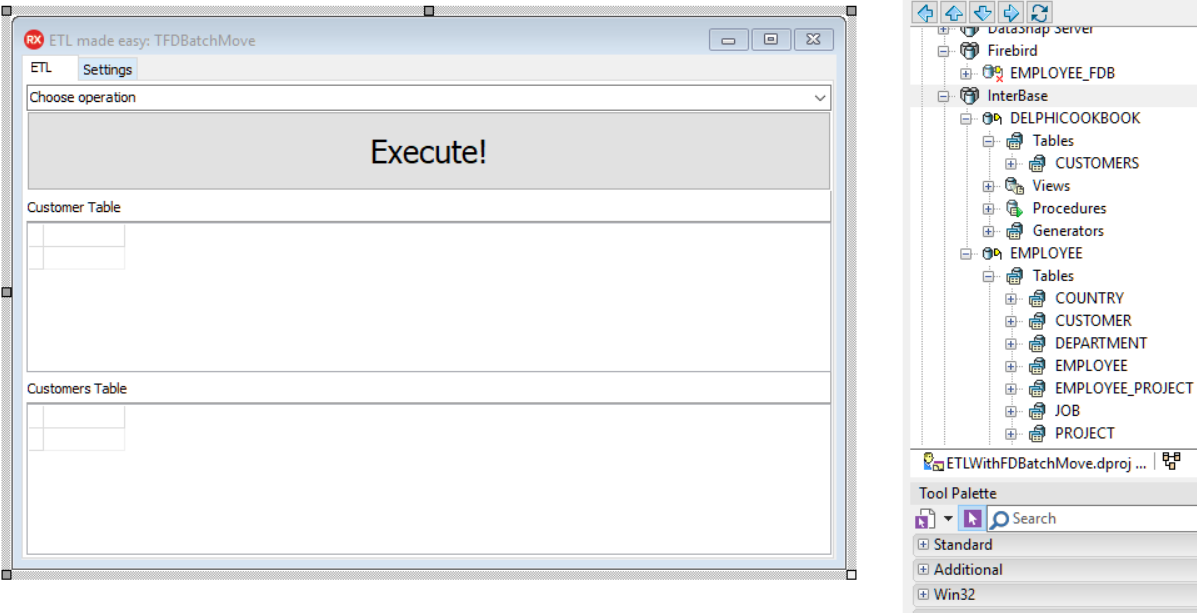
- If you have followed the instructions of the The Amazing FDTable recipe on database preparation, you should see the database connections, as in Figure 14.1, in the Data Explorer tab under the InterBase entry. Select the DELPHICOOKBOOK and EMPLOYEE connections, and drag and drop the CUSTOMERS table from DELPHICOOKBOOK and the CUSTOMER table from EMPLOYEE onto the form.
- This operation generates four components:
- DelphiCookbookConnection: The FDConnection to DELPHICOOKBOOK
- CustomersTable: The TFDQuery component relating to the CUSTOMERS table
- EmployeeConnection: The FDConnection to Employee
- CustomerTable: The TFDQuery component relating to the CUSTOMER table
- Set these SQL statements to TFDQuery components into the form:
- CustomerTable: select CUST_NO as ID, CONTACT_FIRST as FIRSTNAME, CONTACT_LAST as LASTNAME from {id CUSTOMER}
- CustomersTable: select * from {id CUSTOMERS}
- Put the TFDBatchMove component, and two TDataSource components:
- Rename TDataSource to dsCustomer, set the DataSet property to CustomerTable, and assign it to the DataSource property of the first DBGrid
- Rename the second TDataSource to dsCustomers, set the DataSet property to CustomersTable, and assign it to the DataSource property of the second DBGrid
- We'll use the TCombobox component to allow the user to choose the operation to be performed, so set the Items property as follows:
- CSV to Table
- Table to Table
- Table to CSV
- Declare the CloseDataSets procedure in the private section of the form and use the following code:
procedure TMainForm.CloseDataSets;
begin
  CustomersTable.Close;
end;
- Declare the OpenDataSets procedure in private section of the form and use the following code:
procedure TMainForm.OpenDataSets;
begin
  CustomersTable.Close;
  CustomersTable.Open;
  CustomerTable.Close;
  CustomerTable.Open;
end;
- Declare the SetUpReader procedure in the private section of the form and use the following code:
procedure TMainForm.SetUpReader;
var
  LTextReader: TFDBatchMoveTextReader;
  LDataSetReader: TFDBatchMoveDataSetReader;
begin
  case ComboBox1.ItemIndex of
    0:
      begin
        // Create text reader
        // FDBatchMove will automatically manage the reader instance.
        LTextReader := TFDBatchMoveTextReader.Create(FDBatchMove);
        // Set source text data file name
        // data.txt provided with demo
        LTextReader.FileName := ExtractFilePath(Application.ExeName) +
          '..\..\data\data.txt';
        // Setup file format
        LTextReader.DataDef.Separator := ';';
        // to estabilish if first row is definition row (it is this case)
        LTextReader.DataDef.WithFieldNames := True;
      end;
    1:
      begin
        // Create text reader
        // FDBatchMove will automatically manage the reader instance.
        LDataSetReader := TFDBatchMoveDataSetReader.Create(FDBatchMove);
        // Set source dataset
        LDataSetReader.DataSet := CustomerTable;
        LDataSetReader.Optimise := False;
      end;
    2:
      begin
        LDataSetReader := TFDBatchMoveDataSetReader.Create(FDBatchMove);
        // set dataset source
        LDataSetReader.DataSet := CustomersTable;
        // because dataset will be show on ui
        LDataSetReader.Optimise := False;
      end;
  end;
end;
- Declare the SetUpWriter procedure in the private section of the form and use the following code:
procedure TMainForm.SetUpWriter;
var
  LDataSetWriter: TFDBatchMoveDataSetWriter;
  LTextWriter: TFDBatchMoveTextWriter;
begin
  case ComboBox1.ItemIndex of
    0:
      begin
        // Create dataset writer and set FDBatchMode as owner. Then
        // FDBatchMove will automatically manage the writer instance.
        LDataSetWriter := TFDBatchMoveDataSetWriter.Create(FDBatchMove);
        // Set destination dataset
        LDataSetWriter.DataSet := CustomersTable;
        // because dataset will be show on ui
        LDataSetWriter.Optimise := False;
      end;
    1:
      begin
        // Create dataset writer and set FDBatchMode as owner. Then
        // FDBatchMove will automatically manage the writer instance.
        LDataSetWriter := TFDBatchMoveDataSetWriter.Create(FDBatchMove);
        // Set destination dataset
        LDataSetWriter.DataSet := CustomersTable;
        // because dataset will be show on ui
        LDataSetWriter.Optimise := False;
      end;
    2:
      begin
        LTextWriter := TFDBatchMoveTextWriter.Create(FDBatchMove);
        // set destination file
        LTextWriter.FileName := ExtractFilePath(Application.ExeName) +
          'DataOut.txt';
        // ensure to write on empty file
        if TFile.Exists(LTextWriter.FileName) then
          TFile.Delete(LTextWriter.FileName);
      end;
  end;
end;
- Now, create event handlers for the Execute button and write the code that follows:
procedure TMainForm.Button1Click(Sender: TObject);
begin
  // ensure user make a choice
  if ComboBox1.ItemIndex = -1 then
  begin
    ShowMessage('You have to make a choice');
    exit;
  end;

  CloseDataSets;

  // SetUp reader
  SetUpReader;

  // SetUp writer
  SetUpWriter;

  // Analyze source text file structure
  FDBatchMove.GuessFormat;
  FDBatchMove.Execute;

  // show data
  OpenDataSets;

end;
- Run the application by hitting F9 (or by going to Run | Run).
- In the order they are shown, select the item of TComboBox and click on the ExecuteButton to perform the operation.
- After the third click, you should see something similar to the following screenshot:
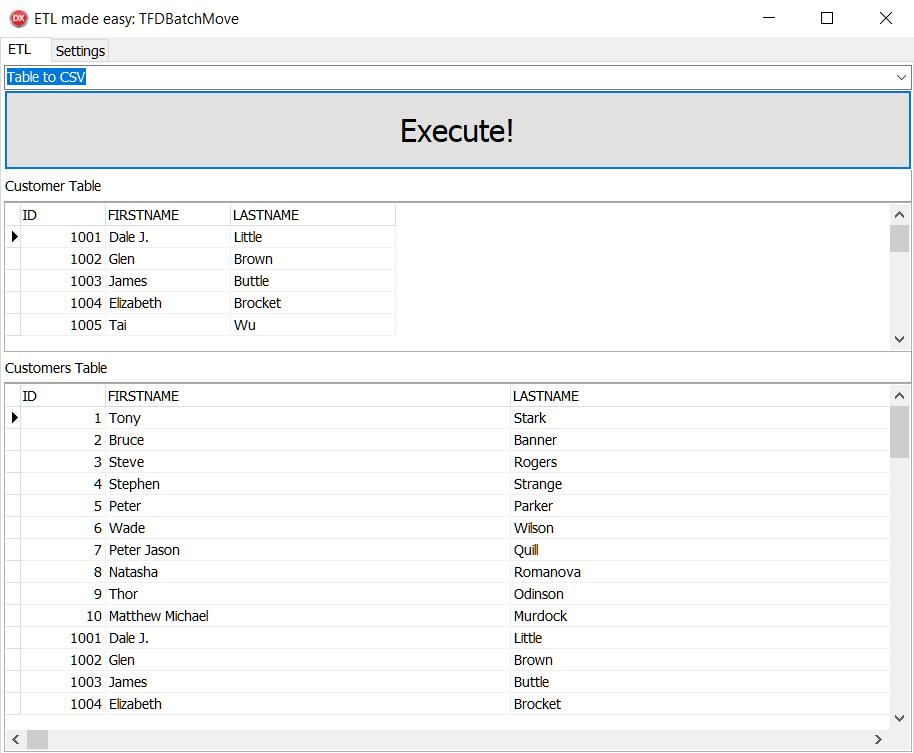
- In addition, at the same level as the executable file, you should find the DataOut.txt file as follows:
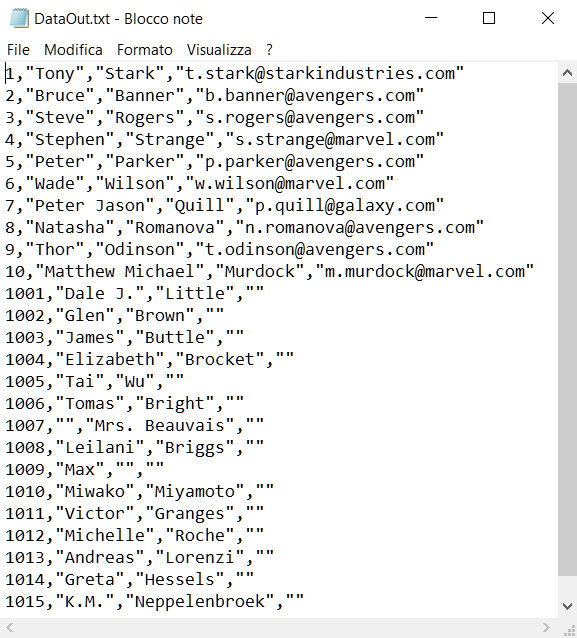
How it works...
This recipe allowed you to do the following operations:
- CSV to Table
- Table to Table
- Table to CSV
Depending on the chosen operation, specific readers and writers are created and hooked to the FDBatchMove component, to allow it to perform the BatchMove operation.
All the important stuff contained in this recipe resides under these operations—SetUpReader, SetUpWriter, and FDBatchMove.Execute.
FDBatchMove.Execute moves data from the data source to a data destination, but to do it we need to set up the reader and writer to tell FDBatchMove how to perform these operations.
In SetUpReader, we create the reader that will be used to read source data. If it is a Text source (CSV), we need to set the FileName and specify the separator. If it is a DataSet source (DB table), we need only to set the DataSet property only.
In SetUpWriter, we create the writer which well be used to write destination data. If it is a Text destination (CSV), we need to set the FileName to specify the output file path. If it is a DataSet destination (DB table), we need to set the DataSet property only.
Once the readers and writers have been prepared, it is possible to call the execute function that will perform the operations according to the specified instructions. Ensure you use the GuessFormat method to automatically recognize the data source format.
There's more...
You can use the Mappings collection property if you need different fields mapped from source to destination.
You can use the LogFileAction and the LogFileName properties, provided by the TFDBatchMove component, to log data movement.
You can use the ReadCount, WriteCount (or InsertCount, UpdateCount, DeleteCount), and ErrorCount properties to get the batch moving statistic.
Here are some Embarcadero documents about TFDBatchMove: http://docwiki.embarcadero.com/Libraries/en/FireDAC.Comp.BatchMove.TFDBatchMove.
Data integration made easy – TFDLocalSQL
As Wikipedia says:
Traditionally, information must be stored in a single database with a single schema, but many organizations store information on multiple databases, so they need a way to retrieve data from different sources and assemble it in a unified way.
FireDAC provides a component that permits you to execute SQL statements against any dataset: TFDLocalSQL.
Getting ready
Let's imagine that a company wants to gain some business intelligence on their data. The marketing department, to allow special customers to take advantage of a special promotion, wants a list of customers who have spent at least a certain sum in at least one order.
The problem is that customers are provided in XML format and sales are stored in a database table. We want to achieve the aim of executing heterogeneous queries—XML and database tables. Let's go!
How to do it...
Let's look at the following steps:
- Create a new VCL application by selecting File | New | VCL Forms Application.
- Put a TFDConnection on the form and set its DriverName to SQLite (because SQL Local uses SQLLite in its engine).
- Place on the form a DBEdit (aligned to the top), a TButton (aligned to the top), a DBNavigator (aligned to the top), a DBGrid (aligned to the client), and a DataSource. Set the DataSource property of DBNavigator1 and DBGrid1 to DataSource1.
- From DataExplorer, drag and drop onto the form the SALES table from the DELPHICOOKBOOK connection under the InterBase voice.
- Now, put on the form one TFDQuery, one TFDLocalSQL, and one TClientDataSet.
- It's time to rename components:
| Old | New |
| FDQuery1 | LocalQuery |
| DataSource1 | dsLocalQuery |
| ClientDataSet1 | CustomersCDS |
- If you performed all the steps correctly, you should be in this situation:
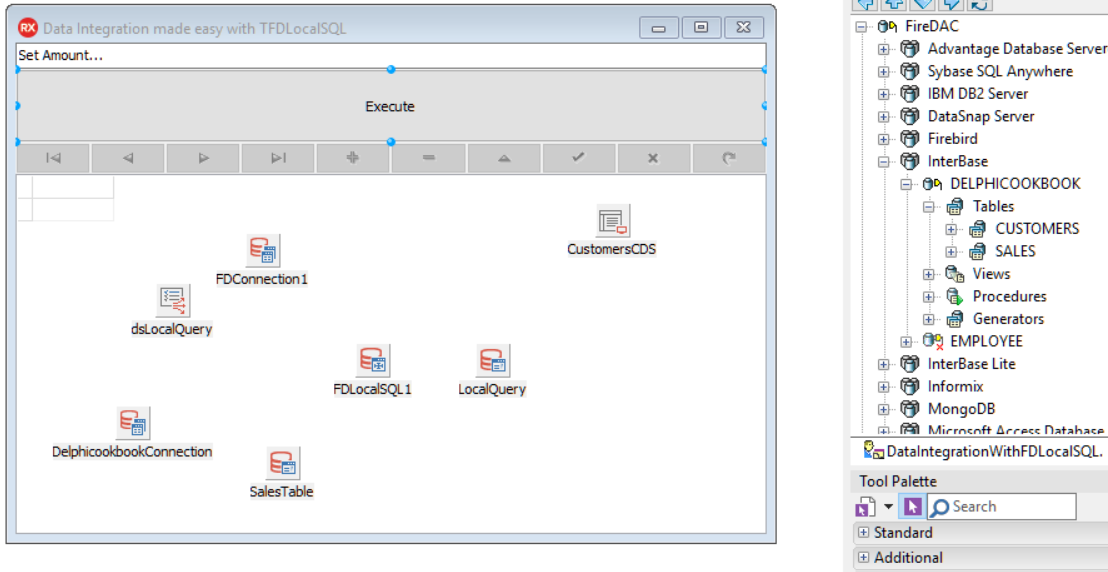
- Set the FDLocalSQL1 connection to FDConnection1.
- Select the DataSets property of FDLocalSQL1 and click the ellipsis button (...) to enter the editor.
- Click the Add New button on the editor twice to add two datasets to the DataSets collection.
- Select the first dataset in the collection and set the DataSet property to SalesTable; set the Name property to Sales in order to use the Sales identifier in SQL to refer to this dataset.
- Select the second dataset in the collection and set the DataSet property to CustomersCDS; set the Name property to Customers in order to use the customers identifier in SQL to refer to this dataset:
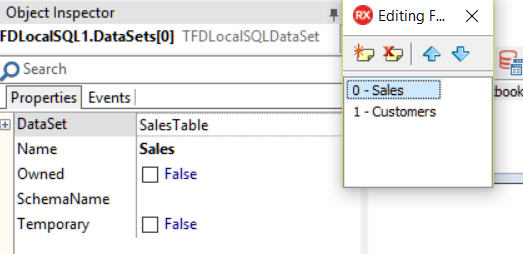
- In the private section of the form, declare a procedure named OpenDataSets and put in the following code:
procedure TMainForm.OpenDataSets;
begin
  SalesTable.Open();
  CustomersCDS.Active := True;
end;
- In the private section of the form, declare a procedure named PrepareDataSets and put in the following code:
procedure TMainForm.PrepareDataSets;
begin
  CustomersCDS.FileName :=
    'C:\Users\Public\Documents\Embarcadero\Studio\19.0\Samples\Data\customer.xml';
  LocalQuery.SQL.Text := 'select distinct c.* from Customers c ' +
    ' JOIN Sales s on cast (s.CUST_NO as integer) = c.CustNo ' +
    ' where s.total_value > :v order by c.CustNo ';
end;
- Generate a FormCreate event handler and put in this code:
procedure TMainForm.FormCreate(Sender: TObject);
begin
  PrepareDataSets;
end;
- We have almost finished; now, we need to put everything together. Generate the Button1 Click event handler and put in this code:
procedure TMainForm.btnExecuteClick(Sender: TObject);
var
  LAmount: Integer;
begin

  // ensure amount is an integer
  if not TryStrToInt(Edit1.Text, LAmount) then
  begin
    ShowMessage('Amount must be integer...');
    exit;
  end;

  LocalQuery.Close;
  OpenDataSets;
  // apply user data
  LocalQuery.ParamByName('v').AsInteger := LAmount;
  // Execute the query through eterogeneous sources
  LocalQuery.Open;
end;
- Run the application by hitting F9 (or by going to Run | Run).
- Try different amounts to filter the different customers:
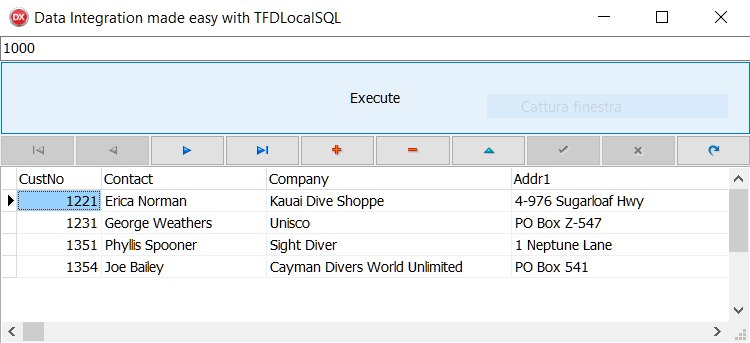

How it works...
The code of this recipe is quite simple but I want to explain it anyway.
Our data is stored in two different dataset—SalesTable, which refers to a database table, and CustomerCDS, which refers to an XML file. By setting the FDConnection1, FDLocalSQL1, and LocalQuery components as explained in the previous How to do it... section, it is possible to have an FDQuery component (LocalQuery) where we write the query using different heterogeneous sources:
select distinct c.* from Customers c
JOIN Sales s on cast (s.CUST_NO as integer) = c.CustNo
where s.total_value > :v order by c.CustNo
When you click on the Execute button, preliminary checks are carried out on the validity of the data entered, then the query in LocalQuery is performed and the LocalQuery dataset is populated with data... from heterogeneous sources! This is a really great feature!
There's more...
The Local SQL is based on the SQLite database and supports most of the SQLite SQL dialect.
All the read and write operations are performed through the TDataSet API with some extensions, which means that FireDAC performs the operations by converting SQL into dataset calls. This is the reason why you can execute SQL statements against any dataset—FDQuery, IBQuery, ClientDataSet, third-party components, and so on.
The possible applications of Local SQL are (from Embarcadero DocWiki):
- Heterogeneous queries: Queryable datasets have result sets from different DBs
- In-memory database: TFDMemTables serve the datasets
- Advanced offline mode: In this case, although the main DB is not accessible, an application is still able to perform SQL queries
- Advanced DataSnap client: The data delivered by the DataSnap driver to the client can be queried locally
- Simplified migration: A developer can use the third-party TDataSet objects in an application, and can use a FireDAC API to work with these data sources
Here some important notes (from Embarcadero DocWiki):
- The Local SQL engine does not support datasets with multiple result sets.
- The Local SQL engine supports the INSERT/UPDATE/DELETE SQL commands as transactions and savepoints. Also, it transforms the corresponding SQL commands intoTDataSet API calls.
- The Local SQL engine supports INSERT/REPLACE, but uses only primary key fields to find a record to replace when a primary or unique key constraint is violated. Additionally, when only several fields are specified in INSERT/REPLACE INTO tab (<field list>), the fields that are not specified get null values on updating.
- The Local SQL engine uses the TDataSet API with some extensions provided by the IFDPhysLocalQueryAdapter interface. FireDAC datasets implement this interface. Optionally, for non-FireDAC datasets, a developer can create a class implementing the interface and assign its instance to the TFDLocalSQL.DataSets[..].Adapter property.
See also
- For more information, take a look at http://docwiki.embarcadero.com/RADStudio/en/Local_SQL_(FireDAC)