In this chapter, we're going to cover the following topics:
Rounding numbers for display
Padding numbers
Displaying metric and imperial measurements
Displaying formatted dates in the user's time zone
Displaying the dynamic time that has elapsed
Displaying Math
Creating an endless scrolling list
Creating a sortable paginated table
Creating multiple-choice filters
Creating range filters
Creating combined complex filters
Displaying code in HTML
Rendering Markdown
Autoupdating fields
The most common task related to web application development is the displaying of text. This chapter will cover some of the issues programmers face when displaying data in browsers, and will explain how to tackle the problems in a simple yet effective way, giving several different options for the programmer from which to choose. These examples will contain the rendering of markup or the conversion of other datatypes into plain text.
The second, most common datatype used in applications after text is numbers. There are many different ways of working with numbers, and we will take a look at some of these ways when a given precision is required. The first obvious option is to use the JavaScript Number object wrapper to work with numerical values.
The Number object contains the toFixed([digits]) method that can be used to display numbers; here the digits parameter can have a value between 0 and 20. The number will either get rounded automatically if needed, or the number will get padded with additional zeros if necessary. Ok, so let's see it in action.
Perform the following steps do demonstrate working with the Number object:
First, we'll create a list of numbers; note that the numbers have been picked intentionally to illustrate some of the characteristics of the functions:
    var listOfNumbers=
        [1.551, 1.556, 1.5444, 1.5454, 1.5464, 1.615, 1.616, 1.4, 1.446,1.45];
Iterate the list and display numbers using the
.toFixed()method with thedigitsparameter's values 0, 1, and 2 accordingly:for (var i = 0; i < listOfNumbers.length; i++) { var number = listOfNumbers[i]; // iterate over all of the numbers and write to output all the value document.write(number + "---" + number.toFixed(2) + "---" + number.toFixed(1) + "---" + number.toFixed() + "<br />"); };
The result retrieved from executing the code will print out the numbers with their respective toFixed representation, which should be straightforward.
Let's take a look at some of the characteristic values:
1.616.toFixed(2)will return1.621.4.toFixed(2)will return1.40as expected, adding a trailing zero1.5454.toFixed()will return2, because the default value fortoFixed()is0; this means that no decimal points, and additionally the0.5segment is rounded to1so the ceiling value is used here1.615.toFixed(2)will either return1.61, ignoring the0.005segment, or the floor value will be used
The toFixed() method works mostly as expected so long as we don't need the higher precision or are only using it to display numbers where the type of rounding is not mission critical.
Additionally, we cannot rely on toFixed() when we need rounding in cases where we have numbers such as 1.446 and others that fall in the same category; calling 1.446.toFixed(1) would result in inconsistent and unpredictable results.
There are various ways to solve this. The quick and dirty solution would be to redefine the Number.prototype.toFixed() function, but we encourage you to not do so, as doing this may have side effects that are not apparent. Any redefinition of the functions from the built-in objects is considered an anti-pattern if it is not absolutely essential. The problem arises if another library or a piece of code is using the same function. The other library might expect our redefined function to work a certain way. These types of redefinitions are hard to track; even if we are to add a function instead of redefining it, someone else might do the same thing. For example, say we decided to add some function to the Number object:
Number.prototype.theFunction = function(arg1,arg2){}There are no guarantees that someone else has not already added theFunction to the Number object. We could do additional checks to verify if the function already exists, but we cannot be sure if it does what we want it to do.
Instead, using a utility function for achieving consistent data would be a better option.
One way of tackling the problem is to first multiply the number with 10 ^ digits and then call the Math.round(number) method on the result, or you can call Math.ceil(number). For example, if you need to have the value rounded upwards to the nearest integer, use the following:
    function round(number, digits) {
        if(typeof digits === "undefined" || digits < 0){
          digits = 0;
        }
        var power = Math.pow(10, digits),
         fixed = (Math.round(number * power) / power).toString();
        return fixed;
    };
Now, as the number gets multiplied with 10 ^ digits and then gets rounded, we do not observe the problems with toFixed(). Note that this method has a different behavior from toFixed() not just in the way of how rounding is being handled, but also the addition of trailing zeroes.
A different option would be to use an arbitrary precision library such as Big.js if precision is crucial (https://github.com/MikeMcl/big.js).
We are sometimes faced with the need to pad numbers to a certain range. For example, suppose we want to display a number in five possible digits, such as 00042. One obvious solution would be to use the iterative approach and prepend characters, but there are a few cleaner solutions.
First, we need to take a look at some of the functions that we are going to use. Let's take a look at the Array.join(separator) method that can be applied to create joined text from a list of elements:
new Array('life','is','life').join('*')This will result in "life*is*life" that shows fairly simple elements that are joined with a given separator. Another method that is of interest is Array.slice(begin[, end]) that returns a copy of a portion of an array. For our use, we are only interested in the begin parameter that can have both positive and negative values. If we use a positive value, it means that this will be the starting index for the slice using zero-based indexing; for example, consider the following line of code:
new Array('a','b','c','d','e','f','g').slice(4);The preceding line of code will return an array with the elements 'e','f', and 'g'.
If, on the other hand, using a negative value for the begin element indicates an offset from the end of the array, consider the same example using a negative value as follows:
new Array('a','b','c','d','e','f','g').slice(-3);The result would be 'e','f','g', as we are slicing from the end.
Let's get back to our problem: how do we create a clean solution for prepending zeros to a number? For an iterative solution, we create a method that accepts the number, the size of the formatted result, and the character that will be used for padding; let's take '0' for example:
function iterativeSolution(number,size,character) {
   var strNumber = number.toString(),
    len = strNumber.length,

    prefix = '';
   for (var i=size-len;i>0;i--) {
      prefix += character;
   }
 return prefix + strNumber;
}
Here we converted the number to a string in order to get the length of its representation; afterwards, we simply create prefix that will have the size–len characters of the character variable, and just return the resulting prefix + strNumber that is the string representation for that number.
You may notice that in the case where size is smaller than len, the original number is returned, and this should probably be changed in order to have the function working for that corner case.
Another way would be to use the Array.slice() method to achieve similar results:
function sliceExample(number,prefix){
   return (prefix+number).slice(-prefix.length);
}
sliceExample(42,"00000");
This will just prepend a prefix to a number and slice off the extra '0' counting from the end, making the solution a lot cleaner and, additionally, enabling us to be more flexible around what will be part of the prefix. The downside of this is that we are manually constructing the prefix that will be part of the method call sliceExample(42,"00000"). In order to make this process automatic, we can make use of Array.join:
function padNumber(number,size,character){
  var prefix = new Array(1 + size).join(character);
We create an array of the expected size + 1 as on joining, we'll get the total array size-1 joined elements. This will construct the prefix with the expected size, and the other part will remain the same:
  return (prefix + number).slice(-prefix.length);
 }
A sample method call will be padNumber(42,5,'0'); this will not have the flexibility of the previous method, but it will be a lot simpler to use in larger numbers.
The recipe is fairly straightforward, but an important thing to note is the functional approach. If there is one thing to take with you from this recipe, it is that the iterative solution is not always the best. When it comes to JavaScript, there are usually a few other ways to complete the task that you have; they are not always that straightforward and sometimes not even faster, but they can be much cleaner.
If, for some reason, we are padding numbers very often, it might make sense to add the function into the Number object and remove the input parameter number with the this keyword:
Number.prototype.pad=function(size,character){
     //same functionality here
}
As the function is now part of every Number object, we can use it directly from any number; let's take the following example:
3.4.pad(5,'#');
Additionally, if the '.' character should not be included in the calculation of the padding, we could add an additional check that would reduce the size of the prefix.
Websites that deal with calculations and measurements often need to solve the problem of using both metric and imperial units of measurement. This recipe will demonstrate a data-driven approach to dealing with unit conversions. As this is an HTML5 book, the solution will be implemented on the client side rather than on the server side.
We're going to implement a client-side, "ideal weight" calculator that supports metric and imperial measurements. This time, we're going to create a more general and elegant data-driven solution that utilizes modern HTML5 capabilities, such as data attributes. The goal is to abstract away the messy and error-prone conversion as much as possible.
The formula for calculating the body mass index (BMI) is as follows:
BMI = (Weight in kilograms / (height in meters x height in meters))
We're going to use BMI = 22 to calculate the "ideal weight".
Create the following HTML page:
<!DOCTYPE HTML>
<html>
    <head>
        <title>BMI Units</title>
    </head>
    <body>
        <label>Unit system</label>
        <select id="unit">
            <option selected value="height=m,cm 0;weight=kg 1;distance=km 1">Metric</option>
            <option value="height=ft,inch 0;weight=lbs 0;distance=mi 1">Imperial</option>
        </select><br>

        <label>Height</label>
        <span data-measurement="height" id="height">
            <input data-value-display type="text" id="height" class="calc">
            <span data-unit-display></span>
            <input data-value-display type="text" id="height" class="calc">
            <span data-unit-display></span>
        </span>
        <br>
        <label>Ideal Weight</label>
        <span data-measurement="weight" id="weight">
            <span data-value-display type="text">0</span>
            <span data-unit-display></span>
        </span> <br>

        <script src="http://ajax.googleapis.com/ajax/libs/jquery/1.8.2/jquery.min.js"></script>
        <script type="text/javascript" src="unitval.js"></script>
        <script type="text/javascript" src="example.js"></script>
        </script>
    </body>
</html>
This page looks very much like the regular page we would make for a BMI-based ideal weight calculator. The main differences are as follows:
We have an imperial/metric selection input
We also have additional custom data attributes to give special meanings to the HTML fields
We use
data-measurementto denote the kind of measurement that the element will display (for example, either the weight or the height)We use
data-display-unitanddata-display-valueto denote fields that display unit strings and values of the measurement respectively
Create a file named
example.jswith the following code:(function() { // Setup unitval $.unitval({ weight: { "lbs": 0.453592, // kg "kg" : 1 // kg }, height: { "ft" : 0.3048, // m "inch": 0.0254, // m "m" : 1, // m "cm" : 0.01, // m } }); $("#unit").change(function() { var measurementUnits = $(this).val().split(';').map(function(u) { var type_unitround = u.split('='), unitround = type_unitround[1].split(' '); return { type: type_unitround[0], units: unitround[0].split(','), round: unitround[1] }; }); // Setup units for measurements. $('body').unitval(measurementUnits); }); $("#unit").trigger("change"); $('#height').on('keyup change',function() { var height = $('#height').unitval(), bmi = 22; var idealWeight = bmi * height * height; $("#weight").unitval(idealWeight); }); }The first part of the code configures a jQuery plugin called
unitval, with the conversion factors for the measurements and units that we are going to use (weight and height).The second part sets the measurement units for the document by reading the specification from the
selectfield. It specifies an array of measurements, each having the following:A type string, for example
"height"A list of units, for example
["ft", "inch"]The number of decimals to use for the last unit
The third part is a regular calculator that is written almost exactly as it would be written if there were no unit conversions. The only exception is that values are taken from the elements that have the
data-measurementattribute using the jQuery plugin named$.unitval.We're going to write a generic unit converter. It will need two functions: one that will convert user-displayed (input) data to standard international (SI) measurement units, and another to convert it back from SI units to user-friendly display units. Our converter will support using multiple units at the same time. When converting from input, the first argument is the measurement type (for example, distance), the second is an array of value-unit pairs (for example,
[[5, 'km'], [300,'m']]), a single pair (for example[5,'km']), or simply the value (for example5).If the second parameter is a simple value, we're going to accept a third one containing the unit (for example
'km'). The output is always a simple SI value.When converting a value to the desired output units, we specify the units as an array, for example, as either
['km', 'm']or as a single unit. We also specify rounding decimals for the last unit. Our output is an array of converted values.Conversion is done using the values in the
Factorsobject. This object contains a property for every measurement name that we're going to use. Each such property is an object with the available units for that measurement as properties, and their SI factors as values. Look in the following inexample.jsfor an example.The source code of the jQuery plugin,
unitval.js, is as follows:(function() { var Factors = {}; var Convert = window.Convert = { fromInput: function(measurement, valunits, unit) { valunits = unit ? [[valunits, unit]] // 3 arguments : valunits instanceof Array && valunits[0] instanceof Array ? valunits : [valunits]; // [val, unit] array var sivalues = valunits.map(function(valunit) { // convert each to SI return valunit[0] * Factors[measurement][valunit[1]]; }); // sivalues.sum(): return sivalues.reduce(function(a, e) { return a + e; }); }, toOutput: function(measurement, val, units, round) { units = units instanceof Array ? units : [units]; var reduced = val; return units.map(function(unit, index) { var isLast = index == units.length - 1, factor = Factors[measurement][unit]; var showValue = reduced / factor; if (isLast && (typeof(round) != 'undefined')) showValue = showValue.toFixed(round) - 0; else if (!isLast) showValue = Math.floor(showValue); reduced -= showValue * factor; return showValue; }); } }; $.unitval = function(fac) { Factors = fac; } // Uses .val() in input/textarea and .text() in other fields. var uval = function() { return ['input','textarea'].indexOf(this[0].tagName.toLowerCase()) < 0 ? this.text.apply(this, arguments) : this.val.apply(this, arguments); }Our generic convertor is useful, but not very convenient or user friendly; we still have to do all the conversions manually. To avoid this, we're going to put data attributes on our elements, denoting the measurements that they display. Inside them, we're going to put separate elements for displaying the value(s) and unit(s). When we set the measurement units, the function
setMeasurementUnitswill set them on every element that has this data attribute. Furthermore, it will also adjust the inner value and unit elements accordingly:// Sets the measurement units within a specific element. // @param measurements An array in the format [{type:"measurement", units: ["unit", ...], round:N}] // for example [{type:"height", units:["ft","inch"], round:0}] var setMeasurementUnits = function(measurements) { var $this = this; measurements.forEach(function(measurement) { var holders = $this.find('[data-measurement="'+measurement.type+'"]'); var unconverted = holders.map(function() { return $(this).unitval(); }) holders.attr('data-round', measurement.round); holders.find('[data-value-display]').each(function(index) { if (index < measurement.units.length) $(this).show().attr('data-unit', measurement.units[index]); else $(this).hide(); }); holders.find('[data-unit-display]').each(function(index) { if (index < measurement.units.length) $(this).show().html(measurement.units[index]); else $(this).hide(); }); holders.each(function(index) { $(this).unitval(unconverted[index]); }); }); };As every element knows its measurement and units, we can now simply put SI values inside them and have them display converted values. To do this, we'll write
unitval. It allows us to set and get "united" values, or set unit options on elements that have thedata-measurementproperty:$.fn.unitval = function(value) { if (value instanceof Array) { setMeasurementUnits.apply(this, arguments); } else if (typeof(value) == 'undefined') { // Read value from element var first = this.eq(0), measurement = first.attr('data-measurement'), displays = first.find('[data-value-display]:visible'), // Get units of visible holders. valunits = displays.toArray().map(function(el) { return [uval.call($(el)), $(el).attr('data-unit')] }); // Convert them from input return Convert.fromInput(measurement, valunits); } else if (!isNaN(value)) { // Write value to elements this.each(function() { var measurement = $(this).attr('data-measurement'), round = $(this).attr('data-round'), displays = $(this).find('[data-value-display]:visible'), units = displays.map(function() { return $(this).attr('data-unit'); }).toArray(); var values = Convert.toOutput(measurement, value, units, round); displays.each(function(index) { uval.call($(this), values[index]); }); }); } } }());
HTML elements have no notion of measurement units. To support unit conversion, we added our own data attributes. These allow us to give a special meaning to certain elements—the specifics of which are then decided by our own code.
Our convention is that an element with a data-measurement attribute will be used to display values and units for the specified measurement. For example, a field with the data-measurement="weight" attribute will be used to display weight.
This element contains two types of subelements. The first type has a data-display-value attribute, and displays the value of the measurement (always a number). The second type has a data-display-unit attribute, and displays the unit of the measurement (for example, "kg"). For measurements expressed in multiple units (for example, height can be expressed in the form of "5 ft 3 inch"), we can use multiple fields of both types.
When we change our unit system, setMeasurementUnits adds additional data attributes to the following elements:
data-roundattributes are attached todata-measurementelementsdata-unit attributescontaining the appropriate unit is added to thedata-display-valueelementsdata-display-unitelements are filled with the appropriate units
As a result, $.unitval() knows both the values and units displayed on every measurement element on our page. The function reads and converts the measurement to SI before returning it. We do all our calculations using the SI units. Finally, when calling $.unitval(si_value), our value is automatically converted to the appropriate units before display.
This system minimizes the amount of error-prone unit conversion code by recognizing that conversions are only really needed when reading user input and displaying output. Additionally, the data-driven approach allows us to omit conversions entirely from our code and focus on our application logic.
In this recipe, we will learn how to format the user's date in their local time zone and display it; additionally, we are going to see how dates are used and represented in JavaScript. The best way to do this is to have the user pick the time zone in which they would like the dates to be displayed, but unfortunately, this is rarely an option.
Just like most programming languages, JavaScript uses Unix time. This is actually a system for representing a given instance of time, for how many seconds or, in JavaScript's case, milliseconds have passed since midnight January 1, 1970 in Universal Coordinated Time, commonly known as UTC.
Note
Some fun trivia regarding UTC: the abbreviation is a compromise between the French version Temps Universel Coordonné, which would be TUC, and the English version Coordinated Universal Time, which would be CUT (http://en.wikipedia.org/wiki/Coordinated_Universal_Time#Abbreviation).
This number is actually not fully compliant with UTC, nor does it account for the various atypical situations such as leap seconds, but this is acceptable in most cases.
In JavaScript, we have the Date object that can be constructed in different ways:
new Date() // uses local time
new Date(someNumber) //create date with milliseconds since epoch
new Date(dateString) // create date from input string representation
new Date(year, month, day [, hour, minute, second, millisecond])
Note
Note that creating a date from a string representation can have different behaviors in various browsers, and that the same thing applies for the Date.parse method that parses a string into a date.
During construction, if you supply some of the arguments and leave out the optional ones, they get defaulted to zero. And one other thing to note is that months in JavaScript are zero based while days are not.
The first thing you need to do is to create the
Dateobject:var endOfTheWorld= new Date(1355270400000);
Then, just use the localized date and time representation:
    document.writeln(endOfTheWorld.toLocaleDateString());
    document.writeln(endOfTheWorld.toLocaleTimeString());
If you need to know the offset in hours in the user's time zone from UTC, you can use the following code:
var offset = - new Date().getTimezoneOffset()/60;
This offset variable represents the number of hours from the local user's time zone to UTC. The minus sign here reverts the logic for the date; this means that the difference will be from date to UTC instead of the original from UTC to date.
What we can usually do is return the millisecond representation from the server side and have the number formatted in the local time zone. So let's say that our API returned us the milliseconds 1355270400000 that is actually 12.12.2012, which is also known as the end-of-the-world date.
The creation of the date is as follows:
var endOfTheWorld= new Date(1355270400000);
When printing in the local string, there are few available options; one of them is toLocaleDateString:
endOfTheWorld.toLocaleDateString()
This method uses the underlying operation system to get the formatting convention. For example, in the U.S. the format is month/day/year while in other countries it is day/month/year. For our case, the end of the world is on "Wednesday, December 12, 2012". You could also manually construct the printed date using the appropriate getX methods.
There is also a method of printing out the local time called toLocaleTimeString that can be used on our end-of-the-world date. Because this method also uses the operating system's local time for us, it is 01:00:00, because we are in the UTC+1 time zone. For us, this means that we have one extra hour to live; or maybe not?
In order to get the offset for the local user, there is a method in the Date object called getTimezoneOffset() that returns the time zone offset from the date to UTC in minutes. The problem is that there is no such method for hours and, additionally, it is contraintuitive as we usually want to know the difference from UTC to the given date.
If working with dates is something common that you need for your application, it makes sense to use a library, such as Moment.js (http://momentjs.com/).
Moment.js provides support for internationalization and the more advanced manipulation of dates. For example, removing 10 days from the current date can simply be accomplished with the following code:
moment().subtract('days', 10).calendar();For getting the time from today's start of day, use the following code:
moment().startOf('day').fromNow();It is very common on every major site to have these great counters that display timestamps on various elements on the page. For example, this would be "you opened this page 3 hours ago" or "commented 2 minutes ago". That is why, this feature, besides the name "dynamic time elapsed", is also known as "time ago".
We are going to use a jQuery plugin called timeago that has especially been designed for this purpose that can be retrieved from http://timeago.yarp.com/.
We will create a simple page where we will display the passed time by performing the following steps:
Because
timeagois a jQuery plugin, we first need to include jQuery and then add thetimeagoplugin:<script src="http://ajax.googleapis.com/ajax/libs/jquery/1.8.2/jquery.min.js"> </script> <script src="jquery.timeago.js" type="text/javascript"></script>
Just as an example, add the following HTML:
        <p> Debian was first announced <abbr class='timeago' title="1993-08-16T00:00:00Z">16 August 1993</abbr>
          </p>
          <p> You opened this page <span class='page-opened' /> </p>
           <p> This is done use the time element
              <time datetime="2012-12-12 20:09-0700">8:09pm on December 12th, 2012</time>
          </p>
This will enable us to get an overview of the basic features provided by the
timeagoplugin. Afterwards, let's add the following JavaScript:$(document).ready(function() { jQuery.timeago.settings.allowFuture = true; var now= new Date(); $(".timeago").timeago(); $(".page-opened").text( $.timeago(now)); $("time").timeago(); //$("some-future-date") $.timeago(new Date(999999999999)); });
And that is it; you now have a fully working time example that will calculate the time since a given date and update it, and additionally, the second part selected with page-opened will be autoupdated as the user spends more time on the page.
The first thing you might be wondering is about the abbr and time tags. The first one, in actuality, is a representation of "abbreviation" and optionally provides a full description for it. If the full description is present, the title attribute must contain this full description and nothing else. The full description is usually presented as a tool tip in the browsers, but this is a noting standard. Why have we picked the abbr tag to display time? Well, there is the new HTML5 time element named time that had some controversies surrounding it, as it was pulled from the spec but then gotten back. This element is more semantically correct and, additionally, represents the date in a machine-readable format that can be used by browsers to enable something like the "add to calendar" feature. The rationale for the use of the abbr element is only supported for older browsers, but this becomes more and more irrelevant as time passes. Currently, most modern browsers for desktops and mobiles provide support for the semantically correct time element—even IE 9+ has support for it.
The rest of the HTML consists of standard, well-known tags and a few markers, such as different CSS classes added in order to later select those elements.
Let's take a look at the JavaScript; first we use the standard jQuery document-ready function:
$(document).ready(function() {Afterwards, we set the setting for allowFuture to true to enable the timeago plugin to work with future dates, as this has not been set by default:
jQuery.timeago.settings.allowFuture = true;
If timeago is applied directly on the selected abbr or time elements, there is no need for us to do anything else as the calculations are done automatically:
 $(".timeago").timeago();
 $("time").timeago();
You can also notice that we can get the text for a given date directly from JavaScript, and work with it in whatever way we see fit:
$(".page-opened").text( $.timeago(now));There are a few questions that come in mind when working on internationalized and localized applications. One of them is time zone support that timeago handles automatically. The only thing we need to make sure of is that our timestamps follow the ISO 8601
(http://en.wikipedia.org/wiki/ISO_8601) time format and have a full time zone designator (http://en.wikipedia.org/wiki/ISO_8601#Time_zone_designators). The other issue that often comes up is language support, but we are mostly covered in that area as there are localized versions of the plugin for many languages, and you can even create your own version and contribute it to the community. To do this, you can use the code hosted on https://github.com/rmm5t/jquery-timeago/tree/master/locales.
There are a few other implementations that perform a similar job, like for example, pretty date by John Resig available at his blog at http://ejohn.org/blog/javascript-pretty-date/.
When it comes to technical writing, we often want to display mathematical formulas inside the page. In the past, this was done by creating an image on the server from some kind of markup, or even manually creating an image with an external program. Since the introduction of MathML, this is no longer needed; this thereby saves us time, which was otherwise spent on sorting out layout issues, and enables native support from the browsers for the display of equations. At the time of writing this book, not all of the major browsers support MathML, even though the spec for most of the features has been available for a few years now.
Mathematical Markup Language (MathML) is a standardized way for an application to describe a formula, and is intended not only to enable integration for the Web, but also to be used in other applications.
There is a list of software that uses MathML maintained by the W3C; it can be found at http://www.w3.org/Math/Software/. Few revisions of the specification are done from the working group (http://www.w3.org/Math/), with the latest being number 3 (http://www.w3.org/TR/MathML3/).
HTML5 adds the support for embedding MathML documents inside HTML.
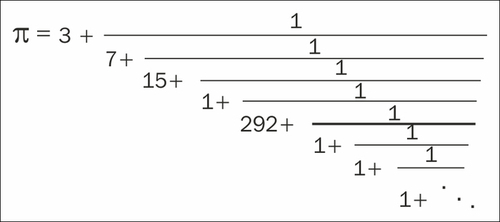
What we are going to do in this recipe is describe a formula, as shown in the previous continued fraction of Pi, with MathML where we have an example of a different representation of the number π.
We will be using a library called
MathJaxthat can either be retrieved from the author's CDN or downloaded separately and included in the project.<script type="text/javascript" src="http://cdn.mathjax.org/mathjax/latest/MathJax.js?config=TeX-AMS-MML_HTMLorMML"> </script>We can proceed by adding the MathML example as follows:
<math xmlns="http://www.w3.org/1998/Math/MathML">
       <mrow>
           <mi>π</mi>
         <mo>=</mo>
         <mfrac>
            <mstyle scriptlevel="0">
              <mn>3</mn>
            </mstyle>
            <mstyle scriptlevel="0">
               <mrow>
                 <mn>7</mn>
                 <mo>+</mo>
                 <mfrac numalign="left">
                   <mstyle scriptlevel="0">
                     <msup><mn>1</mn></msup>
                   </mstyle>
                 </mfrac>
               </mrow>
            </mstyle>
         </mfrac>
      </mrow>
    </math>
The basics on what the elements mean will be explained later, but you can notice that the example becomes really big after very few nesting levels and is hard to read. This is because MathML was never intended to be created manually, but to be used instead as a format by some application.
So what are the real simple options for us if we want to enable human-editable markup? Well, the simplest possible option is something called
ASCIIMath; in order to enable it, we need to change theconfigparameter in the request:<script type="text/javascript" src="http://cdn.mathjax.org/mathjax/latest/MathJax.js?config=AM_HTMLorMML-full"> </script>
We generally use the version with all the possible input formats and rendering options, but that way we would have a problem with the size of the JavaScript file.
So how much simpler is the use of
ASCIIMath? Well, the expression we explained previously can be displayed with a single line:<p> `π = 3+1/(7+1/(15+1/(1+1/...)))` </p>
The use of raw MathML without the MathJax library will not work on most browsers, but with the library, the output is automatically rendered either as an SVG or as a standard image. In the MathML example, we use XML nesting to designate where the elements will be contained, and elements such as mrow and mfrac are all defined in the MathML namespace (http://www.w3.org/1998/Math/MathML) with a root element called math. Although the concept is very simple, in practice it is extremely hard to create expressions like this one without the help of external software.
An additional downside to MathML is the fact that it is not fully supported in all browsers.
ASCIIMath, on the other hand, is very simple to use and very intuitive; basically, anything enclosed in "`" or the Grave accent character will get rendered to HTML and CSS or any other rendering method that has been configured.
The ASCIIMath method is very simple and extremely popular with major websites such as Khan Academy (https://www.khanacademy.org/) and Math StackExchange (http://math.stackexchange.com/). If you are interested to get more details on how ASCIIMath can be used, you can get more info on its official web page at http://www1.chapman.edu/~jipsen/mathml/asciimath.html. Using MathJax you can also render other markup format languages such as Tex and Latex.
Note
Tex is a typesetting format made by Donald Knuth for the purpose of helping him with the writing of his famous books. Latex, on the other hand, is a document markup that uses Tex as the typesetting format. More information on them can be found at http://en.wikipedia.org/wiki/TeX and http://www.latex-project.org/.
Endless scrolling lists were popularized by social networking websites, such as Facebook and Twitter. Their goal is to create the illusion that the entire available content has already been loaded. Additionally, with this technique, interruptions to the normal scrolling that are caused by the user trying to find the button for the next page are avoided.
At the same time, we would also want to avoid unnecessary waste of bandwidth; this means that loading the whole set of data at once is not an option.
The solution is to monitor the user's scrolling and detect the approach at the bottom of the page. When the user is sufficiently close to the bottom, we can automatically load the next page of content by appending it to the end of the currently shown content.
You must already have a service that provides the content on a page-by-page basis. This example works without such a service by default, but to make it fully functional, an actual HTTP server is needed in order for the Ajax requests for the next page to work.
Let's write the HTML page, CSS style, and JavaScript code.
Create a file named
index.htmlthat will contain the full HTML, CSS, and JavaScript code of our example. We need to insert a DOCTYPE into our HTML document; otherwise, the browser will operate in "quirks mode" and the height measurement function$(window).height()will not work.<!DOCTYPE HTML>
We'll add a content placeholder element in the page:
<div id="content"></div>
For demonstration purposes, we'll add the following CSS code to make the pages visible. Feel free to skip this CSS:
div.page {
   min-height: 1200px;
   width: 800px;
   background-color:#f1f1f1;
   margin:0.3em;
   font-size: 3em;
}
div.error {
   color:#f00;
}
Finally, we add the JavaScript code. First we load jQuery:
<script src="http://ajax.googleapis.com/ajax/libs/jquery/1.8.2/jquery.min.js">
</script>
Then we can add our script:
<script type="text/javascript">
(function() {
Our page getter calls the callback with a null error argument and a simple string containing the page number as the content (for example,
Page 1), but it can also perform an Ajax request. See the following code for more info on how to modify it to make an Ajax request.This function is artificially limited to 10 pages of content. After the tenth page, the callback function is called with an error, indicating that there are no more pages available:
var page = 1;
function getPage(callback) {
   if (page <= 10)
       callback(null, 'Page ' + page);
   else
       callback("No more pages");
   page += 1;
};
We use
triggerPxFromBottomto specify when to start loading the next page. When onlytriggerPxFromBottompixels remain to be scrolled, the loading of the next page will begin. Its value is set to0; this means that the user must reach the end of the currently visible page to trigger the loading process:var currentlyLoading = false; var triggerPxFromBottom = 0;
loadNextappends the next page into the#contentdiv. However, if the callback function is called with an error, it will displayNo more contentbelow the last part of the page. After an error event, no more pages will be loaded. This means that whengetPagereturns an error, our code will stop loading new pages. This is the desired behavior:function loadNext() { currentlyLoading = true; getPage(function(err, html) { if (err) { $("<div />") .addClass('error') .html("No more content") .appendTo("#content"); } else { $("<div />") .addClass('page') .html(html).appendTo("#content"); currentlyLoading = false; } }); }This event handler is called when the page is scrolled in any way. It calculates the number of pixels of scrolling that remain below. If the number of the pixels is small enough and the code is not currently loading a page, it calls the page-loading function:
$(window).on('scroll', function() {
    var remainingPx = $(document).height()
        - $(window).scrollTop()
        - $(window).height();
    if (remainingPx <= triggerPxFromBottom
        && !currentlyLoading)
        loadNext();
});
Finally, we call
loadNext()for the first time to load the first page:loadNext(); }()); </script>
The visible area of the browser (also called the viewport) has its own dimensions that can be fetched by calling jQuery's $.fn.height() function on the $(window) object. On the other hand, $(document).height() provides us with the height of the entire content of the page. Finally, $(window).scrollTop() gives us the scroll offset.
Using these functions, we can calculate the remaining pixels to be scrolled. Then we recalculate and check this value every time the user scrolls the page. If the value is sufficiently small, we call our loading function. At the same time, we make sure to stop loading new pages until the current loading process is finished. (Otherwise, the user's scrolling actions might load a couple of more pages while they wait for the content to load.)
Here is a possible Ajax implementation of the getPage function. This function sends Ajax requests to a request handler hosted on the same domain at the path /pages/<number> to retrieve the HTML contents of the next page:
function getPage(cb) {
    $.get('/pages/' + page)
        .success(function(html) { cb(null, html); })
        .error(function() { cb("Error"); }
    page += 1;
}
To make this version work, you will need to implement the request handler in your server-side code.
Your server-side code can return an error, such as 404, to indicate that there is no more content available. As a result, jQuery will never call our success callback, and our code will stop loading new pages.
The endless scrolling list recipe provides great user experience, but it has one significant drawback. We must make sure that we don't have any important page content below the contents element. This means that page elements placed at the bottom (usually the footer links and copyright messages) might become unreachable.
One of the most common tasks we encounter when creating websites is displaying lists and tables. Most techniques focus on server-side sorting, paging, and the rendering of data. Our solution will be completely on the client side, suitable for small to medium amounts of data. The main benefit of a client-side solution is speed; sorting and switching pages will be nearly instantaneous.
In this recipe, we're going to create a client-side, sortable paginated table.
We assume that a service provides the data in a JSON object, containing a data property that is an array of arrays:
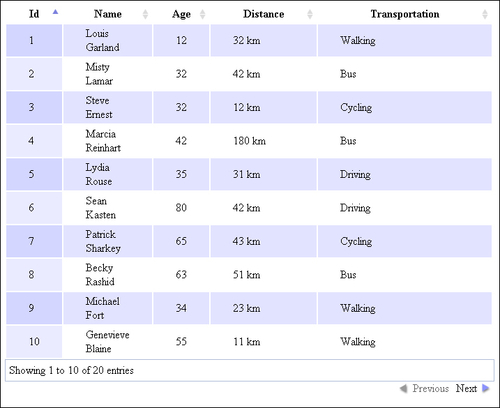
{data:[["object1col1", "object1col2"], ["object2col1", "object2col2"], …]}In our example, we're going to display a list of people near us. Every person in the table will have their own ID number, name, age, distance from us, and transportation method.
We're going to display the distance in km, and would like to be able to sort the list of people by their last names.
As table display problems quickly grow beyond the original simple problem, we're not going to build our own solution. Instead, we're going to use the excellent jQuery DataTables plugin available at http://datatables.net/.
Tip
Downloading the example code
You can download the example code files for all Packt books you have purchased from your account at http://www.packtpub.com. If you purchased this book elsewhere, you can visit http://www.packtpub.com/support and register to have the files e-mailed directly to you.
Let's write the HTML page, CSS style, and JavaScript code.
First, we're going to create an HTML page containing an empty table. We're also going to add some CSS to import a basic DataTables style for the table. The stylesheets are normally available with the DataTables distribution. Our
index.htmlfile is as follows:<!DOCTYPE HTML> <html> <head> <title>Sortable paged table</title> <style type="text/css"> @import "http://live.datatables.net/media/css/demo_page.css"; @import "http://live.datatables.net/media/css/demo_table.css"; #demo, #container { width:700px; } #demo td { padding: 0.2em 2em; } #demo_info { width:690px; height:auto; } </style> </head> <body> <div id="container"> <table id="demo"> <thead> <tr> <th>Id</th><th>Name</th><th>Age</th><th>Distance</th><th>Transportation</th> </tr> </thead> <tbody> </tbody> </table> </div> <script src="http://ajax.googleapis.com/ajax/libs/jquery/1.8.2/jquery.min.js"></script> <script type="text/javascript" src="http://datatables.net/download/build/jquery.dataTables.min.js"></script> <script type="text/javascript" src="example.js"></script> </body> </html>The example includes a link to the minified version of DataTables hosted on the official website.
The DataTables plugin appends the
pagerandinfoelements below the table. Because of this, we need to wrap our table inside acontainerelement.And the
example.jsfile is as follows:(function() { $.extend($.fn.dataTableExt.oSort, { "lastname-sort-pre": function (a) { return a.split(' ').reverse().join(' '); }, "lastname-sort-asc": function(a, b) { return a < b ? -1 : a > b ? 1 : 0; }, "lastname-sort-desc": function(a, b) { return a > b ? -1 : a < b ? 1 : 0; }, "unitnumber-pre": function(a) { return new Number(a.split(' ')[0]); }, "unitnumber-asc": function(a, b) { return a - b; }, "unitnumber-desc": function(a, b) { return b - a; } } ) var fetchData = function(callback) { var data = [ [1,'Louis Garland', 12, 32, 'Walking'], [2,'Misty Lamar',32, 42, 'Bus'], [3,'Steve Ernest',32, 12, 'Cycling'], [4,'Marcia Reinhart',42, 180, 'Bus'], [5,'Lydia Rouse',35, 31, 'Driving'], [6,'Sean Kasten',80,42, 'Driving'], [7,'Patrick Sharkey',65,43, 'Cycling'], [8,'Becky Rashid',63, 51, 'Bus'], [9,'Michael Fort',34, 23, 'Walking'], [10,'Genevieve Blaine',55, 11, 'Walking'], [11,'Victoria Fry',58, 14, 'Walking'], [12,'Donald Mcgary',34, 15, 'Cycling'], [13,'Daniel Dreher',16, 23, 'Walking'], [14,'Valerie Santacruz',43, 35, 'Driving'], [15,'Jodi Bee',23, 13, 'Walking'], [16,'Jo Montana',14, 31, 'Cycling'], [17,'Stephanie Keegan',53, 24, 'Driving'], [18,'Philip Dewey',12, 29, 'Cycling'], [19,'Jack Clemons',11, 44, 'Walking'], [20,'Steve Serna',14, 60, 'Cycling'] ]; callback({data:data}); }; window.myTable = {}; var table = window.myTable.table = $("#demo").dataTable({ 'bLengthChange': false, 'bFilter': false, 'iDisplayLength': 10, 'aoColumnDefs':[{ aTargets: [3], // distance mRender: function(data) { return data + ' km'; }, sType: 'unitnumber' }, { aTargets: [1], sType: 'lastname-sort' }] }); var setData = window.myTable.setData = function(data) { table.fnClearTable(); table.fnAddData(data); table.fnDraw(); }; fetchData(function(result) { window.myTable.data = result.data; setData(result.data); }); }());The implementation of
fetchDatain the example provides hardcoded example data. You can easily replace it with a request to your service. ThesetDatafunction is a convenient function to change the table data—we're going to use the same script, which will call this function to set its own data, for multiple recipes. Finally, the rest of the code is specific to DataTables and will be explained in the next section.
The following image shows the resulting table:
To initialize the table we use the dataTable initialization function. We can pass multiple options to the function. For example, we can specify that we want 10 items per page by setting the value of the iDisplayLength property to 10.
Because we're going to render the Distance column (column 3) slightly differently than just displaying it, we add an item to the aoColumnDefs option for target column 3 that sets a custom rendering function for that column. This is a function that simply appends the km string to our number; but we could also use a more elaborate function (involving custom date formatting, unit conversions, and so on).
Paging works automatically with DataTables—the plugin appends a pager control that provides access to the previous/next page. Sorting also mostly works automatically. However, in our particular example, we need special sorting for the Name column (by last name) even though it's displayed in the format "firstname lastname". To do this, we specify a custom sort type for that column called lastname-sort. We also specify a special sort type for the Distance column called unitnumber.
DataTables allows us to define custom sort types as plugins. Custom sorters have the following properties:
A preprocessing function that pre-processes the column value before passing it to the sorter
An ascending sorting function that returns a value depending on the value of the two arguments that are passed: -1 if the first value is smaller, 0 if they are equal, or 1 if the first value is larger
A descending order sorting function that works similarly to the ascending sorting function
These properties allow us to implement sorting by last name for the Name column, as well as by number for the Distance column.
Here is a simple Ajax replacement of the fetchData function, sending an Ajax request to a request handler hosted on the same domain at the path /people to retrieve the array data:
function fetchData(cb) {
    $.get('/people/').success(cb);
}
Note that this solution doesn't work very well for large datasets. While modern clients have the performance to manipulate a lot of data, bandwidth is also a consideration. A careful consideration of bandwidth requirements and the target clients (desktop or mobile) should be exercised before using this solution.
One common task when displaying tables is to filter the data in the table to a subset that satisfies a certain criteria. Multiple-choice table filters work on columns with a finite number of values. For example, if we had a table containing data of some people where one column is the transportation method used by the person, the filter used on this column would be a multiple-choice filter. The user should be able to select one or more transportation methods, and the table view would display all the people that are using the selected methods.
We're going to assume that we're using the code and data from the previous recipe. We have a list of people with their transportation methods displayed in a sortable, paginated table using the DataTables jQuery plugin. We will copy the files from the previous recipe, and then add to them.
The data that we need to filter is already available in the tableData global variable; we can filter this data and then use the global tableSetData function to display the filtered table.
The filter is going to work on the Transportation field.
Let's modify the previous code to add multiple-choice filters to our table:
In the
index.htmlfile from the previous recipe, add a multiple-choice select list after the opening<body>tag:<select id="list" style="width:100px;" multiple> </select>
Add a script element for
filter.jsbefore the closing</body>tag:<script type="text/javascript" src="filter.js"></script>
We're also going to modify the
fetchDatacall at the end ofexample.jsto trigger a custom event notifying any observers that the data has been fetched and set:$(function() { fetchData(function(result) { window.myTable.data = result.data; setData(result.data); $("#demo").trigger("table:data"); }); });The code is wrapped to be executed after the page is loaded in order for event triggering to work. Before the page load, no events can be triggered.
Create a file named
filter.jsand add the following code:(function() { function getUnique(data, column) { var unique = []; data.forEach(function(row) { if (unique.indexOf(row[column]) < 0) unique.push(row[column]); }); return unique; } function choiceFilter(valueList, col) { return function filter(el) { return valueList.indexOf(el[col]) >= 0; } } $("#demo").on('table:data', function() { getUnique(window.myTable.data, 4).forEach(function(item) { $("<option />").attr('value', item).html(item).appendTo("#list"); }); }) $("#list").change(function() { var filtered = window.myTable.data.filter( choiceFilter($("#list").val(), 4)); window.myTable.setData(filtered); }); }());
The easiest way to implement a user interface for a multiple-choice filter is to use a multiple-choice select element.
We also need to populate the element when the data becomes available. To do this, we trigger our new custom event table:data after fetching the data (either from our server or otherwise). The listener extracts the unique values from the Transportation column of the data and populates the select list with options for the values.
When the selection changes, we extract the selected values (as an array) and create a new filter function using choiceFilter, a higher-order function. The higher-order function returns a new filtering function. This filtering function takes a table row argument and returns true if the value of the fourth column of that row is contained within the specified list.
The filtering function is passed to Array.filter; it applies this function to every row and returns an array containing only the rows for which the filtering function returns true. The filtered data is then displayed instead of the original data.
Tables can also be filtered by their numerical columns. For example, given a table where each row is a person and one of the columns contain data about the person's age, we might need to filter this table by specifying the age range. To do this, we use range filters.
We're going to assume that we're using the code and data from the Creating a sortable paginated table recipe. We have a list of people with their age displayed in a sortable, paginated table using the DataTables jQuery plugin. We will copy the files from the recipe and then add some extra filtering code.
The data that we need to filter is already available in the tableData global variable; we can filter this data and then use the tableSetData global function to display the filtered table.
The filter is going to work on the Age field.
Let's modify the previous code to add range filters to our table:
In the
index.htmlfile from the previous recipe, add two input elements after the opening<body>tag:Age: <input id="range1" type="text"> to <input id="range2" type="text"> <br>
Add a script element for
filter.jsbefore the closing</body>tag:<script type="text/javascript" src="filter.js"></script>
Finally, we create our
filter.jsscript:(function() { function number(n, def) { if (n == '') return def; n = new Number(n); if (isNaN(n)) return def; return n; } function rangeFilter(start, end, col) { var start = number(start, -Infinity), end = number(end, Infinity); return function filter(el) { return start < el[col] && el[col] < end; } } $("#range1,#range2").on('change keyup', function() { var filtered = window.myTable.data.filter( rangeFilter($("#range1").val(), $("#range2").val(), 2)); window.myTable.setData(filtered); }); }());
The easiest way to filter array data is to use JavaScript's built-in Array.filter function. This is a higher-order function; its first argument is a function that takes a row argument and returns true if the row is to be added to the filtered array or false if the row is to be left out.
To provide such a function, we create our own higher-order function. It takes the start and end ranges and the specified column. The return result is a function that filters every row.
To ignore empty or invalid values from the input, we use the number function. If the input field is empty or contains non-number data, a default value is provided (-Infinity for the start of the range and +Infinity for the end). This also enables us to do one-sided range filtering.
The Array.filter function returns an array of all the elements that pass the filter. We display this array in our table.
When displaying tables, we sometimes want to filter table elements using multiple criteria involving multiple columns. For example, given a table of people that contains information such as their name, age, and transportation method, we might only want to view the people older than 30 that use a bus for transportation. We might also want to filter people by name. To do this, we have to apply multiple filters, such as an age range filter, a multiple-choice filter, and a text filter, to the data at the same time. The easiest way to do this is to make a filter combination function.
We're going to assume that we're using the code from the Creating a sortable paginated table recipe, and we're going to add our filters as described in the previous two recipes. This time we're going to allow for the combination of filters.
Let's modify the previous code to add multiple filters to our table:
We're going to add filter-related inputs to our page after the opening
<body>tag:<select id="list" style="width:100px;" multiple> </select> Age: <input id="range1" type="text"> to <input id="range2" type="text">, Name: <input type="text" id="name"> <br>
Add the
filter.jsscript before the closing</body>tag:<script type="text/javascript" src="filter.js"></script>
We're going to modify
example.jsto fetch data after the page is loaded and trigger atable:dataevent after displaying the data:$(function() { fetchData(function(data) { window.myTable.data = data; setData(data); $("#demo").trigger("table:data"); }); });Then we can create
filter.jsby combining the code from the previous two recipes:(function() { function getUnique(data, column) { var unique = []; data.forEach(function(row) { if (unique.indexOf(row[column]) < 0) unique.push(row[column]); }); return unique; } function choiceFilter(valueList, col) { return function filter(el) { return valueList.indexOf(el[col]) >= 0; } } function number(n, def) { if (n == '') return def; n = new Number(n); if (isNaN(n)) return def; return n; } function rangeFilter(start, end, col) { var start = number(start, -Infinity), end = number(end, Infinity); return function filter(el) { return start < el[col] && el[col] < end; }; } function textFilter(txt, col) { return function filter(el) { return el[col].indexOf(txt) >= 0; }; } $("#demo").on('table:data', function() { getUnique(window.myTable.data, 4) .forEach(function(item) { $("<option />").attr('value', item) .html(item).appendTo("#list"); }); }); var filters = [null, null, null]; $("#list").change(function() { filters[0] = choiceFilter($("#list").val(), 4); filterAndShow(); }); $("#range1,#range2").on('change keyup', function() { filters[1] = rangeFilter($("#range1").val(), $("#range2").val(), 2); filterAndShow(); }); $("#name").on('change keyup', function() { filters[2] = textFilter($("#name").val(), 1); filterAndShow(); }); function filterAndShow() { var filtered = window.myTable.data; filters.forEach(function(filter) { if (filter) filtered = filtered.filter(filter); }); window.myTable.setData(filtered); }; }());
Like in the previous recipes, we use the Array.filter function to filter the table. This time we apply multiple filters in succession. We store all of the filter functions in an array.
Whenever there is a change in the inputs, we update the appropriate filter function and rerun filterAndShow() to display the filtered data.
DataTables is a highly flexible table library with many options and a rich API. More information and examples can be found on the official website at http://www.datatables.net/.
There is a common need to display code in HTML or even to display HTML code inside HTML, especially in technical documentation or blogs. This has been done far too many times by taking an image from a piece of formatted code and making it part of the page. The code in the image will probably not get picked up by search engines. Additionally, it can limit us to a specific page layout or even screen size, and with today's mobile revolution, that is just not an option.
The only requirement for this recipe is that the data that will be displayed needs to be properly escaped; this means that <p>awesome </p> needs to be translated into <p>awesome </p>. This can be done either on the server side or escaped before saving.
We will be using Google code prettify because, at the time of speaking, this library is not available completely on any of the CDN's; you can get it from http://code.google.com/p/google-code-prettify/.
Afterwards, we can add the escaped code in the
<pre /> <code />block:<body onload="prettyPrint()"> <div> <pre class="prettyprint"> <code> SELECT * FROM Book WHERE price < 100.00 ORDER BY name; </code> </pre> </div> </body>Either one of these two tags has to include the
prettyprintCSS class. In addition to that, we need to include theonload="prettyPrint()"attribute.There is also the option to call the
prettyPrintfunction from other event listeners added in JavaScript:<script> window.addEventListener('load', function (e){ prettyPrint(); }, false); </script>
The prettyprint class automatically selects all the blocks marked with the appropriate CSS class, and autodetects the programming language used, and does the highlighting afterwards.
The lexer should work on most languages; in the common languages there are custom scripts for specific languages, for example, for the lisp-based ones.
Because prettyprint automatically detects the source language, we could additionally specify it ourselves if we want to get better results. For example, if we wanted to display XML, the code would be as follows:
<pre class="prettyprint"><code class="language-xml">...</code></pre>
There are CSS classes for most of the common languages.
prettyprint is one of the older scripts available, and there are few alternatives that can offer many more customization options and better JavaScript APIs.
Some of them, such as SyntaxHighliger (http://alexgorbatchev.com/SyntaxHighlighter/), Rainbow (http://craig.is/making/rainbows), and Highlight.js (http://softwaremaniacs.org/soft/highlight/en/), are commonly found on most of the sites.
Markdown is a popular, lightweight markup language. The language is similar to Wiki markup (used on Wikipedia), with an emphasis on simplicity. Its main purpose is to enable users to write plain text and get stylized, formatted HTML output. As such, it is used by popular websites, such as Reddit, Stack Overflow, GitHub, as well as various forums as a replacement of the less intuitive BBCode format.
Markdown is the fastest way to enable formatted text input for our users without embedding a full-fledged HTML editor into the page. There are multiple libraries to render markdown; in this recipe, we're going to use the simple markdown-js script to render markdown in real time.
Rendering markdown is very simple. A minimal example is as follows:
<!DOCTYPE HTML>
<html>
<head>
<title>Render markdown</title>
<style type="text/css">
#markdown, #render { width: 48%; min-height:320px; }
#markdown { float: left; }
#render { float: right; }
</style>
</head>
<body>
<textarea id="markdown">
# Markdown example.
This is an example of markdown text. We can link to [Google](http://www.google.com)
or insert Google's logo:

## Text formatting
We can use *emphasis* or **strong** text,
> insert a quote
etc.</textarea>
<div id="render"></div>
<script src="http://ajax.googleapis.com/ajax/libs/jquery/1.8.2/jquery.min.js"></script>
<script src="https://raw.github.com/spion/markdown-js/master/lib/markdown.js"></script>
<script type="text/javascript">
function rendermd(val) { $("#render").html(markdown.toHTML($("#markdown").val())); }
$("#markdown").on('keyup', rendermd); $(rendermd);
</script>
</body>
</html>When the page is loaded, the markdown text in the textarea element is rendered into the #render element on the right-hand side. Every key press will also cause the script to update the rendered element.
Find out more about the markdown format from its official website at http://daringfireball.net/projects/markdown/.
These days, it is common to have an autoupdate on fields where one section is either the result of given choices or it displays a given image or text block. One example of this is having a password strength calculation; for example, searching for "currency converter" on Google will result in a box where you can do currency conversion between USD and EUR. Linking fields in this way makes sense when we have two or more that are logically linked, or when one is a result form of the other.
To demonstrate this, we will create a converter for temperature where updating one of the fields will result in changes in the other, as the values are linked.
For this recipe, we only need a basic knowledge of jQuery and a simple formula to convert the temperatures between Celsius and Fahrenheit and vice versa:
Celsius = (Fahrenheit -32) x (5/9)
Or:
Fahrenheit = Celsius x(9/5) +32
First, we are going to create the HTML part and create two input fields that will get autoupdated and add the appropriate labels:
<div> <label for='celsius'>C°</label> <input id='celsius' type='text' /> = <label for='fahrenheit'>F°</label> <input id='fahrenheit' type='text' /> </div>
Afterwards, we have to make sure that we have included jQuery:
<script src="http://ajax.googleapis.com/ajax/libs/jquery/1.8.2/jquery.min.js"> </script>
Following this, we can add the script that will handle the binding between the fields:
$(document).ready(function() {
  $('#celsius').keyup(function(data) {
  var celsius = new Number(data.currentTarget.value);
  var farenheit =celsius *(9/5) + 32;
    $('#farenheit').val(farenheit);
    });
   $('#farenheit').keyup(function(data) {
       var farenheit = new Number(data.currentTarget.value);
    var celsius =(farenheit-32)*(5/9);
     $('#celsius').val(celsius);
     });
        });
This will connect and automatically calculate the temperature back and forward.
Let's first take a look at the display part where there is nothing specific; here we use a simple input type text and add the appropriate labels for each field. Furthermore, we can use the escaped character ° that will show the degree character.
If we take a look at the jQuery keyup event, we can see that it's executed when a user releases a key on the keyboard on a given element. This event can be attached on any HTML element, but it will only work when the element is in focus; so it mostly makes sense to use it on input elements. As the keyup event has an option to execute a function that will accept the event object, so for our case, it is as follows:
$('#celsius').keyup(function(event) {In the event object, we can access the element that fired the event and access its value:
event.currentTarget.value
After that, we can do the calculation (celsius *(9/5) + 32) and set the result as a value to the other element that displays it in Fahrenheit:
$('#fahrenheit').val(fahrenheit);As we wanted the binding to work both ways, we can do the same on the input field for Fahrenheit:
$('#farenheit').keyup(function(event) {And of course, you need to use the appropriate formula (fahrenheit-32)*(5/9)) for returning back to Celsius.
While this recipe shows a simple use of jQuery event to make an instant update on input text, it can also be applied for creating autocomplete boxes or features, such as Google's instant search. The idea here is that we can and should use one- or two-way binding for various HTML elements, especially when we are talking about derived data or data that is a representation of the same source.