


 Download code from GitHub
Getting Started with AWS Networking Components
In this chapter, we'll cover the following recipes:
- Creating an account in AWS
- Creating an admin user in AWS
- Creating a VPC and a subnet with IPv6
- Creating an EC2 with an IPv6 address
- Creating NAT on EC2 instance
- Working with network interfaces
- Configuring AWS CLI
Introduction
Public cloud computing is a service that can be accessed over the internet. It provides resources, on a shared basis, for hosting applications and data on distributed computing resources. Cloud providers host a pool of services for computer servers, storages, networks, application platforms and software services that are assigned to customers based on their needs. Cloud providers take responsibility of managing computing resources so that customers can concentrate on building applications or services quickly. AWS is the biggest public cloud service provider.
AWS provides most of the networking services that we are going to explore for free. It also lets customers experiment with some of the other services for free at a lower scale. We need to have an account and the required permissions in AWS to execute the recipes provided throughout this book. Creating some of the services may cost some money, so please look into the AWS pricing page (https://aws.amazon.com/pricing/services/) for different services and understand the cost impact that execution of some recipes will have.
Various AWS network services
In this section, we shall come to understand the building blocks of AWS Cloud. We are going to use or create the following components through this book.
- Region: AWS Cloud currently has data centers in 16 cities and is also coming up in new locations throughout the world. Each region is completely isolated from the others. You need to choose one region to create network components.
- Availability Zone (AZ): Each region of AWS Cloud has multiple physically isolated and separate data centers called availability zone. Some network components span across multiple AZs in a region like VPC. Components like subnet are confined within an AZ. AWS provides various networking services as Platform as a Service (PaaS). Examples are:
- Route 53: Distributed, scalable and highly available Domain Name System (DNS)
- Direct connect: This provides a dedicated low latency and high bandwidth network connectivity between a data center and an AWS VPC.
- ELB: This is a high availablility and scalable load balancing service provided by AWS.
- AWS VPC: VPC is a virtual network built in the AWS Cloud similar to a network in a data center. It is isolated from other VPCs that are created in your account or other accounts. You can choose the Classless Inter-Domain Routing (CIDR) range of the VPC and can create instances with the IP address within that range. Virtual Routing and Forwarding (VRF) in conventional networking is equivalent to a VPC in AWS, whereas VLAN is synonymous to a subnet. You can isolate instances in separate VLANs or subnets.
The following figure gives the default VPC components which include Internet gateway, Virtual private gateway, Router, Route table, Subnet, Network ACL and Security group.
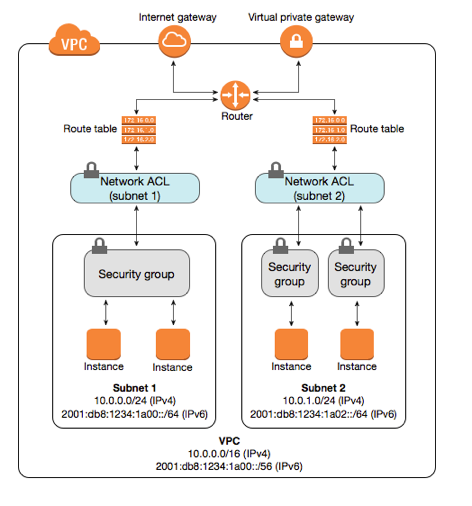
Source: http://docs.aws.amazon.com/AmazonVPC/latest/UserGuide/images/security-diagram.png
Creating an account in AWS
We are going to create an AWS account in this section. Please skip this section if you already have an AWS account. Otherwise, please follow the step by step process to create an account with AWS.
Getting ready
Be ready with your credit card information.
How to do it...
- Please open the URL https://aws.amazon.com/account/ in your favorite browser.
- Click on the button Create an AWS Account.
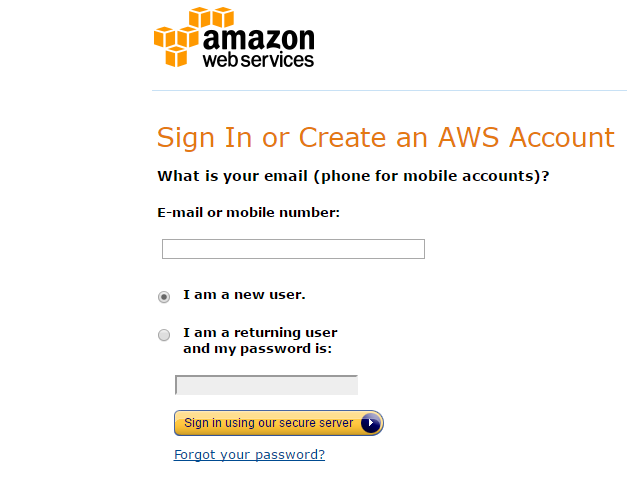
- You will see a page which looks like the following figure. Provide your email or mobile number, select the option I am a new user and click on Sign in using our secure server. The email ID provided here will be treated as the owner or root user for this account and has exclusive rights to do anything in the account.
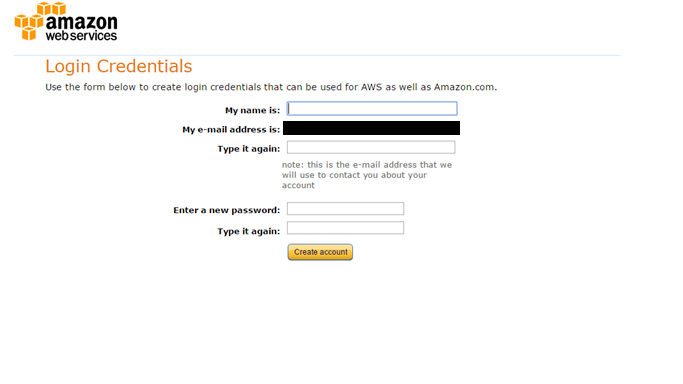
- You will get a page like this. Provide the required details and click on Create account.
- Provide additional details for your account.
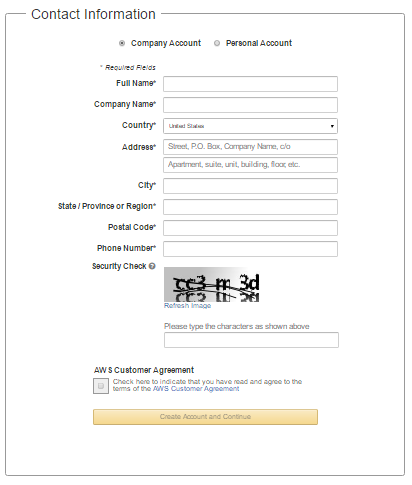
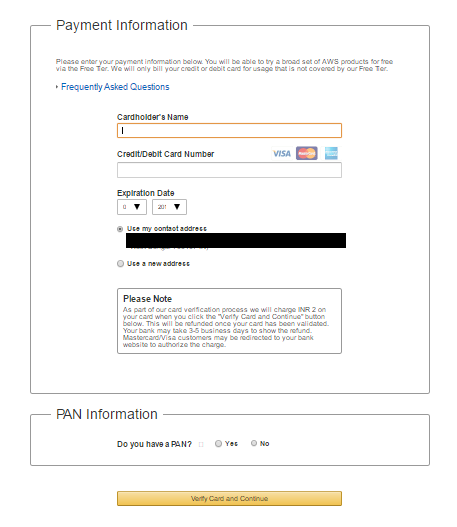
- Provide payment information for billing purposes.
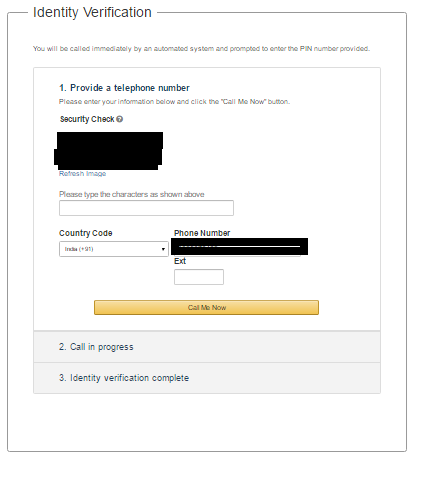
- Provide identity verification. There will be an automated call initiated by AWS to your phone number and you will need to key in the verification code shown on the screen.
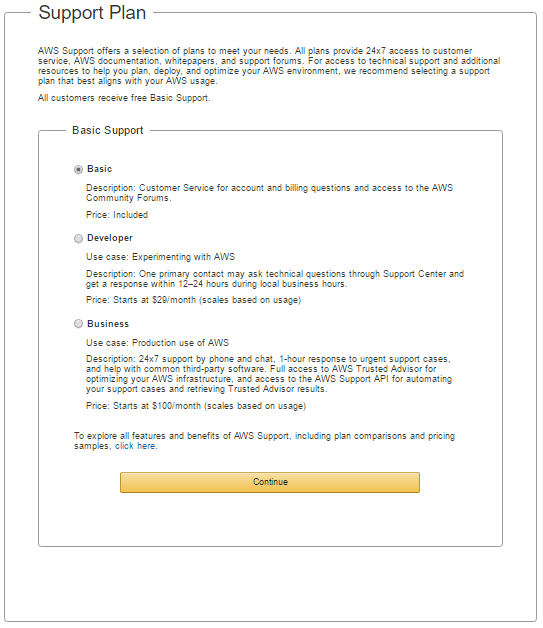
- Choose Support Plan and click on Continue.
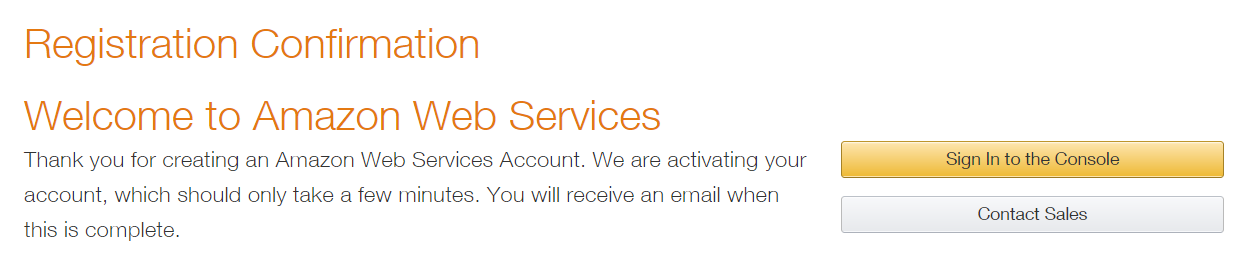
- You will see a welcome screen and can log in to the AWS console by clicking on Sign In to the Console. You'll also receive an email confirmation for the account creation.
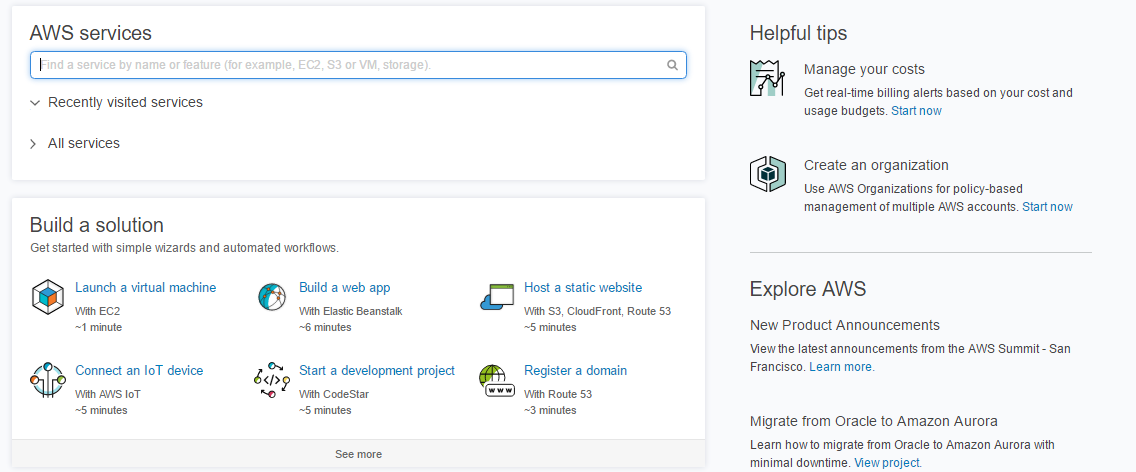
- After login, you will see a screen like the following:
There's more...
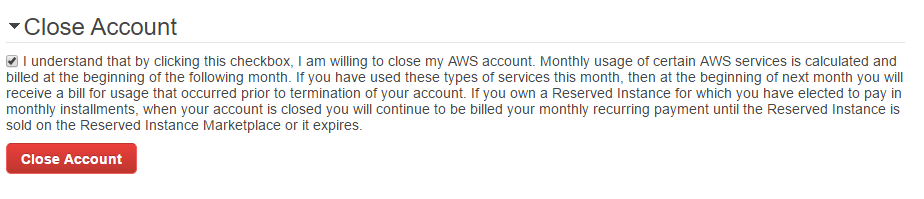
Once you decide to delete your account, you can do so by logging in to your account; see the following figure:
Creating an admin user in AWS
Once the account is created, we should not use it for anything apart from creating an admin user and handling billing related information. A strong password policy and multi-factor authentication (MFA) should be configured for all powerful users. We shall go through the steps to create an admin user. We shall use this user credential for executing recipes for different network elements in AWS. More stringent processes and methods should be followed for creating and managing users in AWS for production purposes.
Getting ready
Log in to the AWS account with user credentials.
How to do it...
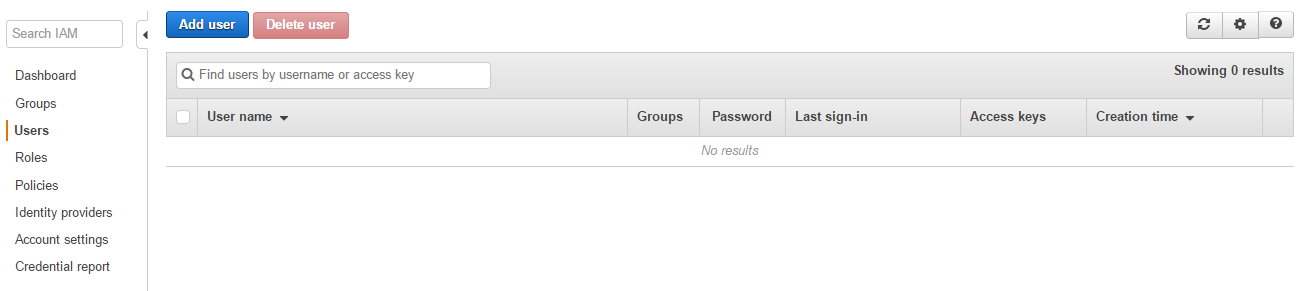
- Select Identity and Access Management (IAM) service from the console by typing https://console.aws.amazon.com/iam/ in the browser. You will see the URL that the user other than the root user will need to use for console access.
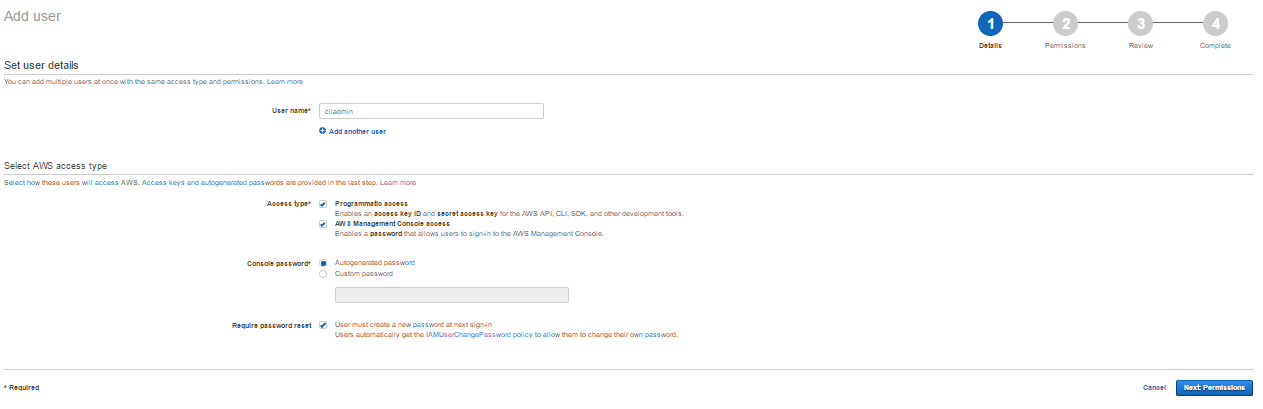
- Click on Users in the left menu and then click on Add user.
- Provide a username of your choice. Opt for both programmatic and console access. Select other relevant options and click on Next: Permission.
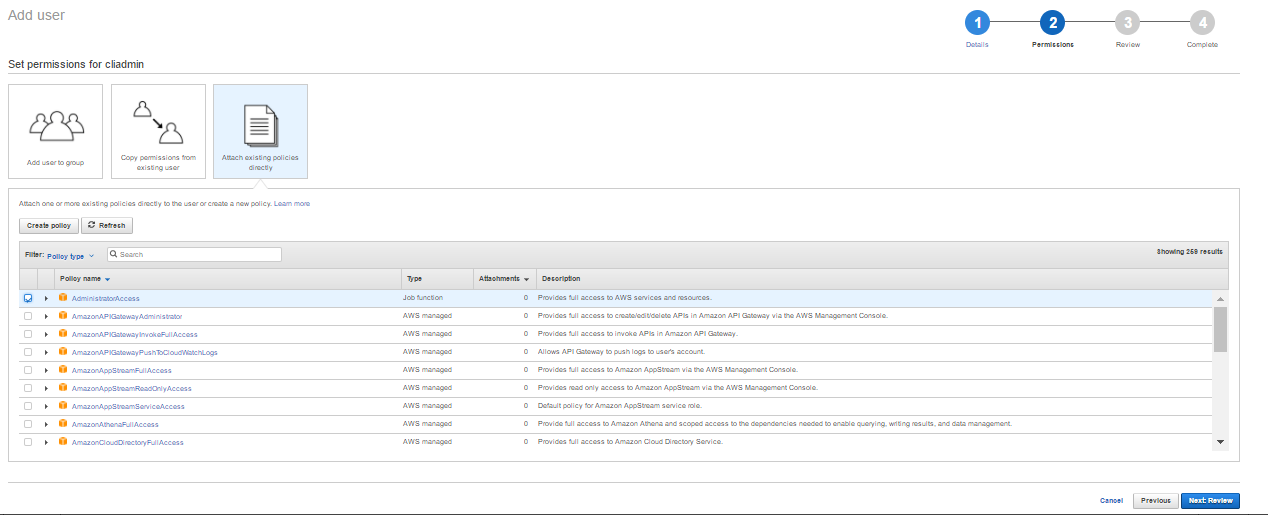
- Choose the option Attach existing policies directly. Choose AdministratorAccess and then click Next: Review.
- Review the details and click on Create User.
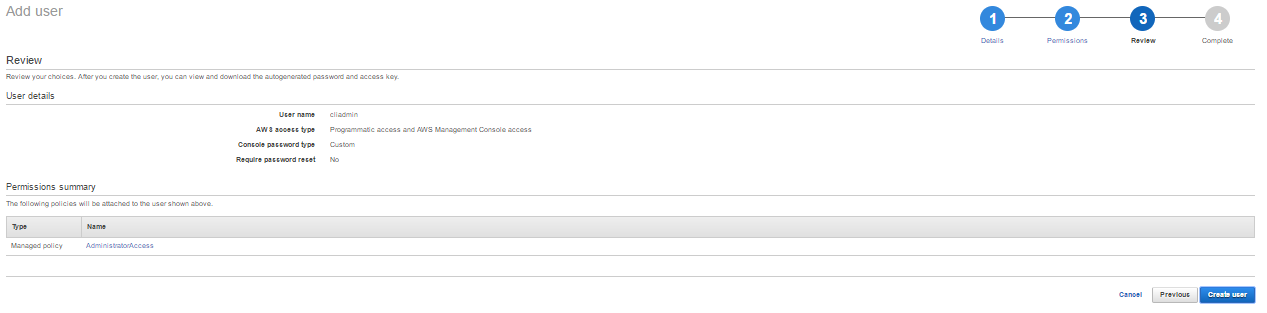
- Download and store the .csv file in a safe place. The file contains user access key details and console login link. User access information is required for AWS service access through program or CLI. It will be used in the later part of the book.

There's more...
The user access details can be used for accessing AWS from Command Line Interface (CLI). Scripts can be written using CLI and can be used as code for managing AWS infrastructure.
Creating a VPC and a subnet with IPv6
In this section, we shall be creating a VPC and a subnet using wizard to get started quickly.
Getting ready
We need an AWS account and a user with the proper permissions for creating a VPC and a subnet.
How to do it...
- Log in to your AWS account. Select VPC in AWS services as shown in the following figure:

- Click on Start VPC Wizard.

- VPC wizard will appear with four options. Now, we shall choose the first one to create our first VPC and subnet. Click on the Select button.
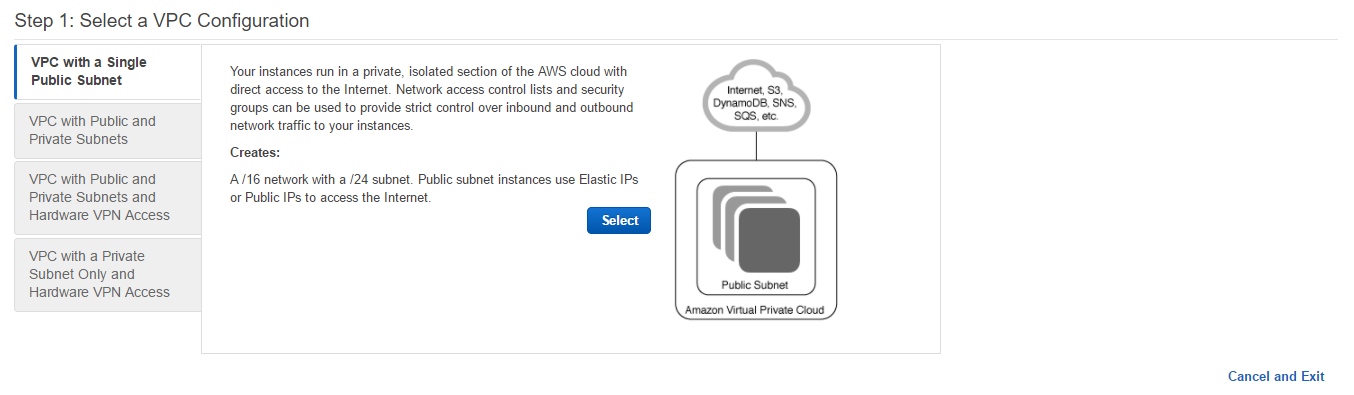
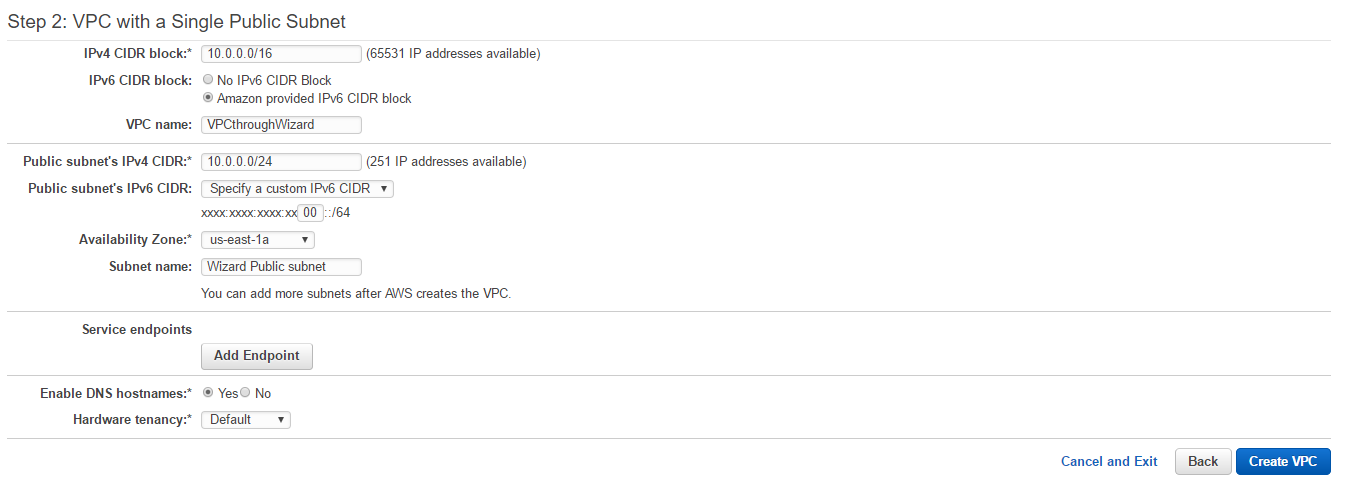
- We need to choose Amazon provided IPv6 CIDR block to enable IPv6 for VPC. For a subnet in a drop-down menu Public subnet's IPv6 CIDR: we need to select Specify a custom IPv6 CIDR. Key in the VPC and subnet names. Keep other options unchanged. Click on th Create VPC button.
- A success message will be displayed as following:

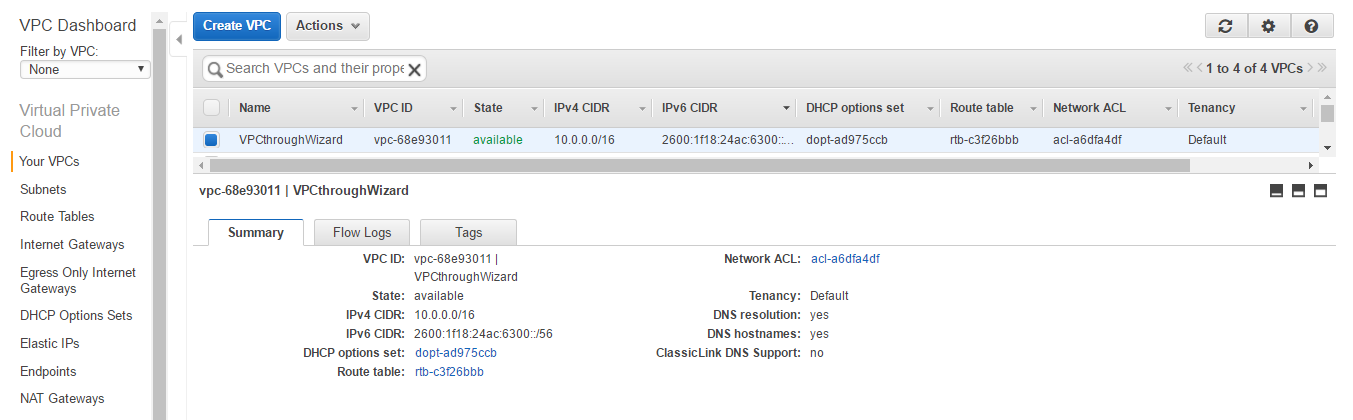
- Click on Your VPCs in the left menu. The VPC will be displayed. If you choose to see details, you can see that a Network ACL and Route table has been automatically created.
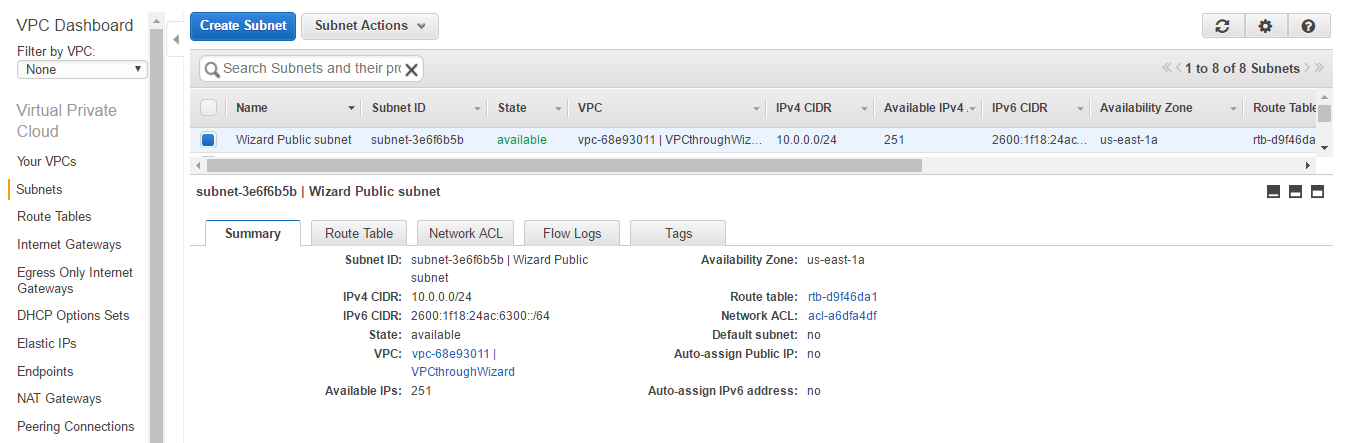
- Click on Subnets on the left menu bar. You will be able to see the subnet that was just created. If you choose to see details, you can see that a Network ACL and Route table that is automatically created.
- Click on the Route Table tab. You can see that the Route Table includes four entries. Two for internal IPv4 and IPv6 communication and two internet gateways (starting with igw) for communication with the outside world for IPv4 and IPv6.

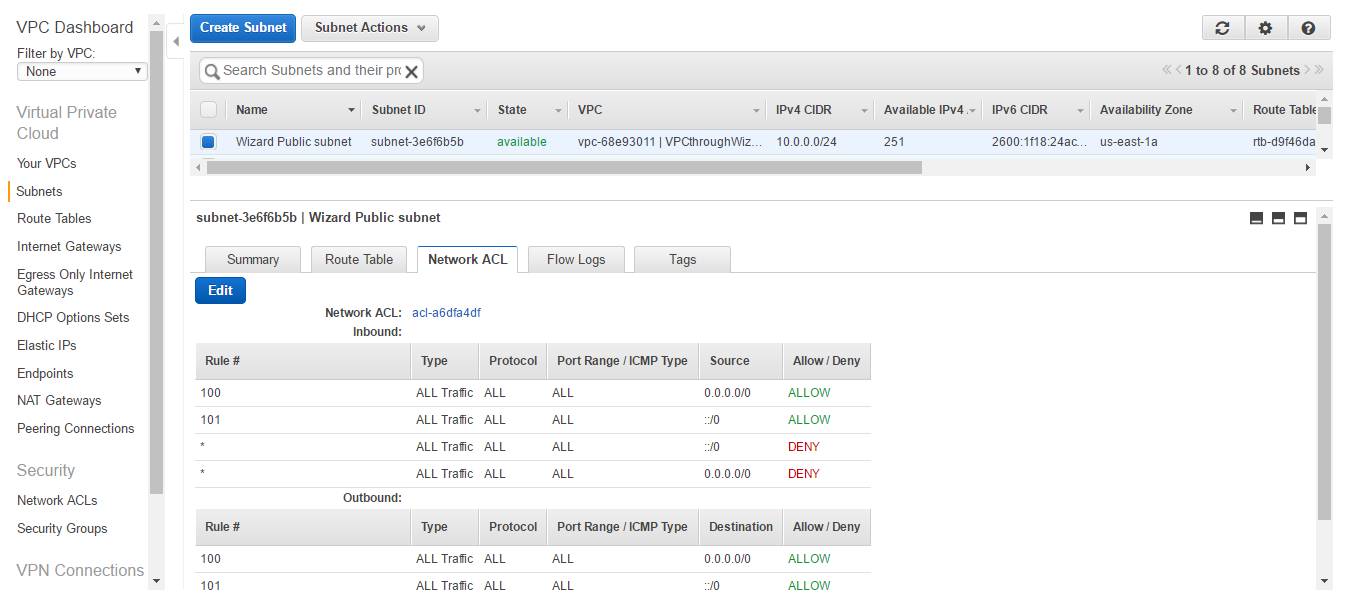
- Click on the Network ACL tab. You can see that all traffic for both IPv4 and IPv6 has been allowed. We shall learn how to configure the rules in the later section of the book.
Creating an EC2 with an IPv6 address
In this section, we shall be creating an EC2 instance with an IPv6 address in the VPC and subnet that we created using the wizard. EC2 is a virtual machine in AWS that comes as an IaaS offering. You can choose different virtual machine images called Amazon Machine Image (AMI) or create your own custom AMI for creating an EC2 instance. We shall also install a web server to test if our steps are correct.
Getting ready
We need an AWS account and user with proper permissions for creating an EC2 instance.
How to do it...
- Log in to your AWS account. Select EC2 services as shown in the following figure:

- The EC2 dashboard will appear. Click on Launch Instance in the EC2 dashboard.

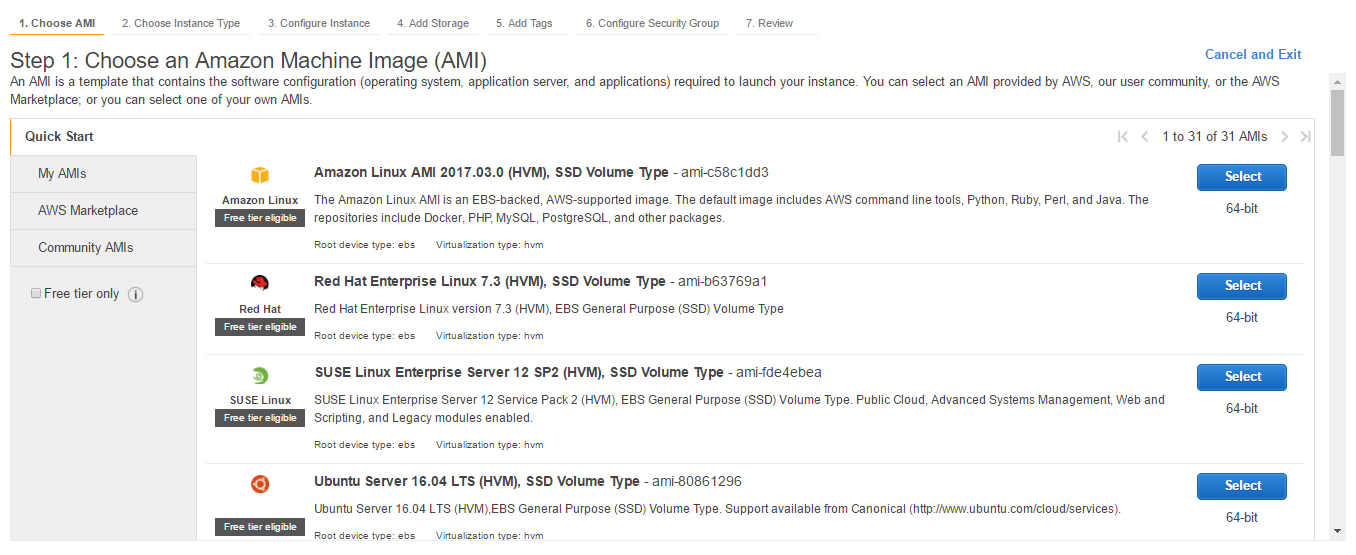
- Select Amazon Linux AMI, which is available on the top of the list
- There are many instance types available with different vCPU and memory options. We shall choose t2.micro and then click on Next: Configure Instance Details.

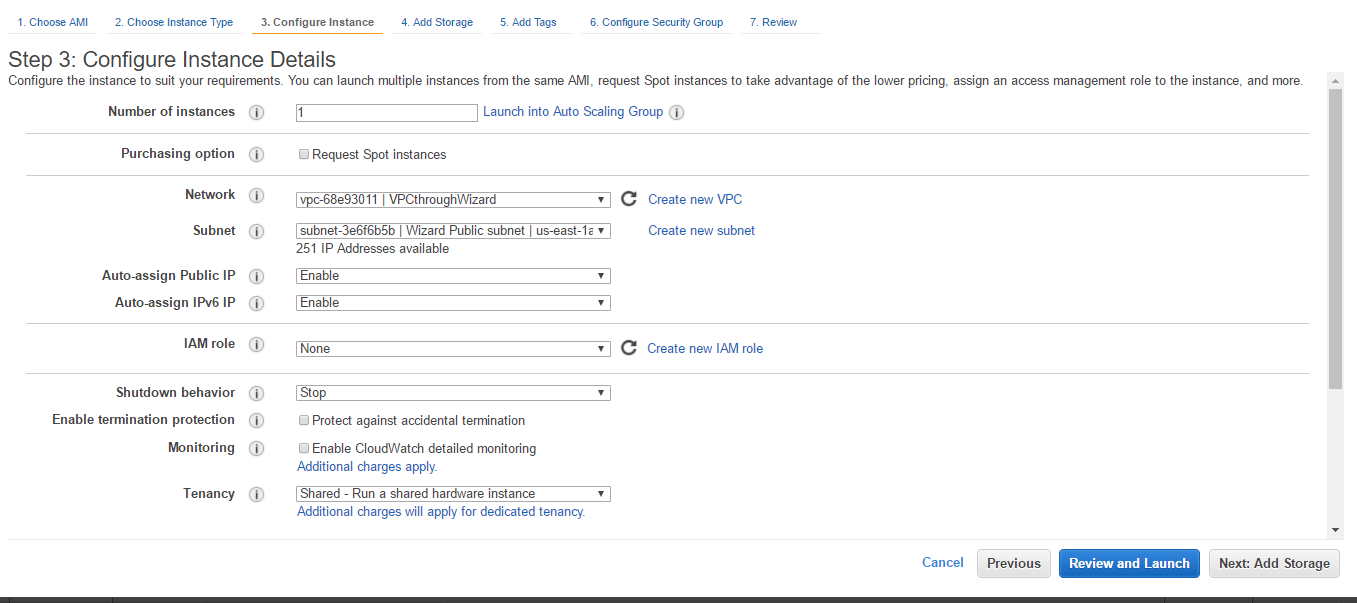
- In Network, choose the VPC we just created. In Subnet, select the subnet we created. In Auto-assign Public IP, choose Enable. In Auto-assign IPv6 IP, choose Enable. Click on Next: Add Storage.
- Click on the Advanced Details and put the following lines in the text box. This is user data. This may vary with the OS of EC2. The script is executed when the instance is first created. Here is a script that can execute on Linux. It will install Apache, PHP, and MySQL in the server. It will also start the Apache server once the EC2 is running.
#!/bin/bash
yum update -y
yum install -y httpd24 php56 mysql55-server php56-mysqlnd
service httpd start
chkconfig httpd on
groupadd www
usermod -a -G www ec2-user
chown -R root:www /var/www
chmod 2775 /var/www
find /var/www -type d -exec chmod 2775 {} +
find /var/www -type f -exec chmod 0664 {} +
echo "<?php phpinfo(); ?>" > /var/www/html/phpinfo.php
- Accept the default option and click Next: Add Tags.

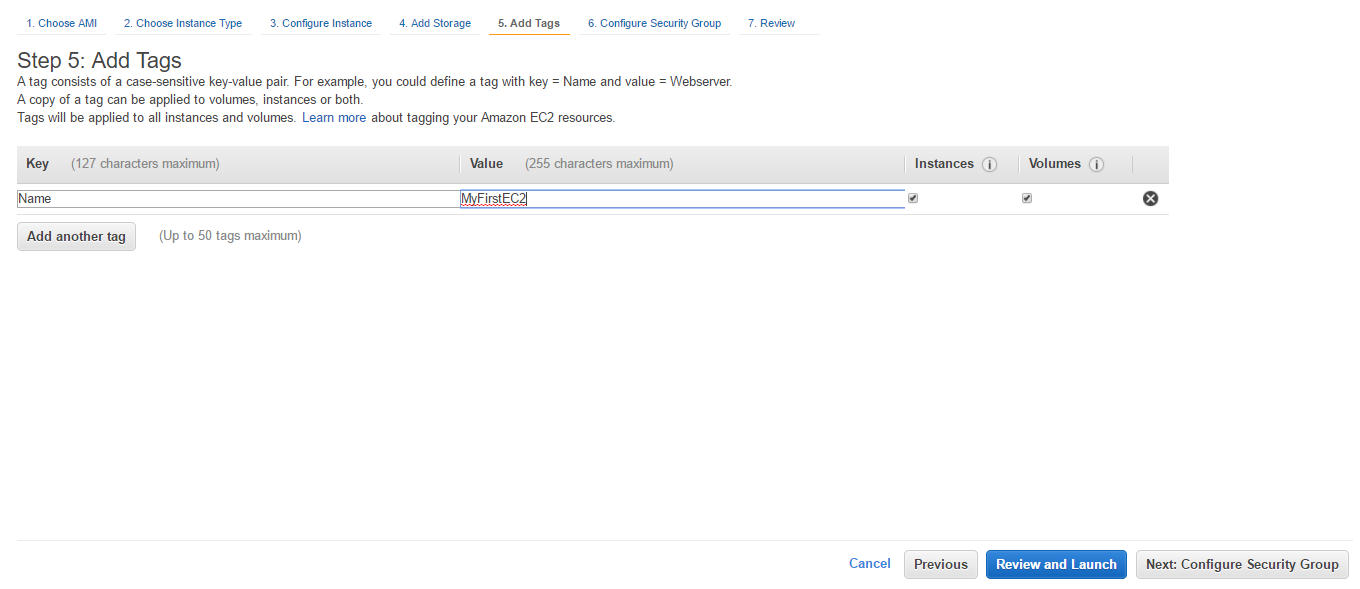
- Click on Add Tags. In Key, put Name and in Value, put MyFirstEC2. Click on Next: Configure Security Group.
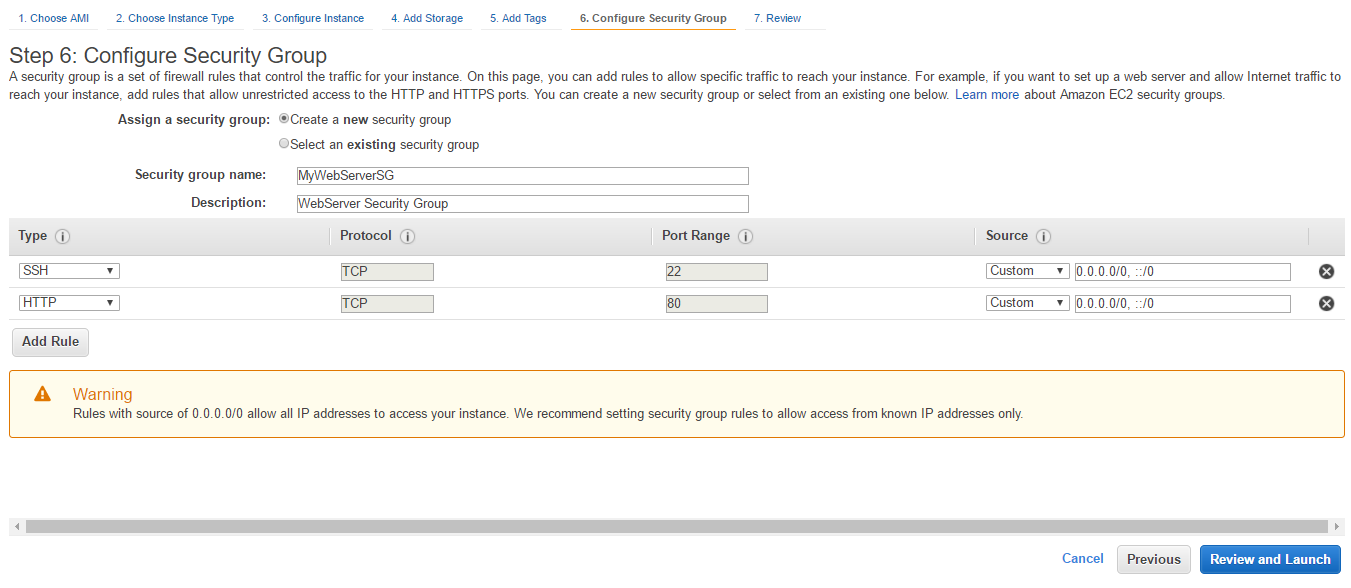
- Provide a Security group name and Description. By default, SSH is open to all IP addresses. In Source, we have two CIDR ranges, 0.0.0.0/0 to allow all IPv4 addresses and ::/0 to allow all IPv6 addresses. Click on Add Rule and allow HTTP traffic to all source. We should not be opening our servers to all like this, however for simplicity, let's do this for now. Click on Review and Launch.
- Review the details and click Launch.
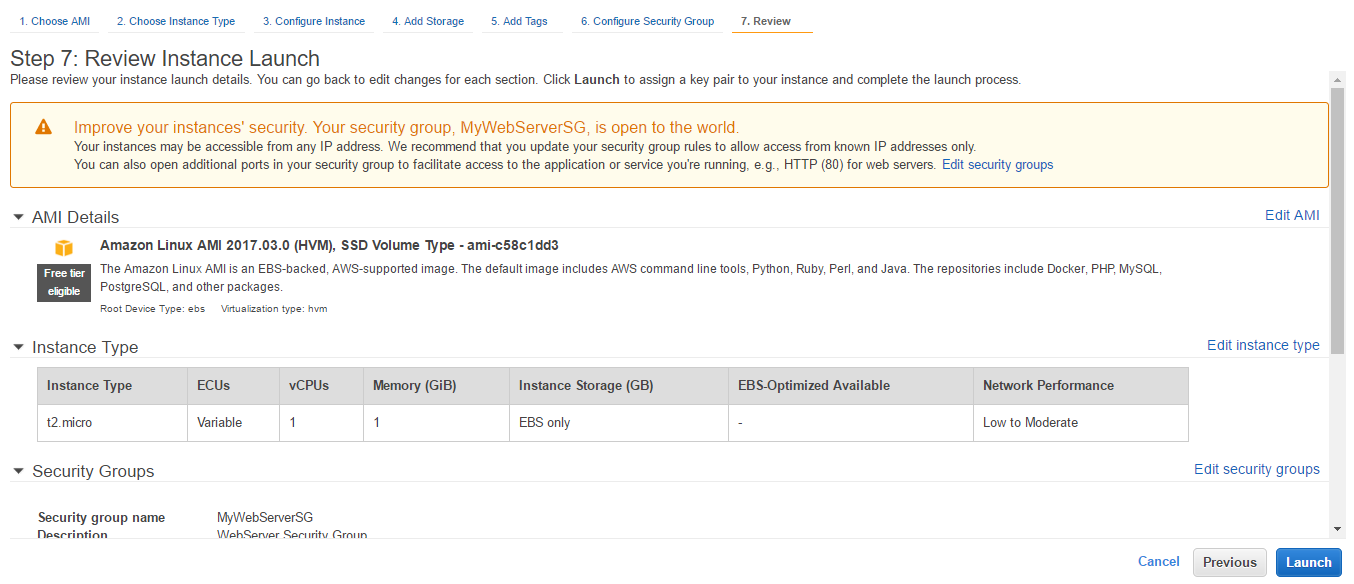
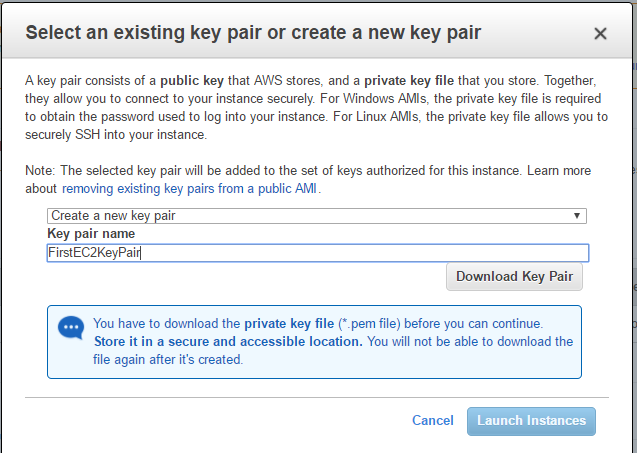
- We can optionally create a key pair. Key information is required if we want to log into EC2. Download Key Pair and store it in a safe place. Click on Launch Instances.
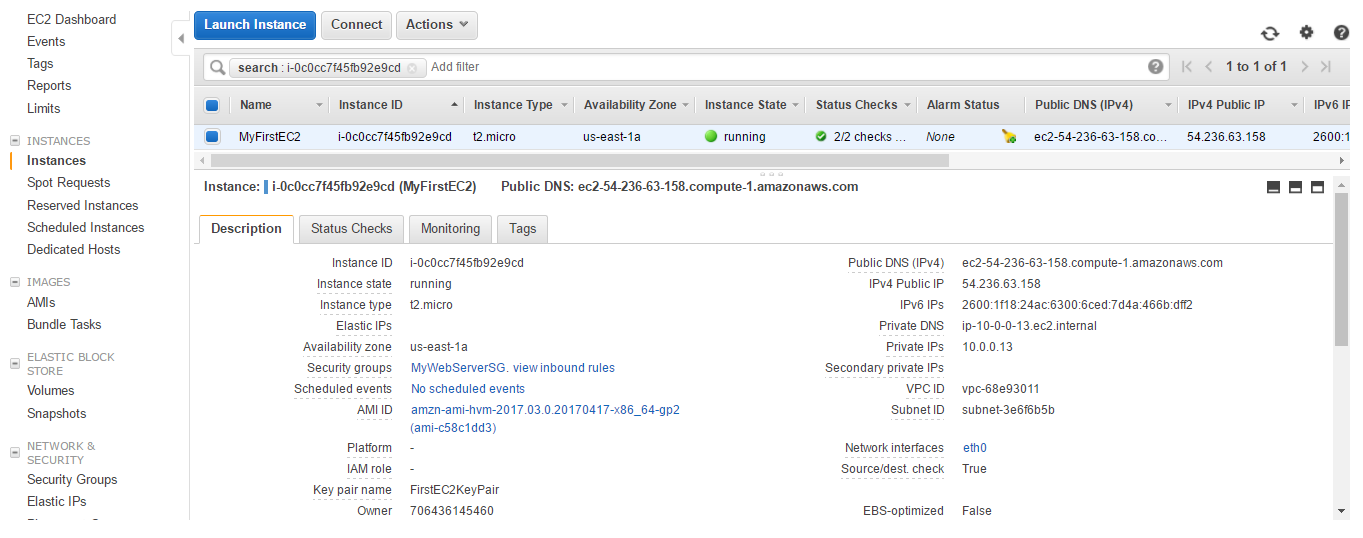
- You can see a success message with the EC2 instance ID. Click on the ID. It will take us to the EC2 console. The instance will be in running condition in some time.

- We can see both Public DNS (IPv4) and IPv6 IPs. We can create URL to access page running on EC2: http:// DNS(IPv4)/phpinfo.php. Replace the DNS (IPv4) in the URL with the one you see in the console. Open a browser and paste the URL.
- We can see the page of the server we created on the EC2 instance.

How it works...
We have seen that the Network ACL with VPC and subnet allows all traffic. In the security group of the instance, we have opened HTTP protocol on port 80 for all incoming traffic. Internet Gateway is attached to the subnet in which we created the instance. During instance creation we have installed Apache, PHP and MySQL to host a website with page phpinfo.php. As we have enabled IPv4 and IPv6 in VPC, subnet and EC2, the EC2 instance has assigned those. So, after EC2 creation, we can access the website using the URL. The DNS name is resolved by AWS Route 53.
Creating NAT on EC2 instance
In this recipe, you'll learn how to create a NAT instance on EC2 instances created in a public subnet. The private subnet does not have any Internet Gateway attached to it, so EC2 on private subnet cannot directly communicate with the outside world.
Getting ready
We need an AWS account and user with proper permissions for creating a NAT instance on EC2. Create an EC2 in the same way as the previous recipe. The only difference is, you don't put any Advanced Details in the Choose Network page. In the security group page, create NATSG security group and attach the same with instance with the following rules. We are allowing all traffic for simplicity. However, you should only put the required CIDR ranges.
NATSG: Rules
|
Inbound |
|||
|
Type |
Protocol |
Port range |
Source |
|
HTTP |
TCP |
80 |
0.0.0.0/0 and ::/0 |
|
HTTPS |
TCP |
443 |
0.0.0.0/0 and ::/0 |
|
SSL |
TCP |
22 |
0.0.0.0/0 and ::/0 |
|
Outbound |
|||
|
Destination |
Protocol |
Port range |
Comments |
|
All traffic |
TCP |
ALL |
0.0.0.0/0 and ::/0 |
You can use the same key pair created before for this instance as well. In the Add tag page, put Nat Instance in value for Name and Key. We also need to create an Elastic IP for attaching it to a NAT instance. This we shall show in the recipe.
How to do it...
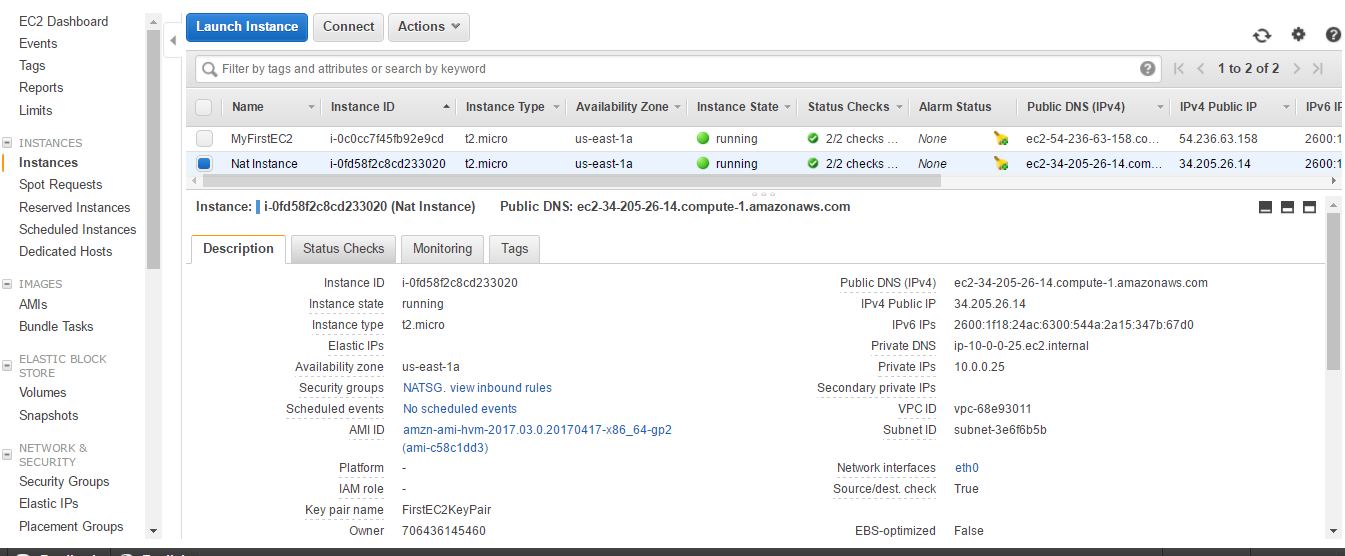
- I have created one more EC2 instance as visible in the Instances section of the EC2 console.
- Click on Elastic IPs in the left menu bar.

- Click on Allocate new address.

- Click on Allocate.
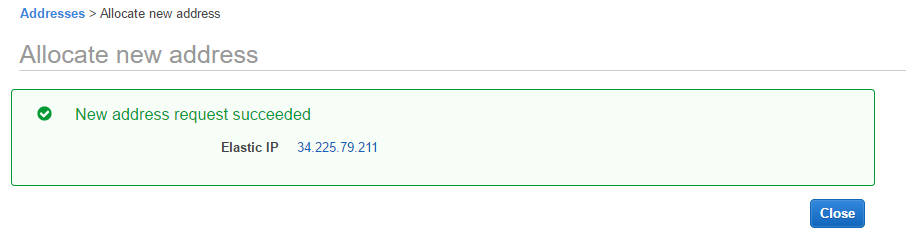
- Click on Close. The Elastic IP page will be visible. Choose Elastic IP and click on Actions | Associate address.

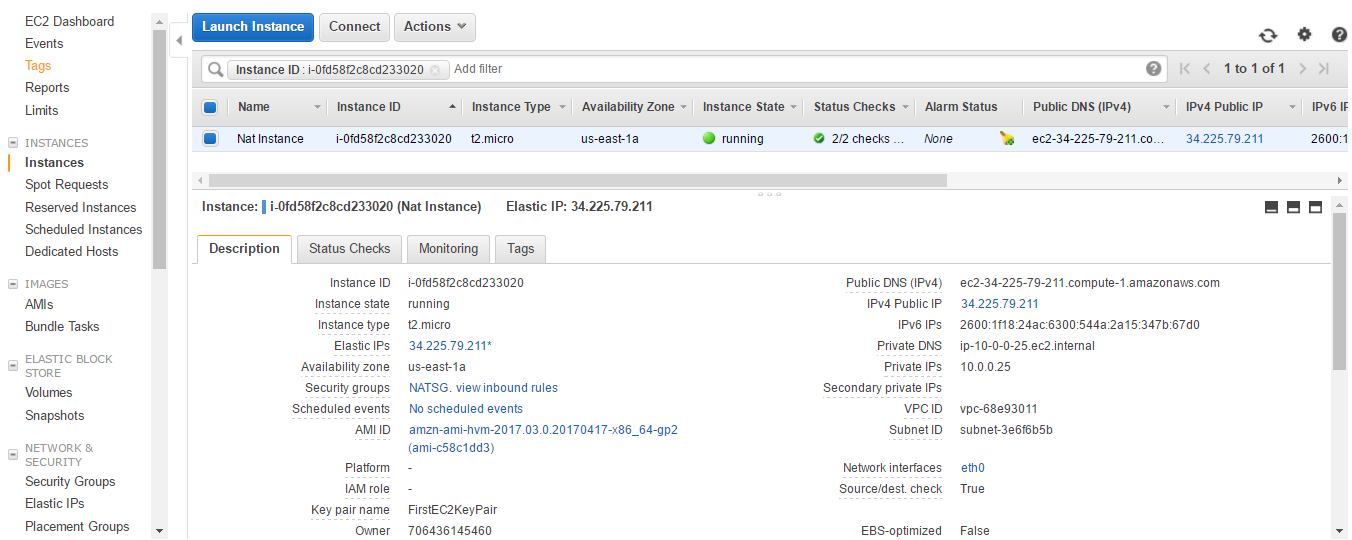
- Choose Instance in the Resource type. Select Nat Instance from the Instance drop-down menu. Click on Associate. A success message is shown.

- Go to the Instances menu. You can see that the public DNS and IPv4 public IP has changed. You can see Change Source/Dest. Check is true for the instance.
- Select Actions | Networking | Change Source/Dest. Check.
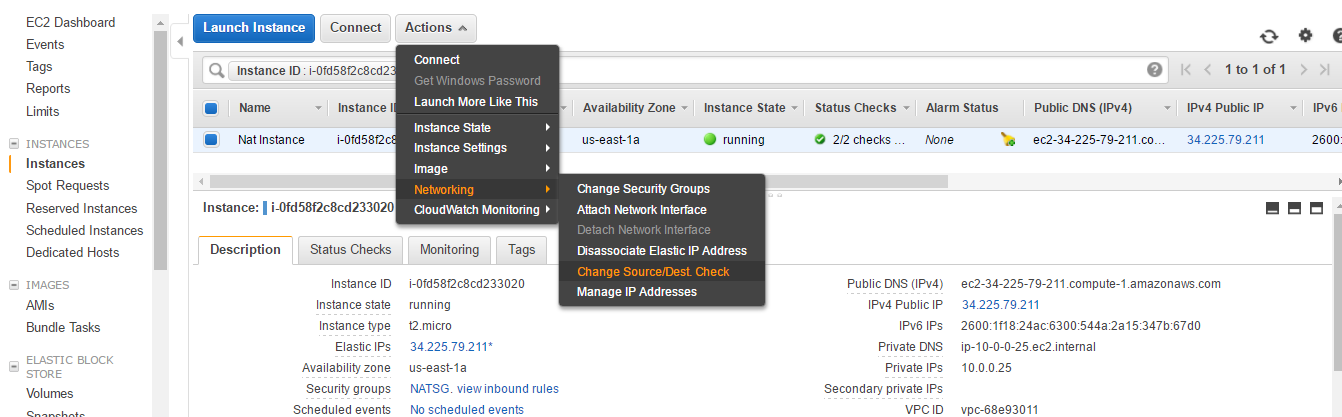
- You can see that Change Source/Dest. Check is now false.

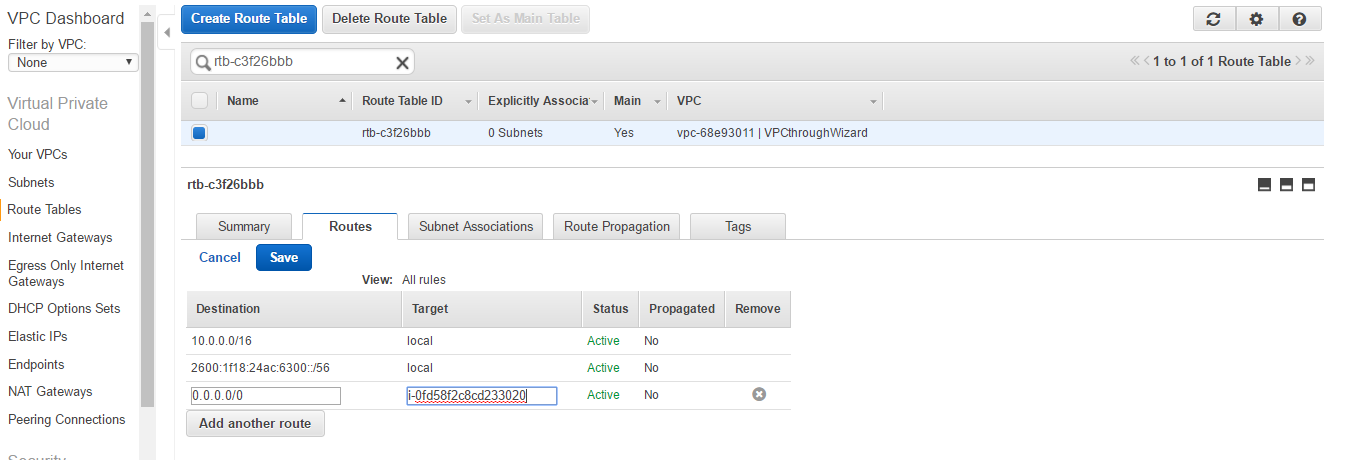
- We need to update the main Route Table attached to the VPC. Let's go back to the VPC dashboard and select our VPC.
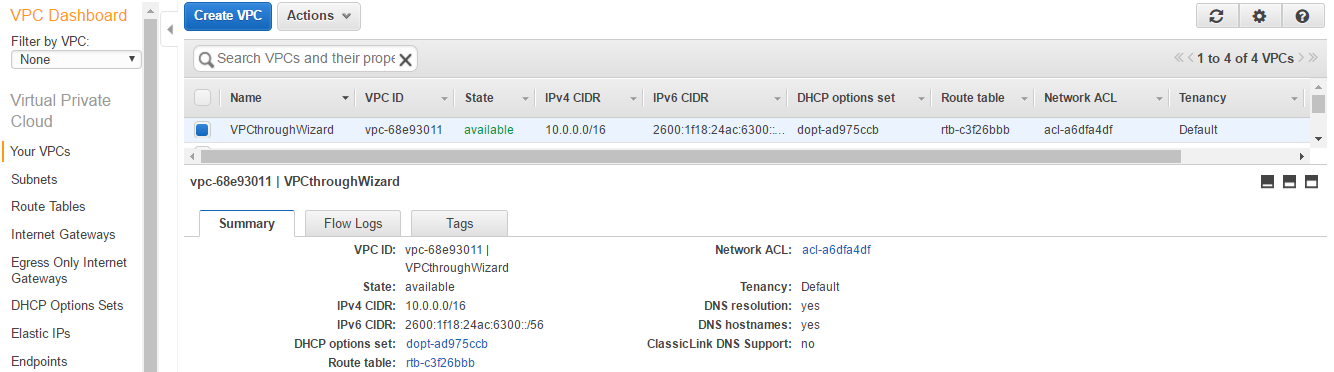
- Click on the Route Tables starting with rtb.

- Select the Route Table and navigate to the Routes tab. Click on the Edit button. Add 0.0.0.0/0 in the destination and the NAT instance ID in Target. Click Save.
How it works...
By default, EC2 instance can either be a source or destination for network traffic request or response. However, NAT instances need to forward requests to the internet that were originated from a private subnet and return the response back to them. That's why we need to disable the source destination check for NAT instance.
There's more...
NAT instance does not support IPv6. To support NAT for IPv6 we need to create an Egress-Only Internet Gateway from the VPC console and attach it to main Route Table.
Working with network interfaces
Elastic Network Interface (ENI) in AWS is a network interface that can be attached to an EC2 instance. Based on its capacity, one EC2 instance can have number of ENIs attached to it. Each ENI comes with its own MAC and IP addresses. You can't move the ENI to another subnet after it is created. You can attach an ENI to an EC2 in the same AZ.
Getting ready
We need an AWS account and user with proper permissions for creating an ENI.
How to do it...
Here are the steps to follow:
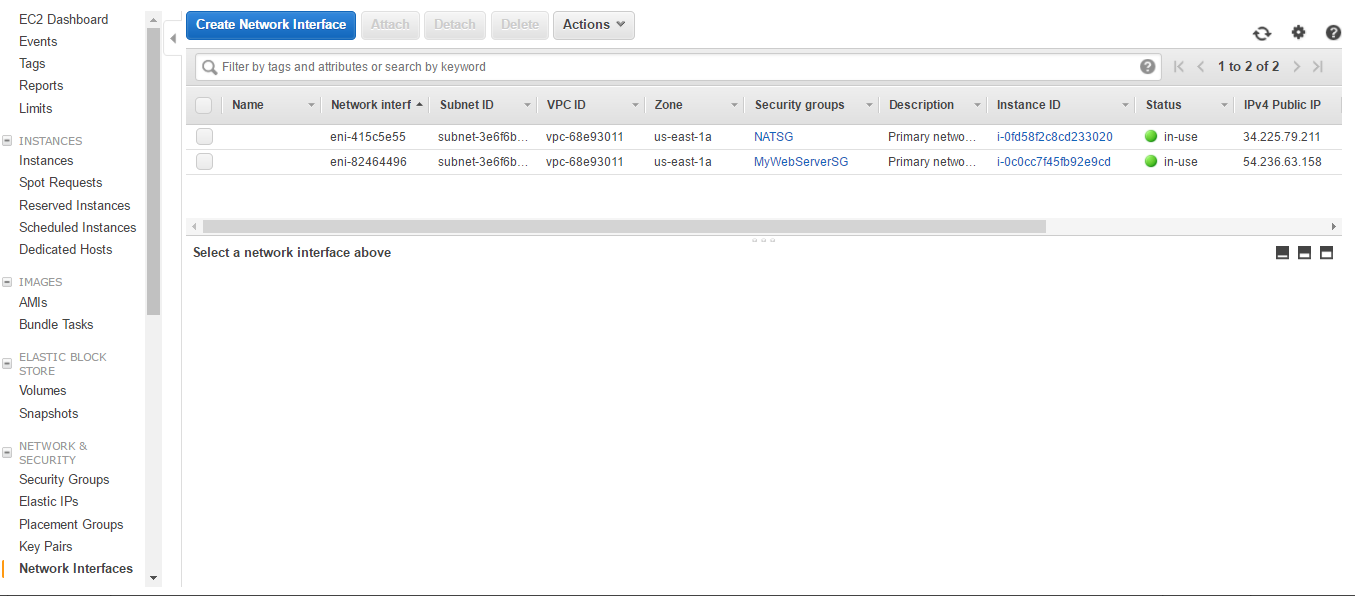
- Log in to the AWS account and browse to https://console.aws.amazon.com/ec2/. In the left navigation menu, choose Network Interfaces.
- Click on Create Network Interface.

- In Description, provide the name. In Subnet, choose subnet where the NIC needs to be created. Leave IPv4 Private IP and IPv6 IP; they will be created as per CIDR range of subnet. Select Security Group. Otherwise, you can mention the IP address from the CIDR range. Click on Yes, Create.

- You can see that only one network interface is created. However, its status is available as it is not attached to any instance. Click on the Attach button.
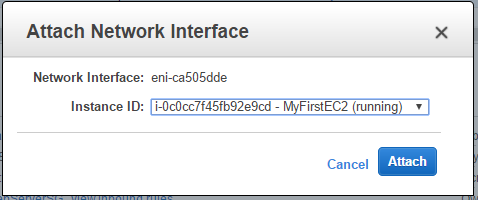
- Choose the EC2 Instance ID with which you want to attach it. Click Attach.

- You can see that the interface is in use. You can Detach it and attach it to some other instance. From the Action menu you can manage the ENI. Click on Instance ID.
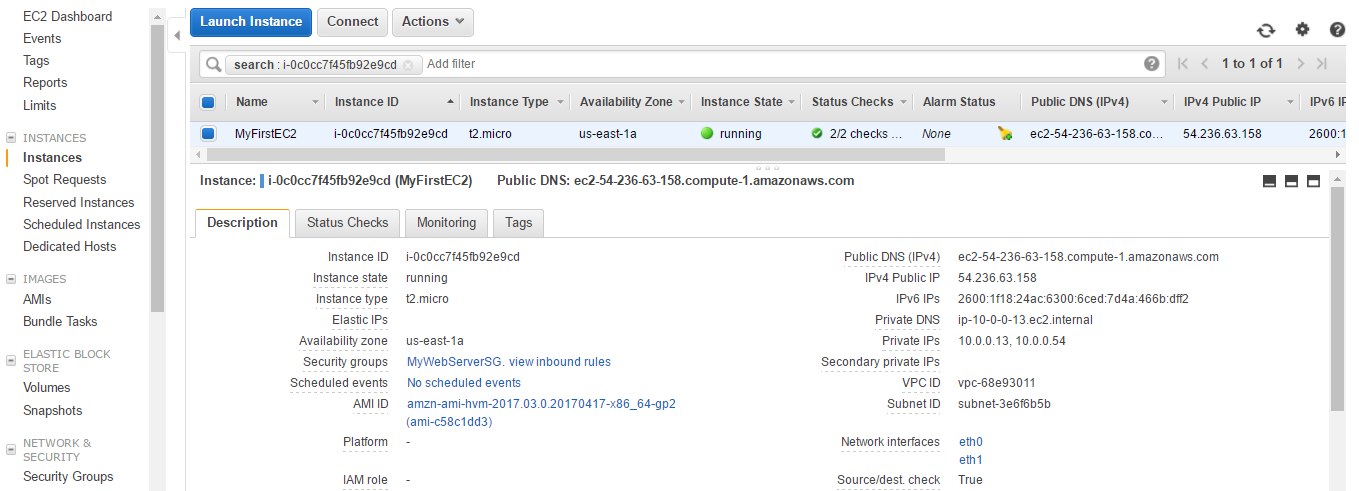
- You can see two private IPs and two network interfaces eth0 and eth1.
Configuring AWS CLI
The AWS CLI is a collection of tools for managing AWS services from the command-line. We can create the script using CLI to automate AWS resource management. AWS CLI can be installed with an installer (Windows) or by using a pip or a package manager for Python.
Getting ready
Keep the user access key details handy that we created in the earlier section.
How to do it...
Here are the steps to follow:
- Installation for Windows:
- Download the installer compatible with your system:
- Windows 64-bit: https://s3.amazonaws.com/aws-cli/AWSCLI64.msi
- Windows 32-bit: https://s3.amazonaws.com/aws-cli/AWSCLI32.msi
- Run the installer and follow the instructions that appear
- Download the installer compatible with your system:
- Installation for Linux, macOS, or Unix:
You should have a working version of Python 2.6.5+ or 3.5+ in your system. Otherwise, install python in your system first. Check your Python installation:
$ python --version
Follow the given steps to install AWS CLI using bundled installer:
Download the AWS CLI bundled installer. For Linux flavor the command is as follows:
$ cURL "https://s3.amazonaws.com/aws-cli/aws-cli-bundle.zip" - "awscli-bundle.zip"
The package need to be unzipped. For Linux flavor the command is as following:
$sudo ./awscli-bundle/install –i /usr/local/aws -b /usr/local/bin/aws
- Configuration:
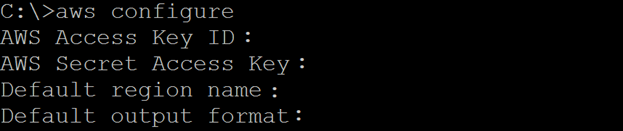
Type aws configure in command prompt or shell depending on your machine operating system. It will ask for the required details. Provide AWS Access Key ID and AWS Secret Access Key that were generated while creating an admin user. You can mention us-east-1 as the default region or choose any other region from the list given in the screenshot following and JSON as Default output format. Don't worry if you don't understand region for now. We shall take a detailed look at in the following section.
You are all set for creating, modifying and managing networking components through API/CLI call in AWS depending on AWS privilege that your user have.


