


Connecting to Amazon Redshift using Jupyter Notebook
The Jupyter Notebook is an interactive web application that enables you to analyze your data interactively. Jupyter Notebook is widely used by users such as business analysts and data scientists to perform data wrangling and exploration. Using Jupyter Notebook, you can access all the historical data available in an Amazon Redshift data warehouse (serverless or provisioned cluster) and combine that with data in many other sources, such as an Amazon S3 data lake. For example, you might want to build a forecasting model based on historical sales data in Amazon Redshift combined with clickstream data available in the data lake. Jupyter Notebook is the tool of choice due to the versatility it provides with exploration tasks and the strong support from the open source community. This recipe covers the steps to connect to an Amazon Redshift data warehouse using Jupyter Notebook.
Getting ready
To complete this recipe, you will need:
- An IAM user with access to Amazon Redshift, Amazon EC2, and Amazon Secrets Manager.
- An Amazon Redshift data warehouse (serverless or provisioned cluster) in a VPC. For more information, visit https://docs.aws.amazon.com/redshift/latest/mgmt/getting-started-cluster-in-vpc.html.
- A notebook instance (such as Amazon SageMaker) running the Jupyter Notebook in the same VPC as Amazon Redshift (https://docs.aws.amazon.com/sagemaker/latest/dg/howitworks-create-ws.html).
- Modify the security group attached to the Amazon Redshift cluster to allow connection from the Amazon SageMaker notebook instance.
- Store the database credentials in Amazon Secrets Manager using Recipe 2 in Appendix.
How to do it…
The following steps will help you connect to an Amazon Redshift cluster using an Amazon SageMaker notebook:
- Open the AWS Console and navigate to the Amazon SageMaker service.
- Navigate to your notebook instance and open JupyterLab. When using the Amazon SageMaker notebook, find the notebook instance that was launched and click on the Open JupyterLab link, as shown in the following screenshot:
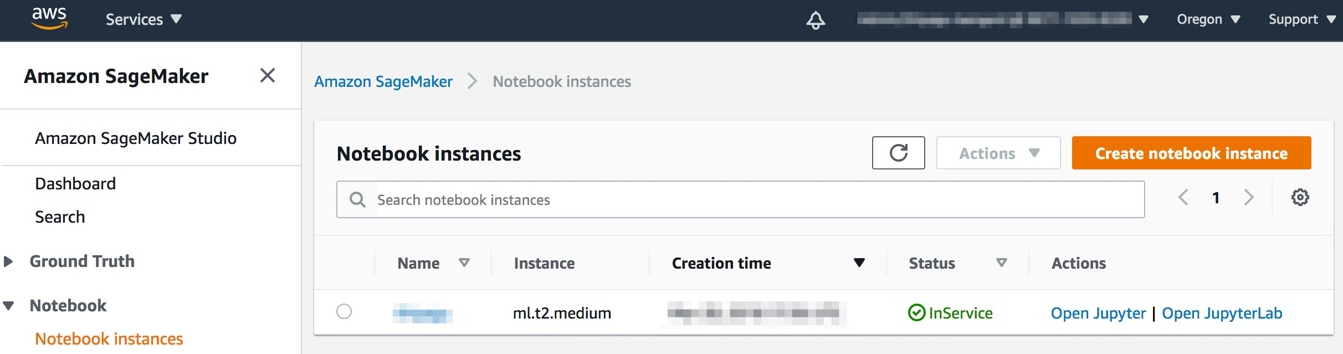
Figure 1.12 – Navigating to JupyterLab using the AWS Console
- Now, let’s install the Python driver libraries to connect to Amazon Redshift using the following code in the Jupyter Notebook. Set the kernel as
conda_python3:!pip install psycopg2-binary ### boto3 is optional, but recommended to leverage the AWS Secrets Manager storing the credentials Establishing a Redshift Connection !pip install boto3Important Note
You can connect to an Amazon Redshift cluster using Python libraries such as Psycopg (https://pypi.org/project/psycopg2-binary/) or pg (https://www.postgresql.org/docs/7.3/pygresql.html) to connect to the Notebook. Alternatively, you can also use a JDBC, but for ease of scripting with Python, the following recipes will use either of the preceding libraries.
- Grant the Amazon SageMaker instance permission to use the stored secret. On the AWS Secrets Manager console, click on your secret and find the Secret ARN. Replace the ARN information in the resource section with the following JSON code:
{ "Version": "2012-10-17", "Statement": [ { "Effect": "Allow", "Action": [ "secretsmanager:GetResourcePolicy", "secretsmanager:GetSecretValue", "secretsmanager:DescribeSecret", "secretsmanager:ListSecretVersionIds" ], "Resource": [ "arn:aws:secretsmanager:eu-west-1:123456789012:secret:aes128-1a2b3c" ] } ] } - Now, attach this policy as an inline policy to the execution role for your SageMaker notebook instance. To do this, follow these steps:
- Navigate to the Amazon SageMaker (https://us-west-2.console.aws.amazon.com/sagemaker/) console.
- Select Notebook Instances.
- Click on your notebook instance (the one running this notebook, most likely).
- Under Permissions and Encryption, click on the IAM role link.
- You should now be on an IAM console that allows you to Add inline policy. Click on the link.
- On the Create Policy page that opens, click JSON and replace the JSON lines that appear with the preceding code block.
- Click Review Policy.
- On the next page select a human-friendly name for the policy and click Create policy.
- Finally, paste the ARN for your secret in the following code block of the Jupyter Notebook to connect to the Amazon Redshift cluster:
# Put the ARN of your AWS Secrets Manager secret for your redshift cluster here: secret_arn="arn:aws:secretsmanager:eu-west-1:123456789012:secret:aes128-1a2b3c" # This will get the secret from AWS Secrets Manager. import boto3 import json session = boto3.session.Session() client = session.client( service_name='secretsmanager' ) get_secret_value_response = client.get_secret_value( SecretId=secret_arn ) if 'SecretString' in get_secret_value_response: connection_info = json.loads(get_secret_value_response['SecretString']) else: print("ERROR: no secret data found") # Sanity check for credentials expected_keys = set(['user', 'password', 'host', 'database', 'port']) if not expected_keys.issubset(connection_info.keys()): print("Expected values for ",expected_keys) print("Received values for ",set(connection_info.keys())) print("Please adjust query or assignment as required!") # jdbc:redshift://HOST:PORT/DBNAME import time import psycopg2 database = "dev" con=psycopg2.connect( dbname = database, host = connection_info["host"], port = connection_info["port"], user = connection_info["username"], password = connection_info["password"] ) - Run basic queries against the database. These queries make use of the
cursorclass to execute a basic query in Amazon Redshift:cur = con.cursor() cur.execute("SELECT sysdate") res = cur.fetchall() print(res) cur.close() - Optionally, you can use the code here to connect to Amazon Redshift using Amazon SageMaker notebook: https://github.com/PacktPublishing/Amazon-Redshift-Cookbook-2E/blob/main/Chapter01/Connecting_to_AmazonRedshift_using_JupyterNotebook.ipynb.


