


 Download code from GitHub
Overview
By the end of this chapter, you will be able to encode and modify the different types of Python data structures, including lists, dictionaries, tuples, and sets, and describe the differences between them; create matrices and manipulate both a matrix as a whole and its individual cells; call the zip() function to create different Python structures; find what methods are available for lists, dictionaries, and sets; write a program using the most popular methods for lists, dictionaries, and sets, and convert between different Python data structures.
Introduction
In the previous chapter, you learned the basics of the Python programming language and essential elements such as string and int, as well as how to use conditionals and loops to control the flow of a Python program. By utilizing these elements, you should now be familiar with writing basic programs in Python.
In this chapter, you are going to learn how to use data structures to store more complex types of data that help model actual data and represent it in the real world.
In programming languages, data structures refer to objects that can hold some data together, which means they are used to store a collection of related data.
For instance, you can use a list to store our to-do items for the day. The following is an example that shows how lists are coded:
todo = ["pick up laundry", "buy Groceries", "pay electric
  bills"]
We can also use a dictionary object to store more complex information such as subscribers’ details from our mailing list. Here is an example code snippet, but don’t worry, we will cover this later in this chapter:
User = {
  "first_name": "Jack",
  "last_name":"White",
  "age": 41,
  "email": "jack.white@gmail.com"
}
Here is a tuple of a point in the x-y plane, another data type that will be covered later:
point = (1,2)
And here is a set of points, whose details will come at the end of this chapter:
my_set = {3, 5, 11, 17, 31}
There are four types of data structures in Python: list, tuple, dictionary, and set:
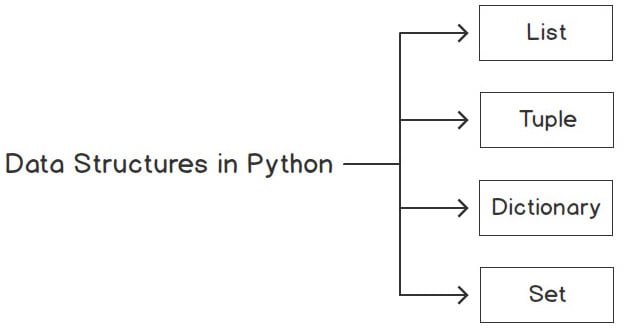
Figure 2.1 – The different data structures in Python
These data structures define the relationship between data and the operations that can be performed on data. They are a way of organizing and storing data that can be accessed efficiently under different circumstances.
In this chapter, we will cover the following topics:
- The power of lists
- List methods
- Matrix operations
- Dictionary keys and values
- Dictionary methods
- Tuples
- A survey of sets
- Choosing types
Let’s start!
Technical requirements
The code files for this chapter are available on GitHub at https://github.com/PacktPublishing/The-Python-Workshop-Second-Edition/tree/main/Chapter02.
The power of lists
You will now look at the first type of data structure in Python: lists.
A list is a type of container in Python that is used to store multiple datasets at the same time. Python lists are often compared to arrays in other programming languages, but they do a lot more.
The following figure shows a list of fruits, along with their respective indices:

Figure 2.2 – A Python list with a positive index
A list in Python is written within square brackets, [ ]. Each element in the list has its own distinct index. The elements in a list have a finite sequence. Like other programming languages, the index of the first item of a list is 0, the second item has an index of 1, and so on. This has to do with how lists are implemented at a lower programming level, so do take note of this when you are writing index-based operations for lists and other iterable objects.
You will now look at the different ways that lists can be useful.
Exercise 21 – working with Python lists
In this exercise, you will learn how to work with a Python list by coding and creating a list and adding items to it. For example, this could prove useful if you have to use a list to store the items that are in a shopping cart:
- Open a new Jupyter Notebook.
- Now, enter the following code snippet:
shopping = ["bread","milk", "eggs"]
print(shopping)
The output is as follows:
['bread', 'milk', 'eggs']
Here, you created a list called shopping with bread, milk, and eggs inside it.
Since a list is a type of iterable in Python, you can use a for loop to iterate over all of the elements inside a list.
- Now, enter and execute the code for a
forloop and observe the output:for item in shopping:
print(item)
The output is as follows:
bread
milk
egg
Note
Python lists are different from arrays used in other languages, such as Java and C#. Python allows mixed types in a list – that is, int and string.
- Now, use a
mixedtype of data within the list’s content and enter the following code in a new cell:mixed = [365, "days", True]
print(mixed)
The output is as follows:
[365, 'days', True]
But you might be wondering, in that case, shouldn’t we be allowed to store a list of lists inside a list? We will take an in-depth look at nested lists, which can be used to represent complex data structures, after the next section.
In this exercise, you were introduced to the basics of Python lists.
Now, let’s see what list methods are available in Python.
List methods
Since a list is a type of sequence, it supports all sequence operations and methods.
Lists are one of the best data structures to use. Python provides a set of list methods that makes it easy for us to store and retrieve values to maintain, update, and extract data. These common operations are what Python programmers perform, including slicing, sorting, appending, searching, inserting, and removing data.
You will learn about these handy list methods in the following exercises.
Exercise 22 – basic list operations
In this exercise, you are going to use the basic functions of lists to check the size of a list, combine lists, and duplicate lists:
- Open a new Jupyter notebook.
- Type the following code:
shopping = ["bread","milk", "eggs"]
- The length of a list can be found using the global
len()function:print(len(shopping))
Note
The len() function returns the number of items in an object. When the object is a string, it returns the number of characters in the string.
The output is as follows:
3
- Now, concatenate two lists using the
+operator:list1 = [1,2,3]
list2 = [4,5,6]
final_list = list1 + list2
print(final_list)
You will get the following output:
[1, 2, 3, 4, 5, 6]
As you can see, lists also support many string operations, one of which is concatenation, which involves joining two or more lists together.
- Now, use the
*operator, which can be used for repetition in a list, to duplicate elements:list3 = ['oi']
print(list3*3)
It will repeat 'oi' three times, giving us the following output:
['oi', 'oi', 'oi']
You are now familiar with some common operations that Python programmers use to interact with lists.
Accessing an item from a list
Just like other programming languages, in Python, you can use the index method to access elements in a list. You should complete the following exercise while continuing with the previous notebook.
Exercise 23 – accessing an item from shopping list data
In this exercise, you will work with lists and gain an understanding of how you can access items from a list. The following steps will enable you to complete this exercise:
- Open a new Jupyter Notebook.
- Enter the following code in a new cell:
shopping = ["bread","milk", "eggs"]
print(shopping[1])
The output is as follows:
milk
As you can see, the milk value from the shopping list has an index of 1 since the list begins from 0.
- Now, access the first index and replace it with
banana:shopping[1] = "banana"
print(shopping)
The output is as follows:
['bread', 'banana', 'eggs']
The output is as follows:
eggs
The output will print eggs – the last item.
Just like with strings, Python lists support slicing with the : notation in the format of list[i:j], where i is the starting element and j is the last element (non-inclusive).
- Enter the following code to try out a different type of slicing:
print(shopping[0:2])
This prints the first and second elements, producing the following output:
['bread', 'banana']
- Now, to print from the beginning of the list to the third element, run the following:
print(shopping[:3])
The output is as follows:
['bread', 'banana', 'eggs']
- Similarly, to print from the second element of the list until the end, you can use the following:
print(shopping[1:])
The output is as follows:
['banana', 'eggs']
Having completed this exercise, you are now able to access items from a list in different ways.
Adding an item to a list
In the previous section and Exercise 23 – accessing an item from shopping list data, you learned how to access items from a list. Lists are very powerful and are used in many circumstances. However, you often won’t know the data your users want to store beforehand. Here, you are going to look at various methods for adding items to and inserting items into a list.
Exercise 24 – adding items to our shopping list
The append method is the easiest way to add a new element to the end of a list. You will use this method in this exercise to add items to our shopping list:
- In a new cell, type the following code to add a new element,
apple, to the end of the list using theappendmethod:shopping = ["bread","milk", "eggs"]
shopping.append("apple")print(shopping)
Let’s see the output:
['bread', 'milk', 'eggs', 'apple']
The append method is commonly used when you are building a list without knowing what the total number of elements will be. You will start with an empty list and continue to add items to build the list.
- Now, create an empty list,
shopping, and keep adding items one by one to this empty list:shopping = []
shopping.append('bread')shopping.append('milk')shopping.append('eggs')shopping.append('apple')print(shopping)
Here’s the output:
['bread', 'milk', 'eggs', 'apple']
This way, you start by initializing an empty list, and you extend the list dynamically. The result is the same as the list from the previous code. This is different from some programming languages, which require the array size to be fixed at the declaration stage.
- Now, use the
insertmethod to add elements to theshoppinglist:shopping.insert(2, 'ham')
print(shopping)
The output is as follows:
['bread', 'milk', 'ham', 'eggs', 'apple']
As you coded in Step 3, you came across another way to add an element to a list: using the insert method. The insert method requires a positional index to indicate where the new element should be placed. A positional index is a zero-based number that indicates the position in a list. You can use ham to insert an item in the third position.
In the preceding code, you can see that ham has been inserted in the third position and shifts every other item one position to the right.
Having concluded this exercise, you are now able to add elements to our shopping list. This proves to be very useful when you get data from a customer or client, allowing you to add items to your list.
Exercise 25 – looping through a list
It’s common to generate new lists by looping through previous lists. In the following exercise, you will loop through a list of the first 5 primes to generate a list of the squares of the first 5 primes:
- In a new cell, enter the first 5 primes in a list called
primes.primes = [2, 3, 5, 7, 11]
- Now create an empty list,
primes_squared, then loop through theprimeslist andappendthe square of each prime, as follows:primes_squared = []
for i in primes:
primes_squared.append(i**2)
print(primes_squared)
The output is as follows:
[4, 9, 25, 49, 121]
This is the standard way to loop through lists to generate new lists. In Chapter 7, Becoming Pythonic, you will learn about a new way of using list comprehensions.
Now, let’s examine matrices as nested lists.
Matrices as nested lists
Most of the data we store in the real world is in the form of a tabular data table – that is, rows and columns – instead of a one-dimensional flat list. Such tables are called matrices or two-dimensional arrays. Python (and most other programming languages) does not provide a table structure out of the box. A table structure is simply a way to present data.
What you can do is present the table structure shown in Figure 2.3 using a list of lists; for example, let’s say you want to store the following fruit orders using a list:
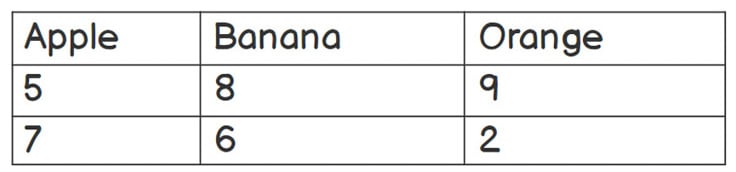
Figure 2.3 – A representation of lists of lists as a matrix
Mathematically, you can present the information shown in Figure 2.3 using a 2 x 3 (2 rows by 3 columns) matrix. This matrix would look like this:
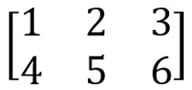
Figure 2.4 – A matrix representation of data
In the next exercise, you will learn how to store this matrix as a nested list.
Exercise 26 – using a nested list to store data from a matrix
In this exercise, you will look at working with a nested list, storing values in it, and accessing it using several methods:
- Open a new Jupyter notebook.
- Enter the following code in a new cell:
m = [[1, 2, 3], [4, 5, 6]]
We can store the matrix as a series of lists inside a list, which is called a nested list.
We can now access the elements using the [row][column] variable notation.
- Print the element indexed as the first row and first column:
print(m[1][1])
The output is as follows:
5
It prints the value of row 2, column 2, which is 5 (remember, we are using a zero-based index offset).
- Now, access each of the elements in the nested list matrix by retaining their reference index with two variables,
iandj:for i in range(len(m)):
for j in range(len(m[i])):
print(m[i][j])
The preceding code uses a for loop to iterate twice. In the outer loop (i), we iterate every single row in the m matrix, and in the inner loop (j), we iterate every column in the row. Finally, we print the element in the corresponding position.
The output is as follows:
1
2
3
4
5
6
- Use two
for..inloops to print all the elements within the matrix:for row in m:
for col in row:
print(col)
The for loop in the preceding code iterates both row and col. This type of notation does not require us to have prior knowledge of the matrix’s dimensions.
The output is as follows:
1
2
3
4
5
6
You now know how a nested list stored as a matrix works, and how to access values from nested lists. In the next activity, you will implement these concepts to store employee data.
Activity 6 – using a nested list to store employee data
In this activity, you are going to store table data using a nested list. Imagine that you are currently working in an IT company and have been given a list of employees. You are asked by your manager to use Python to store this data for further company use.
This activity aims to help you use nested lists to store data and print them as you need them.
The data provided to you by your company is shown in Figure 2.5:
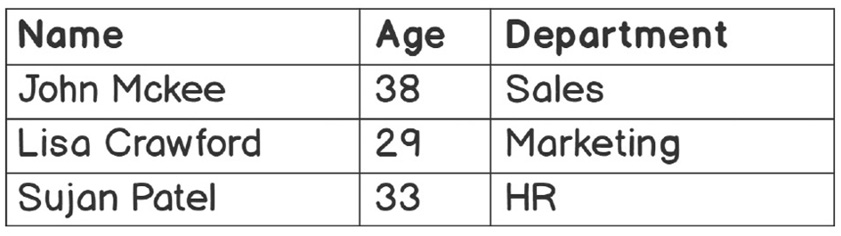
Figure 2.5 – Table consisting of employee data
Follow these steps to complete this activity:
- Open a new Jupyter Notebook.
- Create a list and assign it to
employees. - Create three nested lists in
employeesto store the information of each employee, respectively. - Print the
employeesvariable. - Print the details of all employees in a presentable format.
- Print only the details of
Lisa Crawford.
By printing the details in a presentable format, the output will be as follows:
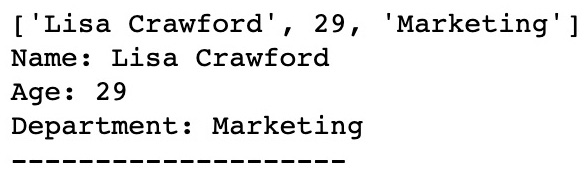
Figure 2.6 – Printed details of an employee using lists
Note
The solution for this activity can be found in Appendix on GitHub.
In the next section, you will learn more about matrices and their operations.
Matrix operations
Let’s learn how to use nested lists to perform basic matrix operations. Although many developers use NumPy to perform matrix operations, it’s very useful to learn how to manipulate matrices using straight Python. First, you will add two matrices in Python. Matrix addition requires both matrices to have the same dimensions; the results will also be of the same dimensions.
In the next exercise, you will perform matrix operations.
Exercise 27 – implementing matrix operations (addition and subtraction)
In this exercise, you will use the matrices in the following figures:
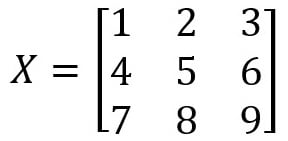
Figure 2.7 – Matrix data for the X matrix
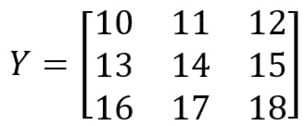
Figure 2.8 – Matrix data for the Y matrix
Now, let’s add and subtract the X and Y matrices using Python.
The following steps will enable you to complete this exercise:
- Open a new Jupyter Notebook.
- Create two nested lists,
XandY, to store the values:X = [[1,2,3],[4,5,6],[7,8,9]]
Y = [[10,11,12],[13,14,15],[16,17,18]]
- Initialize a 3 x 3 zero matrix called
resultas a placeholder:# Initialize a result placeholder
result = [[0,0,0],
[0,0,0],
[0,0,0]]
- Now, implement the algorithm by iterating through the cells and columns of the matrix:
# iterate through rows
for i in range(len(X)):
# iterate through columns
for j in range(len(X[0])):
result[i][j] = X[i][j] + Y[i][j]
print(result)
As you learned in the previous section, first, you iterate the rows in the X matrix, then iterate the columns. You do not have to iterate the Y matrix again because both matrices are of the same dimensions. The result of a particular row (denoted by i) and a particular column (denoted by j) equals the sum of the respective row and column in the X and Y matrices.
The output will be as follows:
[[11, 13, 15], [17, 19, 21], [23, 25, 27]]
- You can also perform subtraction using two matrices using the same algorithm with a different operator. The idea behind this is the same as in Step 3, except you are doing subtraction. You can implement the following code to try out matrix subtraction:
X = [[10,11,12],[13,14,15],[16,17,18]]
Y = [[1,2,3],[4,5,6],[7,8,9]]
# Initialize a result placeholder
result = [[0,0,0],
[0,0,0],
[0,0,0]]
# iterate through rows
for i in range(len(X)):
# iterate through columns
for j in range(len(X[0])):
result[i][j] = X[i][j] - Y[i][j]
print(result)
Here is the output:
[[9, 9, 9], [9, 9, 9], [9, 9, 9]]
In this exercise, you were able to perform basic addition and subtraction using two matrices. In the next section, you will perform multiplication on matrices.
Matrix multiplication operations
Let’s use nested lists to perform matrix multiplication for the two matrices shown in Figures 2.9 and 2.10:
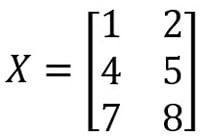
Figure 2.9 – The data of the X matrix

Figure 2.10 – The data of the Y matrix
For matrix multiplication, the number of columns in the first matrix (X) must equal the number of rows in the second matrix (Y). The result will have the same number of rows as the first matrix and the same number of columns as the second matrix. In this case, the resulting matrix will be a 3 x 4 matrix.
Exercise 28 – implementing matrix operations (multiplication)
In this exercise, your end goal will be to multiply two matrices, X and Y, and get an output value. The following steps will enable you to complete this exercise:
- Open a new Jupyter notebook.
- Create two nested lists,
XandY, to store the value of theXandYmatrices:X = [[1, 2], [4, 5], [3, 6]]
Y = [[1,2,3,4],[5,6,7,8]]
- Create a zero-matrix placeholder to store the result:
result = [[0, 0, 0, 0], [0, 0, 0, 0], [0, 0, 0, 0]]
- Implement the matrix multiplication algorithm to compute the result:
# iterating by row of X
for i in range(len(X)):
# iterating by column by Y
for j in range(len(Y[0])):
# iterating by rows of Y
for k in range(len(Y)):
result[i][j] += X[i][k] * Y[k][j]
You may have noticed that this algorithm is slightly different from the one you used in Step 3 of Exercise 27 – implementing matrix operations (addition and subtraction). This is because you need to iterate the rows of the second matrix, Y, as the matrices have different shapes, which is what is mentioned in the preceding code snippet.
Let’s look at the output:
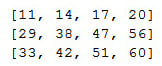
Figure 2.11 – Output of multiplying the X and Y matrices
Note
To review the packages that data scientists use to perform matrix calculations, such as NumPy, check out https://docs.scipy.org/doc/numpy/.
In the next section, you will work with and learn about a new data structure: Python dictionaries.
Dictionary keys and values
A Python dictionary is an unordered collection that contains keys and values. Dictionaries are written with curly brackets, and the keys and values are separated by colons.
Have a look at the following example, where you store the details of an employee:
employee = {
  'name': "Jack Nelson",
  'age': 32,
  'department': "sales"
}
Python dictionaries contain key-value pairs. They simply map keys to associated values, as shown here:
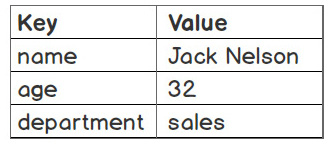
Figure 2.12 – Mapping keys and values in Python dictionaries
Dictionaries are like lists. They both share the following properties:
- Both can be used to store values
- Both can be changed in place and can grow and shrink on demand
- Both can be nested: a dictionary can contain another dictionary, a list can contain another list, and a list can contain a dictionary and vice versa
The main difference between lists and dictionaries is how elements are accessed. List elements are accessed by their position index, which is [0,1,2…], while dictionary elements are accessed via keys. Therefore, a dictionary is a better choice for representing collections, and mnemonic keys are more suitable when a collection’s items are labeled, as in the database record shown in Figure 2.13. The database here is equivalent to a list, and the database list contains a record that can be represented using a dictionary. Within each record, there are fields to store respective values, and a dictionary can be used to store a record with unique keys mapped to values:
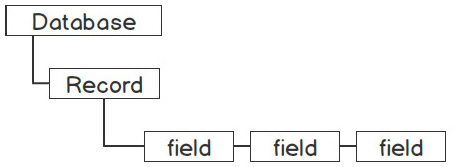
Figure 2.13 – A sample database record
There are, however, a few rules that you need to remember with Python dictionaries:
- Keys must be unique – no duplicate keys are allowed
- Keys must be immutable – they can be strings, numbers, or tuples
You will work with dictionaries and store a record in the next exercise.
Exercise 29 – using a dictionary to store a movie record
In this exercise, you will be working with a dictionary to store movie records, and you will also try and access the information in the dictionary using a key. The following steps will enable you to complete this exercise:
- Open a Jupyter Notebook.
- Enter the following code in a blank cell:
movie = {"title": "The Godfather",
"director": "Francis Ford Coppola",
"year": 1972,
"rating": 9.2
}
Here, you have created a movie dictionary with a few details, such as title, director, year, and rating.
- Access the information from the dictionary by using a key. For instance, you can use
'year'to find out when the movie was first released using bracket notation:print(movie['year'])
Here’s the output:
1972
- Now, update the dictionary value:
movie['rating'] = (movie['rating'] + 9.3)/2
print(movie['rating'])
The output is as follows:
9.25
As you can see, a dictionary’s values can also be updated in place.
- Construct a
moviedictionary from scratch and extend it using key-value assignment:movie = {}movie['title'] = "The Godfather"
movie['director'] = "Francis Ford Coppola"
movie['year'] = 1972
movie['rating'] = 9.2
As you may have noticed, similar to a list, a dictionary is flexible in terms of size.
- You can also store a list inside a dictionary and store a dictionary within that dictionary:
movie['actors'] = ['Marlon Brando', 'Al Pacino',
'James Caan']
movie['other_details'] = {'runtime': 175,
'language': 'English'
}
print(movie)
The output is as follows:

Figure 2.14 – Output while storing a dictionary within a dictionary
So far, you have learned how to implement nesting in both lists and dictionaries. By combining lists and dictionaries creatively, we can store complex real-world information and model structures directly and easily. This is one of the main benefits of scripting languages such as Python.
Activity 7 – storing company employee table data using a list and a dictionary
Remember the employee dataset, which you previously stored using a nested list? Now that you have learned about lists and dictionaries, you will learn how to store and access our data more effectively using dictionaries that contain lists.
The following table contains employee data:
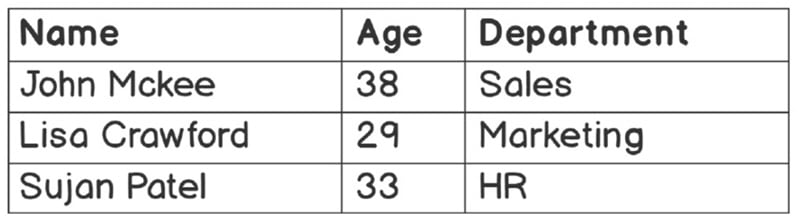
Figure 2.15 – Employee data in a table
Follow these steps to complete this activity:
- Open a Jupyter notebook (you can create a new one or use an existing one).
- Create a list named
employees. - Create three dictionary objects inside
employeesto store the information of eachemployee. - Print the
employeesvariable. - Print the details of all employees in a presentable format.
- Print only the details of
Sujan Patel.
The output is as follows:
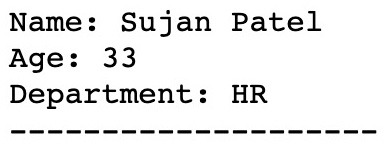
Figure 2.16 – Output when we only print the employee details of Sujan Patel
Note
The solution for this activity can be found in Appendix on GitHub.
Dictionary methods
All Python types, including dictionaries, have their own methods. Since dictionaries include keys and values, it’s common to access them using dictionary methods. In the following exercise, you will use dictionary methods to access and display dictionary elements.
Exercise 30 – accessing a dictionary using dictionary methods
In this exercise, you will learn how to access a dictionary using dictionary methods. The goal of this exercise is to print the order values against the item while accessing dictionary methods:
- Open a new Jupyter Notebook.
- Enter the following code in a new cell:
album_sales = {'barbara':150, 'aretha':75,'madonna':300, 'mariah':220}
print( album_sales.values())
print(list( album_sales.values()))
The output is as follows:
dict_values([150, 75, 300, 220])
 [150, 75, 300, 220]
The values() method in this code returns an iterable object. To use the values straight away, you can wrap them in a list directly.
- Now, obtain a list of keys in a dictionary by using the
keys()method:print(list(album_sales.keys()))
The output is as follows:
['barbara', 'aretha', 'madonna', 'mariah']
- Although you can’t directly iterate a dictionary, you can loop through the dictionary by using the
items()method, as in the following code snippet:for item in album_sales.items():
print(item)
The output is as follows:
('barbara', 150)
aretha75('madonna', 300)
('mariah', 220)
In this exercise, you created a dictionary, accessed the keys and values of the dictionary, and looped through the dictionary.
The last step, showing the dictionary keys and values in parentheses, presents a new Python type, a tuple, as explained in the next section.
Tuples
A tuple object is similar to a list, but it cannot be changed. Tuples are immutable sequences, which means their values cannot be changed after initialization. You can use a tuple to represent fixed collections of items:
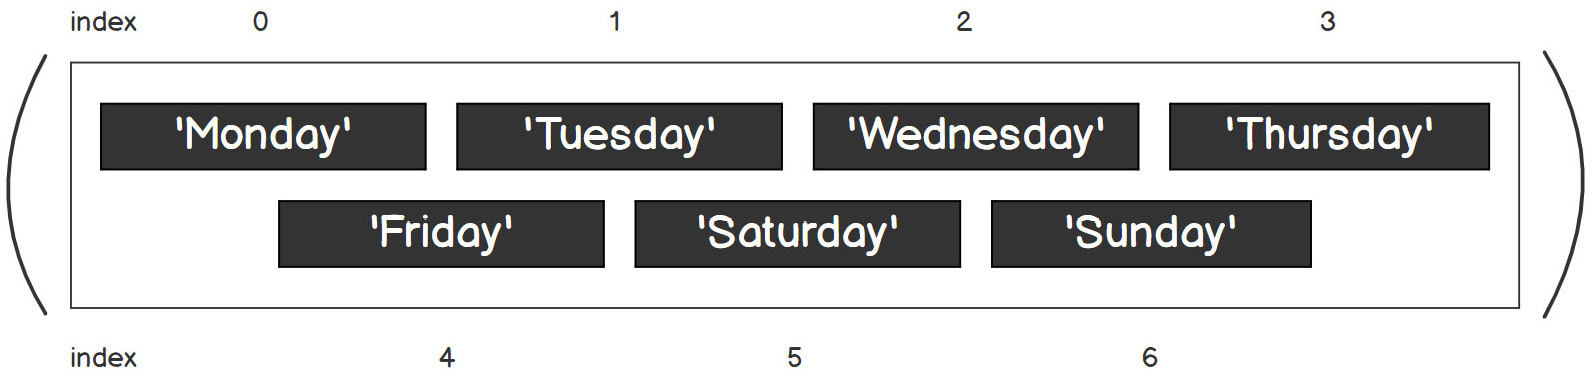
Figure 2.17 – A representation of a Python tuple with a positive index
For instance, you can define the weekdays using a list, as follows:
weekdays_list = ['Monday', 'Tuesday', 'Wednesday',
  'Thursday','Friday','Saturday', 'Sunday']
However, this does not guarantee that the values will remain unchanged throughout their life because a list is mutable. What you can do is define it using a tuple, as shown in the following code:
weekdays_tuple = ('Monday', 'Tuesday', 'Wednesday',
  'Thursday','Friday','Saturday', 'Sunday')
As tuples are immutable, you can be certain that the values are consistent throughout the entire program and will not be modified accidentally or unintentionally. In the next exercise, you will explore the different properties tuples provide a Python developer.
Exercise 31 – exploring tuple properties in a dance genre list
In this exercise, you will learn about the different properties of a tuple:
- Open a Jupyter notebook.
- Type the following code in a new cell to initialize a new tuple,
t:t = ('ballet', 'modern', 'hip-hop')print(len(t))
The output is as follows:
3
Note
Remember, a tuple is immutable; therefore, you can’t use the append method to add a new item to an existing tuple. You can’t change the value of any existing tuple’s elements since both of the following statements will raise an error.
- Now, as mentioned in the note, enter the following lines of code and observe the error:
t[2] = 'jazz'
The output is as follows:

Figure 2.18 – Errors occur when we try to modify the values of a tuple object
The only way to get around this is to create a new tuple by concatenating the existing tuple with other new items.
- Now, use the following code to add two items,
jazzandtap, to our tuple,t. This will give us a new tuple. Note that the existingttuple remains unchanged:print(t + ('jazz', 'tap'))print(t)
('ballet', 'modern', 'hip-hop', 'jazz', 'tap')
('ballet', 'modern', 'hip-hop')
- Enter the following statements in a new cell and observe the output:
t_mixed = 'jazz', True, 3
print(t_mixed)
t_dance = ('jazz',3), ('ballroom',2),('contemporary',5)print(t_dance)
Tuples also support mixed types and nesting, just like lists and dictionaries. You can also declare a tuple without using parentheses, as shown in the code you entered in this step.
('jazz', True, 3)
(('jazz', 3), ('ballroom', 2), ('contemporary', 5))
Zipping and unzipping dictionaries and lists using zip()
Sometimes, you obtain information from multiple lists. For instance, you might have a list to store the names of products and another list just to store the quantity of those products. You can aggregate these lists using the zip() method.
The zip() method maps a similar index of multiple containers so that they can be used as a single object. You will try this out in the following exercise.
Exercise 32 – using the zip() method to manipulate dictionaries
In this exercise, you will work on the concept of dictionaries by combining different types of data structures. You will use the zip() method to manipulate the dictionary with our shopping list. The following steps will help you understand the zip() method:
- Open a new Jupyter Notebook.
- Now, create a new cell and type in the following code:
items = ['apple', 'orange', 'banana']
quantity = [5,3,2]
Here, you have created a list of items and a list of quantity. Also, you have assigned values to these lists.
- Now, use the
zip()function to combine the two lists into a list of tuples:orders = zip(items,quantity)
print(orders)
This gives us a zip() object with the following output:
<zip object at 0x0000000005BF1088>
- Enter the following code to turn that
zip()object into alist:orders = zip(items,quantity)
print(list(orders))
The output is as follows:
[('apple', 5), ('orange', 3), ('banana', 2)]
- You can also turn a
zip()object into atuple:orders = zip(items,quantity)
print(tuple(orders))
Let’s see the output:
(('apple', 5), ('orange', 3), ('banana', 2))
- You can also turn a
zip()object into a dictionary:orders = zip(items,quantity)
print(dict(orders))
Let’s see the output:
{'apple': 5, 'orange': 3, 'banana': 2}
Did you realize that you have to call orders = zip(items,quantity) every time? In this exercise, you will have noticed that a zip() object is an iterator, so once it has been converted into a list, tuple, or dictionary, it is considered a full iteration and it will not be able to generate any more values.
A survey of sets
So far, in this chapter, we have covered lists, dictionaries, and tuples. Now, let’s look at sets, which are another type of Python data structure.
Sets are a relatively new addition to the Python collection type. They are unordered collections of unique and immutable objects that support operations mimicking mathematical set theory. Since sets do not allow multiple occurrences of the same element, they can be used to effectively prevent duplicate values.
A set is a collection of objects (called members or elements). For instance, you can define set A as containing even numbers between 1 to 10, and it will contain {2,4,6,8,10}; set B can contain odd numbers between 1 to 10, and it will contain {1,3,5,7,9}.
The following figure shows a visual of two sets without overlapping values:

Figure 2.19 – Set A and Set B – each set contains a unique, distinct value
In the following exercise, you will work with sets in Python.
Exercise 33 – using sets in Python
In this exercise, you will practice working with sets in Python:
- Open a Jupyter notebook.
- Initialize a set using the following code. You can pass in a list to initialize a set or use curly brackets, as follows:
s1 = set([1,2,3,4,5,6])
print(s1)
s2 = {1,2,2,3,4,4,5,6,6}print(s2)
s3 = {3,4,5,6,6,6,1,1,2}print(s3)
The output is as follows:
{1, 2, 3, 4, 5, 6}
{1, 2, 3, 4, 5, 6}
{1, 2, 3, 4, 5, 6}
Here, you can see that the set is unique and unordered, so duplicate items and the original order are not preserved.
- Enter the following code in a new cell:
s4 = {'martha graham, 'alivin ailey, 'isadora duncan'}print(s4)
You can also initialize a set using curly brackets directly.
The output is as follows:
{'martha graham', 'alvin ailey', 'isadora duncan'}
- Sets are mutable. Type the following code, which shows how to add a new item,
pineapple, to an existing set,s4:s4.add('katherine dunham')print(s4)
The output is as follows:
{'martha graham', 'alvin ailey', 'isadora duncan'}
In this exercise, you were introduced to sets in Python. In the next section, you will dive in a bit deeper and understand the different set operations that Python offers.
Set operations
Sets support common operations such as unions and intersections. A union operation returns a single set that contains all the unique elements in both sets A and B; an intersect operation returns a single set that contains unique elements that belong to set A and also belong to set B at the same time. Let’s look at the union operation in the following figure:

Figure 2.20 – Set A in union with Set B
The following figure represents the intersect operation:
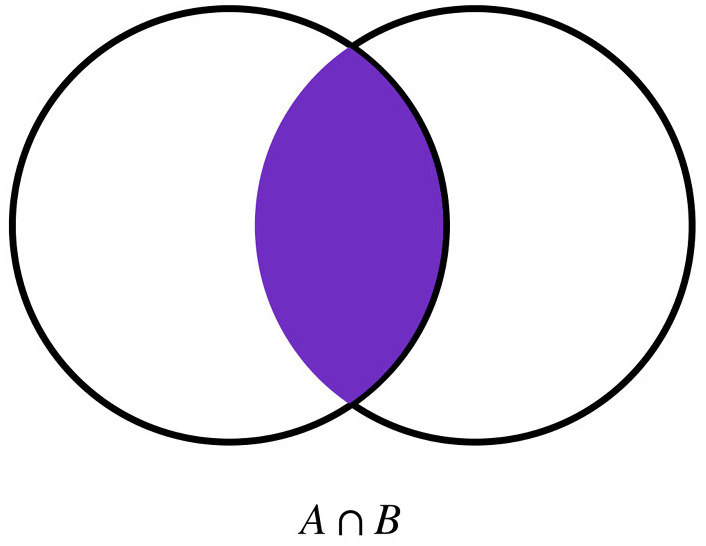
Figure 2.21 – Set A intersects with Set B
Now, let’s implement these set operations in Python in the following exercise.
Exercise 34 – implementing set operations
In this exercise, we will be implementing and working with set operations:
- Open a new Jupyter notebook.
- In a new cell, type the following code to initialize two new sets:
s5 = {1,2,3,4}s6 = {3,4,5,6} - Use the
|operator or theunionmethod for a union operation:print(s5 | s6)
print(s5.union(s6))
The output is as follows:
{1, 2, 3, 4, 5, 6}
{1, 2, 3, 4, 5, 6}
- Now, use the
&operator or theintersectionmethod for anintersectionoperation:print(s5 & s6)
print(s5.intersection(s6))
The output is as follows:
{3, 4}
{3, 4}
- Use the
–operator or thedifferencemethod to find the difference between two sets:print(s5 - s6)
print(s5.difference(s6))
The output is as follows:
{1, 2}
{1, 2}
- Now, enter the
<=operator or theissubsetmethod to check if one set is a subset of another:print(s5 <= s6)
print(s5.issubset(s6))
s7 = {1,2,3}s8 = {1,2,3,4,5}print(s7 <= s8)
print(s7.issubset(s8))
The output is as follows:
False
False
True
True
The first two statements will return false because s5 is not a subset of s6. The last two statements will return True because s5 is a subset of s6. Note that the <= operator is a test for the subset. A proper subset is the same as a general subset, except that the sets cannot be identical. You can try it out in a new cell with the following code.
- Check whether
s7is a formal subset ofs8, and check whether a set can be a proper subset of itself by entering the following code:print(s7 < s8)
s9 = {1,2,3}s10 = {1,2,3}print(s9 < s10)
print(s9 < s9)
The output is as follows:
True
False
False
Here, we can see that s7 is a proper subset of s8 because there are other elements in s8 apart from all the elements of s7. However, s9 is not a subset of s10 because they are identical. Therefore, a set is not a proper subset of itself.
- Now, use the
>=operator or theissupersetmethod to check whether one set is the superset of another. Try this using the following code in another cell:print(s8 >= s7)
print(s8.issuperset(s7))
print(s8 > s7)
print(s8 > s8)
The output is as follows:
True
True
True
False
The first three statements will return True because s8 is the superset of s7 and is also a proper superset of s7. The last statement will return false because no set can be a proper superset of itself.
Having completed this exercise, you now know that Python sets are useful for efficiently preventing duplicate values and are suitable for common math operations such as unions and intersections.
Note
After all the topics covered so far, you may think that sets are similar to lists or dictionaries. However, sets are unordered and do not map keys to values, so they are neither a sequence nor a mapping type; they are a type by themselves.
Choosing types
So far, you have learned about most of the common data structures in Python. One of the challenges you might face is knowing when to use the various data types.
When choosing a collection type, it is useful to understand the unique properties of that type. For example, a list is used to store multiple objects and to retain a sequence, a dictionary is used to store unique key-value pair mappings, tuples are immutable, and sets only store unique elements. Choosing the right type for a particular dataset could mean an increase in efficiency or security.
Consider the following examples:
- Defining points on the x-y coordinate plane:
- List
- Dictionary
- Tuple
- Set
Tuples are preferable for coordinate points that do not change, but some people prefer lists.
- List
- Dictionary
- Tuple
- Set
A list is better than a dictionary here because order matters.
- Finding unique numbers from a bunch of numbers:
- List
- Dictionary
- Tuple
- Set
Sets only include unique instances.
- Organizing a list of books and authors:
- List
- Dictionary
- Tuple
- Set
Dictionaries are ideal for storing attributes regarding people or things.
Although there may be more than one reasonable choice for a data structure, choosing an incorrect type for your data may lead to data loss or low efficiency while running your code, or in the worst case, losing your data altogether.
Summary
To summarize, recall that Python data structures include lists, tuples, dictionaries, and sets. Python provides these structures to enable you to code better as a developer. In this chapter, we covered lists, which are one of the most important data types in Python since they can store multiple objects, as well as other data types, such as dictionaries, tuples, and sets. Each of these data types helps us store and retrieve data effectively.
Data structures are an essential part of all programming languages. Most programming languages only provide basic data types for storing different types of numbers, strings, and Booleans, as you learned in Chapter 1, Python Fundamentals – Math, Strings, Conditionals, and Loops. They are an essential part of any program. In this chapter, you learned that lists and dictionaries may be used to store complex data, including nested lists and mixed data types.
In the next chapter, you are going to learn how to use functions to write modular and understandable code that follows the Don’t Repeat Yourself (DRY) principle.


