


 Download code from GitHub
Introduction to Xamarin
This chapter is all about getting to know what Xamarin is and what to expect from it. It is the only chapter that is a pure theory chapter; all the others will cover hands-on projects. You're not expected to write any code at this point, but instead, simply read through the chapter to develop a high-level understanding of what Xamarin is and how Xamarin.Forms are related to Xamarin.
We will start by defining what a native application is and what .NET as a technology brings to the table. After that, we will look at how Xamarin.Forms fit into the bigger picture and
learn when it is appropriate to use traditional Xamarin and Xamarin.Forms. We often use the term traditional Xamarin to describe applications that don't use Xamarin.Forms, even though Xamarin.Forms applications are bootstrapped through a traditional Xamarin application.
In this chapter, we will be covering the following topics:
- Native applications
- Xamarin and Mono
- Xamarin.Forms
- Setting up a development machine
Let's get started!
Native applications
The term native application means different things to different people. For some people, it is an application that is developed using the tools specified by the creator of the platform, such as an application developed for iOS with Objective-C or Swift, an Android app developed with Java or Kotlin, or a Windows app developed with .NET. Other people use the term native application to refer to applications that are compiled to machine code that is native. In this book, we will define a native application as one that has a native user interface, performance, and API access. The following list explains these three concepts in greater detail:
- Native user interface: Applications built with Xamarin use the standard controls for each platform. This means, for example, that an iOS app built with Xamarin will look and behave as an iOS user would expect, and an Android app built with Xamarin will look and behave as an Android user would expect.
- Native performance: Applications built with Xamarin are compiled for native performance and could use platform-specific hardware acceleration.
- Native API access: Native API access means that applications built with Xamarin could use everything that the target platforms and devices offer to developers.
Xamarin and Mono
Xamarin is a developer platform that is used for developing native applications for iOS (Xamarin.iOS), Android (Xamarin.Android), and macOS (Xamarin.Mac). It is technically a binding layer on top of these platforms. Binding to platform APIs enables .NET developers to use C# (and F#) to develop native applications with the full capacity of each platform. The C# APIs we use when we develop applications with Xamarin are more or less identical to the platform APIs, but they are .NETified. For example, APIs are often customized to follow .NET naming conventions, and Android set and get methods are often replaced by properties. The reason for this is that APIs should be easier to use for .NET developers.
Mono (https://www.mono-project.com) is an open source implementation of the Microsoft .NET framework, which is based on the European Computer Manufacturers Association (ECMA) standards for C# and the common language runtime (CLR). Mono was created to bring the .NET framework to platforms other than Windows. It is part of the .NET foundation (http://www.dotnetfoundation.org), an independent organization that supports open development and collaboration involving the .NET ecosystem.
With the combination of Xamarin platforms and Mono, we will be able to use both all platform-specific APIs and all platform-independent parts of .NET, including, for example, namespaces, systems, System.Linq, System.IO, System.Net, and System.Threading.Tasks.
There are several reasons to use Xamarin for mobile application development, as we will see in the following sections.
Code sharing
If there is one common programming language for multiple mobile platforms, and even server platforms, then we can share a lot of code between our target platforms, as illustrated in the following diagram. All code that isn't related to the target platform can be shared with other .NET platforms. Code that is typically shared in this way includes business logic, network calls, and data models:

There is also a large community based around the .NET platforms and a wide range of third-party libraries and components that can be downloaded from NuGet (https://nuget.org) and used across the .NET platforms.
Code sharing across platforms will lead to shorter development times. It will also lead to applications of a higher quality because we only need to write the code for business logic once. There will be a lower risk of bugs, and we will also be able to guarantee that a calculation will return the same result, no matter what platform our users are using.
Using existing knowledge
For .NET developers who want to start building native mobile applications, it is easier to just learn the APIs for the new platforms than it is to learn programming languages and APIs for both old and new platforms.
Similarly, organizations that want to build native mobile applications could use their existing developers with their knowledge of .NET to develop applications. Because there are more .NET developers than Objective-C and Swift developers, it would be easier to find new developers for mobile application development projects.
Xamarin.iOS
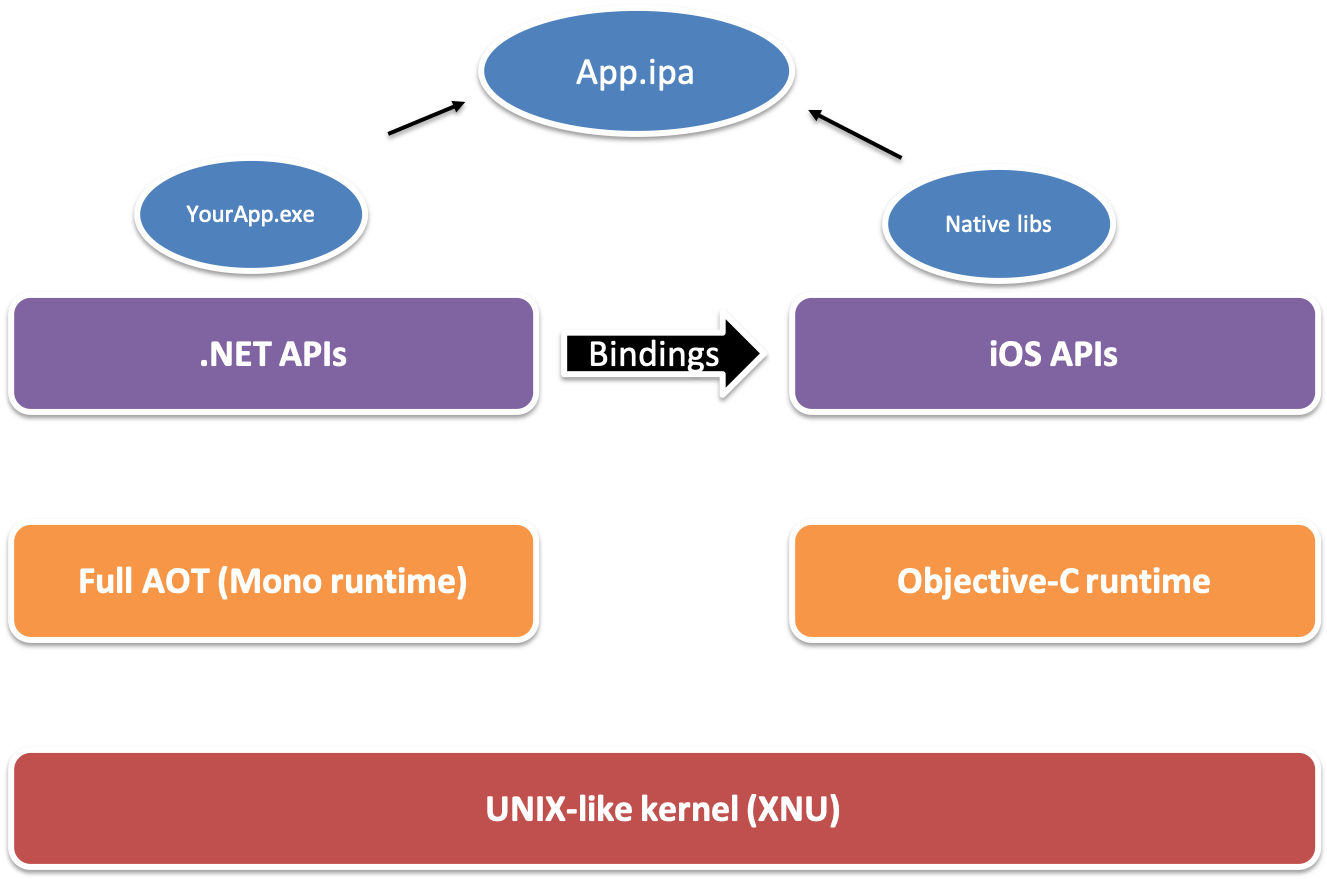
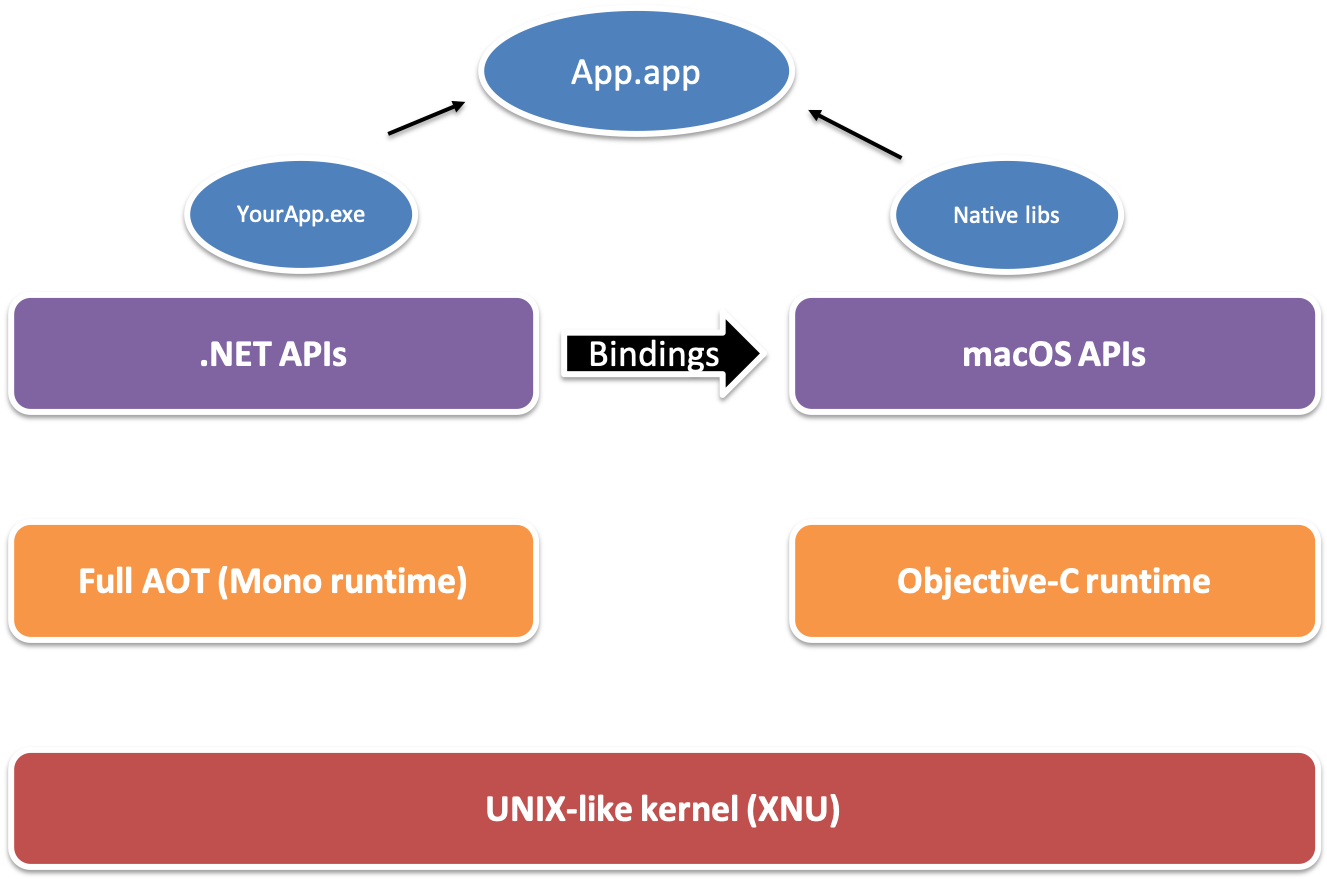
Xamarin.iOS is used for building applications for iOS with .NET, and contains the bindings to the iOS APIs mentioned previously. Xamarin.iOS uses ahead of time (AOT) compiling to compile the C# code to Advanced RISC Machines (ARM) assembly language. The Mono runtime runs along with the Objective-C runtime. Code that uses .NET namespaces, such as System.Linq or System.Net, will be executed by the Mono runtime, while code that uses iOS-specific namespaces will be executed by the Objective-C runtime. Both the Mono runtime and the Objective-C runtime will run on top of the Unix-like kernel, X is Not Unix (XNU) (https://en.wikipedia.org/wiki/XNU), which is developed by Apple. The following diagram shows an overview of the iOS architecture:
Xamarin.Android
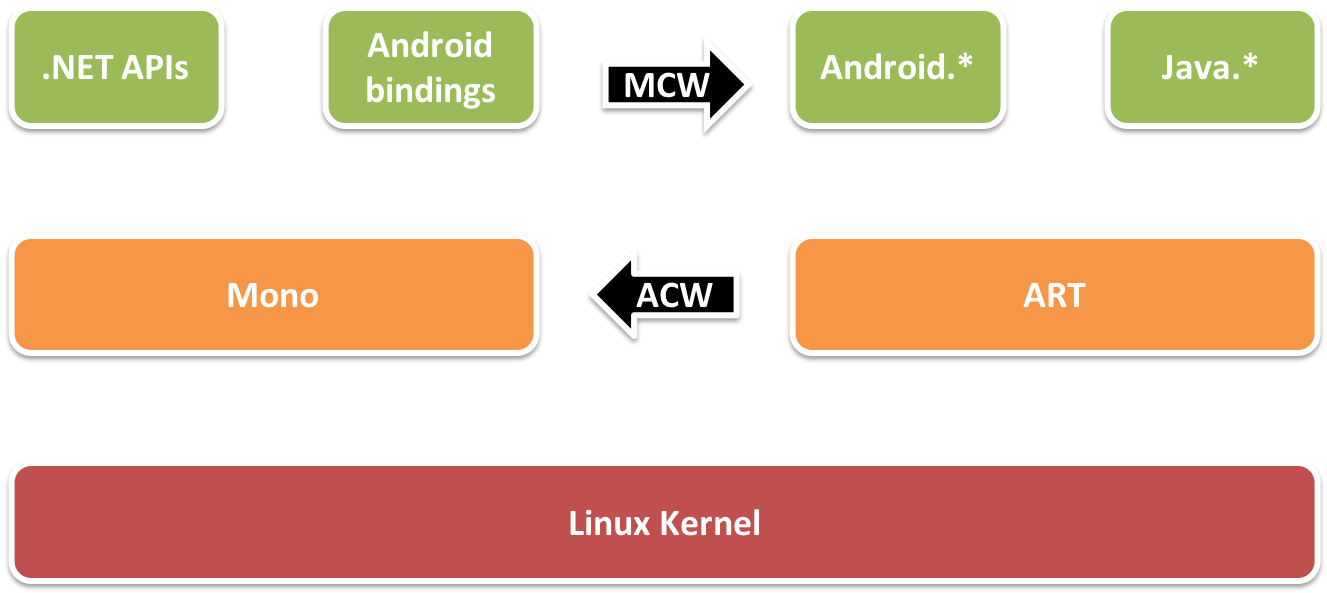
Xamarin.Android is used to build applications for Android with .NET, and contains the bindings to the Android APIs. The Mono runtime and the Android runtime run side by side on top of a Linux kernel. Xamarin.Android applications could either be just-in-time (JIT)-compiled or AOT-compiled, but to AOT-compile them, you need to use Visual Studio Enterprise.
Communication between the Mono runtime and the Android runtime occurs via a Java Native Interface (JNI) bridge. There are two types of JNI bridges: manage callable wrapper (MCW) and Android callable wrapper (ACW). An MCW is used when the code needs to run in the Android runtime (ART) and an ACW is used when ART needs to run code in the Mono runtime, as shown in the following diagram:
Xamarin.Mac
Xamarin.Mac is for building applications for macOS with .NET, and contains the bindings to the macOS APIs. Xamarin.Mac has the same architecture as Xamarin.iOS—the only difference is that Xamarin.Mac applications are JIT compiled, unlike Xamarin.iOS apps, which are AOT-compiled. This is shown in the following diagram:
Xamarin.Forms
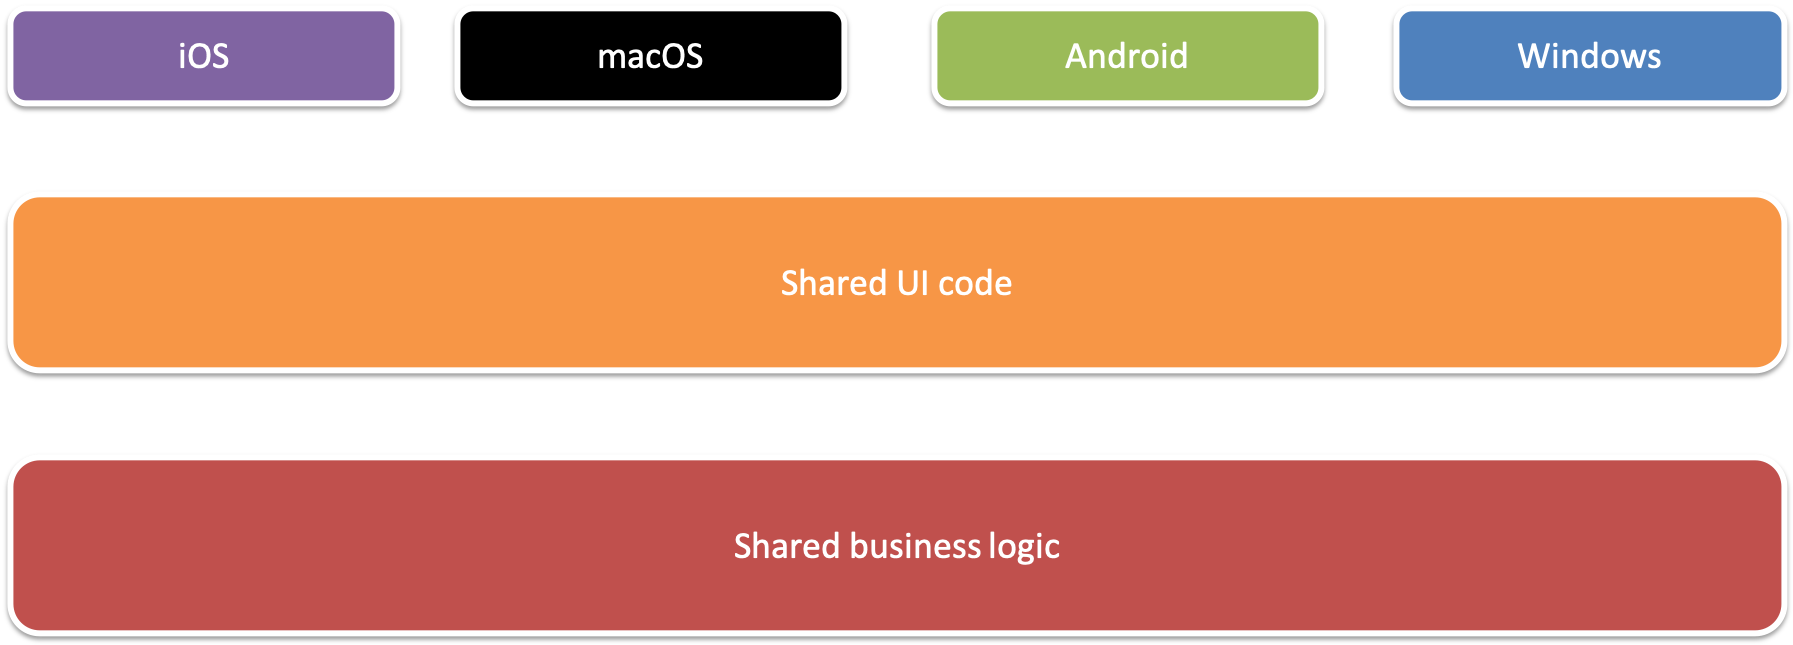
Xamarin.Forms is a UI framework that is built on top of Xamarin (for iOS and Android) and the Universal Windows Platform (UWP). Xamarin.Forms enables developers to create a UI for iOS, Android, and UWP with one shared code base, as illustrated in the following diagram. If we are building an application with Xamarin.Forms, we can use XAML, C#, or a combination of both to create the UI:
The architecture of Xamarin.Forms
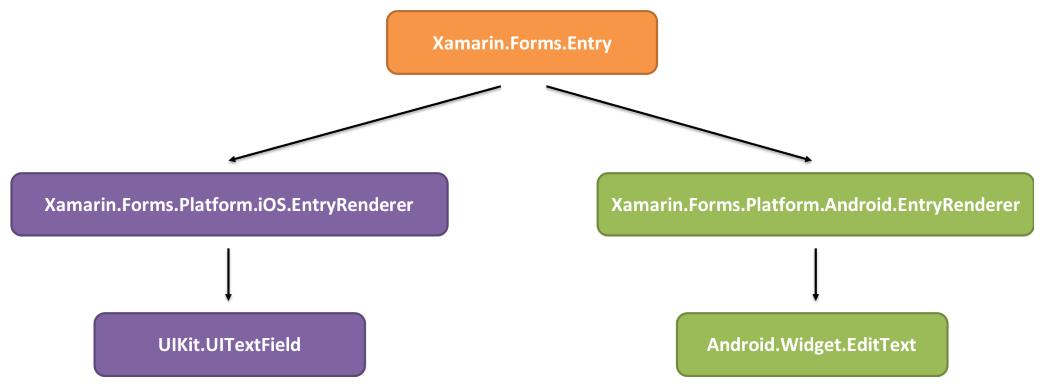
Xamarin.Forms is more or less just an abstract layer on top of each platform. Xamarin.Forms has a shared layer, which is used by all platforms, as well as a platform-specific layer. The platform-specific layer contains renderers. A renderer is a class that maps a Xamarin.Forms control into a platform-specific native control. Each Xamarin.Forms control has a platform-specific renderer.
The following diagram illustrates how an entry control in Xamarin.Forms is rendered to a UITextField control from the UIKit namespace when the shared Xamarin.Forms code is used in an iOS app. The same code in Android renders an EditText control from the Android.Widget namespace:
Defining a user interface using XAML
The most common way to declare your user interface in Xamarin.Forms is by defining it in a XAML document. It is also possible to create the GUI in C#, since XAML is really only a markup language for instantiating objects. You could, in theory, use XAML to create any type of object, as long as it has a parameterless constructor. A XAML document is an Extensible Markup Language (XML) document with a specific schema.
Defining a Label control
As a simple example, let's look at the following snippet of XAML:
<Label Text="Hello World!" />
When the XAML parser encounters this snippet, it will create an instance of a Label object and then set the properties of the object that correspond to the attributes in the XAML. This means that if we set a Text property in XAML, it will set the Text property on the instance of the Label object that is created. The XAML in the preceding example will have the same effect as the following:
var obj = new Label()
{
    Text = "Hello World!"
};
XAML exists to make it easier to view the object hierarchy that you need to create in order to make a GUI. An object model for a GUI is also hierarchical by design, so XAML has support for adding child objects. You can simply add them as child nodes, as follows:
<StackLayout>
    <Label Text="Hello World" />
    <Entry Text="Ducks are us" />
</StackLayout>
The StackLayout is a container control that will organize the children vertically or horizontally within that container. A vertical organization is the default value, and will be used unless you specify otherwise. There are also a number of other containers, such as the Grid and the FlexLayout. These will be used in many of the projects in the following chapters.
Creating a page in XAML
A single control is no good unless it has a container that hosts it. Let's see what an entire page would look like. A fully valid ContentPage defined in XAML is an XML document. This means that we must start with an XML declaration. After that, we must have one, and only one, root node, as shown in the following code:
<?xml version="1.0" encoding="UTF-8"?>
<ContentPage
     xmlns="http://xamarin.com/schemas/2014/forms"
     xmlns:x="http://schemas.microsoft.com/winfx/2009/xaml"
     x:Class="MyApp.MainPage">

    <StackLayout>
        <Label Text="Hello world!" />
    </StackLayout>
</ContentPage>
In the preceding example, we have defined a ContentPage that translates into a single view on each platform. In order to make it valid XAML, you must specify a default namespace (xmlns="http://xamarin.com/schemas/2014/forms") and then add the x namespace (xmlns:x="http://schemas.microsoft.com/winfx/2009/xaml").
The default namespace lets you create objects without prefixing them, like the StackLayout object. The x namespace lets you access properties such as the x:Class, which tells the XAML parser which class to instantiate to control the page when the ContentPage object is being created.
A ContentPage can have only one child. In this case, it's a StackLayout control. Unless you specify otherwise, the default layout orientation is vertical. A StackLayout can, therefore, have multiple children. Later on, we will touch on more advanced layout controls, such as the Grid and the FlexLayout control.
In this specific example, we are going to create a Label control as the first child of the StackLayout.
Creating a page in C#
For clarity, the following code shows how the same thing would look in C#:
public class MainPage : ContentPage
{
}
A page is a class that inherits from the Xamarin.Forms.ContentPage. This class is autogenerated for you if you create a XAML page, but if you go code-only, then you will need to define it yourself.
Let's create the same control hierarchy as the XAML page we defined earlier using the following code:
var page = new MainPage();

var stacklayout = new StackLayout();
stacklayout.Children.Add(
    new Label()
    {
        Text = "Welcome to Xamarin.Forms"
    });

page.Content = stacklayout;
The first statement creates a page. You could, in theory, create a new page directly of the ContentPage type, but this would prohibit you from writing any code behind it. For this reason, it's a good practice to subclass each page that you are planning to create.
The block following this first statement creates the StackLayout control that contains the Label control that is added to the Children collection.
Finally, we need to assign the StackLayout to the Content property of the page.
XAML or C#?
Generally, using XAML will give you a much better overview, since the page is a hierarchical structure of objects and XAML is a very nice way of defining that structure. In code, the structure gets flipped around since you must define the innermost object first, making it harder to read the structure of your page. This was shown in an earlier example in this chapter. Having said that, it is generally a matter of preference as to how you decide to define the GUI. This book will use XAML rather than C# in the projects to come.
Xamarin.Forms versus traditional Xamarin
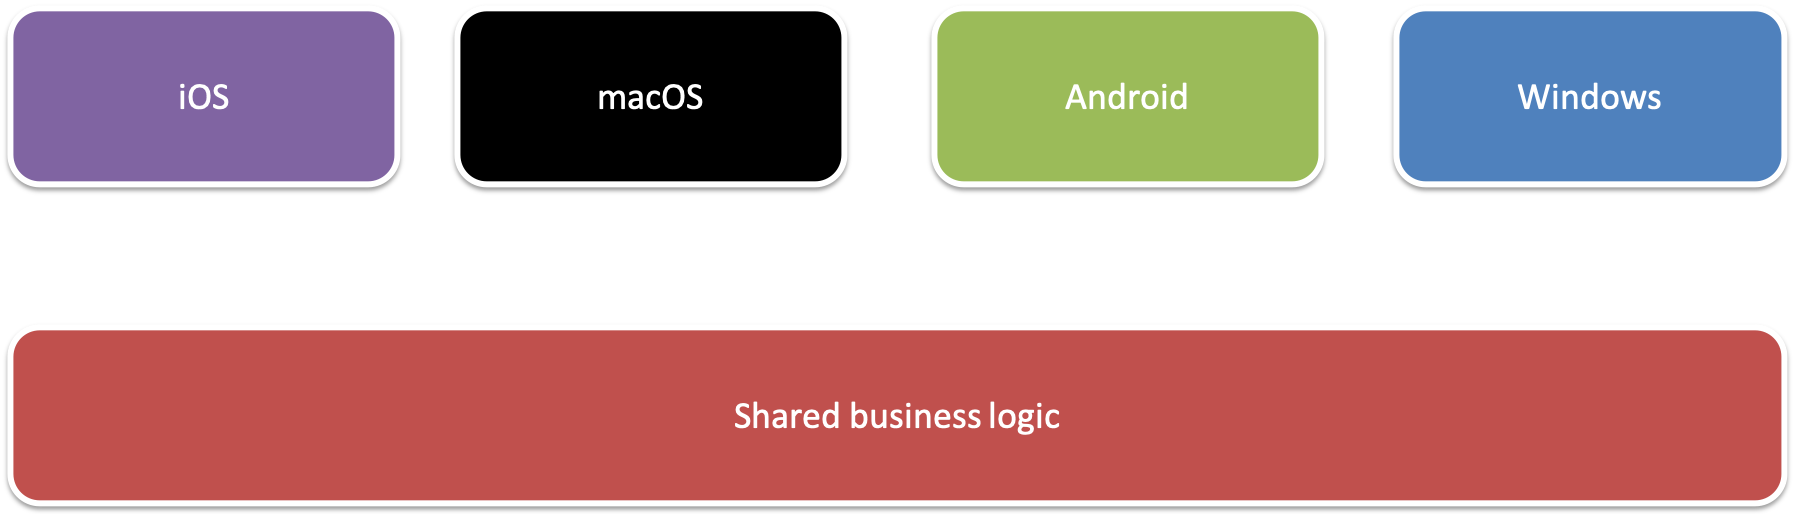
While this book is about Xamarin.Forms, we will highlight the difference between using traditional Xamarin and Xamarin.Forms. Traditional Xamarin is used when developing applications that use iOS and Android SDK without any means of abstraction. For example, we can create an iOS app that defines its user interface in a storyboard or in the code directly. This code will not be reusable for other platforms, such as Android. Applications built using this approach can still share non-platform-specific code by simply referencing a .NET standard library. This relationship is shown in the following diagram:
Xamarin.Forms, on the other hand, is an abstraction of the GUI, which allows us to define user interfaces in a platform-agnostic way. It still builds on top of Xamarin.iOS, Xamarin.Android, and all other supported platforms. The Xamarin.Forms application can be created as a .NET standard library or as a shared code project, where the source files are linked as copies and built within the same project as the platform you are currently building for. This relationship is shown in the following diagram:

Having said that, Xamarin.Forms cannot exist without traditional Xamarin, since it's bootstrapped through an application for each platform. This gives you the ability to extend Xamarin.Forms on each platform using custom renderers and platform-specific code that can be exposed to your shared code base through interfaces. We'll look at these concepts in detail later in this chapter.
When to use Xamarin.Forms
We can use Xamarin.Forms in most cases and for most types of applications. If we need to use controls that not are available in Xamarin.Forms, we can always use the platform-specific APIs. There are, however, cases where Xamarin.Forms is not useful. The most common situation in which we might want to avoid using Xamarin.Forms is if we are building an app that we want to look very different across our target platforms.
Setting up a development machine
To develop an app for multiple platforms imposes higher demands on our development machine. One reason for this is that we often want to run one or multiple simulators or emulators on our development machine. Different platforms also have different requirements with regard to what is needed to begin development. Regardless of whether we are using Mac or Windows, Visual Studio will be our IDE. There are several versions of Visual Studio, including the free community edition. Go to https://visualstudio.microsoft.com/ to compare the available versions of Visual Studio. The following list is a summary of what we need to begin development for each platform:
- iOS: To develop an app for iOS, we need a Mac. This could either be the machine that we are developing on or a machine on our network, if we are using one. The reason that we need to connect to a Mac is that we need Xcode for compiling and debugging an app. Xcode also provides the iOS simulator.
- Android: Android apps can be developed on either macOS or Windows. Everything you need, including SDKs and simulators, are installed with Visual Studio.
- UWP: UWP apps can only be developed in Visual Studio on a Windows machine.
Setting up a Mac
There are two main tools that are required to develop applications for iOS and Android with Xamarin on a Mac. These are Visual Studio for Mac (if we are only developing Android applications, this is the only tool we need) and Xcode. In the following sections, we will take a look at how to set up a Mac for app development.
Installing Xcode
Before we install Visual Studio, we need to download and install Xcode. Xcode is the official development IDE from Apple and contains all the tools they provide for iOS development, including SDKs for iOS, macOS, tvOS, and watchOS.
We can download Xcode from the Apple developer portal (https://developer.apple.com) or from Apple App Store. I recommend that you download it from App Store because this will always provide you with the latest stable version. The only reason to download Xcode from the developer portal is if we want to use a prerelease version of Xcode, to develop for a prerelease of iOS, for example.
After the first installation, and after each update of Xcode, it is important to open it. Xcode often needs to install additional components after an installation or an update. You also need to open Xcode to accept the license agreement with Apple.
Installing Visual Studio
To install Visual Studio, we first need to download it from https://visualstudio.microsoft.com.
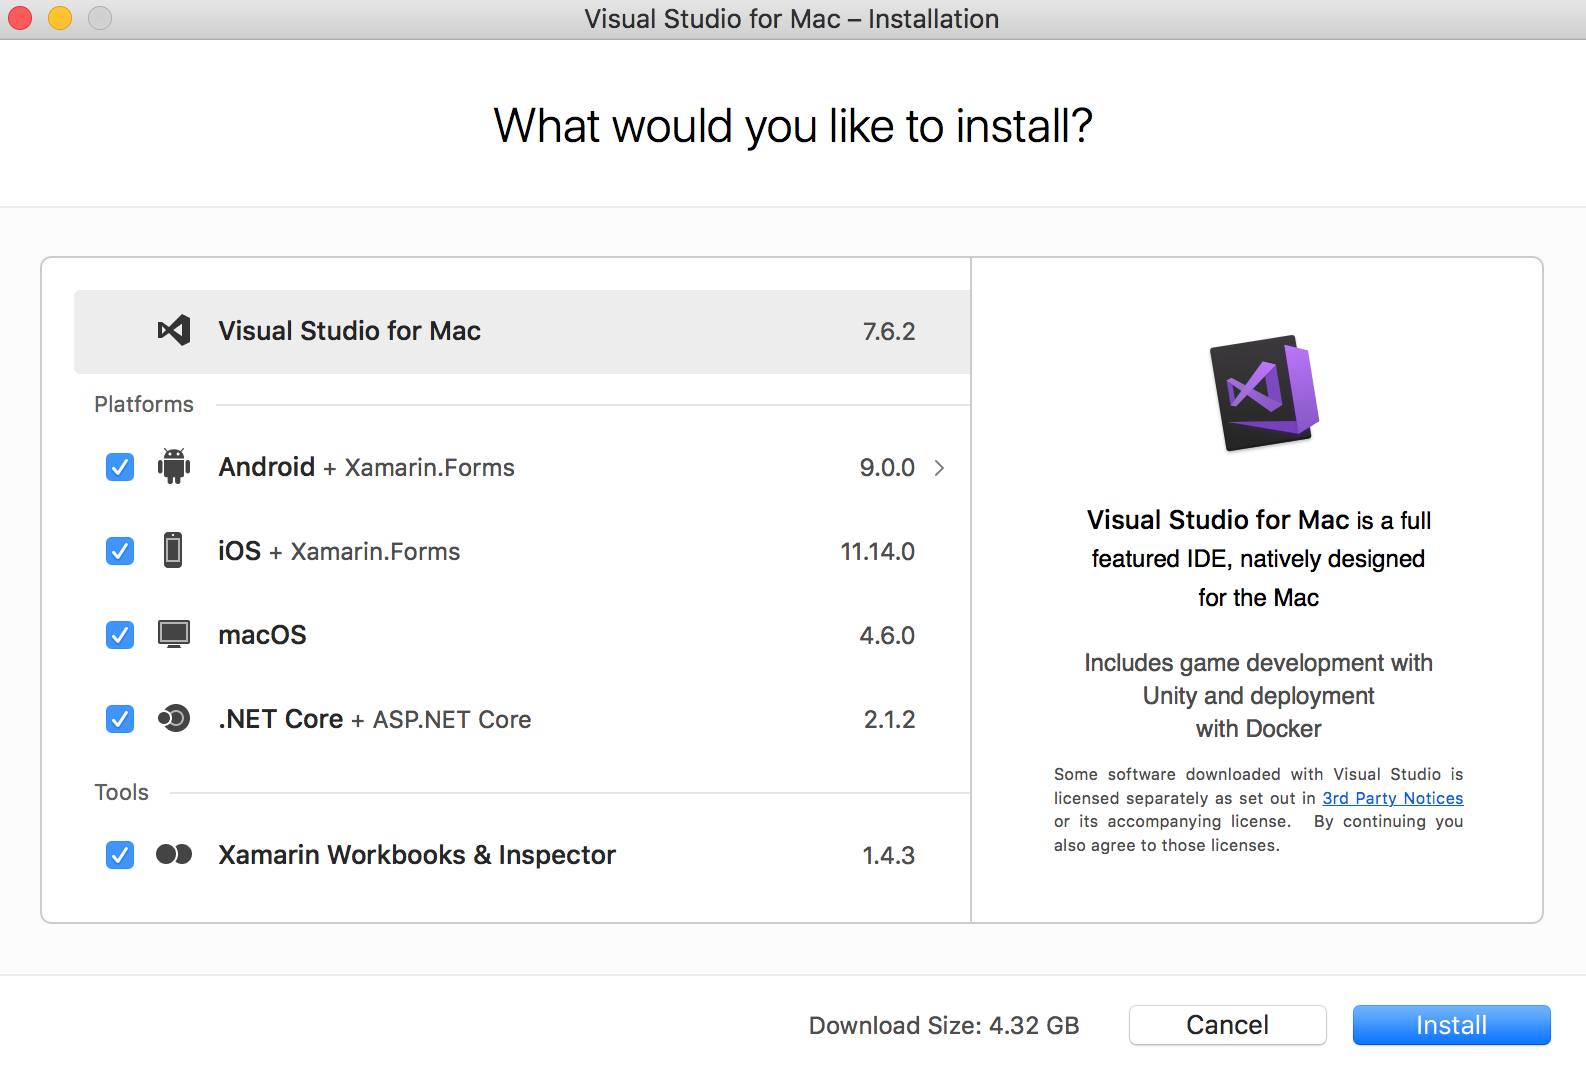
When we start the Visual Studio installer via the file we downloaded, it will start to check what we already have installed on our machine. When the check has finished, we will be able to select which platforms and tools we would like to install. Note that Xamarin Inspector requires a Visual Studio Enterprise license.
Once we have selected the platforms that we want to install, Visual Studio will download and install everything that we need to get started with app development using Xamarin, as shown in the following screenshot:
Configuring the Android emulator
Visual Studio will use the Android emulators provided by Google. If we would like the emulator to be fast, then we need to ensure that it is hardware-accelerated. To hardware-accelerate the Android emulator, we need to install the Intel Hardware Accelerated Execution Manager (HAXM), which can be downloaded from https://software.intel.com/en-us/articles/intel-hardware-accelerated-execution-manager-intel-haxm.
The next step is to create an Android Emulator. First, we need to ensure that the Android emulator and the Android OS images are installed. To do this, go through the following steps:
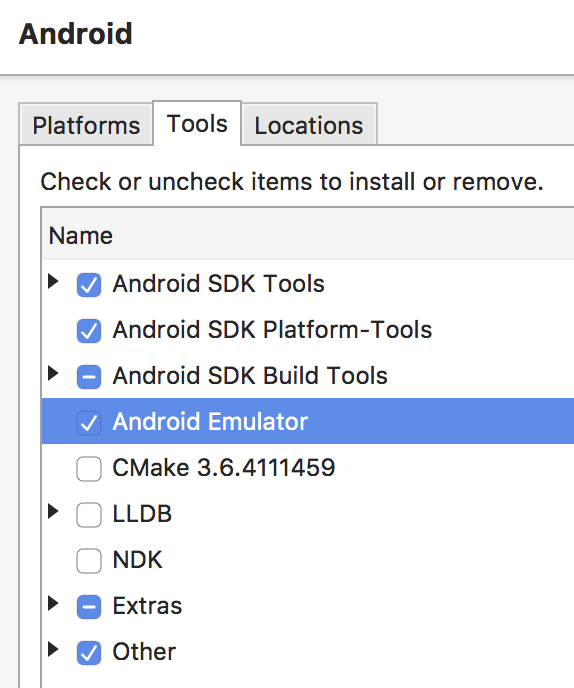
- Go to the Tools tab to install the Android Emulator:
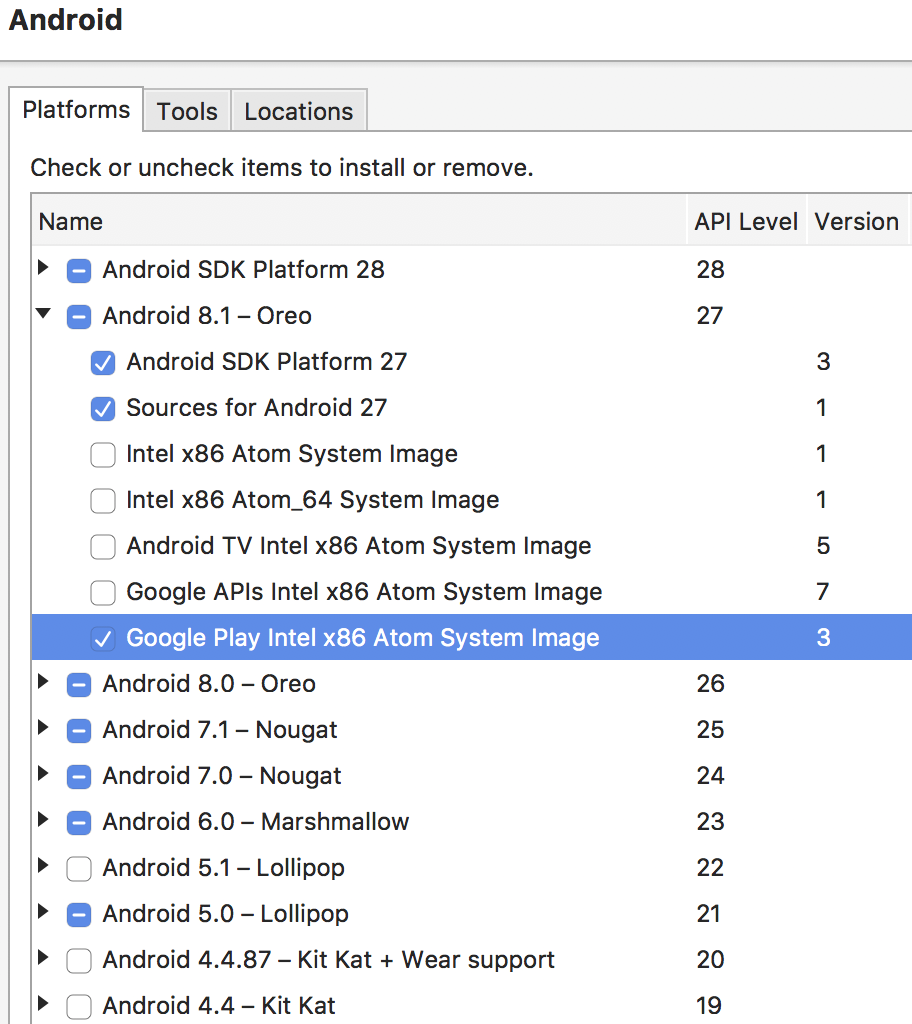
- We also need to install one or multiple images to use with the emulator. We can install multiple images if, for example, we want to run our application on different versions of Android. We will select emulators with Google Play (as shown in the following screenshot) so that we can use Google Play services in our app, even when we are running it in an emulator. This is required if, for example, we want to use Google Maps in our app:
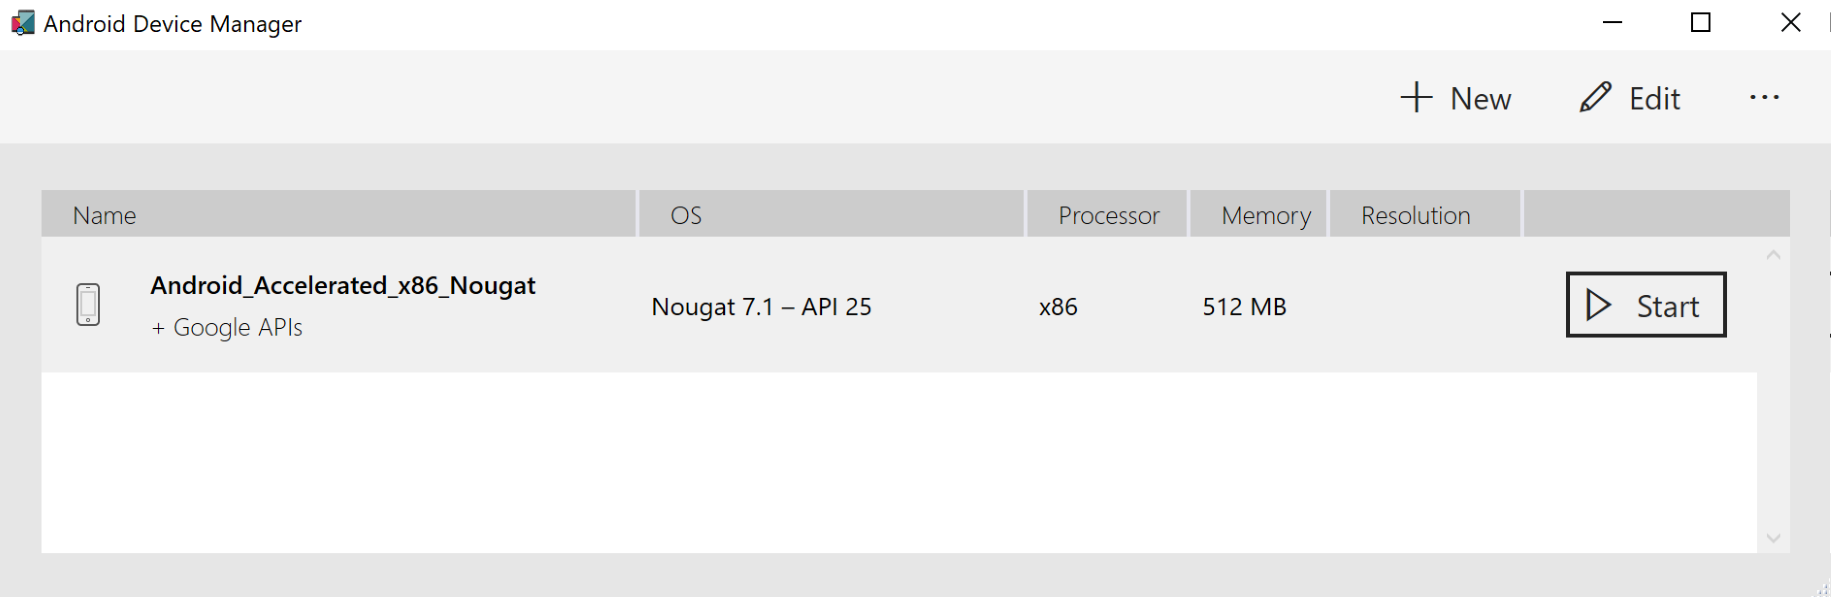
- Then, to create and configure an emulator, go to the Android Device Manager from the Tools tab in Visual Studio. From the Android Device Manager, we can start an emulator if we have already created one, or we can create new emulators, as shown in the following screenshot:
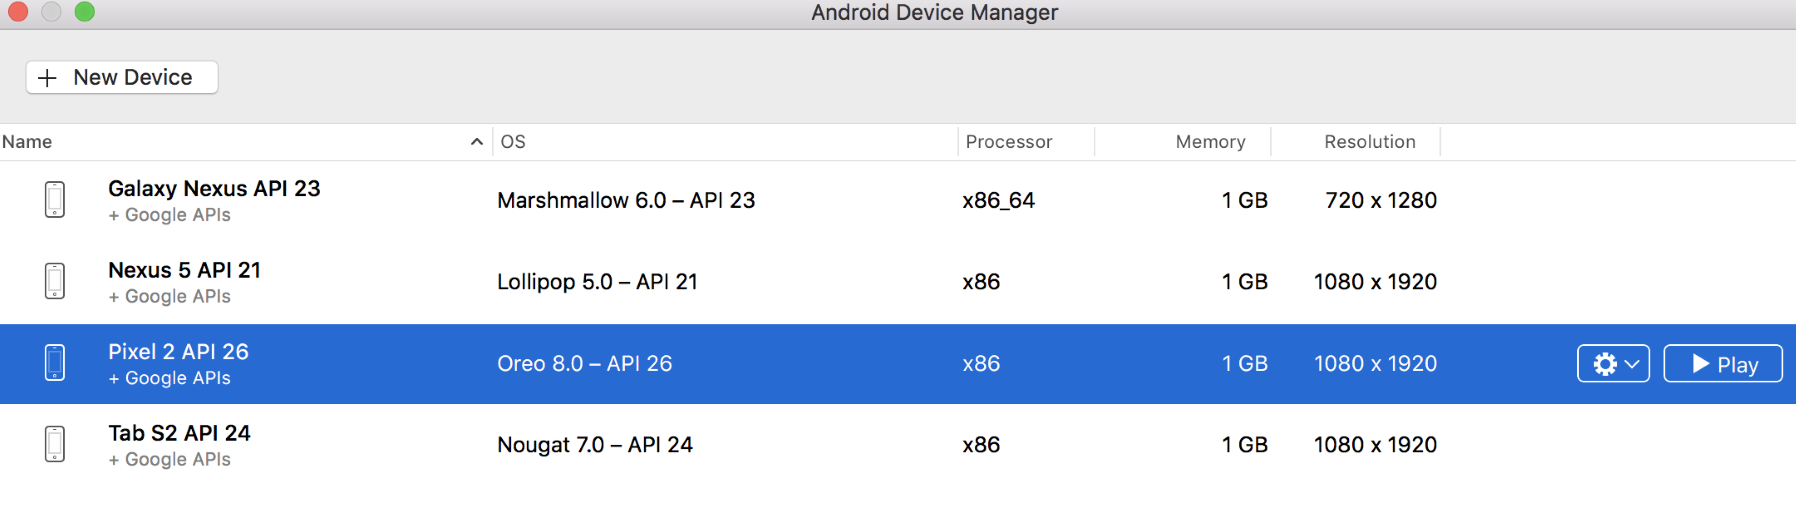
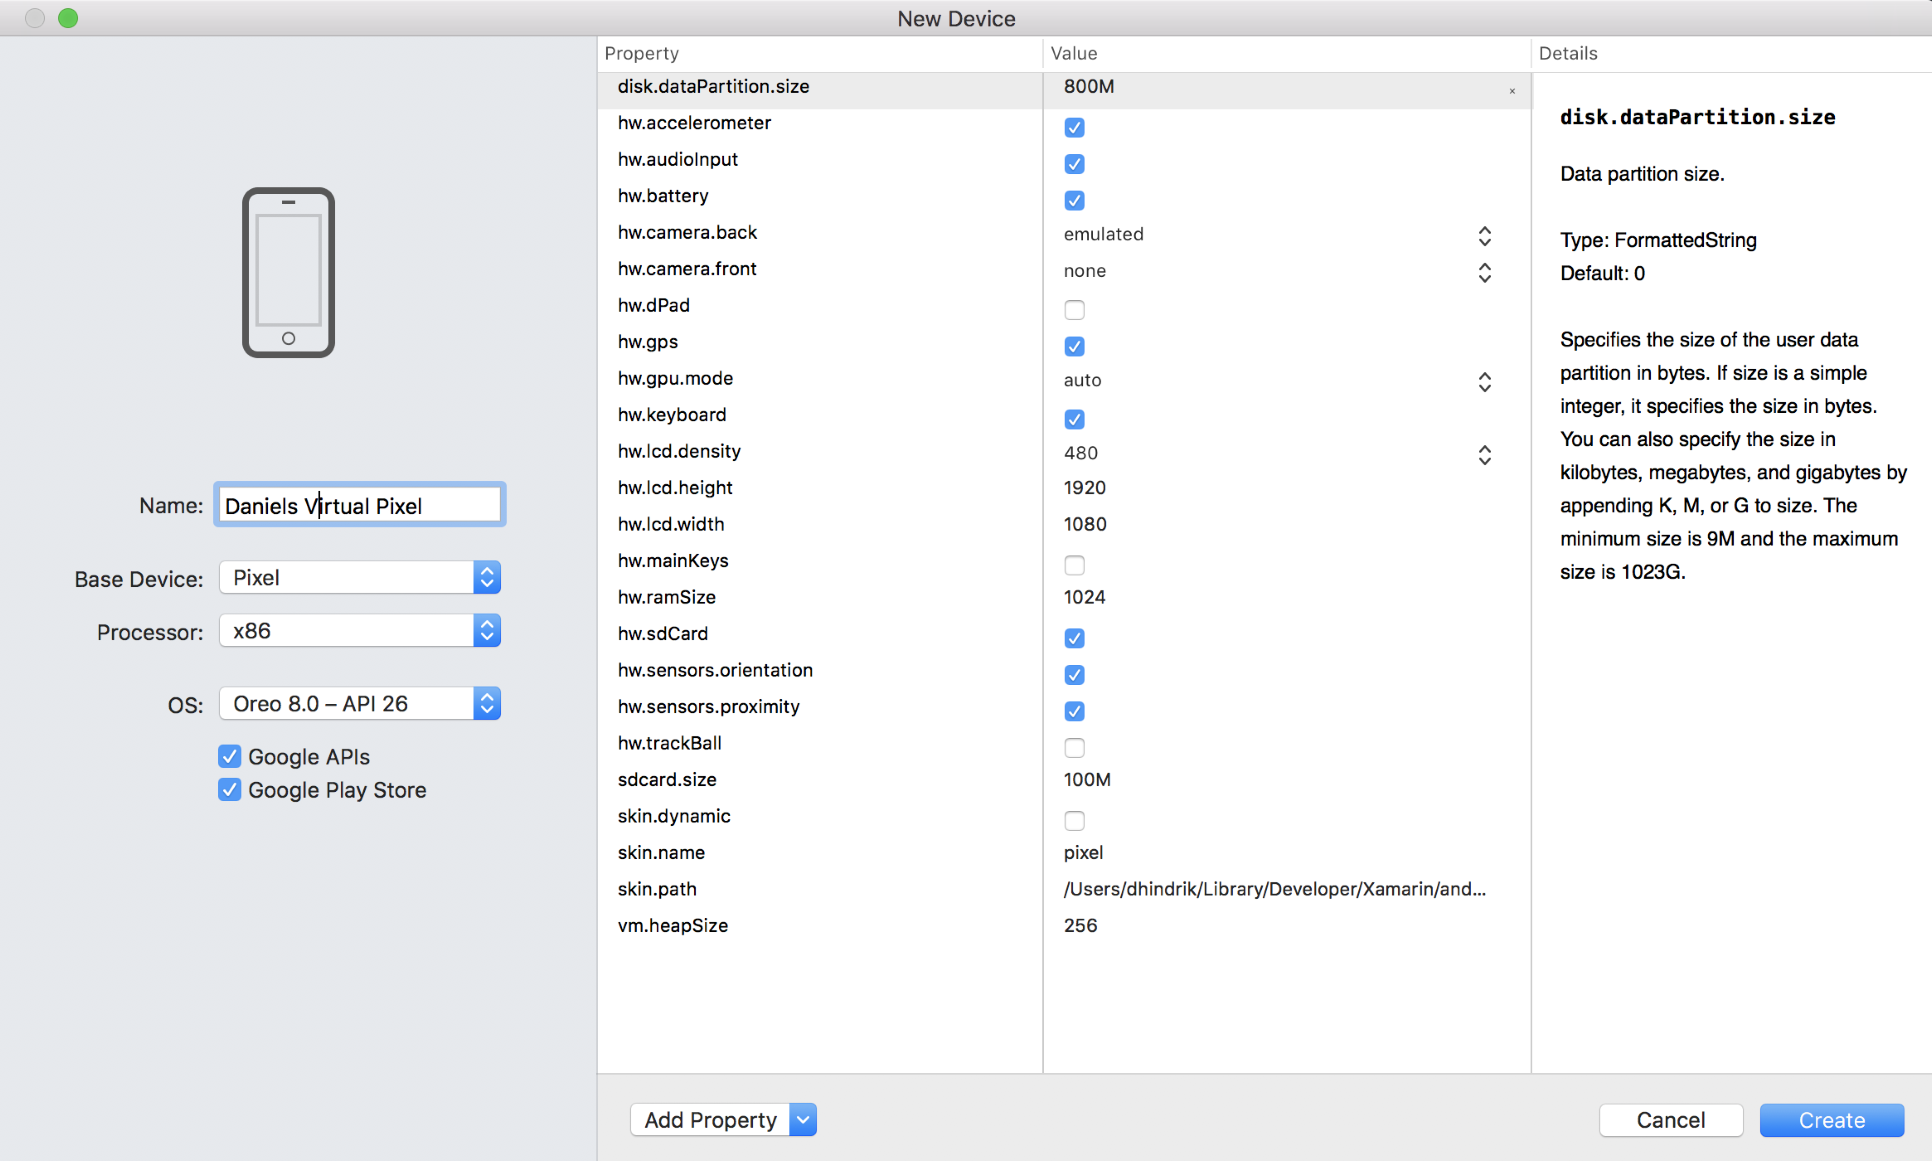
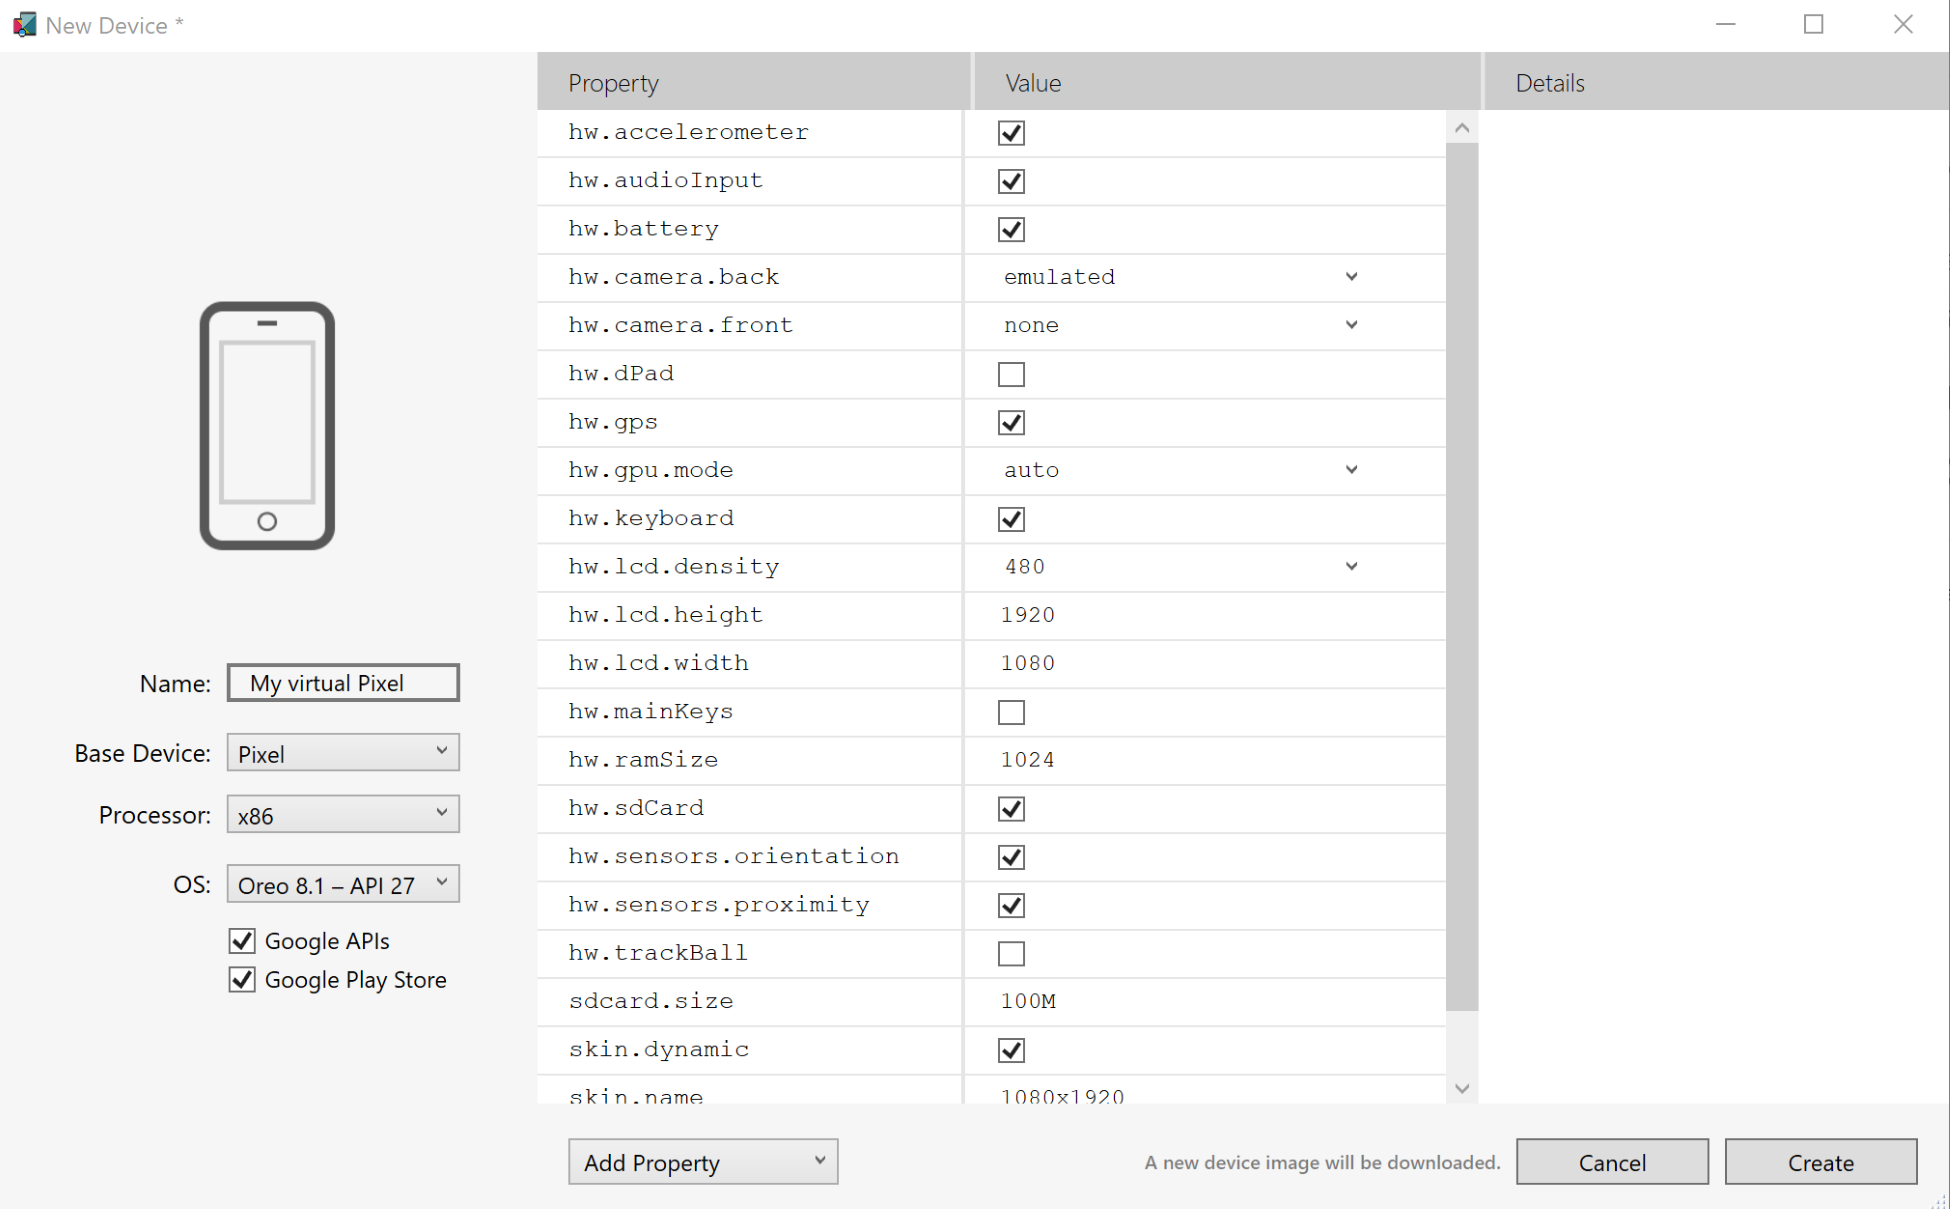
- If we click the New Device button, we can create a new emulator with the specifications that we need. The easiest way to create a new emulator here is to select a base device that matches our needs. These base devices will be preconfigured, and that is often enough. However, it is also possible to edit the properties of the device so that we can get an emulator that matches our specific needs.
Because we will not run the emulator on a device with an ARM processor, we have to select either an x86 processor or an x64 processor, as shown in the following screenshot. If we try to use an ARM processor, the emulator will be very slow:
Setting up a Windows machine
We can either use a virtual or a physical Windows machine for development with Xamarin. We can, for example, run a virtual Windows machine on our Mac. The only tool we need for app development on our Windows machine is Visual Studio.
Installing Xamarin for Visual Studio
If we already have Visual Studio installed, we must first open Visual Studio Installer; otherwise, we need to go to https://visualstudio.microsoft.com to download the installation files.
Before the installation starts, we need to select which workloads we want to install.
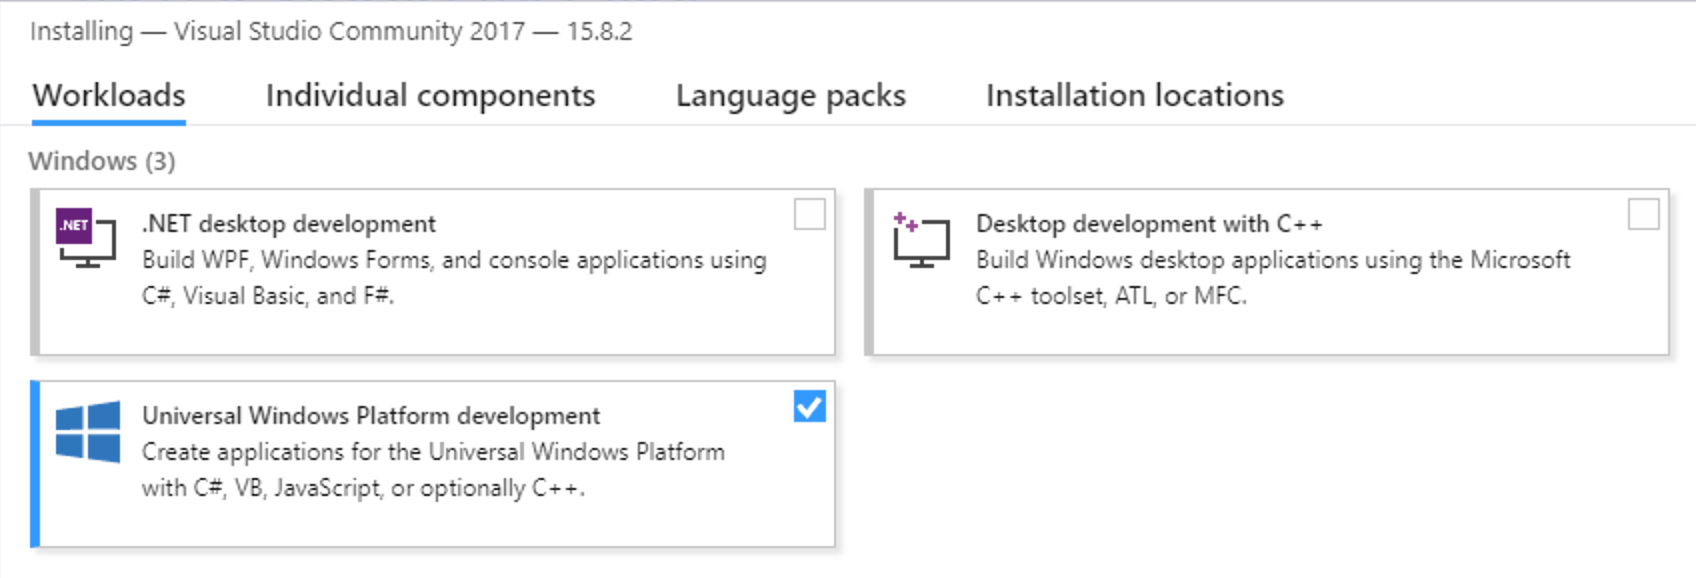
If we want to develop apps for Windows, we need to select the Universal Windows Platform development workload, as shown in the following screenshot:
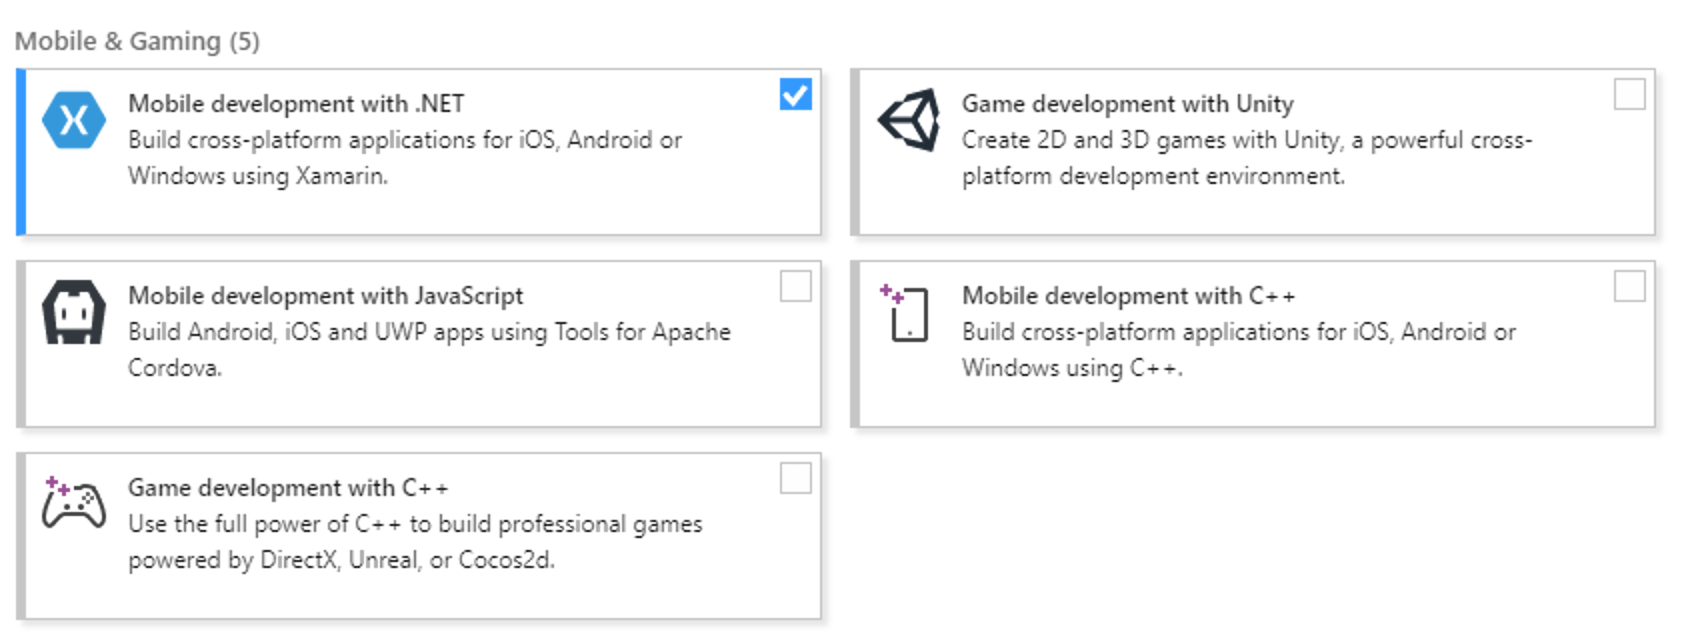
For Xamarin development, we need to install Mobile development with .NET. If you want to use Hyper-V for hardware acceleration, we can deselect the checkbox for Intel HAXM in the detailed description of the Mobile development with .NET workload on the left-hand side, as shown in the following screenshot. When we deselect Intel HAXM, the Android emulator will also be deselected, but we can install it later:
When we first start Visual Studio, we will be asked whether we want to sign in. It is not necessary for us to sign in unless we want to use Visual Studio Professional or Enterprise, in which case we have to sign in so that our license can be verified.
Pairing Visual Studio with a Mac
If we want to run, debug, and compile our iOS app, then we need to connect it to a Mac. We can set up the Mac manually, as described earlier in this chapter, or we can use Automatic Mac Provisioning. This will install Mono and Xamarin.iOS on the Mac that we are connecting to. It will not install the Visual Studio IDE, but this isn't necessary if you just want to use it as a build machine. We do, however, need to install Xcode manually.
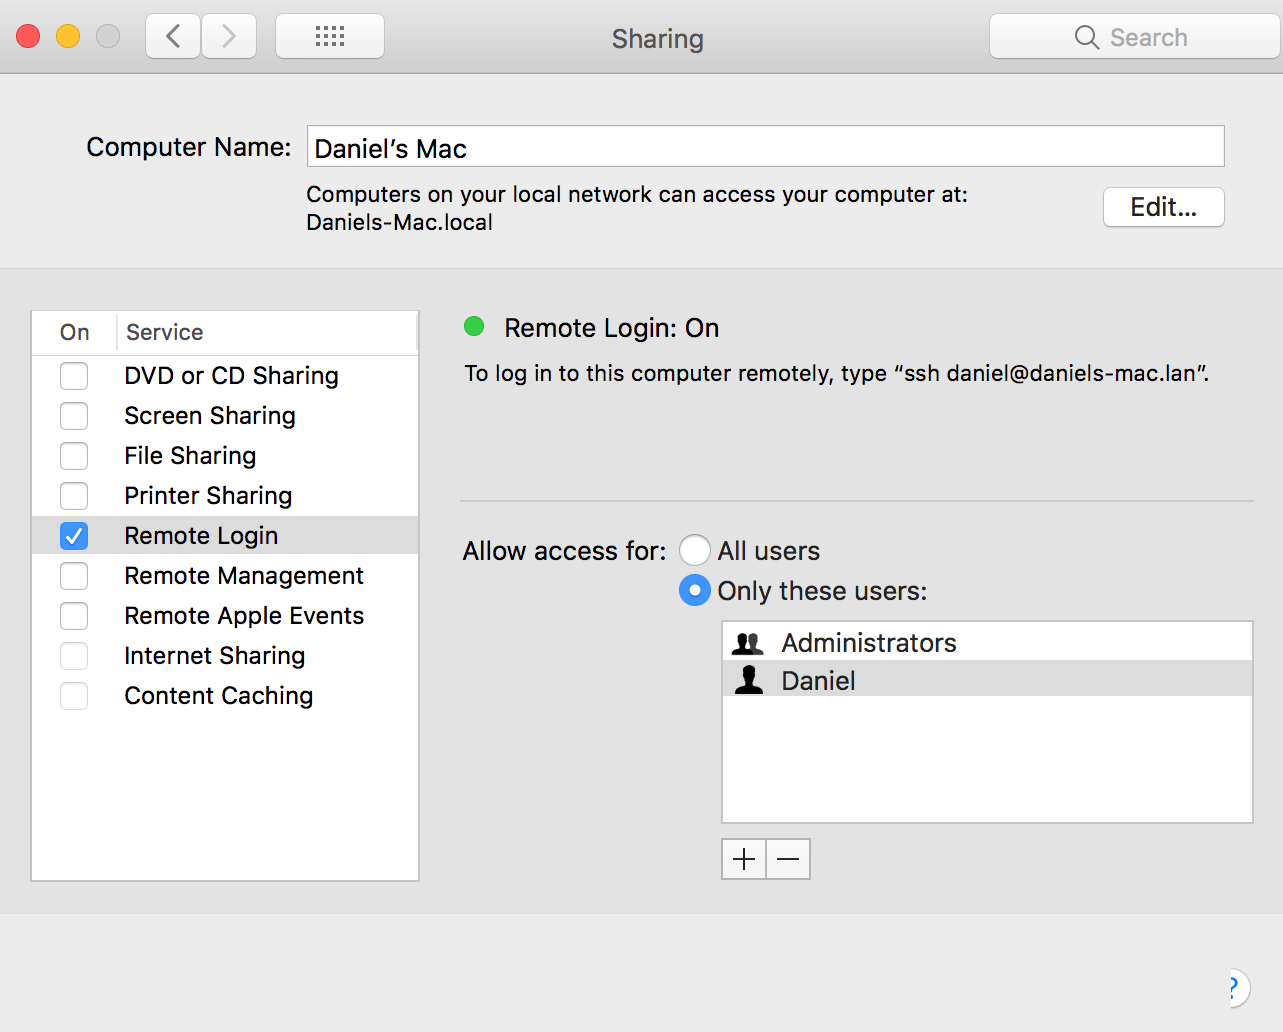
To be able to connect to the Mac—either to a manually-installed Mac or using Automatic Mac Provisioning—the Mac needs to be accessible via our network and we need to enable Remote Login on the Mac. To do this, go to Settings | Sharing and select the checkbox for Remote Login. To the left of the window, we can select which users are allowed to connect with Remote Login, as shown in the following screenshot:
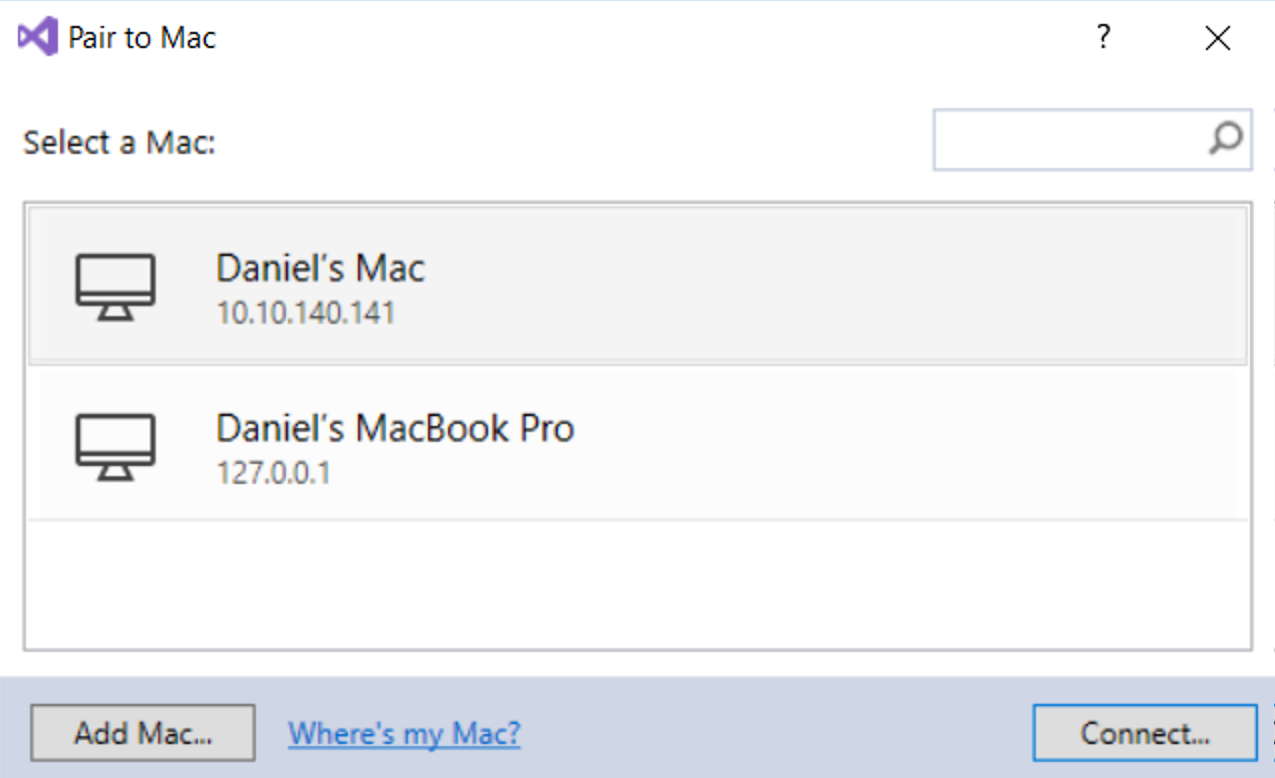
To connect to the Mac from Visual Studio, use the Pair to Mac button in the toolbar (as shown in the following screenshot), or, in the top menu, select Tools | iOS and finally Pair to Mac:

A dialog will appear showing all the Macs that can be found on the network. If the Mac doesn't appear in the list of available Macs, we can use the Add Mac button in the bottom left corner to enter an IP address, as shown in the following screenshot:
If everything that you require is installed on the Mac, then Visual Studio will connect and we can start building and debugging our iOS app. If Mono is missing on the Mac, a warning will appear. This warning will also give us the option to install it, as shown in the following screenshot:

Configuring an Android emulator and hardware acceleration
If we want a fast Android emulator that works smoothly, we need to enable hardware acceleration. This can be done using either Intel HAXM or Hyper-V. The disadvantage of Intel HAXM is that it can't be used on machines with an Advanced Micro Devices (AMD) processor; you have to have a machine with an Intel processor. We can't use Intel HAXM in parallel with Hyper-V.
For these reasons, Hyper-V is the preferred way to hardware accelerate the Android emulator on a Windows machine. To use Hyper-V with the Android emulator, we need to have the April 2018 update (or later) for Windows and Visual Studio version 15.8 (or later) installed. To enable Hyper-V, you need to go through the following steps:
- Open the Start menu and type Turn Windows features on or off. Click the option that appears to open it, as shown in the following screenshot:

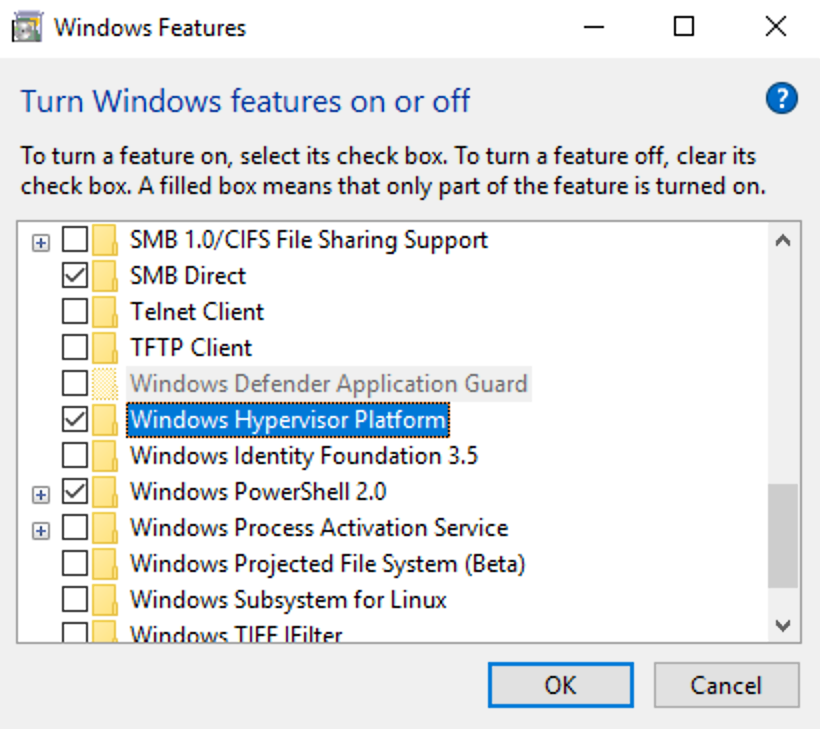
- To enable Hyper-V, select the Hyper-V checkbox. Also, expand the Hyper-V option and check the Hyper-V Platform checkbox. We also need to select the Windows Hypervisor Platform checkbox, as shown in the following screenshot:
- Restart the machine when Windows prompts you to.
Because we didn't install an Android emulator during the installation of Visual Studio, we need to install it now. Go to the Tools menu in Visual Studio, click on Android, and then Android SDK Manager.
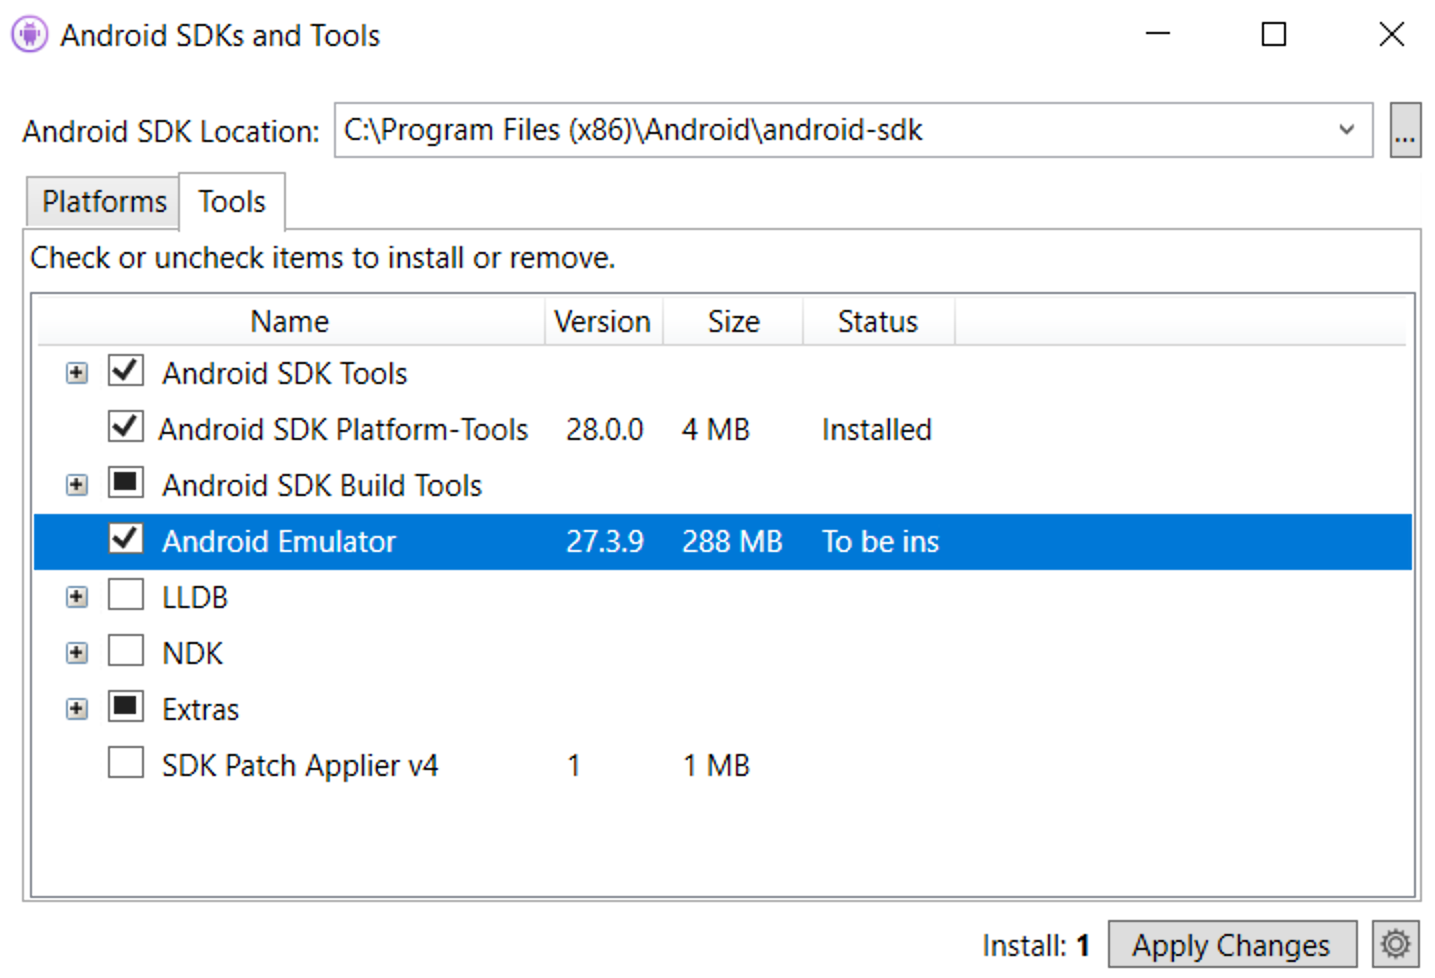
Under Tools in Android SDK Manager, we can install the emulator by selecting Android Emulator, as shown in the following screenshot. Also, we should ensure that the latest version of Android SDK Build Tools is installed:
We recommend installing the NDK (Native Development Kit). The NDK makes it possible to import libraries that are written in C or C++. NDK is also required if we want to AOT compile an app.
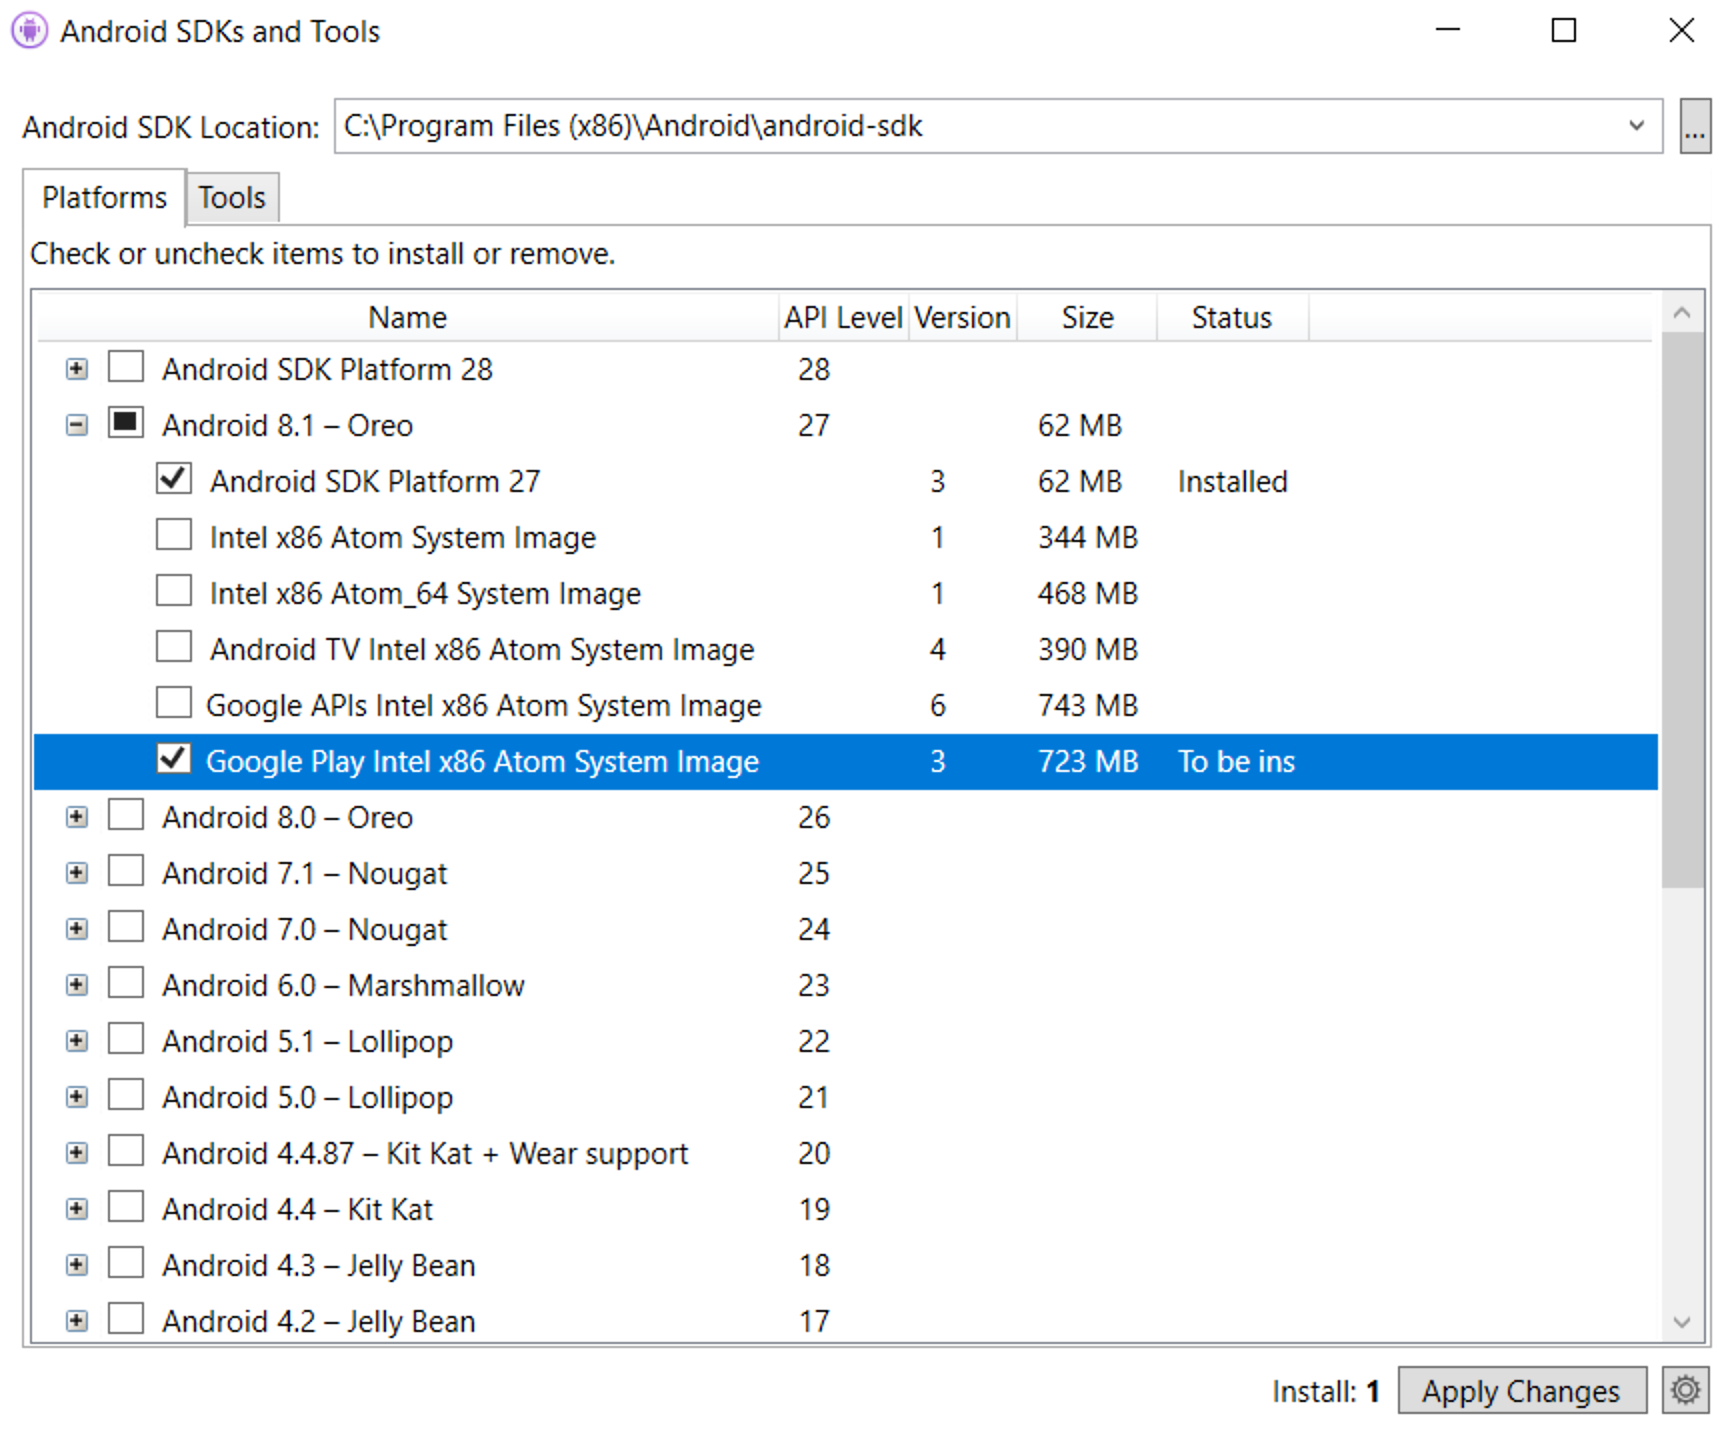
The Android SDK allows for multiple emulator images to be installed simultaneously. We can install multiple images if, for example, we want to run our application on different versions of Android. Select emulators with Google Play (as shown in the following screenshot) so we can use Google Play services in our app even when we are running it in an emulator.
This is required if we want to use Google Maps in our app, for example:
The next step is to create a virtual device to use the emulator image. To create and configure an emulator, go to the Android Device Manager, which we will open from the Tools tab in Visual Studio. From the Device Manager, we can either start an emulator—if we already have created one—or we can create new emulators, as shown in the following screenshot:
If we click the New Device button, we can create a new emulator with the specifications that we need. The easiest way to create a new emulator here is to select a base device that matches our needs. These base devices will be preconfigured, which is often enough. However, it is possible to edit the properties of the device so that we can get an emulator that matches our specific needs.
We have to select either an x86 processor (as shown in the following screenshot) or an x64 processor since we will not run the emulator on a device with an ARM processor. If we try to use an ARM processor, the emulator will be very slow:
Configuring UWP developer mode
If we want to develop UWP apps, we need to activate developer mode on our development machine. To do this, go to Settings | Update & Security | For developers. Then, click on Developer Mode, as shown in the following screenshot. This makes it possible for us to sideload and debug apps via Visual Studio:
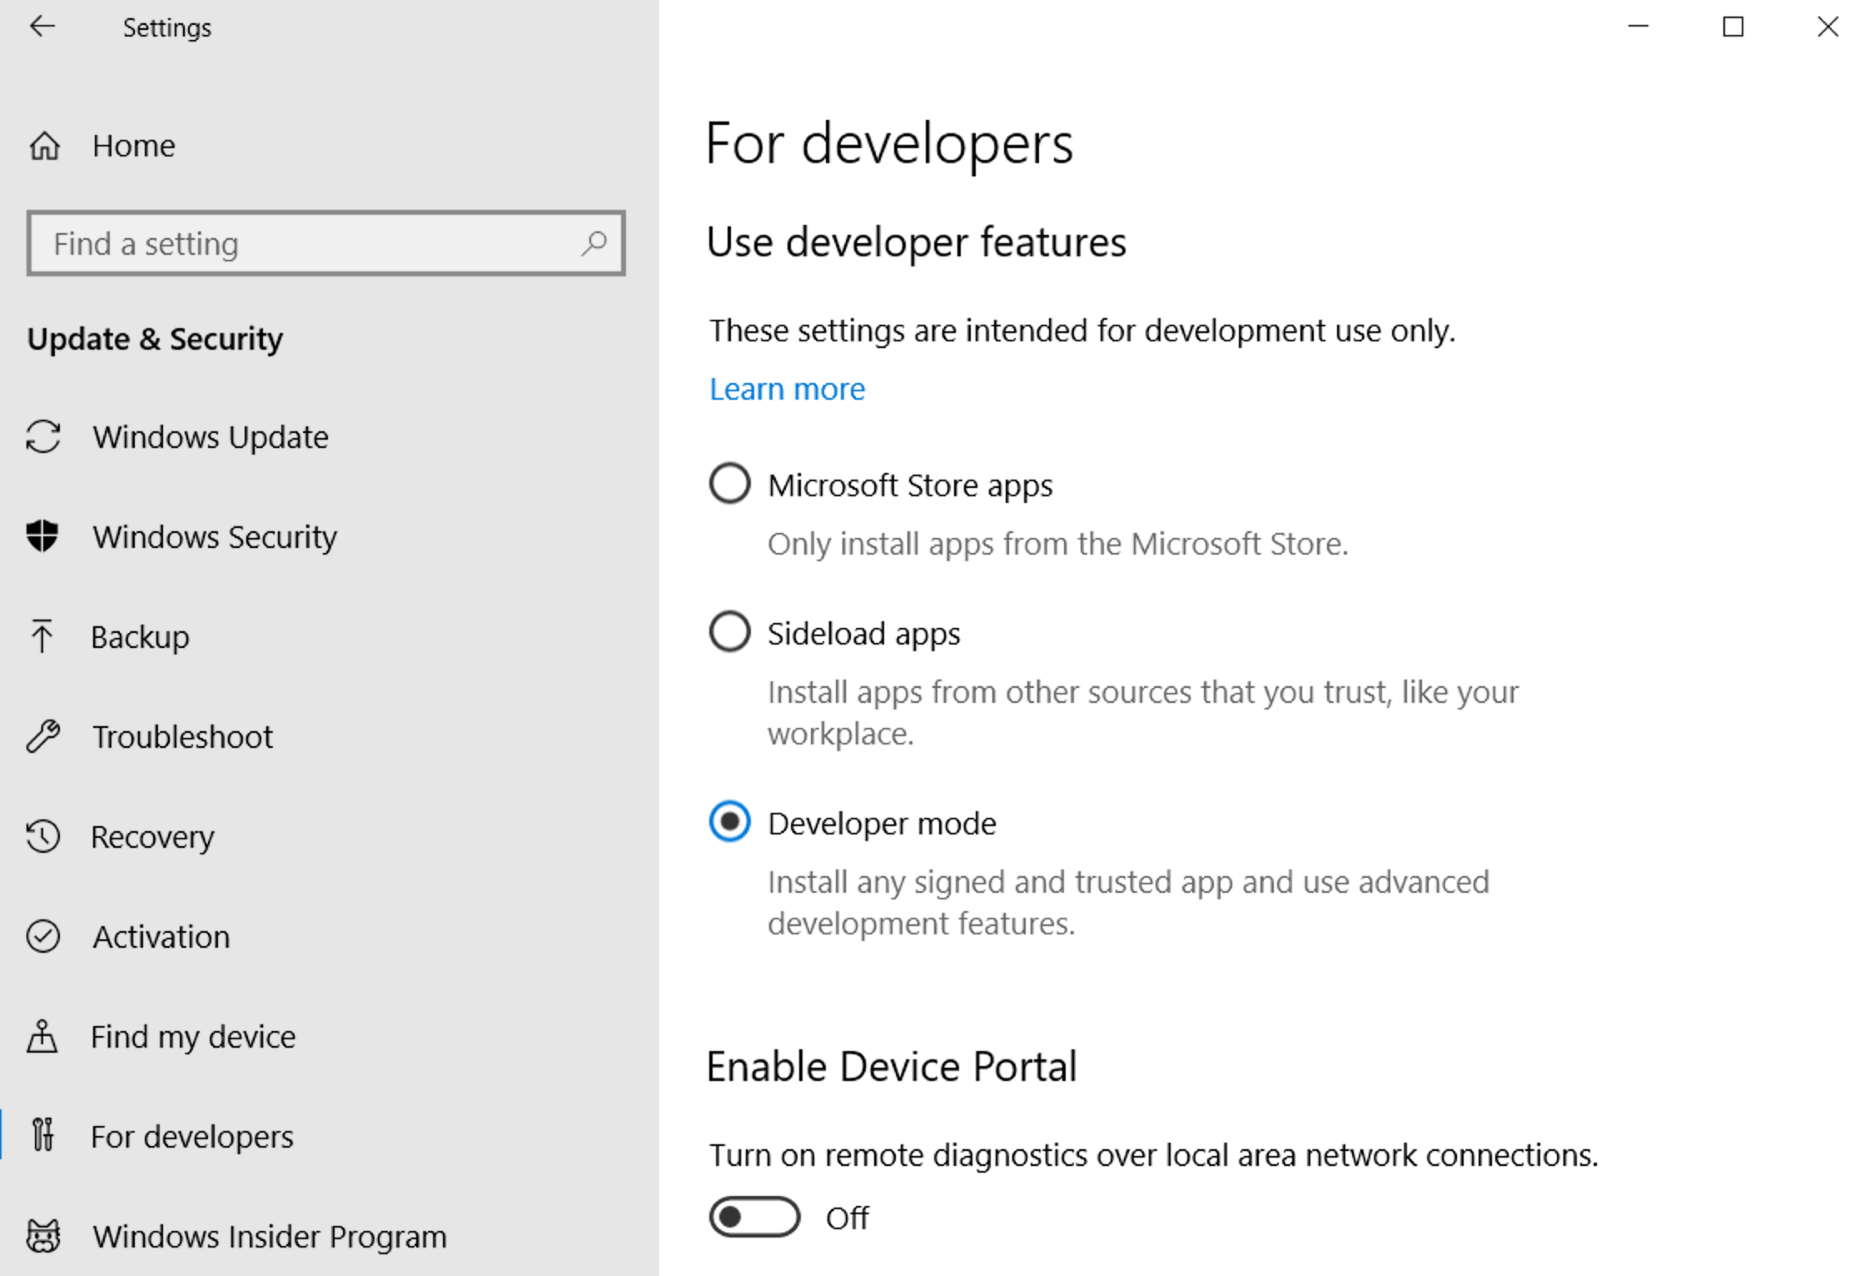
If we select Sideload apps instead of Developer Mode, we will only be able to install apps without going via Microsoft Store. If we have a machine to test, rather than debug our apps on, we can just select Sideload apps.
Summary
After reading this chapter, you should feel a little bit more comfortable about what Xamarin is and how Xamarin.Forms relates to Xamarin itself.
In this chapter, we established our definition of what a native application is, which includes the following elements:
- Native user interface
- Native performance
- Native API access
We talked about how Xamarin is based on Mono, which is an open source implementation of the .NET framework, and discussed how, at its core, Xamarin is a set of bindings to platform-specific APIs. We then looked in detail at how Xamarin.iOS and Xamarin.Android work under the hood.
After that, we started to touch upon the core topic of this book, which is Xamarin.Forms. We started off with an overview of how platform-agnostic controls are rendered into platform-specific controls and how to use XAML to define a hierarchy of controls to assemble a page.
We then spent some time looking at the difference between a Xamarin.Forms application and a traditional Xamarin application.
A traditional Xamarin app uses platform-specific APIs directly, without any abstraction other than what .NET adds as a platform.
Xamarin.Forms is an API that is built on top of the traditional Xamarin APIs, and allows us to define platform-agnostic GUIs in XAML or in code that is rendered to platform-specific controls. There's more to Xamarin.Forms than this, but this is what it does at its core.
In the last part of this chapter, we discussed how to set up a development machine on Windows or macOS.
Now it's time to put our newly acquired knowledge to use! We will start off by creating a To-Do app from the ground up in the next chapter. We will look at concepts such as Model–View–ViewModel (MVVM), for a clean separation between business logic and the user interface, and SQLite.NET, for persisting data to a local database on your device. We will do this for three platforms at the same time—read on!