


In this chapter, we will cover the components that are at the foundation of nearly all wxPython applications, such as:
The application object
The main frame
Understanding the window hierarchy
Referencing controls
Using Bitmaps
Adding icons to Windows
Utilizing Stock IDs
Accessing the clipboard
Supporting drag and drop
Two-stage widget creation
Understanding inheritance limitations
In today's world of desktop applications there is a great amount of incentive to be able to develop applications that can run on multiple operating systems and desktop platforms. Currently there are a handful of cross-platform Python frameworks that can be used to develop desktop applications. The wxPython Library is a set of Python bindings to the wxWidgets Library, which is a powerful cross-platform C++ application framework that can be used to create user interfaces. What sets wxPython apart is that, unlike other UI toolkits that draw their own controls, wxPython uses the platform's own native UI toolkit for creating and displaying UI components. This means that a wxPython application will have the same look and feel as other applications on the system since it is using the same controls and themes as the rest of the system.
Developing an application in wxPython provides great flexibility for writing applications that will run on Windows, Macintosh OS X, Linux, and other UNIX like environments. Applications can rapidly be developed on one platform and often deployed to another with little or no changes necessary.
The App object bootstraps the library and initializes the underlying toolkit. All wxPython applications must create an App object. This should be instantiated before trying to create any other GUI objects to ensure that all the dependant parts of the library have been properly initialized. The App object also maintains the MainLoop, which is used to drive a wxPython application.
This recipe will demonstrate the basic pattern that all wxPython applications can be built from.
Here we will create a "Hello World" like application to show the basic structure of a wxPython application:
import wx
class MyApp(wx.App):
def OnInit(self):
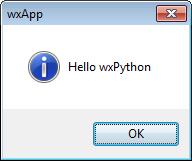
wx.MessageBox("Hello wxPython", "wxApp")
return True
if __name__ == "__main__":
app = MyApp(False)
app.MainLoop()Running the previous script will result in the following pop-up dialog shown on the screen. Click on OK to close it and exit the application.
The application object calls its OnInit
mehod when it is created. This method is overridden and used as the main entry point for initializing this application. By returning True, the method informs the framework that it is good to go. OnInit is where most applications will do their initialization and create their main window(s).
In this example, we created the App object by passing False as the first argument. This argument is used to tell wxPython whether to redirect output or not. When developing an application, it is advised to always set this to False, and to run scripts from the command line so that you can see any error output that might be missed when running the script by double clicking on it.
After creating the application object and once all initializations are complete, the last thing that you need to do is to call the App objects MainLoop method in order to start the event loop. This method will not return until the last top-level window is destroyed or until the App object is told to exit. wxPython is an event-driven system and the MainLoop is the heart of the whole system. During each iteration of the loop, events are dispatched to perform all of the tasks in the GUI, such as handling mouse clicks, moving the window, and redrawing the screen.
The wx.App class constructor has four optional keyword arguments:
wx.App(redirect=True, filename=None,
       useBestVisual=False,clearSigInt=True)
The four optional keyword arguments are as follows:
filename: If redirect isTruethis can be used to specify an output file to reirect to.useBestVisual: Specifies whether the application should try to use the best visuals provided by the underlying toolkit. (It does not have an affect on mos systems.)clearSigInt: ShouldSIGINTbe cleared? Setting this toTruewill allow the application to be terminated by pressing Ctrl + C, like most other applications.
For most applications, you will want to display a window for its users to interact with. In wxPython, the most typical window object is known as a Frame. This recipe will show you how to subass a Frame and display it in an application.
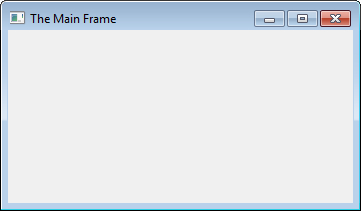
This example extends upon the previous recipe to add a minimal empty application window:
import wx

class MyApp(wx.App):
    def OnInit(self):
        self.frame = MyFrame(None, title="The Main Frame")
        self.SetTopWindow(self.frame)
        self.frame.Show()

        return True

class MyFrame(wx.Frame):
    def __init__(self, parent, id=wx.ID_ANY, title="",
                 pos=wx.DefaultPosition, size=wx.DefaultSize,
                 style=wx.DEFAULT_FRAME_STYLE,
                 name="MyFrame"):
        super(MyFrame, self).__init__(parent, id, title,
                                      pos, size, style, name)

        # Attributes
        self.panel = wx.Panel(self)

if __name__ == "__main__":
    app = MyApp(False)
    app.MainLoop()
Running the previous code will result in a window like the following being shown:
The Frame is the main top-level window and container for most applications. Let's start by examining our MyFrame class. In this class there is one important thing to note. We created a Panel object as a child window of the Frame. You can think of a Panel as a box for containing other controls. Also, in order for a Frame to operate and look correct on all platforms, it is important that it has a Panel as its main child.
Firstly, in the OnInit method of our App, we create an instance of MyFrame, passing None as its first parameter. This parameter is used to specify the parent window of the Frame. Because this is our main window, we pass in None to indicate that it has no parent. Secondly, we call the SetTopWindow method of our App in order to set our newly-created MyFrame instance as the application's top window. Thirdly and finally, we call Show on our Frame; this simply does what its name suggests, and shows the Frame so that a user can see it, though the Frame will not actually be visible on the screen until the MainLoop is started.
The Frame class has a number of style flags that can be set in its constructor to modify the behavior and appearance of the window. These style flags can be combined as a bitmask and are supplied as the value to the constructors' style parameter. The following table outlines some of the common ones. A full list of all available styles can be found in the wxPython online documentation, at http://wxpython.org/onlinedocs.php.
|
Style flags |
Description |
|---|---|
|
This is a bitwise OR of the following flags:
| |
|
Display a title bar button that minimizes the Frame | |
|
Display a title bar button that maximizes the Frame | |
|
Display a title bar button that allows the Frame to be closed. (the "X" button) | |
|
Allow the Frame to be resized by the user when they drag the border | |
|
Displays a caption on the Frame | |
|
Display a system menu (that is, the menu that is shown when clicking in the frames icon on Windows) | |
|
Eliminates flicker caused by the background being repainted (Windows only) |
All of the different windows and controls in wxPython have a hierarchy of containment. Some controls can be containers for other controls and some cannot. This recipe is geared towards giving an understanding of this hierarchy.
We will be making just a minor change to the Frame from the previous recipe, so let's open the code from that recipe to get ready for the new changes.
Here is the new code that will replace our existing Frame class.
class MyFrame(wx.Frame):
    def __init__(self, parent, id=wx.ID_ANY, title="",
                 pos=wx.DefaultPosition, size=wx.DefaultSize,
                 style=wx.DEFAULT_FRAME_STYLE,
                 name="MyFrame"):
        super(MyFrame, self).__init__(parent, id, title,
                                      pos, size, style, name)

        # Attributes
        self.panel = wx.Panel(self)
        self.panel.SetBackgroundColour(wx.BLACK)
        self.button = wx.Button(self.panel,
                                label="Push Me",
pos=(50, 50))Basically, there are three general categories of window objects that are tiered, in the following containment order:
Top-Level Windows (Frames and Dialogs)
General Containers (Panels and Notebooks, …)
Controls (Buttons, CheckBoxes, ComboBoxes, …)
The Top-Level Window is at the top of the hierarchy and it can contain any kind of window except another Top-Level Window. General Containers come next, and they can arbitrarily hold any other General Container or Control. Finally, at the bottom of the Hierarchy are the Controls. These are the functional part of a UI that the user will interact with. They can, in some cases, be used to hold other controls, but typically will not. The containment hierarchy is connected to the parental hierarchy of controls. A parent will be the container for its children.
When running the previous sample, this hierarchy becomes apparent. The Frame, as we have previously seen, is the outer-most container object; next you can see the Panel, which we turned black to make it more visible; finally you can see the Button, which was added as a child of the Panel.
All Window objects in an application are connected in various ways. Quite often it is useful to get a reference to an instance of a control so that you can perform some operation on the control or retrieve some data from it. This recipe will show some of the facilities that are available for finding and getting references to controls.
Here we extend the MyFrame class from the previous recipe to have an event handler for when its Button is clicked. In the event handler we can see some ways to access different controls in our UI during runtime:
class MyFrame(wx.Frame):
    def __init__(self, parent, id=wx.ID_ANY, title="",
                 pos=wx.DefaultPosition, size=wx.DefaultSize,
                 style=wx.DEFAULT_FRAME_STYLE,
                 name="MyFrame"):
        super(MyFrame, self).__init__(parent, id, title,
                                      pos, size, style, name)

        # Attributes
        self.panel = wx.Panel(self)
        self.panel.SetBackgroundColour(wx.BLACK)
        button = wx.Button(self.panel,
                           label="Get Children",
                           pos=(50, 50))
        self.btnId = button.GetId()
        # Event Handlers
        self.Bind(wx.EVT_BUTTON, self.OnButton, button)

    def OnButton(self, event):
        """Called when the Button is clicked"""
        print "\nFrame GetChildren:"
        for child in self.GetChildren():
            print "%s" % repr(child)

        print "\nPanel FindWindowById:"
        button = self.panel.FindWindowById(self.btnId)
        print "%s" % repr(button)
        # Change the Button's label
        button.SetLabel("Changed Label")

        print "\nButton GetParent:"
        panel = button.GetParent()
        print "%s" % repr(panel)

        print "\nGet the Application Object:"
        app = wx.GetApp()
        print "%s" % repr(app)

        print "\nGet the Frame from the App:"
        frame = app.GetTopWindow()
        print "%s" % repr(frame)
Each window in the framework keeps a reference to its parent and to its children. Running our program now will print out the results of using the accessor functions that all windows have for finding and retrieving references to their children and other related controls.
GetChildren: This method will return a list of all of the children that the given control hasFindWindowById: This can be used to find a specific child window by using its IDGetParent: This method will retrieve the window's parent windowwx.GetApp: This is a global function for getting access to the one and only application objectApp.GetTopWindow: This gets the main Top-Level Window in the application
Clicking on the Button will cause the OnButton method to be called. In OnButton, there are examples that show how to use each of the above methods. Each of them will return a reference to a GUI object. In our example, calling GetChildren on the Panel will return a list of its children controls. Iterating over this list, we print out each of the children, which will just be the Button in this case. FindWindowById can be used to find a specific child control; again, we called this on our Panel to find the Button control. Just to show that we found the Button, we used its SetLabel method to change its label. Next, calling GetParent on the Button will return the Button's parent, which is the Panel. Finally, by using the global GetApp function, we can get a reference to the application object. The App object's GetTopWindow will return a reference to our Frame.
Here are a few more useful methods available for getting references to controls.
It's likely that, at some point, you will want to be able to display an image in your application. A
Bitmap is the basic data type that is used to display images in an application. This recipe will show how to load an image file into a Bitmap and then display it in a Frame.
To see how to use Bitmaps, we will create a little application that loads an image from the hard disk and displays it in a Frame:
import os
import wx

class MyApp(wx.App):
    def OnInit(self):
        self.frame = MyFrame(None, title="Bitmaps")
        self.SetTopWindow(self.frame)
        self.frame.Show()

        return True

class MyFrame(wx.Frame):
    def __init__(self, parent, id=wx.ID_ANY, title="",
                 pos=wx.DefaultPosition, size=wx.DefaultSize,
                 style=wx.DEFAULT_FRAME_STYLE,
                 name="MyFrame"):
        super(MyFrame, self).__init__(parent, id, title,
                                      pos, size, style, name)

        # Attributes
        self.panel = wx.Panel(self)

        img_path = os.path.abspath("./face-grin.png")
        bitmap = wx.Bitmap(img_path, type=wx.BITMAP_TYPE_PNG)
        self.bitmap = wx.StaticBitmap(self.panel,
                                      bitmap=bitmap)

if __name__ == "__main__":
    app = MyApp(False)
    app.MainLoop()
The StaticBitmap control is the simplest method of displaying a Bitmap in an application. In the example code that accompanies this recipe, we have an image in the same directory as our script, called face-grin.png, that we want to display. In order to display the image we first use the Bitmap constructor to load the image into memory, and then pass it to the StaticBitmap control in order to display the image on the screen. The constructor takes a path to the file, and a type argument that specifies the image format.
There is built-in support for the most common image formats. The following list shows the supported image file formts:
wx.BITMAP_TYPE_ANYwx.BITMAP_TYPE_BMPwx.BITMAP_TYPE_ICOwx.BITMAP_TYPE_CURwx.BITMAP_TYPE_XBMwx.BITMAP_TYPE_XPMwx.BITMAP_TYPE_TIFwx.BITMAP_TYPE_GIFwx.BITMAP_TYPE_PNGwx.BITMAP_TYPE_JPEGwx.BITMAP_TYPE_PNMwx.BITMAP_TYPE_PCXwx.BITMAP_TYPE_PICTwx.BITMAP_TYPE_ICONwx.BITMAP_TYPE_ANIwx.BITMAP_TYPE_IFF
The Working with ToolBars recipe in Chapter 3, Basic Building Blocks of a User Interface contains some more Bitmap usage examples.
The Customizing the ArtProvider recipe in Chapter 10, Creating Components and Extending Functionality provides more on information how to create Bitmaps.
Adding an icon to your application's title bar as a way of branding the application that will help to set it apart and distinguish it from the other applications running on the desktop. This recipe will show how easy it is to add an icon to a Frame.
Here we will create a Frame subclass that loads an image file from the hard disk and displays it on its title bar:
class MyFrame(wx.Frame):
    def __init__(self, parent, id=wx.ID_ANY, title="",
                 pos=wx.DefaultPosition, size=wx.DefaultSize,
                 style=wx.DEFAULT_FRAME_STYLE,
                 name="MyFrame"):
        super(MyFrame, self).__init__(parent, id, title, pos,
                                      size, style, name)


        # Attributes
        self.panel = wx.Panel(self)

        # Setup
        path = os.path.abspath("./face-monkey.png")
        icon = wx.Icon(path, wx.BITMAP_TYPE_PNG)
        self.SetIcon(icon)
Displaying this Frame subclass will result in a window like the following. Comparing this to the one in the Main Frame recipe, you can see the new icon to the left of the title:
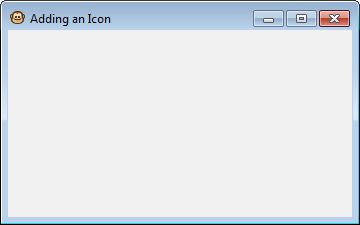
In this recipe we have a small (16x16) image of a monkey that we want to show in the title bar of the Frame. For simplicity, this image is located in the same directory as our script and we load it using a relative path. The Frame requires an icon instead of a Bitmap, so we have to use an Icon to load our image into memory. After loading the image, all that is left is to call the Frame's SetIcon method in order to set the Icon for the Frame.
All controls, and many other user-interface elements, such as menus, take an ID as an argument in their constructor that can be used to identify the control or object inside event handlers. Typically, the value of wx.ID_ANY is used to let the system automatically generate an ID for the item, or the wx.NewId function is used to create a new ID. However, there are also a number of predefined IDs available in the wx module that have special meaning for certain common items that many applications tend to have, such as Copy/Paste menu items or Ok/Cancel buttons. The expected behavior and appearance of some of these items can vary from platform to platform. By using the stock ID, wxPython will take care of the differences for you. This recipe will show a few of the places in which these IDs can come in handy.
This code snippet shows how to make use of some of the predefined IDs to simplify the creation of some common UI elements:
class MyFrame(wx.Frame):
    def __init__(self, parent, id=wx.ID_ANY, title="",
                 pos=wx.DefaultPosition, size=wx.DefaultSize,
                 style=wx.DEFAULT_FRAME_STYLE,
                 name="MyFrame"):
        super(MyFrame, self).__init__(parent, id, title,
                                      pos, size, style, name)

        # Attributes
        self.panel = wx.Panel(self)

        # Setup
        ok_btn = wx.Button(self.panel, wx.ID_OK)
        cancel_btn = wx.Button(self.panel, wx.ID_CANCEL,
                               pos=(100, 0))

        menu_bar = wx.MenuBar()
        edit_menu = wx.Menu()
        edit_menu.Append(wx.NewId(), "Test")
        edit_menu.Append(wx.ID_PREFERENCES)
        menu_bar.Append(edit_menu, "Edit")
        self.SetMenuBr(menu_bar)
The previous class will create the following window:
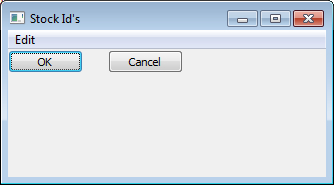
The first thing to notice in this recipe is that no labels were specified for the two buttons that we created. By using the Stock IDs for OK and Cancel as their IDs, the framework will automatically put the proper label o the control.
This also applies to menu items, as can be seen in our Edit menu for the Preferences item. Another important thing to note is that if this sample is run on Macintosh OS X, the framework will also automatically move the Preferences menu item to its expected location in the Application menu.
Using buttons with Stock IDs in a Modal Dialog will also allow the dialog to be dismissed, and return the appropriate value, such as wx.OK or wx.CANCEL, without the need to connect event handlers to the buttons for performing this standard action. Automatically getting the correct button layout for a dialog can also be achieved by using Stock IDs with StdDialogButtonSizer.
The Creating Stock Buttons recipe in Chapter 3, Basic Building Blocks of a User Interface shows how Stock IDs can be used to construct standard buttons.
The Standard dialog button layout recipe in Chapter 7, Window Layout and Design shows how to easily add common buttons to dialogs by using Stock IDs.
The Optimizing for OS X recipe in Chapter 12, Building and Managing Applications for Distribution shows more uses for Stock IDs.
The Clipboard is a system-wide, accessible way of getting data to and from one application to another. This recipe will show how to get text from the clipboard, as well as how to put text in the clipboard for other applications to access.
The following two functions can be used to get text from and put text on the clipboard:
def SetClipboardText(text):
    """Put text in the clipboard
    @param text: string
    """
    data_o = wx.TextDataObject()
    data_o.SetText(text)
    if wx.TheClipboard.IsOpened() or wx.TheClipboard.Open():
        wx.TheClipboard.SetData(data_o)
        wx.TheClipboard.Close()

def GetClipboardText():
    """Get text from the clipboard
    @return: string
    """
    text_obj = wx.TextDataObject()
    rtext = ""
    if wx.TheClipboard.IsOpened() or wx.TheClipboard.Open():
        if wx.TheClipboard.GetData(text_obj):
            rtext = text_obj.GetText()
        wx.TheClipboard.Close()
return rtextwxPython provides a singleton clipboard object that can be used to interact with the systems clipboard. This class works with data objects that are used to represent the underlying system data types. The use of the clipboard is a three-step process:
Open the Clipboard
Set/Get the DataObject
Close the Clipboard
The clipboard supports many other data types besides just text. wxPython provides built-in support for some additional types, as well as classes for defining your own custom types. The usage of these different data types follows the same general pattern as the TextDataObject.
|
Data types |
Description |
|---|---|
|
Used to get Bitmaps from and put Bitmaps on the Clipboard | |
|
Can hold any Python picklable data type | |
|
Can contain any arbitrary number of simple data types and make them all available at once | |
|
Used for holding filenames | |
|
Used for holding URLs |
In order to improve usability, it is good to support drag and drop in an application so that the user can simply drop files or other objects into your application. This recipe will show how to support accepting a CompositeDataObject that supports both files and text.
First we will define a custom drop target class:
class FileAndTextDropTarget(wx.PyDropTarget):
    """Drop target capable of accepting dropped
    files and text
    """
    def __init__(self, file_callback, text_callback):
        assert callable(file_callback)
        assert callable(text_callback)
        super(FileAndTextDropTarget, self).__init__()
        # Attributes
        self.fcallback = file_callback # Drop File Callback
        self.tcallback = text_callback # Drop Text Callback
        self._data = None
        self.txtdo = None
        self.filedo = None

        # Setup
        self.InitObjects()

    def InitObjects(self):
        """Initializes the text and file data objects"""
        self._data = wx.DataObjectComposite()
        self.txtdo = wx.TextDataObject()
        self.filedo = wx.FileDataObject()
        self._data.Add(self.txtdo, False)
        self._data.Add(self.filedo, True)
        self.SetDataObject(self._data)

    def OnData(self, x_cord, y_cord, drag_result):
        """Called by the framework when data is dropped
        on the target
        """
        if self.GetData():
            data_format = self._data.GetReceivedFormat()
            if data_format.GetType() == wx.DF_FILENAME:
                self.fcallback(self.filedo.GetFilenames())
            else:
                self.tcallback(self.txtdo.GetText())

        return drag_result
Then to make use of the FileAndTextDropTarget, we assign it to a window using the window object's SetDropTarget method.
class DropTargetFrame(wx.Frame):
    def __init__(self, parent, id=wx.ID_ANY, title="",
                 pos=wx.DefaultPosition, size=wx.DefaultSize,
                 style=wx.DEFAULT_FRAME_STYLE,
                 name="DropTargetFrame"):
        super(DropTargetFrame, self).__init__(parent, id,
                                              title, pos,
                                              size, style,
                                              name)

        # Attributes
        choices = ["Drag and Drop Text or Files here",]
        self.list = wx.ListBox(self,
                               choices=choices)
        self.dt = FileAndTextDropTarget(self.OnFileDrop,
                                        self.OnTextDrop)
        self.list.SetDropTarget(self.dt)

        # Setup
        self.CreateStatusBar()

    def OnFileDrop(self, files):
        self.PushStatusText("Files Dropped")
        for f in files:
            self.list.Append(f)

    def OnTextDrop(self, text):
        self.PushStatusText("Text Dropped")
        self.list.Append(txt)
The framework will call the OnData method of our DropTarget when the window has received the drop data. When OnData is called, we simply get the data from our DataObject and pass it to the appropriate callback function to let our window decide how to handle the data.
All window objects have a SetDropTarget
method that can be used to assign a DropTarget, so this class can be reused for almost any type of control. In the previous example, we assigned it to a ListBox and then appended the dropped data to the list in each of our callbacks.
The PyDropTarget class provides a few more methods that can be called at different times during the drag operation. These methods can also be overridden in order to do things such as change the mouse cursor, show a custom drag image, or reject the drag object.
|
Methods |
When the methods are called |
|---|---|
|
Called when a drag object enters the window. Returns a drag result value (that is, | |
|
Called while the mouse is dragging the object over the target | |
|
Called when the mouse leaves the drop target | |
|
Called when the user drops the object. Return | |
|
Called after |
Two-stage widget creation is a way of initialzing a widget and then its UI part, in two steps. This method of object creation is used by class factories such as XRC (XML Resource) and to set extra style flags that cannot be set by using the constructor's regular style parameter. This recipe will show how to use two-stage creations to create a frame that has a special button that can be used to put it into a context-sensitive help mode.
Note
This is a Windows-specific example; other platforms do not support having a ContextButton in their title bar.
Here we will create a Frame subclass that uses two stage creation in order to set an extra style flag:
In wxPython, two-stage widget creation is actually a three-step process. First, each class that supports it has its own PreClass that is used as a factory constructor that pre-creates the object. At this point, the pre object can be used to set the extra style flag. The next step is to call Create. Create acts like the regular constructor and creates the UI portion of the control. The final step is to call PostCreate, PostCreate does the work of translating the pre object into self so that the object will appear just as if the class's __init__ method had been called normal.
The Using XRC recipe in Chapter 7, Window Layout and Design discusses XRC.
wxPython is a wrapper around the wxWidgets C++ framework. This relationship means that inside most wxPython objects there is a C++ object. Because of this, methods that belong to wxPython classes cannot always be overridden in the same way as they can with a normal Python object.
To demonstrate this behavior, this recipe will show how to create a class that will automatically add its children windows to its Sizer layout. This will be contrasted to a class that does not expose its virtual methods to the Python layer of the class.
To demonstrate the difference in overriding methods, we will create two similar classes first starting with one that derives from the standard Panel class:
import wx

class MyPanel(wx.Pael):
    def __init__(self, parent):
        super(MyPanel, self).__init__(parent)

        sizer = wx.BoxSizer()
        self.SetSizer(sizer)

    def AddChild(self, child):
        sizer = self.GetSizer()
        sizer.Add(child, 0, wx.ALIGN_LEFT|wx.ALL, 8)
        return super(MyPanel, self).AddChild(child)
Now we will create a class that is exactly the same except that it derives from the Py version of the class:
class MyVirtualPanel(wx.PyPanel):
    """Class that automatically adds children
    controls to sizer layout.
    """
    def __init__(self, parent):
        super(MyVirtualPanel, self).__init__(parent)

        sizer = wx.BoxSizer()
        self.SetSizer(izer)

    def AddChild(self, child):
        sizer = self.GetSizer()
        sizer.Add(child, 0, wx.ALIGN_LEFT|wx.ALL, 8)
        return super(MyVirtualPanel, self).AddChild(child)
Now below we have a little sample application that uses the above two classes:
class MyFrame(wx.Frame):
    def __init__(self, parent, *args, **kwargs):
        super(MyFrame, self).__init__(parent,
                                      *args, **kwargs)

        # Attributes
        self.mypanel = MyPanel(self)
        self.mypanel.SetBackgroundColour(wx.BLACK)
        self.virtpanel = MyVirtualPanel(self)
        self.virtpanel.SetBackgroundColour(wx.WHITE)

        # Setup
        self.__DoLayout()

    def __DoLayout(self):
        """Layout the window"""
        # Layout the controls using a sizer
        sizer = wx.BoxSizer(wx.VERTICAL)
        sizer.Add(self.mypanel, 1, wx.EXPAND)
        sizer.Add(self.virtpanel, 1, wx.EXPAND)
        self.SetSizer(sizer)

        # Create 3 children for the top panel
        for x in range(3):
            wx.Button(self.mypanel,
                      label="MyPanel %d" % x)
        # Create 3 children for the bottom panel
        for x in range(3):
            wx.Button(self.virtpanel,
                      label="VirtPanel %d" % x)

        self.SetInitialSize(size=(300, 200))

class MyApp(wx.App):
    def OnInit(self):
        self.frame = MyFrame(None,
                             title="Virtualized Methods")
        self.SetTopWindow(self.frame)
        self.frame.Show()

        return True

if __name__ == "__main__":
    app = MyApp(False)
    app.MainLoop()
Running this code will result in a window like the following one being displayed:
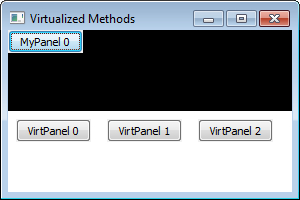
In each version of our Panel class we override the AddChild method, which is called every time that a window has a new child window created. AddChild is called inside the C++ part of the class when this happens, so in order to be able to override the method in our Python version of the class, we need to use the special version that provides access to overriding the virtualized method from the C++ class.
The classes in wxPython that have a version of the class prefixed with Py
have the virtualized versions of many of the methods exposed, so that when they are overridden in a Python subclass they get bound to the method in the C++ layer of the object and will be called by the framework instead of the base class's implementation.
This can be seen in the screenshot of our recipe application that was shown above. The top version of the class that does not derive from PyPanel has all three of its Buttons stacked on top of each other in the top left-hand corner of the window, because its overridden AddChild method is never called. On the other hand, the version of the class that does derive from PyPanel has its AddChild
method called and is able to lay out the Buttons in its Sizer.
It is not well documented as to which methods are exposed as virtual methods and which ones are not. Here is a little trick that can help you to identify which virtual methods are available in a given class. Just run the following code inside the Python interpreter:
import wx
for method in dir(wx.PyPanel):
    if method.startswith('base_'):
        print method
The argument in the dir() call can be changed to whatever class you want to inspect. Running this will print out a list of all of the methods in the class that are virtualized. The base_ methods are generated by SWIG as a part of the wxPython bindings to wxWidgets, and should not be used directly in your code. Instead, the methods without the base_ prefix should be used.
The Creating a custom control recipe in Chapter 10, Creating Components and Extending Functionality, shows more usage examples of overriding virtual methods.
The Using a BoxSizer recipe in Chapter 7, Window Design and Layout, explains how the BoxSizer class can be used to perform the layout of controls in a window.
