Web Services Business Process Execution Language (WS-BPEL), also BPEL or BPEL4WS, is an orchestration language for composition, orchestration, and coordination of services. BPEL is not used for actual programming of functionalities. Rather, it is used to orchestrate and compose functionalities, exposed through services, into larger units and composite applications.
Composition or orchestration usually follows a certain order of activities; it forms a process. Therefore, this language is called business process execution language. Particularly in information systems, BPEL has an important role. It is used to orchestrate business processes which consists of several activities. Some of them are automated, some are not. For automated activities, a BPEL process would invoke a specific service that provides the corresponding operation. For manual activities, a BPEL process would call a human task. We will explain human tasks later in this book.
As BPEL is not suitable for actual programming of functionalities, it is much easier to learn and understand than traditional languages, such as Java, C#, or C++. However, BPEL still provides a rich vocabulary for expressing the behavior of business processes. In BPEL, it is much easier to implement specifics of business processes, such as parallel or asynchronous invocations of activities, fault handling, and compensations.
BPEL is usually considered as a part of Business Process Management (BPM) with Service Oriented Architecture (SOA). It is used to weave the bits and pieces of the SOA technology together into a more useful and business-friendly whole. BPEL is as important for SOA as SQL is for relational databases.
In this chapter, we will get familiar with the basic concepts and develop our first Hello BPEL process. We will cover the following topics:
Understanding what BPEL is and how it differs from traditional languages
Learning how to install Oracle JDeveloper and SOA Suite
Creating a domain on the SOA Suite server
Developing a simple BPEL processes
Having an understanding of the BPEL source code
Understanding some of the basic construct of BPEL
Deploying the BPEL processes to the SOA Suite server
Using the Enterprise Manage console to test the BPEL processes
Let's get started...
Business Process Execution Language (BPEL) is a language for composing, orchestrating, and coordinating the flow of services. BPEL is a programming-in-the-large language, used for service composition. It differs from programming-in-the-small languages, such as Java, C#, or C++, which are used to implement specific functionalities. BPEL is used to compose (orchestrate) functionalities exposed through services (service interfaces) into composite applications.
For example, let's consider that we have a bookstore. In this bookstore, we have an application that provides support for the bookstore operations, among them the stock management. Let's assume that this application provides a web service interface through which we can query the number of books in stock. If the number of books in stock is lower than anticipated, our bookstore would need to buy more books. It would need to make the purchase order with the book publisher. Again, let's assume that the publisher provides a web service through which the bookstore can make the purchase order.
BPEL allows us to implement the previously-mentioned process in an easy and straightforward way, as we will see very shortly. BPEL is a language specialized for process orchestrations; it provides specific language constructs for business processes. BPEL, therefore, provides several important advantages as follows:
Implementing business processes with BPEL is easier and more straightforward when compared to traditional programming languages.
Business processes implemented with BPEL still look like processes. Maintaining, updating, and modifying them in the future will be much easier when compared to using traditional programming languages.
BPEL tends to bridge the huge gap between business executives and software developers, as business people can visually comprehend what goes on in the business processes.
BPEL separates defining business process from coding the actual functionality in programming language thereby leading developers to use the same code for multiple processes. In other words, it promotes reuse.
There are two ways we can write the BPEL code. One is to write the code directly. BPEL uses an XML-based vocabulary that allows us to specify and describe business processes. Writing the BPEL XML code directly requires quite a lot of knowledge. The other simpler approach is to use a visual editor. Using an editor allows us to construct the BPEL processes using a drag-and-drop approach where we select the appropriate BPEL activity and drop it to the process flow. BPEL is today widely supported in development environments, such as JDeveloper, WebSphere Integration Designer, or Eclipse. Visual editors in these tools might differ. However, the BPEL code generated by all Integrated Development Environments (IDEs) is the same. This is because BPEL is an industry standard and is defined as OASIS specification (https://www.oasis-open.org/). The current version of BPEL is 2.0, although the previous version BPEL 1.1 is still widely used. As long as we stick with the standard BPEL without vendor-specific extensions, BPEL code is portable between different environments.
To execute a BPEL process, we need a process server. There are several commercial and open source BPEL process servers available. Most well-known are Oracle SOA Suite, IBM WebSphere BPM, ActiveVOS, and Apache ODE.
In order to develop the examples in this chapter, we need to install IDE and the process server on which the BPEL processes will execute. To develop the BPEL processes, we will use Oracle JDeveloper 12c 12.1.3. To execute the BPEL processes, we will use the runtime environment of the Oracle SOA Suite 12c 12.1.3.
The installation will consist of the following steps:
A prerequisite for installing and running JDeveloper and SOA Suite is the JDK. We will install the latest JDK Version 7. Currently, SOA Suite 12c required Java SE 7 and has not been certified to work with Java SE 8 yet. However, this might change with newer versions.
Perform the following steps to download and install the JDK:
Go to http://www.oracle.com/technetwork/java/javase/downloads/index.html and download and install the latest version of Java SE 7 Java Platform, Standard Edition. Currently, this is Java SE 7u60. You need to download the JDK (and not JRE or Server JRE).
Install the JDK. On Windows, you will need to double-click on the installation file and you will be guided through the install process. On Linux, you will have to execute the install from the command shell, as shown in the following screenshot:

Finally, we need to set the
JAVA_HOMEandORACLE_HOMEenvironment variables. On Linux, you need to write the following command:JAVA_HOME=$HOME/top_level_folder_jdkversion export JAVA_HOME ORACLE_HOME=%HOME/Oracle/Middleware/Oracle_Home export ORACLE_HOME
On Windows, write the following command:
SET JAVA_HOME=%USERPROFILE%\top_level_folder_jdkversion
SET ORACLE_HOME=%USERPROFILE%\Oracle\Middleware\Oracle_Home
We installed the JDK and set the environment variables, JAVA_HOME and ORACLE_HOME, which are required for the JDK and SOA Suite.
You can check the JDK installation with a simple java –version command, which will print the JDK version and the virtual machine version:

The easiest way to start using both products is to download a free SOA Suite 12c installation available at http://www.oracle.com/technetwork/middleware/soasuite/downloads/index.html.
We will use a quick-start installation. The quick-start installation will contain all the following software required for a development environment on a single host:
JDeveloper with SOA IDE extensions
BPEL Process Manager
Human Workflow
Business Rules
Mediator
Service Bus
Technology Adapters
Enterprise Scheduler
SOA Spring Component
Enterprise Manager Fusion Middleware Control
Integrated WebLogic Server
Java DB
The quick-start installation is the quickest way to start developing and testing the BPEL processes using SOA Suite and JDeveloper and exactly what most developers need (and what we need for this book).
Please note that the quick-start installation is limited to one server and cannot be upgraded to a production environment. A production environment requires a much more complex installation, described at http://docs.oracle.com/middleware/1213/core/INSOA/planning.htm.
Perform the following steps to download and install Oracle SOA Suite 12c with JDeveloper using the quick-start installation:
Go to http://www.oracle.com/technetwork/middleware/soasuite/downloads/index.html and download the free SOA Suite 12c installation. You can choose between a Microsoft Windows 64 bit JVM installation and All Platforms Generic 64 bit JVM installation. Select SOA Suite Quick Start Installer of SOA Suite 12.1.3. You don't need any Additional Components for this book.
Once downloaded, unzip the content into the same directory. Two
.jarfiles will unzip, as shown in the following screenshot:
We need to execute the
fmw_12.1.3.0.0_soa_quickstart.jarfile, which will launch the installation wizard, as shown in the following screenshot:
The installation wizard will appear, guiding you through several steps. First, we need to specify the Central Inventory installation directory. Specify
/home/oracle/oraInventory. We also need to specify Operating System Group. This is the group with write permissions to the inventory directory. Use theoraclegroup:
Next, the quick-start installer will appear, guiding you through the six steps. The first step is the Welcome screen, where we only need to click on the Next button:

In the next step, we need to specify the location where we would like to install SOA Suite and all the related components. This is called Oracle Home. This directory must be empty, otherwise the wizard will give an error message. Use the default path,
/home/oracle/Oracle/Middleware/Oracle_Home:
The prerequisite checks will run. If you have successfully installed the JDK, you will see a screen shown in the following screenshot; click on Next:

The installation procedure will show the installation summary. Check the installation location once again and look at the feature sets to be installed. Click on Install to proceed with the installation:

Monitor the installation progress and click on Next:

Finally, we will see the Installation Complete screen. Please notice that the checkbox for Start JDeveloper should be checked:

Clicking on the Finish button will launch JDeveloper. On the first screen, select the Studio Developer (All Features) role, which we will be using throughout the book:

After this, JDeveloper will launch and we will see the JDeveloper desktop.
We installed SOA Suite 12c with bundled JDeveloper. Before we can start using SOA Suite, we need to create the domain and verify the installation.
SOA Suite runs on top of Oracle WebLogic Server. A domain is the basic administration unit for the WebLogic Server instances. The easiest way is to create the default domain within Integrated WebLogic Server, which is bundled with JDeveloper. We will use this option.
Alternatively, you can configure a standalone domain or a compact domain. For more information, refer to http://docs.oracle.com/middleware/1213/core/SOAQS/integrated.htm.
To create the default domain, perform the following steps:
In JDeveloper, start the integrated WebLogic Server. Choose the Run menu and select the Start Server Instance option:

A dialog box will open where you need to enter Administrator ID and Password. Use
weblogicfor Administrator ID andwelcome1for Password:
The creation of the default domain will start. It might take a half hour or more, depending on the performance of your computer, so be patient. Once you see the following messages in the log window, you know that the domain has been created and the server is running: SOA Platform is running and accepting requests and IntegratedWebLogicServer started.
We created the default domain, which is required to deploy and execute SOA composite applications (which include the BPEL processes).
To verify that the SOA Suite server is running, we will use the Enterprise Manager console. We will access it through the Web browser. Therefore, let's now start the Web browser and enter the following address: http://localhost:7101/em/
We will log in with the weblogic username and welcome1 password and will see the Enterprise Manager console:

With this, we have successfully finished the installation and creation of the domain and are ready to develop our first BPEL process, which we will do in the next section.
In this section, we will develop our first BPEL process. We will start with a simple BPEL process to get things rolling. Earlier in this chapter, we explained that BPEL is usually used to orchestrate services. This is true. However, in our first BPEL process, we will not be able to orchestrate services, as we do not have any. Rather, we will create a very simple BPEL process, which will return the number of books in stock.
Before we start, let's have a brief look at the artifacts that need to be created. Each BPEL process is part of the SOA composite. SOA composite shows all components, relations between components, service interfaces, and links to external services (external references). In addition to the BPEL processes, an SOA composite can include human tasks, business rules, mediators, adapters, and other components. Our first step will be the creation of an SOA composite.
Each BPEL process also consists of several artifacts. The most important is the BPEL code, which uses XML representation. Each BPEL process also has a WSDL interface, through which it can be invoked. The third artifact is XML Schema Definition (XSD) used by BPEL and WSDL. Our second step will be the creation of BPEL with the corresponding XSD and WSDL.
We will proceed in two steps. First, we will create the SOA composite application. Then, we will add the BPEL process with the corresponding XSD and WSDL (first, we will create the XML Schema, then WSDL, and then we will implement the BPEL process).
Let's start. To create the SOA composite application, we will perform the following steps:
First, create a new application. Select the New Application… option in the Applications window:

Next, select SOA Application:

Name the application
Chapter1, as shown in the following screenshot. Use the default directory and click on Next to proceed:
Next, create a project and name it
Bookstore. Use the default directory again:
After clicking on Next, we are asked what type of composite template we would like to use. We will start from a Standard Composite template. Select the Composite WithBPEL Process option and click on Finish. Alternatively, we can select Empty Composite and add the BPEL process later.

Clicking on Finish brings us to the Create BPEL Process wizard. Here we have the option to select the BPEL version, name the process, and specify the BPEL XML namespace. Each BPEL process is uniquely identified by
QName. Thus, a namespace and a process name are needed. We also need to select the process template and define the service name. We will expose the BPEL process as a SOAP web service, therefore we should leave the Expose as a SOAP service checkbox selected.We will use BPEL 2.0 specification, name the process as
BookstoreABPEL, add the namespacehttp://packtpub.com/Bookstore/BooksotreABPEL, and select the Synchronous BPEL Process template. We leave default values for Transaction, Input, and Output, and click on OK, as shown on the following screenshot:
We created an SOA composite application with the BPEL process. We can see the composite view already opened under the BookstoreA tab. A composite application usually consists of several service components. The BPEL process is just one component type. The others include human tasks, business rules, mediators, adapters, and Spring components.
The SOA composite view has three sections. The middle part shows all Components, which are part of the composite. In our case, this is the BookstoreABPEL process. In following chapters, we will add more components to the composite. The left part shows Exposed Services. Exposed services are service interfaces exposed to other service consumers. Usually, these are WSDL interfaces (but can also be REST interfaces or events). In our example, the BookstoreABPEL process is exposed through the bookstoreabpel_client WSDL interface, which has one operation named process. The right-hand side shows External References. External references are external services used by our composite. External services are not part of our project. We only use them by referencing their WSDL interface. In our example, we do not have any external references yet. The composite design view is shown in the following screenshot:

We also created the BPEL process. Let's have a closer look. To open the BPEL process, we have to select the already opened BookstoreABPEL.bpel tab. Alternatively, we can double-click on the BookstoreABPEL component on the composite design view (the blue-colored component in the middle of the screen) or double-click on the BookstoreABPEL.bpel file from the project tree in the left-hand side window. This brings us into the BPEL designer:

Each BPEL process consists of a receive activity, which is supposed to receive the initial request. This means that once the service consumer (client) will invoke the process operation on the WSDL interface of the BPEL process, the receiveInput receive activity will receive the request. This request will be a WSDL message, as we will see later in this section.
The other essential part of a BPEL process is the reply activity, which is used by the BPEL process to return the response to the service consumer (client). Remember that we have selected a synchronous BPEL process, which follows the request and response message exchange pattern. Therefore, in the replyOutput activity, the BPEL process will return the response to the client.
Note
The BPEL processes can be synchronous or asynchronous. The synchronous BPEL processes follow the request and response semantics. A service consumer, which invokes a synchronous BPEL process will wait until the process finishes and will receive a reply from the process. This assumes that the BPEL process will finish in a reasonable time and that it will cutely return a response.
The BPEL processes can also be asynchronous. A service consumer, which invokes an asynchronous BPEL process, will not wait for the response. An asynchronous BPEL process might not return any response, or it might use a callback for the response. We will explain the asynchronous BPEL processes in Chapter 5, Interaction Patterns in BPEL.
We will put the BPEL process logic between the initial receive and the final reply activities. Before we do that, we have to create the XML Schemas for the elements and messages used in the BPEL process.
Before we can start developing our BPEL process, we have to specify the XSD elements used for the input and output messages (for the request and the response message). Also, the XSD elements are used for variables within the BPEL process.
The XML schema has already been created and can be found in the BookstoreABPEL.xsd file. The default XSD elements for request and response contain only strings, which are not adequate for our example. Therefore, we will modify it.
First, we will rename it from BookstoreABPEL.xsd to BookstoreBPEL.xsd. The reason is that we might use same XSD for more than one bookstore, so we would like to have a generic XSD filename.
Our request element consists of the following elements: book ISSN, book title, edition, and date of publishing. The response element consists of the following elements: book ISSN and stock quantity.
We will perform the following steps:
To rename XSD, right-click on the
BookstoreABPEL.xsdfile in the project tree, select Refactor, and then Rename:
In the dialog box, enter the new name,
BookstoreBPEL.xsd.Double-click on the
BookstoreBPEL.xsdfile in theSchemasfolder and switch to source view.We have to define two complex elements. First, edit the existing
processelement, rename it to theBookDataelement, and enter the code shown in the following screenshot:
Next, define the content of the
processResponseelement, which we will rename toBookDataResponseand add the two elements shown in the following screenshot:
Before we continue, let's save the XSD file.
We created the XSD elements used by the BPEL process. To be more accurate, we modified the autogenerated XSD file and specified the request element (BookData) and the response element (BookDataReponse).
The request element (BookData) is used as the input for the initial receive activity (receiveInput). The response element (BookDataReponse) is used by the final reply activity (replyOutput).
This is specified in the autogenerated WSDL file, which you can find in the WSDLs folder. It is named BookstoreABPEL.wsdl. Let's have a look at it.
WSDL specifies the web service interface, which is used to invoke the BPEL process. When creating the BPEL process, the corresponding WSDL has been generated in the WSDLs folder of the project tree. It is named BookstoreABPEL.wsdl.
By default, WSDL contains a single operation named process. We will modify the default WSDL and rename the operation name from process to getBookData. This name denotes the purposed of the operation more precisely. We will also modify WSDL to include the XSD elements, which we created in the previous section.
To achieve this, let's perform the following steps:
Double-click on the
BookstoreABPEL.wsdlfile in theWSDLsfolder and switch to the source view.In the
<portType>section, rename the operation name fromprocesstogetBookData:
In the
<message>section, change the element names of both messages toBookDataandBookDataResponserespectively. This way, we will reference the changes that we made in the XSD:
Finally, change the name of the included schema file from
BookstoreABPEL.xsdtoBookstoreBPEL.xsd, as shown in the following screenshot:
We looked at WSDL for the BPEL process and modified the operation name. Instead of using the default process name, we renamed it to getBookData. We also modified WSDL to reflect the XSD elements that we defined. Finally, we modified the XSD filename, which we renamed previously.
This way we have become familiar with WSDL, which is generated for each BPEL process. We are now ready to implement the BPEL process.
In this step, we will implement the BPEL process itself. The goal is to return the book data, including the stock quantity. For this, we would usually need to access the database to query for the stock of the specified book. In our case, we do not want to complicate the example, so we will simply return a fixed value.
To achieve this, we will use the Assign activity to assign a fixed value to a BPEL variable. Assign is one of the basic BPEL activities. We will explain the BPEL language later in this chapter.
For now, let's perform the following steps. First, we will copy BookISSN from request inputVariable to response outputVariable. Second, we will copy a number 5 to the StockQuantity element of the output message:
Open our
BookstoreABPELprocess by selecting the already opened BookstoreABPEL.bpel tab. Alternatively, you can double-click on theBookstoreABPELcomponent on the composite design view or double-click on theBookstoreABPEL.bpelfile from the project tree on the left-hand side window.Drag-and-drop the Assign activity from the right-hand component palette to the BPEL process in the middle between the receiveInput and replyOutput activities, as shown in the following screenshot:

Double-click on the Assign activity and set the parameters. Name the activity as
DetermineStockQuantity. CopyBookISSNfrominputVariabletooutputVariableby draggingBookISSNfrominputVariableand dropping it onBookISSNinoutputVariable, as shown in the following screenshot:
To set the
StockQuantityelement of the output message, we will need to use an expression. Drag-and-drop Expression from the upper-right corner of the window to theStockQuantityelement. Doing this, the Expression Builder window will appear.Click on the Conversion Functions tab and select the n()number function. Let's assume that we will return stock quantity of
5. This means we need to writenumber(5):
Clicking on OK twice and saving all we have performed brings us to the following screenshot:

We implemented our first BPEL processes. It contains a very simple logic for returning the book data, including the stock quantity. It assigns the book ISSN and the stock quantity to the constant value of 5. Obviously, this is an oversimplified process, but it is sufficient for our first example and to get a feeling about BPEL. Next, we will try to deploy the BPEL process.
To deploy the process, perform the following steps:
Right-click on the BookstoreA project and click on the Deploy submenu. Select BookstoreA from the option.
Select Deploy to Application Server:

We can specify the deployment configuration. For this time, we will use the default values. Please note that the most important is to specify New Revision ID, which denotes the revision (or version) number of your composite application. Also note Overwrite any existing composites with the same revision ID; this has to be checked if you want to redeploy a composite application with the same revision ID:

Click on the IntegratedWebLogicServer server for the deployment and click on Next:

We will see the status of the SOA server. Click on Next:

Finally, we will see the deployment summary. Click on Finish:

Monitor the deployment log windows at the bottom of the screen and look for the Deployment finished. message. This means that the BPEL process has been successfully deployed:

To test our BPEL process, let's perform the following steps:
Switch to the Web browser and navigate to
http://localhost:7101/em/.Log in with the
weblogicusername andwelcome1password (or a different password, which you have specified by the creation of the domain).At the bottom of the screen, you will see the Bookstore application. If you cannot see it, use the scroll bar to find it.
After clicking on it, a new screen will be displayed.
To test the BPEL process, click on the Test button.
We will see a quite complex screen. In the lower part of the screen, we will see the payload with the four parameters, which we defined as input parameters for the BPEL process: BookISSN, Title, Edition, and PublishingYear.
Fill the book ISSN, title, edition, and publishing year. Please note that the publishing year is a
datetype; therefore, it requires2014-09-01syntax, as shown in the following screenshot:
Alternatively, we can switch from Tree View to XML View to get a better understanding that we will send the XML that we defined previously in the XML Schema section. The complete SOAP message is shown in the following screenshot:

Click on the Test Web Service button in the upper-right corner of the screen to invoke our BPEL process.
We invoked our BPEL process. Once the process executes, the view switches to the Response tab where the response of the BPEL process is displayed. If the invocation has been successful, we will see the quantity of 5. Indeed, we can see that the process will return the quantity 5 for a selected book. Again, we can switch between Tree View and XML View:

To see the XML representation, the SOAP response message directly, we can switch to XML View and we will see the following screenshot:

With this, we have successfully tested our first BPEL process. It was an oversimplified BPEL process, which took four parameters as an input (book ISSN, title, edition, and publishing year) and returned the quantity of the book together with the ISSN. Moreover, we hardcoded the quantity to 5 units for simplicity purposes.
Let's now have a more detailed look into what we did and try to understand what a BPEL process is. A BPEL process is basically a piece of source code with the .bpel extension, which is executed on a process server. BPEL uses the XML vocabulary to write the code. So far, we have used the visual editor to compose the BPEL process. However, we can switch to the source code view.
A BPEL process consists of steps. Each step is called an activity. BPEL supports basic and structured activities. Basic activities represent basic constructs and are used for common tasks listed, as follows:
Invoking other web services using
<invoke>Waiting for the client to invoke the business process through sending a message using
<receive>(receiving a request)Generating a response for synchronous operations using
<reply>Manipulating data variables using
<assign>Indicating faults and exceptions using
<throw>and<rethrow>Waiting for some time using
<wait>Terminating the entire process using
<exit>
We can then combine these and other basic activities and define complex flows that specify exactly the steps of a business process. To combine basic activities, BPEL supports several structured activities. The most important are as follows:
Sequence (
<sequence>) for defining a set of activities that will be invoked in an ordered sequenceFlow (
<flow>) for defining a set of activities that will be invoked in parallelConditional construct (
<if>) for implementing branchesWhile, repeat, and for each (
<while>,<repeatUntil>,<forEach>) for defining loopsThe ability to select one of the number of alternative paths using
<pick>
Each BPEL process will also define partner links using <partnerLinks>. Partner links are other services that use the BPEL process or are used by the BPEL process. A BPEL process also declares variables using <variables>.
A BPEL process definition is written as an XML document using the <process> root element. Within the <process> element, a BPEL process will usually have the top-level <sequence> or <flow> element. Within the sequence, the process will first wait for the incoming message to start the process. This wait is modeled with the <receive> construct. Then, the process will perform some activities and return a response. This is shown in the following code excerpt:
<process ...>
   ...
  <sequence>

    <!-- Wait for the incoming request to start the process -->
    <receive ... />

    <!-- Perform some activities -->
    ...

    <!-- Return the response -->
    <reply ... />
  </sequence>
</process>
To provide an idea of a BPEL process structure, let's look more closely at the BookstoreABPEL process. We can see the <process> activity, which represents the root element. Within the <process> activity, several XML namespaces are defined. The process will also import WSDL. We have already mentioned that each BPEL process requires the interface definition, which is specified in WSDL:

Next, <partnerLinks> are declared. Partner links define which services our process is communicating with. The client, which calls the BPEL process, is one of the partners. In our process, it is the only partner, as our BookstoreA process does not call any other services or processes.

Next, variables are declared. BPEL uses variables much like any other programming language, except that these variables hold the XML elements or primitive types. Two variables are declared by default. The inputVariable holds the input payload (input parameters). In our case, these are the four parameters, including ISSN, title, edition, and publishing year. The outputVariable activity holds the output, which is returned to the client (the one who has invoked the BPEL process), as shown in the following screenshot:

Next, we specify the process steps. These are gathered within the top-level <sequence> activity, which contains all the process flow. Each BPEL process first waits for the initial request message from the client (<receive>). Usually, a BPEL process also returns some response to the client. This is true for the synchronous BPEL processes. In this case, the BPEL process will end with a <reply> activity through which it will return the response to the client.
In between <receive> and <reply>, we specify all the required activities for the actual process flow. In our case, this is only an <assign> activity, which has been used to manipulate variables and to assign the quantity of 5 to the one of the elements of the outputVariable. With more complex processes, we would have several activities listed here. The BPEL source code of our first process looks like the following screenshot:

This corresponds to the following graphical presentation in the design view:

In this section, we will have a more detailed look at different BPEL activities. This gives us more information on the syntax of the activities and helps us to understand the BPEL language better.
Let's focus more closely on the <process> tag. This delimits the root element of the BPEL document. The <process> tag requires that we specify certain attributes. We have to specify at least the following attributes:
name: This attribute specifies the name of the BPEL business processtargetNamespace: This attribute specifies the target namespace for the business process definitionxmlns: This namespace used by BPEL is available at http://docs.oasis-open.org/wsbpel/2.0/process/executable.
Usually, we also specify one or more additional namespaces to reference other involved namespaces (for example, those used by services). If you look at the preceding screenshot, you will see that there are quite a few namespace declarations, such as xmlns:client, which has the namespace of the imported WSDL and any reference to elements within WSDL will go through this namespace.
We can also specify additional attributes for the <process> tag as follows:
queryLanguage: This attribute specifies which query language is used for node selection in assignments, properties, and other uses. The default (and part of the BPEL standard) is XPath 1.0 (urn:oasis:names:tc:wsbpel:2.0:sublang:xpath1.0). However, another language can be specified, such as XPath 2.0 or XQuery. The available options are determined by what is supported by a given BPEL engine.expressionLanguage: This attribute specifies which expression language is used in the process. The default is again XPath 1.0 (urn:oasis:names:tc:wsbpel:2.0:sublang:xpath1.0).suppressJoinFailure: This attribute determines whether to suppress join failures (yesorno). Default isno. This is used in flow activities with links, which is an advanced scenario of using BPEL.exitOnStandardFault: This attribute defines how the process should behave when a standard fault occurs. We can specifyyesif we want the process to exit on a standard fault (other thanbpel:joinFailure), ornoif we want to handle the fault using a fault handler. Default isno.
With <receive>, the process waits for incoming messages (that is, operation invocations). Usually, it waits for the initial message to start the process. Another typical use of <receive> is to wait for callbacks (we'll discuss this in Chapter 5, Interaction Patterns in BPEL).
With <reply>, a BPEL process can send a response. Usually, it is used in the synchronous BPEL processes. However, in general, it can be used with any open request or response operation. Both activities use the same basic attributes as follows:
partnerLink: This attribute specifies which partner link will be usedoperation: This attribute specifies the name of the operation to wait for being invoked (<receive>), or the name of the operation that has been invoked but is synchronous and requires a reply (<reply>)variable: This attribute specifies the name of the BPEL variable used to store the incoming message (<receive>) or send the outgoing message (<reply>)
Note
For each BPEL activity, we can also specify a name attribute. We use the name attribute to provide names for activities. In most BPEL activities, the name attribute is optional, but we can add it to improve the readability of the code.
Let's now take a closer look at the <receive> activity. We said that <receive> waits for the incoming message (operation invocation), either for the initial to start the BPEL process, or for a callback function. Usually, the business process needs to store the incoming message and it can use the variable attribute to specify a suitable variable.
Another attribute for the <receive> activity is the createInstance attribute, which is related to the business process life cycle and instructs the BPEL engine to create a new instance of the process. Usually, we specify the createInstance="yes" attribute with the initial <receive> activity of the process to create a new process instance for each client. We will discuss this attribute in more detail in the next chapter.
The following example shows a <receive> activity that waits for the getBookData operation on the port type client:BookstoreBBPEL using the bookstoreBbpel_client partner link. As this is the initial <receive> activity, the createInstance attribute is used. The client request is stored in the inputVariable variable:

The <reply> activity is used to return the response for the synchronous BPEL operation. It is always related to the initial <receive> through which the BPEL process started. Using <reply>, we can return the response, which is the normal usage, or we can return a fault message. Returning a fault message using <reply> is discussed in Chapter 6, Fault Handling and Signaling.
When we use <reply> to return a response for a synchronous operation, we have to define only one additional attribute—the name of the variable where the response is stored. The following example shows a reply on an initial receive operation. It uses the bookstoreBbpel_client partner link and provides a response for the getBookData operation on client:BookstoreBBPEL port type. The return result is stored in the outputVariable variable. Please note that the same partnerLink, portType, and operation name have been used in the initial <receive>:

With this, we have concluded our discussion on the fundamental BPEL syntax. We will look more closely into the syntax on other activities in subsequent chapters of this book.
To conclude this chapter, we will develop another bookstore BPEL process. This time, this will be the BookstoreBBPEL process. Compared to the first version, we will use a more sophisticated data manipulation. Instead of returning a constant stock quantity for each book, we will return a different stock quantity for several different book ISSNs. We will hardcode the results but will get familiar with branches, with the XPath expressions, and will use the assigns to manipulate variables.
To develop the second BPEL process, we will follow similar steps as in the previous section, where we developed the first BPEL process. This process will be oversimplified too, but this and the previous process will present a solid basis for an even more sophisticated BPEL process, which we will create in Chapter 2, Service Invocation.
To start, double-click on the Bookstore composite in our existing project tree. This will open the SOA composite view, which shows the main building blocks (service components) of our application. So far, we have a BPEL process named
BookstoreABPEL, which is exposed as SOAP web service through a WSDL interface.Add a second BPEL process named
BookstoreBBPEL. To achieve this, drag-and-drop the BPEL Process component from the right-hand side toolbar to the Components space of the SOA composite:
Doing this will add the BPEL process component and immediately open the dialog box, where we need to specify the BPEL process name and other details, such as the BPEL version, XML namespace, select the process template, and define the service name. Again, use the BPEL 2.0 specification, name the process
BookstoreBBPEL, select the namespace from thepacktpub.comdomain, and select the Synchronous BPEL Process template, as shown on the following screenshot:
After clicking on OK, we will see the composite with the added BPEL process. On the left-hand side in the project tree, we can see that several artifacts have been generated, including the WSDL interface and the corresponding XSD (XML Schema).
We are now ready to implement the process. To do so, double-click on the
BookstoreBBPELcomponent represented by the blue rectangle. This will open the BPEL design perspective.Use the same schemas as in the
BookstoreABPELprocess. To achieve this, we can edit the WSDL file of theBookstoreBBPELprocess namedBookstoreB.wsdl. Let's double-click on the file, click on the source tab, and modify the import of the schema. Instead of using theBookstoreBBPEL.xsdfile, use theBookstoreBPEL.xsd. We also need to modify the XML namespace under the client namespace alias:
We also need to modify WSDL a little bit. We basically need to do the same changes as we did earlier in this chapter for the
BookstoreABPELprocess. To summarize, rename the operation name fromprocesstogetBookData. Modify both message elements toBookDataandBookDataResponserespectively, and modify the schema location to use theBookstoreBPEL.xsdfile:
Let's now go back to the
BookstoreBBPELprocess design window tab. In contrast to the first example, we will hardcode the response for a few predefined book ISSNs for which the BPEL process will return different stock quantities. For the 1111-1111 ISSN, it will return 10 books; for the 2222-2222 ISSN, it will return 20 books; for the 3333-3333 ISSN, it will return 30 books. For all other ISSNs, we will return five books.First, add the
<if>activity to the BPEL process by dragging-and-dropping the If icon from the lower-right side of the toolbar (look under Structured Activities). Drop the<if>activity between the receiveInput and replyOutput activities.As we have four choices that we need to cover, first add the two Else If branches. Click on the
<if>activity so that a big green plus sign will appear. Clicking on it will reveal Else If:
Let's now click on the Else If branch twice. Next, we need to add expressions, which will serve as the conditions for the if and elseif branches. Let's click on the first label. Name it
ISSN1.Next, right-click on the first if and select Edit. We could enter the condition directly, but will use the Expression Builder instead. Let's click on the Fx icon, to start Expression Builder.
In Expression Builder, use the equals operator to compare strings. Compare the ISSN within the
inputVariablepayload and compare it with the'1111-1111' string:
After clicking on OK, we will see the expression in the initial Edit If dialog box:

Enter other two conditions in the same way, first for the 2222-2222 ISSN, and 3333-3333 ISSN.
For each
<if>branch, we now have to add the corresponding<assign>activity, which will set the stock quantity output variable. We already know how to use the<assign>activity, as we have used it in the previous example. However, this time, set the stock quantity within the<if>activity only. Set the other parameter, theBookISSNin the output variable after the<if>activity, as it is the same for allifbranches.First, let's add the
<assign>by dragging-and-dropping the activity from the right-hand toolbar. It will appear as Assign1. Let's double-click on the Assign1 activity and create a copy rule, where we will copy the number 10 to the stock quantity: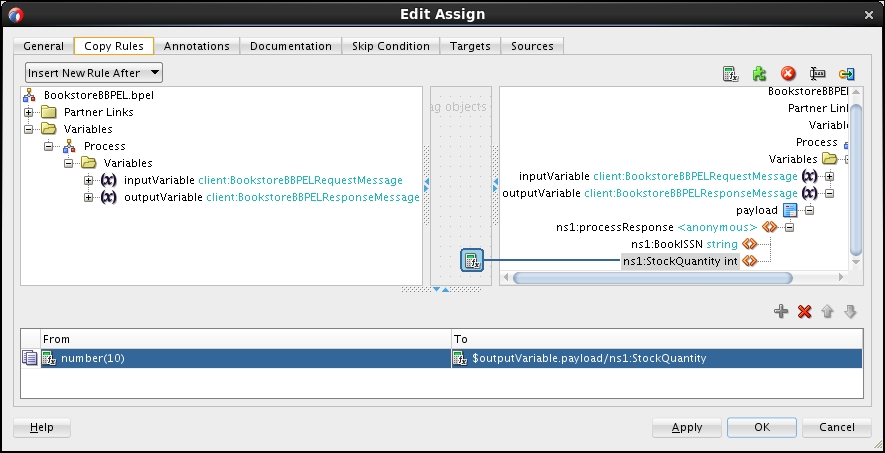
Let's now rename the Assign1 activity to a more meaningful name. We can do this under the General tab, as shown in the following screenshot:

Add the other three
<assign>activities to the BPEL process the same way. The first activity will assign the quantity of20, the second30, and the last (under theelsebranch) the quantity of5.Let's now add the final assign that will copy the
BookISSNfrom the input variable to the output variable. Add the assign after the<if>activity and before thereplyOutputactivity:
The assign will copy
BookISSNfrominputVariabletoBookISSNofoutputVariable. Please note that it would be the same if this assign activity would be added after the receive activity and before theifactivity, as shown in the following screenshot:
In the second BPEL example, we used the <if> activity, which is similar to the syntax of the if clause in other programming languages. Using the <if> activity, we can create branches in the BPEL process. In each branch, we used the corresponding <assign> activity to set the appropriate stock quantity.
We will say more about the <if> activity in the later chapters of this book. However, let's now look at the BPEL source code to get a feeling of how the source code looks like. As we've seen before, the process starts with a <receive> activity, which is responsible for receiving the input request, sent by the process client:

Next, the <if> activity starts. Each if and elseIf branch contains the condition, which is expressed as the XPath expression. Within the <if> branch, the <assign> activity is nested:

Please remember that we can always edit (or even write) the source code, which will reflect in the modified graphical representation and vice versa. We are not ready to write the BPEL code yet, but it is important to understand that the source code is the basis for the execution and that the graphical representation is created from the source code.
After the <if> activity, another <assign> is located. This assigns copies the BookISSN activity from the input to the output variable:

Finally, the process finishes with the <reply> activity. In this activity, the process returns the results to the client, which has invoked it. Remember that we selected a synchronous BPEL process, which always returns a reply. Later in this book, we will become familiar with asynchronous processes as well, which might not return responses:

We are now ready to deploy and test this BPEL process, which we will do in the next section.
To deploy and test our second BPEL process, we will redeploy the whole SOA composite, which now includes both BPEL processes. Let's perform the following steps:
Right-click on the project in the project tree and select the Deploy submenu.
Then, select Deploy to Application Server.
We will use the default deployment configuration, but make sure that we check the Overwrite any existing composites with the same revision ID option.
Choose the IntegratedWebLogicServer server for the deployment and click on Finish.
After the successful deployment, we are ready to test the process. We will use Enterprise Manager Console. As we created the new BPEL process within the same application, we deployed it inside the Bookstore composite application. After clicking on the application, click on the Test button, which will now have two options, BookstoreA and BookstoreB.
Test the
BookstoreBBPELprocess by clicking on it.Let's do the test for the 1111-1111 ISSN. To perform the test, first select the XML View.
This time we will enter the request message in plain XML. For this, simply enter the required data in the following predefined XML form:

After clicking on the Test Web Service button, we will see the screen with the response of
10:
We successfully tested our second BPEL process. First, we redeployed the whole SOA composite application, which now consists of the two BPEL processes. Then, we invoked the BookstoreBBPEL process and monitored the response for different ISSNs.
Note
There are other ways to test the BPEL process than using the Enterprise Manager. The SOA Suite test framework can be used directly from JDeveloper to test and debug SOA composites. A popular option is using the SoapUI tool, which can generate the requests and show the responses in a similar way, as we did with the Enterprise Manager. For more information on SoapUI, visit http://www.soapui.org/.
To get more insight into the BPEL execution, a nice option is to click on the Launch Flow Trace button. This opens a new window, which shows the execution flow trace. Our BPEL process is relatively simple; therefore, we see only one component. If we click on the BookstoreBBPEL instance, we will see another view named Audit Trail:

An even more interesting view is the Flow view, which can be activated on the Flow tab. It shows the visual execution flow. For our process, it will look like the following screenshot:

Clicking on any activity on the visual flow allows us to inspect the variables, which is very useful for debugging.
With this, we have concluded our discussion. You have successfully developed, deployed, and tested your second BPEL process, which is already a bit more complex than the first one. Still, it was an oversimplified BPEL process, which took four parameters as an input (the book ISSN, title, edition, and publishing year) and returned the quantity of the book together with the ISSN. However, this time different ISSN returned different stock quantities.
In the next chapter, we will use both BPEL processes, BookstoreABPEL and BookstoreBBPEL, and will orchestrate them into a more complex process.
It's your turn now. Test the BookstoreBBPEL process for different parameters, including ISSNs 2222-2222, 3333-3333, and others, and verify that the process returns the correct response.
Q1. Try to answer which of the following items are true:
BPEL is a language for composing services and orchestrating and coordinating the flow of services.
BPEL is a programming-in-the-small language.
BPEL is used to implement specific functionalities.
BPEL is used to compose (orchestrate) functionalities exposed though services (service interfaces) into composite applications.
BPEL is a graphical language.
BPEL code uses XML syntax.
Q2. Which is the latest version of the BPEL language?
1 .0.1 .1.2 .0.
Q3. BPEL process starts with which root-element activity?
Q4. Does BPEL support variables?
Q5. Which activity is used to manipulate variables?
Q6. What is the correct syntax of the <if> activity?
<if><then><else>.<if><then><endif>.<if><then><else><endif>.<if><elseif><endif>.<if><elseif><else>.
Q7. What is the default expression and query language in BPEL?
XQuery.
XPath.
Q8. What is the purpose of the <receive> activity?
To send response to the client.
To wait for incoming messages.
To receive e-mail messages.
Tip
Downloading the example code
You can download the example code files for all Packt books you have purchased from your account at http://www.packtpub.com. If you purchased this book elsewhere, you can visit http://www.packtpub.com/support and register to have the files e-mailed directly to you.
In this chapter, we gained the basic understanding of BPEL. We have seen that BPEL is an important orchestration language for SOA. It uses XML syntax. Usually, it is represented graphically for easier development.
In this chapter, we learned how to install Oracle JDeveloper and SOA Suite, how to create a domain on the SOA Suite server, and how to use JDeveloper to develop BPEL.
We developed two simple BPEL processes. The first one was a very simple process returning the stock quantity of a book as a hardcoded constant. The second BPEL process was a little more sophisticated and returned the quantity depending on the ISSN number. In addition to becoming an overview understanding of the BPEL source code, we gained a deeper understanding of the <assign> and <if> activities.
We also learned how to deploy a BPEL processes to the SOA Suite server and how to use the Enterprise Manage console to test the BPEL processes. We have done so for both BPEL processes, which we developed.
In the next chapter, we will develop a more sophisticated BPEL process which will orchestrate the two simple BPEL processes developed in this chapter. We will learn how to invoke services and processes sequentially and in parallel. We will also get a deeper understanding on process WSDL interfaces and partner links.