


Chapter 1: Getting Started with Outlook
Outlook is the main productivity application for office workers today. It has become the main hub for office communication. Over the past few years, there has been an increase in popularity in the use of messengers, social media, and chat applications, yet emails continue to grow and have increased year on year. Email is predicted to grow for several years to come.
In this chapter, we’re going to cover the following main topics:
- Managing Outlook
- Drag and drop techniques
- Customizing as per tailored needs
By customizing your Outlook environment, you will create a customized feel for your display that will streamline how you work with Outlook. You will find many tips and tricks in this chapter that can potentially save you a great amount of time, which will ultimately help you regain control of your inbox.
Manage Outlook
Do you feel at times that Outlook is managing you? If you answered yes, then it’s time to take back control and start managing your Outlook environment. It is estimated that over 316.5 billion emails will have been sent and received in 2021. With this many emails passing through our inboxes, it is time to take control of your email. By using the techniques used in this book, you will be well on your way to having an organized, efficient time management system.
Let’s start by looking at the Options menu in the File tab. These options allow you to control and customize Outlook for the way you want to work. Once you click on File, you are in the backstage view. Microsoft’s definition of this view is that “it is everything that you do to a file that you don't do in the file.”

Figure 1.1 – Outlook tabs
Info
First, let’s look at the Info tab located on the left side of the screen and represented below the left-facing arrow in the following figure (clicking on the arrow will display the Outlook tabs). Use the drop-down arrow by the Microsoft Exchange box at the top of this screen to specify which account you want the information to appear for, and you can select the account you desire from this list if you have various accounts set up. In this example, my account is a Microsoft Exchange account, which is the name for this account in the following figure. You can have a different name here than Microsoft Exchange if you are not using Exchange. Accounts will be discussed in detail in Chapter 3, Managing Email Accounts.
To set up a new email account that you have already created from Gmail or another account, click on +Add Account, and you will be prompted to add a new email account to the Outlook environment. If you are working in your Microsoft 365 account, you can type in the email address of the email that you would like to track in Outlook, such as your Gmail account.
Because Microsoft Exchange synchronizes email with Outlook, everything will process automatically, and answer the prompts as requested. Once you complete this, you will see a dialog box, indicating that the account was set up successfully. If you have errors or have been given specific instructions for the setup, click on Advanced Options, and you will be able to customize the installation.
You can add up to 10 email accounts in Outlook with this method, and if you need more than 10 accounts, that will be discussed in Chapter 3, Managing Email Accounts.
Once you have completed the installation, your email account will be added to the navigation pane on the left side of the screen. An email will also be sent to this email account, testing the settings for your account.
Settings in Info
The other settings that you see on this Info tab will be discussed throughout this book, and the following table provides a reference for what these buttons are used for and also the chapters that will discuss them in more detail.
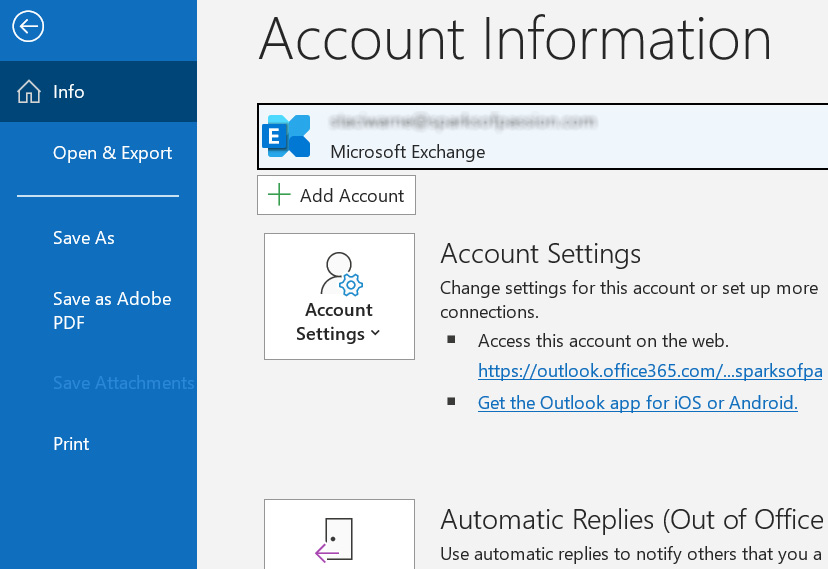
Figure 1.2 – The Info tab
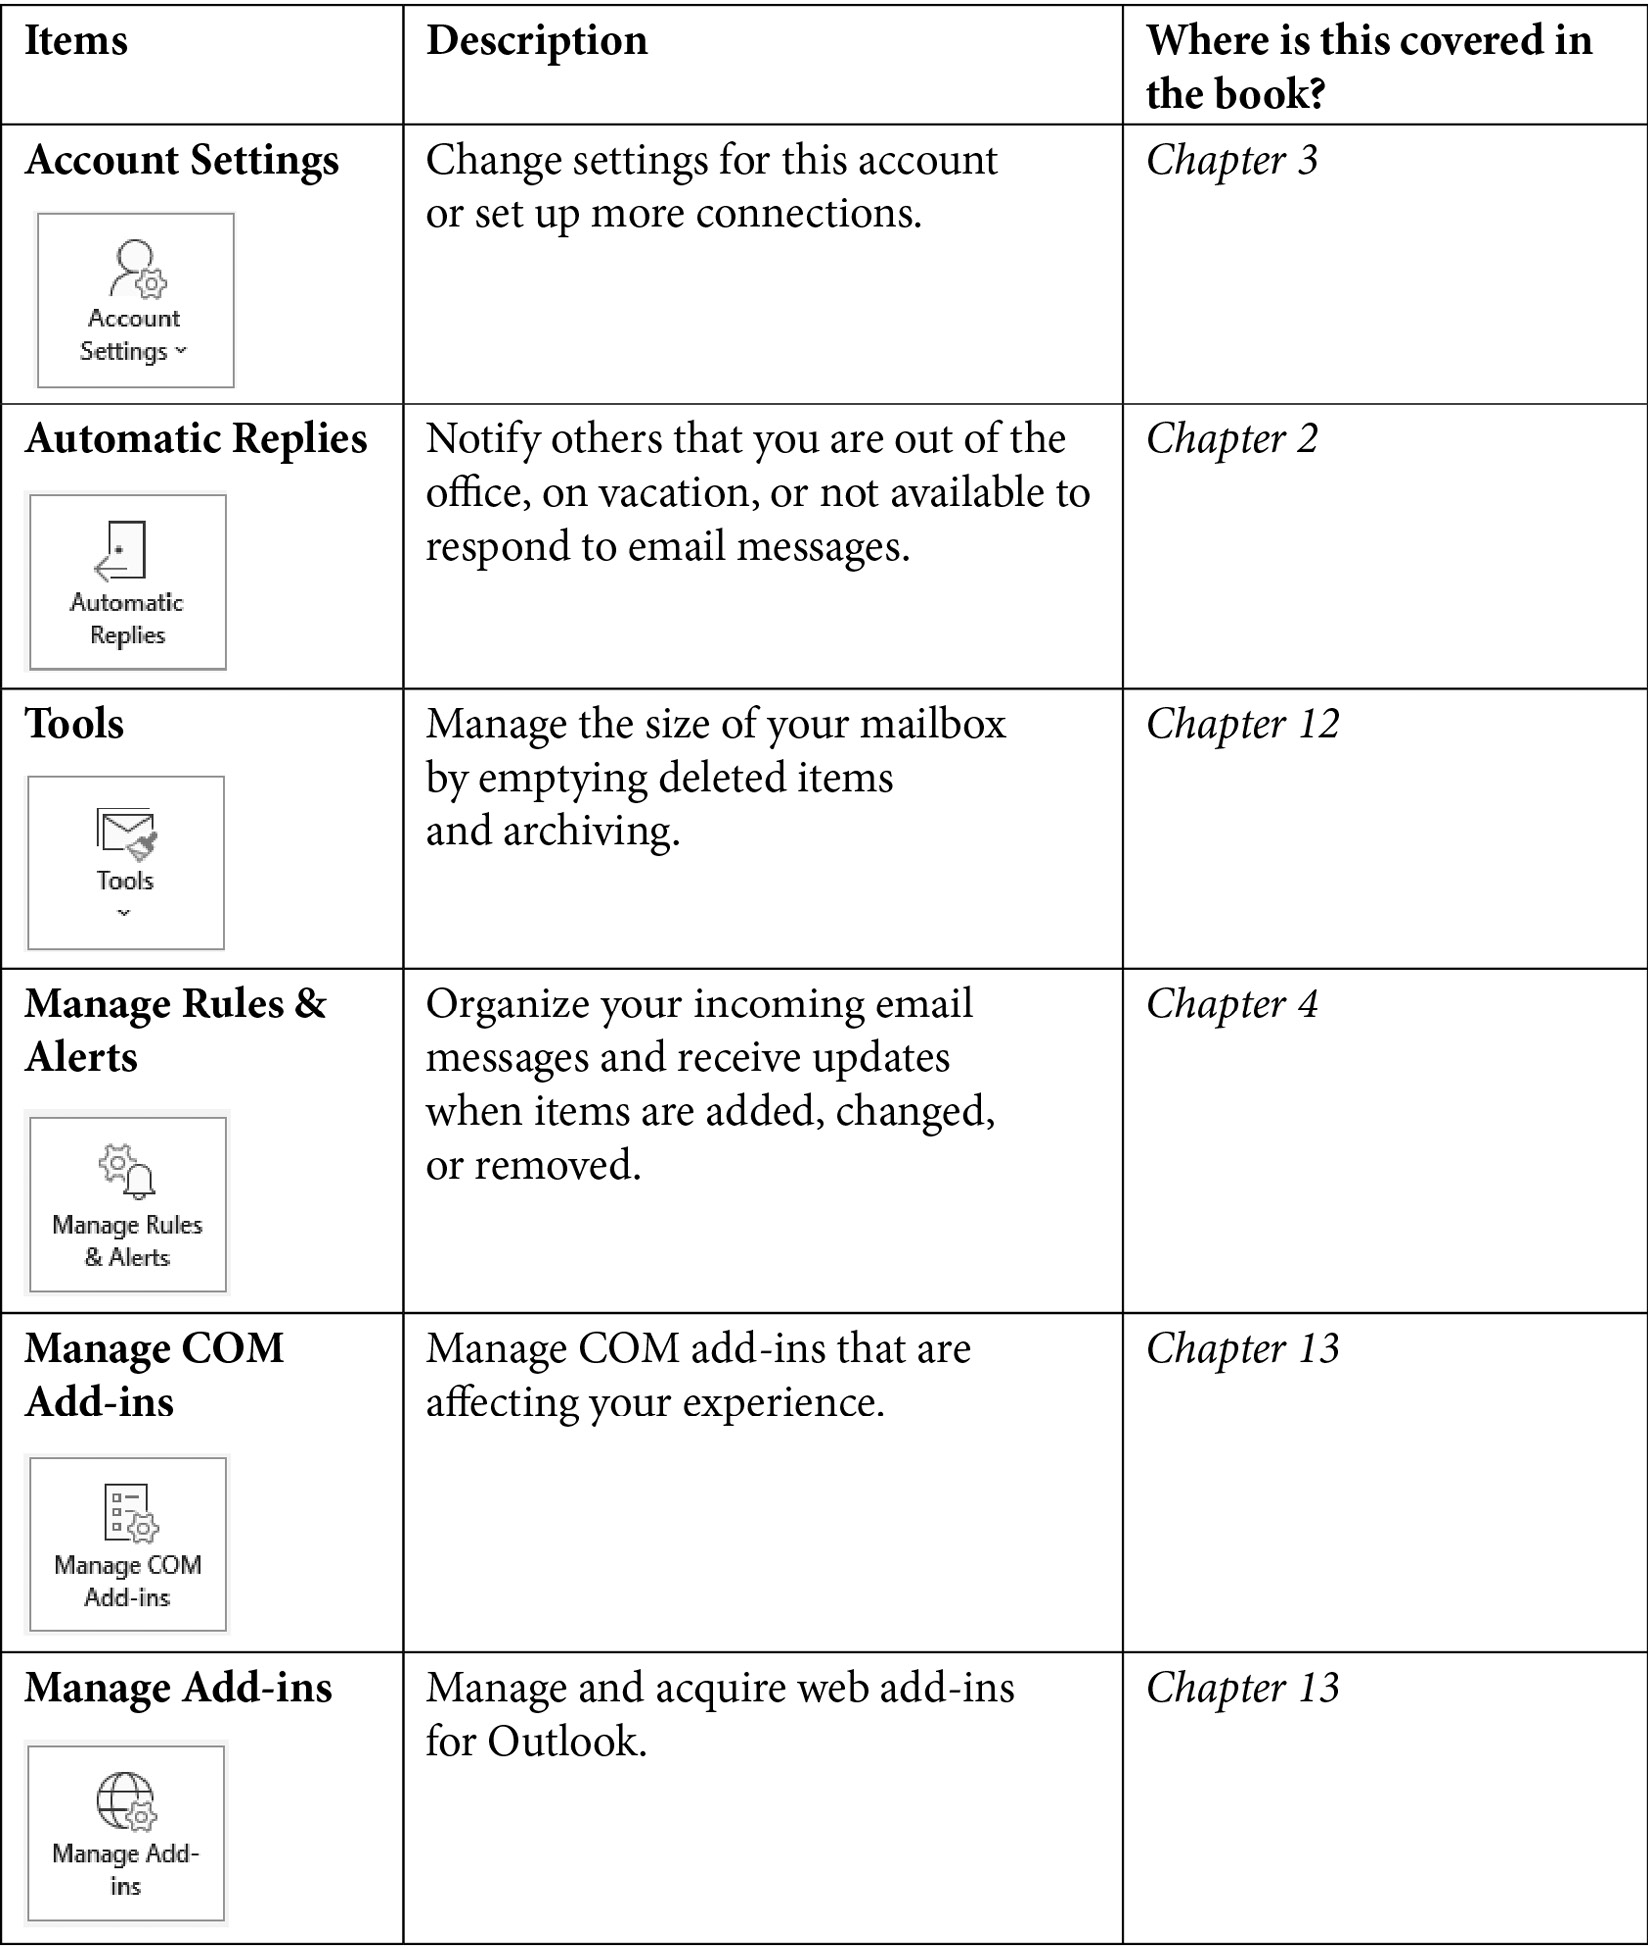
Table 1.1 – Account information on the Info tab
At the bottom of the navigation pane, on the left side of your screen, are a few more menu items that you will find quite important to customizing your experience inside Outlook. Let’s look at the Office Account.
Office Account
Use this Office Account tab to look at information related to your account. You will find this screen self-explanatory, but if you want to set a new office background or theme, this is the screen from which you can access it. On the right side of the screen in the Product Information section, you can identify which version of Outlook is on your computer and what you are in now.
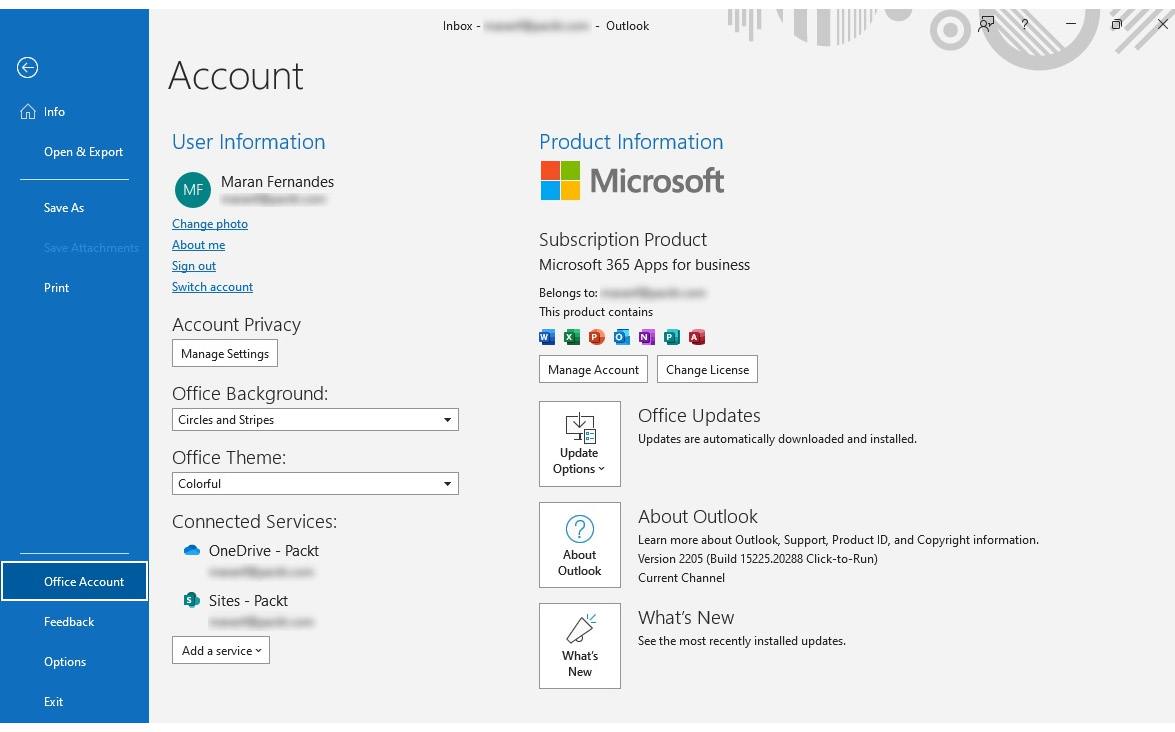
Figure 1.3 – The Office account
Feedback
Microsoft wants to hear from you to help make the application better. You now have an option to give feedback. Use this screen to report what you like and do not like about the application. There is even a button on here to suggest a feature that you would like added to Outlook. This menu is self-explanatory as well, so we will not be covering it in detail in this book.
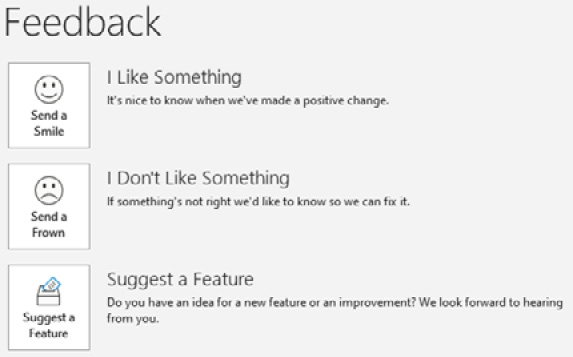
Figure 1.4 – Feedback
Other options
Several options can be set to affect how Outlook settings will behave. All these settings have a default setting (preset settings from the installation of Outlook). For example, you can control a setting to show three different time zones on your calendar so that you know what time it is in another location when setting up a meeting. The default is to only have the time showing for where you are located in the world. Another example is to set up the AutoComplete feature, detailed in Chapter 2, Sending and Receiving Emails, so that when you type a couple of letters, the complete name of your corporation will be typed. These settings can save you a lot of time and, in turn, will make you so much more productive.
To view these options in Outlook, click File | Options.
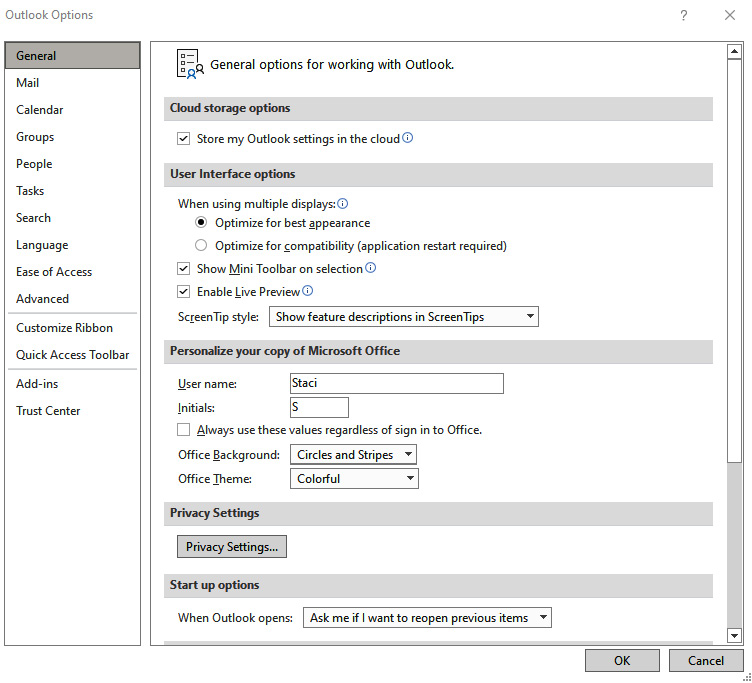
Figure 1.5 – The Options dialog box
There are hundreds of items that you can manipulate in this Outlook Options dialog box, and you have a navigation pane on the left to select a category. The following table lists a few of the recommended adjustments you can make:
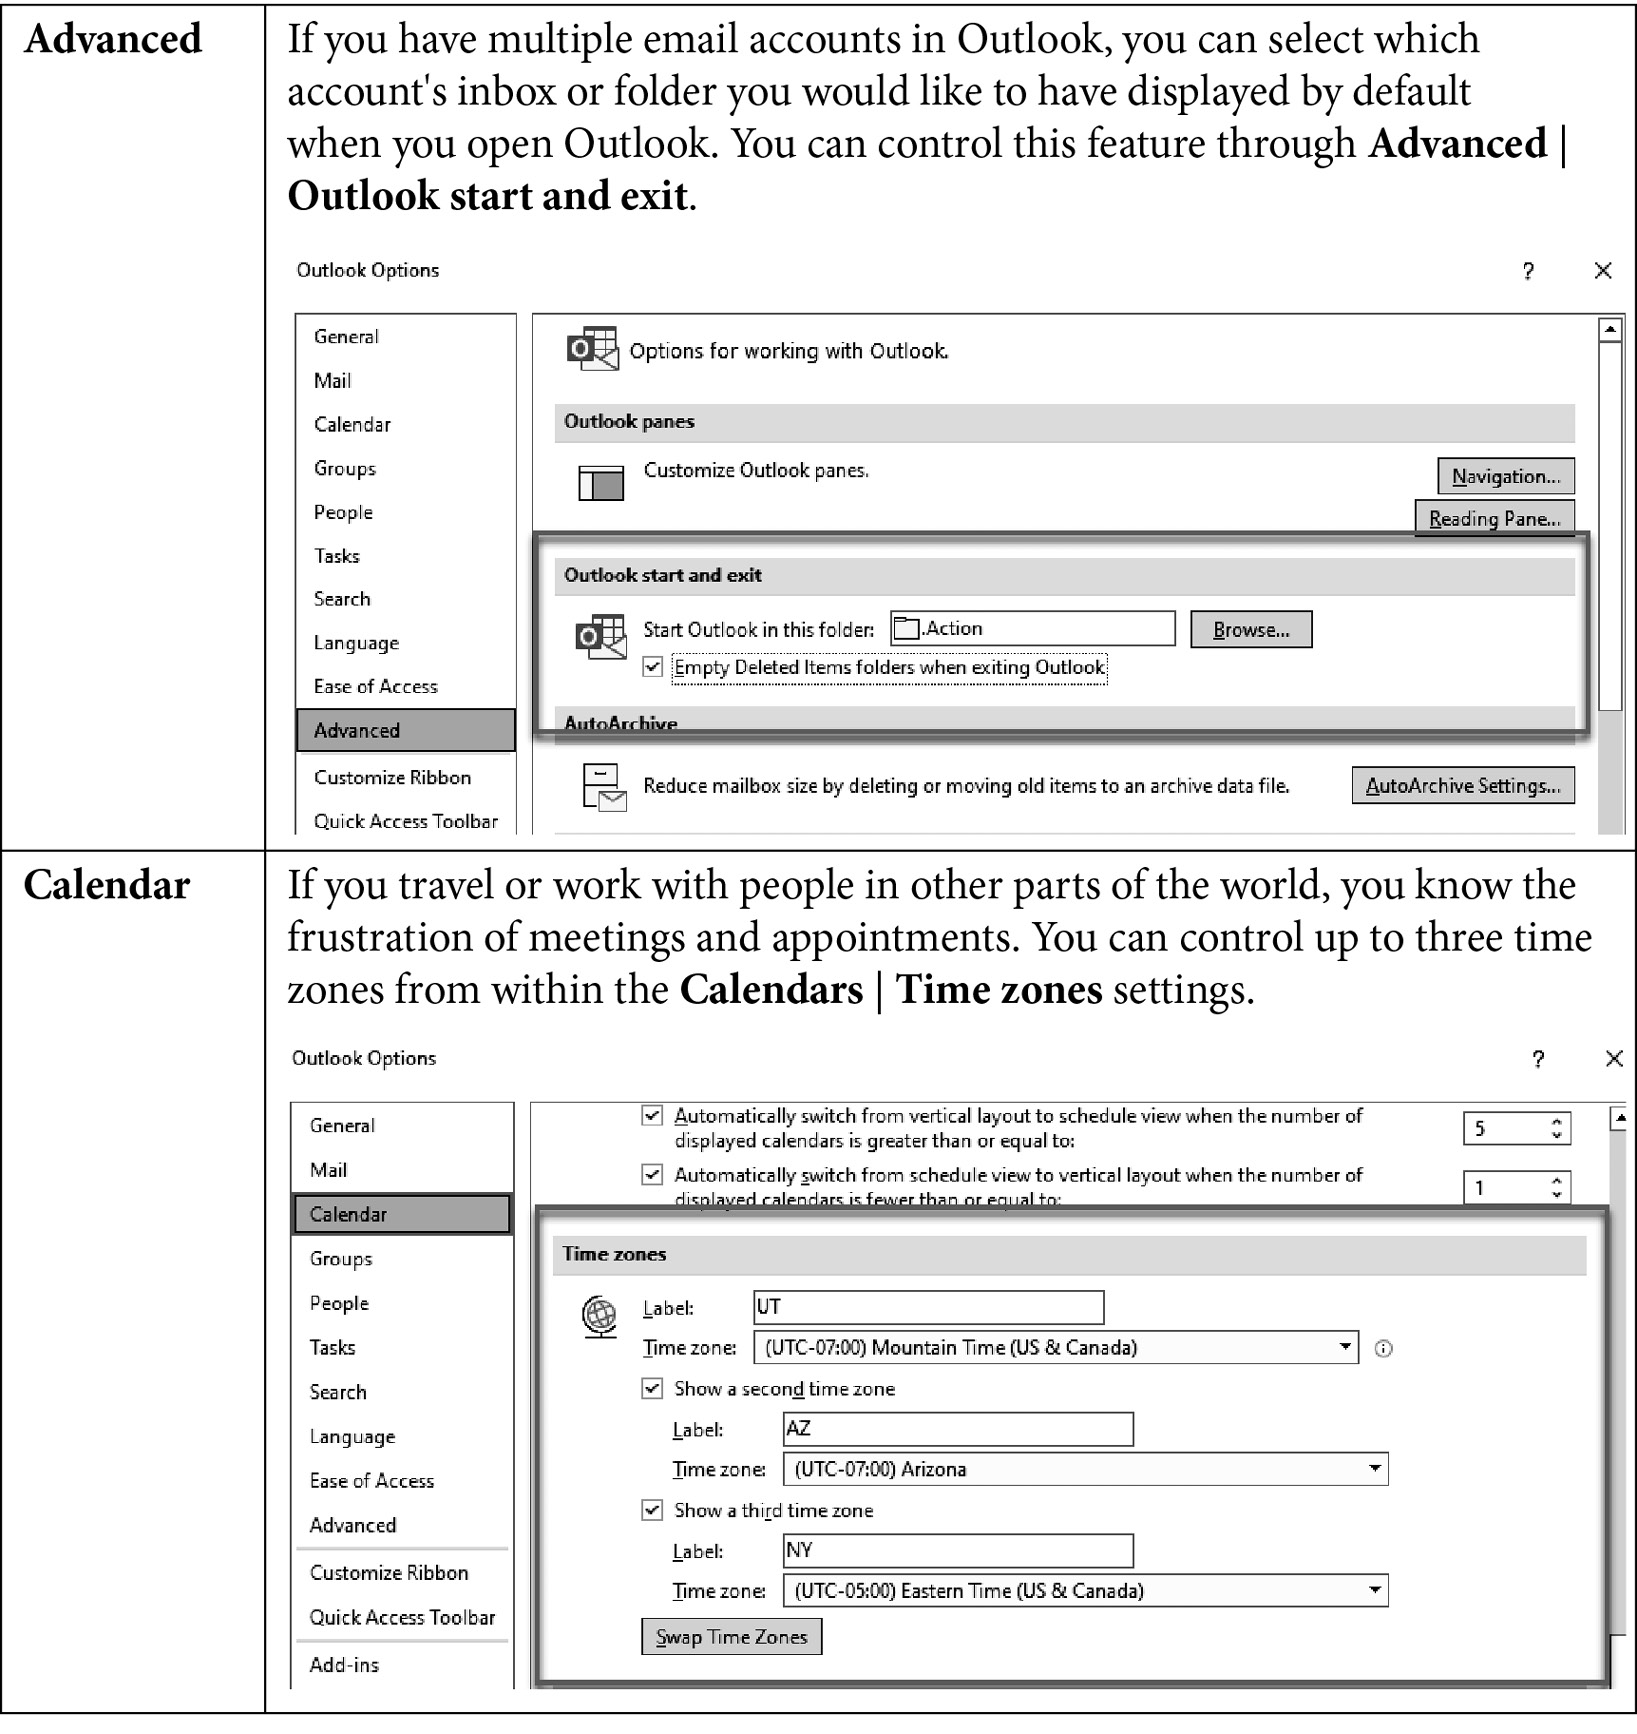

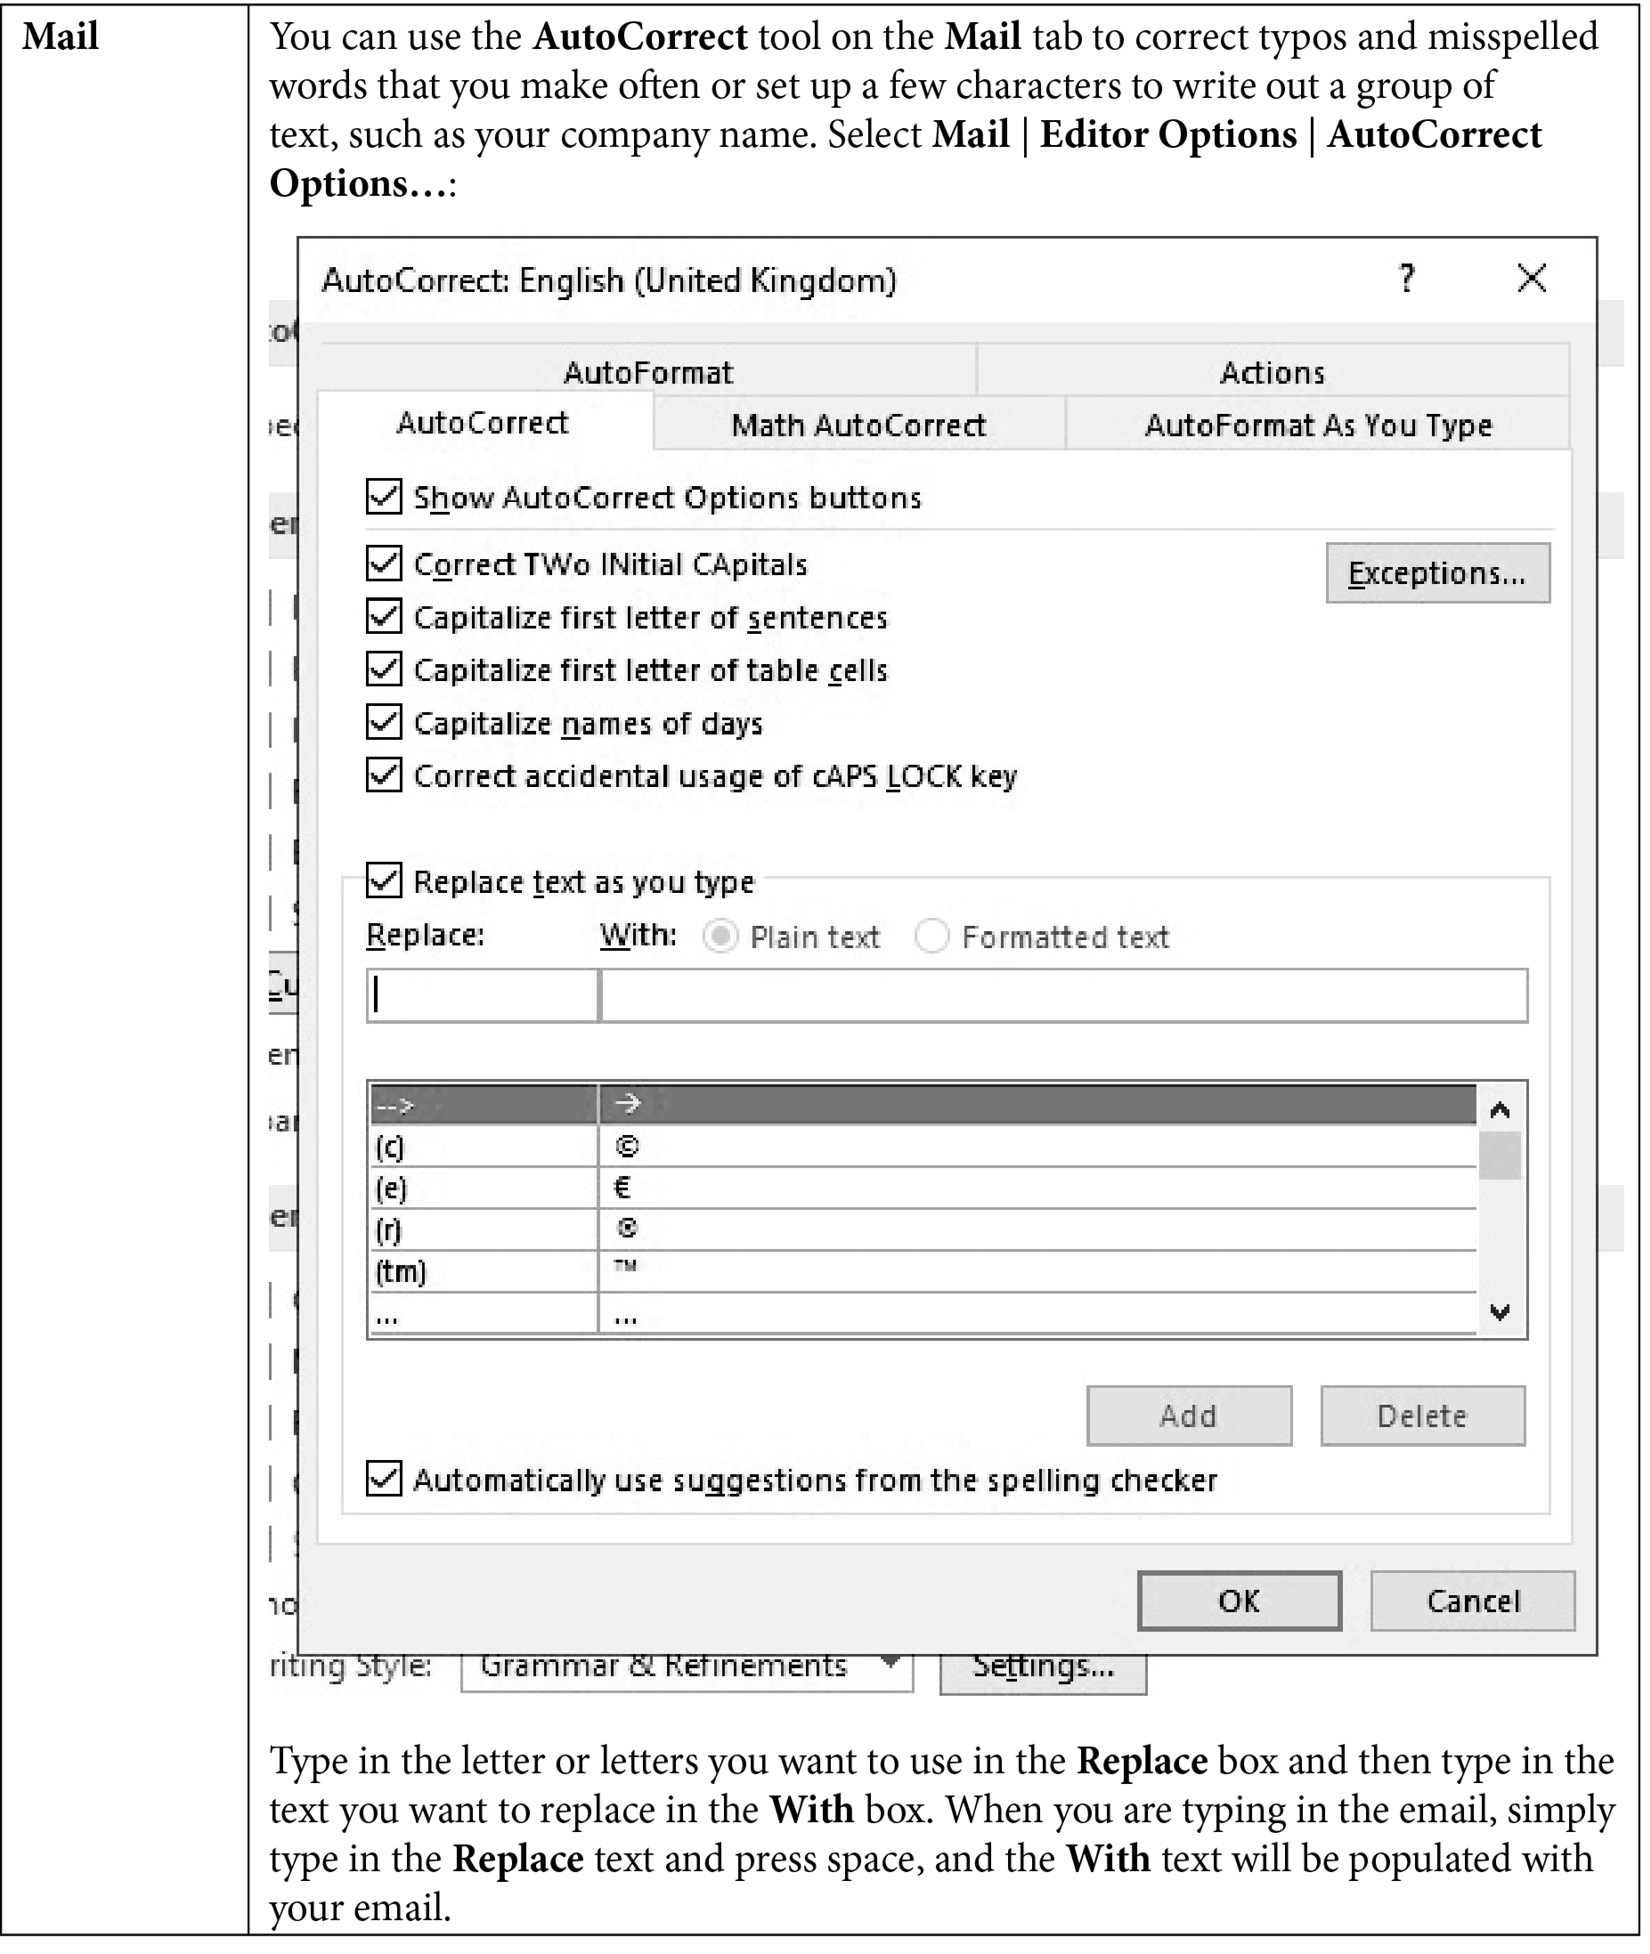
Table 1.2 – The Outlook options available
This is a very small list, and you are encouraged to spend some time looking over all the possibilities you can adjust. These options are categorized by Mail, Calendar, Groups, People, Tasks, Search, Language, Ease of Access, and Advanced. We will continue to discuss several of these options throughout this book, but we will not cover them all. When you find yourself having troubles or wish you could change the feel or effects inside of Outlook, you will usually find a solution to your troubles in this Options dialog box.
Drag and drop techniques
In Outlook, there is a surprisingly simple technique you can use called drag and drop. This allows you to drag and drop one object to another object, and at times, doing this will create another item. This technique will help you be more productive, as you will not have to recreate the email content in the item you are creating by dragging the email.
To drag and drop, first move the mouse pointer to the item that you want to drag. Press and hold down the button on the mouse to “grab” the item. Drag the item to the desired location on your computer by moving the mouse pointer to the item. Release the mouse click once you are at the location where you want to drop the item.
Drag and drop to the calendar
As shown in the following example, you can click on an email message and keep the mouse button pressed down while dragging it to the calendar object in the navigation pane. This will create a new calendar item, with the email contents included in the notes section of the calendar event. The steps are as follows:
- Click on the item you want to copy to a calendar item:
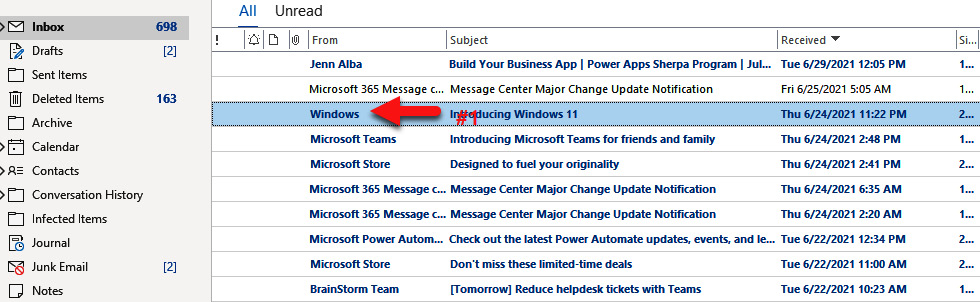
Figure 1.6 – The item to copy
- Click and hold the mouse down while you move it to the calendar object:
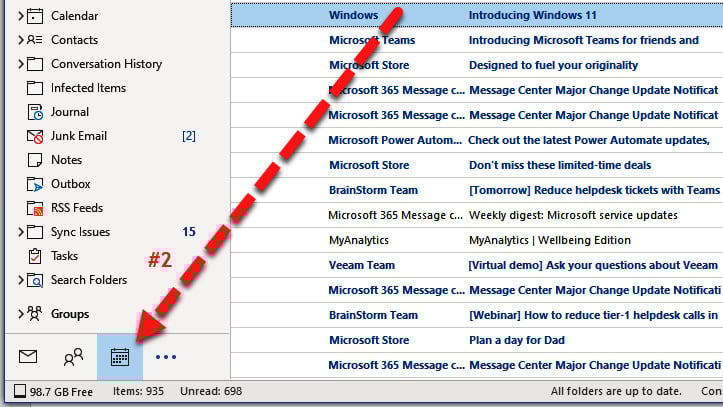
Figure 1.7 – Moving to a Calendar object
- Drag and drop the item onto the calendar or another object. Fill in the required text for the event and be sure to click Save & Close:

Figure 1.8 – Creating the Calendar item
Drag and drop to a to-do Item
To drag and drop an email to the to-do list on the right side of the screen within the TO-DO BAR (turn this on through the View menu), first select the email to drag and drop. Drag your mouse to the to-do list, and a thin line will position between the tasks. If you want to move this to the top of the list, just keep the mouse button pressed and relocate that line where you want the task to drop:
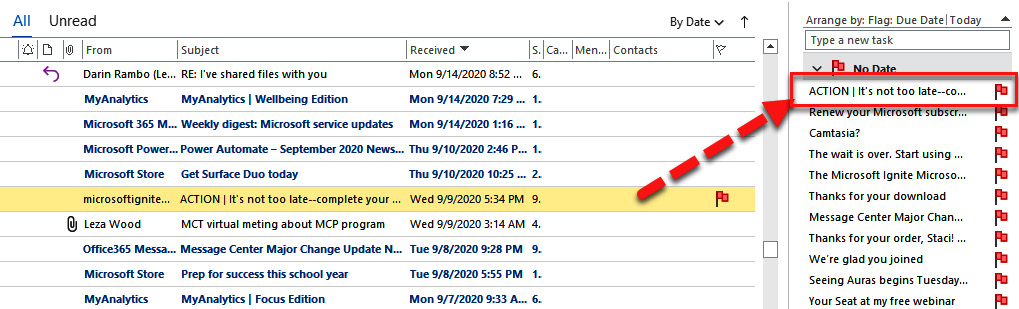
Figure 1.9 – Positioning an item
Note
If you don’t have the to-do bar open, you can drag the item to the tasks object at the bottom of the navigation bar as well. This technique will open a new task dialog box to create a new task item.
Drag and drop to people/contacts
If you drag and drop an email to a People object, Outlook will create a new contact from the email. The email address will become the new contact’s name and the email address will be created, and a copy of the email message will be copied to the Notes section of the contact, as seen here:
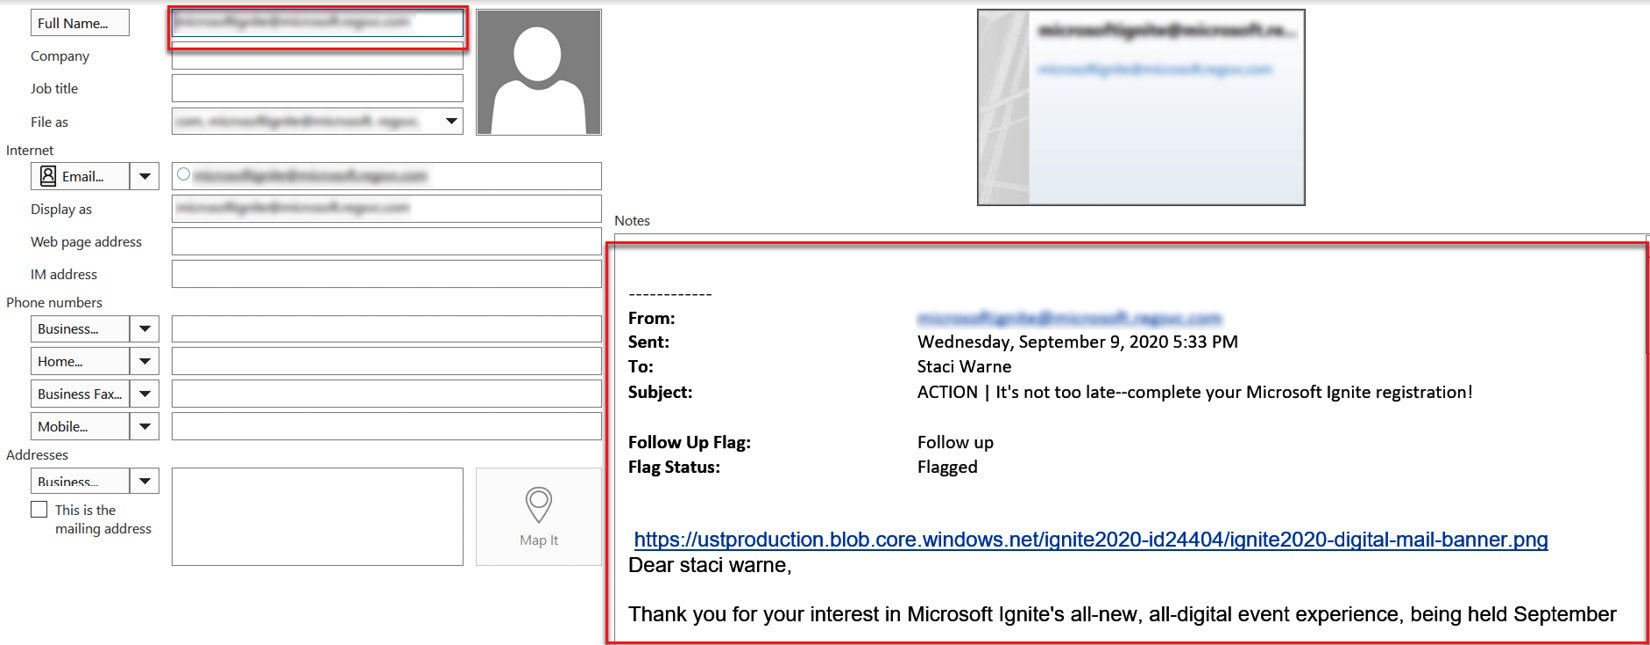
Figure 1.10 – A new contact
Drag and drop other uses
The preceding steps will work to drag and drop an email item to any of the buttons at the bottom of the navigation pane in Outlook, including the following:
- People (Contacts)
- Calendar
- Notes
- Tasks
- Folders
- Shortcuts
- Other applications such as PowerPoint and Word
- Desktop or other folders on the system
- Outlook folders
You can also go in a reverse direction to drag and drop other objects in your system from their folders to an email window. This will automatically open a blank email and attach the object to the email. This can save a lot of time spent clicking on the drop-down arrow by attaching an item and then navigating through your file path. If the folder is open, just select the item (or items) and click and drag them wherever you want them.
Note
You cannot attach a folder to the email, but you can open the folder and select the files inside the folder to attach.
To access objects not showing on the navigation bar, let’s follow these steps:
- Click the three dots to access more items:
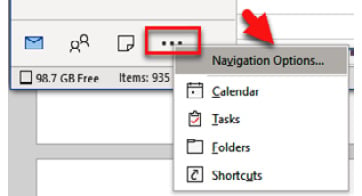
Figure 1.11 – Accessing more items
- Select Navigation Options…:
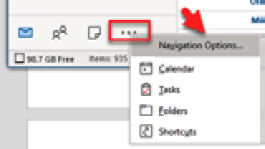
Figure 1.12 – Navigation Options
- From the Navigation Options dialog box, move the object you need to view to the top of the list in the Display in this order box:
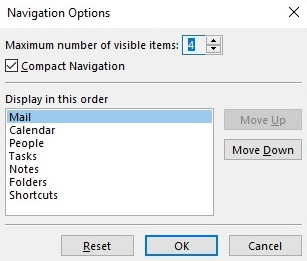
Figure 1.13 – Display in this order
Don’t be afraid to experiment; try to drag and drop several objects. You will probably find some other ways to use drag and drop other than what you have seen in this book. It’s an amazing feature.
Customizing views as per tailored needs
Outlook provides a seamless and secure management system that will enable you to stay organized and connected in your personal and business life. You have the options to integrate it with other applications or use it as a standalone program. Whichever way you choose, you can customize the views to work for you. In these sections, we will discuss a few of the more advanced techniques that you can use and several you didn’t realize were even an option. We will start with the Quick Access Toolbar to customize your frequently used buttons, and then we will discuss setting up different views for your inbox by using multiple views, such as Outlook Today, Options, and Show Focused Inbox, all of which are available to you within Outlook.
The Quick Access Toolbar
Have you ever heard the phrase, “You don't know what you don't know”? That could apply to the Quick Access Toolbar. Even though you may have used Outlook for decades, you may have never noticed the toolbar in the top-left corner. This is the Quick Access Toolbar and is a customizable toolbar that displays your most frequently used. By default, this is what you will see on the Quick Access Toolbar:

Figure 1.14 – Quick Access Toolbar
The out-of-the-box default buttons on this toolbar are as follows:
- The Send/Receive All Folders button.
- Undo.
- The drop-down arrow to add a suggested button or an option to go to More Commands, which opens a dialog box to customize the Quick Access Toolbar. This also gives you the option to show this toolbar above or below the ribbon.
Follow these steps to customize this toolbar to fit your needs:
- Click the drop-down arrow at the right of the Quick Access Toolbar or click File | Options | Quick Access Toolbar:
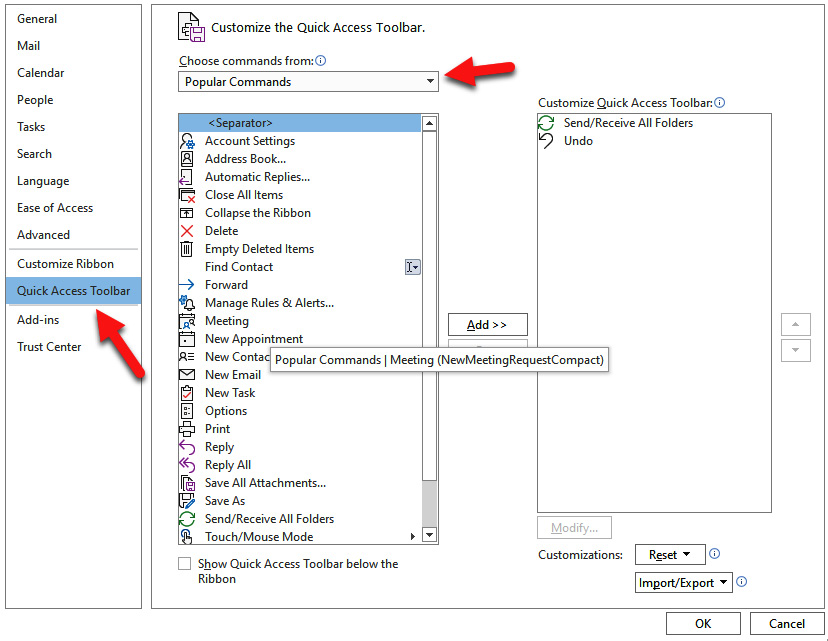
Figure 1.15 – Customizing the Quick Access Toolbar
- Click the dropdown by Popular Commands and select All Commands. This will give you access to all of the possible commands that are available to add to this toolbar. The buttons I would recommend that help me are as follows:
- Categories
- New Appointment
- My Computer
- Select a command on the left, and then click Add >> in the center between the Choose commands from box and the Customize Quick Access Toolbar box. The selected command will show in the list of commands to be shown on the toolbar.
- Click OK, and the buttons will now be on the toolbar, as shown here:

Figure 1.16 – The customized Quick Access Toolbar
You can also select a command and then use the up and down arrow to select the order of the buttons that appear on the toolbar. Top down button as shown:

Figure 1.17 – The buttons for moving a selected item up and down
- Right-click on any of the buttons on the ribbon (any ribbon) to see a drop-down menu that will have the (if available) Add to Quick Access Toolbar option. This is a quick way to add the buttons instead of the preceding steps. In this example, I right-clicked on the Delete button:
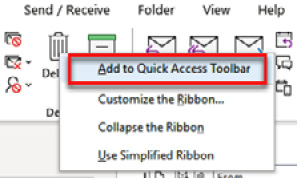
Figure 1.18 – The right-click menu of the Delete button
Outlook Today
Use the Outlook Today view to get a convenient, quick interactive view of your day. To access the Outlook Today View, click on the account name box located in the navigation pane. At the top right of this view, you will see the Customize Outlook Today link. This view allows you to customize the following items:
- Startup
- Messages
- Calendar
- Tasks
- Styles
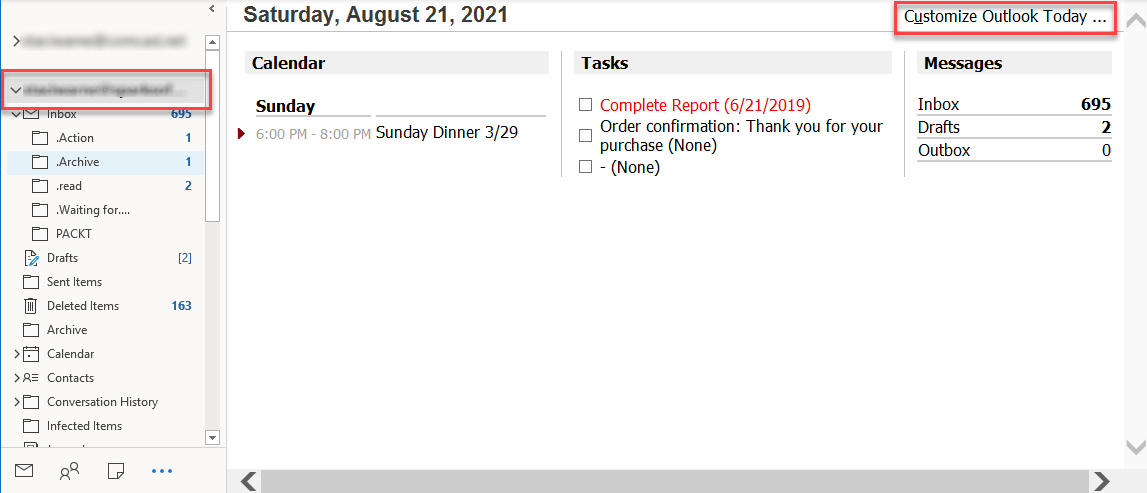
Figure 1.19 – Customize Outlook Today
Show Focused/Other view
The Show Focused Inbox button allows you to separate your email into two tabs, Focused and Other. Your most important emails will be in the Focused tab, and all the others will appear in the Other tab. You will have to watch this at first to determine how Outlook is assigning your emails to these folders.
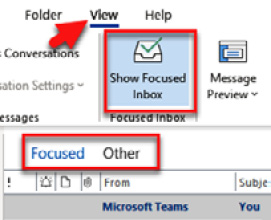
Figure 1.20 – The Show Focused Inbox button
It’s not perfect by any means, but it does a pretty good job determining where to put each email. To turn on this feature, click on View | Show Focused Inbox. If you identify emails appearing in the wrong folder, you can right-click on the email and select Move to Other or Move to Focused, depending on the location of the email. Over time, Exchange will begin to see your pattern and adjust emails between these folders accordingly.
Note
The Focused inbox is only available for Office 365, Exchange, and outlook.com.
If you do not see this button on your version of Outlook, then this feature is most likely not available to you. New features are usually rolled out to members of Microsoft’s insiders first, and then others are rolled out via updates to your Office programs. To check for any updates, select File | Office Account | Update Options | Update Now.
The Layout section
The Layout section of the View tab has commands available for you to customize the screen for how you choose to be productive. You can see the section in the following figure that represents the layout options for your screen. The Use Tighter Spacing command is used to reduce the amount of space between your messages to show more messages on your screen. The Folder Pane command has controls for how the navigation pane on the left side of the screen is viewed or not viewed. The Reading Pane command lets you control whether the message of the email is opened to view and where that window will open on the screen. The To-Do Bar command is my personal favorite, which allows you to view Calendar, People, or the Tasks list on the right side of your screen:
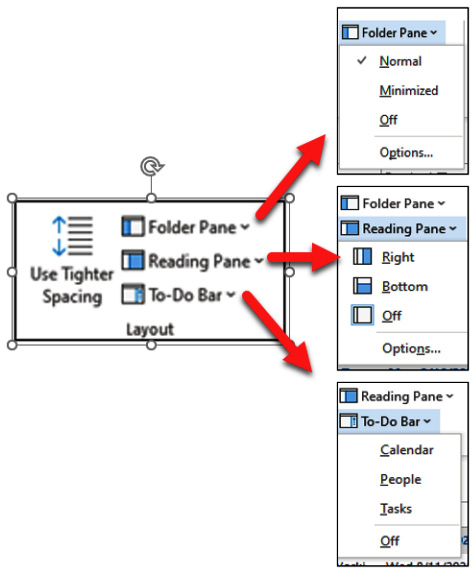
Figure 1.21 – The Layout options
Peek
Peeks was introduced to Outlook with the 2013 version. Peeks works with the To-Do Bar, but it allows you to take a peek at Calendar, People, or Tasks. You can view the Peek when you hover on the Calendar, People, or Tasks button at the bottom of the navigation bar. Once you hover over the button, the specific button’s window will show a snapshot view of it. Use the Dock the Peek button in the top-right corner to have this view docked on the To-Do Bar.
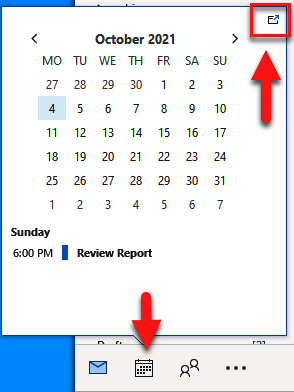
Figure 1.22 – Peek
Advanced View settings
The default view for Outlook is the Preview view; however, you can customize the view to your liking and set it up for your own way of working. You can either create, change, or customize a view:
- Select View | View Settings.
- Select Other Settings… in the Advanced View Settings box.
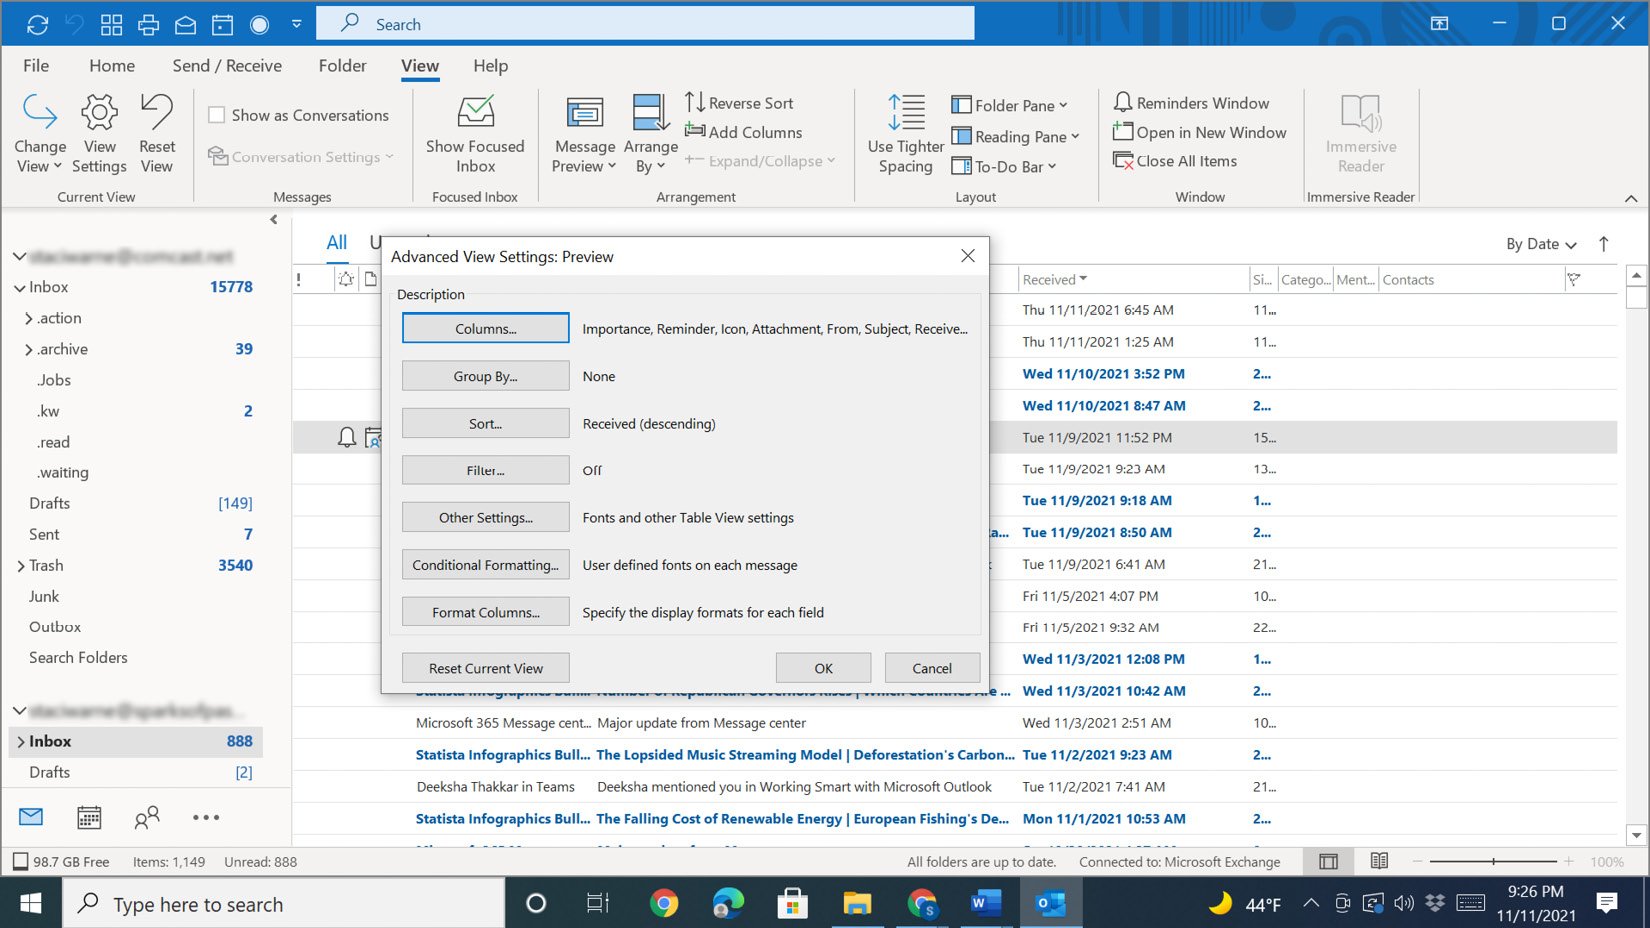
Figure 1.23 – The Advanced View Settings dialog box
Advanced views in Outlook are not the simplest of tasks to set up. The different options for customizing your views with this dialog box will be demonstrated in several topics in this book. Be patient in selecting the view that is right for you. The bottom of the Advanced View Settings dialog box has a button to reset the original fields back to the original views.
The Clipboard viewer
Most of you know how to use copy (Ctrl + C) and paste (Ctrl + V), but few people know that you can open the Clipboard viewer to copy multiple items and then paste them in multiple places without having to copy and paste each item separately. The Clipboard viewer is not available to you on the Home tab in Outlook as it is in other Microsoft applications. To use the Clipboard Viewer in Outlook, follow these steps:
- Get the clipboard history at any time by pressing the Windows logo key + V.
- If this is your first time accessing this, you will get the following box. Click the Turn On button to start a history of the items you will copy to accumulate in the clipboard.
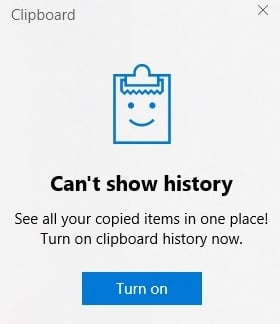
Figure 1.24 – The Turn on history
- As you copy items to the clipboard, the history will record them, and you will be able to paste and pin frequently used items by choosing an item from the clipboard menu.
After turning on the Clipboard setting, Windows will start keeping a record of the items that you copy so that you can look at the history and place items where you need to, whether that is within Outlook or another application on your computer.
Summary
With Outlook’s power comes a lot of options for you to customize your environment. You have seen many techniques in this chapter to start customizing Outlook to your needs. We looked at the Info tab in the Backstage view, which holds several tools for setting up more connections, managing rules and alerts. In addition to these tools, we discussed the Options dialog box, which allows us to adjust dozens of settings within Outlook.
You need to find a system that works for you and tailor it to your needs. Spend some time exploring your different options and look around, and if you don’t like the way something is laid out, there is probably a way to change it. Be creative, pay attention to the way you use Outlook, and be open to making changes along the way. As you spend more time making these adjustments, you will have insight into how you may need to adjust your setting again, and keep evolving with your Outlook environment.
In the next chapter, we will move away from settings for Outlook and concentrate on how you can take control of your email by creating rules, quick steps, and effectively using categories, as well as understanding how to correctly set up one or multiple email accounts.
Questions
- How do you empty the trash/deleted items and remove a deleted item upon exiting Outlook?
- How can you change your account name on your email account (not your email ID – just your name)?
- How do I know which version of Outlook I am using?
- What is the difference between a task and to-do item in Outlook?
- How do you empty the trash/deleted items and remove the deleted item upon exiting Outlook?
Answers
- When you delete an email, it is moved to the deleted items folder. Once you delete the email, it will be available or recoverable for 14 days. Anything that has been deleted for 14 days can no longer be recovered. To empty the deleted items folder upon exiting Outlook, click on Tools | Options | Other and check the box that says Empty the deleted items folder upon exiting.
- The default name on an account when it is set up is the email ID. To change this name, click File | Info | Account Settings | Account Settings. From the list of accounts, select the one that you want to change the name of and click on the Change button. In the Account name field, change the name to one you prefer and click Next. You will be shown that your account was successfully updated and then click Done.
- If you are running Outlook 2007, you are running a 32-bit version, but since 2010, you could be running either version. You need to know what version Outlook is running when installing Outlook plugins and add-ons, as some of them are not compatible with the 64-bit version. To check what version your computer is running, select File | Office Account | About Outlook, and you will see a line of text indicating 64-bit (as shown in the following figure) or 32-bit:

Figure 1.25 – 64-bit
There are so many Outlook apps and services that you can use to access Outlook. It’s in your best interest to know which version of Outlook you have. To locate your version, select File | Office Account. The version will be listed in the Product Information folder
- The To-Do list is a collection of items that have been flagged for follow-up in Outlook. This is the list that will appear on the To-Do bar if it is displayed. This list also includes the Outlook task, which is a task that has been stored in a Task folder. Tasks are created and stored in the Task folder, and currently, the To Do list doesn’t yet support Outlook Task fields, such as start and end dates, task status, task completion percentage, multiple priority levels, work hours, colors, or categories that are available in an Outlook task.
- When you delete an email, it is moved to the deleted items folder. Once you delete the email it will be available or recoverable for 14 days. Anything that has been deleted for 14 days can no longer be recovered. To empty the deleted items folder upon exiting Outlook, click on Tools | Options | Other, check the box that says “Empty the deleted items folder upon exiting”.