Running our own hosted WordPress installation will provide us with power and flexibility that is not available through free blog services. In this chapter, we'll walk through the process of installing WordPress on a server. Once WordPress is installed we'll explore the WordPress dashboard interface, learn the difference between posts and pages, and adjust our site's settings.
To power our site, we will need access to a web server. This can be achieved by either purchasing a web hosting account or discussing web hosting possibilities with the IT department within our institution.
As of version 3.2 or later, the requirements for WordPress are PHP 5.2.4 or greater and MySQL 5.0 or greater. If these acronyms seem frightening, don't worry, just be aware that PHP is the web scripting language that will power our WordPress installation and MySQL is the database that will store all of our content.
Many educational institutions have begun to offer WordPress installations to faculty, staff, and students. These installations come free-of-charge with a domain name already in place. Speak with your IT department to see if your school provides this service.
If your institution does not provide WordPress installations, we will cover two additional ways in which WordPress can be installed. If you plan to purchase web hosting from a third-party company, follow the instructions in the purchased hosting portion of the chapter. If your institution or IT department provides web hosting services, but does not provide WordPress installations, follow the instructions for manually installing WordPress.
Installing WordPress is a relatively straightforward procedure. In fact, the WordPress team has dubbed it the Famous 5-Minute Install. It can, however, require a bit of technical know-how. For that reason, I recommend using a web hosting service that offers a "one-click" WordPress installation. Essentially, this means that the service will run the installation for us.
Choosing a web host can feel a bit overwhelming. Luckily, WordPress offers a list of recommended web hosts (http://wordpress.org/hosting/). Each of these hosts, with the exception of Laughing Squid, offers "one-click" installations of WordPress and due to their wide use among the WordPress community, it is often easy to find solutions to any hosting related technical problem. While these are the hosts recommended by WordPress, nearly any modern commercial web host will meet the WordPress requirements. If you are interested in performing a manual WordPress installation, follow the instructions given in the in-house hosting portion of the chapter.
The hosts recommended by WordPress are:
Bluehost— http://bluehost.com
DreamHost— http://dreamhost.com
MediaTemple— http://mediatemple.net/wordpress-webhosting.php
Laughing Squid— http://laughingsquid.us
Once we have selected a web host, the next step is to choose an appropriate hosting plan. For a simple class site, the basic plan of nearly any web host will work well. For sites that utilize the WordPress MultiSite or BuddyPress features discussed later in the book, we may need to choose something more robust. These sites tend to use more bandwidth and require a larger database, making a more fully-featured hosting plan a wise decision. If you are unsure of which plan will work best for your site, contact the hosting provider and they will guide you to the service that is best suited for your needs.
I have had a very positive experience working with Media Temple's Grid-Service hosting. At $20 per month, it is the most expensive hosting option listed, but I am currently using a single account to power several WordPress installations, including a BuddyPress site.
The first step in setting up our hosting is obtaining a domain name. Domain names are the public address of your site and must be purchased and renewed annually. The cost of domain registration varies but is most often around $10-$15 per year.
To register our domain, we must find an available domain name. A domain name is a unique identifier such as example.org. Domain names end with top-level domain names such as .com, .net, .org, or .info. For educational use, I recommend avoiding .com as it is designed for commercial services and as the most commonly used domain extension, it is also the most difficult to find available domain names.
Note
Example URLs
Throughout this book I will use example.org as our sample URL. Anywhere you see example.org, it should be replaced with your unique URL.
Once we have found a suitable domain name, we can continue setting up an account with our chosen hosting provider. With our hosting account activated, we are ready to install WordPress. MediaTemple offers its customers a service entitled 1-Click Applications, which will install a WordPress site. Each hosting company listed will have their own unique interface and clear documentation for this service, but look for choices such as 1-Click Applications or Simple Scripts.
At this point of the installation we will be asked to name the database and provide a database table prefix. By default these are wp, but for security reasons it is recommended that the user should change the name to something unique. For the sample site, we will use something more descriptive to name the database and database prefix. Using descriptive names will prevent future confusion should we install more WordPress sites at a later date.
Database name: wpcourse
Database prefix: course_ (note that the database prefix is followed by an underscore)
To complete the installation, we will visit the WordPress Welcome page. To access this page, type http://example.org/wp-admin/install.php in your browser (remember to replace example.org with the name of your site).
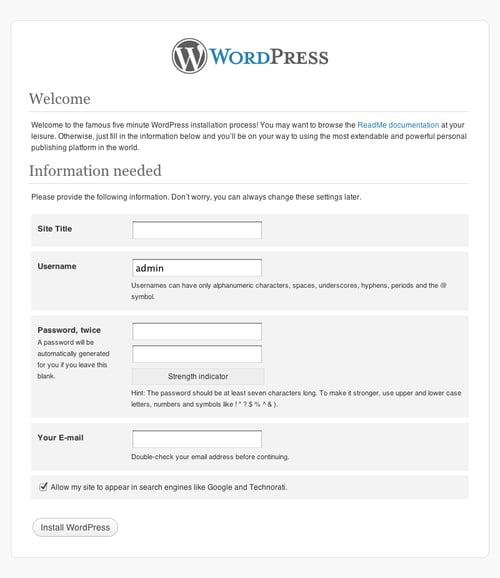
From the Welcome page, we are able to enter the title of our site, create a username and password, enter our e-mail address, and choose if we would like our site to be available to search engines such as Google and Bing.
Note
Choosing a username
By default WordPress selects admin as the username. For security reasons, it is advisable to choose a unique name.
Once the information has been entered, click on the Install WordPress button to complete the installation process. We will then receive a success message and be given the option to log in to WordPress. WordPress is now installed and our site is live!
Some educators may be lucky enough to have access to institution running web hosting accounts. Speak with your IT department about this possibility and ensure that the servers meet the PHP and MySQL requirements needed to run WordPress. In this scenario, we may need to perform a manual installation of WordPress.
Before performing a manual WordPress installation, we will need two crucial pieces of software: an FTP program and a text editor.
FTP (File Transfer Protocol) programs allow us to transfer files from our computer to a web server. FileZilla (http://filezilla-project.org) is an open source FTP program that is available cross platform (Windows, Mac OS X, and Linux).
Text editors allow us to edit text files in a range of formats. When installing WordPress manually, we will use our text editor to make changes to the WordPress PHP files. If you do not already have a specialized text editor, both Windows and Mac OS X come pre-equipped with basic text editors (Notepad for Windows, Text Edit for Mac OS X, and Nano or gedit for Linux).
With our FTP program and text editor, we are ready to complete the Famous 5-minute install process.
1. Download WordPress: Visit
WordPress.org, available through download, and unzip the latest version of the WordPress software.2. Create a database: The most common means for creating a database is to use the tool phpMyAdmin. This is a web page that allows us to administer our MySQL databases. If phpMyAdmin is not already available, documentation and a download link are available through http://phpmyadmin.net.
Note
Institutionally managed accounts may not permit users to install phpMyAdmin, but may provide other means for creating databases. Speak with your IT administrators to gain a clear understanding of your institution's policies.

Be sure to note the following information about your database:
The Database name is the name you have given the new database.
The Database username is the username you use to log in to the database.
The Database password is the password you use to log in to the database.
The Database host is the name given by the host. This is typically localhost.
Of these, only the database name is generated by us. The remaining information should be supplied by the IT department or hosting provider.
In this example installation, my database information is as follows:
Database name: wpcourse
Database username: administrator
Database password: xyz123
Note
The database host
The majority of hosting companies use localhost as the database hostname, but it may vary depending on provider. The WordPress Codex provides a list of database hostnames for a number of popular hosting companies (http://codex.wordpress.org/Editing_wp-config.php). If you are working with the IT department at your institution, speak with them regarding the database host information.
3. Create a copy of the
wp-config-sample.phpand rename the filewp-config-sample-copy.php. This ensures that there is a backup of the initialwp-configfile.4. Rename the
wp-config-sample.phpfile towp-config.php. This file is located in the main directory of the downloadedWordPressfolder.5. Fill in your database details in the
wp-config.phpfile. To do this, openwp-config.phpwith your text editor and locate the following:// ** MySQL settings - You can get this info from your web host ** // /** The name of the database for WordPress */ define('DB_NAME', 'putyourdbnamehere'); /** MySQL database username */ define('DB_USER', 'usernamehere'); /** MySQL database password */ define('DB_PASSWORD', 'yourpasswordhere'); /** MySQL hostname */ define('DB_HOST', 'localhost');
To edit the file:
Replace
putyourdbnameherewith your database name. In our example, this is wpcourse.Replace
usernameherewith your database username. In our example, this is administrator.Replace
yourpasswordherewith your database password. In our example, this is xyz123.If necessary, replace localhost with your MySQL hostname.
This information will now be changed to look something like this (be sure to use your own database information):
// ** MySQL settings - You can get this info from your web host ** //
/** The name of the database for WordPress */
define('DB_NAME', wpcourse);

/** MySQL database username */
define('DB_USER', 'administrator');

/** MySQL database password */
define('DB_PASSWORD', 'xyz123');

/** MySQL hostname */
define('DB_HOST', 'localhost');
6. Update the WordPress security keys within the
wp-config.phpfile. The security keys are a long, random collection of characters used to encrypt user information. To create the security keys visit https://api.wordpress.org/secret-key/1.1/salt/.This will create a set of random keys such as:
define('AUTH_KEY', 'mJZ!HZUYS^EGrg~I5xJLCdnQ|xq?%56c;~@l7g5)Eb2n+I/zrv<cqBdFtjA^jp%/');
define('SECURE_AUTH_KEY', 'NH#,QsmxIV 1ig~~{;|~T<i-x+_(`En>+Z?;@H+tg%/w/AbNb|]u9?HB>I*W8]>0');
define('LOGGED_IN_KEY', 'CfC-VBrKNXYiR9d.V&Wj=IJ/P)_3fNgBq(- u9HW 2kD[KpX,.$n&K}|kvVa{}+l');
define('NONCE_KEY', '%Vo8&Fq+fy78f4mJE`QoXcrW<Qw:|TvDu<f~Dtl]$Hr|h@:l,sC{CmJ/z,ZMv1g(');
define('AUTH_SALT', '`+>ED885rL]r4TLU.P77m23.x$=<-@--<JEC>aKd0{{bM5VIc54]g*b6T[c>aUVM');
define('SECURE_AUTH_SALT', 'm^{}c[1Fx/FT!3<5OP+_H^E0+p.W<rV|ADSxT =DMHkTaPnrdxY6R!bJbrzSoeJM');
define('LOGGED_IN_SALT', 'WapX3 yi;iG<x-&T)}qEAF18_J#<%wSHjMS*6cWTp=I:WWb|N|}L_84KE4>muI6N');
define('NONCE_SALT', '?a2b|4pawNj4.4YX;n9LZGxXW/|?zd@JJ(|AlO*@VdUna-*[$VQQ*6-_MF{olRcP');
Add the security key to the
wp-config.phpfile by copying it and replacing the default keys contained within the file.7. Upload WordPress to the server. Using the credentials supplied by your IT department/web host, access your server through the FTP software and drag the entire contents of the WordPress directory to your server.
8. Run the installation. Run the WordPress installation script by going to http://example.org/wp-admin/install.php in your browser and filling in the appropriate information.

This covers the basic installation of WordPress. The WordPress Codex has a variety of instructions covering a range of hosting options and can serve as an excellent resource (http://codex.wordpress.org/Installing_WordPress).
To power our site, we will need access to a web server. This can be achieved by either purchasing a web hosting account or discussing web hosting possibilities with the IT department within our institution.
As of version 3.2 or later, the requirements for WordPress are PHP 5.2.4 or greater and MySQL 5.0 or greater. If these acronyms seem frightening, don't worry, just be aware that PHP is the web scripting language that will power our WordPress installation and MySQL is the database that will store all of our content.
Many educational institutions have begun to offer WordPress installations to faculty, staff, and students. These installations come free-of-charge with a domain name already in place. Speak with your IT department to see if your school provides this service.
If your institution does not provide WordPress installations, we will cover two additional ways in which WordPress can be installed. If you plan to purchase web hosting from a third-party company, follow the instructions in the purchased hosting portion of the chapter. If your institution or IT department provides web hosting services, but does not provide WordPress installations, follow the instructions for manually installing WordPress.
Installing WordPress is a relatively straightforward procedure. In fact, the WordPress team has dubbed it the Famous 5-Minute Install. It can, however, require a bit of technical know-how. For that reason, I recommend using a web hosting service that offers a "one-click" WordPress installation. Essentially, this means that the service will run the installation for us.
Choosing a web host can feel a bit overwhelming. Luckily, WordPress offers a list of recommended web hosts (http://wordpress.org/hosting/). Each of these hosts, with the exception of Laughing Squid, offers "one-click" installations of WordPress and due to their wide use among the WordPress community, it is often easy to find solutions to any hosting related technical problem. While these are the hosts recommended by WordPress, nearly any modern commercial web host will meet the WordPress requirements. If you are interested in performing a manual WordPress installation, follow the instructions given in the in-house hosting portion of the chapter.
The hosts recommended by WordPress are:
Bluehost— http://bluehost.com
DreamHost— http://dreamhost.com
MediaTemple— http://mediatemple.net/wordpress-webhosting.php
Laughing Squid— http://laughingsquid.us
Once we have selected a web host, the next step is to choose an appropriate hosting plan. For a simple class site, the basic plan of nearly any web host will work well. For sites that utilize the WordPress MultiSite or BuddyPress features discussed later in the book, we may need to choose something more robust. These sites tend to use more bandwidth and require a larger database, making a more fully-featured hosting plan a wise decision. If you are unsure of which plan will work best for your site, contact the hosting provider and they will guide you to the service that is best suited for your needs.
I have had a very positive experience working with Media Temple's Grid-Service hosting. At $20 per month, it is the most expensive hosting option listed, but I am currently using a single account to power several WordPress installations, including a BuddyPress site.
The first step in setting up our hosting is obtaining a domain name. Domain names are the public address of your site and must be purchased and renewed annually. The cost of domain registration varies but is most often around $10-$15 per year.
To register our domain, we must find an available domain name. A domain name is a unique identifier such as example.org. Domain names end with top-level domain names such as .com, .net, .org, or .info. For educational use, I recommend avoiding .com as it is designed for commercial services and as the most commonly used domain extension, it is also the most difficult to find available domain names.
Note
Example URLs
Throughout this book I will use example.org as our sample URL. Anywhere you see example.org, it should be replaced with your unique URL.
Once we have found a suitable domain name, we can continue setting up an account with our chosen hosting provider. With our hosting account activated, we are ready to install WordPress. MediaTemple offers its customers a service entitled 1-Click Applications, which will install a WordPress site. Each hosting company listed will have their own unique interface and clear documentation for this service, but look for choices such as 1-Click Applications or Simple Scripts.
At this point of the installation we will be asked to name the database and provide a database table prefix. By default these are wp, but for security reasons it is recommended that the user should change the name to something unique. For the sample site, we will use something more descriptive to name the database and database prefix. Using descriptive names will prevent future confusion should we install more WordPress sites at a later date.
Database name: wpcourse
Database prefix: course_ (note that the database prefix is followed by an underscore)
To complete the installation, we will visit the WordPress Welcome page. To access this page, type http://example.org/wp-admin/install.php in your browser (remember to replace example.org with the name of your site).
From the Welcome page, we are able to enter the title of our site, create a username and password, enter our e-mail address, and choose if we would like our site to be available to search engines such as Google and Bing.
Note
Choosing a username
By default WordPress selects admin as the username. For security reasons, it is advisable to choose a unique name.
Once the information has been entered, click on the Install WordPress button to complete the installation process. We will then receive a success message and be given the option to log in to WordPress. WordPress is now installed and our site is live!
Some educators may be lucky enough to have access to institution running web hosting accounts. Speak with your IT department about this possibility and ensure that the servers meet the PHP and MySQL requirements needed to run WordPress. In this scenario, we may need to perform a manual installation of WordPress.
Before performing a manual WordPress installation, we will need two crucial pieces of software: an FTP program and a text editor.
FTP (File Transfer Protocol) programs allow us to transfer files from our computer to a web server. FileZilla (http://filezilla-project.org) is an open source FTP program that is available cross platform (Windows, Mac OS X, and Linux).
Text editors allow us to edit text files in a range of formats. When installing WordPress manually, we will use our text editor to make changes to the WordPress PHP files. If you do not already have a specialized text editor, both Windows and Mac OS X come pre-equipped with basic text editors (Notepad for Windows, Text Edit for Mac OS X, and Nano or gedit for Linux).
With our FTP program and text editor, we are ready to complete the Famous 5-minute install process.
1. Download WordPress: Visit
WordPress.org, available through download, and unzip the latest version of the WordPress software.2. Create a database: The most common means for creating a database is to use the tool phpMyAdmin. This is a web page that allows us to administer our MySQL databases. If phpMyAdmin is not already available, documentation and a download link are available through http://phpmyadmin.net.
Note
Institutionally managed accounts may not permit users to install phpMyAdmin, but may provide other means for creating databases. Speak with your IT administrators to gain a clear understanding of your institution's policies.
Be sure to note the following information about your database:
The Database name is the name you have given the new database.
The Database username is the username you use to log in to the database.
The Database password is the password you use to log in to the database.
The Database host is the name given by the host. This is typically localhost.
Of these, only the database name is generated by us. The remaining information should be supplied by the IT department or hosting provider.
In this example installation, my database information is as follows:
Database name: wpcourse
Database username: administrator
Database password: xyz123
Note
The database host
The majority of hosting companies use localhost as the database hostname, but it may vary depending on provider. The WordPress Codex provides a list of database hostnames for a number of popular hosting companies (http://codex.wordpress.org/Editing_wp-config.php). If you are working with the IT department at your institution, speak with them regarding the database host information.
3. Create a copy of the
wp-config-sample.phpand rename the filewp-config-sample-copy.php. This ensures that there is a backup of the initialwp-configfile.4. Rename the
wp-config-sample.phpfile towp-config.php. This file is located in the main directory of the downloadedWordPressfolder.5. Fill in your database details in the
wp-config.phpfile. To do this, openwp-config.phpwith your text editor and locate the following:// ** MySQL settings - You can get this info from your web host ** // /** The name of the database for WordPress */ define('DB_NAME', 'putyourdbnamehere'); /** MySQL database username */ define('DB_USER', 'usernamehere'); /** MySQL database password */ define('DB_PASSWORD', 'yourpasswordhere'); /** MySQL hostname */ define('DB_HOST', 'localhost');
To edit the file:
Replace
putyourdbnameherewith your database name. In our example, this is wpcourse.Replace
usernameherewith your database username. In our example, this is administrator.Replace
yourpasswordherewith your database password. In our example, this is xyz123.If necessary, replace localhost with your MySQL hostname.
This information will now be changed to look something like this (be sure to use your own database information):
// ** MySQL settings - You can get this info from your web host ** //
/** The name of the database for WordPress */
define('DB_NAME', wpcourse);

/** MySQL database username */
define('DB_USER', 'administrator');

/** MySQL database password */
define('DB_PASSWORD', 'xyz123');

/** MySQL hostname */
define('DB_HOST', 'localhost');
6. Update the WordPress security keys within the
wp-config.phpfile. The security keys are a long, random collection of characters used to encrypt user information. To create the security keys visit https://api.wordpress.org/secret-key/1.1/salt/.This will create a set of random keys such as:
define('AUTH_KEY', 'mJZ!HZUYS^EGrg~I5xJLCdnQ|xq?%56c;~@l7g5)Eb2n+I/zrv<cqBdFtjA^jp%/');
define('SECURE_AUTH_KEY', 'NH#,QsmxIV 1ig~~{;|~T<i-x+_(`En>+Z?;@H+tg%/w/AbNb|]u9?HB>I*W8]>0');
define('LOGGED_IN_KEY', 'CfC-VBrKNXYiR9d.V&Wj=IJ/P)_3fNgBq(- u9HW 2kD[KpX,.$n&K}|kvVa{}+l');
define('NONCE_KEY', '%Vo8&Fq+fy78f4mJE`QoXcrW<Qw:|TvDu<f~Dtl]$Hr|h@:l,sC{CmJ/z,ZMv1g(');
define('AUTH_SALT', '`+>ED885rL]r4TLU.P77m23.x$=<-@--<JEC>aKd0{{bM5VIc54]g*b6T[c>aUVM');
define('SECURE_AUTH_SALT', 'm^{}c[1Fx/FT!3<5OP+_H^E0+p.W<rV|ADSxT =DMHkTaPnrdxY6R!bJbrzSoeJM');
define('LOGGED_IN_SALT', 'WapX3 yi;iG<x-&T)}qEAF18_J#<%wSHjMS*6cWTp=I:WWb|N|}L_84KE4>muI6N');
define('NONCE_SALT', '?a2b|4pawNj4.4YX;n9LZGxXW/|?zd@JJ(|AlO*@VdUna-*[$VQQ*6-_MF{olRcP');
Add the security key to the
wp-config.phpfile by copying it and replacing the default keys contained within the file.7. Upload WordPress to the server. Using the credentials supplied by your IT department/web host, access your server through the FTP software and drag the entire contents of the WordPress directory to your server.
8. Run the installation. Run the WordPress installation script by going to http://example.org/wp-admin/install.php in your browser and filling in the appropriate information.
This covers the basic installation of WordPress. The WordPress Codex has a variety of instructions covering a range of hosting options and can serve as an excellent resource (http://codex.wordpress.org/Installing_WordPress).
To log in to our WordPress site, visit www.example.org/wp-login.php . I would recommend creating a browser bookmark for the login page, as it will be the gateway to your WordPress site.
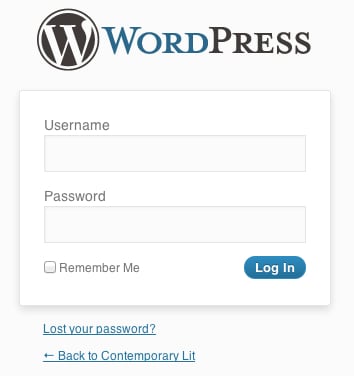
Once we have entered the credentials created during the installation process, we will be taken to the Dashboard of the WordPress interface.
At the top of the Dashboard is the WordPress Toolbar. The admin bar will remain at the top of our browser window throughout the WordPress interface, allowing us to quickly visit our public website, check for updates, administer comments, add/edit posts and pages, and log out of WordPress.
On the left hand side of the Toolbar we see the WordPress logo followed by the name of our site. The name of the site is a link that, when clicked, will take us to our site's public home page. This is a quick and easy way to view our site.
At the right side of the Toolbar we will see our username. Hovering over our username presents us with the option to Log Out of WordPress. Below the username are the Screen Options and Help links. Screen Options allows us to manage the appearance of the current WordPress screen. The Help link opens a unique help guide for each section of the site.
The left sidebar offers links to all of the different tasks we can perform within WordPress, allowing us to manage the posts, pages, settings, look, and functionality of our site.
The large, center column of the dashboard is designed to provide an overview of our site. The first time we access the WordPress dashboard, the center column will contain a large Welcome to your new WordPress site section, designed to provide an overview of WordPress and its functionality.
The Right Now area offers an overview of what is happening on the site by listing the number of posts, pages, categories, tags, comments, and comment details. It also displays which version of WordPress we are currently running.
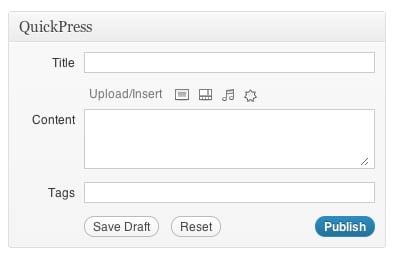
Through the QuickPress option, the dashboard offers us a quick way to write a post without the need to leave the dashboard.
Within the center column of the dashboard we can also see the latest WordPress news, a list of recent popular plugins, recent site comments, and a list of recent links to our site.
The two essential functions of WordPress are its ability to quickly and easily create posts and pages. Posts are the primary content of a typical WordPress blog site. They are individual chunks of content, similar to news items, which are used to post frequent and timely updates to the site. Blog posts tend to be read in reverse chronological order on the site or by subscribers in feed readers. Pages make up the individual web pages of our site. Pages tend to be less frequently updated and are typically accessed through menus. For instance, we may have a page on our site that contains the course syllabus. When we make a change to that syllabus, we can write a new post alerting our students of the change.
Posts are one of the foundations of WordPress. Posts can otherwise be thought of as blog posts, updates, or news. In terms of our class, posts are a great way to publish assignments, due date reminders, supplemental course content, and any news we may deem relevant to the course. Posts can be tagged and organized so that they may be sorted or searched by subject matter or keywords. Students may even use an RSS reader to subscribe to your posts so that they will never miss an update.
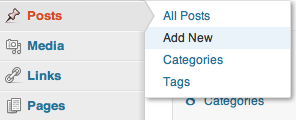
To write a new post, hover over Posts in the left sidebar of the WordPress dashboard and choose the Add New option.
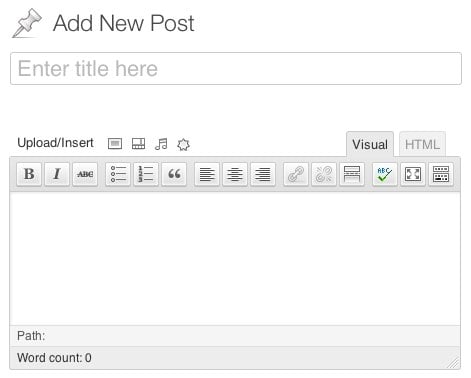
This presents us with the New Post screen. From this screen we are able to write and publish posts. Creating a post is as simple as typing in the large input area and pressing the Publish button. Give your post a brief descriptive title by typing in the Enter title here input area.
The larger text area below the title bar is where we will type the post. It works much like a Word processor, allowing us to type content as well as edit the formatting of our text.
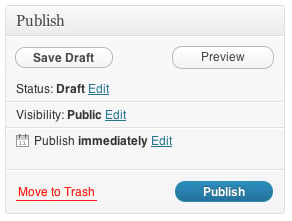
Once we have finished writing our post, we can publish it to our site by clicking on the blue Publish button located on the right-hand area of the screen. A view post link will appear within a yellow box above the page title, allowing us to quickly view the new post on our site.
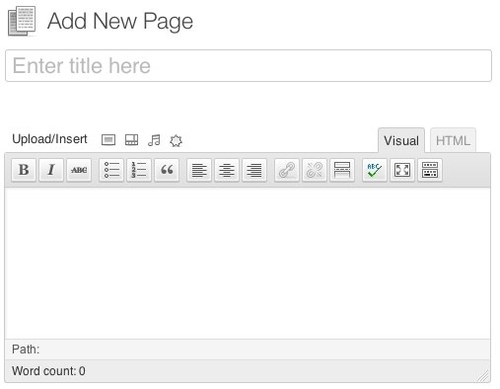
Creating a new page works similar to writing a post in WordPress. From anywhere within the WordPress dashboard, click on the arrow next to Pages in the left sidebar and choose Add New. Enter a title for the new page in the top text area. The large text area below is used to create the body of our page. To publish the page, click on the blue Publish button located on the right hand side of the screen.
As an example, we may wish to create an About page to describe the purpose of our site. Enter About into the top text area and type a brief description of the site within the body text area. Once the description is complete, click on the Publish button to create the page.
Once the page is published, click on the view page link that appears within the yellow box above the page title, to see the post live on our site.
While WordPress works great right out of the box, adjusting a few of our site's settings can improve both our experience as WordPress users as well as the experience of our students and site users. To view the settings categories, click on the drop-down arrow next to Settings at the bottom of the left sidebar.
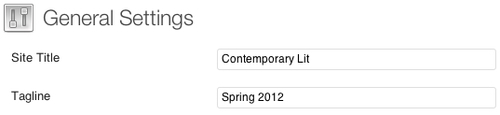
General Settings allows us to edit the basic settings of our site. Here we can update the site title, site tagline, site address, administrator e-mail, as well as date and time information. One of the first changes I make to a fresh WordPress installation is to update the time zone to correctly reflect my location.
Another important General Setting to update is the tagline. Our site's tagline appears below the site title in most WordPress themes. By default the tagline reads, Just another WordPress site. Within the General Settings we are able to change the tagline to reflect a better description of our site.
Writing Settings gives us greater control as to how we input content into WordPress. Within these settings, we are able to control the textbox formatting, change the default categories of posts and links, add the Press This bookmarklet, and enable posting via e-mail and desktop applications.
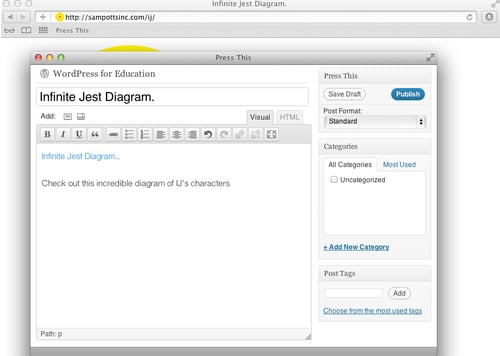
I would recommend adding the Press This bookmarklet to your browser. A bookmarklet is a small piece of JavaScript code that, when installed as a browser bookmark, allows you to interact with any web page. To install the Press This bookmarklet, click-and-drag the Press This button to your browser's bookmark bar. With this bookmarklet, you are now able to quickly create a post from anywhere on the web. For example, if you encounter a great class resource while browsing, click on the Press This bookmarklet and quickly add a post to inform your students. This post will automatically title itself with the title of the website you are visiting and add a link to the page.
The following screenshot shows you the Press This bookmarklet in action:
Reading Settings allows us to make changes to the way our students or readers interact with our content both on the site itself and within the site's RSS feed. Within Reading Settings, we can adjust the home page of our site, the number of posts that appear on single page, and the type of RSS feed that will be available.
Note
What is RSS?
RSS stands for Real Simple Syndication and allows readers to easily subscribe to a site using a feed reader such as Google Reader (http://google.com/reader). New posts will automatically appear in the feed reader, saving the site user the trouble of checking for site updates.
WordPress enables site visitors to leave comments. Our site's Discussion Settings refers to the comments left on our site's posts and pages. We can make adjustments to our site's discussion settings to suit our preferences or even disable comments altogether. For example, un-checking the Allow people to post comments on new articles box will disable comments.

If you choose to allow comments, I would suggest checking the An administrator must always approve the comment checkbox. This will prevent any inappropriate or off-topic comments from appearing on our site.

Media Settings allows us to control the size and location of the images and videos used in our site.
When installing WordPress we were able to choose if we would like search engines to index our site. Within the privacy settings we can adjust this setting if we choose to reverse our initial decision.
By default, WordPress creates URLs for our posts that use the post ID along with question marks and numbers. These default URLs wind up looking something like: http://example.org/?p=123. By changing the Permalink Settings we can adjust our post URLs to be more memorable (not to mention much more aesthetically pleasing), such as: http://example.org/2012/12/post-name/.
WordPress provides several choices to easily change our permalink structure to one of the most common settings, but we can create our own structure using special tags provided by WordPress.
|
Chart of permalink tags | |
|---|---|
|
%year% |
Numerical year of the post |
|
%monthnum% |
Numerical month of the post |
|
%day% |
Numerical day of the month |
|
%hour% |
Numerical hour of the day |
|
%minute% |
Numerical minute of the hour |
|
%second% |
Numerical second of the minute |
|
%post_id% |
The unique numerical ID of the post |
|
%postname% |
The name of your post |
|
%category% |
The category of your post |
|
%tag% |
The tags used in your post |
|
%author% |
The name of the post author |
If we wanted to create a custom permalink structure for our site that displayed the year, post category, and post name we would enter the following into the Custom Structure text area:
/%year%/%category%/%postname%/
Now, a post written in October of 2012, titled Essay, and given the category of assignments would appear as such:
In this chapter we've covered everything we need to get started with WordPress. We've chosen a web host, installed WordPress, explored the WordPress dashboard, learned the difference between posts and pages, and configured WordPress by updating our site's settings. In the next chapter we'll look at how WordPress posts and pages can be used to build a course website.