


In this chapter, we will cover:
Finding documentation on WordPress.org
Downloading themes from the WordPress theme repository
Downloading themes from third-party websites
Installing and activating a theme
Displaying the blog name
Getting the absolute directory path of the active theme
Creating a theme from scratch
Creating a child theme
Creating a theme by using a theme framework
Adding expected WordPress hooks
Including PHP files from your theme
If you're going to be creating or modifying a WordPress theme, it pays to start with the basics. That's what this chapter is all about. By reviewing the recipes contained within, you'll learn how to find useful documentation, how to download and install themes from various places, and what is required if you want to create your own theme from scratch.
As you progress through the recipes in this book, you'll need a theme to work with. If you're an experienced WordPress developer, you'll probably want to create your own theme by using the recipe Creating a theme from scratch contained later in this chapter. If you're just starting out, I recommend using either of the two themes distributed with the base install of WordPress. Both "WordPress Default" and "WordPress Classic" offer solid bases on which you can build your custom theme.
This book will help you through the most common tasks you may encounter when developing a WordPress theme. However, you'll certainly have questions along the way that need further investigation. When these questions arise, you should consult the official WordPress documentation.
First fire up your browser and go to http://codex.wordpress.org. This is the home page for the codex, where you'll spend a lot of time as a WordPress developer. The page looks like the following screenshot:

From the home page, you can browse to a topic that you are interested in. In the following screenshot, you can see the topic page for the WordPress Database Description:

The WordPress Codex is a user-generated set of documentation for the WordPress system. Most functions and functionality are well-documented, and most theme-related questions can be answered through careful browsing and reading.
For questions related to specific topics, it may be useful to consult that topic's page. Here is a short guide:
Theme development—http://codex.wordpress.org/Theme_Development
Template tags—http://codex.wordpress.org/Template_Tags
Conditional tags—http://codex.wordpress.org/Conditional_Tags
Function reference—http://codex.wordpress.org/Function_Reference
The best place to find reputable WordPress themes free for use is the official WordPress theme repository. Every theme in the official repository is licensed under the GPL, which means that you can download it, modify it, and distribute your changes as you please.
You'll find themes for almost every use in the repository. There are themes for business sites, blogs, and even team communication. If you look hard, you'll probably find a theme you can use, or at least one you can modify to look the way that you want.
A web browser with Internet access is required to download themes from the official theme repository.
First fire up your browser and visit http://wordpress.org/extend/themes/. This is the theme repository home page, and looks like the following screenshot:

From the home page, you can browse themes by several different sorting criteria. Of note are the most popular, the newest, and the most recently-updated themes. If a theme appeals to you and you want to try it out, click on the name of the theme and then click on the download button on the resulting page. Be sure to read the theme's description to determine the type and placement of the dynamic sidebars, default widgets, and the different options that you can configure for the theme. As an example, you can see Arjuna X's theme page in the following image:

The WordPress Theme Repository hosts WordPress themes submitted by individual theme developers and that conform to the GPL—the same license that ships with WordPress. This means that all themes contained within the theme repository are free to use, modify, and redistribute as you wish.
When downloading items from the theme repository, you are almost guaranteed a stable well-developed theme that will work when you first install it. In addition, the themes that you download from there will not contain affiliate links or other malicious or obfuscated code that could negatively affect your WordPress blog.
Although browsing the repository by theme type or one of the special categories (like featured, new, or popular) is great in some instances, there are other ways to find a theme that will fit your exact needs. The following techniques will help you in your search for the perfect WordPress theme.
The Theme Repository includes a basic search function. Simply type in the search terms that you're looking for and the system will return the best-matched results. This is great if you're looking for a theme built for a particular purpose, such as photoblogging, podcasting, content aggregation, or business. The following image shows the search results page when searching for"2 column":

Another great way to find a theme that fits your particular needs is to use the WordPress theme repository's tag filter functionality. You can find this at http://wordpress.org/extend/themes/tag-filter/. After checking your desired filtering criteria, click on the Find Themes button. You'll be presented with a screen like the one shown in the following screenshot:

Another place to find good, sometimes great, WordPress themes is on third-party websites. You have to be careful, though. Although most themes released to the public are done with the best intentions, there have been some instances where people have released themes full of backdoors into your site and spam links.
As such, care needs to be taken to make sure that the theme you are downloading doesn't give hackers and crackers a backdoor into your website, or populate your blog with hidden spam links.
The first thing that you need to do is find a theme you'd like to download. A search on Google or Bing for best free WordPress themes will return a list of results that should get you started. You can try more specific searches, such as best one column WordPress themes or best business WordPress themes, if you already have a good idea of what you want.
After you find a theme that you'd like to download, you have some due diligence to perform. You need to check the reputation of the theme developer to ensure that the theme is safe to download. Some things to look for are:
Does the theme developer have support forums for their themes?
Does the developer have a blog that is updated somewhat frequently?
Have other users commented on the theme, either on the theme's website or their own?
If you're comfortable with the reputation of the theme developer, it is usually safe to download the theme and try it out. Just remember that you're taking a risk every time you download software from the web. You should test the theme in a non-critical environment before deploying it to a site that you actually care about.
Developers release WordPress themes on their site instead of on the official theme repository for a variety of reasons. The theme may use a different license than the GPL, the author may be trying to garner publicity, or market themselves, and so on. Be sure to read any materials distributed with the theme to make sure that you know your rights in regards to it.
Be cautious with themes that you download from third-party sites. Again, most themes are safe, but it never hurts to have a friend or colleague familiar with WordPress check it out to make sure. If that is not an option, you can always try contacting the developer before using his theme and ask him if there is anything that you should watch out for. No matter what, make sure that you test the theme in a non-critical environment before deploying it somewhere important.
There are several trusted developers who release high-quality themes on a regular basis. You can find them at the following places:
In addition, there are several sites available where you can purchase high-quality WordPress themes at very reasonable prices. Some of the best sites to visit are:
It is important to point out that paying $30-$100 for a theme (the average price range across these and similar sites) is much less costly than taking an entire week to build a theme from scratch. Although you may lose some of the individual flavor that you might have had if you had developed a theme from scratch, the cost and time savings may be worth it to you.
Once you find or create a theme that is right for you, there is a need to install and activate it so that it can start providing the output for your WordPress install. Installation is easy once you know where WordPress expects theme files to be located, and activation is done through the administration panel with a few clicks. In this recipe, you'll learn exactly how to do both.
Download or create a theme that you wish to install. The theme's files should be contained in a single directory, exactly like the default WordPress themes are packaged.
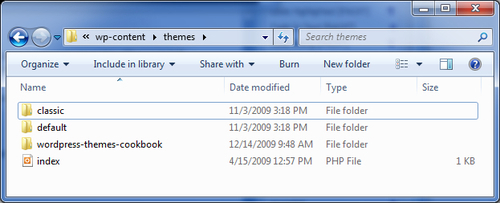
First, you need to get your theme into the proper location in your WordPress install. Unless you've configured your installation in an unusual way, the correct directory to install your theme is wp-content/themes/. If you're working with a fresh install of WordPress, the directory should contain two subdirectories: default and classic. This is shown in the following screenshot:

Once you get to the correct place, you need to create a new subdirectory for your theme. Here we create a directory called wordpress-themes-cookbook that will hold all of the files for the new theme:
After you've created the directory, place all of your theme's files into the new directory. At this point, if your theme has been constructed properly and contains the necessary files, you can activate the theme for use on your site. Open up your WordPress administrative area and click on the Appearance menu item. You'll see the Manage Themes page, as shown in the screenshot below:

If you need to preview your theme before activating it, click on the Preview link under the theme that you're interested in. After confirming that the view is correct, click on the Activate link in the upper-right corner of the preview box, as shown in the next screenshot:

If you don't wish to preview your new theme, you can click on the Activate link directly. After activation, the page will refresh and you'll be greeted with a message regarding the switch:

When you activate a new theme, WordPress stores two values in the database, indicating which theme is active, and what template files should be used. Whenever a page is viewed on the website, WordPress looks up the active theme and uses the correct template files to display the appropriate output.
The two values are located in the WordPress options table for your install and have keys of stylesheet and template. In most circumstances, these two values will be the same. However, if you are using a child theme, the template option will be the name of the folder in which the parent theme is located.
A variety of information about a blog can be entered in the WordPress administration panel. Displaying that information publicly is the responsibility of the active theme. One piece of information that you may want to display is the name of the blog.
First, you must locate the position at which the blog name should be displayed in your theme. Open the appropriate theme file (header.php is a good place to start) and place your cursor at the desired location. For the purposes of this recipe, you'll be inserting the blog's name as the value of the title tag.
Locate the title tag and remove whatever value is contained within it. Now, insert the bloginfo function and make the markup look like the following:
<title><?php bloginfo('name'); ?></title>
When the blog name is set in the administrative panel, the value that the user enters is stored in the options table within the WordPress database. When you call bloginfo with name as the argument, the name of the blog is retrieved from the options table and displayed.
Note
Benefits of open source
WordPress is open source software. As such, you can examine the code base directly when you want to see how things are implemented. To get the most out of WordPress, you should look up functions that you use frequently, and bloginfo is a great place to start. It gives you a good idea of the way WordPress stores and retrieves miscellaneous information, and can be found in wp-includes/general-template.php.
Template tags, of which bloginfo is one, often take one or more parameters that modify the output produced. With bloginfo, the single parameter you can pass determines which piece of information about the blog should be displayed.
The sole parameter accepted by the bloginfo function is a simple string. The following strings are supported, and must be passed in place of name in the above code sample:
|
String |
Data Displayed |
|---|---|
|
|
The blog's title |
|
|
The blog's tag line |
|
|
The URL to the blog's home page |
|
|
The URL to the WordPress installation |
|
|
The URL for the blog's RDF/RSS 1.0 feed |
|
|
The URL for the blog's RSS 0.92 feed |
|
|
The URL for the blog's ATOM feed |
|
|
The URL for the blog's comments RSS 2.0 feed |
|
|
The URL for the pingback XML-RPC file |
|
|
The URL for the primary CSS file of the active theme |
|
|
The URL of the style sheet directory of the active theme |
|
|
The URL of the active theme's directory |
|
|
The e-mail address of the blog administrator |
|
|
The blog's encoding for pages and feeds |
|
|
The blog's version of WordPress |
|
|
The content type of WordPress HTML pages |
To retrieve a piece of information for storage in a variable or for further manipulation, use the get_bloginfo function instead of bloginfo. get_bloginfo returns information instead of printing it, and supports the same parameters as bloginfo.
As an example, perhaps you want to capitalize the blog name for some reason. The following would allow you to do so:
<?php echo strtoupper(get_bloginfo('name')); ?>
It sometimes becomes necessary to directly access files within the active theme's directory. Binary file loading, PHP or HTML includes, and iteration over custom file structures (as used in some theme frameworks) are some of the reasons for using direct access.
You can access the STYLESHEETPATH constant from any PHP file in your theme. The STYLESHEETPATH constant is defined when WordPress first loads.
To give you an idea of how the constant works, consider the case where you want to load a file containing some variable declarations for your theme. Create a new file in your theme's directory called config-variables.php, and add the following code to it:
<?php
$blue = 1;
$red = 2;
$green = 3;
Next, open up your theme's header file—header.php—and add the following code at the very beginning of the file:
<?php include (STYLESHEETPATH . '/config-variables.php '); ?>
Now, anywhere inside of your theme, you'll be able to access the variables defined within config-variables.php.
The STYLESHEETPATH constant contains the absolute directory path to the file system location that contains the active theme. This is true for both regular themes and child themes. The STYLESHEETPATH constant does not contain a trailing slash, so one will need to be appended when accessing individual files within the directory.
Creating a great theme from scratch is a challenging task. You have to define markup and behaviour, and add all of the necessary styles yourself. That being said, building from the ground up is sometimes the only thing that makes sense if you're building something really special.
Although making sure everything works correctly when you're finished will be difficult, getting started with your theme is not. There are only a few files required to get you going. After that, though, you'll be on your own as far as making sure that all of the appropriate information gets displayed.
First, create a new directory to contain your theme, and name it whatever you want. If you need help figuring out where to place your theme, see the recipe Installing and activating a theme.
Next, create the following files inside your newly-created directory:
style.cssindex.php
The theme's main stylesheet (style.css) is required to contain information about the theme in a particular format. This is very important. Without this information, WordPress will not be able to correctly recognize your theme. Open style.css and insert the following:
/*
Theme Name: Your Theme Name
Theme URI: http://example.com
Description: Write a short description.
Author: Your Name
Author URI: http://example.com
*/
After inserting the base structure, you are free to change it to whatever you see fit. For my purposes, I've changed the code to read as follows:
/*
Theme Name: WordPress Themes Cookbook
Theme URI: http://plugin-developer.com/wordpress-themes-cookbook-theme/
Description: A demonstration theme for the WordPress Themes Cookbook.
Author: Nick Ohrn
Author URI: http://plugin-developer.com
*/
Now, to test that you correctly entered all the information, you need to visit the Manage Themes section of the WordPress administration panel. Open up the WordPress administration interface and click on Appearance. Scroll down, and you should see a box that contains all of the information for your newly-created theme. Given the information that I entered, my box looks like the following:

Your Manage Themes page should display the information that you entered. For more information on the different items that your style.css file can contain, see the official WordPress documentation at http://codex.wordpress.org/Theme_Development#Theme_Style_Sheet.
WordPress themes generally contain a variety of different files to display data of different types and organizations. In addition to the required style.css and index.php files, you can create specially-named files that will handle certain situations.
WordPress recognizes and uses a variety of files for different situations. A full list of files and their use can be found at http://codex.wordpress.org/Theme_Development#Theme_Template_Files_List. The following list describes the most common files and the purposes for which they are used:
WordPress recognizes that a good theme will be well-organized and often has a consistent header, sidebar, footer, and comments section. As such, the following files are supported for separating those elements out, and are included with special WordPress functions:
For more information on these functions, see http://codex.wordpress.org/Theme_Development#Basic_Templates.
One of the features that is really gaining traction in the WordPress theme development community is the concept of child themes. A child theme is a theme that has a unique stylesheet but inherits the template files from a parent theme. That is, the parent theme is largely responsible for producing the template output, and the child theme is responsible for styling that output.
In addition, a child theme can selectively override certain template files. So, if a child theme wishes to have a special home page or wants to list a specific archive type in a unique way, it can override only those pages and everything else will still display as defined by the parent theme.
Before creating a child theme, you must choose a parent to base it on. You can use any existing WordPress theme as your parent when creating a child theme. When deciding on a parent theme, remember that the child theme can both style the output of the parent and use its own template files to override the parent theme's display of information.
First, you need to determine which theme you want to use as the parent. Pick a theme that generates markup that you're happy with and feel that you can style appropriately. For the purposes of this recipe, we'll use the WordPress Default theme.
When you choose your parent theme, you need to make a note of the name of the directory containing the parent theme. The directory for the WordPress Default theme is named default.
Now create a new a directory to contain your child theme. You can name the new directory whatever you want. Create a new file—style.css—inside your newly-created directory. Then insert the following code:
/*
Theme Name: Your Child Theme Name
Theme URI: http://example.com
Description: Write a short description.
Template: Parent Theme Directory Name
Author: Your Name
Author URI: http://example.com
*/
Replace the information in the above code snippet with your desired theme information. For example purposes, we've modified this code snippet to read as follows:
/*
Theme Name: WordPress Themes Cookbook Child
Theme URI: http://plugin-developer.com/wordpress-themes-cookbook-theme/
Description: A demonstration child theme for the WordPress Themes Cookbook.
Template: default
Author: Nick Ohrn
Author URI: http://plugin-developer.com
*/
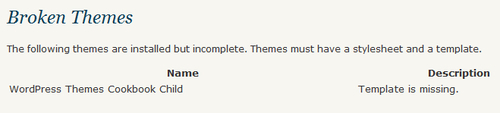
After creating the child theme's style.css file, visit the Manage Themes page in your WordPress administration panel. If you've done everything correctly and put the correct string next to the Template: item, you'll see something like the following:

However, if you put a nonexistent or incorrect folder name next to the Template: item, you'll see an error message like the following:
When you activate a child theme, WordPress reads the style.css file for that theme and recognizes that it has a parent. It then stores the values as discussed in the recipe Installing and activating a theme. The parent theme's folder name is stored in the template option, whereas the child theme's folder name is stored in the stylesheet option.
When WordPress starts to render a page, it looks for appropriate templates first in the directory defined by the stylesheet option, and then falls back to the directory specified by the template option. Other than that, there isn't that much difference between a child theme and a regular theme.
The concept of child themes is a really powerful one. As a theme developer, you can create a base theme with good markup and a layout that you're happy with, and then make small style tweaks by using a child theme. If you're doing this, then there is one trick in particular that you'll want to use.
If you've got a carefully-styled base theme, you can choose to selectively override styling while maintaining the basic look of the parent theme. To do so, you include an import statement in the style.css file. Insert the following statement after the theme definition header that you copied earlier in the recipe:
@import url('../folder-name/style.css');
Replace folder-name with the directory name of your parent theme. At this point, refresh your browser and you'll notice that the child theme looks exactly the same as the parent theme. Individual styles can then be selectively overridden in the child theme's style sheet by placing style declarations after the import statement.
Creating a theme by using a theme framework allows for the ultimate in customization. Theme frameworks tend to allow easy modification of template output in addition to customization of element styles. This puts more power into the hands of the derivative theme developer.
Download and install the theme framework of your choice. For more information on this, please see the recipe Installing and activating a theme.
First, you need to pick a theme framework to build on. There are several theme frameworks listed in the There's more... section of this recipe, and all of them consist of quality markup and carefully chosen styles, making them a snap to build on top of.
After you've chosen a theme framework, it is time to create a theme based on that framework. To do so, you'll use the technique described in Creating a child theme. After you've created the base child theme, you can start to customize it.
In most cases, you override the markup of a parent theme by supplying template files directly in your child theme. With a theme framework, things generally work a little differently. You supply your custom markup by attaching callbacks to custom action and filter hooks, as defined by the theme framework. To find out what the custom hooks are, you need to read the theme framework's documentation.
To add appropriate functionality via the custom hooks, you create a functions.php file inside your child theme, and use the Plugin API to add callbacks to the theme framework's custom hooks.
A theme framework is a theme created for the sole purpose of being extended by child themes. They are built to be modified by users for use on their own websites. Although most theme frameworks can be used out of the box, it is the personalization and customization that end users and developers perform that really allow their particular use of the framework to shine.
There are several quality theme frameworks in existence at the time of writing this book. The best are as follows:
Thematic—http://themeshaper.com/thematic/
Hybrid—http://themehybrid.com/archives/2008/11/hybrid-wordpress-theme-framework
Carrington—http://carringtontheme.com/
Vanilla—http://code.google.com/p/vanilla-theme/
Whiteboard—http://plainbeta.com/2008/05/20/whiteboard-a-free-wordpress-theme-framework/
WordPress themes should possess a number of different hooks by default, allowing active plugins to alter or add output when pages are rendered. WordPress development guidelines specify the names and locations of the expected WordPress hooks in themes.
There are three WordPress hooks that you need to add to almost every custom theme. They are:
First, add the wp_head hook. Find the end tag of the HTML head element (</head>, often in header.php) and place your cursor on the line before it. Insert the following:
<?php do_action( 'wp_head' ); ?>
Next, add the wp_footer hook. Find the end tag of the HTML body element (</body>, often in footer.php) and place your cursor on the line before it. Insert the following:
<?php do_action( 'wp_footer' ); ?>
Finally, insert the comment_form hook. Locate the end tag of the HTML form element for the comment form (</form>, often in comments.php and comments-popup.php) and place your cursor on the line before it. Insert the following:
<?php do_action( 'comment_form', $post->ID ); ?>
If you are using the default comments form layout, you won't have to explicitly add the comment_form hook because it is provided in the default theme's comments.php file.
Plugins use these hooks to add to or modify the rendered output of a theme's template files. Often the modification includes linking to or outputting JavaScript, CSS, or HTML code. Many popular plugins use the above hooks, and making sure that they are present is essential to the plugin's proper operation.
For organizational or reuse purposes, you will often separate components of your theme into separate files to be used in several different places.
Before getting started, you need to identify the pieces of output that will be reused throughout your theme, and separate them into different PHP files. You may wish to separate common post listing structures or advertisement blocks.
First, you should identify the piece of output that you wish to reuse and separate it into a new file. For this recipe, we'll say that you have a notice snippet that you may wish to include in several places. Place the following code in a new file called notice-snippet.php:
<div class="notice-snippet">
Thanks for visiting my site!
</div>
After you've separated it, you need to decide where you want to display the snippet. Wherever you want to display the snippet, insert the following:
<?php include TEMPLATEPATH . '/notice-snippet.php'; ?>
You'll notice that your snippet is now shown in the template wherever you inserted the above statement.
The include function does exactly what you would think it does: it includes the contents of the separate file wherever you use it. The important thing to remember about this example is the TEMPLATEPATH constant used in the include statement.
TEMPLATEPATH is a constant defined by WordPress that holds the directory path to the directory that contains the template used to render output for the theme. You should use the TEMPLATEPATH constant whenever you need to have PHP access files from your theme.
In addition to the TEMPLATEPATH constant, WordPress provides a STYLESHEETPATH constant. Generally, these two constants hold the same variable. However, if a child theme is active, then the STYLESHEETPATH constant will contain the file system path to the style sheet in use, whereas the TEMPLATEPATH constant will contain the file system path to the parent theme directory.
