


Back in 2003, when blogs weren't as popular as they are nowadays, an average 2000 users used a blogging platform created by Michel Valdrighi known as b2.
This year, two b2 users, Matt Mullenweg and Mike Little, decided to create a fork of b2 and named it as WordPress.
Due to the growing popularity of the blogging platform, several core members of WordPress development team decided to create a company devoted to promote and enhance WordPress, called Automattic. The team also started to provide a hosted service at www.wordpress.com.
Today, WordPress is used by many people and companies. While there's a lot of personal blogs, with people simply willing to stay tuned with their friends, some very well-known companies, such as CNN, use WordPress to share their content on the web.
With its Open Source code, dynamic community, and passionate individuals WordPress can be used by everyone and easily make it fit to their own needs.
Even if understanding the working of WordPress isn't that difficult, it may take some time for a novice or a non-developer to get accustomed to it. The WordPress Cookbook can be read chapter wise, as a way to understand the working of WordPress and explore new things using it.
On the other hand, it is possible to keep the WordPress Cookbook on your desk and refer to it in case an issue arises. WordPress Cookbook features many recipes that can be read in no particular order.
In this chapter, you will learn:
Managing media files with the Media Library
Live editing themes with the built-in Theme Editor
Editing plugins with the WordPress built-in Plugin Editor
Managing authors and users with the User Manager
Importing and Exporting content with the Import and Export tool
By default, WordPress provides some useful tools for the bloggers that make your blogging life easier. The following are the tools provided by WordPress:
Media Library
Theme Editor
Plugin Editor
User Manager
Import/Export Manager
The Media Library allows you to manage all the media files (images, videos, and so on) in one place. The Media Library allows you to add, delete, and edit media files for further integration on your blog posts.
To access WordPress Media Library, log in to your WordPress Dashboard and go to Media | Library, located to the right of the screen.
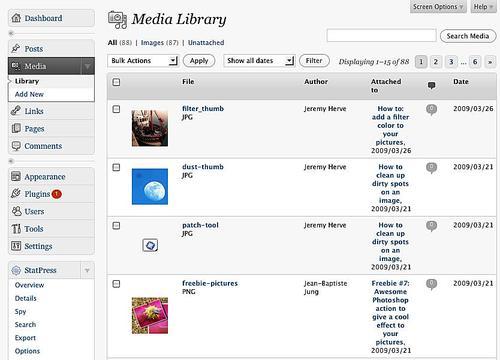
To add a new media file on the Media Library, click the Media option, in WordPress admin menu, and then click on Add new. A Select files button will be displayed. Simply click on it and select the media files from your hard drive.
There are two uploaders available: the Flash uploader (which uses Adobe Flash technology) and the Browser uploader (which uses a good old input file HTML field). The Flash uploader allows you to select multiple files at once, while the browser uploader allows you to upload only one file at a time. With WordPress 2.6, the Flash uploader wasn't working on Mac OS and GNU/Linux platforms. This has been fixed with WordPress 2.7. However, if you have any issues with Flash uploader, the Browser uploader will always work.
To delete the media, carry out the following steps:
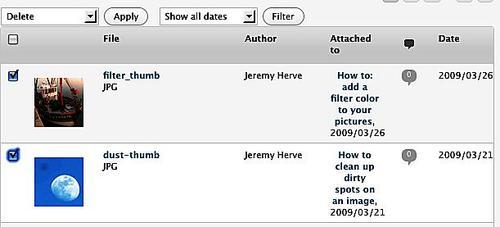
For bulk media deletion, carry out the following steps:
If you need to delete around 5 or 10 media files, WordPress allows you to erase all the undesired files at once.
To do so, simply go to the Media Library and check the checkboxes related to the media you want to delete.
Select the Delete option in the Bulk Actions drop-down list (located on the top left of the page) and then click on the Apply button.
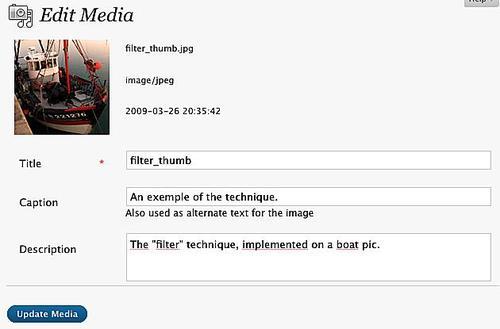
All media files can be edited. You can change its title and add a caption or description. Carry out the following steps to do so:
Among other tools, WordPress features the Theme Editor, which allows you to edit your theme files without downloading or uploading the files. Chapter 3 covers WordPress themes in detail.
To access the Theme Editor, log in to your WordPress Dashboard, and go to Appearance | Editor located at the top of the screen. To select a theme for editing, use the drop-down list located at the top right of the screen. By default, you'll be editing the theme being used currently by your blog.
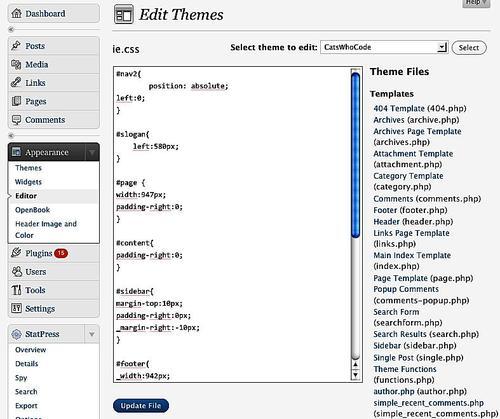
While editing a theme file in WordPress theme editor, you're actually editing the real file on the server. Once you press the Update File button, the file is saved and the previous version is erased.
Although the Theme Editor is probably my favorite built-in tool from WordPress, you have to be careful with it.
It is safe to always have a backup of your theme before editing. The Theme Editor does not save revisions. If you have made a modification and later would like to undo the modification, you need to have a backup of the previous version of the file.
Use the Theme Editor only if you're sure about what you're doing. If you're editing your current theme and make a programming error (for example, a PHP syntax error), it is possible that your blog will stop functioning.
Sometimes, a programming mistake can result in you losing access over the Theme Editor. While this is quite a rare case (it mostly happens when you make a code mistake in the
functions.phpfile), the problem can be important enough for you to always be sure to have a proper backup of your theme, as well as a valid FTP connection to your blog server, before editing any files.In case you are not able to access the editor after editing a file on it, use a FTP program to transfer a backup version of the file you've just edited to your WordPress server.
As WordPress features an editor allowing you to live edit your theme, it also provides another editor for editing plugins. Chapter 4 covers plugins in detail.
To access the Plugin Editor, log in to your WordPress Dashboard and go to Plugins | Editor located at the top of the screen. Then, select the plugin to edit from the list located on the right of the screen.
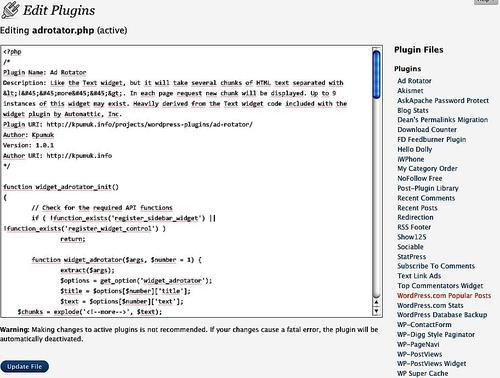
The built-in Plugin Editor works in exactly the same way as the theme editor. When a file is modified and saved, the modifications are written directly in the source file—there's no copy or backup.
Similar to the Theme Editor, even the Plugin Editor is a very useful tool. However, it also can raise problems in the case of a mistake in the code.
Unless you're very sure about what you're doing, always deactivate the plugin before editing it.
Always have a backup of the plugin you're editing, as the Plugin Editor does not save any revisions.
If—after editing a plugin—your blog is messed up, deactivate the plugin, and upload your plugin files backup to your
wp-content/plugins/yourplugindirectory.
Among other built-in tools, WordPress features the User Manager, which is useful for multi-author blogs or blogs with open registration. If you have a personal blog, you'll not need the User Manager, except in rare instances; for example, to change your password or email ID.
To access the User Manager, log in to your WordPress Dashboard, and then click on the Users option on the WordPress menu.
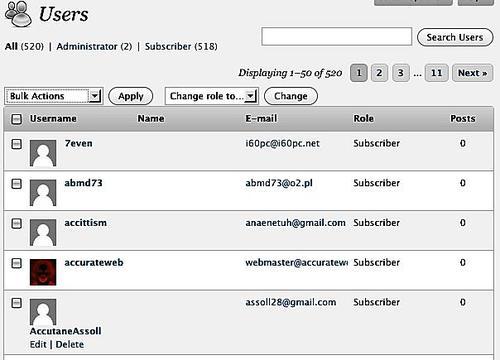
WordPress User Manager allows you to edit or delete user or author accounts. Let's learn How to do it, in detail.
In order to delete users, carry out the following steps:
Deleting users is an easy process. To do so, simply find the user you'd like to delete (a mini search engine is included on the top right of the page) and place the mouse cursor over his or her name. The Edit and Delete button will appear.
Once you click on the Delete button, you'll have to choose between deleting the user and all the content which he has provided (posts, comments, and so on) or deleting the user but transferring the content to another author.
It is also possible to bulk delete users, simply check the checkbox related to the users you'd like to delete.
Once done, click on the Bulk Actions drop-down and select the Delete option. Finally, click on the Apply button.
In order to delete users, carry out the following steps:
Of course, it is also possible to edit the user details. All users can edit their own information, while the administrators can edit the details of any user.
To edit user details, find his or her name in the list and hover the mouse point over it. The Edit and Delete buttons will be displayed.
Click on the Edit button.
On the next page, you can edit the following information about the user:
Enable/Disable Visual Editor
Admin color scheme
Enable/Disable keyboard shortcuts
User Role
First name, Last name, and Nickname
How the user name should be publicly displayed
Contact info
User bio
Password
Simply fill out the required fields, scroll the page down, and click on the Update User button to save your modifications.
The User Manager doesn't use any advanced process. It simply gets your changes and saves it on WordPress database.
User management will be discussed, in detail, in Chapter 6.
WordPress features a very useful script to import your posts, comments, and links from another platform to WordPress. Of course, it is possible to export your current blog content.
To access the Import tool, log in to your WordPress Dashboard and click on Tools | Import located at the top of the screen. To access the Export tool, go to Tools | Export.
Let's see in detail how to use both the Import and Export tools.
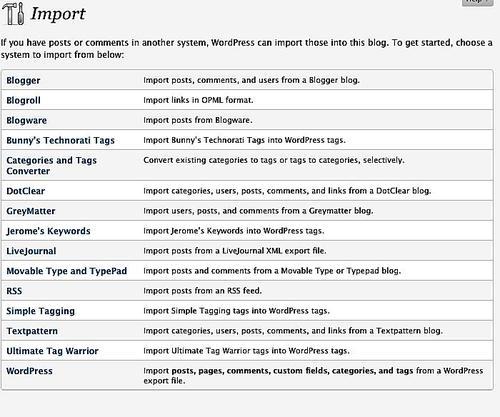
WordPress is able to import your previous blog content and automatically create post with it, as shown in the upcoming screenshot. WordPress can import content from Dotclear, TypePad/Movable Type, LiveJournal, Greymatter, Textpattern, Blogware, and Blogger.
It is also possible to import tags from tagging plugins, such as Jerome's keywords, Simple Tagging, or Ultimate Tag Warrior.
To import your content from another blogging platform, you have to follow a platform specific procedure.
To import content from an export file, carry out the following steps:
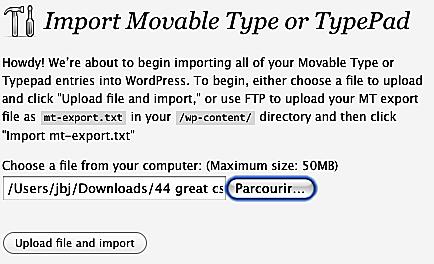
The blogging clients, namely, LiveJournal, MovableType/Typepad, Blogware, and WordPress allow you to export your content into an XML, OPML, or TXT file. Follow this procedure to import your content from one of these blogging platforms:
Connect to your old blog and export your content. Save the file on your hard drive.
Log in to your WordPress Dashboard, then go to Tools | Import.
Select the blogging platform from where you're importing the content.
On the next page, click on the Browse button to select the exported file located in your hard drive.
Once done, click on the Upload file and import button.
You're done! Please note that depending on your exported file size, this procedure can take a while.
To import content from the database, carry out the following steps:
If the blogging client you're using is Dotclear or Textpattern, you have to import your content using your old blog database. Carry out the following procedure to get started:
Log in to your WordPress Dashboard, and then go to Tools | Import.
Select the blogging platform you're using.
On the next page, fill out the form to let WordPress know about your old blog server, database name, password, and so on.
When you're done, click on the Import button.
Your content will now be imported. Note that the process can take a while depending of your database size.
To import content from Blogger, carry out the following steps:
Blogger is a very popular blogging platform—owned by Internet giant, Google. If you wish to move your Blogger blog into WordPress, carry out the following simple steps:
Make sure you have a Google account and an upgraded (New, was Beta) blog hosted on www.blogspot.com.
Log in to your WordPress Dashboard, then go to Tools | Import.
Select the Blogger option.
On the next page, you have to authorize WordPress to access your Blogger account. To do so, click on the Authorize button.
You will be redirected to a Google page, where you'll see your Blogger blog listed. Click on the Allow access button to authorize WordPress to access your old blog.
Once done, you'll be taken back to your WordPress Dashboard, where you'll see your Blogger blog's name. Click on the Import button to start importing your content.

After you have finished the import process, you can clear the account information that has been stored into WordPress database during the content import. Simply click on the Clear account information button to get rid of your old account information. This will not affect any of your posts or comments.
For some reasons—such as, moving to another blogging platform, re-using your posts on another blog, and so on—you may want to export your content into a file that can be imported on another blogging platform or a different WordPress blog.
Exporting content is a very easy process, simply carry out the following steps:
Log in to your WordPress Dashboard, then go to Tools | Export.
Select an author to export if you want to get the posts from a specific author only, otherwise select the All Authors option.
Click on the Download Export File button.

After having a look at the Import and Export tools, let's have look at how they work:
When the Download Export File is clicked, WordPress generates an XML file and prompts you to download it. This file—often referred to, as WXR (WordPress Extended RSS)—will contain your posts, pages, comments, custom fields, categories, and tags. It can be imported on any WordPress install by using the Import Tool.
Depending from which platform you're importing content, the WordPress Import Tool functions accordingly. For some content, you just have to submit a file (for example, suppose you want to import posts from a previous WordPress installation), whereas in some other cases (for example, importing from Dotclear blogs) you have to connect to the old blog database in order to import the content into WordPress.
