


In this chapter, we will cover the following recipes:
Verifying Hyper-V requirements
Enabling the Hyper-V role
Installing Windows Server 2016, Microsoft Hyper-V Server 2016, and Nano Server
Managing a Server Core installation using sconfig
Remotely managing a Nano Server installation
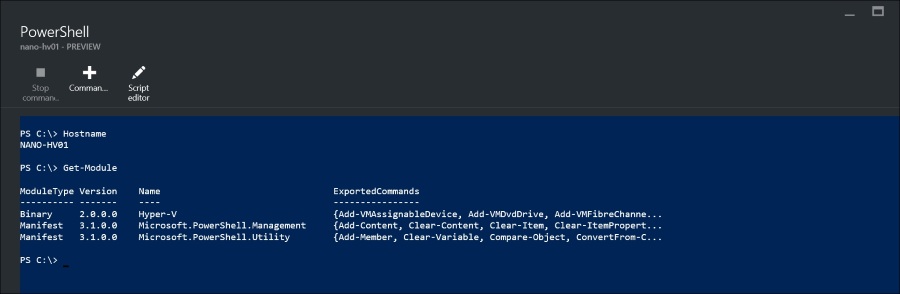
Managing Nano Server using PowerShell
Managing Nano Server using Server Management Tools – SMT
Configuring Hyper-V post-installation settings
Microsoft has done a great job with Hyper-V. Since its first version was introduced in 2008, the enterprises realized that it was a very good virtualization solution for a first release. The second version, released with Windows Server 2008 R2 SP1, brought a couple of new features that enabled mobility, such as Live Migration, Dynamic Memory, and RemoteFX support. The version of Windows Server 2016 Hyper-V goes beyond all expectations and brings with it the components that let the enterprises and service providers have everything they need to build the base of their cloud, either private or hybrid.
Almost everything in Hyper-V has been worked upon and improved and it comes with lots of extraordinary features that will transform the way we manage and deploy our data centers today. All workloads can now be virtualized with no exceptions and new features deliver environments beyond virtualization, as we know it. Nano Server, shielded virtual machines, cross-version PowerShell support, PowerShell Direct, Hot add and remove static memory, nested virtualization, SMB 3.1, and the new limits are examples that make Windows Server 2016 Hyper-V a key component with results, such as high availability, low cost, elasticity, reliability, and everything we need for our servers.
The Hyper-V journey starts with its installation. Even though the installation steps are simple, it is important to take care of the server prerequisites and the post-configuration tasks. It is also very important to verify all the hardware prerequisites, the installation, and the administration methods that will be used to manage your server.
Before we move on and start buying the physical hardware and installing Hyper-V, we need to start with planning phase which is one of the most important phases in building a virtual environment. During this phase, you will identify the proper hardware configuration and all the prerequisites based on your needs. By default, Hyper-V in Windows Server 2016 has some processor requirements and that's why these components must be present on every server that runs Hyper-V.
This chapter will provide all the information that you need to know before, during, and after the Hyper-V installation, to make sure that you can save time and solve any problem that you might face.
In order to install Hyper-V, you should make sure that your server supports it by verifying the prerequisites. Failing which, the Hyper-V requirements will result in an error while you install it.
Neither Windows nor Hyper-V offers a tool to verify the prerequisites, but processor companies have created tools, such as AMD-V System Compatibility Check and INTEL Processor Identification Utility.
In this recipe, you will learn how to use them and the MachineSLATStatusCheck tool to facilitate the process.
To verify the prerequisites of your processor, you must download Intel Processor Identification Utility. You can download it from the following link:
http://downloadcenter.intel.com/Detail_Desc.aspx?ProductID=1881&DwnldID=7838&lang=eng&i
Based on the server processor, you can also download the AMD Virtualization Technology and Microsoft Hyper-V System Compatibility Check Utility from the following link:
http://download.amd.com/techdownloads/AMD-VwithRVI_Hyper-V_CompatibilityUtility.zip
To identify the processor brand, open the DirectX Diagnostic Tool (dxdiag) and check the processor information.
You also need to download the MachineSLATStatusCheck tool available at https://slatstatuscheck.codeplex.com/ to verify if your processor supports Second-Level Address Translation (SLAT) that is required to install Hyper-V in Windows Server 2016. SLAT was always required since the first version of Hyper-V became available on Windows 8 client OS.
Note
If you are using Coreinfo tool to check your processor advanced features from Sysinternals, https://technet.microsoft.com/en-us/sysinternals/cc835722, please note that Coreinfo must be run on a system without the Hypervisor running for accurate results.
In the following steps, you will learn how to check whether your computer meets the requirements to install Hyper-V on Windows Server 2016 and Windows 10:
After downloading and installing the necessary tools as explained in the Getting ready section, install the utility based on your processor.
For AMD processors, the AMD-V System Compatibility Check provides the results for AMD processors, if it supports Hyper-V, as shown in the following screenshot:

If you have an Intel processor, after the Intel Processor Identification Utility is installed, you will see three tabs after you run it.
Select the first tab named Frequency Test to show the highest frequency and speed that your processor can handle.
Select the second tab named CPU Technologies and check whether the results for the technologies is supported by processor models, such as Virtualization technology, Hyper-Threading, and other technologies.
Then, select the CPUID Data tab to see information, such as the Processor type, Family model, Cache sizes, and Data Execution Prevention (Execute Disable Bit).
For Intel processors, the result will be similar to the following screenshot:

Note
As you can see in preceding screenshot, the Intel® Virtualization Technology support is showing No. Since Hyper-V is already installed on this machine and the
hypervisorlaunchtypeis set toAuto, Hyper-V will lock VT-x at boot time (The hypervisor loads before the parent/management partition). For that reason, the tool will show No for VT-x with Extended Page tables if Hyper-V is enabled and the system is running.To verify whether the processor supports Second-Level Address Translation (SLAT) or not, use the free tool called
MachineSLATStatusCheck.After it's downloaded, copy it to the chosen directory and then access it through the
Windows Explorerand run it.The following screenshot is an example of a computer running a processor with SLAT support:

With these steps, you have identified whether the server you want to install Hyper-V on has all its prerequisites satisfied.
The mentioned tools simply verify the processor properties to show that it has the necessary features to install Hyper-V. One of these features is the Hardware-assisted virtualization. This functionality allows Hyper-V to run under privileged access through a special layer in the processor. In some cases, this feature must be enabled through the Basic Input-Output System (BIOS).
These tools also check whether the Data Execution Prevention (DEP) is present. Intel calls this feature Intel XD bit (Execute Disable Bit) and for AMD it is AMD NX bit (No Execute Bit). This feature must be enabled through the BIOS.
There is a particular prerequisite called Second Level Address Translation (SLAT) that is shown by the MachineSLATStatusCheck tool. Starting with Windows Server 2016, SLAT has now become necessary for Windows Server installations; as mentioned earlier, SLAT was required for client OS starting with Windows 8 onwards. Hyper-V uses this to perform more VM-memory-management functions and reduce the overhead of translating guest physical addresses to real physical addresses. By doing this, Hypervisor CPU time is significantly reduced and more memory is saved for each VM.
The processor, with SLAT capability, has a Translation Lookaside Buffer (TLB) that supports virtual to physical memory address translation. A TLB is a cache on the processor that contains recently used mappings from the page table. When a virtual to physical address translation is required, the TLB checks its cache to determine whether or not it contains the mapping information. If TLB contains a match, the physical memory address is provided and the data is accessed. If TLB doesn't contain a record, a page error occurs and the Windows checks the page table for the mapping information. If Windows finds a mapping, it is written to the TLB, the address translation takes place and then the data is accessed. However, the Hypervisors overhead gets substantially decreased due to this buffer.
Appendix A, Hyper-V Architecture and Components
By default, Windows Server does not come with Hyper-V installed. In order to start using the virtual environment, Hyper-V needs to be enabled. Even with its straightforward steps, it is important to understand how it works after the set up and what has changed in the Windows architecture.
There are different methods to install Hyper-V. The most common one is through the graphical interface. To get ready to enable Hyper-V you must be logged on with administrative privileges.
The following steps will demonstrate how to enable the Hyper-V Role for Windows Server and what has changed in the Windows architecture after its installation:
On the Start Screen select Server Manager.
In the Server Manager Dashboard, click on Add roles and features.
In the Add Roles and Feature Wizard, click on Next thrice.
On the next screen, Server Roles page, select Hyper-V, as shown in the next screenshot and click on Next thrice.

In the Features window, click on Next.
In the Virtual Switches window, select the network adapter you want to use on Hyper-V, as shown in the next screenshot. You can add, remove, and modify the virtual switches after the Hyper-V installation through Hyper-V Manager.

On the Virtual Machine Migration page, check the Allow this server to send and receive live migration of virtual machines option if you want to enable live migration requests, as shown in the next screenshot. Do not enable live migration if this server is going to be a part of a Hyper-V cluster; click on Next:

The last Hyper-V installation page called Default Stores and specified the default location for virtual disks and virtual machine configuration files. It's very important to change the default path, from
C:\to a dedicated drive as shown in the next screenshot, otherwise your virtual machines will end up being installed onC:\drive. Click on Next, confirm the installation selections, and then click on Install to start the installation process:
Reboot the server after the installation.
The process that you have performed to install Hyper-V is quite simple, but it changes the processor architecture by creating a new privileged layer called ring-1 that runs under the normal layers. The setup process, completed in the previous task, installs the Microsoft Hypervisor on this layer to make sure that Hyper-V has more privileges than Windows itself. Basically, the host operating system runs above the Hypervisor together and at the same level as the virtual machines. The host turns into a special virtual machine containing the virtualization stack, responsible for managing all the virtual machines from it. The following diagram illustrates Hyper-V high-level architecture being installed in ring-1 and all the partitions running above it.
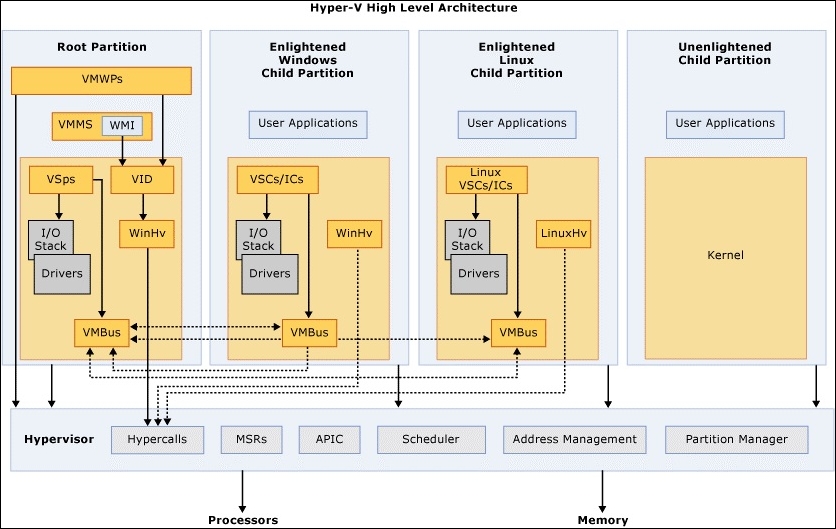
After the first reboot, the Windows boot (winload.exe) loads the driver (hvboot.sys) responsible for verifying the processor that is running and if it supports virtualization. Then the Hypervisor image file is loaded. The host OS and the virtual machines are called partitions because they run at the same privileged access above the Hypervisor. The host OS is known as root or parent partition and the virtual machines are known as child partitions.
For automation and fast installation, you can enable Hyper-V using command lines. You can do that using the command line ocsetup, Servermanagercmd, or Windows PowerShell.
The Creating and managing virtual switches recipe in Chapter 3, Managing Disk and Network Settings
Appendix A, Hyper-V Architecture and Components
After the prerequisites verification, we are now ready to install either the Windows Server 2016 or Microsoft Hyper-V Server 2016. The basic installation for both products is not so complicated, but it takes time to be finished. It would be interesting to identify the needs of a server provisioning for large deployment such as the Microsoft Deployment Toolkit (MDT) and System Center Virtual Machines Manager (SCVMM) which provides a unified collection of tools, processes, and guidance to automate this process, thus could result in both cost and time saving.
In case you want to use the Windows Server 2016 installation, it offers three deployment options: Full Server with desktop experience, Server Core, and Nano Server. The Full Server option provides a graphical interface to manage Hyper-V and Windows, including Hyper-V Manager, Server Manager, and all the other tools and services available on Windows. The problem in Full Server with desktop-experience option is that it comes with other components and services installed by default. That's why Microsoft introduced, in Windows Server 2008, a new installation method called Server Core, which is the default installation method in Windows Server 2016. This option does not come with the Graphical User Interface (GUI); instead, it has a command-line interface. With Server Core, we have more security and better performance in the host computer because only the core components of Windows are installed and features, such as the Internet and Windows Explorer are not present.
However, Microsoft went beyond Windows Server Core in Windows Server 2016 and introduced a new server deployment option called Nano Server.
Nano Server is a new headless, 64-bit only, deployment option in Windows Server 2016 that has been optimized for private clouds and data centers. It is similar to Windows Server in the Server Core mode, but significantly smaller, has no local log on capability, and only supports 64-bit applications, tools, and agents. It takes up lesser disk space, sets up significantly faster, requires fewer updates, and restarts faster than full Windows Server.
The major difference between Nano Server and Server Core is that none of the roles and features are available in the image as we get in Server Core and Full Server. In other words, when you add or install additional roles and features with Full Windows Server, it never prompts you for the media, all the binaries exist on your hard disk within the OS apart for .Net Framework 3.5. In Nano Server, all the Infrastructure roles live in separate packages, so you have to add them to the image. In this case, your base Nano Server image will always stay very small (zero-footprint).
As you add roles and features to Nano Server, some of them have additional dependencies which require additional space, as an example, the Hyper-V package requires only the Nano Server base OS, so the image will always be small and tight. Nano Server has full driver support, so any driver that works for Windows Server 2016, will work with Nano Server as well.
As a result, Nano Server deployment option provides the following improvements versus Server Core, Full Server, and Hyper-V Server:
Reduced maintenance and management
Less risk of bugs and failures
Less disk and memory requirements
Less updates and patches requirements
Less and faster reboot
More security
All these described options are available on Windows Server, which means that a Windows Server License has to be purchased, although there is a free version of Hyper-V called Hyper-V Server. This version is very similar to Windows Server Core installation, but it comes only with Hyper-V and failover clustering. The Hyper-V server contains all the features of Windows Server 2016 Hyper-V and Nano Server with Hyper-V role excluding RemoteFX, in other words, Remote Desktop Virtualization Host (RDVH) is not supported on the free Hyper-V Server.
In this task, you will see how to install Windows Server 2016 Hyper-V.
Before you start, make sure that you have the correct media file or DVD with the Windows Server 2016 installation image.
The following steps will walk you through the installation process of Windows Server 2016 and Nano Server:
After the DVD boot process in the first screen, select your language, time and current format, keyboard or input method, and click on Next.
On the second screen, click on Install now and the installation will automatically continue. If prompted, add the Windows Product Key and again click on Next.
Select the operating system to be installed, as shown in the following screenshot, and then click on Next. As mentioned in the preceding section, Server Core is selected by default:

In order to install Windows Server 2016, you will have to accept the license terms. Select the I accept the license terms option and click on Next.
For a new installation, select the option Custom: Install Windows only (Advanced), as shown in the following screenshot. The upgrade option for this version has been disabled:

In the Where do you want to install Windows screen, select the hard drive on which you want to install Windows Server and click on Next. For advanced driver options click on Drive options (advanced).
If you have an external storage device or a hard drive that needs a driver to be loaded, click on Load Driver, as shown in the next screenshot, and install the proper drivers. Click on Next.

At this point, you need to wait for the installation to be completed. It can take from 10 to 30 minutes, based on your hardware.
When it finishes, you will see the login screen asking you to provide the username and password. The default user is
Administratorwith a blank password. By default, Windows creates a blank administrator password. For the first login, the system prompts you to insert a password.
The installation for Nano Server is a little bit different; we have actually three different installation options, in a virtual machine, on a physical machine or in Microsoft Azure.
At the time of writing this book, the following list of roles and features (packages) have been added by Microsoft:
|
Role or Feature |
Physical or Virtual Machine |
Description |
|---|---|---|
|
Compute-Package |
Both | |
|
Storage-Package |
Both |
Storage role Note: This package is only available for the Datacenter edition of Nano Server. However, the Storage and Failover Clustering packages contain all the storage features in this first release. If you install Failover Clustering you'll have Storage Spaces Direct, but you won't be able to use it on Standard edition as it calls licensing APIs and will not run, you'll only be able to use traditional clustering. |
|
FailoverCluster-Package |
Both | |
|
Containers-Package |
Both | |
|
DNS-Package |
Both | |
|
IIS-Package |
Both | |
|
Defender-Package |
Both | |
|
OEM-Drivers-Package |
Physical |
The OEM package for Nano Server contains the same drivers that ship in-box with Server Core for physical machine deployment. |
|
Guest-Package |
Virtual | |
|
SCVMM-Package |
Both |
Helps in managing, deploying, and monitoring Nano Server with VMM |
|
DSC-Package |
Both |
PowerShell DSC helps in simultaneously configuring large numbers of Nano servers in the push mode |
|
DCB-Package |
Both |
DCB package is needed while configuring Network Datacenter Bridging |
|
ShieldedVM-Package |
Both |
Deploying shielded virtual machines on top of Nano Server with Hyper-V role. Note: This package is only available for the Datacenter edition of Nano Server |
|
SecureStartup-Package |
Both |
Secure Startup includes support for BitLocker, Trusted Platform Module (TPM), volume encryption, platform identification, cryptography providers, and other functionality related to secure startup which is a prerequisite for Shielded VMs. |
|
Host-Package |
Physical |
The Host package includes drivers, utilities, and services required for deploying to a physical machine. |
|
SoftwareInventoryLogging-Package |
Both |
Software Inventory Logging (SIL) is a feature which helps server administrators retrieve a list of the Microsoft software that is installed on their servers. Note that the SIL package in Nano server is agent only, not the aggregator. More information about SIL can be found on TechNet (https://technet.microsoft.com/en-us/library/dn268301(v=ws.11).aspx). |
Before we deploy Nano Server, we need to create a Nano Server image, we have two options to do so, we can use the new PowerShell module that ships with Windows Server 2016 media or we can use Nano Server Image Builder, which can now be downloaded from the Microsoft download center.
In the following section we will cover both options.
We will start by creating a folder on the machine that you will use for the Nano Server creation process. For instance, you can create a folder named C:\NanoServer. After creating this folder, there are four resources that you must have saved in that folder. These resources include:
NanoServerImageGenerator.psm1moduleConvert-WindowsImage.ps1scriptNanoServer.wimfileWindows Server 2016 ISO file (https://www.microsoft.com/en-us/evalcenter/evaluate-windows-server-2016)
In fact, all the resources are included in Windows Server 2016 ISO media under the NanoServer folder, you can mount the ISO image and copy the required components, verify that all are in the correct folder. Next, open Windows PowerShell and import the NanoServerImageGenerator.psm1 module. While doing so, you can start creating the image using the New-NanoServerImage commandlet (cmdlet).
The default Nano Server image that ships with Windows Server 2016 requires customization. Customizations include adding Nano Server packages based on the role the server will play in the environment, which is Hyper-V in this case, the addition of boot critical drivers, and an unattend.xml file to complete the setup process. This chapter covers only a few customizations and deployment scenarios.
We will create a new VHD image using the New-NanoServerImage cmdlet; the computer name will be NanoServer01 and have OEM drivers installed for most common hardware and has the Hyper-V role, clustering feature, and the Emergency Management Services (EMS) enabled.
Note
Make sure to run the following script on a computer member of a domain where Nano Server will be deployed and update the IP addresses to match your environment.
#region Generate Nano Server image with Hyper-V Server role installed
#region Variables

$ComputerName = 'NanoServer01'
$StagingPath = 'C:\Temp' # Staging path for new image
$ServerISO = 'C:\Temp\WindowsServer2016.ISO' # Path to Windows Server 2016 ISO file
# Mount the ISO Image
Mount-DiskImage $ServerISO
# Get the Drive Letter of the disk ISO image
$DVDDriveLetter = (Get-DiskImage $ServerISO | Get-Volume).DriveLetter
$MediaPath = ($DVDDriveLetter + ':\')
$DomainName = $env:USERDNSDOMAIN.ToLower()
$Path = Join-Path -Path $StagingPath -ChildPath NanoServer
$Password = Read-Host -Prompt Password -AsSecureString

#endregion Variables

#region Copy source files
if (-not (Test-Path $StagingPath)) {
mkdir $StagingPath
}

$NanoServerSourcePath = Join-Path -Path $MediaPath -ChildPath NanoServer -Resolve
Copy-Item -Path $NanoServerSourcePath -Destination $StagingPath -Recurse -Force

#endregion

#region Generate Nano Hyper-V image
Import-Module -Name (Join-Path -Path $Path -ChildPath NanoServerImageGenerator\NanoServerImageGenerator.psm1) -Verbose

$NanoServerImageParameters = @{

ComputerName = $ComputerName
DeploymentType = 'host'
Edition = 'Datacenter'
MediaPath = $MediaPath
BasePath = (Join-Path -Path $Path -ChildPath $ComputerName)
TargetPath = Join-Path -Path $Path -ChildPath ($ComputerName + '.vhd')
DomainName = $DomainName
AdministratorPassword = $Password
Ipv4Address = '172.16.20.120'
Ipv4SubnetMask = '255.255.255.0'
Ipv4Gateway = '172.16.20.1'
Ipv4Dns = '172.16.20.9'
InterfaceNameOrIndex = 'Ethernet'
Compute = $true
Package = 'Microsoft-NanoServer-Compute-Package'
EnableRemoteManagementPort = $true
OEMDrivers = $true
Clustering = $true
EnableEMS = $true
}

New-NanoServerImage @NanoServerImageParameters

#endregion

# Dismount Windows Server 2016 ISO Image
Dismount-DiskImage $ServerISO

#endregion
If the physical server uses UEFI to boot, then make sure to change .vhd to .vhdx.
The Nano Server Image Builder is a GUI-based wizard that helps you create a custom Nano Server image and bootable USB media. The Nano Server Image Builder is based on the inputs you provide, it generates images for deployment and also creates reusable PowerShell scripts that allow you to automate the image creation process.
To create a Nano Server Image using Nano Server Image Builder, there are three resources that you must have ready. These resources include:
Windows Assessment and Deployment Kit (ADK): https://developer.microsoft.com/en-us/windows/hardware/windows-assessment-deployment-kit
Nano Server Image Builder: https://www.microsoft.com/en-us/download/details.aspx?id=54065
Windows Server 2016 ISO file: https://www.microsoft.com/en-us/evalcenter/evaluate-windows-server-2016
You need to install Windows Assessment and Deployment Kit (ADK) on the machine that you will use to create Nano Server image, using Nano Server Image Builder.
When ADK is installed, launch Nano Server Image Builder and select the prefer method of creating the image, as shown in the following screenshot:

Make sure you have downloaded Windows Server 2016 ISO and extracted it to a folder on your machine, click on Create a new Nano Server image, select a location for the media source, and then click on Next:

Accept the License Agreement, click on Next and then choose your deployment type:
Virtual machine images: This can be
.vhdor.vhdxPhysical machine images: This can be
.vhd,.vhdx, or.wim
In this case, I will select a physical machine image:

Click on Next twice and then select the Nano Server Edition (Standard or Datacenter) and the optional packages that you want to add as a part of the image, as shown in the next screenshot:

Since we are creating an image for the physical machine, the Server Core drivers is selected by default; we have added the Hyper-V role, Failover Clustering Service, and File Server role. Click on Next, you can add additional drivers provided by the OEM vendor if needed. In the Destination machine information, you need to provide the Computer name, local Administrator password, and the preferred Time zone, as shown in the following screenshot:

Click on Next, enter a domain name that can be used as the existing Active Directory account or you can provision a computer account metadata blob file. Click on Next, in the Set network, you can enable for PowerShell remote management from all subnets, enable VLAN ID, and configure network settings (DHCP or Static), as shown in the following screenshot:

Click on Next, you can now proceed and create a basic Nano Server image or continue to configure advanced settings, such as (add update packages, embed files and commands to run when setup completes, enable Emergency Management Services (EMS), and enable support for development scenarios and debugging methods). In this example, we will proceed by creating a basic Nano Server image. Click on Create, when ready, and the image creation will start, as shown in the next screenshot. The image creation process will take between eight to thirteen minutes, depending on your machine speed. As mentioned earlier, you can also copy the PowerShell command and use it to automate the image creation:

There are a few ways to deploy Nano Server to a physical machine:
It is important to reiterate that there are multiple ways to configure and deploy Nano Server; this chapter covers just the first deployment option for the readers to get started.
I strongly encourage you to check the Getting Started with Windows Nano Server book by Packt for in depth details about Nano Server. Check out https://www.packtpub.com/virtualization-and-cloud/getting-started-windows-nano-server.
To quickly deploy Nano Server on a physical computer, you need to have a generalized Nano Server VHD or VHD(X) image ready, which we created in the previous section.
To configure the physical machine to boot from this new VHD(X), please follow these steps:
We need to add an entry to the boot database using
bcdboot, but before we add this entry, let's look at the current boot database by runningbcdedit, as shown in the following screenshot:
As you can see we have a single entry as identifier called
{current}.Next, we need to add a new entry to the BCD store, so in addition to the current operating system, which in this example is Windows Server 2012 R2, we would like to add another boot entry, in order to do that we need to use
bcdboot.Copy the VHD(X) that we created in the previous section to the physical computer and configure it to boot from this new VHD. To do that, follow these steps:
Mount the generated VHD. In this example, it's mounded under
E:\as shown in the following screenshot:# Nano Server 2016 VHD Image $NanoImage = "C:\Nano\NanoServer01.vhd" # Mount the VHD Image Mount-DiskImage $NanoImage -Verbose # Get the Drive Letter of the VHD image (Get-DiskImage –ImagePath $NanoImage | Get-Disk | ` Get-Partition | Get-Volume).DriveLetter

Run
bcdboot e:\windows /v.Unmount the VHD by running:
Dismount-DiskImage $NanoImage.
Let's now look at the
bcdeditsettings, as shown in the following screenshot:
As you can see,
bcdboothas updated all boot files (such asbootmgr), and took the bcd template from the Nano image you want to boot from and stamp it into the BCD store and update the device paths. Now, you will know for sure that the paths are correct, the entry is correct, and the binaries have supported versions.Note
You could possibly accomplish something similar with
bcdedit, but withbcdedityou would need to manually set the VHD path, which is easy to get wrong. If you are not careful while copying different entries, you will end up booting the OS with an incorrect boot configuration. On top of thatbcdeditwill not update the binaries, which could result in an unsupported configuration. As the best practice, usebcdboot.Lets reboot the physical machine now and show you what the boot process looks like:

Wait for a couple of seconds until Nano Server boots and then log on to the Recovery Console, as shown in the following screenshot using the user name (in this case:
Administrator) and password you supplied while creating the Nano Server image:
The process to install a free Hyper-V Server and Windows Server (Core or Full Server) is the same. However, for Nano Server you need to customize and create the image according to the use case. The setup will install all the necessary components only to run Hyper-V without any other services (or applications, in case of Hyper-V Server). The first step in the installation procedure is to load the boot.wim setup image file and after the preceding process, setup applies the install.wim image file containing the OS image.
In case of Hyper-V Server and Windows Server (Core or Full Server), once the installation is completed, you will be prompted to change the administrator password and the system will be ready to be used.
The Managing a Server Core installation using sconfig recipe in this chapter
The Remotely managing a Nano Server installation recipe in this chapter
The Chapter 5, Hyper-V Best Practices, Tips, and Tricks
In the previous recipe, you read about all the benefits of Server Core, such as performance, security, and so on. However, it's not easy to do the daily management and maintenance of Hyper-V without GUI. If you want to change the computer name or the IP address, the GUI is always the easiest to use. But on the other hand, the command line can bring about a fast and automated process.
That's why in Windows Server 2016, the Server Core version of Windows and Microsoft Hyper-V Server 2016 comes with the Server Configuration (sconfig). This is a command line with a simple interface to reduce the time for doing the most common tasks in Windows. In the following screenshot, you can see an example of the first page of sconfig:
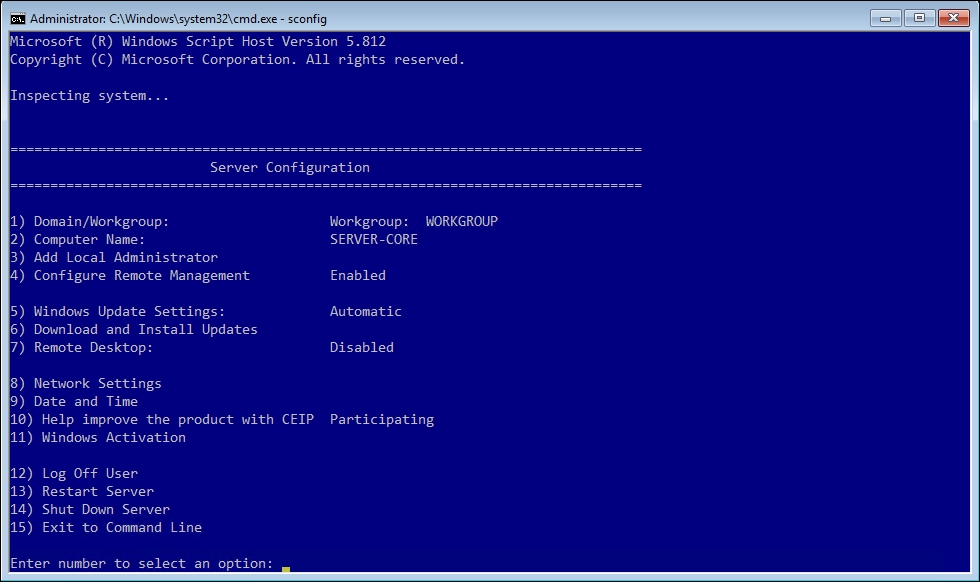
The sconfig tool can do this via an intuitive numerical menu to facilitate the Windows configuration.
A simple example is when you have to change the IP address of your computer using the command line. Take a look at the following command:
netsh interface ip set address "Local Area Connection" static 192.168.0.10 255.255.255.0 192.168.0.1 1
Sometimes it is hard to remember the exact command syntax and this can lead to server misconfiguration.
Using sconfig, the process would be simply to press the numbers 8, 0, and 1 from the menu and simply specify the new IP configuration. That's it.
In this recipe, you will learn how to set up the most common configurations in your Server Core without advanced command lines.
The Server Configuration tool is added by default on a Server Core installation or Hyper-V Server. Just type sconfig in the command line and the menu will be loaded.
In order to manage the server core installation using sconfig, carry out the following steps:
To change the domain/workgroup settings, press 1.
Press D for domain or W for workgroup.
Specify the domain or workgroup name, the necessary username and the password, and then press Enter.
To change the computer name, press 2 and specify the new computer name.
Select Yes to restart the computer.
Press 3 to add a local administrator.
Enter the account to join the local administrators group and type the user password.
To configure the remote management, press 4.
Select one of the following options:
Allow MMC Remote Management
Enable Windows PowerShell
Allow Server Manager Remote Management
Show Windows Firewall settings
Press 5 to change Windows update settings and Select A for automatic or M for manual.
Press 6 to download and install updates.
Select A for all updates or R for recommended updates only.
To enable remote desktop, press 7. Select E to enable or D to disable.
Press 8 to configure network settings.
Select the network adapter number you want to configure and then select one of the existing options:
Set network adapter IP address
Set DNS Servers
Clear DNS Server Settings
To change the date and time, press 9 and a graphical interface will show up with the date and time settings to be configured.
To restart and shut down the server:
Press 1+0 to join Customer Experience Improvement Program
Press 1+1 for logoff
Press 1+2 to restart the computer
Press 1+3 to shut down the server
Press 1+4 to exit to command line
After these configurations using
sconfigand with reduced command line interaction, your server will be ready for the production environment.
Server Configuration basically runs scripts in the background for every option that has been selected through a numeric menu, making your life much easier. For every number you select, sconfig can run another script to show a submenu or just run the final script to apply the changes you have selected.
The Hyper-V management and PowerShell improvements recipe in Chapter 4, Saving Time and Cost with Hyper-V Automation.
Without GUI, it's not easy to carry out the daily management and maintenance of Hyper-V on Nano Server. In fact, all the existing graphical, such as Hyper-V Manager, Failover Cluster Manager, Server Manager, Registry editor, File explorer, Disk and device manager, Server configuration, Computer management, Users and groups are compatible to manage Nano Server remotely. For most IT administrators, the graphical user interface is the easiest way to use. But on the other hand, the command line can bring a fast and an automated process.
That's why in Windows Server 2016, the Nano Server deployment option of Windows comes with full PowerShell remoting support. The purpose of core PowerShell engine is to manage Nano Server instances at scale. PowerShell remoting includes WMI, Windows Server cmdlets (network, storage, Hyper-V, and so on.), PowerShell Desired State Configuration (DSC), Remote file transfer, Remote script authoring and debugging, and PowerShell Web Access. As we discussed earlier in this chapter, Nano Server is deep refactoring initially focused on the CloudOS infrastructure.
Nano is a light-weight server OS made to be accessed remotely.
In this recipe, you will see how to access and set the most common configurations in your Nano server with remote graphical tools, PowerShell.
In order to manage Nano server installation using Hyper-V Manager, carry out the following steps:
Open your management machine and make sure that you have installed the Remote Server Administration Tools (RSAT) that includes Hyper-V Manager.
Launch Server Manager, as shown in the following screenshot, and add your Nano Server machine that you would like to manage:

You can add as many as you want of Nano Servers machines.
You can refresh the view and browse all events and services as you expect, I want to point out that at the time of writing this book, Microsoft is still working to bring full support of Server Manager, for this reason you can see in the preceding screenshot Nano Server is online but not all data is retrieved yet.
The next console that you probably want to access is Hyper-V Manager, right click on Nano Server name in Server Manager and select Hyper-V Manager console as shown in the following screenshot:

Hyper-V Manager will launch with full support as you expect when managing full Windows Server 2016 Hyper-V, free Hyper-V Server, Server Core and Nano Server with Hyper-V role.
PowerShell version 5 comes with a lot of features that Nano Server benefit from. The main feature are:
Copying files via PowerShell sessions
Remote file editing in PowerShell ISE
Interactive script debugging over PowerShell session
Remote script debugging within PowerShell ISE
Remote host process connects and debugs
If you want to manage your Nano Server right now, you can use PowerShell Remoting or if your Nano Server is running in a Virtual Machine you can also use PowerShell Direct which is covered in Chapter 4, Saving Time and Cost with Hyper-V Automation.
In order to manage Nano server installation using PowerShell remoting, carry out the following steps:
You might need to start the WinRM service on your desktop to enable remote connections. From the PowerShell console type the following commands:
net start WinRMIn the PS console, type the following, substituting the server name or IP with the appropriate value (using your machine-name is the easiest to use, but if your device is not named uniquely on your network, try the IP address):
Set-Item WSMan:\localhost\Client\TrustedHosts -Value "servername or IP"If you want to connect multiple devices, you can use comma and quotation marks to separate each machine, as shown here:
Set-Item WSMan:\localhost\Client\TrustedHosts -Value "servername or IP, servername or IP"You can also set it to allow it to connect to a specific network subnet using the following command:
Set-Item WSMan:\localhost\Client\TrustedHosts -Value 10.10.100.*To test Windows PowerShell remoting against Nano Server if it's working, you can use the following command:
Test-WSMan -ComputerName "servername or IP" -Credential servername\Administrator -Authentication NegotiateNow you can start a session with your Nano Server. From your administrator PS console, type:
Enter-PSSession -ComputerName "servername or IP" -Credential servername\AdministratorNow we will create and deploy two virtual machines on Nano Server Hyper-V host using the PowerShell remoting feature. From your management machine, launch PS console or PS ISE as Administrator, type:
#region Variables

$NanoSRV = 'NANOSRV-HV01'
$Cred = Get-Credential "Demo\SuperBook"
$Session = New-PSSession -ComputerName $NanoSRV -Credential $Cred
$CimSesion = New-CimSession -ComputerName $NanoSRV -Credential $Cred
$VMTemplatePath = 'C:\Temp'
$vSwitch = 'Ext_vSwitch'
$VMName = 'DemoVM-0'

#endregion

Get-ChildItem -path $VMTemplatePath -filter *.VHDX -recurse | `
Copy-Item -Destination D:\ -ToSession $Session

1..2 | % {

New-VM -CimSession $CimSesion -Name $VMName$_ -VHDPath "D:\$VMName$_.vhdx" -MemoryStartupBytes 512MB `
-SwitchName $vSwitch -Generation 2

Start-VM -CimSession $CimSesion -VMName $VMName$_ -Passthru

}
In this script, we created a PowerShell session and a CIM session to Nano Server, then we copied VM Templates from the management machine to Nano Server, when the copy is done, we created two Generation 2 VMs and finally started them up.
After a couple of seconds, we launched Hyper-V Manager console and observed the new two VMs running on Nano Server host, as shown in the following screenshot:

As mentioned earlier, if you have installed Nano Server in a Virtual Machine running on a Hyper-V host, you can use PowerShell Direct to directly connect from your local Hyper-V host to your Nano Server VM using the following command:
Enter-PSSession -VMName "VMName" -Credential servername\Administrator
Moreover, if you have Nano Server as a Hyper-V host, as shown in the preceding example, you could use PowerShell remoting to connect to Nano Server from your management machine and then leverage PowerShell Direct to manage your virtual machines, welcome to Nested PowerShell Remoting (PSRemoting + PSDirect).
To do this use the following command:
#regionVariables
$NanoSRV = 'NANOSRV-HV01' #Nano Server name or IP address
$DomainCred = Get-Credential "Demo\SuperBook"
$LocalCred = Get-Credential "~\Administrator"
$Session = New-PSSession -ComputerName $NanoSRV -Credential $DomainCred
#endregion

Invoke-Command -ComputerName $NanoSRV -Credential $DomainCred -ScriptBlock {
                param ($LocalCred)
                Get-VM
                Invoke-Command -VMName (Get-VM).Name -Credential $LocalCred -ScriptBlock {
                                hostname;Tzutil /g}
} -ArgumentList $LocalCred
In this script, I established a PowerShell session into Nano Server host, and then I used PowerShell Direct to query all VMs and get their hostnames and time zones.
Here is the output:

The Server Management Tools (SMT) is a new service hosted in Microsoft Azure, which is still in preview at the time of this writing.
The Server Management Tools includes the following features:
View and change system configuration
View performance across various resources and manage processes and services
Manage devices attached to the server
View event logs
View the list of installed roles and features
Use a PowerShell console to manage and automate
Using the Azure portal from anywhere, on any browser, Server management tools is a free cloud service that requires Azure subscription which enables you to remotely manage machines running Windows Server 2016 including Nano Server, Windows Server 2012 R2, and Windows Server 2012 with and without Hyper-V.
To create a new connection for the first time, you will need to create a new gateway by configuring an existing server to connect to Azure as the gateway to your environment, as shown in the following diagram. The gateway allows connections to be routed to other servers and you can then use web-based versions of familiar tools, such as PowerShell, Task Manager, Event Viewer, Firewall, File Explorer, Network Settings, Windows Update, Registry Editor, and so on, to manage servers in that network:
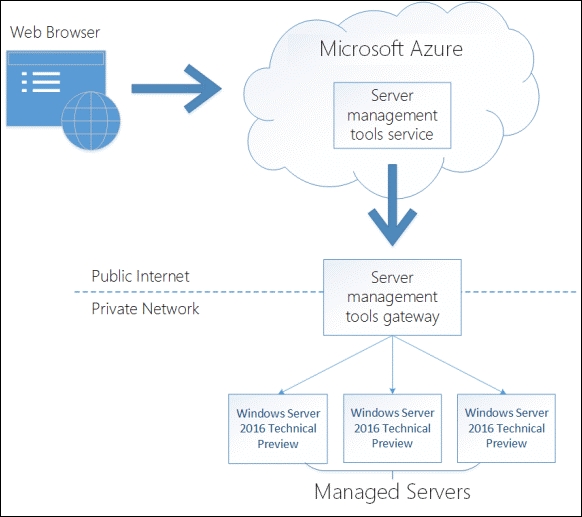
The server management gateway can be a Windows Server 2012 R2 Server running the Windows Management Framework 5.0—WMF 5.0 (https://www.microsoft.com/en-us/download/details.aspx?id=50395) or Windows Server 2016 with no additional preparation. You also need a Microsoft Azure subscription and an account.
The gateway will handle the connection to Azure and the Server Management Gateway that is deployed on-premises needs connection to the Internet. The managed Nano servers do not need a direct connection to the Internet; the gateway will connect to the managed Nano servers. With that, the gateway needs a connection to Nano server(s) that will be managed from Azure.
One of my favorite remote management features in SMT is the web-based PowerShell console, as shown in the following screenshot:
In order to manage Nano server installation using SMT carry out the following steps:
Prepare a new Windows Server 2016 virtual machine on the premises in which you would connect to the Internet, it should have the latest updates installed.
Create a Nano machine that you want to be able to manage via Server management tools.
To begin your deployment, log in to your Azure portal account and search for
Server management toolsin Marketplace or navigate to Marketplace | Management | More | Server management tools.Select the Server management tools, read the description, review the terms of this release, and click on Create.
In the computer name field, make sure you enter the Nano Server machine name, which you have deployed on-premises in Step 2, as shown in the following screenshot.

After the connection is created, you can see the connection as shown in the following screenshot; however, you will get the information that the gateway is not ready. As the next step, you will configure the gateway on the prepared server:

Under the Server Management Tools Gateway, you can find a setup for the gateway that will generate a custom install package for your gateway. As shown in the following screenshot, you can copy this link, download this package, which is around 4 MB in size, and install it on your gateway server:

Unzip the gateway package from the machine that you want to designate as the gateway; the package contains two files,
profile.jsonandGatewayService.MSI. Run theGatewayService, as shown in the following screenshot and walk through the steps in the MSI setup file.
Note
Note that you can also install the Gateway on a Windows Server Core machine using the following MSI parameters through the command line:
GatewayService.msi /qn GATEWAYPROFILEJSON=c:\temp\gateway\profile.json ACCEPTEULA=true ACCEPTPRIVACYPOLICY=trueYou need to replace the preceding path with the appropriate absolute path to the
profile.json.After you have installed the Server Management Gateway package on your gateway server you can see the connection in the Azure portal.
Once the gateway installation is completed, return to the Microsoft Azure portal and reopen your SMT connection, click on the
Manage ascommand and enter administrative credentials of your Nano Server, as shown in the following screenshot:
As shown in the following screenshot, you should be able to manage your Nano machine if the Microsoft Azure portal can reach it through the gateway:
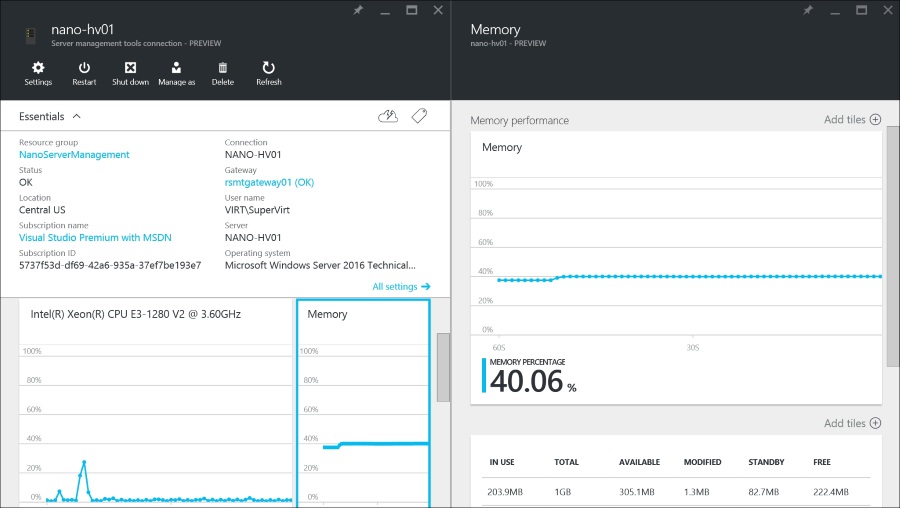
Now you can start remote managing your Nano server. As mentioned earlier, the new management tool is really handy if you want to manage Server Core or Nano Server.
The main management story in Nano Server is core PowerShell:
Windows Management Instrumentation (WMI)
Windows Remote Management (WinRS)
Emergency Management Services (EMS)
PowerShell relies on the .NET Framework, as you noticed Nano Server is a small and tiny OS and only has the Core Common Language Runtime (CLR). The Core CLR is a tiny subset of the .NET Framework, the PowerShell team went ahead and refactored PowerShell to run on Core CLR, which was a huge effort. The good news is that PowerShell users probably will not miss the most important features. It has full language compatibility and supports PowerShell remoting, so you can use the most popular remote command, such as (Invoke-Command, New-PSSession, Enter-PSSession, and so on).
Each Nano Server image contains, by default, Core CLR that takes up 45 MB of space, PowerShell itself takes about 8 MB of space, and there is 2 MB available for two built-in modules. Remoting is turned on by default, so a Nano server installation will always be ready to be remoted into and be managed remotely.
Managing virtual machines with PowerShell Direct recipe in Chapter 4, Saving Time and Cost with Hyper-V Automation.
The Windows Server 2016 installation process is almost the same as Windows Server 2012/R2. Some steps, such as IP settings, computer name, and domain join have been removed (in comparison with older versions such as Windows Server 2003), to make it straightforward. That's why the post installation settings are more important than ever now because the setup just adds default configurations, such as a random computer name in workgroup, the Automatic Private IP Address (APIPA), and a few other settings.
A Windows Server installation with the default settings can lead to security risks, network access errors, and management problems.
Beyond that, Hyper-V also has some configurations that must be changed, such as default locations for new virtual machines, shortcuts, and other things that you will see in this task.
The only thing you need is a basic Windows Server installation with the Hyper-V role enabled.
The following steps will show how to configure the Windows and Hyper-V post installation settings:
First, you need to make sure that the Windows Server post installation settings were completed. Before we start the Hyper-V post configuration, let's list the Windows Server post installation settings that you might need to change:
Windows activation
Configure the time, date, and time zone
Network configuration such as IP address, default gateway, and DNS settings
Computer name
Workgroup or Domain settings
Update and configure automatics updates
Add the necessary roles and features
To guide you through the post configurations, the Windows setup opens the Server Manager tool during the first login with some settings from the mentioned list for quick access and setup.
To see the list, click on Local Server in the pane on the left-hand side in Server Manager, as shown in the following screenshot:

Using the list provided by Server Manager, you can make sure that your server is ready to be used with all the common post-installation settings. Select the components you want to change by clicking on the hyperlink in front of them and follow the configuration steps.
However, some other interesting settings are not provided by the Server Manager list because they are optional, but some of them that you might want to consider are as follows:
After using Server Manager, check the Do not show me this console at logon option
Choose a wallpaper to show the system configuration using tools, such as
BgInfofromSysinternalsFrom the
Windows Exploreroptions, uncheck the Hide extensions for known files type option and check the Show hidden files optionAn antivirus installation that supports your Windows server version and the roles being executed on it
Clients and agents for products, such as backup, software deployment, monitoring systems, and so on
Now that your Windows Server is ready to go, you can open Hyper-V and change its default settings, if needed.
To open the Hyper-V settings, open the Hyper-V Manager tool and then click on Hyper-V Settings column on the right-hand side.
You'll then see the Hyper-V Settings window, as you can see in the following screenshot:

Hyper-V Settings allow you to manage the Hyper-V default settings divided in 10 components. To change the virtual hard disk's default location, click on Virtual Hard Disks.
To modify the default virtual machine location, click on Virtual Machines and specify the new location.
To manage and enable the Remote FX feature select Physical GPUs.
To allow the Non-Uniform Memory Architecture (NUMA) spanning, select Numa Spanning.
To enable and change the default values of virtual machine movement settings such as limits and networks that will be used, select Live Migrations, as shown in the following screenshot:

To change the maximum number of simultaneous storage migrations, click on Storage Migrations.
To enable enhanced session mode, click on Enhanced Session Mode Policy and select Allow enhanced session mode.
To set up your server as a replica server and change its configuration, click on Replication Configuration.
The next settings—Keyboard, Mouse Release Key, and Reset Check Boxes—can be changed as well, if needed. Change the settings that you want wherever necessary. After that, your Hyper-V Server will be ready with the specific server settings based on your needs.
Changing these configurations might help in some cases, when we need a different setting or when you don't want to change them manually every time you have to use them. The first steps showed the most common settings for every Windows server, no matter if it's a Hyper-V Server or not. You won't be able to access your network or access your Active Directory if you don't specify information, such as the computer name, IP address, and the other components listed in the first step.
The settings shown in Steps 6 through Step 16 are designed only for Hyper-V Servers and are optional; however, most of them are not enabled by default, for example Live Migration, Replication Configuration, and Enhanced Session Mode Policy. In this case, if you don't enable them, some tasks such as the Hyper-V Replica, Enhanced Session Mode or the Move option will not work.
By completing all these steps, you will make sure your server was deployed with the correct and necessary configuration for Hyper-V and the operating system.
The Migrating the virtual machine storage using Storage Migration recipe in Chapter 2, Migrating and Upgrading Physical and Virtual Servers
The Installing and configuring anti-virus for the host and virtual machines recipe in Chapter 5, Hyper-V Best Practices, Tips, and Tricks
The Configuring Hyper-V Replica between three Hyper-V hosts using HTTP authentication recipe in Chapter 8, Disaster Recovery for Hyper-V


