


When Microsoft introduced the .NET framework many years ago, a new powerful environment for development was introduced, giving no limits for developers' innovation to build applications and create solutions that fit nearly all needs. One major key for the success of .NET is its powerful library that keeps growing over different versions. Also, it provides an ease of use for such a library, taking away all the freaky processes of managing database connections, controlling a socket, formatting UI controls, and many more routines that developers encounter in everyday life in their work.
Moreover, another great tool was introduced as well that can have a major impact on speeding up and smooth management of the created solutions; yes, it is the Windows PowerShell. Built itself on the .NET Framework, PowerShell provides the super flexibility of a scripting language that gives a middle ground between developers and IT professionals, getting them near each other and providing a simple, easy-to-learn language for automating and managing common tasks.
In this chapter, we will cover the following topics:
Windows PowerShell—the story behind it
Windows PowerShell features under the spot
Windows PowerShell fundamentals
Windows PowerShell syntax and grammar
Windows PowerShell has been proven to be a strong automation tool that has various usages for IT professionals as well as developers; that is why you might hear different answers for this question: What is Windows PowerShell? One of the answers is "it is a scripting language"; other answers are, "it is a command-line interface", "it is an automation tool", and others. The good news is that there is no wrong definition for Windows PowerShell; each person defines it according to his own use of it. So the optimum and widest definition for Windows PowerShell is that it is an automation engine that provides a task-based command-line interface, a dynamic scripting environment, an interactive shell engine, and much more. All of these are bundled together in one component and shipped with the Windows operating system in order to provide a common automation platform for Microsoft technologies, alongside interoperability and integration with various technologies from different vendors.
Windows PowerShell is also available as part of Windows Management Framework (WMF). The WMF is a package that includes updates and enhancements to different management technologies such as PowerShell, Windows Remote Management (WinRM), and Windows Management Instrumentation (WMI). The WMF allows to use the latest management technologies on older operating systems. For example, WMF 4.0 allows you to use Windows PowerShell 4.0 on Windows Server 2008 R2 with SP1 or Windows 7 with SP1.
Windows PowerShell has been built on top of .NET framework, Common Language Runtime (CLR), and Dynamic Language Runtime (DLR). This architecture made it a powerful, dynamic, consistent, and extensible shell. Also it made PowerShell an object-based (object-oriented) shell where everything is produced as an object (.NET object) unlike other shells that deal with everything as raw text. Using the .NET framework makes the Windows PowerShell syntax almost like C# except for some differences in specific areas. Also, it made it easy to deal with other technologies such as Component Object Model (COM), Windows Management Instrumentation (WMI), and Extensible Markup Language (XML).
Moreover, it is possible to compile C# code inside PowerShell and execute PowerShell code as part of the code managed by .NET. Last but not least, PowerShell is shipped with its own Application Programming Interface (API) to give you the capability to build customized PowerShell commands and extensions for your own developed applications.
Windows PowerShell became part of Microsoft's Common Engineering Criteria (CEC) program in 2009. In case you don't know what the Microsoft CEC is, it is a program started in 2005 to define, unify, and standardize a set of engineering requirements across all Microsoft server products; some of these requirements are related to security, automation, and manageability. In other words, starting with 2005, each Microsoft server product must follow and pass these requirements before being released to the end users. In our case, starting with 2009, each and every server products must provide a management interface via Windows PowerShell. Today, almost all Microsoft server products support Windows PowerShell.
In Windows PowerShell, we refer to commands as cmdlets (pronounced "command-lets") where each cmdlet represent a function or task-based script. The cmdlets can be used individually for simple tasks or together in combination to perform more complex tasks. A cmdlet has a consistent naming style known as verb-noun, where each cmdlet has a verb and a noun separated by a dash (-) symbol, for example, Get-Service, Restart-Computer, and Add-User. This naming style makes the cmdlets' names easier to remember and even to guess and expect the new cmdlets. Windows Server 2012 is shipped with more than 2,400 cmdlets covering most of Windows Server roles and features.
Windows PowerShell has multiple consoles: Windows PowerShell console and Windows PowerShell Integrated Scripting Environment (ISE), which had been introduced with Version 2.0. On 64-bit operating systems, you will find two instances of each: a 32-bit instance and a 64-bit one.
Note
The PowerShell.exe and PowerShell_ISE.exe files are located at the following path: %WINDIR% | System32 | WindowsPowerShell | v1.0. You can get this path within your PowerShell by using a predefined variable called
$PSHome.
The two consoles provide (almost) the same capabilities in terms of core usage of Windows PowerShell, same cmdlets, same modules, and even the same way of execution; however, the Windows PowerShell ISE provides more features in terms of usability and user experience. The following couple of paragraphs will describe the differences between both the consoles.
The Windows PowerShell console is the basic console for Windows PowerShell and it is very similar to the command prompt console (cmd.exe). From the end user perspective, both almost look the same for the first time except that the Windows PowerShell console host has a blue background and the command prompt has a black background. However, the core functionality is totally different. The console host is a good choice for on-the-fly (interactive) usage of PowerShell such as executing inline cmdlets, scripts, or native win32 commands.
The following screenshot illustrates the look of the Windows PowerShell console host:
Windows PowerShell ISE is the Graphical User Interface (GUI) editor for Windows PowerShell, and it is similar to the PowerShell console host but with more advanced features. The ISE is similar to the Integrated Development Environment (IDE), such as Microsoft Visual Studio.
The following screenshot illustrates the Windows PowerShell ISE:
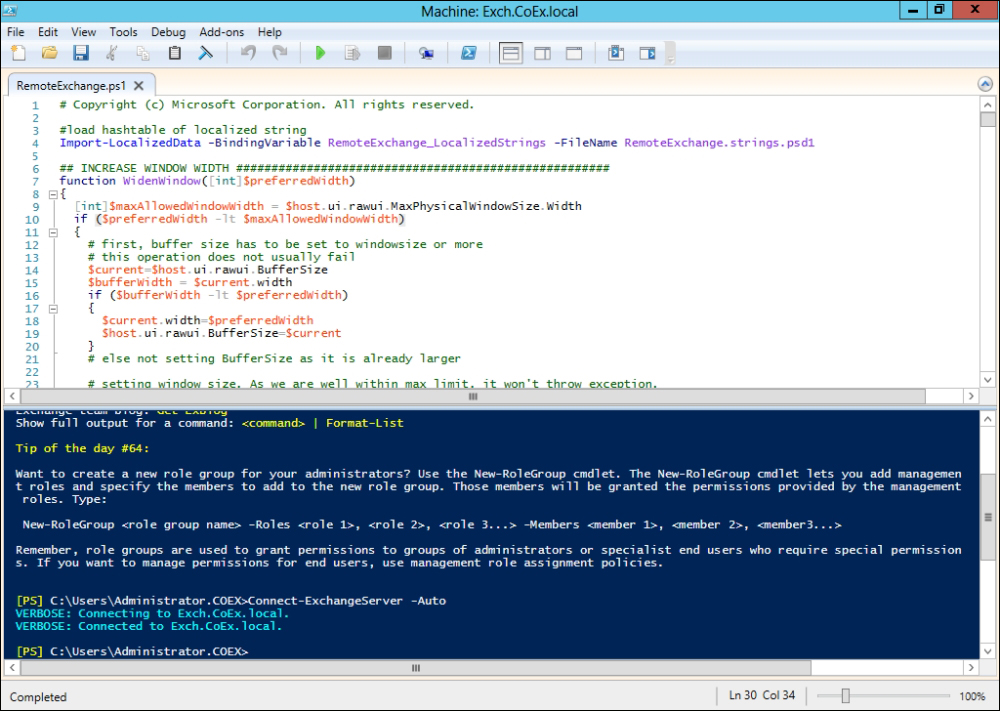
You can think of the Windows PowerShell ISE as a mini scripting IDE. You can also see that Windows PowerShell ISE shares a lot of features with Visual Studio, such as:
Syntax highlighting and coloring for PowerShell and XML
Script snippets (also known as code snippets)
Script debugging, code parsing, and error indicators
Brace matching and code regions
Support for remote script debugging
Support for Windows PowerShell Workflow debugging
Console customization such as font sizes, zoom, and colors
Multiple tabs (local and remote) to work simultaneously on several independent tasks
Full unicode support, execute, edit, and display complex scripts and right-to-left languages
IntelliSense support for Windows PowerShell syntax, Desired State Configuration providers, and configurations
In addition to the features adapted from Visual Studio, Windows PowerShell has its brand new unique features, such as:
Modules Auto-Loading and cmdlets discovery: PowerShell automatically loads and discovers all PowerShell modules available in your system. Thus, you do not have to know which module is needed for which cmdlet. Simply, Windows PowerShell will take care of discovering all modules and finding which modules are required for your script to be executed and then loading them if they were not loaded before.
Add-on tools: Add-on tools are Windows Presentation Foundation (WPF) controls that can be added to the PowerShell ISE to add extra features and functionalities, such as spelling checker and script printing features.
Autosave: PowerShell ISE automatically saves any open script file and runspaces; so in case of a crash or failure in your ISE or an unplanned system restart, ISE will restore all your runspaces once you re-open it (it is similar to Restore last session in Internet Explorer).
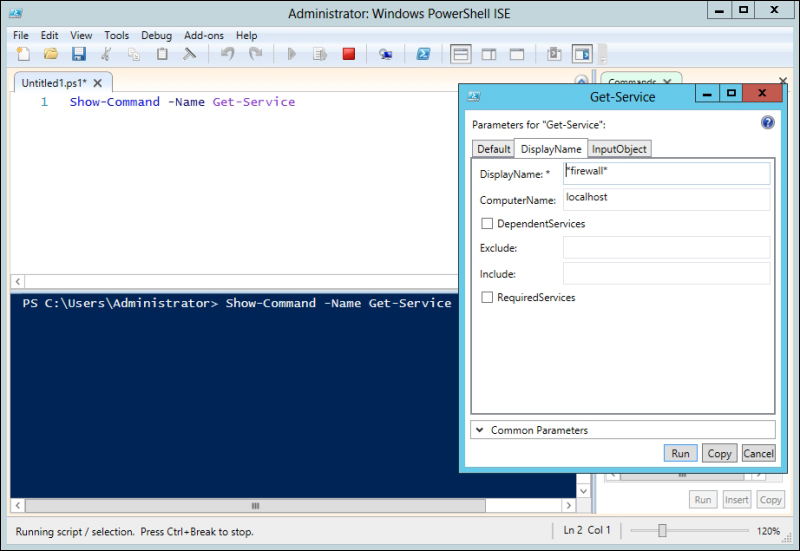
The Show-Command cmdlet: The
Show-Commandcmdlet allows you to display the command in a GUI as if you are browsing a web form or a normal Windows program. You can useShow-Commandto compose a command in a GUI form; select the required variables and parameters and write the values, and then click on Run to execute the command with the parameters supplied in the information field. You can also click on the Copy button to copy the command with the parameters and values to the clipboard, so that you can paste it to another PowerShell console and/or save it to a script.
At the time of writing these lines, Windows PowerShell is available in its fourth release, which comes with a lot of features and enhancements. In this section, we will focus the spotlight on the key features that have a great impact on Windows PowerShell's users in order to understand the essence of PowerShell; then we will make sure to cover these features deeply alongside other features as we go through this book.
PowerShell remoting: The remoting feature allows the execution of PowerShell cmdlets on remote systems that help to manage a set of remote computers from one single machine. The remote execution feature rely on WinRM technology. PowerShell remoting is acting like a Remote Desktop session; you can disconnect your session without interrupting any running process, application, or script and you connect to this session again from the same or a different computer to continue working from where you left off.
Background job: PowerShell introduced the concept of background jobs, which run cmdlets and scripts asynchronously on local and remote machines in the background without affecting the interface or interacting with the console.
Scheduled job: A scheduled job is similar to a background job; both jobs are running asynchronously in the background without interrupting the user interface, but the difference is that a background job must be started manually. However, scheduled jobs can create the background job and schedule it for a later execution using a set of cmdlets instead of doing it manually using the Task Scheduler wizard. You can also get the results of running scheduled jobs and resume the interrupted jobs.
Steppable pipeline: This allows the splitting of script blocks into a separate steppable pipeline. It gives you the option to call the begin, process, and end methods of a script block in order to ease the control of execution sequence.
Script debugging: As in Visual Studio, you can set breakpoints on lines, columns, functions, variables, and commands. You can also specify actions to run when the breakpoint is hit. Stepping into, over, or out of functions is also supported; you can even get the call stack.
Error-handling: PowerShell provides error-handling mechanism through the
Try{ },Catch{ }, andFinally { }statements as in .NET languages.Constrained runspaces: Constrained runspaces allow creation of PowerShell runspaces with a set of constraints that include the ability to restrict access and execution of cmdlets, scripts, and language elements.
Tab-expansion: This feature is an implementation of autocompletion that completes the cmdlets, properties, and parameter names once the Tab button has been pressed.
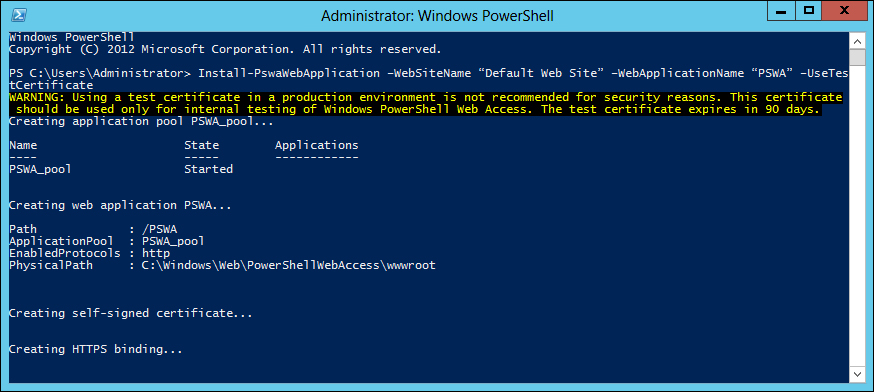
Windows PowerShell Web Access: A web-based version of the PowerShell console has been introduced in Windows Server 2012, where you can run and execute PowerShell cmdlets from any web browser that is not only available on desktops but also on any mobile or tablet devices.
Windows PowerShell Web Service (PSWS): This is also known as Management OData IIS Extension, is the infrastructure for creating RESTful ASP.NET web service endpoints that expose management data accessed through PowerShell cmdlets and scripts. These endpoints can be accessed via OData protocol, which allows IT professionals and developers to access the management data remotely from both Windows and non-Windows devices. It simply processes the OData requests and converts them to PowerShell cmdlets invocations.
Online and Updateable help: PowerShell help is no longer shipped in the box. Help now can be retrieved and updated from time to time to make sure that you always have the latest help documentation instead of static content that might have some mistakes and errors.
Windows PowerShell Workflow: Workflow capabilities have been introduced in Windows PowerShell 3.0, and it is designed specifically to help you perform long-time and effort-consuming complex tasks across multiple and different devices at different locations.
Desired State Configuration (DSC): The DSC feature enables the deployment and management of configuration for software and services to ensure the consistency of configuration data across all computers and devices.
Now, after understating what is Windows PowerShell and what makes it a unique and different shell, it is time to go back to important basic aspects such as syntax and grammar. Since you are already a .NET developer, and Windows PowerShell syntax is adapted from C#, this part should not take much time.
As mentioned earlier, one of the biggest advantages of PowerShell is being an object-based shell. Everything in PowerShell is an object (.NET object) that is an instance of a .NET framework class. Each object holds a piece of data alongside information about the object itself, in addition to the group of properties and methods. This makes the object manipulation much faster and easier unlike the other traditional text-based shells. Text-based shells produce everything as raw text that requires a lot of parsing and manual manipulation to find the required value at the right location. This is more than enough to turn your tasks into nightmares.
Windows PowerShell is taking advantage of the underlying .NET framework to deal with and manipulate different types of objects such as WMI, COM, XML, and ADSI.
The following examples demonstrate how Windows PowerShell cmdlets are tightly close to the .NET framework. In the following example, we will use the Get-Date cmdlet to retrieve the current system time. Yes, you are right. It is what you are thinking of.
PS C:\> Get-Date
Wednesday, October 9, 2013 7:57:18 PM
Now, we have the result of execution and this is supposed to be a DateTime type of object. So, to get the data type of our results, we will use the GetType() method.
PS C:\> (Get-Date).GetType()

IsPublic IsSerial Name                          BaseType
-------- -------- ----                          --------
True     True     DateTime                      System.ValueType
Since we have a .NET object of type DateTime, we can use a method such as ToShortDateString() to manipulate the result's format.
PS C:\> (Get-Date).ToShortDateString()
10/9/2013

PS C:\> (Get-Date).ToShortDateString().GetType()

IsPublic IsSerial Name                           BaseType
-------- -------- ----                           --------
True     True     String                         System.Object
Pipelines are the mechanism used to connect a group of simple cmdlets together in order to build a complex task-based script. A pipeline is not something invented newly for PowerShell, it is an old trick used in different shells before. However, what makes it different here is using objects to make the output of each cmdlet to be used as an input for the next cmdlet in the pipeline. Thus, there is no need of manual result manipulations. For piping, we use the pipeline operator | between cmdlets.
PS> cmdlet1 | cmdlet2 –parameter1 argument1 | cmdlet3 –parameter1 argument1 argument2
The following examples demonstrate how to pipe the Get-Process cmdlet in different scenarios with other cmdlets using pipelines.
In the first example, the Get-Process cmdlet is to be used with the Get-Member cmdlet to discover the .NET object class and members type.
PS C:\> Get-Process | Get-Member

   TypeName: System.Diagnostics.Process

Name                   MemberType     Definition
----                   ----------     ----------
Handles                AliasProperty  Handles = Handlecount
Name                   AliasProperty  Name = ProcessName
VM                     AliasProperty  VM = VirtualMemorySize
Close                  Method         void Close()
Kill                   Method         void Kill()
Start                  Method         bool Start()
ProcessName            Property       string ProcessName {get;}
(...)
Another piping example: the Get-Process cmdlet is to be used with the Sort-Object cmdlet to retrieve the list of running processes and sort them according to the CPU usage, and then pipe the results to the Select-Object cmdlet to select the top three processes. Finally, the results are formatted using the Format-Table cmdlet.
PS C:\> Get-Process | Sort-Object -Property CPU -Descending | Select-Object -First 4 -Property ProcessName,CPU,VirtualMemorySize | Format-Table

ProcessName             CPU                    VirtualMemorySize
-----------             ---                    -----------------
WINWORD                 2155.515625            632963072
OUTLOOK                 1431.640625            792113152
explorer                591.4375               1018482688
Aliases are mainly used as pointers for cmdlets in order to make it easy to remember long commands or to make your commands look familiar. At the end, aliases are used to make your scripting environment more comfortable, friendly, and familiar.
For example, the Get-ChildItem cmdlet is the directory listing cmdlet in PowerShell and you will find this cmdlet has two aliases: one called dir for people with cmd background and another alias called ls for people with UNIX background.
Other examples are Select-Object, Where-Object, and Sort-Object cmdlets that have aliases without the –Object part.
So, consider the following command:
Get-Process | Sort-Object -Property CPU -Descending | Select-Object -First 5 -Property ProcessName,CPU,VirtualMemorySize | Format-Table
The previous command should be like this after using aliases:
gps | Sort -Property CPU -Des | Select -First 5 -Property ProcessName,CPU,VirtualMemorySize | FT
In order to list all available aliases on your system, you have to use the Get-Alias cmdlet.
PS C:\> Get-Alias

CommandType     Name
-----------     ----
Alias           % -> ForEach-Object
Alias           ? -> Where-Object
Alias           cat -> Get-Content
Alias           cd -> Set-Location
Alias           clc -> Clear-Content
Alias           clear -> Clear-Host
Alias           clhy -> Clear-History
Alias           clv -> Clear-Variable
(...)
Also, you can create your own alias using the New-Alias and Set-Alias cmdlets.
PS C:\> New-Alias -Name Restart -Value Restart-Computer

PS C:\> Get-Alias restart

CommandType     Name
-----------     ----
Alias           Restart -> Restart-Computer
Note
Aliases in PowerShell are not persistent, which means that you will lose them once you close your PowerShell session. To avoid this trap, use the Export-Alias cmdlet to export all your aliases before closing your session, and then use the Import-Alias cmdlet to import them again. To avoid importing your aliases each and every time you open PowerShell console, it is highly preferred to use PowerShell Profiles.
In Windows PowerShell, variables are defined as in PHP using the dollar sign ($) as a prefix for the variable's name that can contain characters, numeric values, or both, such as $var, $arr4, and so on.
"We wanted to close the semantic gap between what admins thought and what they had to type."
Jeffrey Snover – PowerShell inventor
Windows PowerShell is a dynamic language. Thus, using data types is optional not because it is a typeless language but because it is a type-promiscuous language. This means that Windows PowerShell interpreter is capable of and smart enough to determine the type of each object and convert them to match each other without any loss of data or object characteristics in order to provide you with the results you expect.
To show you by example, let's define a couple of variables and assign a value with a different data type to each one of them, and then perform a simple mathematical operation on those variables.
PS C:\> $a = 1 ; $a.GetType()

IsPublic IsSerial Name                           BaseType
-------- -------- ----                           --------
True     True     Int32                          System.ValueType

PS C:\> $b = "2" ; $b.GetType()

IsPublic IsSerial Name                           BaseType
-------- -------- ----                           --------
True     True     String                         System.Object

PS C:\> $c = 3.5 ; $c.GetType()

IsPublic IsSerial Name                           BaseType
-------- -------- ----                           --------
True     True     Double                         System.ValueType

PS C:\> $a + $b + $c
6.5
Note
Semicolon in PowerShell is optional; however, you might use them to execute multiple commands separately in a single line.
So, we had different variables of the Int32, String, and Double data types, and we were able to calculate them together in just a single step without any data type conversion or casting.
If you feel that using variables this way is confusing, then I have to tell you that you are still able to use strong type variables. All you have to do is just use the data type you need within square brackets like this [data type].
Windows PowerShell is shipped with a set of predefined built-in variables. Those variables can be categorized into the following two categories:
Session configuration: These variables are used to store the current Windows PowerShell session configuration, such as errors generated during a session and user-defined variables
Preferences settings: These variables are used to store the PowerShell preferences and settings such as User Home Folder location, PowerShell Host configuration, and PowerShell version information
You can access those built-in variables either by using the variable name directly, such as $PSVersionTable, or using the $Variable: prefix with a variable name such as $Variable:Host or $Variable:Error. You can also list all the variables using the Get-Variable cmdlet.
Windows PowerShell provides different types of operator. You will find part of it very familiar and has been used in different programming languages, and the other part very unique to PowerShell.
The following are examples of the available operators in PowerShell:
Arithmetic operators: The arithmetic operators are add (
+), subtract (-), multiply (*), divide (/), and mod (%)Comparison operators: The comparison operators are equal (
-eq), not equal (-ne), less than (-lt), greater than (-gt), less than or equal (-le), greater than or equal (-ge), contain (-contains), and not contain (-notcontains)Wildcard and RegEx match operators: These operators are
-like,-notlike,-match,-notmatch, and-replaceLogical and bitwise operators: These operators are
-and,-or,-xor,-not,-band,-bor,-bxor, and-bnot
Arrays in PowerShell are simply a zero-based list of objects. Also, they are variables of [Array] data type as in .NET but as usual PowerShell is developed to code less and get more output; thus there is no need to define the data type even for arrays. The array can be defined using the @() syntax or you simply create a variable and assign the list to it, and PowerShell will understand and determine the data type automatically as discussed before.
PS C:\> $arr = @()

PS C:\> $arr = 1,2,3,4,5

PS C:\> $arr.GetType()

IsPublic IsSerial Name                                BaseType
-------- -------- ----                                --------
True     True     Object[]                            System.Array
Also, arrays can store either single or mixed types of data, as shown in the following example:
PS C:\> $arr = 1,'a', ,(Get-Service)

PS C:\> $arr
1
a

Status   Name               DisplayName
------   ----               -----------
Running  AppIDSvc           Application Identity
Running  Appinfo            Application Information
Hash tables are similar to arrays in the way they behave and also how we create them. Hash tables are defined using @{}, or like arrays just create a variable and fill it with data.
PS C:\> $ht = @{}

PS C:\> $ht.GetType()

IsPublic IsSerial Name                              BaseType
-------- -------- ----                              --------
True     True     Hashtable                         System.Object

PS C:\> $ht = @{1='red';2='blue';3='green'} ; $ht

Name                           Value
----                           -----
3                              green
2                              blue
1                              red

PS C:\> $ht.2
blue
Flow control and conditional execution in Windows PowerShell is very similar to the C-languages family.
For conditional execution, PowerShell is using the if-else statements and switch cases.
The
If-elsestatement:If (condition) { Statement block } ElseIf (condition) { Statement block } Else { Statement block }The
Switchcase:Switch (pattern) { Pattern {statement block} Pattern {statement block} Default {statement block} }
The preceding code block shows the traditional syntax for the switch case as is used in different programming languages as well as PowerShell. The unique feature in PowerShell is that you can add an extra matching option (condition) to your pattern. The available options are –regex, -wildcard, –exact, and –casesensitive.
Switch –option (pattern)
{
  Pattern {statement block}
  Pattern {statement block}
  Default {statement block}
}
Iterations (looping) statements in PowerShell work similar to C#.
The
Forloop:For (initialization; condition; increment) { Statement block }The
ForEachloop:ForEach (variable in expression) { Statement block }The
Whileloop:While (condition) { Statement block }The
Do/Whileloop:Do { Statement block } While (condition)
Functions remain the same across different programming and scripting languages. They do the same job, which is producing a piece of code with a name that is independent from the main program and can be called any time on demand. This helps in avoiding the routine of repeating the same piece of code more than once in the same program. The keyword function is used to define functions in PowerShell.
So, the function syntax should look like the following code:
Function <function_name> (function_parameters)
{
  <function_body>
}
Let's turn this dummy function syntax into something more practical. No, not a Hello World..! function. I meant something that sounds interesting and takes inputs and returns a value. Let's build a quick function called Avg that calculates the average of three integer numbers, n1, n2, and n3.
Function Avg ([int] $n1, [int] $n2, [int] $n3)
{
  return ($n1 + $n2 + $n3) / 3
}
Note
Using return in the previous example is optional; you can remove it and you will get the same result. For more information, return to see the conceptual help about_Return topic.
Now, in order to call your function, just use the function name and pass the required values to the respective parameters. The parameters must be passed within the command delimited by a space, unlike other languages in which parameters are delimited by semicolons.
PS C:\> Avg -n1 5 -n2 6 -n3 7
6
Providers in Windows PowerShell are .NET libraries that you can use to navigate to data that a particular provider represents. Simply, it is an interface between the user and the data. For instance, FileSystem is the provider of all files and folders on your hard disk drive. While Registry is also a provider, but for all the registry keys.
Let's have a closer look at the providers by listing all the available providers using the Get-PSProvider cmdlet.
PS C:\> Get-PSProvider

Name                 Capabilities                     Drives
----                 ------------                     ------
Alias                ShouldProcess                    {Alias}
Environment          ShouldProcess                    {Env}
FileSystem           Filter, Credentials              {C, D, E}
Function             ShouldProcess                    {Function}
Registry             ShouldProcess, Transactions      {HKLM, HKCU}
Variable             ShouldProcess                    {Variable}
Certificate          ShouldProcess                    {Cert}
WSMan                Credentials                      {WSMan}
In the previous example, you will notice that each provider has at least one drive. PowerShell providers allow access to their data in the form of drives, so you use the same cmdlets to navigate different objects according to the provider. For example, the Get-ChildItem cmdlet will list all the files and folders in the FileSystem provider, all registry keys in the Registry provider, and so on.
Let's see how we can access those drivers. By default, you are being redirected to the FileSystem provider drive once you open your PowerShell console. To move between different drives, use the Set-Location cmdlet.
For example, to navigate to the certificates drive, use the Set-Location cmdlet with a drive name Cert:\ and then use the Get-ChildItem cmdlet to list the available certificate stores, or you can simply use it directly as Get-ChildItem Cert:\.
PS C:\> Set-Location cert:\
PS Cert:\> Get-ChildItem

Location   : CurrentUser
StoreNames : {TrustedPublisher, ClientAuthIssuer, Root, UserDS...}

Location   : LocalMachine
StoreNames : {TrustedPublisher, ClientAuthIssuer, Remote Desktop, Root...}The typical PowerShell script file is just a text file with the .ps1 extension that contains pieces of Windows PowerShell code and instructions. This file could be created using any text editor, even Notepad. However, to make our life easier, we use one of the PowerShell consoles or at least a PowerShell-oriented text editor such as Notepad++.
You can consider the .ps1 script file in the scripting world as equivalent to your .exe file for your .NET application. The PowerShell script files are similar to functions; both can allow users to pass parameters for initialization. Script files have the built-in $args variable set up with the parameters passed at the time of the execution.
The following is an example code for using $args to get the arguments' values:
$firstName = $args[0]
$lastName = $args[1]
Write-Host "Hello, $firstName $lastName"
Copy and paste the previous code into your PowerShell editor and save it in a script file called Greeting.ps1.
Now, very soon we will have a simple script file that can be executed. The first thing to do right before executing your first script is defining your PowerShell execution policy. Execution policy is a security policy that defines how PowerShell scripts should be executed on your system. The execution policy configuration could be one of the following:
Restricted: In this, no script execution is allowed. This is the default execution policy for Windows Server 2012, Windows 8, and earlier Windows versions.
RemoteSigned: In this, script execution is allowed only for the scripts you wrote on the local computer but not for any scripts from the external sources such as the Internet. The external scripts will not be executed unless they are signed by a trusted publisher. This is the default policy on Windows Server 2012 R2 and Windows 8.1.
AllSigned: In this, all the scripts must be signed by a trusted publisher, even the scripts you wrote on the local computer.
Unrestriced: In this, all scripts can be executed without any restriction.
To set the execution policy settings, we use the Set-ExecutionPolicy cmdlet in a Windows PowerShell session running with administrative privileges.
PS C:\ > Set-ExecutionPolicy -ExecutionPolicy RemoteSigned
Now, your PowerShell console is ready to execute your script file. If you tried to run the script by clicking on it, your script will be opened in Notepad. Don't worry, you did not do anything wrong, but this behavior is one of the security features of Windows PowerShell that prevents you from accidentally running PowerShell scripts. This way it prevents the accidental execution of a script that might harm your computer. Instead, we call the script file from the PowerShell console itself.
In order to call your script, either type the full path of your script or use the .\ prefix before the script name to refer to the full path if your script is located in the directory you are currently browsing. I know this looks weird but, again, this is for your security to make sure that you are executing the right script and not another script with the same name created by someone or even a malicious code.
PS C:\> D:\myScripts\Greetings.ps1 Sherif TalaatHello, Sherif TalaatPS D:\myScripts> .\Greetings.ps1 Sherif Talaat Hello, Sherif Talaat
Like any programming or scripting language, you can add comments in your code. There are two types of comments in PowerShell:
PowerShell comes with a super powerful and unique help mechanism. It provides information beyond the traditional help system that shows only the command and its parameters. Help in PowerShell is enough to know everything about what you are looking for; it gives you a synopsis, detailed description, syntax, parameters, input and output objects, notes, examples, and more.
In order to use this help system, we use the Get-Help cmdlet along with the respective cmdlet you want to get help for. For example, if you want to show help information for the Get-Process cmdlet, the code should looks like the following:
PS C:\> Get-Help Get-Process
The previous line of code will show basic help information about the Get-Process cmdlet. You can add extra parameters to get more information. For instance, you can add –detailed or –Full to get a detailed help information.
PS C:\> Get-Help Get-Process –Detailed
If you know the cmdlet but want just a few examples to help you to get started with the syntax, then you can add –Examples to show the examples only.
PS C:\> Get-Help Get-Process –Examples
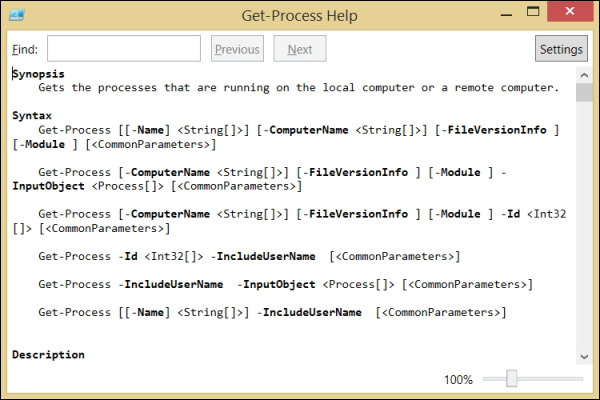
Last but not least, reading long pieces of information on the console window is hard. The more information you get, the harder you read. For this purpose, PowerShell has the –ShowWindow parameter that displays the help information on a GUI instead of the console, as shown in the following screenshot:
Another interesting feature in PowerShell help is the conceptual About help topics. These topics are extra help information about PowerShell modules and other PowerShell subjects such as syntax. They are called About topics because it always starts with about_ as a prefix.
The following code demonstrates how to get the list of all the available help files in your system:
PS C:\> Get-Help -Category HelpFile

Name                              Category
----                              --------
about_ActivityCommonParameters    HelpFile
about_Aliases                     HelpFile
about_Arithmetic_Operators        HelpFile
about_Arrays                      HelpFile
(...)
The information in the help topics can be retrieved by using the Get-Help cmdlet along with the topic name.
PS C:\> Get-Help about_Functions
Earlier in this chapter, we mentioned that starting with Version 3, PowerShell help is no longer a shipped inbox. However, it is downloaded and updated from the Internet. For the purposes of achieving this task, we use a couple of cmdlets such as Update-Help and Save-Help. The Update-Help cmdlet is used to download the latest help files directly from the Internet and embed them in PowerShell. However, the Save-Help cmdlet downloads the help files and stores them on a local disk or shared folder. So, you can use them later to update the help files locally instead of downloading them from the Internet each time for every computer.
PS C:\> Save-Help –DestinationPath \\FS01.contoso.local\ PSHelp
PS C:\> Update-Help –SourcePath \\FS01.contoso.local\PSHelp
Tip
Downloading the example code
You can download the example code files for all Packt books you have purchased from your account at http://www.packtpub.com. If you purchased this book elsewhere, you can visit http://www.packtpub.com/support and register to have the files e-mailed directly to you.
Common parameters are the set of cmdlet parameters that are available for any cmdlet. These parameters are implemented and handled by Windows PowerShell and not by a cmdlet developer. The developer has to populate and pass the data to the parameters within the cmdlet code.
The common parameters in PowerShell are:
Verbose: This displays detailed information about the operation performed by the cmdlet. You can think of it as a tracing or logging parameter.Debug: This is similar toverbosebut it displays a programmer-level information about the operation performed by the cmdlet.ErrorAction: This determines how the cmdlets respond to the non-terminating error from the cmdlet during execution. This parameter has pre-defined values, which areContinue,ignore,inquire,stop,suspend, andSilentlyContinue.ErrorVariable: This determines a variable to store the error messages generated by the cmdlet during the execution of an operation.WarningAction: This determines how the cmdlets respond to the warning from the cmdlet during execution. This parameter has fewer pre-defined values such asErrorAction. The values areContinue,stop,inquire, andSilentlyContinue.WarningVariable: This determines a variable to store the warning messages generated by a cmdlet during the operation execution.WhatIf: This displays a message that describes the instructions, effects, and change in effects that are supposed to happen by the cmdlet without executing it.Confirm: This prompts for a confirmation before executing cmdlets.OutBuffer: This determines the number of objects to be accumulated in the buffer before moving to the next cmdlet in the pipeline.OutVariable: This determines the variable to store the output objects from the cmdlet.
In this chapter, we learned what Windows PowerShell is, what makes it a different shell, and how it is impacting IT professionals and developers. Also, we got introduced to the Windows PowerShell console and to the ISE. Then we shed the light on the objects structure and on how PowerShell is using the underlying .NET framework to deal with and manipulate objects. Moreover, we had a quick tour of PowerShell syntax and grammar and how it is very close to the C# syntax.
In the next chapter, we will jump into more advanced PowerShell topics, for example, working with different objects such as WMI, CIM, and COM+, understanding scripting debugging, error-handling techniques in PowerShell, and developing PowerShell modules and workflows.