Chapter 1. Getting Started with Vue.js
This book is primarily focused on Vue.js’ ecosystem and it’s development tools. Depending on where you are in your Vue.js journey, it doesn’t hurt to have a refresher or a crash course before delving into the main content. Understanding the basics of the technology that an ecosystem is built around will only make you better as a developer and problem solver.
Understanding the Virtual DOM
The DOM (Document Object Model) API is slow...very slow. Web applications have a lot of moving parts to them that require data to be updated instantly. Sometimes your application will react differently depending on the data that was modified. Since the DOM is really slow, your web application could be unusable if the user is updating a lot of data. To solve this problem, Vue.js uses something called a Virtual DOM.
Much like React, Vue.js utilizes a Virtual DOM that makes rendering your application’s user interface lightning fast. A Virtual DOM is a representation or a copy of the actual DOM; it’s also known as a “shadow DOM” and is rendered using JavaScript. In other words, when a change is made in the application, the Virtual DOM compares itself to the real DOM, defines what has changed, and only updates what needs to be changed.
Let’s say in a hypothetical app you have a header, a footer, and a content section. If a user updates some data in the content area of your application, only the content area will be re-rendered, not the header or the footer. Vue.js is smart and efficient enough to only re-render what’s needed, rather than the entire DOM.
Installing Vue.js
Unlike some of its competitors, Vue.js is incredibly easy to install and arguably the easiest to get started with. Vue.js was designed with performance and simplicity in mind; so much so that simplicity was considered in every aspect of its development. Vue.js is very small in file size and is often described as “The Progressive JavaScript Framework,” meaning that you can easily add Vue to your project as it grows in complexity and size.
Although a robust and powerful framework, you do not need some intimidating development environment with cutting-edge technologies like Webpack or Parcel for it to work. Although you can use that (in fact, we’ll get into that in the next chapter), it is not required. Need to use Vue.js to display a simple Twitter feed? Done. Need to use Vue.js for an enterprise application? Not a problem.
You can download and install Vue.js like any other CSS or JS library (i.e. Bootstrap or jQuery); via a <script> tag in your HTML page. You can either download the package via NPM, Yarn, or a CDN.
NPM
$npm install vue# or$yarn add vue
CDN
<scriptsrc="https://cdn.jsdelivr.net/npm/vue@<version-number>/dist/vue.js"></script>
Whichever route you prefer, you can add the framework to any HTML page with a <script> tag and get started. Now that you know how to install Vue.js, it’s time to learn about Vue itself, starting with the Vue Instance.
Understanding the Vue Instance
What is a Vue Instance? Well, it’s a single occurrence of a Vue.js object. The Vue instance is the most important thing to understand because it literally controls the section of the web page or application that you instruct it too. Once you understand the instance, the better you’ll understand more complex things, like how Vue CLI scaffolds a new project and how single file .vue components work.
This section of the chapter will refer in bold to the file names of where the code lives. This is done so you can better understand how Vue.js talks to the different pages and files. The file structure for this hypothetical application is something like this:
project-folder/
  |__index.html
  |__app.js
The Vue.js library and the app.js file (Vue Instance) are referenced in the index.html file via a <script> tag.
app.js
varvm=newVue({// options});
This instance doesn’t do much. In fact, it doesn’t do anything at all. If you were to add this to a webpage, you wouldn’t see anything. However, Vue.js is already initialized and ready to be used.
Note: If you are using ES6, it’s always recommended to use const or let.
The Vue instance accepts options or properties that you can add to enhance the functionality of your application. These are things like, el, data, methods, computed, and much more.
app.js
varvm=newVue({el:'#app',data:{name:'Dave Berning',hometown:'Cincinnati, OH',},});
Let’s dissect this instance. The most important property is el because it defines which part of our application this Vue Instance should control. Without it, Vue.js cannot function; it’s required. In this case, Vue.js will “control” all of the HTML that’s inside of the <div id="app"><div> element.
You could have an HTML file that has multiple <div>’s:
index.html
<divid="app"><p>My name is, {{ name }}<p></div><divid="contact-form"><form>...</form></div>
Since the el property in the Vue instance has a value of #app, Vue.js will only modify the HTML in the first div; it will never touch the contact form. Unless you create another Vue instance and make the el in the second instance have a value of #contact-form. However, it’s always recommended to have just one Vue Instance at a time.
The Data Property
The data property stores all of your data that you want to display or modify in the HTML of the Vue instance. Any information that you declare in the data property instantly becomes reactive. Reactive meaning that your data can change based on user interactions. Reactive properties are also bound in two-ways; when the data property is updated, any instance of that property is also updated. To display your data into your HTML view, use interpolation by using the mustache ({{ }}) syntax. If you’ve used AngularJS in the past, this should be familiar to you.
index.html
<divid="app"><p>Hi, my name is {{ name }}. I am from {{ hometown }}.</p></div>
app.js
varvm=newVue({el:'#app',data:{name:'Dave Berning',hometown:'Cincinnati, OH',},});
Your view should read: Hi, my name is Dave Berning. I am from Cincinnati, OH. Try modifying your data by either changing the data properties or by adding additional properties, and use interpolation to display it out into your HTML view.
The Methods Property
The method property does what you would expect it to: it stores methods or functions that you can use across your application. These functions can either be used to execute something on one of Vue’s lifecycle methods (more on that later), running business logic or by returning a value that you can later use in your HTML view.
Let’s build off of the Vue Instance above.
Note: All of the examples in this book will be using the ES6 syntax, which requires a compiler like Babel to run in the browser. You are more than welcome to use TypeScript or the more supported ES5 syntax, which doesn’t require a compiler.
app.js
varvm=newVue({el:'#app',data:{name:'Dave Berning',hometown:'Cincinnati, OH',},methods:{showDataOnMounted(){console.log(this.name);console.log(this.hometown);},},mounted(){this.showDataOnMounted();},});
In this example, there is an instance method that console logs the name and hometown data properties when the Vue Instance is mounted. You might also notice that we are using this a lot in the instance. That’s because this in Vue, refers to the Vue Instance, not the function. If you want to access the name data property, you can access it with this.name. To use name in your HTML via interpolation, just omit the this and use name. The same refers to any method or object.
Let’s write a method that returns something to your HTML view.
index.html
<divid="app"><p>Hi, my name is {{ name }}. I am from {{ hometown }}</p><p>{{ numberOfSomething(someNumber, 'dogs') }}</p></div>
app.js
varvm=newVue({el:'#app',data:{name:'Dave Berning',hometown:'Cincinnati, OH',someNumber:2,},methods:{numberOfSomething(number,something){return`I have${number}${something}.`;},},});
The numberOfSomething function accepts two arguments: a number and something. As demonstrated above, methods do not need to be called exclusively in the Vue Instance in the <script> tag; it can also be referenced in the HTML view and accept arguments. When wrapped in curly braces, the method is ran and the method returns the string, “I have 2 dogs.”.
The Computed Methods Property
One common mistake with new Vue developers (including myself, I must admit) is mixing up computed properties with methods that return a value. When used correctly, computed methods are great for a couple of reasons: 1) the value returned gets stored as if it was a data property (becomes reactive), and 2) computed properties are cached and stored.
Much like a method, computed properties can also perform logic and return something. The main difference between computed properties and methods are, computed properties cannot accept arguments. Computed properties are essentially used to perform logic, and return and store a value.
A method that should be a computed property (bad)
index.html
<divid="app"><p>You have {{ dogCount }} {{ dogs() }}</p></div>
app.js
varvm=newVue({el:'#app',data:{dogCount:2,},methods:{dogs(){if(this.dogCount===1){return'dog';}else{return'dogs';}},},});
Your view should read: You have 2 dogs. If you change your dogCount to 1, it should read: You have 1 dog.
Computed properties, the proper way (good)
index.html
<divid="app"><p>You have {{ dogCount }} {{ dogs }}</p></div>
app.js
varvm=newVue({el:'#app',data:{dogCount:2,},computed:{dogs(){if(this.dogCount===1){return'dog';}else{return'dogs';}},},});
Your view should still display the same information in the view. However, in this example, computed properties are being used appropriately.
A good rule of thumb when deciding to use computed properties or methods is: If you need to pass in an argument to return a certain value, always use methods. If you need to perform logic and return a value without any arguments, always use computed properties.
The Watch Property
The watch property is very similar to the computed property. They both react to a change in data, both can react to change in other data property, and both can be used as a data property. The main difference between the two properties is that the watch property is more generic than a computed property. Watch properties are more likely to be used if you have expensive operations in response to changing data or if you want to perform asynchronous tasks.
The watch property name must match that of the data property it’s watching.
varvm=newVue({el:'#app',data:{favoriteFramework:'Vue.js',},watch:{favoriteFramework(){...}},});
Lifecycle Methods
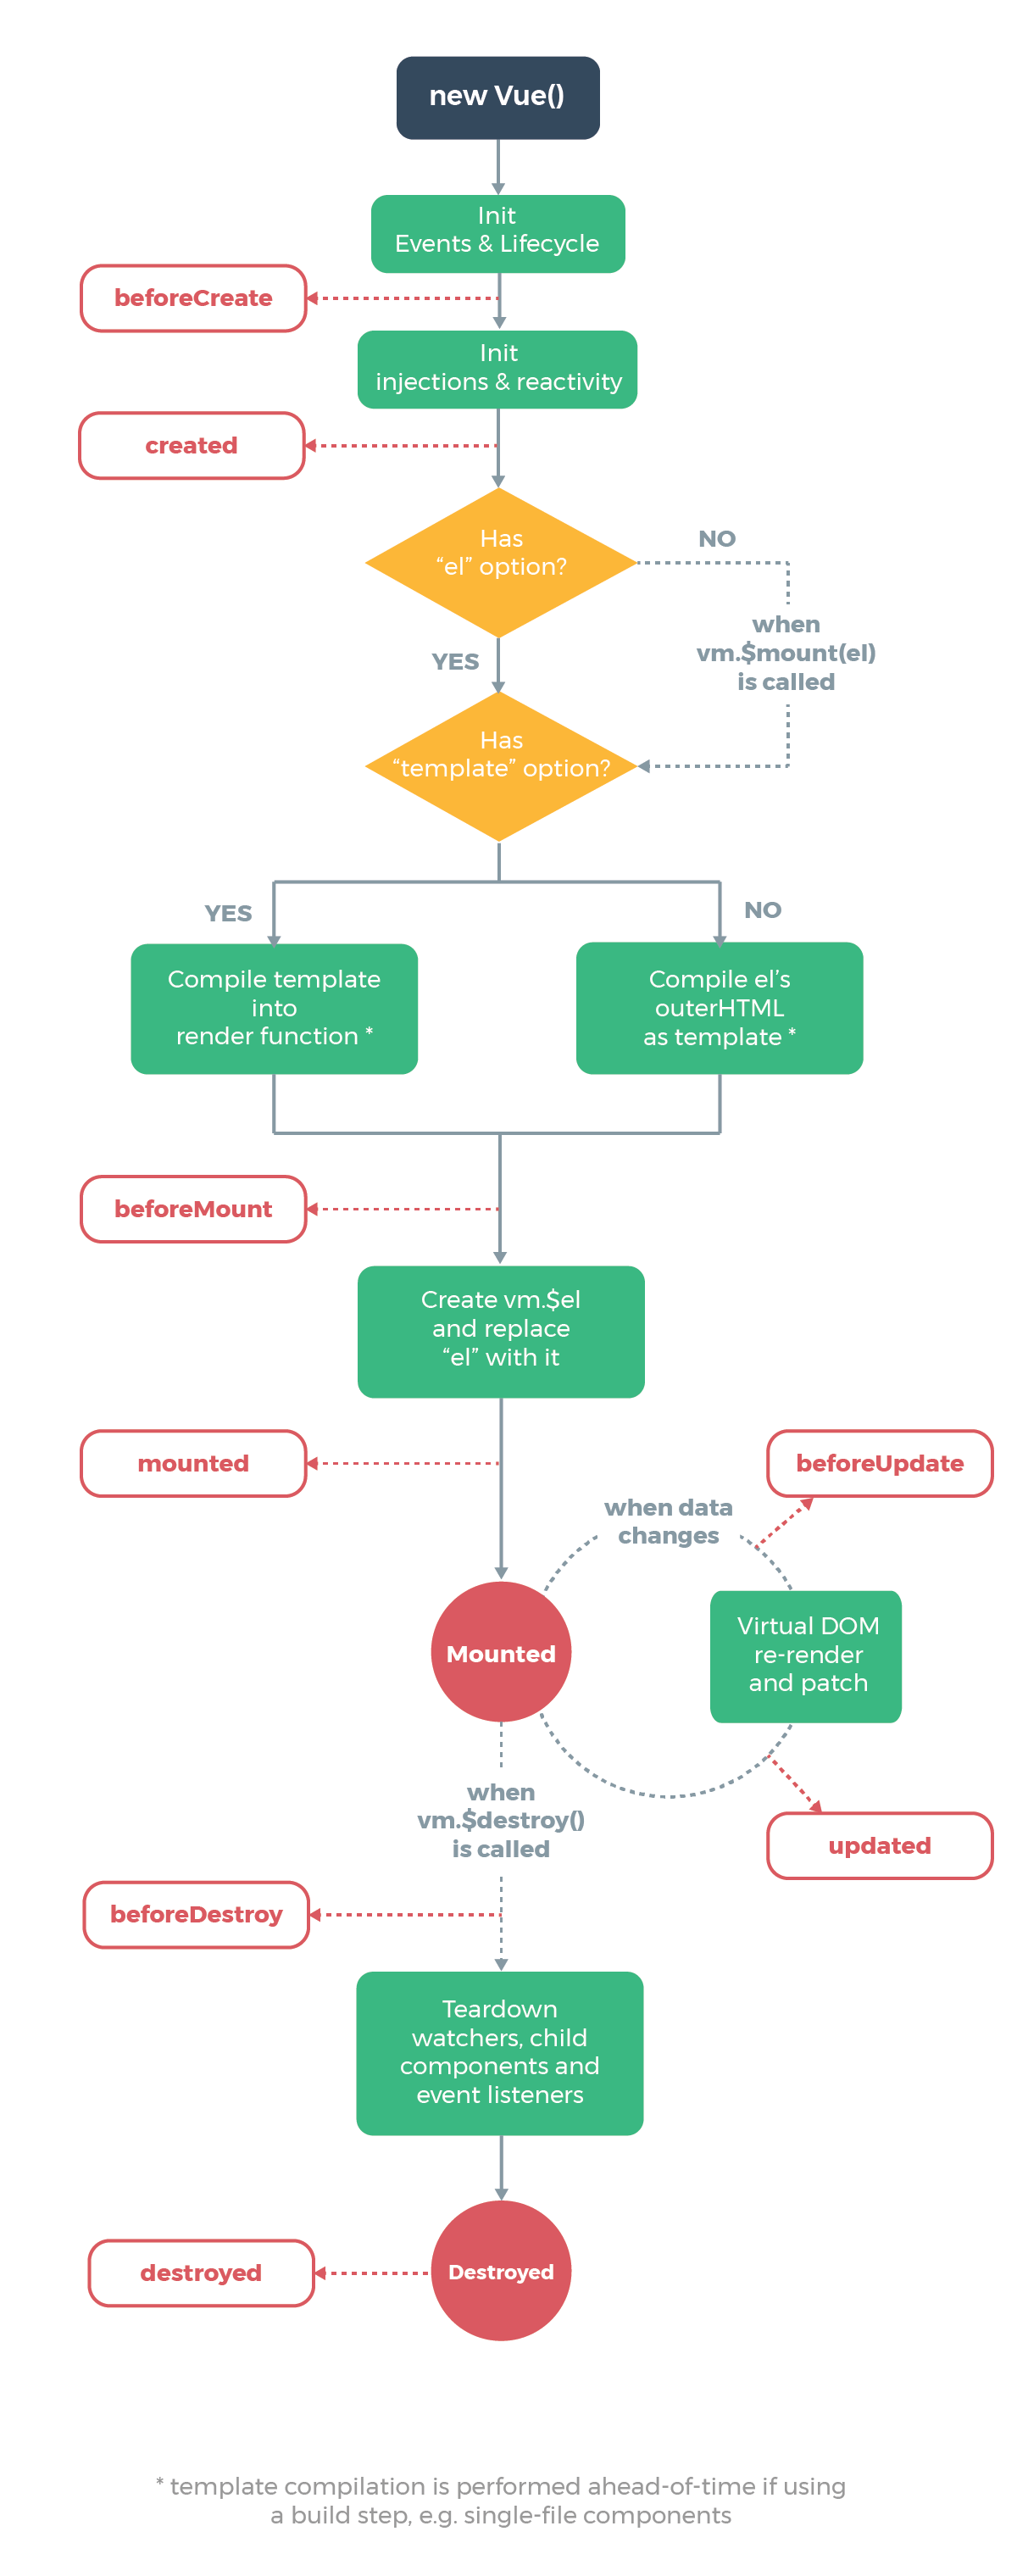
Lifecycle methods or “lifecycle hooks” are a way to perform functions or tasks during an instance’s lifecycle (i.e. run something when the component is created, mounted, destroyed, etc.).
Below is a list of all the current lifecycle hooks in Vue.js 2 at the time of writing. The most commonly used hooks are: created, beforeMount, mounted, and destroyed.
beforeCreatecreatedbeforeMountmountedbeforeUpdateactivateddeactivatedbeforeDestroydestroyederrorCaptured
Below is an easily digestible graph that is on the Vue.js documentation website.
You use lifecycle methods like any other instance property.
app.js
varvm=newVue({el:'#app',data:{...},beforeMount(){console.log('I am executed before the component or instance is mounted!');},mounted(){console.log('I am executed when the component or instance is mounted!');},destroyed(){alert('I am defeated!');}});
Understanding Directives
Directives are a direct take away from AngularJS. If you’ve worked with AngularJS before then directives are second nature.
Vue.js comes pre-packaged with a few directives that help you render data to your view. You can create custom directives, however, these pre-packaged directives are the only directives you’ll need about 99% of the time. Although, it’s nice to have the option.
Below is a list of directives that can be used with Vue.js out-of-the-box. All directives are prefixed with v-.
v-for*v-show*v-if*v-else*v-else-if*v-textv-htmlv-on*v-bind*v-model*v-prev-cloakv-once
Note: Starred (*) directives are the more common directives you will most likely use.
The v-for Directive
The v-for directive is used to iterate through data in your view. In vanilla JavaScript, you would use a loop of some kind like forEach to iterate through data. However, in your view, there will be plenty of times where you want to display text for each item in an array.
app.js
varvm=newVue({el:'#app',data:{bands:['Green Day','Nirvana','Foo Fighters','The Beatles','Blink-182','Pearl Jam'],},});
In this example, we have an array called bands that has a total of six bands. To display each band as a list item in an unordered list, you can use v-for to iterate through this data.
index.html
<divid="app"><ul><liv-for="band in bands">{{ band }}</li></ul></div>
You should see an unordered list with all six of the rock bands:
- Green Day
- Nirvana
- Foo Fighters
- The Beatles
- Blink-182
- Pearl Jam
The v-show Directive
The v-show directive is pretty straightforward; it displays an element based on a condition.
app.js
varvm=newVue({el:'#app',data:{airports:[{code:'CVG',country:'USA',},{code:'YYZ',country:'Canada',},{code:'SEA',country:'USA',},{code:'CDG',country:'France',},{code:'DCA',country:'USA',},],},});
In this example, we use the string "Airport {{ code }} is in the United States." to display if the country of that airport is equal to “USA.”
index.html
<divid="app"><divclass="airport"v-for="airport in airports"><p>{{ airport.code }}<p><pv-show="airport.country === 'USA'">Airport<strong>{{ airport.code }}</strong>is in the United States.</p></div></div>
The string should only display for airports CVG (Cincinnati, OH), SEA (Seattle, WA), and DCA (Washington, D.C.).
Note: The v-show directive will still render every paragraph to the DOM even if the condition is not met. If the condition is not met, the paragraph will just be hidden.
The v-if, v-else, v-else-if Directives
The v-if, v-else, v-else-if directives are some of the most useful and common directives, in addition to v-for. These directives will render the element if a condition is met. These are similar to v-show and when checked with v-if, the element will not even render to the page. This the preferred way to conditionally render something to your view. Plus, you can use v-else and v-else-if in conjunction with it.
If you use the airport example from above, we have more information based on the airport’s country.
index.html
<divid="app"><divclass="airport"v-for="airport in airports"><p>{{ airport.code }}<p><p>Airport<strong>{{ airport.code }}</strong><spanv-if="airport.country === 'USA'">is in the United States.</span><spanv-else-if="airport.country === 'Canada'">is in Canada.</span><spanv-else>is in France.</span></p></div></div>
The v-on Directive
This directive declares a method to run on a specific event such as click, keyup, or submit, to name a few. The event and the directive are separated by a colon (:). The directive can accept a function or a string that is mapped to the function name in the methods property.
index.html
<divid="app"><buttonv-on:click="showAlert">Show Alert</button></div>
app.js
varvm=newVue({el:'#app',methods:{showAlert(){alert('This was triggered by using the v-on directive!');},},});
Using the Shorthand Syntax
You can also use the shorthand syntax for v-on, which is the “at sign” (@). Every example in this book moving forward will be using the shorthand syntax.
<divid="app"><button@click="showAlert">Show Alert</button></div>
The v-bind Directive
The v-bind directive is used when you need to “bind” or connect your view to some data in your Vue instance or component. You may be trying to add an alt tag to an img with a description from your instance’s data. If so, you need to bind that attribute to the data.
There will be many times when you’ll need to bind an attribute to data. As stated above, one of these examples might be giving an img an alt attribute or even a src.
To bind that attribute to data, use the v-bind: directive.
index.html
<divid="app"><imgv-bind:src="imageSrc"v-bind:alt="altText"></div>
app.js
varvm=newVue({el:'#app',data:{imageSrc:'path/to/image.jpg',altText:'The Cincinnati Skyline as seen from Newport, Kentucky.',},});
Vue.js comes pre-shipped with a shorthand syntax for v-bind: the colon (:). Every example in this book moving forward will be using the shorthand syntax.
Using the Shorthand Syntax
<divid="app"><img:src="imageSrc":alt="altText"></div>
That’s a lot easier to read!
Event Handling
At this point, this chapter has referenced only the click event, however, there are many more. Event handlers must be bound with v-bind or @ if you are to reference a function in your Vue Instance.
index.html
<divid="app"><button@click="showAlert">A Call to Action Button</button></div>
app.js
varvm=newVue({el:'#app',methods:{showAlert(){alert('Hey, look at me!');},},});
Since the click event was registered via v-bind or @ to the button, clicking on that button will display an alert to the user. You can even pass arguments into the click event inline:
index.html
<divid="app"><button@click="showAlert('Some string.')">A Call to Action Button</button></div>
app.js
varvm=newVue({el:'#app',methods:{showAlert(string){alert(string);},},});
This will display an alert with the text, “Some string.” Other events include submit and keyup. With submit, executing a method when an HTML <form> has been submitted.
<form@submit="someFunction">...</form>
Event Modifiers
Event modifiers are pre-set modifications that you can chain to your event listener via dot notation. There will be times (especially with single page applications) where you need to use stopPropogation(). You can do this very easily with Vanilla JavaScript, but Vue.js makes event modifiers very easy. The stopPropogation() method can be recreated with @click.stop="functionName".
Other modifiers include:
.prevent.capture.self.once.passive
You can also chain multiple modifiers to a single event.
<button@click.stop.prevent="functionName">Some Button Text</button>
Key Modifiers
Not only can you listen for an event, but you can also listen for specific keys that have been pressed. Again, you can do this is Vanilla JavaScript, but Vue.js makes this a whole lot easier. These key modifiers allow you to specify which key event you want a function to run. For example, if you want to run a function when the enter key is pressed and released, just use @keyup.enter.
<button@keyup.enter="someFunction">Button Text</button>
Other pre-defined key modifiers include:
tabdelete(bothdeleteandbackspace)escspaceupdownleftright
If you wish to run a function when a specific key is pressed, you will need to obtain the key code of that specific key. There are a lot of resources out there for you to get the key code. If you don’t want to look through a long list of codes, you can visit Keycode.Info and get the key code by pressing the key you want to listen to.
For example, if you want to listen to the shift key, you can add a keyup modifier to listen to the keycode, 16.
<button@keyup.16="someFunction">Button Text</button>
One last thing about keyup events. You can even register or map a specific key to an event. You can do so easily with:
Vue.directive('on').keyCodes.f1=112;
This custom event will register the F1 key to @keyup.f1. The f1 of the registration is a friendly name and can be anything that is meaningful to you.
Conclusion
This is just a brief overview of Vue.js. As stated before, a Vue.js introduction can be a whole book within itself, but I hope this provides you with a general overview of this fun and progressive framework. I strongly encourage you to check out the official documentation, which is maintained by Chris Fritz, Sarah Drasner, and the rest of the Core Team.
Whether you are an experienced Vue.js developer, or if this was your first introduction, there’s a lot to love about Vue.js and its ecosystem. You should now be better equipped to delve into other tools and frameworks like VuePress, NativeScript for Vue, and Nuxt.js.
Please note, from this chapter on, this book is going to be using ES6, and single file components from the Vue.js template that is generated from Vue CLI 3; which will be discussed in the next chapter.