In this chapter, we will cover the following recipes:
Preparing our VCM deployment – installing SQL
Preparing our VCM deployment – installing and configuring IIS
Preparing our VCM deployment – configuring SSRS
Preparing our VCM deployment – installing other prerequisites
Installing VCM – single-tier deployment
Installing VCM – two-tier deployment
Installing VCM – three-tier deployment
VCM post-installation tasks – database fine-tuning
What is vRealize Configuration Manager (VCM) and what it can do for you?
vRealize Configuration Manager is a complete configuration management solution provided by VMware. This is a part of the vRealize Operations suite along with vRealize Operations Manager, vRealize Hyperic, and vRealize Infrastructure Navigator, to name a few. Being a part of the suite, VCM is responsible for compliance and patch management, these being its core functionalities.
VCM is a tool that collects data automatically from managed machines, which may be running Windows or Unix, and virtualization tools such as vCenter, vShield, and vCloud Director, and based on that data, VCM can perform compliance checks and help you manage your virtual machines from the console.
VCM can perform the patching of managed machines, which may either be physical or virtual, and Windows and many flavors of Unix/Linux are supported, such as Red Hat Enterprise Linux (RHEL), SUSE, CentOS, and Mac OS. To patch these operating systems, we need a RHEL server acting as a patch repository. For non-windows servers, this RHEL patch repository downloads the patches, and all the managed machines can come and download them over HTTP, HTTPS, FTP, or NFS. VCM can patch all the supported versions of Windows.
You can download various compliance packs created by VMware and others. Just download and import them, and they will be ready for use with your managed machines. The packages include but are not limited to security best practices developed by the Defense Information Systems Agency (DISA), the National Institute of Standards and Technology (NIST), the Center for Internet Security (CIS); regulatory mandates such as Sarbanes-Oxley (SOX), the Payment Card Industry (PCI) standard, the Health Insurance Portability and Accountability Act (HIPAA), and the Federal Information Security Management Act (FISMA); and hardening guidelines from VMware and Microsoft.
You not only can check the compliance of your infrastructure but also enforce it to enhance your compliance score. Enforcing compliance means VCM can make necessary changes to the server to make it compliant.
This does not limit you from creating your own rules and compliance templates; you can either create a completely new rule or combine rules from various rulesets provided by VMware.
VCM can be used to install an operating system on bare metal, or you can deploy a virtual machine. You can use VCM to deploy applications on managed machines, which is limited to Windows. With features such as VCM Remote Client, you can manage communication and management mechanisms for mobile Windows machines as they connect to and disconnect from the network.
With the vRealize Operations (vROps) Manager Management Pack, you can push the compliance score of managed virtual machines to the vROps console. vROps is a monitoring solution from VMware used to monitor virtual infrastructure; pushing the compliance score to the console gives us the view of the infrastructure under one console. Also, if required, an alert can be configured if the score goes beyond a certain limit.
Along with all this, we can use VCM to manage Active Directory. VCM for Active Directory collects Active Directory objects across domains and forests and displays them through a single console. The information is consolidated and organized under the Active Directory slider, allowing you to view your Active Directory structure, troubleshoot issues, detect changes, and ensure compliance.
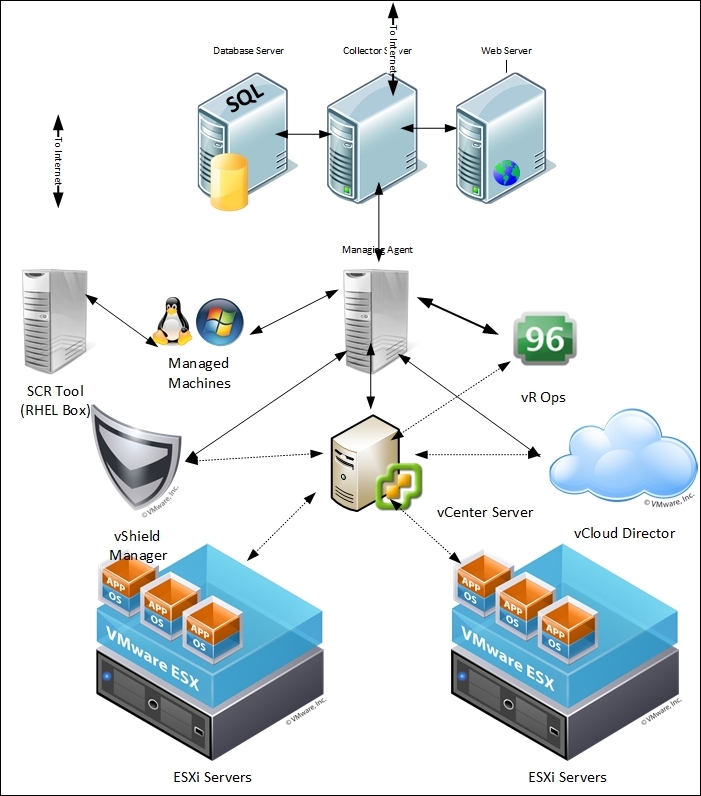
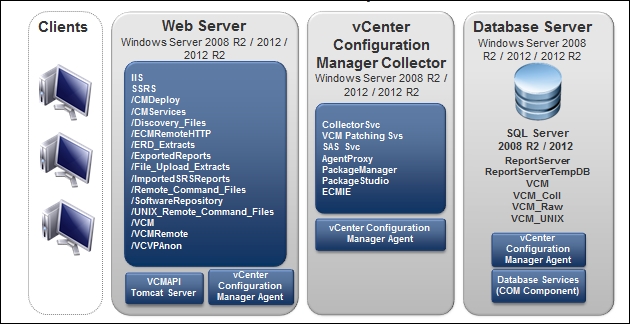
VCM is an application composed of multiple components, as described in the following figure:
The database server contains the VCM, VCM_Coll, VCM_Raw, and VCM_UNIX databases. Using a shared SQL Server instance is supported by VCM. However, VCM makes heavy use of SQL Server for query and transaction processing. You must ensure that you have or can add enough capacity to a shared SQL Server instance so that VCM and any other databases on the shared server do not experience poor performance.
VCM operates with the Standard, Enterprise, or Datacenter editions of SQL Server. You must install the 64-bit SQL Server 2008 R2, 2012, or 2014 versions on the database server used by VCM.
The SQL Server license must include SQL Server Reporting Services (SSRS), which is used by VCM for the reporting feature.
The VCM Collector is a standalone application that can run even when no other VCM components are active. This is particularly useful in the case of scheduled collections, because it means the VCM Portal does not have to be up and running. The Collector has all the necessary information and capabilities to perform the requested functions. You can stop the Collector and still look at data as the UI does not interact directly with the collector service; instead, it communicates with various executables that are installed on the same machine as the Collector.
Windows patches will be hosted on the VCM Collector as per the default configuration. Linux patches will be handled by the Standby Continuous Replication (SCR) server. We will have a look at Linux patching in Chapter 3 , Linux Patching.
Supported operating systems for installing the VCM Collector are Windows Server 2008 R2, 2012, or 2012 R2. The VCM Collector must be installed on a AD domain member.
We will discuss the installation of the VCM Collector server in multiple recipes in this chapter.
The web server contains web applications such as IIS and SSRS, other services, and VCM software components. Before you install VCM, you must configure the web server. The Windows machine that hosts the web components must be running Internet Information Services (IIS) 7.5. Supported operating systems to install the web server to are Windows Server 2008 R2, 2012, or 2012 R2.
We will discuss the installation and configuration of the web server in the Preparing our VCM deployment - installing and configuring IIS recipe.
We need to install an agent to manage the machines through VCM. In the case of vCenter Server, vCloud Director, and vCloud Networking and Security Manager, VCM uses an intermediary managing agent for data collection. This intermediary collects data through the use of the vSphere VIMAPI, vCloud REST API, and vCloud Networking and Security Manager REST API, and it then passes it to VCM Server.
We need to install VCM agent 5.5 or higher on the system designated as being the managing agent. However, after the agent deployment, there is an additional step. Mutual two-way trust must be established with the system designated as the managing agent before the collection of any vCenter, vCloud Networking and Security, or vCloud Director data can be done.
The vCenter collection process via the managing agent is serial and very CPU intensive. For this reason, a separate managing agent is recommended for virtual infrastructures. If the number of vCenter or vCloud Server instances increases, the number of managing agents can be horizontally scaled.
We will see this in action in the Chapter 2, Configuring VCM to Manage Your Infrastructure, in the Configuring a managing agent machine for virtual environment management recipe.
To ensure that all patch dependencies are met when VCM deploys the patches, the SCR Tool downloads all of the necessary patches (except for patches that have been superseded by newer patches). VCM patching handles all the dependencies when the patches are deployed. If the patch was available when the SCR Tool was installed and configured, it would have been downloaded. If the patch was not available when the SCR Tool was last synchronized, it would not have been downloaded and hence not available for distribution to managed machines. If the patch is still available from the OS vendor, it will be available for download using the SCR Tool patch-replication process. The SCR server does not share or sync the details of the patches downloaded by it; VCM gets the details of the released patches from http://www.vmware.com/ . So, we need to make sure is fully synced with vendors such as RHEL or SUSE and has all the patches downloaded in the repository.
The SCR Tool is not used to run patch assessments or deployments. It also does not assess the machine configuration or the downloaded patch content that is used for patch deployment. That job is done by the VCM server.
The SCR Tool downloads the patch signature files and OS vendor patch content from the content distribution network (CDN) and downloads subscription-only content from the OS vendor's content web sites. We will look at this in more detail in Chapter 3 , Linux Patching.
Depending upon the size of the infrastructure you manage, VCM can be deployed in multiple ways.
If you plan to install VCM on two or three tiers, check out this link for how to size your hardware environment: http://kb.vmware.com/kb/2033894 .
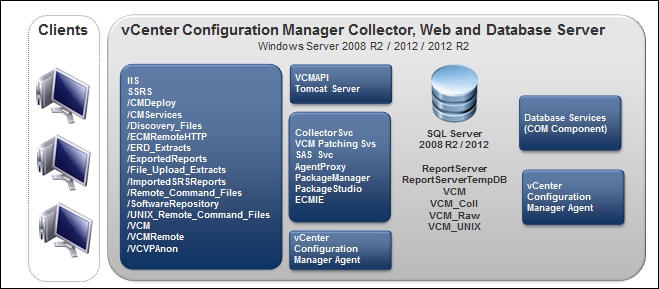
A single-tier installation can be used by organizations smaller than 2,000 managed servers and POC/pilot engagements.
All the components, such as the VCM Database server, web server, and the VCM Collector, are installed on the same server, like this:
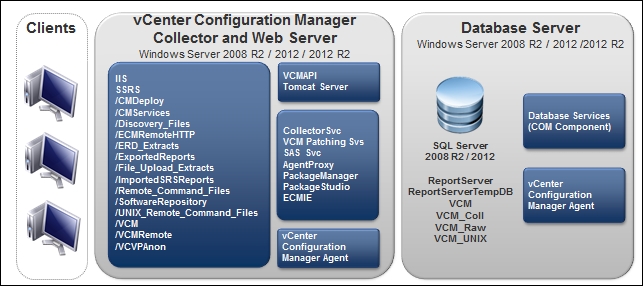
A two-tier installation can be used by organizations where the number of managed servers is between 2,000 and 5,000.
In this deployment, we have the application server (Collector) and IIS on one machine, SQL Server instance on the other machine, and SSRS on either system, as shown here:
A three-tier installation can be used by organizations with more than 5,000 servers. It is constructed in this manner:
The application server (Collector), IIS, and SQL Server instance are on separate machines
SSRS can be either on the IIS or the SQL Server system
This figure depicts a three-tier installation:
Every software application we install has its own requirements for successful installation and functioning. VCM is no different. In this section, we will discuss the hardware and software requirements for getting VCM deployed.
We need the following software to install VCM:
|
Software component |
Versions supported |
|
Operating system for VCM Web, Collector, and Database server |
Windows Server 2008 R2, Windows Server 2012, or Windows Server 2012 R2 |
|
SQL version |
SQL Server 2008 R2, 2012, or 2014 Standard, Enterprise, or Datacenter Edition (64-bit) |
|
SSRS version |
SQL Server 2008 R2, 2012, or 2014 Reporting Services |
|
OS for SCR* |
RHEL 7.x |
(*SCR: software content repository. It is used to download and store patches for non-Windows operating systems)
Hosting the VCM has some hardware requirements as well, which are provided in the following tables:
Minimum hardware requirements to support 1-1,000 managed machines:
|
Single Tier |
2-Tier
Database |
2-Tier
Web/Collector |
3-Tier
Database |
3-Tier
Web |
3-Tier
Collector | |
|
RAM |
8 GB |
8 GB |
4 GB |
8 GB |
4 GB |
4 GB |
|
Processor |
Dual Xeon or single dual-core 2 GHz |
Dual Xeon or single dual-core 2 GHz |
Dual Xeon or single dual-core 2 GHz |
Dual Xeon or single dual-core 2 GHz |
Single 2-GHz processor |
Single 2-GHz processor |
Minimum hardware requirements to support 1,001-2,000 managed machines:
|
Single Tier |
2-Tier
Database |
2-Tier
Web/Collector |
3-Tier
Database |
3-Tier
Web |
3-Tier
Collector | |
|
RAM |
12 GB |
12 GB |
4 GB |
12 GB |
4 GB |
4 GB |
|
Processor |
Quad Xeon or two dual-core 2 GHz |
Quad Xeon or two dual-core 2 GHz |
Quad Xeon or two dual-core 2 GHz |
Quad Xeon or two dual-core 2 GHz |
Single 2-GHz processor |
Dual Xeon or single dual-core 2 GHz |
Minimum hardware requirements to support 2,001-5,000 managed machines:
|
Single Tier |
2-Tier
Database |
2-Tier
Web/Collector |
3-Tier
Database |
3-Tier
Web |
3-Tier
Collector | |
|
RAM |
16 GB |
16 GB |
8 GB |
16 GB |
4 GB |
8 GB |
|
Processor |
Eight-way Xeon or four dual-core 2 GHz |
Eight-way Xeon or four dual-core 2 GHz |
Dual Xeon or single dual-core 2 GHz |
Eight-way Xeon or four dual-core 2 GHz |
Single 2-GHz processor |
Dual Xeon or single dual-core 2 GHz |
Let's look at the list of accounts and the privileges required for VCM to work properly.
You can reuse an account for more than one function, but dedicated accounts might be useful for troubleshooting and tracking.
The Collector, VCM Remote, Tomcat, and vSphere Client VCM plug-ins can be used from the same account. If you reuse one account, apply the permissions shown for the Collector service account.
|
Role |
Permissions |
Description |
|
VCM Administrator |
(During installation only) Local admin access on the VCM Collector and Web server.
(During installation only) System admin access to the VCM SQL Server instance on the database server.
This must be an interactive account and separate from the other accounts in this table. |
The VCM Administrator account is the login account used when installing VCM and possibly post installation for the administration and maintenance of VCM. |
|
VCM Collector Service |
Local admin access on the VCM Collector and Web servers.
This is not a domain administrator or interactive user account. |
The Collector service account is the account under which the VCM Collector, VCM Database, and VCM Patch Management services run. During installation, VCM configures the Collector service account with DBO and bulk insert rights in SQL Server for the VCM databases. |
|
VCM Remote Service |
Local admin access on the VCM Web server.
This is not a domain administrator or interactive user account. |
The VCM Remote service account is used by the VCM Remote client for anonymous access to the VCM Remote virtual directory on the Web server. |
|
VCM Tomcat Service |
Local admin access on the VCM Database server.
Public access on VCM databases.
This is not an interactive user account. |
The Tomcat service account serves as the VCM application programming interface for SQL login to the E12VCM Database server. |
|
vSphere Client VCM Plug-in Service |
Local admin on the VCM Web server.
This is not an interactive user account. |
The vSphere Client VCM Plug-In (VCVP) account provides vSphere access over HTTP to VCM managed machines.
The VCM Advanced Installation option prompts for credentials for the VCVP account. Typical Installation does not. |
|
VCM Default Network Authority |
Local admin access on Windows machines that VCM collects from using the DCOM agent.
Depending on the enterprise size and for convenience, a separate, domain administrator account with rights on the Windows machines.
This is not an interactive user account. |
The network authority account is for data collection from DCOM Windows machines. |
Tip
IMPORTANT: Never use the service accounts for logging in to the VCM Console or for any other purpose. Logging in to VCM using a service account can lead to unexpected or inconsistent behavior. Services that use the same account as a logged-in user might modify the logged-in user's current role or machine group or log the user out of the system.
If for some reason you don't get a local admin account to be used as the NAA, you need at least the privileges mentioned in the following table. For VCM to make changes on licensed machines, such as rebooting and managing audit settings, the account used to interact with the VCM agent needs the following permissions and rights on each licensed machine:
|
Action |
Required user right |
|
Emergency repair disk |
Back up files and directories |
|
NTFS permissions |
Manage auditing and security logs |
|
Reboot |
Shut down the system, force shutdown from a remote system |
|
Services change |
Shut down the system |
|
Share permissions |
Manage auditing and security logs |
To check or set the appropriate rights on each machine, you can use either of these:
Local security policy: Security Settings | Local Policies | User Rights Assignment
Group Policy plugin: Local Computer Policy | Computer Configuration | Windows Settings | Security Settings | Local Policies | User Rights Assignment
There are four databases created by VCM; there is a list of them along with their purpose in the following table. The databases are created when we deploy VCM using the installer.
|
Database name |
Minimum size |
Purpose |
|
|
3 GB |
This contains configuration data for the VCM application itself, collected data from Window systems and virtual infrastructure, change details from all systems, and results of patch and compliance assessments. The base name |
|
|
1 GB |
This provides operational state information for the Collector service and is mainly used to track details of running jobs and the last contact state of managed client systems. |
|
|
1 GB |
This contains the collected managed machine data gathered from any Linux, Unix, or Mac agents in the environment. |
|
|
1 GB |
To improve performance, this database temporarily holds collection data before it is transformed into the |
The list of OSes supported by VCM is as per the following table, but this is not a comprehensive list.
You can take a look at the Hardware and Operating System Requirements for VCM Managed Machines chapter of the VMware vRealize Configuration Manager Installation Guide ( http://www.vmware.com/pdf/vrealize-configuration-manager-58-installation-guide.pdf ) for the complete list.
|
Supported operating system |
Supported hardware platform |
|
Microsoft Windows Server 2003 SP2 |
x86 and x64 |
|
Microsoft Windows Server 2008 R2 Enterprise Gold |
x64 |
|
Microsoft Windows 7 Enterprise Gold |
x86 and x64 |
|
Microsoft Windows 8.1 Enterprise |
x86 and x64 |
|
Microsoft Windows Server 2012 R2 Datacenter |
x64 |
|
Red Hat Enterprise Linux 5.0-5.11, 6.0-6.5, and 7.0
(x64) Server, Desktop with Workstation, and Advanced Platform |
x86 and x64 |
|
SUSE Linux Enterprise Server (SLES) 10.0-10.2 (up to agent version 5.5.0 only)
SUSE Linux Enterprise Server (SLES) 10.3-10.4, 11.0-11.3, and 12 |
x86 and x64 |
|
Windows 10 |
x86 and x64 |
The following table shows the port and protocol requirements for proper functioning in the environment:
|
Source |
Target |
Port and protocol |
Description |
|
Managing agent |
vCloud Management vCenter |
HTTPS: 443 |
The web service connection to the vCenter API.
Valid credentials and certificate thumbprint are required. |
|
Managing agent |
vCloud vCenter |
HTTPS: 443 |
The web service connection to the vCenter API.
Valid credentials and certificate thumbprint are required. |
|
VCM Collector |
VCM Database Server |
SQL: 1433 |
Windows authenticated connection. |
|
VCM Collector |
VCM Database Server |
DCOM: 135 |
DCOM is required between the Collector and the DB Server in a two-tier configuration so that the DB server can call back to the Collector at the end of various jobs. |
|
VCM Collector |
VCM Database Server |
SMB: TCP ports 139 and 445 |
VCM creates a share to the DB server during installation. |
|
VCM Collector |
VCM Database Server |
HTTP: 80 |
An SSRS connection from VCM Server to the DB SSRS instance. |
|
VCM Collector |
VCM Database Server |
ICMP |
Login details are not sent to the agent.
Mutual authentication is used and the agent runs under LocalSystem. Data is pulled back to the Collector over a new TLS session. |
|
VCM Collector |
Agent |
HTTP: 26542 |
Login details are not sent to the agent.
Mutual authentication is used and the agent runs under LocalSystem. Data is pulled back to the Collector over a new TLS session. |
|
VCM Collector |
Agent |
ICMP |
Login details are not sent to the agent.
Mutual authentication is used and the agent runs under LocalSystem. Data is pulled back to the Collector over a new TLS session. |
|
VCM Collector |
Agent |
SMB: TCP ports 139 and 445 |
This is a mapped driver for Windows patch downloads. |
|
Agent software |
RedHat Patch Server |
HTTPS: 443/80 |
This depends on how you have configured Apache, which will be used to download patches from the patch repository. |
vRealize Operations is available with two license models:
Per processor with unlimited VMs: For virtual environments with high consolidation ratios, vRealize Operations is available per processor as a part of VMware vRealize Suite, VMware vCloud Suite, and VMware vSphere with Operations Management.
Per virtual machine or physical server: For virtual environments with low consolidation ratios, vRealize Operations is also available à la carte in 25 VM or OS instance license packs.
The new release, VCM 5.8.2, supports Hybrid Cloud Suite license keys, as VCM will not be part of vCloud Suite anymore. This keeps changing; you can contact VMware for current pricing details or check out more details here: https://www.vmware.com/products/vrealize-operations/pricing .
VCM requires four databases on a dedicated SQL system. In this recipe, we will learn how to correctly install the SQL Server component.
Depending upon the deployment type we choose, we will need either a dedicated SQL Server (two- and three-tier deployment) or we can use the Windows server used for the VCM Collector server (single-tier deployment).
We will need an operating system-Windows Server 2012 (or better)-and SQL 2012.
For proof of concept or testing purposes, you can use shared SQL; or else, use dedicated SQL.
The steps to install SQL are the same for all the three types of VCM deployments–only the server will change depending upon the type of tier.
Note
As this is not a dedicated guide to installing and configuring SQL, we will not include all the screenshots; if you need further help, consult your DBA team for detailed instructions.
Follow these steps:
Start the SQL installer.
Under the installation menu, select New SQL Server standalone installation or add features to an existing installation.
Make sure all the setup support rules have been passed.
Ignore product update errors if you do not have an Internet connection.
Enter the product key.
Accept the EULA.
Under Setup Role, select SQL Server Feature Installation.
Select the following features:
Instance Features
Database Engine Service
Full-Text and Semantic Extractions for Search
Reporting Service - Native
Shared Features
Documentation Components
Management Tools - Basic
Management Tools - Complete
Choose the installation folder according to your server configuration.
Make sure all the installation rules have been passed.
Go with the default instance and again change the installation folder location if required.
It is always better to use a service account to run SQL services, and you need to have a domain account if you will be installing a two- or three-tier VCM instance.
Note
In a multi-tier VCM deployment, the database is on a different server, and we need a domain service account so that SQL can communicate over the network.
Provide the correct service accounts to the SQL installation wizard.
The collation setting supported by VCM is
SQL_Latin1_General_CP1_CI_AS; make sure this is selected.Add the SQL admin group from Active Directory. Depending on company policy, enable Mixed mode and provide the
SAaccount with a password.For reporting services, we will be only installing SSRS and not configuring it.
Follow the wizard and install SQL.
SQL will host all the four databases required for VCM. We don't need to create or configure any database right now; they will be created when we install VCM. We will need special permissions for SQL Server, as previously stated in the Service accounts subsection.
Also, all activities such as compliance check and patch status for a machine are performed using the data available in the database, so this puts extra workload on the database, which highlights the need for a dedicated SQL Server. All the schedules are stored as SQL jobs in SQL, putting another layer of work pressure on the SQL Server.
VCM uses SSRS to host the reporting feature; we installed SSRS as well while deploying SQL, and in the following recipes we will configure it.
Another important part after the SQL database is IIS. A VCM application is a web-based portal connected to a database, so all the actions are performed via the web interface, which needs IIS. In this recipe, we will install and configure IIS.
Again, depending upon the type of VCM deployment, you either need dedicated servers (two- or three-tier) or a single VCM server (single-tier) installation. We will need Windows Server 2012 R2 to start with the recipe.
As seen in the first diagram in this chapter (in the Understanding VCM components subsection) and the Distributed VCM deployment subsection, the placement of IIS changes according to the type of deployment.
The web components of VCM Collector contain web applications such as IIS and SSRS, other services, and VCM software components. Before you install VCM, you must configure the web components of VCM Collector.
Note
We will cover the installation process on Windows 2012 R2. Installation on Windows 2008 might differ.
Follow these steps to install IIS:
Log in to the IIS server and launch Server Manager. Go to Manage |Add roles and features.
Add the Web Server (IIS) role.

Add the .NET Framework 3.5 feature.
Add the following components:
Sr. no.
Option
Action
1
Common HTTP features
Static Content
Default Document
Directory Browsing
HTTP Errors
HTTP Redirection
2
Application development
ASP.NET
.NET Extensibility 3.5
.NET Extensibility 4.5
ASP
ASP .NET 3.5
ASP .NET 4.5
ISAPI Extensions
ISAPI Filters
3
Health and diagnostics
HTTP Logging
Logging Tools
Request Monitor
Tracing
4
Security
Basic Authentication
Windows Authentication
Digest Authentication
URL Authorization
Request Filtering
IP and Domain Restrictions
5
Performance
Static Content Compression
Dynamic Content Compression
6
Management tools
IIS Management Console
IIS Management Scripts and Tools
Management Service
Provide a path to the Windows 2012 ISO if required.
Click on Install and let the installation begin; follow the wizard and make sure the installation is successful.
Once IIS has been installed, we need to configure it:
Click on Start and go to All Programs | Administrative Tools | Internet Information Services (IIS) Manager.
Expand <server name>, expand Sites, and click on Default Web Site.
In the Actions pane, under Manage Web Site and Browse Web Site, click on Advanced Settings.
Expand connection's Limits and set Connection Time-out (seconds) to
3600.Click on OK

IIS 7.5 provides a default website, which defines the default authentication settings for applications and virtual directories. Verify that the IIS 7.5 default website has the correct settings.
Follow these steps to configure IIS:
Click on Start and go to All Programs | Administrative Tools | Internet Information Services (IIS) Manager.
Expand <server name>, expand Sites, and click on Default Web Site.
In the Default Web Site home pane, locate the IIS options.
Double click on Authentication and set the authentication settings as follows:
|
Sr. no. |
Option |
Action |
|
1 |
Anonymous Authentication |
Set to Disabled. |
|
2 |
ASP.NET Impersonation |
Set to Disabled. |
|
3 |
Basic Authentication |
Set to Enabled. |
|
4 |
Forms Authentication |
Set to Disabled |
Your screen should look like this:

VCM uses IIS to host the web applications that present the data. The web applications relay the commands we give from the VCM console to the database, the operations are performed, and the end result is again presented on the console GUI. VCM creates multiple applications inside IIS that are required for VCM. CMAppPool and CMServices are IIS application pools used for VCM virtual directories and web services.
SSRS is used by VCM for providing the reporting functionality.
In this recipe, we will configure SSRS to be used by VCM; as this is not a dedicated SQL guide, it is recommended you consult your DBA team while configuring SSRS.
To avoid getting charged for multiple licenses of SQL, it is recommended you install SSRS on the same server as the database server, which is what we did when we installed SQL Server.
We will need SSRS installed on the database server before we start.
Connect to the database server with the service account credentials, launch Reporting Service Configuration Manager, and follow the wizard:
Connect to the SQL Server instance where the reporting service is installed. Provide the correct server name and instance.
On the Service Account page, in this case, use the same service account which will be used by the VCM service. Click on Apply.

On the Web Service URL page, select port
80and click on Apply.Under Database, click on Change Database and follow another wizard to Create a new report database. It involves these steps:
Select Create a new report server database.
Under Connect to the Database Server, provide these values:
Server Name: The SQL database server name
Authentication Type: Current User - Integrated Security
Use the default database name and language.
Under Credentials, use Service Credentials.
Accept the summary, click on Next and then on Finish on the next page to complete the database creation.
For the Report Manager URL tab, select Virtual Directory:
Reportsand click on Apply.We don't need the rest of the parameters for VCM; you can check with your DBA team if they need to configure them and, if so, what the best options for you are.
Write down the URL (we will need this when we install VCM).
There are a few other prerequisites that we need to install before we can actually start installing VCM. We will install them in this recipe.
We need Internet access to download the following installers if they are not already available. We need to install them on all the servers in the VCM hierarchy.
We need to install them in the same sequence, or else they won't get installed.
The following links are used in this book; they might change if you change the SQL version, such as those of SQL Native Client and SQL Command Line Utilities:
|
Sr. no. |
Description |
Download location |
|
1 |
SQL Native Client | |
|
2 |
SQL Command Line Utilities | |
|
3 |
SQLXML 4.0 SP1 |
http://www.microsoft.com/en-us/download/details.aspx?id=30403 |
This is a very simple installation and you just need to click on Next and Finish.
Just follow the sequence and install all the three utilities. You must install them on all the servers, that is, if you are deploying a three-tier VCM installation, these three must be installed on all the three servers.
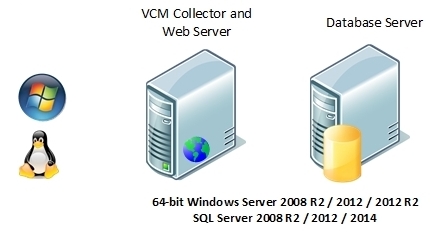
In this recipe, we will deploy vRealize Configuration Manager 5.8.2 on a Windows Server 2012 R2. As the title suggests, this is a single-tier installation; hence, all the VCM components will be installed on a single server. So, the VCM Database server, web server, and the VCM Collector components will reside on a single Windows Server 2008 R2, 2012, or 2012 R2 machine (in our case, Windows Server 2012 R2), which is referred to as the VCM Collector, as illustrated here:

In this case, we will need a single Windows Server 2012 R2 installation where we have already installed SQL, configured IIS, and installed all the prerequisites by following the previous recipes.
The VCM installer is available on http://www.vmware.com/ . You need to have an account on my.vmware.com to download the installer.
You need to have all the required service accounts ready in Active Directory, and they should have the permissions described in the requirements document of VCM. The server should be a part of the Active Directory domain, and you must log in with an AD account that is a local administrator on the server.
You need to log in with the account that you want to have VCM admin rights to, as the account that is used to install VCM gets full admin rights on the VCM application, so you can choose either your account or any specifically created VCM administrator account.
Download the installer from the Internet and copy it to the VCM server. Then, follow these steps:
Mount the ISO and start the installation wizard by double clicking on
setup.exe. Select Typical Installation.
Read and accept the license agreement and select "I am an authorised agent and/or representative of the customer/end user" and "I have read the terms and conditions stated above".
It will perform the prerequisite checks and run a few tests for that; once the tests are complete, select View full results of prerequisite check.

The results will be launched in Internet Explorer and check whether there are any errors and/or warnings; you can install if there are any warnings but can't proceed if there are errors.
Once you see any error, you can drill down by clicking on the error link in the report; it will then tell you why you faced the error.
In our case, we had not installed the ServerSideIncludes IIS role service, as shown in the following error report:

After installing the missing component, we can resume the installer.
In the next step, we need to provide the following details:
VCM Database Server (a local or a remote SQL Server instance): The same server where we are installing as this is a single-tier installation.
SQL Server Reporting Services WebService URL: You must have noted this down while configuring SSRS; if not, go and launch the SSRS configuration wizard to check the URL. The default is
http://<Server-Name>/ReportServer.

Click on Validate... under SSRS Web service, and provide the following information:
Database Server: The hostname of the SSRS server
Domain: The Active Directory domain
User Name: The account to be used to can connect to the SSRS instance
Password: Password for the user
Port: The port configured while configuring SSRS
Virtual Directory: Configured while configuring SSRS
Click on Validate and make sure the validation is successful.
After you fill in the details, the screen should look like this:

Enter the license key, provide the service account username and password, and click on Validate.
Provide the installation path.
Select Use HTTPS. By default a self-signed certificate will be generated. Select an alternate certificate here.
It will autogenerate a certificate; if you want, you can add your own certificate here:

The installation can take upto an hour, depending upon the configuration of the server.

Once it is complete, launch the console using
https://<IP or Hostname of Collector>/VCM.As mentioned at the start of the recipe, only the account that has access to the VCM console is the one that is used for installation; we can add another users later.
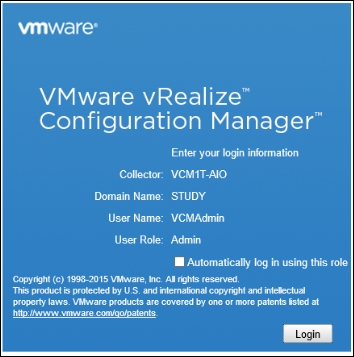
Click on Login, and you will be presented with the VCM console for the first time:

We are installing VCM on a single server where we have already installed SQL, SSRS, and IIS. This console can then be used to manage the entire infrastructure. We will use this console to perform patching, checking compliance, publishing software exporting reports, and a lot more in the upcoming chapters.
As you now know, VCM depends on SQL, and if we have a medium-sized infrastructure, it becomes too much load–the SQL, SSRS, web, and Collector server components–to carry on a single server. We can split the load in two by moving SQL databases to a dedicated server and the web and Collector components on another server.
This is how the two-tier deployment will look:
We will need two servers; on one, SQL Server 2012 should be installed with SSRS, and SSRS should be configured as per previous recipes.
Install all the prerequisites on both the SQL and Collector servers. Have all the mentioned service accounts ready and firewall ports open wherever required.
Install and configure IIS as per the Preparing our VCM deployment - installing and configuring IIS recipe.
As this is a two-tier VCM deployment recipe, you must have guessed that we need to perform the installation on two servers–not exactly correct; we just need to install SQL, configure SSRS, and install the prerequisites on the SQL Server; all the action happens on the VCM Collector server.
Log in to the collector server with a domain account that has local admin privileges; this is the account on which you want to have admin access on the VCM application.
Copy the downloaded ISO to the server and mount it.
Start the installation by double-clicking on setup.exe on the installer disk, and follow the wizard to install VCM, like this:
In this recipe, we will choose Advanced Installation.
Click on Next for the introduction page.
Click on Next for the patent information page.
Read and accept the license agreement and select "I am an authorised agent and/or representative of the customer/end user" and "I have read the terms and conditions stated above".
Under Select Installation Type, select the following:
VMware vRealize Configuration Manager
VCM Web Console
VCM Collector Components
Tools
ImportExport Utility
Foundation Checker
VMware VCM Package Manager for Windows
VMware VCM Package Studio

The installer will perform a prerequisite check and present the results; after the checks are successful, click on Next; if there are errors, click on View Results, remedy any errors and warnings, and perform a recheck.
Do not proceed further unless there are no errors; you can proceed if there are warnings, but it is not recommended. This is what a successful check looks like:

On the next page, enter the serial key.
On the Configure Components page, provide the hostname of the SQL Server and enter
VCMas the database name; click on Validate.If the validation is successful, it will provide you with the path for the data and log files, along with the Size and Auto Grow options. You can go with the defaults.

On the next page, provide the Tomcat service account and its password.
On the next page, provide the URL in WebService URL; credentials to validate the details include the Domain, User Name, and Password. Click on Validate. Accept the warning about insecure SRS, as we had configured it with port
80.
Provide the path to install the web console to.
Provide a URL to the application; the default
/VCMis a good option.We can provide an SMTP address; the default is the collector server. If you don't know it now, it can be configured in the VCM console.
Provide a path to install the collector component to, and accept the SSL3 warning.
Provide a path to store the staging data to; this is the path where data is temporarily stored before being added to the database.
Provide the details of the Collector service account. This account will be given rights to log in as a service; accept the confirmation dialog.
Provide details of network authority accounts. We can add as many accounts as we want later, but we need at least one for the time being. More details about this can be found in the Service accounts subsection of this chapter's introduction.
The next page is about certificates. Click on Generate and then on Next.

On the next page, which lets you select domains to run the discovery, select specific NetBIOS and AD domains.
Note
If you have multiple AD or NetBIOS domains, it will take more than 24 hours to detect all the domains, and the installation could eventually fail. To avoid such a scenario, select a few domains to start with and add the rest of them once VCM is ready.

Provide details about the virtual directory and credentials to access it.
Provide the credentials for the Virtualization Client plugin.
On the next page, provide the path to install package manager components to.
On the next page, provide the path to the local package cache.
On the next page, provide the path to the software repository and local cache.
Provide the name of the virtual directory.
Provide the path to the Package Studio components.
Finally, we will have reached the summary page; check the options and click on Install.

Log in to the portal and make sure the installation was successful.

We installed VCM on two servers; we had already installed SQL and SSRS on the SQL Server, while IIS for the web and collector components are on the Collector server. The console can then be used to manage the infrastructure. We will use this console to perform patching, compliance checking, publishing software exporting reports, and a lot more in upcoming chapters.
So far, we have covered installing VCM on single and two-tier systems. There will be times when these are not sufficient, and you have a larger infrastructure to manage. To provide services to such large infrastructures, we can share the load across three tiers, namely, the database, web, and collector servers. In this recipe, we will install VCM on three different servers.
This is how the three-tier deployment will be configured:
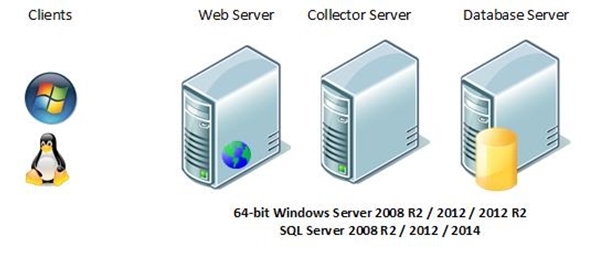
We will need three different servers to install the database, web, and collector components of the VCM server to.
We need all the prerequisites installed on all three servers. We should have all the mentioned service accounts ready, and firewall ports should be open wherever required.
IIS needs to be configured on the web server only.
SQL Server must be installed and SSRS configured as per previous recipes.
Even though this is a three-tier installation, we don't need to do much on the SQL Server; in addition to installing SQL Server 2012, we need to install the SQL Native Client, SQL Command Line Utilities, and SQLXML 4.0 SP1.
We will look at the web and collector servers in detail.
Let's cover the web server first.
We need to log in to the web server with a domain account that has local administrative privileges. Mount the VCM ISO and double-click on setup.exe on the installer disk. Follow the steps in the wizard to install the web component of VCM, as follows:
Select Advanced Installation, as this is a three-tier installation.
Click on Next for the introduction page.
Click on Next for the patent information page.
Read and accept the license agreement and select "I am an authorized agent and/or representative of the customer/end user" and "I have read the terms and conditions stated above".
Under Select Installation Type, select the following:
VMware vRealize Configuration Manager
VCM Web Console
Tools
VMware VCM Package Manager for Windows
VMware VCM Package Studio

Accept that you have intentionally chosen to split the installation by clicking on OK in the dialog box that pops up.
The installer will perform a prerequisite check and present the results. If the check is successful, click on Next; if there are failures, click on View Results, remedy any errors and warnings, and perform a recheck. Do not proceed further until there are zero errors.

On the next page, enter the serial key.
On the Configure Components page, provide the hostname of the SQL Server and enter
VCMas the database name; click on Validate.If the validation is successful, you will be provided with a path for the data and logfiles, along with the Size and Auto Grow options. You can go with the defaults.

On the next page, provide the Tomcat service account details and its password.
On the next page, provide the URL in WebService URL. Credentials to validate the details include the Domain, User Name, and Password. Click on Validate. Accept the SRS insecure warning as we had configured it with port
80.Provide the path to install the web console to.
Provide the URL to the application; it's okay to use the default value.
We can provide an SMTP address. The default is the collector server. If you don't know it now, it can be configured in the VCM console.
Provide the credentials for the Virtualization Client plugin.
On the next page, provide the path to install the package manager components to.
On the next page, provide the path to the local package cache.
On the next page, provide the path to the software repository and local cache.
Provide the name of the virtual directory.
Provide the path for the Package Studio components.
After this, you'll reach the summary page. Check the options and click on Install.

Click on Finish to exit the wizard.
This completes the web component installation; now, we have to perform similar steps on the Collector server.
Once you are finished with the web server, log in to the Collector server with a domain account that has local administrative privileges. Copy the ISO of the VCM installer from the downloaded location and mount it.
Double-click on the setup.exe file from the installer media mounted, and follow these steps to complete the wizard.
Start with Advanced Installation.
Click on Next for the introduction page.
Click on Next for the patent information page.
Read and accept the license agreement and select "I am an authorized agent and/or representative of the customer/end user" and "I have read the terms and conditions stated above".
Under Select Installation Type, select the following:
VMware vRealize Configuration Manager
VCM Collector Components
Tools
ImportExport Utility
Foundation Checker
VMware VCM Package Manager for Windows

Accept that you have intentionally chosen to split the installation–click on OK.
The installer will perform a prerequisite check and present the results. If the check is successful, click on Next; if there are failures, click on View Results, remedy any errors and warnings, and perform a recheck. Do not proceed further until there are zero errors.
On the next page, enter the serial key.
Provide the path to install the collector component to and accept the SSL3 warning.
Specify the same database server and database name used when you installed the web components.
Provide details of a Collector service account; this account will be given rights to log in as a service; accept the corresponding dialog box.
Provide details of network authority accounts. We can add as many accounts as we want later, but we need at least one for the time being. More details about this can be found in the Service accounts subsection of this chapter's introduction.
The next page is for certificates; click on Generate and click on Next.
On the next page, in order to select domains to run the discovery, select Specific NetBIOS and AD domains.
On the next page, provide the path to install package manager components to.
On the next page, provide the path to the local package cache.
You will now reach the summary page; check the options and click on Install.

On the final page of the wizard, click on Finish to close it and launch the VCM console.
Once connected to the console, you will be able to notice the difference in single and two-tier deployments versus a three-tier deployment.
Earlier, our collector and web server were the same, but now, the Collector is different from the web server. Of course, this is expected as we just finished installing them separately.

For larger environments, such as where we need to manage more than 2,000 machines, it is recommended to have a three-tier deployment. Here, the Collector acts as middleware between the frontend IIS web component and the backend SQL database component. This distributes load between all the three components.
In a three-tier installation, when you want to connect to the VCM console, you need to use a web server and not a collector server. So, the link will be something like this:
https://<Web Server IP/Hostname>/VCM
VCM relies heavily on its SQL databases for operation. You must update the default settings in order to optimize SQL Server performance. We will create a maintenance plan for VCM databases.
We will perform the fine-tuning at three different levels, as detailed in the following subsections.
To ensure that VCM runs at peak performance and requires little operator intervention during its lifecycle, set up a routine maintenance plan. Take a look at the VCM Administration Guide.
Open SQL Server Management Studio and connect to the VCM SQL Server instance. Then, follow these steps:
Right-click on the SQL instance that you installed and select Properties.
In the Select a page area, select Database Settings.
Configure the following settings:
Default index fill factor: Set the fill factor to
80%in order to keep 20% free space available in each index page
Tip
Note: This sets a percentage value for the amount of free space in each index page when the page is rebuilt. Set the fill factor to
80%to keep 20% free space available in each index page. This setting is part of the SQL maintenance plan wizard. If you configure the default fill factor using this setting, keep space free in an index when you run a maintenance plan.Recovery interval (minutes): Set the value to
5
Tip
Note: This configures the approximate amount of time that SQL Server takes to run the recovery process. The default setting is
0, which causes SQL Server to adjust this value and base the values on the historical operation of the server. In large environments, the recovery interval can affect the overall performance of VCM. Because VCM constantly updates how it interacts with SQL Server to process activities whose intervals differ, such as an inspection request and a compliance run, the server expends a lot of time constantly adjusting this value. By setting the recovery interval to5minutes, SQL Server no longer needs to tune this value.Click on OK to save the settings.
To ensure that VCM runs at peak performance and requires little operator intervention during its lifecycle, you must set up a routine maintenance plan. VCM relies heavily on its SQL databases for operation.
The maintenance plan uses the automated maintenance functions on the SQL Server instances that host the VCM database.
On the VCM SQL Server instance, follow these steps:
Click on Start.
Select All Programs | Microsoft SQL Server {version} | SQL Server Management Studio.
Expand the Management folder, right-click on Maintenance Plans, and select Maintenance Plan Wizard.
On the Maintenance Plan Wizard page, click on Next.
On the Select Plan Properties page, enter a maintenance plan name, select Single schedule for the entire plan or no schedule, and click on Change.
On the Job Schedule Properties - Maintenance Plan page, set the scheduling properties to run the maintenance plan when the SQL Server is idle or has low usage.
Click on OK to return to the Select Plan Properties page, and click on Next.
On the Select Maintenance Tasks page, select the following maintenance tasks and click on Next:
Check Database Integrity
Rebuild Index
Update Statistics
Clean Up History
On the Select Maintenance Task Order page, order the maintenance tasks and click on Next.
On the Define Database Check Integrity Task page, define how the maintenance plan will check database integrity:
On the Define Rebuild Index Task page, define how the maintenance plan will rebuild the index:
On the Define Update Statistics Task page, define how the maintenance plan will update database statistics:
On the Define History Cleanup Task page, define how the maintenance plan will clean up historical data from the SQL Server machine, and click on Next:
Select Backup and restore history.
Select SQL Server Agent job history.
Select Maintenance plan history.
Set the cleanup task to remove historical data older than 4 months.
On the Select Report Options page, save a report of the maintenance plan actions:
Select Write a report to a text file.
Select a folder for the report and click Next.
On the Complete the Wizard page, verify your selections in the Maintenance Plan Wizard summary, expand the selections to view the settings, and click on Finish.
When the Maintenance Plan Wizard progress has finished, verify that each action was successful.