Unreal Engine 4 is completely free (including all future updates!) to download and use. You get all the Unreal Engine tools, free sample contents, complete C++ source code which includes code for the entire editor, and all of its tools; you also get access to official documentation that includes tutorials and support resources, plus you get access to UE4 marketplace, which offers tons of free and commercial content.
Unreal Engine 4 can be downloaded in two different versions. One is a binary version (launcher) and the other is the source version (GitHub). The differences between the GitHub and launcher version are as follows:
Launcher (binary) version: These are compiled by Epic and are available through launcher. You will also get all source files (
*.cpp) with the launcher version, but you cannot make any modifications to Unreal Engine since launcher versions do not generate a solution file.GitHub version: These do not have any binary files so you have to compile the Engine yourself. You get the entire source and you can modify virtually anything in Unreal Engine. You can add new Engine features, modify existing features or remove them (which no one does), and create a pull request on GitHub so if Epic likes it, they will integrate it officially into Unreal Engine.
In this guide, I'll show you how to get both versions.
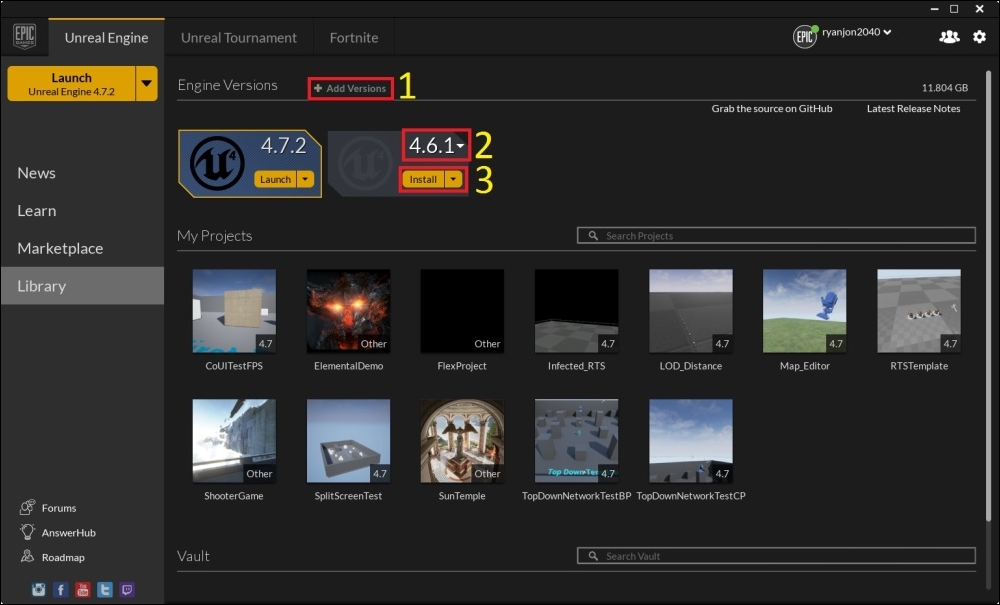
To download the launcher version of Unreal Engine, you obviously need the launcher. To download the launcher, follow these steps:
First go to https://www.unrealengine.com/ and log in using your credentials.
Once you log in, you can download the launcher by clicking on the big orange Download button under Get Unreal Engine.

When you open the launcher for the first time after installation, it should automatically download the latest version of Unreal Engine 4. If it doesn't, then go to the Library tab and click on Add Engine. A new Engine slot will now appear and here, you can select your Unreal Engine version and install it.
To download the source of Unreal Engine 4, follow these steps
First create a GitHub account (it's free!).
After that, you need to go to https://www.unrealengine.com/dashboard/settings and update your GitHub account name and click on Save:

After you have successfully linked your GitHub account with your Unreal Engine account, you need to log in to GitHub and navigate to the Unreal Engine repository.
Note
Make sure you have linked your GitHub account to your Unreal Engine account. Otherwise, you will not be able to see the Unreal Engine repository.
When you are at the repository page:
Click on Fork at the top right of the page.
Select your username to fork it to your GitHub repository.
Then, you need to download GitHub for Windows (if you are on Windows) or GitHub for Mac (if you are on Mac) and install it.
You need this Git client to clone (download) your forked repository, make your own changes to Unreal Engine, and submit the changes as a pull request to Epic to integrate them into the editor.
To clone your forked repository follow these steps:
Click on the plus (+) sign on the top left corner of the Git client.
Then, click on the Clone tab and select your username (you should now see Unreal Engine).
Now, click on Clone Unreal Engine and choose a folder where you want to save your Unreal Engine repository.
Click on OK.
You should now see GitHub cloning Unreal Engine to your hard disk.

Once cloning is complete, navigate to that directory and run the Setup.bat file.
Once Setup.bat has finished, run GenerateProjectFiles.bat, which will generate the Visual Studio Solution file. Open the UE4.sln file and now, you are all set to compile your own copy of Unreal Engine 4☺. Now, right-click on UE4 in the Solution Explorer and click on Build.
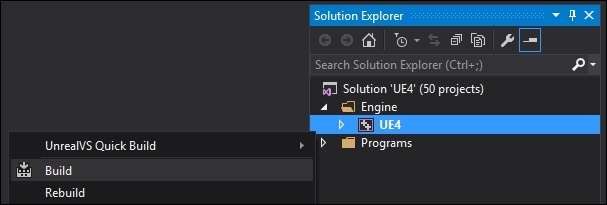
This will take from 15 minutes to 1 hour depending on your system hardware. So sit back, grab a cup of coffee, and wait till Engine finishes compiling.
Once your Engine finishes compiling (or downloading, if you are using launcher) it's time to start it:
Starting your custom build: You can either press F5 in Visual Studio to start debugging the Engine or navigate to the directory where you downloaded it and go to
Engine\Binaries\Win64folder and double-click onUE4Editor.exe.Starting launcher build: Simply click on that big Launch button and you're good to go.
Note
You might experience long loading time when you start the Engine for the first time after compiling. This is because Unreal Engine will optimize the contents for your platform to derive data cache. This is a one-time process.
After the splash screen, you should now see the Unreal project browser. Perform the following steps:
Select the New Project tab, and this is where you create your new projects.
For this book, we will stick with a Blank Blueprint Project. So, in the Blueprint tab, select Blank project.
You can choose which platform you want for your project. There are two platforms available: Desktop/Console and Mobile/Tablet. Feel free to change this setting for your project. The second setting determines the graphics settings for your platform. If you choose Desktop/Console, it's better to stick with Maximum Quality and if your project is targeting Mobile/Tablets, you should choose scalable 3D or 2D, which is aimed at low-end GPUs. The third and final setting lets you add some Starter Content from Epic, which contains some basic meshes, materials, and textures. You can choose not to include Starter Content so the project will only contain essential elements for the selected project.
Note that it is not recommended to include Starter Content when creating a project for the Mobile/Tablet platform. This can significantly increase the package size of your project.
Choose a name for your project and the location where you want to save it.
Finally, click on Create Project to start Unreal Engine 4 with your project:

This is how the Unreal Engine user interface looks:
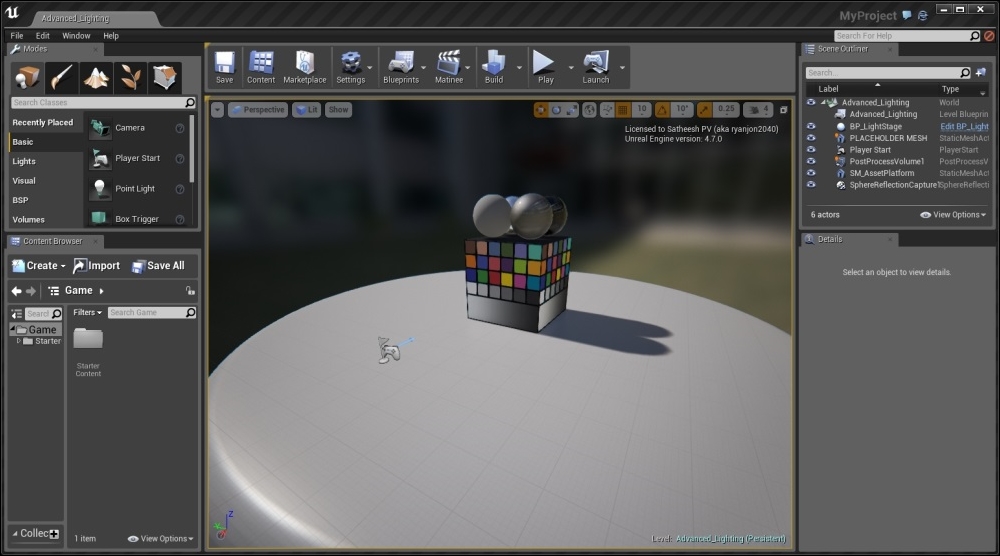
Once Unreal Engine starts up, you should see a scene similar to the preceding screenshot. This is the scene that will be displayed by default, if you choose to include Starter Content. If you skip Starter Content, then the startup scene will be different.
The viewport toolbar contains various tools that you will use throughout your level design process. Let's take a quick look at them:

Transform Tools: These three tools are the move tool, the rotate tool, and the scale tool.
Coordinate System: This allows you to move, rotate, or scale your Actor either on world axes (world space) or on its own local axes (local space). By default, Unreal editor starts in world axes but you can toggle by clicking on the icon. The globe icon means world space and the cube icon means local space.
Snapping and Move Grid: Snapping allows you to snap one Actor to another Actor's surface, and move grid allows you to snap to a three-dimensional implicit grid within the scene.
Rotation Grid: This provides incremental rotation snaps.
Scale Grid: This snaps to additive increments.
Camera Speed: This lets you control how fast the camera moves in viewport.
Maximize Viewport: This toggles between a single viewport and a 4-view split style.

Later in this chapter, you will learn how to use Binary Space Partitioning (BSP) and change some project settings such as Splash screen, game Icon, and so on.
The Modes tab contains all five modes of the editor. They are as follows:
Place mode (shortcut key is Shift + 1): Place mode allows you to quickly place your recently placed objects and also Engine primitives such as lights, geometries, triggers, volumes, and so on.
Paint mode (shortcut key is Shift + 2): Paint mode (also known as Mesh Paint) allows you to interactively paint vertex colors on Static Mesh in Level Viewport.
Landscape mode (shortcut key is Shift + 3): Landscape mode lets you create a new landscape entirely in Unreal Editor or import a height map from an external program, such as World Machine, TerreSculptor, and so on, and make modifications to it.
Foliage mode (shortcut key is Shift + 4): Foliage mode allows you to paint or erase multiple static meshes on Landscapes, other static meshes, and so on. An example workflow is to paint grass, trees, and so on on a large area.
Geometry Editing mode (shortcut key is Shift + 5): Geometry mode allows you to edit BSP brushes.

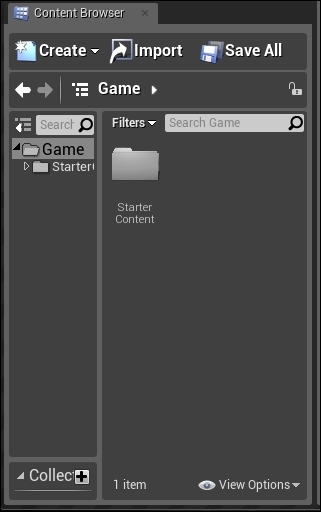
Content Browser is what you call the heart of your project. This is where you create, import, view, edit, organize, and modify all the assets for your game. It also lets you rename, delete, copy, and move assets across other folders just like you do in Windows Explorer. Additionally, Content Browser also lets you search for specific assets based on keywords or asset type and you can exclude assets from your search by adding '-' (hyphen) as the prefix.
You can also create Collections to arrange your commonly used assets for quick access.
Tip
Collections are just references to assets and are not moved into collections. That means a single asset can exist in multiple collections and you can create an unlimited number of collections.
There are three types of collections:
Shared collection: These are visible to you and to other users. This option is active only if you have Source Control (for example: Perforce, Subversion and so on.) enabled.
Private collection: These are visible only to those who are invited to view the collection. This option is active only if you have Source Control (for example: Perforce, Subversion and so on.) enabled.
Local collection: These are only for you. That means they only exist on your local machine.
If you want to transfer an asset from one project to another, you can right-click on the asset and choose Migrate…, which will copy that asset and all its dependencies to your new project.
Content Browser can be accessed by pressing Ctrl+Shift+F or from the Windows menu on the menu bar. You can also have four instances of Content Browser at the same time.
This can be really useful when you want to move assets to different folders or to preview various assets in different folders.
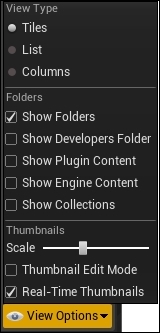
View options lets you do the following:
Change the thumbnail size
Change the view style
Modify the 3D thumbnail, and more
View Options can be accessed from the bottom-right corner of Content Browser.
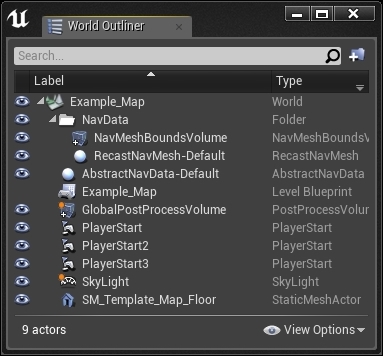
World Outliner shows all the Actors within the level in a tree view. Actors can be selected and modified from world outliner. Right-clicking on an Actor in World Outliner will show the same context menu used in Viewport so you can modify it without having to navigate to them in Viewport. You can drag an Actor to another Actor and attach them together.
World outliner allows you to search for a specific Actor. You can exclude a specific Actor by adding - (hyphen) before the search term and you can force a term to match exactly by adding + before the search term.
The Details panel shows all the information, utilities, and functions specific to the selection in the viewport. It displays all the editable properties for the selected Actor and provides additional functionality based on the selected Actor. For example, if you select a Blueprint, the Details panel will show everything related to that Blueprint, that is exposed variables, Blutility events, and so on. If you select a Static Mesh actor, the Details panel will show which material was applied, the collision settings, the physics settings, the rendering settings, and more. The Details panel can be locked to the selected Actor so it does not change based on Actor selection. Just like Content Browser, you can have four instances of Details panel open at the same time.
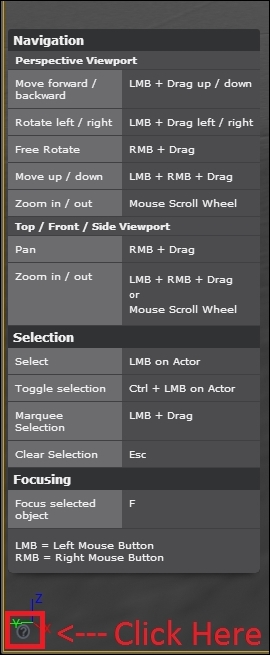
You can navigate the viewport easily using the mouse and keyboard. A high-level explanation of navigating the viewport can be found here: https://docs.unrealengine.com/latest/INT/Engine/UI/LevelEditor/Viewports/ViewportControls/index.html
Tip
At the bottom-left corner of the viewport, there is a small question mark button. If you click on that, you will see some commonly used viewport shortcut keys.
Now that we have some solid understanding of Engine UI, let's use BSP to create a simple level. BSP is a geometry tool (also known as Geometry Brush or simply Brush) used for quickly prototyping levels (also known as blocking out levels). Some developers prefer to call this Constructive Solid Geometry (CSG), which is the more accurate term since geometry in Unreal editor is created by adding and subtracting brushes. BSP has been there since the first release of Unreal. It was used for level designing long ago but later, this role has been passed to static meshes because BSP is more expensive in performance.
So basically, BSP should only be used to prototype a level. Once you have the basic idea of how a level should look, you should start replacing it with static meshes.
Unreal Engine 4 comes with seven Brushes and all of them can be customized in Details panel. They are as follows:
Box: You can adjust the X, Y, and Z axes and set it to Hollow, which is a fast way to make a room, and adjust Wall Thickness, which defines the thickness of the inside walls.
Cone: You can customize the number of sides, height, and both outer and inner radius in Details panel. You can also set this to Hollow and adjust Wall Thickness to define the thickness of the inside walls.
Cylinder: You can customize the number of sides, height, and both outer and inner radius in Details panel. You can also set this to Hollow and adjust Wall Thickness to define the thickness of the inside walls.
Curved Stair: This creates a staircase shape that bends around an angle but cannot wrap over itself.
Linear Stair: This creates a straight staircase that does not bend.
Spiral Stair: This creates a spiral staircase that can repeatedly wrap over itself.
Sphere: This creates a sphere shape. The radius can be customized in Details panel.
Just like any other actor, you can use Transform Tools to move, rotate, and scale as you see fit.
There are two types of Brushes. They are as follows:
Additive: These brushes are solid. This will add geometry to the level. For example, you will use the Additive type to create walls, floors, ceilings, and so on.
Subtractive: These brushes are hollow. This will subtract solid space from a previously created Additive brush. For example, you will use the Subtractive type to create windows or doors on walls.
You can also convert BSP geometry to Static Mesh and save them in Content Browser, but remember, they will have no UVs or additional Material elements. It is also worth mentioning that this is not a good or recommended workflow. You should only use BSP to block out your level and later, you should import your assets created from a DCC application.
You can change the default starting level for both the game and editor. For example, for the game you may want the Main Menu map as the default and for editor you want another level as the default startup level.
It's easy to set them in Unreal editor:
Click on Edit in the menu bar.
Click on Project Settings.
Go to Maps & Modes.
Here, you can change the game and editor default map.

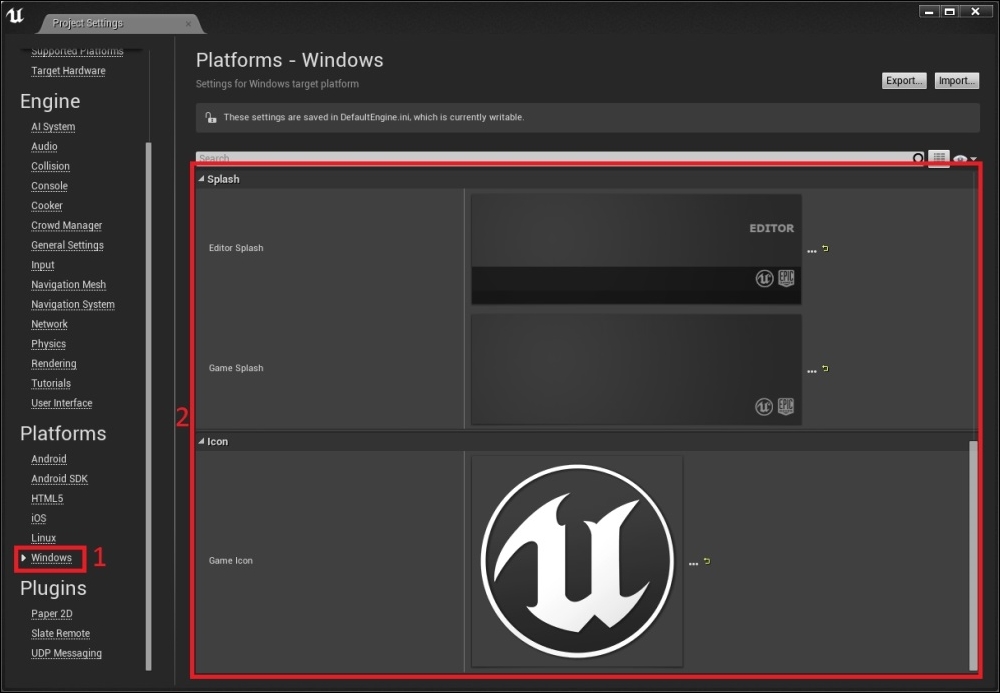
You can adjust Splash screen through Project Settings:
Tip
The default dimensions for Splash screens are 600 x 200 and requires a .bmp image. The game Icon requires a 256 x 256 .ICO file.
Now that you understand the basics of Unreal Engine, it's time to import some assets from a DCC application such as 3ds Max, Maya, or Blender. In the next chapter, we will create a simple mesh in 3ds Max and import it into Unreal Engine and go through various options, such as setting up materials, collisions, and LODs.