


Introducing the Unreal Development Kit (UDK)
Epic Games' Unreal Development Kit is a powerful tool, but like any complicated piece of software it can be overwhelming at first. This book will guide you through the structure of the UDK and the basic principles of UnrealScript, and by the end you will have the skills you need to start making your own games. Let's get started!
It's a great time to get into the UDK and UnrealScript. With the release of the UDK, Epic Games has opened up a great way for indie developers to make high quality games without high quality budgets. With hard work and dedication even a small team of people can make a great game in their spare time, and with digital distribution platforms such as Steam, it's become much easier to self-publish and build a community of fans, and being able to sell your game doesn't hurt either.
With constant updates to the UDK, Epic provides the latest features of the Unreal Engine for free if you're just looking at game development as a hobby. If you're aiming to start up your own development studio, the licensing terms for the UDK fit even in the smallest of budgets. If you're looking for AAA quality, the UDK is where you'll find it.
Being an UnrealScript programmer is the most important job in a UDK project. Even without artists you can build prototypes and demonstrate your gameplay using UnrealScript and placeholder artwork using the assets included with the UDK. As they say, actions speak louder than words, and having a fun game which people can play will help attract the art talent to give your project the visual quality you need.
So with that, let's take a look at the Unreal Development Kit!
Before we start cooking let's set the table. There are a few things we need to do before we write our first line of code.
In this chapter we will:
Install the UDK and take a look at its directory structure.
Learn what external programs we can use to code UnrealScript.
Set up our first project.
Compile and test a Hello World program.
Let's see what our computer needs to run the UDK.
Epic's official UDK website is the best place to stay up to date with the latest UDK releases and features, so we'll be heading there for the download.
Go to http://udk.com/download and get the latest release.
Run the installer. It will ask us to accept the license agreement and where we want to install the UDK. By default, it will use the UDK version for the installation, but to help keep things organized it's better to use a project name. This helps if you have more than one project using the same UDK version. In this book we will be calling our project Awesome Game, so let's change the installation directory.

After installing the prerequisites and the UDK, the installer will ask us what to do next. Let's click on Return to Desktop for now.

Now we have a working copy of the UDK installed on our computer. We can play the example game that comes with it to get an idea of what the UDK can do by going into C:\UDK\UDK-AwesomeGame\Binaries\Win32 (or Win64 if we have a 64 bit operating system) and running UDK.exe. Take a few minutes and look through the game's menus and play the Deathmatch map DM-Deck to get an idea of what the UDK is capable of.
Now we're ready to take a peek under the hood of the UDK. Where are the files that the UDK uses to make our game work?
Let's take a look at the folders in the UDK install to see how everything is organized.

The first folder, Binaries, holds the game executables and tools for artists and animators. We won't be working with the art tools in this book, but it's helpful to know what they do.
ActorX: Provides plugins to export static and animated game objects from 3D modeling programs like 3ds Max and Maya.FaceFXPlugins: Lip syncing and facial animation tools for characters.GFx: Tools used to make Scaleform menus for the interface and player HUD.SpeedTreeModeler: Used to quickly make trees and other vegetation to fill game environments.
The next folder, Development, is where most of our work will take place. You may have heard people talk about a game's source code before. The Development\Src folder is where our game's source code will go. If we look in the Src folder we see that it isn't empty, there are a lot of folders already in there. Epic provides the source UnrealScript files for reference, to make it easier to learn how to make our own code. As Indiana Jones might say if he were a programmer, "Seventy percent of programming is reading the source code." One important thing to remember: NEVER ALTER EPIC'S SOURCE CODE! A lot of the files have C++ code behind the scenes, and altering these files could break them since we don't have access to the C++ code. All the work we do will be creating our own files to work with.
The Engine folder holds resources and configuration files for the game and editor, and will rarely need to be touched even by experienced UnrealScript programmers.
The next folder is where the heart of a UDK project resides. UDKGame is where all of the content for our game is found, where the configuration files are, even where the splash screen is. Let's take a look at each folder individually. The next two folders are:
Autosave: This folder doesn't exist when you first install the UDK. When you open the editor and start creating a level, the editor will periodically save a copy of your map to this folder. If the editor freezes up or your computer crashes, you would be able to retrieve a recent version of the map you had been working on without losing a lot of work.Config: We use theINIfiles in here to change settings that the game uses to run, as well as giving the player a way to change settings for our custom game. The game's resolution and keyboard settings are in here as an example.INIfiles can be opened with any plain text editor such as Notepad. Here is an example of keybinds that can be found in theDefaultInput.inifile:.Bindings=(Name="E",Command="GBA_Use") .Bindings=(Name="LeftMouseButton",Command="GBA_Fire") .Bindings=(Name="RightMouseButton",Command="GBA_AltFire") .Bindings=(Name="C",Command="GBA_Duck") .Bindings=(Name="Escape",Command="GBA_ShowMenu")
Content: Maps, sounds, characters, environment art, it's all here. The directory structure inside this folder is divided up to create separate areas for mobile content if we were working on an iOS project, to keep it separate from the normal PC content. The exact directory structure here doesn't matter much, we can organize our content however we like. As long as it's in theContentfolder the game will be able to find it.Flash: This folder holds the source files for our Scaleform menus and any HUDs our game uses.Localization: If we were releasing our game in different languages, this is where we would put all of our translated text. As withINIfiles,INTfiles can be opened with a plain text editor.Logs: The files here record game events and any debugging code that we put in, and are very helpful when trying to fix broken code. TheLOGfiles can be opened with a plain text editor.Movies: Any cutscene videos we create would go in here, as well as the game loading and level loading movie files.Script: Once our source code is compiled, the.ufile ends up here. These are the files that the game uses and the ones that are distributed with our game, the source code is only used to create these and aren't included.Splash: In addition to the images that are shown when the game or editor are starting up, there are links to the Epic forums and the Unreal Developer Network in here. Both are valuable resources for learning how to use the UDK.
Not too complicated! In this next section we'll be taking a closer look at the Development folder by installing and setting up a few programs we can use to making coding in UnrealScript easier. Let's get to it!
There are two things we need to look at when deciding what programs to use to help us write UnrealScript code. The first, obviously, would be something we can use to write the code itself. Script files can be opened and written in a plain text editor like Notepad if we prefer, but there are free programs out there we can use to make our lives easier.
Find the installer included with this book, or go to http://www.contexteditor.org and download the latest version.
Run the installer. It will ask what language to use.

The installer will ask where we want to install the program. The location doesn't matter, choose a convenient location or leave it at the default.
The installer will ask if you would like to add shortcuts or Replace Windows Notepad. Let's leave this at the default for now unless you don't need the shortcuts.
Review the settings and click on Install to finish the installation.

After ConTEXT is finished installing, let's run it!

With ConTEXT installed we have a simple, but powerful tool to make our coding lives easier. We can drag files from the Development\Src folder directly onto ConTEXT to open them, or use the File Explorer pane on the left to browse through the directories. However, before we're ready to use it for programming, we need to configure a few things.
Now we'll set up ConTEXT to make reading UnrealScript easier, and use it to compile scripts with a single button press.
Click on Options in the top toolbar, then Environment Options. In the first tab, General, set When started to Open last file/project. That way any files that we're working on will automatically open the next time we use ConTEXT.
Make sure that Remember editing positions is checked. This makes the files we're working with open in the same position the next time we open ConTEXT. This saves a lot of time remembering where we left off.

In the Editor tab, uncheck Allow cursor after end of line. This will keep our code clean by preventing unnecessary spaces all over the place.
Uncheck Smart tabs. Part of writing clean code is having it lined up, and Smart tabs tends to move the cursor to the beginning of words instead of a set number of spaces.
Make sure that Line numbers is checked. When we start compiling, any errors that show up will give us a line number which makes them easier to find and fix. This also helps when we search through our code as the searches will also give us line numbers.
Finally for this tab, set Block indent and C/Java Block Indent to 4. This comes down to personal preference but having four spaces instead of two makes it easier to quickly scan through code and find what you're looking for.

Now we're going to set up ConTEXT to compile code. On the Execute Keys tab, click on Add, then type
.ucinto the Extensions field that comes up.
Once that's done four keys, F9 through F12, will show up in the User Exec Keys window. Let's click on F9 to make it convenient. Once clicked the options on the right become available.
For the Execute line, click on the button to the right of the field and navigate to our UDK installation's
Binaries\Win32folder, and selectUDK.exe. For Start In, copy the Execute line but leave outUDK.exe.In the Parameters field, type "make" without the quote marks. This tells
UDK.exethat we want to compile code instead of opening the game.Change Save to All Files Before Execution. This makes sure that all of our changes get compiled if we're working in more than one file.
Check Capture Console Output and Scroll Console to the Last Line. This lets you see the compile progress at the bottom of ConTEXT, and any compiler errors will show up there as well.

Now we're going to set up an UnrealScript highlighter. Highlighters make code easier to read by color coding keywords for a programming language. Since each language has different keywords, we need a highlighter specific to UnrealScript. Close ConTEXT and find the
UnrealScript.chlfile included with this book, or head to http://wiki.beyondunreal.com/ConTEXT and follow the instructions for the UnrealScript highlighter. Once you have your.chlfile, place it in ConTEXT's Highlighters folder.Open ConTEXT again. In the top toolbar there is a drop-down menu, and our UnrealScript highlighter should show up in the list now. Select it and we're done setting up ConTEXT!

ConTEXT is now set up to compile our UnrealScript files; all we have to do is press F9. The first time we do this it will also recompile Epic's UnrealScript files, this is normal. The compiler may also show up in a separate window instead of at the bottom of ConTEXT, this is also normal.
Starting to feel like a programmer yet? Now that we're able to compile code we just need an easy way to browse through Epic's UnrealScript source code, and to do that we're going to install another small program, UnCodeX.
We can write our own code with ConTEXT, but now we need something to make sense of the Development\Src folder. There are over 2,000 files in there! This is where UnCodeX comes in. UnCodeX organizes the files into a class tree so that we can easily browse through them and see their relationship to each other. It also allows us to quickly search through the source code, which is where the line numbers in ConTEXT come in handy when we're searching through our own code.
Find the installer included with this book, or head to http://sourceforge.net/projects/uncodex and download the latest version of UnCodeX.
Run the installer. It will ask you to accept the agreement. Read through it and accept.
Choose where you want to install the program. The location doesn't matter so choose a place convenient for you.
The default setting for the components is fine, so let's use a Full Installation. This will give us a graphical interface and some extra help files if we need them.

UnCodeX will ask whether you would like to add a Start Menu folder. Select your options and continue.
Select where you would like shortcuts placed and click on Next.
Review the installation settings and click on Install!

When the installation finishes, exit without running UnCodeX.
UnCodeX needs to know where our source code is before we can search through it. Let's set up UnCodeX now.
Open UnCodeX. It will automatically detect that this is the first time we've run it and ask if we want to edit the settings. Choose Yes.

The UnCodeX window will pop up with the Source Paths tab open. This is where we will add our source code directory. Click on Add.

Navigate to our UDK installation's
Development\Srcfolder and select it.The directory will show up in the window below the Add button. That's all we need to do here, so click on Ok. UnCodeX will ask if we want to scan the directory. Click on Yes.

That's all we need to do! UnCodeX will scan and organize all of the files in the
Srcfolder and display them.
UnCodeX is now configured and ready for us to use. Let's take a look at what it's showing us.
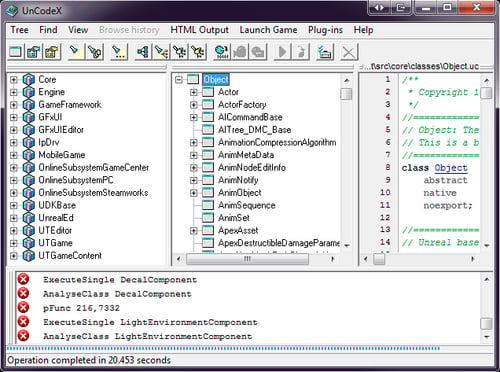
The left window shows each package and the classes in them, which is basically like a folder in Windows. The middle window shows the class tree, which organizes all of the files to show their relationship to each other. The right window shows the contents of the file we have selected. You'll notice that some words are highlighted. Clicking on them takes you to the file or function with that name. This is convenient for finding out how things interact with each other in UnrealScipt.
Changing projects in UnCodeX is easy. Simply go to Tree, click on Settings, and Add or Remove directories as needed. Later, go to Tree and click on Rebuild and Analyse or use the keyboard shortcut Ctrl + B. It will rebuild the package and class tree the same as our initial setup.
We will be using ConTEXT and UnCodeX in this book, but there are other programs we could use when working with UnrealScript. Let's briefly discuss them, and then start setting up our own project!
nFringe is an IDE (Integrated Development Environment) that allows programmers to work with UnrealScript in Microsoft Visual Studio 2005 or 2008. It includes a debugger that allows us to stop the game while it is running to see what is happening in script. There is a free version available for non-commercial work, but if you'd like to use it for commercial projects there is a licensing fee. If you have Visual Studio and would like to try it out, head over to http://pixelminegames.com and get the latest version!
WOTgreal was originally created by Dean Harmon for the Unreal Engine based Wheel of Time game. The program works with all Unreal Engine games though, and is like ConTEXT and UnCodeX combined. There is a small licensing fee for the standard or professional version of the program. Head over to http://www.wotgreal.com to check it out!
For the most part the choice of program to use when working with UnrealScript comes down to personal taste. The Unreal Editor itself will detect changes in the source code and ask if you want to compile when it opens. Some programmers use Notepad to write and a DOS prompt to compile, using the same make command that ConTEXT uses. Try out the various programs to see what works best for you.
Now we have the programs, we need to start working on our own project, but where do we start? Looking back at the UDK directory structure, there are really only three folders we would need to create. The first would be our own folder in the UDKGame\Content directory to contain any assets our project needs. Any artists or animators on the project would put their files in that directory. The second would be a folder in UDKGame\Content\Maps for our project's levels. This keeps everything organized and separated from Epic's assets so we know what's ours. For programmers though, there is only one folder we really need to worry about.
The last folder we need for our own games is the one we'll be doing most of our work in as programmers. It's the place we'll be keeping all of our source code.
In the
Development\Srcfolder, create a folder calledAwesomeGame. Inside that, create a folder calledClasses. This is where all of our source code will go.
When code is compiled, the final
.ufile's name is the same as the folder, so in our case when we compile a file calledAwesomeGame.u, it will show up in theUDKGame\Scriptfolder. Empty folders are ignored, so let's create our first class so we have something to work with. We'll create a simple class we can place in a level to have the game run the code that we write.Create a text file and name it
AwesomeActor.uc(make sure file extensions are shown in your folders so you don't accidentally name itAwesomeActor.uc.txt).Open the file in ConTEXT and type the following code into it.
Class AwesomeActor extends Actor
   placeable;

defaultproperties
{
   Begin Object Class=SpriteComponent Name=Sprite
      Sprite=Texture2D'EditorResources.S_NavP'
   End Object
   Components.Add(Sprite)
}
Tip
Downloading the example code
You can download the example code files for all Packt books you have purchased from your account at http://www.PacktPub.com. If you purchased this book elsewhere, you can visit http://www.PacktPub.com/support and register to have the files e-mailed directly to you.
Make sure all of the punctuation is correct, particularly the opening and closing brackets after
defaultproperties. The compiler is very particular about those brackets; they have to be on their own lines for anything inside them to work correctly.The first line of our class defines the name of our object and its relationship to other objects in the game. The name of the file has to be the same as the name we type here; otherwise the compiler will give us an error. In this case both are
AwesomeActor. Theextends Actorpart makes ourAwesomeActora child ofActor. In a way the class tree can be seen as a family tree, with classes inside the tree being children of the ones further up the chain.The second line makes it so our class can be placed in the editor. Things like lights, path nodes, vehicles, all of these have placeable in their
.ucfile so the editor will let us place them. Other things like projectiles or explosions wouldn't be set as placeable since they are created while the game is running.The section in the default properties creates a sprite so that we can see the actor in the editor and in the game.
Now, before we compile we need to let the game know about our
AwesomeGamefolder.Open
UDKGame\Config\DefaultEngine.iniand add our package AwesomeGame to the end of the EditPackages list.[UnrealEd.EditorEngine] +EditPackages=UTGame +EditPackages=UTGameContent +EditPackages=AwesomeGame
Save
DefaultEngine.iniand close it.
Now we've created a folder for our code to go in called AwesomeGame, which is in the Development/Src folder. In it we've created our first code file, AwesomeActor.uc. We then edited DefaultEngine.ini so the game would recognize our new code package.
The folders in the Development\Src directory aren't automatically detected. The main reason for this is that in some cases we may not want or need the classes inside it. For instance, we may have different folders for a PC project and an iOS project. Both of them would be in the Development\Src folder, but the PC version of our game wouldn't need the iOS code and vice versa. Remember when we went over the directory structure and we talked about the Config folder? That folder contains all of the settings for our game. Let's take a look.
The file we added to, DefaultEngine
, contains things like the game's resolution and texture detail. It also contains the EditPackages list we added to, which tells the game which packages to compile and in what order.
[UnrealEd.EditorEngine]
+EditPackages=UTGame
+EditPackages=UTGameContent
As you can see, the names in this list can also be found as folders in the Development\Src directory:
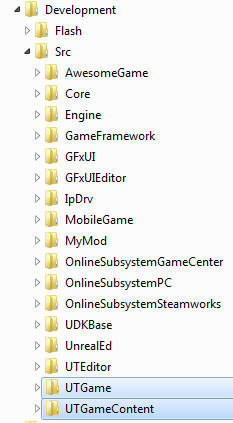
The list in DefaultEngine.ini
seems kind of short though, doesn't it? Well, much like the class we created is a child of Actor, DefaultEngine.ini also has a parent. If we look at the top of DefaultEngine we can see this:
[Configuration]
BasedOn=..\UDKGame\Config\DefaultEngineUDK.ini
This .ini file is actually based on another one, its parent DefaultEngineUDK.ini. Let's close DefaultEngine.ini and take a look at DefaultEngineUDK.ini's EditPackages list.
[UnrealEd.EditorEngine]
EditPackagesOutPath=..\..\UDKGame\Script
FRScriptOutputPath=..\..\UDKGame\ScriptFinalRelease
+EditPackages=UDKBase
+EditPackages=UTEditor
;ModEditPackages=MyMod
AutoSaveDir=..\..\UDKGame\Autosaves
InEditorGameURLOptions=?quickstart=1?numplay=1
That's a bit better. UDKBase and UTEditor are two more folders in our Development\Src directory. But there are a lot more folders there, so what's the deal? Let's see if we can go higher up the ini tree to find out. At the top of DefaultEngineUDK.ini we see that this file also has a parent:
[Configuration]
BasedOn=..\Engine\Config\BaseEngine.ini
Let's close DefaultEngineUDK.ini and take a look at BaseEngine.ini, which is in the Engine\Config directory.
EditPackages=Core
EditPackages=Engine
EditPackages=GFxUI
EditPackages=GameFramework
EditPackages=UnrealEd
EditPackages=GFxUIEditor
EditPackages=IpDrv
EditPackages=OnlineSubsystemPC
EditPackages=OnlineSubsystemGameSpy
EditPackages=OnlineSubsystemLive
EditPackages=OnlineSubsystemSteamworks
That's better! It looks like all of the folders are accounted for now, except for MyMod which is an empty example folder. And if we look at the top of BaseEngine.ini
we can see that this is the end of the chain, BaseEngine doesn't have a parent.
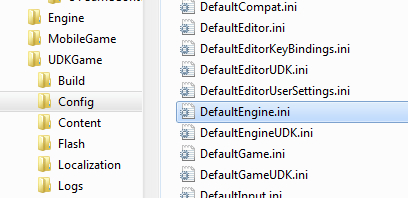
So how does the game use these files? If you haven't run the game or compiled the code when we installed ConTEXT, run the game real quick and exit out of it at the main menu. The first time the game is run, it uses all of the Default and Base ini files to generate the ones the game actually uses in the UDKGame\Config directory:
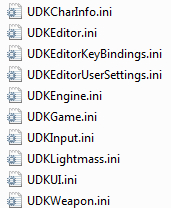
So the obvious question is why are there so many files? Well, let's take another look inside BaseEngine.ini to see why. About two-thirds of the way down the file we can see a list of system settings:
MotionBlur=True
MotionBlurPause=True
MotionBlurSkinning=1
DepthOfField=True
AmbientOcclusion=True
Bloom=True
bAllowLightShafts=True
Distortion=True
These settings control some of the visual effects in the game like motion blur and bloom. What would happen if we changed them? It would change the game's visual effects of course, but here's another question. While playing the game, in the Settings we're able to revert back to the defaults. If we changed the settings in these files, how would the game know what the default was? The game uses the Base and Default ini files to create the UDK ones, that way the player can change things like the resolution or keybinds, but the game will still have the known safe default settings available if it needs them. It may seem a bit complicated but it's pretty easy to work with. As the game's developer we would work in the Default and Base ini files to make the game work the way we want by default, and the player can change the settings if they want to.
Now that AwesomeGame has been added to the EditPackages list we'll be able to compile it. But why did we have to add AwesomeGame to the very end of the list? The way the compiler works is that it goes down the EditPackages list in order and looks for any changes to the files in the Development\Src directory. If any .uc files are changed it recompiles that package. It's also important to know that any package that our classes are dependent on has to be compiled before ours. As an example, let's take a look at DefaultEngine.ini again. One of the EditPackages listed is UTGameContent
. In the UTGameContent folder we can see a class called UTJumpBoots. If we wanted to make our own jump boot class with UTJumpBoots
as its parent, we have to make sure that UTGameContent
is compiled before our package, otherwise the compiler won't know about that class yet and will give us an error saying our class' parent doesn't exist.
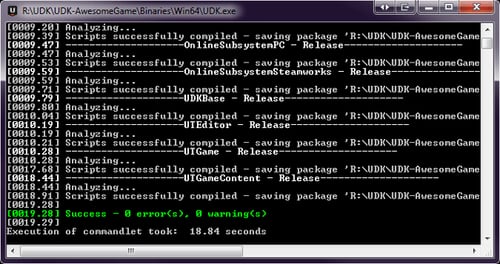
Open ConText and press F9, which we set up earlier to compile our code. If we typed everything in correctly, it should give us a Success message at the end!

If there are any warnings or errors, look over the code again to make sure everything is spelled correctly and the punctuation is correct. The error message itself should provide a clue as to where to look. It will also give you a line number where the error happened.
Now that our code is compiled, let's add our AwesomeActor to a level. If you don't have an editor shortcut or can't find it in your Start menu, it's easy to make one. Go into
UDK-AwesomeGame\Binaries\Win32and right-click onUDK.exe. Click on Send To and then Desktop (create shortcut). Right-click on the shortcut it created and click on Properties. In the Target field, add editor to the end without quotes:
Now let's open the editor!

Close the Welcome Screen and Content Browser, and let's take a look at the editor real quick. To try out our code we're going to need a test map, so go to File, and click on Open, and select
ExampleMap.udkto open it.
One thing we'll notice immediately is that there seems to be a lot of strange objects floating around the level. These are Actor classes that are normally invisible in game, but have sprites that can be seen in the editor. Remember the sprite we added to the default properties of our AwesomeActor? This is where it gets used.
Now let's add our AwesomeActor.
Click on the Content Browser button to open it up again.

The Content Browser will show the tab with game assets like textures and meshes at first, but we need to take a look in the Actor Classes, so select that tab in the top.

This looks a lot different than the class tree in UnCodeX though. Classes can be put into Categories so they're more organized in the editor, but right now we just need to see a normal class tree, so uncheck Show Categories.

There's our AwesomeActor class!
Select AwesomeActor and close the Content Browser. In the 3D viewport, right-click on the floor and near the bottom click on Add AwesomeActor Here.

There's the AwesomeActor, showing the sprite that we put in the default properties of our class! Normally these sprites won't show up in the game, but we didn't put any restrictions on the one in our default properties so we'll be able to see it for now.
Click on the Play button to run the game in a new window.

After you're done checking out the AwesomeActor in the level, close the game window.
Now let's save the map so we can keep using it to test. We don't want to save over
ExampleMapso let's save it in our own folder. Create a new folder in theContent\Mapsdirectory calledAwesomeGame, and in the editor save the map asAwesomeMap.udkinside that folder.
Close the editor.
So we have our class set up, but is there anything more we can do with it? Usually the first task when learning a new programming language is to make a Hello World program, so let's do that now. Open up our
AwesomeActor.ucfile in ConTEXT. Let's add some more code.The first thing we'll do while we're here is make it so our actor doesn't show up in the game but still shows in the editor. We can do this with a simple one line addition to our default properties.
Add a new line in the default properties and write the following:
Begin Object Class=SpriteComponent Name=Sprite
   Sprite=Texture2D'EditorResources.S_NavP'
   HiddenGame=True
End Object
Components.Add(Sprite)
Now let's add our Hello World. This will go before the default properties section.
function PostBeginPlay() { `log("Hello World! =========="); }PostBeginPlayis a function that is run when an Actor is first created, so it's a good place for our Hello World. The log line we put inside that function will output to a text file so we can see that our class is running correctly. So now, our class should look like this:class AwesomeActor extends Actor placeable; function PostBeginPlay() { `log("Hello World! =========="); } defaultproperties { Begin Object Class=SpriteComponent Name=Sprite Sprite=Texture2D'EditorResources.S_NavP' HiddenGame=True End Object Components.Add(Sprite) }Before we compile, make sure the editor is closed. The compiler can't delete the old
.ufile if it's still in use by the editor and we'll get an error.With the editor closed, compile the code by hitting F9 in ConTEXT.
Now open the editor, and open
AwesomeMap.udk.We don't need to do anything to our AwesomeActor, changes we make to our compiled classes automatically affect any of the actors we've placed in our levels.
Run the game by clicking on the Play button in the top as before. We'll see that our AwesomeActor is invisible now, so the line we added to the default properties is working. But where's our Hello World?
Close the game window and exit the editor. Go into the
UDKGame\Logsfolder and take a look at the files in there.There should be
Launch.log,Launch2.log, and any number of backups depending on how many times the game, editor or compiler has run. When they run, they create a backup of the existingLaunch.logfile and start a new one. Whenever more than one is run at the same time, as in the case of us running a game window from the editor, it creates a second file calledLaunch2.logand so on. So, since we were testing our code from a game window in the editor, let's take a look atLaunch2.log.Open
Launch2.login theUDKGame\Logsfolder.[0008.05] Log: Game class is 'UTGame' [0008.24] Log: Primary PhysX scene will be in software. [0008.24] Log: Creating Primary PhysX Scene. [0008.26] Log: Bringing World UEDPCAwesomeMap.TheWorld up for play (0) at 2011.05.19-15.15.52 [0008.28] ScriptLog: Hello World! ========= [0008.28] Log: Bringing up level for play took: 0.193269
Towards the end of the file we can see our Hello World shows up!
Now you can see why we added a bunch of equal signs in our code. It's pretty easy for our logs to get buried with everything else that's going on, so using some kind of unique marker like we did makes them easier to find.
One of a programmer's essential tools are comments. They serve two purposes. First, since they're ignored by the compiler, they can be used to write notes to yourself in your code. Doing this lets you remember what your code does, which can be helpful when you come back to it months later. If you're working with other programmers, writing comments is good programming practice so others can see what your code does.
Second, comments are a quick way to remove sections of your code without permanently deleting it or relying on undo, since you may have to make changes over several days or weeks and repeatedly close and open the files.
There are two ways to write comments. The first way is to write to slash marks, which comments out a line or part of a line:
// This entire line is a comment.
SomeCode(); // This is a comment at the end of a line.
4 + 5; // + 6; We've commented out "+ 6;" here to test something.
The second way to write comments is to use a slash and asterisk. This comments out entire sections of code.
/* This line is commented out.
This line is commented out as well.
The slash and asterisk at the end of this line end the comment. */
Note that these cannot be nested as it will break the code. For example, this works:
/* Commenting out some code.
// Having a double slash comment inside here is fine.
Ending the comment.  */
While this would not work:
/* A comment.
/* A comment inside a comment like this would not work. */
Ending the comment. */
As you're working on your own projects, don't forget to comment your code! It makes it easier to read and understand.
We learned a lot in this chapter about how the UDK works and how to set up our own game project.
Specifically, we covered:
The UDK directories and what goes into each folder. We know which folders we'll be working in as programmers as well as the ones any artists or designers on the project would be using.
Which programs we can use to work with UnrealScript. We know that there are two aspects to programming, writing the code and being able to easily browse the existing source code.
How to set up our own project and compile and test code that we've written. We know how to use UnrealEd and the Logs folder to help us test and make sure our code is running correctly.
Now that we've learned about the UDK, we're ready to start learning more about the UnrealScript language by taking a look at variables and operators—which is the topic of the next chapter.
