


In this chapter, we will cover:
Installing Unity 4.x
Setting your preferences
Understanding and optimizing the User Interface
Saving assets created in Unity as Prefabs
Discovering Unity's content
Importing your own content
Importing Unity packages into your project
Importing custom packages into your project
Exporting custom packages from your project
Adding custom packages to Unity's quick list
Using the Project browser
Unity is a very powerful and versatile game engine. It is available in both Indie (free) and Pro (paid) versions. In case you haven't installed Unity yet, this recipe will show you how to do it.
To Install Unity, please follow these steps:
Access the Unity website at www.unity3d.com.
Locate and click the Download button, placed in the top-right corner.

Now, on the Download page, click the button to get the latest version of Unity. Wait for the download to complete.
Run the Installer. This is a very straightforward process that will install everything you need in a couple of minutes.
Once the software is installed, run Unity. That should take you to the activation dialog where you can choose between activating Unity Pro (provided you have a valid serial number), Unity Free, or a 30-day trial of Unity Pro:
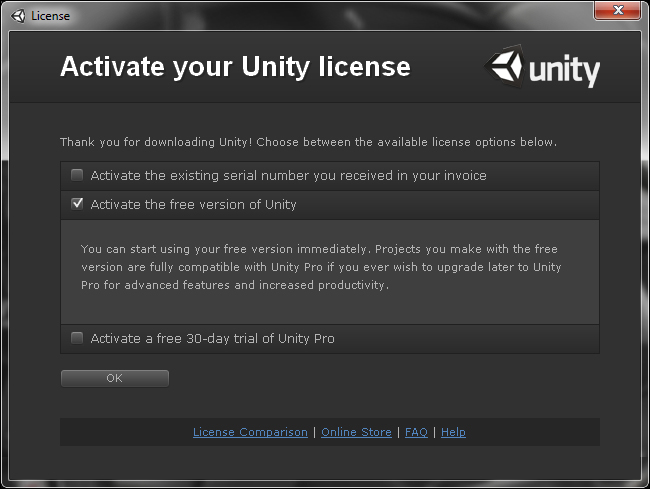
Select your choice and click OK. You should be prompted to log in or create an account.
Register (if necessary) and log in to activate your copy of Unity and start using it right away.
You can expand Unity's capabilities and reach new audiences by adding more platforms to your editor.
iOS and Android exporters are now included free, and others can be bought from the Unity Store at https://store.unity3d.com.
Setting the editor to your preferences might sound superfluous to some. However, it could accelerate your development process and make Unity even more comfortable to use. In this recipe, we will learn how to adjust some of those settings to your taste.
To adjust Unity's preferences, follow these steps:
Inside the Unity editor, navigate to Edit | Preferences... (or, if you are using Mac OS, Unity | Preferences…).
As the Preferences window shows up, notice that it is divided into these sections: General, External Tools, Colors, Keys, and Cache Server.
Select the General tab. If you're working with multiple projects, you might want to leave the Always Show Project Wizard option checked.
Also, if you use OS X and are used to its native color picker, leave the OSX Color Picker option checked.
Now select the External Tools tab. In case you want to use a different script editor than Unity's built-in MonoDevelop, you can use the drop-down menu in External Script Editor to browse to your favorite application.
If Image Application is set as Open by File Extension, you might end up working with several image editors simultaneously. To avoid that, use the drop-down menu to browse to your favorite software.
Also, if you happen to develop to Android, make sure to browse to the SDK in Android SDK Location.
Let's move on to Colors tab. The default settings are fine, but feel free to change colors that make you most comfortable.
Now select the Keys tab. You might select any action to change its shortcut. Again, the default settings are perfectly fine. Use this opportunity to learn more about them.
As you probably noticed, Unity's Preferences window has more options than was covered here. If you want a full explanation for each setting, please check the online documentation at http://docs.unity3d.com/Documentation/Manual/Preferences.html.
Depending on your target platform, you might want to adjust the level of graphical quality of your game. This can be done through Quality Settings, which controls, for instance, the resolution of real-time shadows, or how much anti aliasing will be applied. Those options (and much more) are organized in levels that range from Fastest to Fantastic. If you want to experience a particular quality setting when running your game from the Editor, navigate to Edit | Project Settings | Quality and select it from the table in the Inspector view.
Game engines, especially 3D-capable ones, can be a bit intimidating the first time you open them. Although Unity is particularly intuitive, user-friendly, and well documented, we have provided this recipe to show you how to operate inside its User Interface (UI).
Let's take a look at Unity's user interface:
Run Unity. Unless you have previously changed it, its layout should initiate in Wide mode. Access Window | Layouts and choose another option, such as 4 Split or 2 by 3, and notice how the interface is organized into Views:
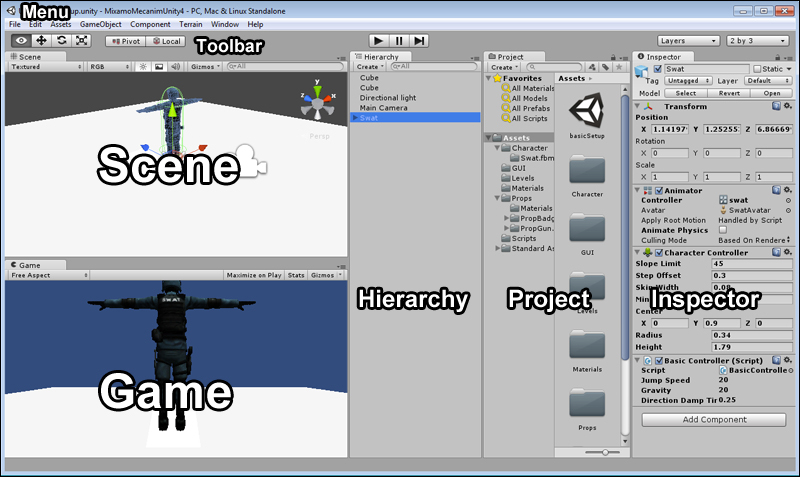
Let's take a look at those views:
Scene: This view is used to position, rotate, scale, and select game objects, and also navigate your level.
Game: This is the place to play and test your game. It will reproduce the player's experience as accurately as possible.
Hierarchy: Game objects (as diverse as characters, cameras, level geometry, lights, and even GUI textures) placed in our scene will be listed here.
Project: This is where you create, organize, and access your game assets. From 3D models and 2D textures to C# scripts and Prefabs, every re-usable element will be listed here.
Inspector: From the Inspector, you can configure any game objects (selected from the Hierarchy view) or assets (selected from the Project view). That includes changing its Transform settings, configuring existing components and attaching new ones. Also, you can adjust other preferences for your game, once you have accessed them from the menu, in the Inspector view.
Toolbar: Includes transform tools (used for manipulating game objects and navigating the scene), control tools (used for playing / pausing and stopping the level), and drop-down tools (used for managing layers and layouts).
Menu: Gives access to a diverse list of commands covering asset import/export, preferences setting, game object creation, components, terrain, layout, and documentation.
If you want to customize the layout any further, drag and drop the views to relocate and/or dock them.
If you like your custom layout, save it through the Window | Layouts | Save Layout... menu.
When testing your game, it might be a good idea to check the Maximize on Play button, in the Game view. Also, if you work with more than one display monitor, you could drag the Game view into the second display, leaving a display exclusively for the Editor.
You can also adjust the Game view resolution. It's a good idea to test your game running on its standard standalone resolution and every supported aspect ratio.
In case you want to check the graphics performance of your game during testing, you should turn on the Stats button (you can also turn it off during testing, if so you wish).
Finally, activate Gizmos if you want them to be drawn at runtime, making it easier to spot rays, colliders, lights, cameras, and so on in your scene, as shown here:

There is another view you should pay attention to: the Console view. Access it by navigating to Window | Console. This is a very important view when it comes to debugging your game, as it displays errors, warnings, and other debug output during testing.
Another interesting view (for those with Unity Pro) is the Profiler (Window | Profiler), where you can check out detailed statistics of your game performance in real time.
To get an extensive explanation on each UI feature, please check out Unity's documentation at http://docs.unity3d.com/Documentation/Manual/LearningtheInterface.html.
You can easily create primitive geometry with Unity. In this recipe, we will create a game object from Unity's resources and keep it in our project as a Prefab.
To create a Prefab, follow these steps:
Inside the Unity editor, navigate to GameObject | Create Other | Sphere.
In the Hierarchy view, right-click Sphere and choose the appropriate option from the context menu to rename it to Cue Ball.
Now, in the Project view, click on the Create button and choose the Material option. Then, rename the new material to Cue Ball Material.
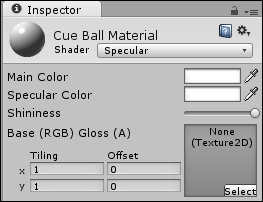
In the Project view, select Cue Ball Material. Then, in the Inspector view, change its Shader value to Specular.
Also, set Specular Color to white and set its Shininess to the maximum, as shown in the following screenshot:
From the Project view, drag Cue Ball Material into the Cue Ball game object, in the Hierarchy view.
Select Cue Ball. Then, access Component | Physics | Rigidbody. That should attach a Rigidbody component to that game object.
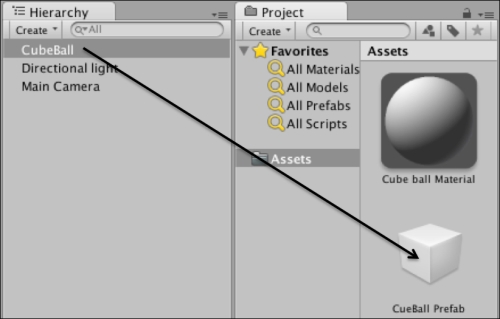
Now that your game object is complete, click on the Create button in the Project view and choose the Prefab option. Then, rename it to Cue Ball Prefab.
Drag the Cue Ball game object from the Hierarchy view into the Prefab in the Project view. Your game object is ready to be re-used in this project.
In Unity, game objects can be stored as Prefabs. This is very useful in case you want to re-use a game object in several levels or instantiate it through scripting. Adobe Flash users can think of it as the Unity equivalent of MovieClips.
There are many other ways to use Unity's built-in resources. Here are some ideas:
In this recipe, we haven't used any external asset. However, there's no reason you could not have imported a texture and used it as the Cue Ball Material base map, for instance.
Also, if you plan of re-using your Prefab in other projects, you can do it by exporting it as a custom package.
As you enter Unity for the first time, you might think you'll need to build and code everything from scratch. However, Unity comes with several collections of content called Packages, designed to save you time when implementing commonly required features.
Let's find out what's inside Unity's standard packages:
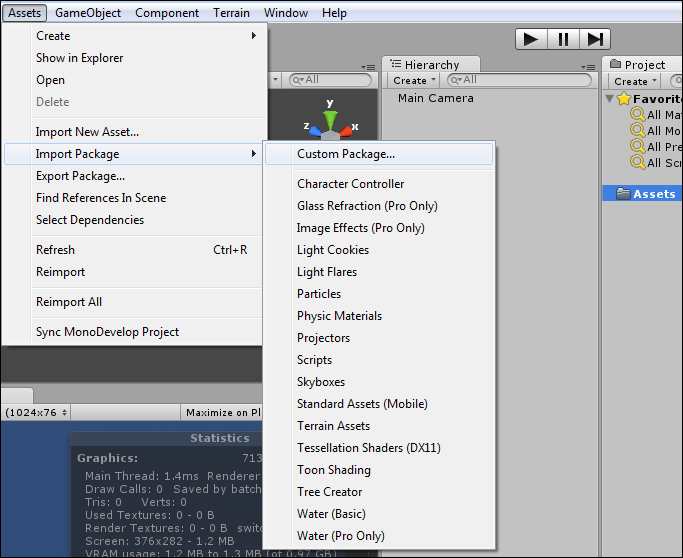
Inside the Unity editor, access the Assets menu.
Expand the Import Package submenu.
You will see a list of available packages from Unity. These are filled with ready-to-use content.
Unity makes implementing commonly requested features easy by making them available as packages ready to be imported and used in your project. These packages include First-Person and Third-Person Character Controllers, Image Effects (Pro Only), Terrain textures and assets, Skyboxes, Water, Tree Creator, and more.
There are other ways to learn from ready-made material. Here are some:
Unity also comes with a sample project ready to be dissected by you. It automatically opens the first time you start the software.
You can find and download even more resources, such as packages, projects, tutorials and assets, from Unity's resources page at http://unity3d.com/support/resources/.
After you have created a 3D model, audio clip, movie clip, or texture, you can import it into your project. In this recipe, we will learn how it can be done.
Follow these steps to import an asset:
Inside the Unity editor, access the Assets menu.
Select the Import New Asset… option.
Browse to your file and click Import.
Your file should be now listed in the Project browser, as shown here:
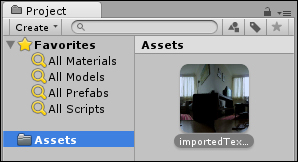
Unity makes a copy of your file, converts it to an appropriate format (if necessary) and saves it into the Project browser's Assets folder.
Here's a couple of helpful pieces of information on the subject:
Unity updates its Project view whenever a new file is added to the Assets folder. You could then save or export your work directly into that folder. You could also paste or move multiple files into there. However, you should not reorganize or rename your imported files via your OS file management system (Window's Explorer or Mac OS Finder), as this could damage important information kept by Unity about those files.
If you are not sure about how to prepare and export your work to Unity, or which file format you should use, please check out Unity's documentation at http://docs.unity3d.com/Documentation/Manual/AssetImportandCreation.html for a very comprehensive guide on the subject. Some other useful pages regarding the subject are:
Importing objects from 3D Studio Max: http://docs.unity3d.com/Documentation/Manual/HOWTO-ImportObjectMax.html
Importing objects from Maya: http://docs.unity3d.com/Documentation/Manual/HOWTO-ImportObjectMaya.html
Export FBX – How-to: http://docs.unity3d.com/Documentation/Manual/HOWTO-exportFBX.html
The packages provided by Unity can save you a lot of development time. They usually contain resources (such as texture maps, materials, and so on) and fully implemented features ready to go into your project. When creating a new project, Unity offers to install those packages into the Assets folder. However, if you've missed it at first, you can still import them into your project at any time.
Unity installation files include a number of packages that can be imported into your project as ready-to-use resources. Inside those packages are all the assets needed to implement a specific feature or functionality. Once imported, new features can be accessed through the Project view (and dragged and dropped into your level) or through newly added menu items (the Tree Creator package, for instance, adds the Tree option into the Create Other sub-menu of the GameObject menu).
Custom Unity packages are available from a variety of sources, and they can be very helpful when developing a project.
As its title implies, this recipe requires a custom package to be imported. If you need one for testing purposes, please use the one inside the folder named 0423_01_09-11.
To import a custom package, follow these steps:
Inside the Unity editor, access the Assets menu.
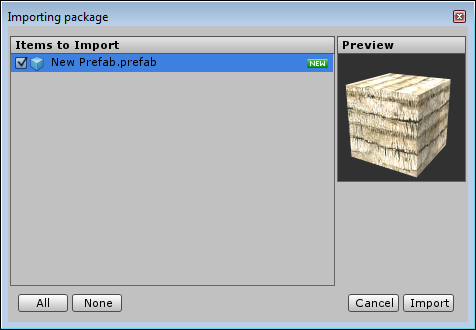
Enter the Import Package sub-menu and choose the Custom Package... option.
Browse to the package file you have saved on your disk and click Open.
Preview package contents in the top-right Preview window, if you like.
Make sure every needed component is selected and click Import.
Package contents should be ready and listed in the Project view.
Tip
Downloading the example code
You can download the example code files for all Packt books you have purchased from your account at http://www.packtpub.com. If you purchased this book elsewhere, you can visit http://www.packtpub.com/support and register to have the files e-mailed directly to you.
Custom packages are commonly used to distribute a number of assets inside a single compressed file. As they are made by third parties, the content inside those packages may vary, as they can include scripts, 3D models, texture maps, materials and any other file handled by Unity. Once imported, the package content is uncompressed into your project's Assets folder, and can be accessed through the Project window.
Third-party made content can also be found, downloaded, and bought from the Unity Asset Store. For more information, access http://unity3d.com/unity/asset-store/.
Creating packages can be a very useful and practical way of storing your game objects and assets for future use and reference. If you want to save a feature, a group of assets, or even a prefab from the project you are currently working on, it's a good idea to export them as a package, so you can easily import them into your future projects.
In order to export a package, you will need a project containing some assets. If you need one for testing purposes, please use the one inside the downloadable content for this book, which can be found inside the 0423_01_10 folder.
To export content as a custom package, follow these steps:
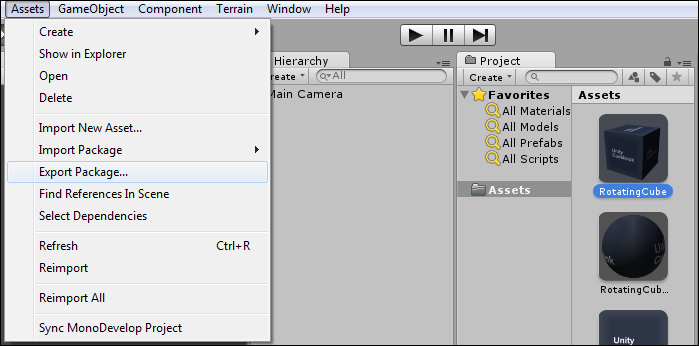
Select the RotatingCube prefab in the Project view.
Go to the Assets menu and choose the Select Decencies option. This will highlight, inside the Project tab, all assets that are linked to the RotatingCube prefab.
Once again, select only the RotatingCube prefab.
Go to the Assets menu and choose Export Package.... A new window will now pop up:
Inside the Exporting Package window, make sure the Include dependencies checkbox is selected. It is important that checkboxes for all listed objects are also selected.
Click Export and save your package into your disk. You can give it any name you want (although a name similar to RotatingCube will make things easier later, when you want to use it).
Your custom package is ready to be imported.

If you have one or more packages you'd like to include frequently in your projects, it might be a good idea to add them to Unity's package quick list.
In order to complete this recipe, you will need a custom package (any package will do). If you need one for testing purposes, please use the one inside the 0423_01_09-11 folder.
To add a custom package to the quick list, follow these steps:
Using your file manager (Windows Explorer on Windows, Finder on Mac OS), browse to the package file and copy it by pressing Ctrl + C or Command + C.
Go to Unity's
Editorfolder. On Windows, that would typically beC:/Program Files (x86)/Unity/EditororC:\Program Files\Unity\Editor. On Mac OS, it should beApplications/Unity.Access the
Standard Packagesfolder.Paste the previously copied package into this folder.
Restart Unity. It should now be listed on the Assets menu, under the Import Package sub-menu, as shown in the following screenshot:
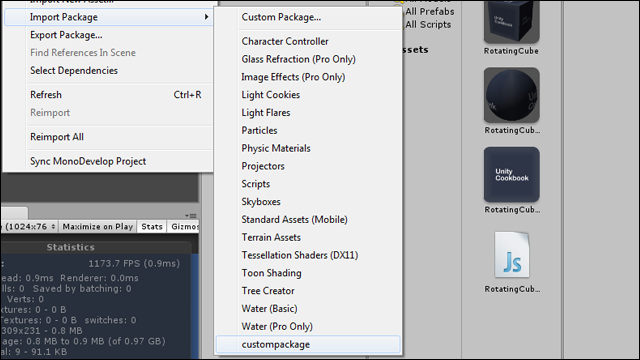
Unity's menu actually reads the Standard Packages folder content when starting up, instead of getting that information from somewhere else. This is very practical, as it always reflects the actual content of that folder and also allows the user to quickly retrieve his favorite packages.
Custom packages stored in the Standard Packages folder will also appear in the Create New Project Wizard window, making it simple to add them to new projects.
It doesn't matter how organized you keep your project folders, there will be times when you will need to search for one or more specific assets. To make things easier, Unity 4 includes the Project browser. In this recipe, we will learn how to save time by using it.
All we need to follow this recipe is a collection of assets. We will use Unity's Terrain Assets to populate our Project view.
Let's take a look at the Project browser:
Import the Terrain Assets package (Assets | Import Package | Terrain Assets).
Browse through the Assets subfolders to see the files that have been imported and how they are organized, as shown in the following screenshot:

Now let's search for all the assets containing the word "Palm" in their names. On the search field located above, type in
Palm. Observe how every file and folder is listed on the search results window.Click on the Save Search button (the one with the star icon) and name your search as
Palm.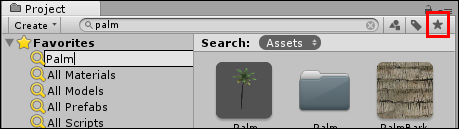
We could filter our search results by tag or file type. Click the Search by Type button (the one with a circle, triangle, and square) and select only the Models and Textures categories. You can select multiple options by holding Ctrl (Windows) or Command (Mac).
Click on the Save Search button and save it as a new filter (name it
Palm Models and Textures).Browse through the other filters saved in Favorites—they are shortcuts to browse through specific file types (All Materials, All Models, and so on).
Unity's new browsing system scans through the assets and lets you save and organize your search results.

