


 Download code from GitHub
In this chapter, we prepare the assets to build up our game prototype, starting with the process of exporting 3D models from Maya, our 3D editor of choice, into Unity. We also take care of correctly setting up the imported models and animations in Unity Inspector once they get imported.
In this chapter, we will cover the following recipes:
Setting up a scene in Maya
Using groups to rotate FBX files
Exporting FBX files from Maya
Configuring imported FBX files in Unity
Exporting animations
Configuring imported animations in Unity Inspector
When building up a game, we usually start by importing the graphics assets to actually build up and prototype the gameplay.
In this specific case, we decided to begin with 3D models. Before importing the models, you should take care of bringing in the textures. Feel free to switch between Chapter 1 and Chapter 2, 2D Assets for Unity, which focuses on textures and materials. A cookbook is specifically designed to leave the readers free to access the contents in whichever order they prefer.
We assume that you have the assets to test the operations explained throughout this book; in case you don't, you can download the contents available on Packt Publishing website.
When importing models from a 3D software into Unity, there are several settings to be defined: scales, source materials and textures, rigging and animations, and many others. We will discuss the most important setting soon.
For the importing process to be fully successful, it is also important that the scene in the 3D editor is properly set. When modeling stuff with a 3D editor for a 3D engine, it is important that scales, lights (if available), and cameras match between the scenes, or your models won't fit the game levels properly.
For the recipes of this chapter, we decided to pick Maya as our reference 3D editor. We do not mean that Maya is the best software, but there are plenty of reasons for this choice. Native Maya files are supported by Unity, and the LT version of Maya allows you to perform "one-click-exporting" of Maya scenes directly into Unity (http://videos.autodesk.com/zencoder/content/dam/autodesk/www/products/autodesk-maya-lt/video/send-to-unity-fbx-export-video-1280x720.mp4).
Maya is also an industry standard for 3D artists, and it is supported by both Windows and OS X (while 3D Studio Max, for example, isn't). You can check out 3D forums to delve into the differences between 3D software. The following is a list of very popular forums to begin with:
The first point to keep in mind when setting up a scene in Maya is that the standard unit in Maya is 1 cm, while the standard unit in Unity is 1 m So, whenever you export an FBX file from Maya into Unity, Unity scales it down to 0.01 percent of its original size.
Another very relevant point is that Maya and Unity are affected by strange kinds of idiosyncrasies that put them on opposing sides, with regard to what left or right and front or bottom mean. This is not something that only happens between Maya and Unity. Many 3D software disagree about the concepts of right and up. To get an idea, have a look at the following image, taken from Unity's forum:
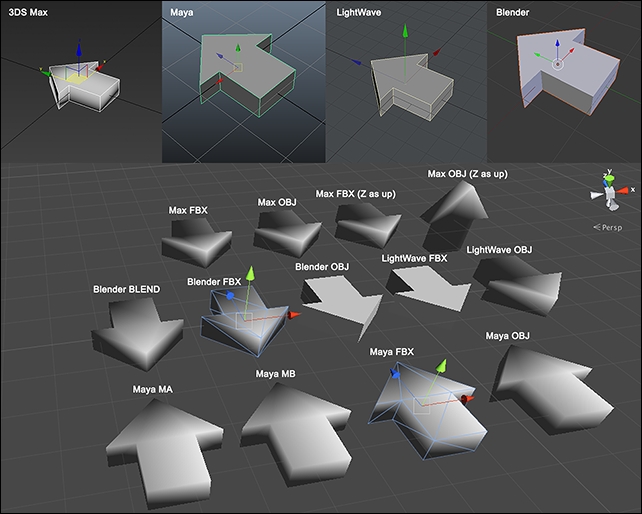
As you can see, the red arrow, representing the left-right axis in the 3D world, may point to the left or right on different software or file formats, and the green and blue axes may switch to alternatively point to the forward or upward directions.
With Maya and Unity, what happens is that the front in Maya is the back in Unity. So you model the front of a character in Maya, and when you import it into Unity, it shows its back.
How do we deal with this? There's more than one option available, and turning the camera by 180 degrees in Unity is not the only one. We will show you how to deal with this problem but, before this, we need to learn how to actually export an FBX file from Maya and add it to a Unity scene, which is what we will do in the first recipe of this chapter.
For this recipe, we need a Maya scene with a 3D model, any model with at least one material applied to it. A textured model is provided with the contents of this book.
In this recipe, we will show you how a model is exported from Maya using the default FBX exporter panel and how the FBX file will get imported in Unity.
Open your model in Maya.
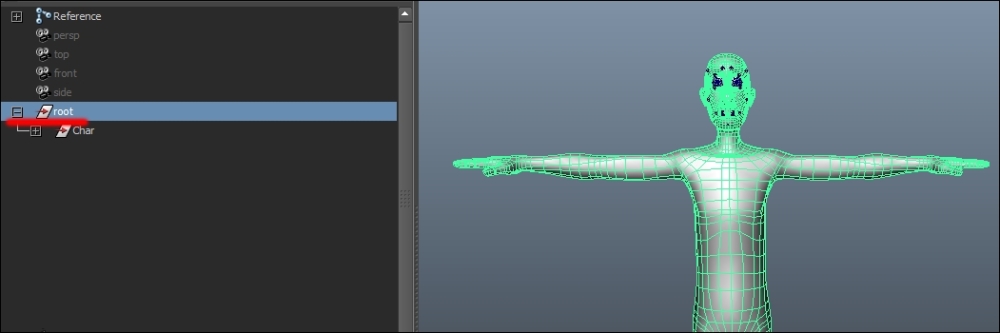
Open the outliner panel, and from the hierarchy, select the root node of your model. Remember that it is good practice to name the root node with a meaningful name, such as root. It can turn out to be useful, for example, when managing the exporting process through scripts (as shown later).
Now, in the top menu window, navigate to File | Export Selection. The Maya exporter panel will open, as shown in the following screenshot. Don't bother with the panel on the right-hand side with the actual settings; we will get back to it in a while.
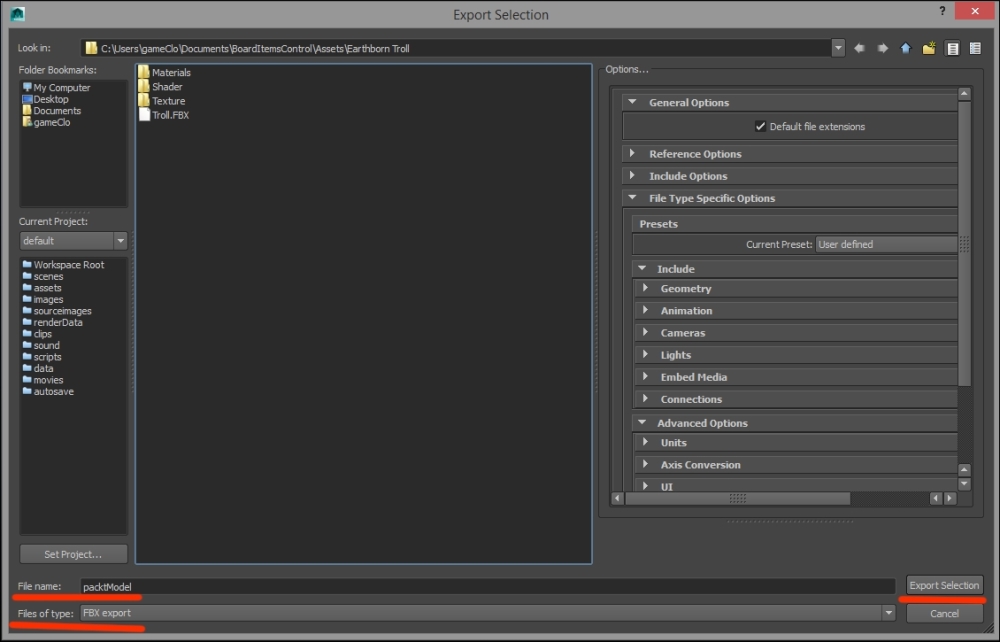
Be sure that FBX export is selected from the drop-down menu at the bottom.
Put a name you like in the File name field.
Click on Export Selection to save the file in your
destinationfolder.Now open Unity and, in the project panel, right-click and select Import New Asset…. from the menu:

Select your saved FBX file from the Explorer window that opens and click on Import.
Alternatively, you could have directly exported the FBX file from Maya into the
Assets/Modelsdirectory of your Unity project.Now select the FBX file from the project panel and drag it onto the scene. The following screenshot shows what happens in Unity:

The operation of exporting FBX files from Maya is simple: select the actual root node in the hierarchy and click on the Export button. But, as you can see, unless we use some precautions, the result of importing an FBX file from Maya is that the model is flipped by 180 degrees on the the y axis in Unity. This happens because the blue arrow that represents the z axis in Maya points in the opposite direction in Unity. As a consequence, the model shows its back to Unity's camera.
As we write, there are rumors that this issue is going to be solved in forthcoming Unity versions. For now, we will provide custom solutions we have used ourselves.
An efficient solution to dealing with the discrepancy between Maya and Unity is to act on Maya's side and rotate the model on its y axis there. Though, as we write, this problem is going to be solved soon by Maya LT, we offer a solution here that prevents the imported FBX file from acting strangely once they are turned into prefabs in Unity. The idea is to use the so-called "groups" to apply the transformations required and yet get a clean hierarchy for the prefab to appear in Unity. Let's see how to do it.
Open the scene again with the model we used before and be ready to follow our instructions.
In this recipe, we will show you how to use groups and hierarchies in Maya to export a model that will not show its back once it gets imported into Unity. Have the Maya scene open on your screen.
From the outliner panel, select the root node of your model. Be sure that the model is at the 0,0,0 position with 0,0,0 rotation.
With root node selected, press Ctrl+G to create a group in the hierarchy.
Double-click on the newly created group name to edit it and type
rot_180(this is actually just for reference so we know what the group means).Set a value, namely 180, for the rotation on the y axis in the Transform Attributes panel.
With the
rot_180group selected in the hierarchy, press Ctrl+G again to create another group. Name this groupexportafter double-clicking on the group name in the hierarchy.Now you can select the export node to export the selection in order to get an FBX file out of this model.
By using one group for flipping the model on the y axis and another to make a selection featuring neither rotations nor translations for the export, we made sure that the FBX file won't have any unexpected rotation or position offsets that will affect its behavior once it gets scripted into the code in Unity.
Another technique we will only mention here is to use your programming skills and code an AssetPostprocessor class to handle the process automatically.
AssetPostprocessor is a class in Unity, provided with several methods to act on the pipeline for importing assets into Unity.
What one could do is add a custom attribute to the model in Maya, something like turn me 180 degrees on the y axis when imported, and let the AssetPostprocessor class read this attribute and perform the transformation.
You can learn more about the AssetPostprocessor class by checking the scripting reference guide at http://docs.unity3d.com/ScriptReference/AssetPostprocessor.html.
Now that we are done with our first import, we can approach the many settings available in the Maya FBX exporter panel. There are several operations that require our attention, so follow us in our next recipe.
Open the scene with the model in Maya.
From the outliner panel, select the root node of your model. Be sure that the model is at the 0,0,0 position with 0,0,0 rotation.
In the top menu window, navigate to File | Export Selection and the Maya exporter panel will open.
Be sure that FBX export is selected from the drop-down menu at the bottom of the panel.
From the Options... panel on the right-hand side, let's examine the first group of settings. Edit the General Options, Reference Options, and Include Options tab, as shown in the following screenshot:

Now we can move to the next group of settings. In File Type Specific Options, make sure that the Include and Geometry settings are configured as shown in the following screenshot:

Next comes the animation-related group of properties. Since we are not importing animations with an FBX file, unflag the Animation option entirely. This action will disengage all the following properties (see that they are barred in the following screenshot).
Unflag Cameras, Lights, and Embed Media; we don't need any of them either.
Flag Input Connections in the Connections tab. Refer to the following screenshot for the last three steps:

Finally, in the Advanced Options tab, check that Units is set to Automatic.
Check that Axis Conversion is set to Up Axis: Y.
Check that FBX File Format is set to the latest Maya version available for your Maya installation (Binary FBX 2014, as we write). Refer to the following screenshot to be sure you have set everything correctly:

Set a
destinationdirectory for the export, most likely theAsset\FBXdirectory in your Unity project.You can now press Export Selection to have the FBX file saved and ready to be used in Unity.
As you can see, there is quite a lot that can be tweaked with regard to exporting FBX files from Maya. What we offered here was a basic outline that will do for most cases. It is very likely that, depending on the specific need that would rise with your own project, you may need to use different settings on specific tabs. In such cases, we suggest you to refer to the official Unity documentation, where an entire section dedicated to exporting from Maya is available.
Anyway, at some point, you will have determined the optimal settings configuration for your project and won't need to reset them every time. Once you get your optimal configuration, the only change will be with regard to the Animation tab. Don't worry about it now; we'll get to importing animations soon.
If you check Unity's reference manuals (http://docs.unity3d.com/Manual/HOWTO-ImportObjectMaya.html), you may learn that Unity actually imports native Maya files, which means you can directly open Maya scenes (*.mb and *.ma files) in Unity. You can therefore ask, Why export FBX files into Unity at all?
There is more than one reason actually; one that is worth $4,000 is that FBX files are far more shareable than native Maya files. For example, to open a Maya scene in Unity, you must have Maya installed or the file won't open. If you expect to exchange files between people on their own PCs, you cannot assume that each one of them will have a Maya license. It will thus be safer to use formats that don't require additional costly software, as is the case with Maya (almost $4,000 per license).
That said, it is still quite useful to open Maya scenes in Unity. For example, in Unity you can immediately check the result of modifications made on a file in Maya without the need to export an FBX file with each new edit. Also, as already stated, Maya LT is going to export FBX file directly into Unity.
Whenever an FBX file is imported into Unity, it is possible to edit some of its properties using Unity Inspector. Usually, these are operations that are required for setting things such as the correct scale of the model, the materials settings, as well as animations and other animation-related settings.
The following recipe provides useful hints on correctly specifying these settings using Unity Inspector.
For this recipe, we will basically resume from where we left the previous recipe. After having exported the model from Maya, launch Unity. By default, Unity always opens up to the last project you worked on.
From the
FBXfolder in yourAssetsdirectory, select the FBX file you just imported.In the Inspector panel, let's begin with the Model tab. Depending on the actual unit system you set Maya with, you may need to set Scale Factor for Unity. By default, Unity scales down imported FBX files to one-hundredth of their original size. If you didn't consider this when modeling the object in Maya, you may need to scale it up in Unity Inspector. In our case, we scale the model back to its original size, setting Scale Factor to
1.Set both Normals and Tangents to Import from the drop-down menu.
Flag the Import Materials option.
From the drop-down menu, set Materials Naming to From Model's Materials.
For completeness, check that Material Search is set to Recursive-Up, which is the default setting.
Click on the Apply button on the bottom-right corner. Check the following screenshot to ensure you did everything right:

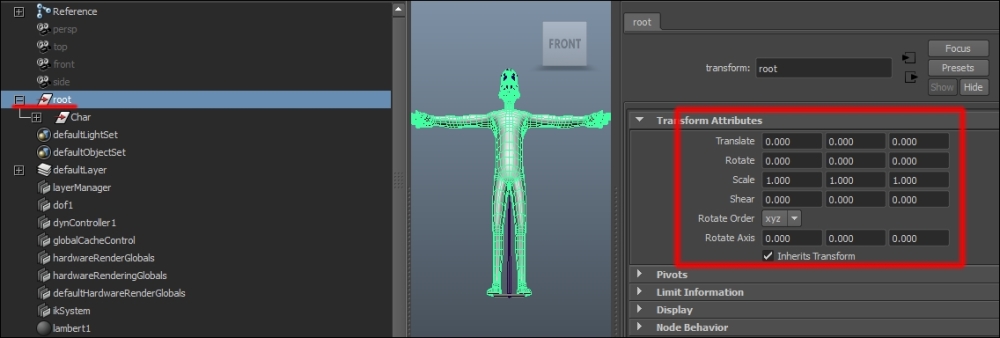
We can now move to the next tab, Rig. In the Avatar Definition field, select Create From This Model from the drop-down menu. This setting is important in order to animate the character. What we are stating here is that we want the Rig model for this character to be created from this actual FBX file.
In the Root node field, set the
rootnode of your model, then click on Apply. Check the following screenshot for reference. As stated previously, we took care of naming our root noderootearlier:
The last tab is called Animations. Since we are not importing the animations of our model with this specific FBX file, we will unflag the Import Animation option, as shown in the following screenshot:

Click on Apply to update the setting.
As already said with regard to the export settings in Maya, what we provided here was a default reference to set an FBX file imported in Unity. You may need to change some of these settings based on specific matters related to how you modeled your object in Maya and\or how you exported and\or planned to use it as a Unity game object.
We suggest you experiment with Inspector settings to get a wider grasp of the meaning of each setting and refer to the Unity documentation available at http://docs.unity3d.com/Manual/HOWTO-exportFBX.html when you have questions.
It is very likely that models are enriched with animations to improve the quality of their behavior as game objects. In the following recipe, we will see how to export animations from Maya.
When exporting animations, two approaches are possible. One, which we will adopt in this book, is to keep things on separate files. With this approach, we export one FBX file for the model, the materials, and the rigging (as we did before), and one FBX file for each individual animation, such as idle, run, jump, and the like.
The other approach is to export everything on a single file. In this case, the exported FBX file will consist of the model, materials, rigging, and a timeline containing the frames for the entire animation set of the character. We will discuss this second approach later.
As usual, we took care of providing the required assets (animated Maya scenes for the model) in case you don't have any.
With the root node of the animated model selected in the outliner, navigate to File | Export Selection as usual.
Select FBX File Format in the exporting panel and name your file. If you want Unity to automatically read the animation name when it is imported, follow the official naming convention that requires the animation file to be named
modelName@animationName(with @ before the animation name). Assuming that we are about to export the idle animation for our character, name the filemodelName@idle.Select the
destinationdirectory for theAnimationfile, which should be under Animations in your Unity project.
In the Options... panel, we need to make some adjustments to import the animation correctly. Under the Animation tab, flag the Animation option.
In the Bake Animation field, check that Bake Animation is flagged and that the starting and ending frame for the current animation are selected (this should be done automatically by Maya).
In the Deformed Models field, check that all the flags are selected. These settings may change, depending on the specific requirements of each individual model and animation set.
You don't need to change anything else with regard to the setting we defined to export the static model, so you can click on Export Selection.
As we will see in the following recipe, where we will edit the settings of the imported animation in Unity, what we get is an FBX file containing an animation clip named idle, which represents the idle animation for our character.
As we said before, it is possible to trace the animation clips on a single file\timeline and export all character animations in one FBX file; in this case, however, additional operations are required when compared to the one-file-one animation technique.
With a single file containing all the clips, Unity is not capable, by default, to read the timeline imported from Maya and automatically detecting the individual clips, and you end up with a single, most likely long, timeline named track01 containing all the animations.
So you have to split the whole timeline by yourself, naming each clip individually and manually setting the start and end frames for each one of them in Unity Inspector.
If you think about a typical working pipeline with different people taking care of different operations, you may find your animators manually writing a text file of some sort with information regarding animation clip names and their reference frames. The animators then pass on this text file to someone responsible for taking care of importing animations in Unity. This last guy would also be responsible for typing the data found in the text file into Unity Inspector. A way of doing things that can easily lead to human errors, as you can imagine...
This is the reason why we prefer using separate FBX files for each animation clip.
It is also possible to automate the exporting process so it doesn't become a time-consuming activity, but you may need a programmer for this.
The idea is to script a piece of code in MEL to handle the job. MEL is the scripting scaffold of Maya: any operation you perform in the Maya editor has an equivalent instruction in MEL. Since performing hardcoding in the MEL scripting language would go beyond the scope of this book, we just provide a few references here for those interested. The list of MEL exporting commands is available at http://download.autodesk.com/us/fbx/20112/Maya/_index.html.
An example MEL script, courtesy of James Kyle, is available at http://www.jameskyle.net/2013/03/maya-to-fbx-batch-export/.
For those of you who are interested in automating the exporting process, there are ways, pretty elegant too, that require advanced programming skills.
One way is to create a Maya Embedded Language (MEL) script that reads the scene in Maya and exports what you need, based on the settings you define for the exporting process. MEL is the programming language behind Maya; any operation performed in Maya can be converted into a scripting instruction that will achieve exactly the same result. By using MEL, you can thus create a script that automatically exports animation clips into Unity on one or more FBX files, helping you save time (and reduce the risk of errors).
Another option is to configure Maya to generate an XML file that describes the animation data stored in the timeline of a model (animation names, starting\ending frames, and the like), and then read this XML file from Unity to automatically create the required FBX files.
Both these approaches are very similar to using the post-processor to read custom attributes from Maya, as we discussed earlier.
If you'd like to go that way, you can refer to the following links:
Before we end this chapter about Maya and Unity, there is one last step we must take care of configuring imported animations in Unity Inspector. This is the topic of our next recipe.
Again, we pick up from where we left the previous lesson. Open Unity and select the animated FBX file in the project panel.
With the animated FBX file selected in the project panel, go to Inspector and access the Model tab. Since we are only interested in the animation data stored in this file, we will basically unflag most of the options that we set when we imported the static model. Use the following screenshot as a reference and then click on Apply:

Now we move on to the Rig tab. As the animation clip stored in this file is to be used by the model we imported before, we need to set the Avatar Definition field as Copy From Other Avatar.
We also need to set the source avatar. Click on the small button to the right of the Source field and add the avatar created from the static model to it, as shown in the following screenshot:

In this tab, there is much to do. First of all, flag the Import Animations option, which will make a group of related options that depend on this option visible:
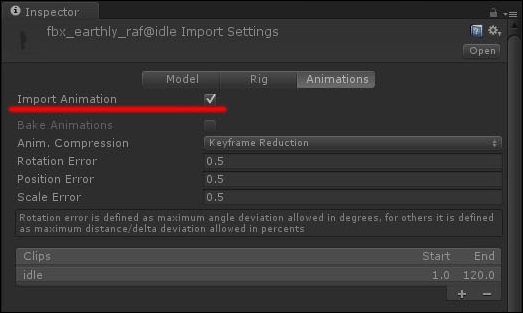
Scroll down the panel and look for the Root Transform Rotation. Flag Bake Into Pose and select Root Node Rotation from the drop-down menu.
In the Root Transform Position (Y) group, flag Bake Into Pose and check that Root Node Position (Y) is flagged. In the Root Transform Position (XZ) group, flag Bake Into Pose and ensure that Root Node Position isn't flagged.

Notice that this is an idle animation and, as such, it should be set on looping by flagging the Loop Time option. We didn't do this intentionally to provide a more general example.
Click on Apply to end configuring the animation.
Let's begin with a few words on the topic of root motion, as Unity Inspector displays several options about it.
Root motion has to do with controlling the actual position of the mesh with regard to its collider while animations are being played. Most animations happen in place, meaning that the mesh and the collider don't actually move around as the character is animated. This may be the case for examples of walk and run animations.
There are other animations though that require the mesh and collider to actually move or rotate in the 3D world as the animation is played. Actions such as strafing, jumping, and other in-game specials require the mesh and the collider to change their position and rotation in the 3D world as the animation is performed.
By setting the properties of Root Rotation and Root Position groups, you control whether the collider should rotate or move with the mesh during specific animation clips.
In a walk animation, the start and stop root orientations and positions in world space are identical. In such cases where animations are acknowledged by Unity with a green light in Unity Inspector, it is recommended to flag the Bake into Pose option in the Root Transform Rotation group and set Root Node Rotation from the drop-down menu. Also, flag Bake Into Pose in the Root Transform Position (Y) group and set Root Node Position from the menu.
As for the Root Transform Position (XZ) group of options, the manual recommends using them for long, idle animations, where the repetition of many frames could lead the mesh to drift from its collider in the long run. In such cases, it is recommended that you bake the position on the x and z axes as well.
Latin speakers used to say "Repetita iuvant," meaning repetition helps. The settings provided here are to be intended as general, default settings that may not fit into any situation. For example, you may find yourself having to set Scale Factor in the Model tab for the animated FBX file too in order to prevent the animation from not fitting the model rig. Alternatively, you may need to tweak the Root Transform Rotation and Root Transform Position settings differently, depending on how you rigged\animated your model with specific animation clips. As usual, we recommend that you refer to the Unity documentation at http://docs.unity3d.com/Manual/AnimationsImport.html whenever you have questions.
The Rig tab in Unity Inspector displays an option that we didn't mention here: Animation Type. You configure this option to select whether you want your character to be animated as a humanoid or a generic object, as it could be with a vehicle, a ball, or whatever.
Also, when a rigged FBX file is imported into a project, Unity automatically creates a so-called avatar out of it. This task is generally performed automatically by Mecanim, the built-in tool responsible for animation setting and management; we will discuss this in detail in Chapter 3, Animating a Game Character.
Mecanim has routines that examine the skeletal configuration of a rigged model imported in Unity and then recompute it into a general template it can interpret. This template is called the avatar. Once an avatar has been created, other animation clips can be targeted to that same avatar. This is how multiple animation clips are linked to a single character model in Unity.
In the recipe, we configured the model scale and material in the Model tab only for the static version of the model; in the Rig tab, we set the Avatar Definition option to Create for this model. For animated clips, on the other hand, we didn't configure the Model tab, and we set Avatar Definition to Copy From Other Avatar with a reference to the static avatar. This assumes Mecanim succeeds in interpreting the rigged model.
There are cases where for some reason Mecanim is unable to correctly compute the avatar; alternatively, you may just want to make changes on your own. In such cases, it is possible to manually edit the avatar in Unity Inspector and check that all bones required by Mecanim are correctly named and in place.
A recipe about setting up the avatar would go beyond the scope of this book, as it has a lot to do with modeling and rigging techniques, which are beyond the scope of this book.
Refer to the Unity manual at http://docs.unity3d.com/Manual/AvatarCreationandSetup.html. Besides this, if you are interested in delving more into this matter, we suggest the many tutorials available on websites about game development and 3D graphics. For example, digital tutors offer many exceptional tutorials about Unity in general and Mecanim in particular; we recommend you check them out.
