


TYPO3 is one of the most functional and powerful content management systems (CMS). Offering both functionality and expansiveness, TYPO3 is a relevant competitor for commercial solutions. Considering that there are thousands of extensions available at the moment ("plugins" are called extensions in the TYPO3 community), this chapter explains how to install TYPO3 and choose the appropriate extension. The topics covered here include:
Ways to install TYPO3
Extension installation
By the end of this chapter, you will have installed TYPO3 for a particular domain.
TYPO3 is developed and is in use as GNU General Public License (a free, copyleft license for non-profit and commercial homepages). This software was created in 1997 and is still being supplemented with new functions. The basic server requirements are:
A web server with Apache (recommended)—Apache (under Linux, Windows, Unix platforms) or IIS (under Windows platform)
PHP—TYPO3 version 4.2 onwards; you need a PHP 5.2 or higher
MySQL database
These server extras are also recommended:
GraphicsMagick (standalone). ImageMagick will work too.
GDlib/Freetype (compiled with PHP).
zlib (compiled with PHP).
Apache with
mod_gzip/mod_rewrite.A PHP-cache (for example, PHP-accelerator/Zend Accelerator, Unix only).
There are a few basic steps to start your first TYPO3-driven shop:
1. First, you need a copy of TYPO3. In this example, we used the dummy and core package that is needed for a new installation. You can get your free copy at http://typo3.org/download.
Note
If you prefer using the SSH/Shell Access (especially in a Unix server), we recommend downloading the *.tgz package. This package contains symbolic links (symlinks). If you use a Unix server with the ability to create symlinks, download the *.tgz package.
You will find detailed information about TYPO3 installation on different servers at TYPO3Wiki: http://wiki.typo3.org/index.php/TYPO3_Installation_Basics
2. Choose one of the installer packages if you don't have a web server, or choose the
ziportar.gzpackages option if you do have a web server.3. Unzip the copy of TYPO3 with a decompressing software such as WinZip, WinRar, or 7Zip—the choice is up to you.
4. Upload a copy of TYPO3 to your FTP web space with the accordant FTP software. To start the installation you need to add an extra file—the
ENABLE_INSTALL_TOOL. You have to create this file independently. For example, you could create the fileENABLE_INSTALL_TOOL.txtand upload this file to your TYPO3 installation folder/TYPO3-ROOT-FOLDER/typo3conf. Then, delete the file extension*.txt.
Base requirements for different operational systems and installation in different operational systems' environments are described on the TYPO3Wiki page: http://wiki.typo3.org/index.php/TYPO3_Installation_Basics. You could also go to the TYPO3 homepage: http://typo3.org/documentation/document-library/extension-manuals/doc_basicinstall/current/.
You can run the TYPO3 Install tool now.
In the following section, we cover the installation of TYPO3 using the TYPO3 Install tool.
You can use the 1-2-3 Install tool, which has three simple steps, to install TYPO3 on your hosting server.
To access the TYPO3 Install tool, open your web page: http://[yoursitename.com]/index.php and you will be redirected to the TYPO3 1-2-3 install script that provides an easy setup of TYPO3.
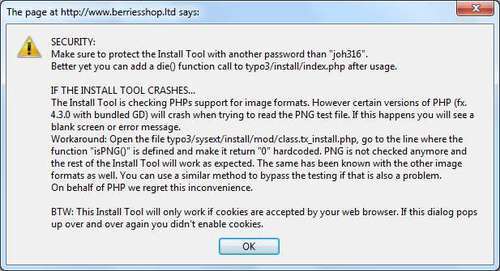
The default password is joh316. It is recommended that you change this password after the installation is complete. The following is a screenshot of the installation start-up:
The TYPO3 1-2-3 Install tool allows you, in three simple steps, to connect to the MySQL database and import the default tables from the database dump file. You can choose to create a new database and add tables to the main database. There were 36 tables in our installation for version 4.2.8.
Using a hosting service can often lead to a situation where you need to create a database independently using the Control Panel tools. For example, if you use cPanel for creating a new database, you need to:
1. Authorize in Control Panel.
2. Go to the section Databases and select MySQL Databases.
3. Enter the name of the new database.
4. Click on the Create Database button.
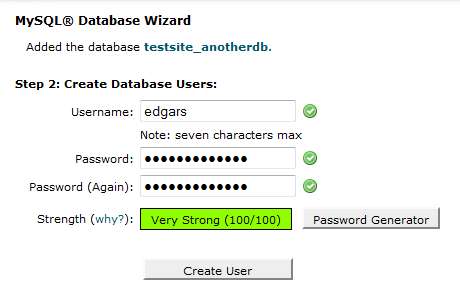
If you create a database this way, you should add the previously created user account to this database. If you choose to create the database and user account together, you have to select the function MySQL Database Wizard from the section Databases. This wizard contains the following steps:
1. Step 1: Create a Database (enter the database name).
2. Step 2: Create Database user (enter username and password for user).
3. Step 3: Add user to the Database (enable/disable user database privileges such as insert, edit, delete, and drop, among others). We recommend choosing All privileges in the checkbox for normal TYPO3 installation.
4. Step 4: Complete the task. After these four steps, you can choose to return to the first page of admin tool, create another database, or create additional user accounts for the database.
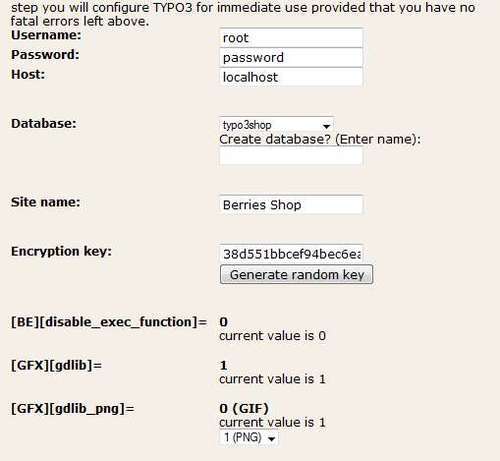
This is Step 1 in the TYPO3 installation. Write the database access information in the respective fields—username and password. After this, approve the information and move onto the next step:
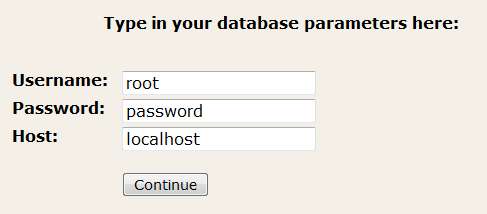
Here, enter the username and password to access your database:
Username—given username
Password—given password
Host—often"localhost"
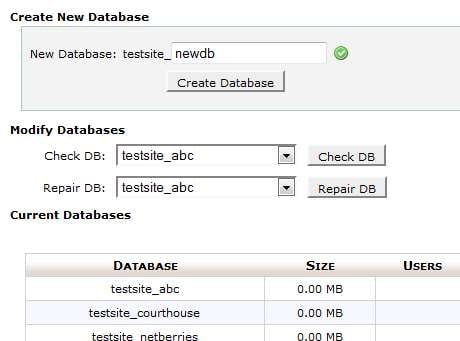
This is Step 2 in the installation of TYPO3. With this step, you can choose the existent database or create a new one (recommended). Usually, hosting service providers offer already created databases wherein you won't have permissions to create a new one.
It is different if you use a website hosting service that allows managing your web space or if you are the web server administrator; then, you may be able to create a new database through the TYPO3 Install script.
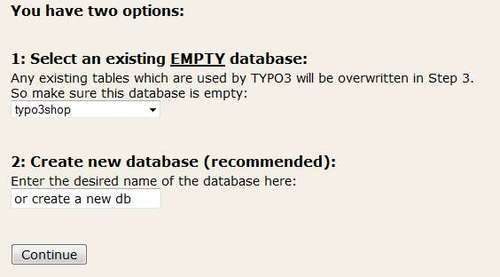
Select an existing database or create a new one for the TYPO3 installation.
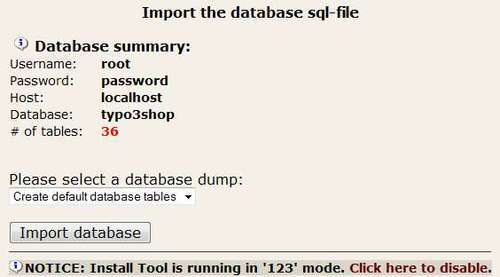
This is Step 3 in the installation of TYPO3. Import the database SQL file by pressing the Import database button.
After these three steps, you are done with TYPO3's basic installation.
For a complete installation, you should continue with the configuration—also called Normal mode, which secures additional options for TYPO3's complete functionality. Here you can continue page configuration, providing the preferred page operations. Using the section Basic Configuration, you can activate and set up the following:
ImageMagick or GraphicsMagick: for processing images (for TYPO3 image resizing, cropping, and special effects). If you choose ImageMagick, specify its location on the web server (in case ImageMagick is installed in the "non standard" folder and TYPO3 can't find it).
GDLib: options for text processing and converting it to an image.
TTF font size: 72 or 96 (look at the generated image—if it fits the box, you can leave it at size 72, or you can set it to 96).
Format of image generation: take note that the
*.pngformat files are more qualitative than the*.giffiles. The maximum color scale of a*.giffile's is only 256 colors.
To switch to Normal mode, click on the link at the bottom of the TYPO3 Install tool. You will be able to configure the content management system in detail in the Normal mode. The following screenshot shows the configuration of TYPO3 settings:
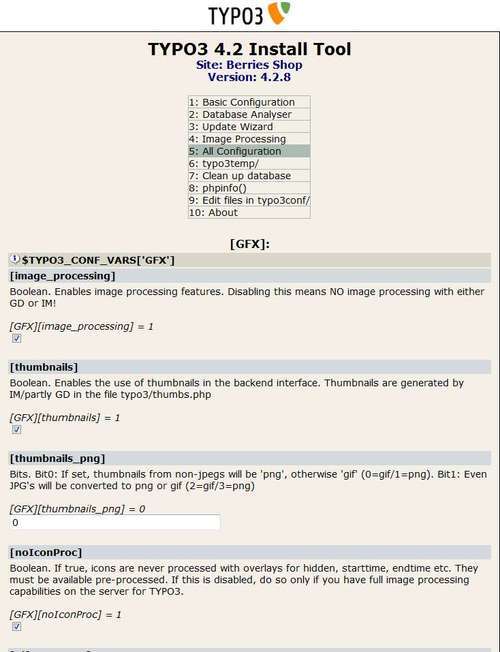
We adjusted only a few points in our example that are related to image processing using GDLib and ImageMagick.
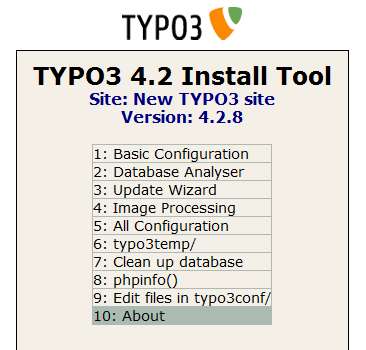
You can access Basic Configuration, All Configuration, and other useful, extra functions from here.
You can check your TYPO3 installation with basic settings at the section Basic Configuration:
Do directories have enough rights to write/read content from them? If not, you should
CHMODthem in the command line (in Unix systems) or by using the chosen FTP software. You can set up marketable Install tool values. For maximum safety of your installation, please read the security actions described in the TYPO3 Security Cookbook. You can find information about this book at the TYPO3 homepage: http://typo3.org/teams/security/resources/.php.iniconfiguration check: usually, you will not be able to edit this file if you're not the administrator of the hosting space.If your hosting administrator has granted access to some
php.inisettings, you can overwrite some functions with the.htaccessfile. For example, you can set the 'memory_limit', if it isn't enough, in your.htaccessfile by adding an extra line:php_value memory_limit 64M
GDLib and FreeType check: if there is a GDLib installed on your server and also format support check for GIF and PNG.
ImageMagick check: checks the available installation of IM on your server. If the Install tool doesn't find it, it doesn't mean that you don't have it. We set the full path to IM by ourselves in our example.
Write configuration to
localconf.php:add the needed values for site configuration and press the Update localconf.php button. Also, here you can make changes to some configuration flags. For example, give a name to your site. We called our example Berries Shop. The following screenshot shows the basic configuration:
System's options are stored in the localconf.php (/typo3conf/localconf.php) file. If necessary, you can edit and complement options manually using one of the text editors. We added the following values:
$TYPO3_CONF_VARS['GFX']['im'] = '1';
describes that we will use ImageMagick.
$TYPO3_CONF_VARS['GFX']['gdlib_2'] = '1';
enables the usage of GDLib2 (if applicable).
$TYPO3_CONF_VARS['GFX']['im_version_5'] = 'im6';
we're using ImageMagick v.6, so we entered im6.
You can set this flag depending on the version of ImageMagick that you use. Values can be im4, im5, im6, or gm (if you need to use GraphicsMagick instead of IM).
$TYPO3_CONF_VARS['GFX']['gdlib_png'] = '1';
set at 1 to generate text as images in PNG format. Also, you can leave this value at 0 to keep it in GIF format.
$TYPO3_CONF_VARS['GFX']['im_imvMaskState'] = '1';
inverts the state of im_negate_mask if set.
$TYPO3_CONF_VARS['GFX']['im_v5effects'] = '1';
this setting allows creating blur or sharpening effects. If set, it cancels the im_no_effects flag.
$TYPO3_CONF_VARS['BE']['installToolPassword'] ='0c6ca3b2c0891c8a74026cf1743148e8';
sets the Install Tool password berriesshop (md5 hashed). You can set it at the About section, or if necessary, create the md5 hash by yourself.
$TYPO3_CONF_VARS['BE']['forceCharset'] = 'utf-8';
by default, the TYPO3 administration panel is called Backend and has charset iso-8859-1, but we switched it to utf-8.
After these changes, save your localconf.php file and upload it to the web server.
Now you can log into the administration panel (backend) with the default username admin and password password.
To be safe do the following:
Change the default password for the user
admin(at the backend section User settings).Change the TYPO3 Install tool password (at the About section of the Install Tools).
Delete the
ENABLE_INSTALL_TOOLfile (/typo3conf/ENABLE_INSTALL_TOOL) fromweb space/web server.Also, you'll be informed about the undone security operations when you log into the TYPO3 backend. More important security aspects are described in the TYPO3 Security Cookbook. You can find it at the TYPO3 homepage: http://typo3.org/teams/security/resources/.
One of the advantages of using TYPO3 is that this CMS has expandability possibilities that are called "extensions". Using these extensions, you can extend the TYPO3 functionality. You can manage shops, galleries, forums, or even a small community portal.
You can download extensions from the TYPO3 extension repository (TER): http://typo3.org/extensions.
*.t3x is the file format used for extension files. This package is partly compressed using GZIP and it contains the necessary files for the extension (SQL dump, tables, functions, templates, image resources, and so on). This site is a recommended easy way to search for appropriate and suitable extensions. Also, you can find an overview of the extension functionality and additional documentation. For easy extension installation, use its import through Extension Manager.
In the extensions section,http://typo3.org/extensions, you'll find the following:
New and updated: the latest updated or recently added extensions from the last 20 days—as per the claim on the repository.
Popular: a list of the most downloaded extensions on TER.
Full list: a complete list of extensions sorted by alphabet.
Search: search the form to find an appropriate extension you need. A Search form is also provided in the section New and updated.
All the extensions are sorted in groups according to their status:
Reviewed extensions: extensions that are secure. These extensions don't affect the normal operation of the system and are qualitative.
Alfa: early stage of extension development.
Beta: early stage of extension development but operates partly.
Stable: stable extension that can be used to provide page functionality.
Test: test extension. These kinds of extensions are usually without functionality or are used for concept examples.
Obsolete: extensions that are included in the TYPO3 core or are associated with other extensions.

For our new shop, we need an eCommerce extension that provides product catalogue and functionality of a shopping cart. You can type shop or commerce in the search area and get a few versions of online shop extensions and those extensions that provide extra functionality to basic extensions.
Note the most popular and downloaded online shop extensions:
Shop System (tt_products) by Franz Holzinger
Webformat Shop System (extendedshop) by Mauro Lorenzutti
Commerce (commerce) by Ingo Schmitt, Volker Graubaum, and Thomas Hempel
The difference between these extensions is the functionality. For our online shop creation, we chose tt_products. This extension is updated, well-documented, has a lot of nice features, and has flexible configuration possibilities.
You can click on the extension title and find the basic information about the extension: the author, the updated date and version, a link to the manual, information about changes in the current version, decryptions, and dependencies.
Note
Not all extensions can work together. For this reason, always compare extensions with the already installed ones. Also, we recommend comparing used TYPO3 versions of extensions.
There is an available download link under the extension's description. You can use this link to download the extension to your hard drive.
You can log into your TYPO3 installation using the backend:
http://www.yourdomain.com/typo3.
To get authorized in the TYPO3 backend, you need to activate Cookies and JavaScript. New Internet browsers automatically support these options. In the older browsers like Internet Explorer 6, JavaScript was switched off for security reasons. This is why authorization in the TYPO3 backend can be unsuccessful in older Internet browsers. The is a screenshot of the backend login form:

Type in the username and password. The default username is admin and the password is password. After you are logged on, for security reasons change the password by clicking on the link in the warning window or in the section User Admin:

Change the username admin and password to your chosen identification data. You can enter a name, e-mail, and preferred language, and save the data by clicking on the Save and close document button.
After the identification data are changed, update the reference index by clicking on Update Reference Index.

You could get to this function from the main backend page or choose it from the side menu in the section DB check. Choose the section Manage Reference Index and click on the Update Now! button. The following screenshot shows the Extension Manager in the BE administration panel:

For extensions imported to TYPO3, use the Extension Manager. Choose Import Extensions from the drop-down menu at the top. The easiest way to install new extensions is to use the function at the top of the module under List of look up reviewed/all extensions. Hit the Retrieve/Update button to get a list with the updated extensions and enter the necessary extension name, for example "tt_products".
The extension will not be found if it isn't "reviewed". For switching this off, choose Settings from the drop-down menu, and check Enable extensions without review (basic security check) under Security Settings.

Now go back to the section Import Extensions. First, update the list of extensions by clicking on Retrieve/Update. When the list update is complete, in the search field type the extension name—in our case "tt_products".
In the search results you would find the extension tt_products and extensions that have a similar name or description:

Press the import button with the red arrow for the extension import to your web server. After the import is successfully done, you can go on to the extension installation.

Now press the + icon for Install extension. The following screenshot shows the extension installation step with the data import in the database:

Click on the Make updates button, and the extension will automatically add new tables and a new upload folder tx_ttproducts with subfolders (for product images, datasheets, rich text editor (RTE), and bills). The following screenshot shows the additional settings for extension:

After the extension is installed, you can choose extra options or leave the default settings. We recommend leaving Flexforms. For using Flexforms, you don't have the additional install extension fh_library that is needed only for tt_products versions 2.5.2-2.6.0.
Also, we require the extension Table Library (table) for the extension tt_products.
All the extensions are available at TYPO3 TER. For better search results, you can write the full extension title or part of it—for example, 'Static Methods' (without quotes).
The tt_products dependencies that are compulsory for the operation of the extension (at the time of writing this book) are:
"Shop System"—tt_products, version: 2.6.2
"Static Methods for Extensions since 2007"—div2007, version: 0.2.4
"Table Library"—table, version: 0.1.32
TYPO3 is one of the most functional and powerful content management systems. For comprehensive system functionality, we require a definite server power and an accordant software. The TYPO3 1-2-3 Install tool allows you, in three simple steps, to connect to the MySQL database and import the default tables from the database dump file. After these three steps, you are done with the TYPO3 basic installation that will provide the main functionality. For a complete installation, you should switch to advanced, also called "Normal" mode, which secures additional options for the complete functionality of TYPO3. Using extensions, you can extend the TYPO3 functionality.
In the next chapter, we will describe the TYPO3 template configuration. Using TYPO3, you can set up templates in the same way as for statistical HTML web pages.