


 Download code from GitHub
Getting Started with Studio Modeling
Roblox Studio is unique in its use of parts. A part is the fundamental building block in Roblox Studio that can be used to create literally anything in an experience. Parts can be moved, resized, and rotated. The properties of a part, such as the color and material, can also be adjusted to affect its appearance.
In this chapter, we will be manipulating parts in many ways to develop an understanding of the use of parts in creating an experience on Roblox Studio. We will be using the basic tools provided by Roblox Studio to create various props and assets that will be used to furnish and decorate many of the scenes we will be creating in the proceeding chapters of this book. We will learn how to use the MaterialFlip plugin to properly orientate textures applied to parts, and utilize a technique called shingling to make our assets stand out in terms of quality. Finally, we will learn about the different methods of creating ladders using parts and trusses.
The following is a list of the recipes found within this chapter:
- Creating a chair
- Building cactuses
- Creating wooden crates
- Building a functional TV
- Creating a ladder
- Making your bed
- Creating a stone water well
Technical requirements
You will need the latest version of Roblox Studio downloaded. In this chapter, we will be building with primitive parts, which can be found in the build kit model located inside the Chapter 1 folder at https://packt.link/gbz/9781805121596.
Alternatively, you can use parts directly from the Part drop-down menu found in Roblox Studio.
Creating a chair
In this recipe, we will be creating a chair prop using primitive-shaped parts. We will start by boxing out the shape of the chair with a primitive part and then attach a seat, which will allow players to sit on the chair. You will see how to orientate the seat part before we apply color and wood to our chair. We will finish off this recipe by using the MaterialFlip plugin, which can be downloaded from here: roblox.com/library/166951203.
How to do it…
We will begin by creating the basic shape of the chair out of square parts. We will further render out the chair’s shape by adding legs. Next, will add a seat part to the model and then detail the chair with color and the Wood material. To finish, we will correct the woodgrain of the chair using the MaterialFlip plugin.
So, to create a chair, follow these steps:
- Insert a square part into Workspace by navigating to the Model tab in the top bar and then selecting the Part tab.
- Next, select the part and then navigate to the Property tab. In the Size value field, change the increments to
2,1.5,2.25studs. - Duplicate the square part and place it flush on top of the original part. Resize the duplicated part to
0.35,2.5,2.25to make this the back of the chair. - Rescale the original part to
2,0.2,2.25, which will be the seat of the chair. Adjust as necessary using the Scale and Move tools. - Next, create four legs on each corner of the bottom of the chair using a square part scaled to
0.2,1.3,0.2studs. - Now, in the Model tab, select the Rotate tool. In the Snap to Grid part of the Model tab, checkmark the box labeled Rotate, and then change the number in the value field box to
5degrees. - Rotate each of the legs
5degrees outward on the x and z axes. You can see a before-and-after comparison in Figure 1.1:
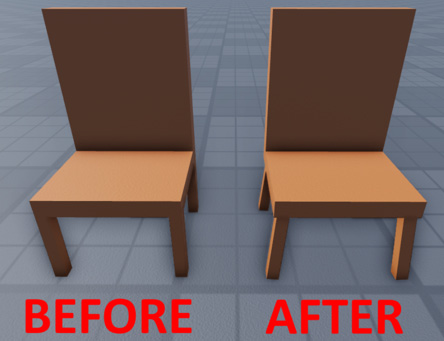
Figure 1.1: Rotated chair legs
- Now, to make sure there’s no gap between the legs and the chair seat, select all four legs and then use the Move tool to move the legs upward so the tops of the legs are hidden inside of the chair part.
- Next, insert a Seat object from Toolbox or the
Chapter1folder. - Next, place the Seat object onto the chair with the yellow marker facing where the player’s legs will point. You can press Ctrl + R and Ctrl + T to rotate the seat or part selected:
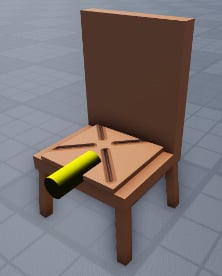
Figure 1.2: A seat object placed on the chair
- Change the transparency of the seat to
1by navigating to the Appearance tab found within the seat’s Properties box. - Change the color of the chair to (
108,88,75). - Next, change the chair part Material type to Wood.
- If your wood grain does not flow the proper way, select the
MaterialFlipplugin found in the Plugin tab within the top bar and then click on the part with improper woodgrain to flip the texture’s orientation:
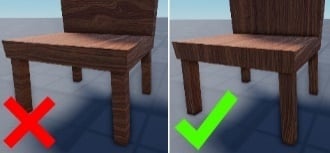
Figure 1.3: Images of incorrect (left) and correct (right) woodgrain
- Select all of the parts of the chair and then checkmark the Anchored box found in the Properties menu. This will cause the parts to remain in place and not be affected by physics.
- With all of the parts still selected, click Ctrl + G to group the parts of the chair, and name the model
Chairwithin the Workspace.
This completes this recipe for creating a chair:
Figure 1.4: Completed chair model
You now should have a basic understanding of how to manipulate parts within Roblox Studio, set transparency, and use seat parts.
Building cactuses
Creating smooth yet optimal rounded ends can sometimes be a challenge on Roblox. In the following recipe, we will build a variety of cactuses through a workflow method that allows you to line up the rounded corner edges seamlessly together. We will be working with both cylindrical and spherical parts to give the cactus a proper non-blocky shape and will then learn how to rapidly create new variants of the original model. We will complete the recipe by applying differing colors and materials to give each cactus its own distinct look.
How to do it…
We will be building the body and arms out of cylinder parts. We will then then use spheres to round the elbows on the cactus arms. Finally, we will apply color and material to the model. To begin this recipe, follow these steps:
- Start by navigating to the Model tab and selecting the Part drop-down arrow. Next, select the Cylinder option to insert a cylinder part onto the baseplate.
- Rescale the cylinder part to your desired height. In this example, the cylinder part being used is
12studs tall and2studs wide. This will be the body of the cactus. - Next, duplicate the body.
- Rotate the duplicated part
90degrees so that, together, both parts create a t shape. This creates arms for the cactus, which you can rescale to differing lengths. - Next, we will be creating three spheres to fit on both ends of the arms and the top of the cactus. First, we need to get the size of each sphere. To do this, select a part on the cactus and copy the number in the Size input box within the Property tab.
For this example, the cactus body part size is
12,2,2, so the sphere should be scaled2,2,2, as that is the proportionate size:
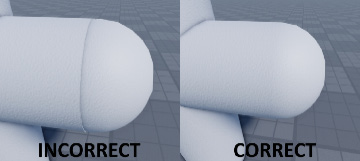
Figure 1.5: Ensure there is no crease between the ball and cylinder
- Next, insert a sphere part and paste the dimensions that you copied in step 5 into the sphere’s Size box, found inside the part’s Properties box.
- Duplicate the sphere three times and move the added spheres to the ends of both arms and the top of the cactus, as seen in Figure 1.6.
If you’re having trouble placing the sphere in the center, copy the numbers in the Position box of the arm or body of the cactus and then paste the position number into the Position box of the sphere. This will center the sphere exactly in the middle of the arm or body, leaving you with something similar to Figure 1.6:
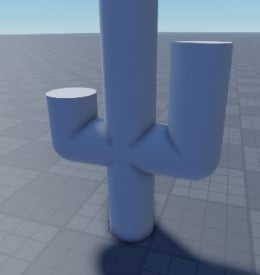
Figure 1.6: Finished basic model of the first cactu.
- Now, duplicate the body of the cactus and move it along one of the arms to be flush with the spheres that we previously placed on the ends of each arm, creating a rounded elbow.
- Next, duplicate the sphere of the arm that you just placed a cylinder part onto and move it up to round the top of the cylinder part.
- Select all of the parts of the cactus and then anchor them.
- With all of the parts of the cactus still selected, group them together by pressing Ctrl + G.
- Next, rename your model
Cactusfrom the explorer’s Workspace or the Properties box of the model. - Now, select all the parts in the model and change the color to (
127,142,100). - Finally, change the material of all parts to Grass to finish your cactus model.
This completes the final step of the recipe and should leave you with the knowledge to work with sphere parts as well as to create clean elbow bends without getting misaligned seams:
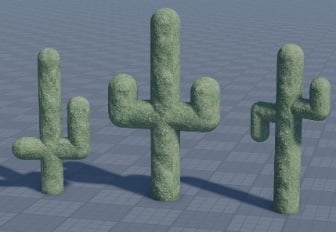
Figure 1.7: Various cactus styles
There’s more…
The Move tool (Ctrl + 2) and the Rotate tool (Ctrl + 4) can be set to move or rotate in increments by typing a number into the Rotate and Move fields found under the Snap to Grid section of the Model tab. This allows for consistent placements of our parts. When doing this, it is best to move parts with increments that can be multiplied into whole numbers such as 1; for example, 0.1, 0.25, 0.5, 1. Use increments that add up to 360 when using the Rotate tool, such as 5, 15, 30, 90. This helps keep things aligned and scale better.
Creating wooden crates
One of the most widely used props across all genres of games is the humble crate. They come in many different shapes and sizes and make for a great asset that can be duplicated and stacked on top of one another. Crate models are also a prop that can be very easily scaled, stacked, and modified. In this recipe, we will be going over how to create a basic wooden crate model.
How to do it…
We will begin the recipe by creating a large cube and then creating an extruded outline along the top and bottom. Next, we will create corner and diagonal braces. To finish the recipe, we will apply color and material to the crate after we group and name the model.
Let us start:
- Insert a square block part onto the baseplate.
- Rescale the part to be a large cube. In this recipe, the cube size being used is scaled
5,5,5studs. - Next, place a
0.5 x 0.5stud block across one of the top sides of the cube. Have the part sticking out of the cube by0.25studs to create a lip. - Duplicate the top part and add it to the other three top sides. It should look like what is shown in Figure 1.8:
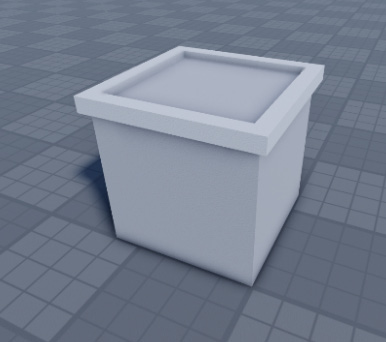
Figure 1.8: Square block outline at the top with square parts
- Duplicate the four parts at the top and move them to
0.25studs below the bottom of the cube. - Duplicate one of the side parts and then place it vertically on all four corners of the box. This completes the initial outline for the box:
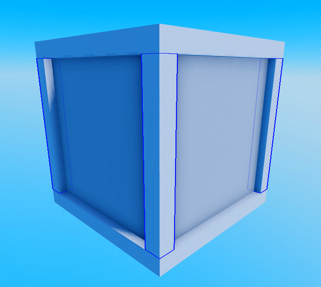
Figure 1.9: Parts placed on each corner
- To create a diagonal part across the faces of the box, duplicate one of the vertical border parts and move it to the middle of the face.
- Rotate the part by increments of
45degrees until it lines up with the corners:
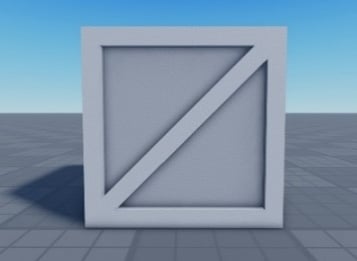
Figure 1.10: Diagonal brace after rotating
- Rescale the diagonal part along its x axis to extend out of the other side of the box. This allows us to create the same diagonal shape on the other side of the box without using an extra part, which helps keep our total part count low, as seen in the cut-away view in Figure 1.11:
Figure 1.11: Diagonal brace extended onto both sides
- Rescale the diagonal part inward
0.15studs to give another layer of depth to the model. - Duplicate the diagonal part and then rotate the duplicate part
90degrees. - Next, group the parts into a model.
- Rename your model
Crate. - Now, color the parts in your
Cratemodel. Use a darker shade on the inside (or outside) parts of the crate so that the depth of the braces stands out better, as seen in Figure 1.10. In this example, I used (108,88,75) for the inside parts and (138,112,96) for the outer crate parts. - Finally, add material to your crate. Wood was the material used in this recipe’s example.
If you are using the Wood material, use the
MaterialFlipplugin to fix any incorrect woodgrain flow.
That completes the recipe for building crates. Make sure to anchor your model if you have not done so already!
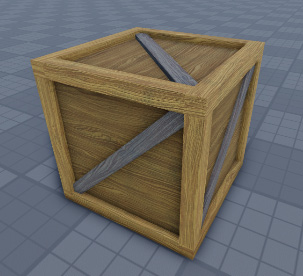
Figure 1.12: Finished crate
Now, you can use this model as a template to create a wide variety of crates to use across your maps.
There’s more…
Z-clipping, also known as Z-fighting, occurs when two faces intersect with each other. This results in both materials fighting to be rendered and is often seen as flickering on the surface. To fix this, move the flickering parts up by at least 0.001studs.
Building a functional TV
In this recipe, we will create a large flat-screen TV model that can be mounted on any flat surface. After building the TV model as a static prop, we will insert a script into the screen that will allow us to insert our own image IDs. These images will display on the TV and change every few seconds. To do so, we will learn how to modify the script to play to the parameters that we will set.
How to do it…
We will begin by scaling a square part to the size and shape of our TV and attach a wall mount to the back of it. Next, we will create a border around the TV for the screen to sit in. We will create a neon screen, and then adjust the bloom intensity of the material. To finish, we will color the TV and then insert a script, which we will customize with our own values. Let’s begin:
- To begin this recipe, insert a square part, then scale it
11,6,0.5studs. - Add a smaller square part into the center of the back face. This part will attach to the walls so that the TV can hang.
- Next, create a border around the edges of the TV using square parts roughly
0.75studs thick. The border should be flush at the back and overhang the front of the TV by0.25studs:
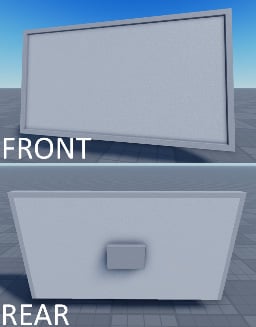
Figure 1.13: Front and back view of TV
- Duplicate the rectangular body part of the TV and move it forward
0.1studs to create the screen of the TV. - Change the material of the part we just placed to Neon.
- Rename the neon screen part
Screen. - Select the neon screen, open the color wheel, and select a color shade that is not overly intense, such as (
159,158,161). You can see the difference in bloom in Figure 1.14:
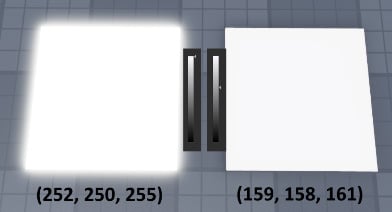
Figure 1.14: Front and back view of TV
- Next, add two small square or cylinder neon parts to the bottom-right corner of the front of the TV. These represent the power buttons.
- Select all the parts and group them into a model.
- Rename your model
Prop_Tv. - Now, color the parts within the TV model to (
35,35,28).You now have a finished static TV prop. If you would like to add functionality to your TV, continue to step 12.
- Insert into the screen part. The script is located inside the
Chapter1folder. - Double-click inside of the screen part to open Script Editor.
- Paste in your own image IDs in the place of
999999, such as9900113573,13572778873, or13544130736. imageID is a string of numbers found in the Texture box if you upload the image onto a decal.To learn how to find an image ID, check the There’s more… section at the end of this recipe.
- Modify the number inside the parentheses of
wait(10.0). The number represents the amount of time it takes to change slides. You can now exit the script. - Lastly, select all of the parts in the TV model and anchor them.
This completes the recipe on how to make both a static and functioning TV:
Figure 1.15: Completed functioning TV
There’s more…
To find an image ID, navigate to Roblox Studio Toolbox and find the Free Image search option. Insert an image onto the face of a part, then double-click the decal to view its properties in the Properties menu. Copy the numbers at the end of the Texture link.
Creating a ladder
Roblox has a unique system that allows many different objects to function as ladders. In this recipe, we will be looking at three different methods to build a functional ladder. First, we will look at what the default truss object is and how it can be used as a climbable object. Next, we will create a rope with a part and then place an invisible truss over the top, allowing players to climb the rope. Lastly, we will use a primitive square part to build a realistic-looking and functioning ladder by using evenly spaced parts placed vertically.
How to do it…
We will first examine the truss part, which we will then use to create a climbable rope hanging from a wall. Next, we will create a ladder using blocks spaced apart vertically. Let’s dive in:
- To begin creating our first ladder, select the truss part provided in the
Chapter1folder. - Alternatively, open Toolbox to the Free Models section, search for
truss, and then insert it onto the baseplate:

Figure 1.16: Truss part
- Resize the truss
14studs along the y axis. - Next, anchor the truss by checking the Anchor checkbox located in the truss’s Properties box. As seen in Figure 1.17, you can see that players are able to climb the default truss without any modifications. This is the most basic type of Roblox ladder:

Figure 1.17: Player climbing a truss
- To begin your second style of ladder, create a tall cylinder part the width of a rope. In this example, the cylinder is
14,0.3,0.2studs and the Orientation value is set to0, 0, -90. We will be using this part to represent a rope that the players can climb up. - Next, create a large wall using a square part that is the same height as the rope – in this case,
14studs tall. - Move the rope so that it is against the wall.
- Now, we will create a rounded elbow like what we learned in step 7 of the Creating wooden crates recipe. To do so, insert a sphere part scaled to the diameter of your rope part. Keeping the diameter of the sphere the same as the rope cylinder will help ensure that the sphere fits seamlessly into the cylinder.
- Move the sphere along the rope until it correctly rounds the top cap.
- Duplicate the rope part and line it up horizontally to the sphere at the top of the rope, completing the elbow, as shown in Figure 1.18:

Figure 1.18: Rope hanging over the edge of the wall
- Change the rope’s color to
150,85,85. - Change the rope’s material to fabric.
- Next, move the truss from step 3 over the top of the rope so that the rope is inside of the truss.
- Change the transparency of the truss to
1, making it invisible.Now, your rope will appear to be climbable, though the player will be climbing the invisible truss inside of the rope.
- Group the parts of the scene together and rename the model
Rope. This completes the second method of creating the ladder:

Figure 1.19: Player climbing the rope
- For the third and final style of ladder, create a rectangle part. This example uses a
9.5,1,2stud part. - Next, duplicate the part and move it up roughly
2studs above the preceding part. Continue to repeat this step until you reach your desired ladder height. These evenly spaced parts function as ladder rungs, which enables players to climb them like a ladder. - Now, place vertical ends on both sides of the ladder using two square parts. Rescale the part just beyond the top of the ladder rungs.
- Select every other rung part on the ladder.
- Now, change the part color of the selected rungs to a slightly darker color tone than the other rungs. In this example, the lighter rungs are colored (
99,95,98) and the darker rungs are colored (77,74,76). This creates a contrast in the colors by alternating the lighter and darker tones.
This completes the third method of creating ladders as well as this recipe:

Figure 1.20: Player climbing a ladder made of square parts
You now have the understanding to create a variety of climbable surfaces.
There’s more…
Trusses can only be scaled in increments of 2 studs at a time. They have a minimum size of 2 x 2 x 2 and a maximum size of 64 studs.
Making your bed
Making your bed tends to be a daily task in real life. On Roblox, thankfully, you only need to make it once. In this recipe, we will be using the building tools within Roblox Studio in combination with primitive parts to create a bed template, and then detail it with a headboard and bed frame legs. We will then create blankets and pillows. We will complete this recipe by finalizing the bed with color and a material.
How to do it…
In this recipe, we will first build the bed’s frame out of different-shaped parts. We will then create a mattress and pillows, followed by covering the bed with sheets. We will finish by draping the sheet over the edges of the bed at the bottom of the bed.
Let’s look at how we can do this:
- To begin, insert a square block part onto the baseplate.
- Next, rescale the part to roughly the size of a bed. In this example, we will be scaling the part to
10,1.25,14studs:

Figure 1.21: Legs attached under the bed frame
- Now, to make room to place the legs, move the part up
0.75studs from the baseplate so that the bed is levitating above the baseplate:

Figure 1.22: Bed leg moved inward from the corner
- Now, using square parts, create four bed legs, one under each corner of the bed. The legs used in this example are scaled
0.5,0.75,0.5studs. - Move each of the table legs inward
0.15studs from the tabletop’s edges to add depth to the model. - Next, create a headboard along the back end of the bed using a square part.
- Next, insert a wedge part, place it on one of the sides at the top of the headboard, and rescale it to be roughly half of the length of the headrest. In this example, I have the wedge sloping inward.
- Duplicate the headboard wedge part and rotate it
180degrees, then place it on the opposite side of the headboard, as seen in Figure 1.23:

Figure 1.23: Wedges on headboard
- Duplicate the original part sitting on top of the legs and then move it to sit on top to create the mattress.
- Now, to help tell the pieces apart, change the mattress part color to
Pearl(231,231,236). - Using a cylinder part, round the end of the mattress at the bottom end of the bed opposite to the headboard, as seen here:

Figure 1.24: Breakdown photo of the parts used to round a mattress
- Now, insert a square part and rescale it to the shape of a pillow. In this example, the pillow is
3.5,1,2studs. - Using four individual cylinder parts, place them on each corner of the pillow to round the edges.
- Next, duplicate the pillow’s square body parts.
- Rescale the duplicated part to fill the gap between the corners, as shown in Figure 1.25:

Figure 1.25: Breakdown photo of the parts used to round a pillow
- Group the parts of the pillow and name the model
Pillow. - Now, recolor the parts within the pillow group to (
231,231,236). - Move the pillow onto the bed below the headrest.
- Now, rotate the pillow so that it’s leaning against the headrest.
- Next, duplicate the pillow and move it beside the first to finish the pillows.
- To create a bed sheet, duplicate the mattress and rescale it to sit over the top of the mattress by
0.15studs on all 6 sides. - Rescale the top of the bedsheet (the end where the pillows are) back
2studs so that the mattress is visible. - Now, duplicate the sheet part and create a second bedsheet at the foot of the mattress. In this example, the foot sheet is scaled to
10.2,1.65,2.3, as shown here in Figure 1.26:

Figure 1.26: Foot sheet
- Now, color your bed sheets and frame. In this example, the color for the sheets is
236,57,57and the color of the bed frame is165,126,107. - Next, add the Wood material to the bed frame and legs.
- Select all the parts and group them, then rename your model
Bed.
This concludes the final step of creating a bed model. If your bed falls apart when you test the place, it means that you probably didn’t anchor your parts! Make sure to remember that as you build through each recipe in this cookbook:

Figure 1.27: Completed bed model
You now should have an understanding of the ways to overlay parts onto each other as well as how to use the seat part as a method of letting players lay on the bed (see the There’s more… section at the end of this recipe).
There’s more…
Remember using the seat part for the chair in step 7 of the Building cactuses recipe? Well, if you use the same seat part but have it rotated at an angle on top of the bed, players can then lay on the bed:

Figure 1.28: Player lying on the bed, or are they sitting?
Creating a stone water well
In this recipe, we will go over the process of creating a stone water well. We will create a circular shape out of stone bricks with a hollow center. We will then build a sloped, shingle roof over the top of the well with a shingle pattern created with randomly sized and offset parts. Next, we will cut out a part of the ground using the CSG tool, but we will do so in a way that does not break the hole’s collisions. To finish the well, we will create stone walls that lead to a pool of water at the bottom of the well.
How to do it…
We will begin by creating a circle of bricks. Then, we will copy and stack the bricks into layers until the well is three layers high. Next, we will create a frame for the roof to attach to and use wedges to get our roof’s slope. We will then cut a hole into the ground and put water at the bottom. To finish this recipe, we will shingle the roof in an organic manner.
Let’s look at how we can do this:
- Start by inserting a part and shaping it into a rectangular brick for the well. This example’s brick is scaled
3.5,1.5,0.5studs. - Duplicate the part and move the duplicated part forward around
8studs. - Select both parts and duplicate them.
- With both parts selected, rotate them
60degrees. Repeat this process until you have a circle of bricks. If you are having trouble with where your Rotate or Move tool arrow selectors are pointing, you can switch to Global and Local movements by using Ctrl + L:

Figure 1.29: Circle of bricks
If the brick edges are intersecting, you may need to reduce the length of your brick.
- Select all the parts, group them, and then rename the model
BrickLayer. - Select the model, then copy (Ctrl + C) and paste (Ctrl + V) on top of the first brick layer or duplicate the group and move it up manually.
- Next, rotate the top layer of bricks
30degrees. - Create two poles symmetrically on both sides of the well with either square or cylinder parts. The poles in this example are
0.5,9.5,1studs tall:

Figure 1.30: Tall pillars for the roof
- Place two same-sized wedges connecting the roof from one pole to the other.
- Place a part onto the sloped face of one of the wedges, then rescale it to fit the surface. Duplicate the part and place it on the other wedge.
- Next, rescale both of the parts that we placed in step 10 so that they overhang the wedge by around
4studs and overhang the bottom of the wedge by1stud. It should look like what’s shown in Figure 1.31:

Figure 1.31: Roof overhanging the well
- Delete both wedges.
- Lower the two sloped roof parts downward so that they are merged into the posts such that the roof is not levitating above the posts.
- Insert a cylinder brick and resize it to fit the inside of the well.
- Color the cylinder brick (
13,105,172) to represent water. - Duplicate the cylinder part and then rescale it to be both above and below the baseplate part.
- Negate the cylinder part by pressing Ctrl + Shift + N.
- Select both the baseplate and the negated part and unite them with Ctrl + Shift + G to create a hole in the ground.
- Move the blue water part to the bottom of the hole.
- Change the water part transparency to
0.6. - Duplicate the water part three times, each time moving the part
0.75studs above the last to create multiple layers of water. - Now, use a cylinder part to create a beam between the two parts holding up the roof. Rescale the cylinder part to fit in between the two poles underneath the roof. The beam size in this example is
9.9,0.5,0.5:

Figure 1.32: Row of shingles
- Insert a cylinder part and place it vertically on top of the beam that we made in step 22. This will be a rope leading into the well.
- Rescale the rope part to be
0.3 x 0.3studs in width. - Next, recolor the rope cylinder to (
27,42,53). - Now, create a thinner rope leading from the rope on the beam to the bottom of the well.
- Select the rope parts and turn their collisions off by unchecking the CanCollide box in the Properties box. This will cause players to pass through the rope and not get stuck on it.
- Now, to create shingles, start by creating a row of varying sizes of parts along one of the sides of the roof.
- Rotate the bricks so that they peel upward at varying angles.
- Duplicate the row and then reposition the shingles along the rest of the roof in a staggered fashion.
- Group all the shingles on one side of the roof and then duplicate the group to the other side. Make sure to randomize the shingles on the other sides so that they don’t simply look mirrored.
- Color all the roof shingles (
190,104,98). - Select random singles and slightly raise or lower the color shade to give the roof a stylized look.
- Insert a square part along the top gap of the well’s roof and scale it to extend over both sides of the well by about
0.5studs. - Finish coloring the well by making the pillars and roof base (
86,66,54) and the stone rocks on the well (99,95,98). - Materialize your well by applying the Wood material to the brown-colored parts and applying the Slate material to the shingles.
This completes this recipe:

Figure 1.33: Completed well model
You now have a basic understanding of the Union tool, as well as how to create a single pattern that can be used in many different cases.
Now, after completing the recipes found in this first chapter of this cookbook, you should have a decent grasp of the different tools, as well as some of the use cases that plugins have while building your maps and models. With a good grasp of how to build with primitive parts, let’s move on to the next chapter for a more in-depth look at solid modeling and the necessary CSG tools.