


 Download code from GitHub
Chapter 2: IAM, Users, Groups, and Admin Access
Building IT services for your organization in Google Cloud needs to start like a good house, with a firm and secure foundation. If the foundation is weak, then sooner or later, cracks appear, and that’s so much harder to fix after the house is built.
Interestingly, this is exactly what got me into working with Google Cloud. I’ve spent most of my career writing code, helping others to write code, training around writing code, and… well, you get the picture. I’ve been coding in one form or another since the mid-1980s. I never wanted to be a cloud consultant/trainer; I liked the code.
A Note on the Whole “Why Google Cloud?” Question
I regularly get asked why I like Google Cloud. There are a lot of good reasons, but they are based on my experiences and the types of work I do. I say the best answer is, “Go try it yourself.” AWS was the first and is currently the biggest cloud provider, followed by Azure (rhymes with pressure), with Google Cloud the third most popular. All the major cloud providers have free trials and other programs to allow you to give things a spin before you spend too much money. Do some tutorials, try to do what you need, and see what you like best. If it’s Google Cloud, then you’re reading the right book.
As a developer, I followed my aforementioned advice and did some work with AWS, a bit with Google Cloud, and working with SharePoint got me into a bit of Azure, but after playing with the big three cloud providers, the one that clicked best for me was Google. So, I started saying to my clients, “Hey, this app you want to build – why don’t we build it in Google Cloud?”
Those who were at least open to the idea came back with one of two common responses. First, there were the “Sounds like an interesting idea… How do we do that?” clients. They liked the idea of the cloud and were open to giving it a shot, but they didn’t know how to make a start. Understandably, they wanted help taking those first steps, and there I was.
Now, I am not a good liar, and if I don’t just say what I’m thinking, it typically shows all over my face, so for the clients who went with “Great idea – as a matter of fact, we’ve already started moving to Google Cloud. The CEO/CTO/CIO/big boss recently attended a conference, and we’ve started an initiative to create all future applications in the cloud. Come look,” it was really hard to not let the horror show.
Why horror? Well, because so many times, I would look at what they had done and it would be hard not to simply put my head in my hands. There would be so much fundamental cloud architecture to fix, and that was all before we could even start with the application development.
It’s generally not a good idea to burst out with uncontrollable laughter or to tell a client that they’re an idiot, so I usually went with something like, “Yes, I can see what you’ve done there and I’m glad you’re thinking cloud, but there’s a couple of things we should probably rework before building the application.” Hey, embellishment isn’t lying; it’s just good storytelling.
At some point, my brain kicked in and said, “Hey, there’s a need here. You should do this,” and then I wasn’t writing as much code anymore.
To help get our foundation started in Google Cloud Platform (GCP), Google has created a checklist, which you can find here: https://cloud.google.com/docs/enterprise/setup-checklist. I’m not going to reinvent the wheel by coming up with my own checklist, but I am going to paraphrase Google’s a bit:
- Configuring identity management
- Adding an initial set of users and security groups
- Enabling administrator access
- Setting up billing and initial cost controls
- Creating a resource hierarchy to control logical organization
- Adding IAM trust boundaries to the resource hierarchy
- Building and configuring the initial Virtual Private Cloud (VPC) network
- Configuring logging and monitoring so that you know what’s happening in the cloud
- Adding organization policies, the Security Command Center, and other security measures
- Selecting and enabling a Google support plan
At the time of writing, Google is creating a wizard to help you through their steps (https://console.cloud.google.com/cloud-setup). Most of this help seems to be taking the form of instructions with links, then Google runs checks to see that you’ve completed each item, and you mark the items complete once you’re both satisfied. I’m going to walk you through the steps in detail so that you know what you’re doing and why. Feel free to just use the help that the wizard provides, but keep reading to truly understand the decisions that you and the wizard are making.
In this chapter, we’re going to take the first three major steps toward laying our foundation in Google Cloud:
- Step 1 – configuring identity management
- Step 2 – adding an initial set of users and security groups
- Step 3 – enabling administrator access
Step 1 – configuring identity management
I tossed around a few different ideas on how to get this section started, and I finally realized that the easiest would be to simply set up a new organization that I could use for any examples related to this book. I headed over to a Domain Name System (DNS) registry service (I like https://www.namecheap.com/) and did a little unused domain name searching. I thought this had a nice ring to it:
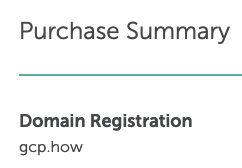
Figure 2.1 – My new domain – gcp.how
Then, I signed up for Google Workspace (formerly G Suite). To be clear, having a Google Workspace is not a requirement for setting up Google Cloud. I’m using Google Workspace because it provides me with email, Google Drive, and so on, but it doesn’t automatically come with an account in Google Cloud.
Google workspaces can be self-served from the Workspace home page, https://workspace.google.com/, or a domain service such as Namecheap can also create the workspace account for you.
Now that I have my domain and email configured, let’s get back to our first major Google Cloud setup step – configuring identity management.
Cloud Identity is Google’s Identity as a Service (IDaaS) offering. IDaaS is a cool acronym for a system that can authenticate users. If you head into an office building to visit someone, you frequently have to show your ID before you can get access. That’s an analog version of an IDaaS system. Google’s Cloud Identity can handle identity services for you directly, as it both stores and validates credentials, or it can federate with other providers, such as Microsoft’s Active Directory (AD) and Azure AD, and let them be the source of truth when it comes to identity.
In the case of Google Cloud, Cloud Identity will be the access gateway that decides exactly how apps, people, and devices prove who they are in a secure and reliable way before they can access services. But Cloud Identity can be much more than just an IDaaS system; it can also help organizations manage employee computers, phones, and tablets, as well as integrating into systems requiring Lightweight Directory Access Protocol (LDAP).
In my office building example, after the person at reception checks your ID to make sure you are who you claim, they then have to decide on exactly what you can access. In Google Cloud, once identity is confirmed, Identity and Access Management (IAM) takes over and, based on the security roles your identity has been assigned, IAM can then decide exactly what you are authorized to do in terms of Google Cloud services. We will talk more in depth about IAM in a later chapter.
Together, Cloud Identity and Google Cloud IAM work like Figure 2.2. The user comes into Cloud Identity and proves who they are. Then, based on the roles directly assigned to them or to the group to which they belong, they are authorized to access some, all, or none of the resources that Google Cloud makes available:
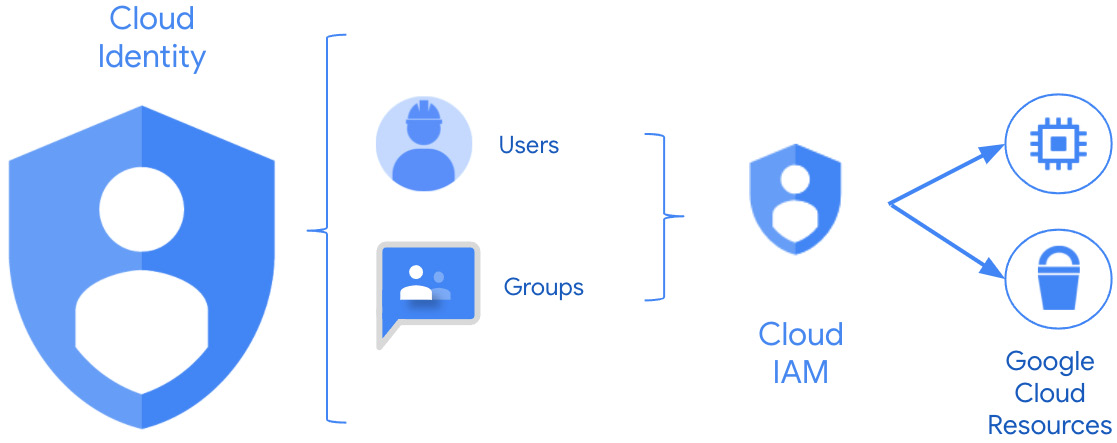
Figure 2.2 – Cloud Identity working with Cloud IAM
Before setting up Cloud Identity, you need to decide which of the two editions you’ll need – free or premium. If you look at https://cloud.google.com/identity/docs/editions, you’ll see a good comparison. The editions aren’t mutually exclusive, so you can allocate some of your users to free and others to premium, based on need.
To briefly summarize the differences, the free version provides the authentication you’ll need for Google Cloud for up to 50* users, plus Chrome sync, most Cloud Identity reporting features, and core mobile device and computer management. The premium edition (currently $6 a month per user) provides everything from the free pile for as many users as you want to pay for, plus much more advanced mobile device and mobile app management, LDAP app integration support, more reporting, and 24 x 7 email, phone, and chat support, all with a 99.9% SLA.
For my demonstration site, where I’m mostly concerned with controlling access to Google Cloud, the free version will be just fine.
*Up to 50 Users
The default Cloud Identity free user count is officially 50 but, based on your organization’s reputation and what else you may be paying for, Google can automatically and/or manually raise that number. For example, I’m using Cloud Identity’s free version, but my default user count limit in Cloud Identity is showing 90 users. Why? Because I’m paying for Google Workspace, so I’m already paying something per user.
Cloud Identity setup
To set up Cloud Identity, you will need the following:
- The ability to get into your domain name registry settings so that you can verify domain ownership. If you have any domain aliases (perhaps you own
.comand.org), have the keys to them ready as well. - A first Cloud Identity super admin username.
I have just set up my domain, so I know that I have access, but you’d be surprised how frequently this is a stumbling point for organizations. Everyone in the organization knows that there is a domain name, and you pay for it every 5 years or something, but who has the keys to it? Check with IT and, if they don’t know, send a message to your finance department and have them check for the bill. If no one has a clue, you can do an Internet Corporation for Assigned Names and Numbers (ICANN) lookup (https://lookup.icann.org/). I just did a search for my new domain name, and it provided me with a contact form that I can use to send a message to the owner. It also told me who the registrar was and how I could contact them. Going down that route may take a bit of time, but it’s a place to start.
Next, I need to decide on my first Cloud Identity super admin user. This will be the first user who has full control over Cloud Identity, and that’s a lot of power at the access control level. The best practices for Cloud Identity super admins are as follows:
- The account should be used for Cloud Identity administration (user and group life cycle and organizational security settings) only. It should not be a normal daily-use account.
- The account should not be used as a Google Cloud organizational administrator (Google Cloud’s version of a super admin, which we’ll discuss in more detail later).
- You should eventually have two to five Cloud Identity super admins. You need at least two in case one is on vacation. You don’t need many more than five because it’s just too much power to have floating around.
- This first account will be used for initial Cloud Identity or Google Workspace setup, Google Cloud setup, and then kept back for use as a final recovery option. If you are a super admin, we’ll create an account for that later, but not yet.
- As a best practice, come up with a descriptive but generic name, such as
gcp-superadmin@<your-domain>. I’m going to usegcp-superadmin@gcp.how. - Protect all super admin accounts with some form of 2-Step Verification (2SV). The strongest option would be a physical key, such as Google’s own Titan key (https://cloud.google.com/titan-security-key), or one of the keys from Yubico (https://www.yubico.com/products/). Make sure that you also have backup configured, perhaps backup codes encrypted and stored securely.
You can find the steps to sign up for Cloud Identity here: https://cloud.google.com/identity/docs/setup.
If you aren’t going to be pairing Cloud Identity with Google Workspace, start with one of these:
- To sign up for Cloud Identity Free, start here: https://workspace.google.com/signup/gcpidentity.
- To sign up for Cloud Identity Premium, start here: https://cloud.google.com/identity/signup/premium/welcome.
If you are going to use Google Workspace, then set that up first and after it’s up and running, follow these steps:
- Log into your Google Workspace admin page: https://admin.google.com/.
- Go to Billing | Get more services | Cloud Identity.
- Select Cloud Identity Free (my choice) or Cloud Identity Premium.
The steps you run through to initially sign up for Google Workspace or to sign up for Cloud Identity are almost identical. There’s a setup wizard, and you’ll have a quick about you section where, besides your name, you’ll also have to provide a secondary email, something outside your current domain. There’s a section where you can enter basic business information, your domain information, and finally, you’ll finish and run through the initial user setup. Remember, this should be your first super admin user, as discussed previously, so it should be your equivalent to my gcp-superadmin@gcp.how.
The domain name verification section is where you’ll need to be able to access your domain name registrar configurations. In it, you’ll have to create a TXT or CNAME record, depending on preferences, or you may also be able to verify your domain by adding a tag or page to your organizational website itself. Since I also needed to tie my domain name mail configurations to my Google Workspace, I had to add a handful of Mail Exchanger (MX) records. It can take Google minutes to hours to complete its verification process once the registrar configurations are updated. You may have to check back on the verification pages multiple times. For me, it took about 10 minutes.
Once that part is complete, you’ll get your Cloud Identity/Google Workspace admin page: https://admin.google.com/.
Now that you have initial access to Cloud Identity or your Google Workspace, via the corresponding superuser, go ahead and log into Google Cloud with it for the first time by heading over to the getting started page for Google Cloud: https://console.cloud.google.com/getting-started. If you like, go ahead and start your trial, though you’ll need to be ready to provide a credit card if you do (make it a corporate card!).
If you can access the Cloud Identity or Google Workspace admin page (https://admin.google.com) with your superuser account, and you can access the Google Cloud Console page (https://console.cloud.google.com/), then you are ready to move on to the next major step.
Step 2 – adding an initial set of users and security groups
Before we get to adding an initial set of users, we need to discuss how you manage users now and whether you want to integrate that with what you’re doing in Cloud Identity.
There are two main concepts that come into play here:
- The one source of truth for user identities. This is where you create and manage users and where you store information about those users (such as name, email, manager, and group membership).
- The Identity Provider (IdP) where you perform authentication to verify that a user is who they claim to be.
So, the big questions are, what are you going to use as the one source of truth for users? What are you going to use as an IdP? And if they aren’t the same, how are you going to mix them?
Cloud Identity managing users and acting as IdP
Let’s start with the case where Google Cloud Identity is managing both users and serving as an IdP, something like this:
Figure 2.3 – Cloud Identity managing both users and the IdP
The nice thing about this approach is that it’s easy, low-cost, and you don’t have to do anything to integrate Google Cloud Identity with an external IdP or user service. You are essentially setting up a new and isolated set of users, and you’re using a Google mission-critical security system to do it.
This is when you should use it:
- You’re just getting started as a new business, and leveraging Cloud Identity as both a user store and IdP just makes sense. In this case, I’d strongly consider Google Workspace as well, since it does such a nice job with Docs, Sheets, Drive, and so on.
- You are already using Google Workspace and simply want to add Google Cloud access.
- You want a small, isolated set of users to have access to Google Cloud services and you like the idea that they are managed independently in GCP.
This is what the login process will look like to a user:
- The user follows a link to a protected resource in GCP, such as Cloud Storage.
- If their browser isn’t already authenticated, then they are redirected to a standard Google sign-in screen where they enter their username and password. If 2SV is enabled, they are prompted to provide their key or code.
- If the user authenticates, then IAM decides whether they are authorized to access the requested resource, and if so, they are then redirected back to the service they requested – in our example, Cloud Storage.
That’s really easy, but what if an organization likes Google as an IdP but they are already managing users with a system in HR? In that case, a better option might be to split the duties.
Cloud Identity managing IdP and an HR system managing users
Some organizations use a Human Resources Information System (HRIS) such as SAP SuccessFactors, BambooHR, Namely, Ultimate Software, or Workday to manage their users. By letting the HRIS focus on user management, you can preserve existing HR workflows for things such as provisioning new users, and Cloud Identity can be used to handle everything IdP-related. This architecture would look something like this:
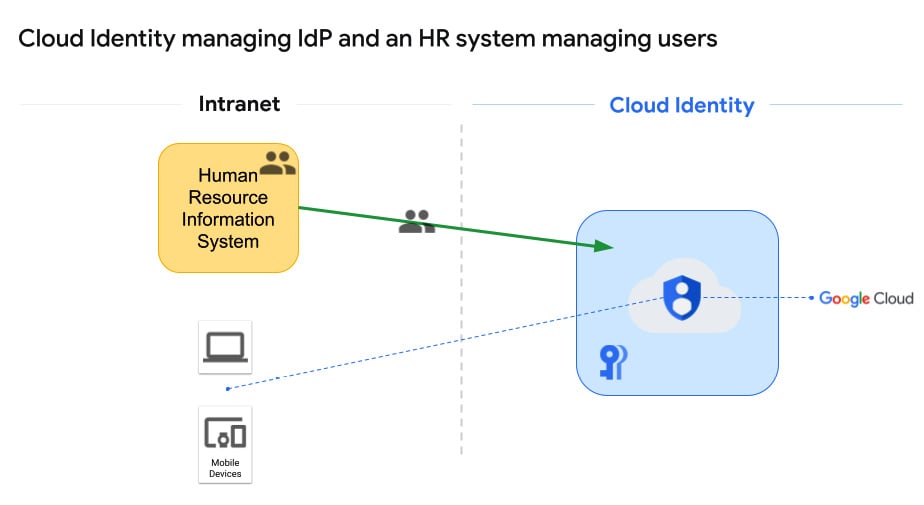
Figure 2.4 – HRIS manages users and Google handles IdP
This configuration allows the HRIS system to focus on what it’s good at, HR, and lets Google handle something it’s good at, high-grade user authentication. The biggest downside here would be that if your HRIS can also manage passwords, you aren’t necessarily leveraging that. For some environments, that would imply that you have the same username in two systems, the HRIS and Cloud Identity, but the passwords wouldn’t be the same. You’d log into local intranet systems through the HRIS and to Google Cloud through Google. It’s either that or, more likely, you would make Google the only IdP, and your local systems would reach out to Google when logging into anything.
Here’s a good link to check on the detail of setting this stuff up: https://support.google.com/a/topic/7556794.
This is when you should use it:
- You already have a solid HRIS in place and would like to preserve your HR system workflows as you move to Google Cloud.
- You’re okay, and maybe even happy, to let Google handle the IdP, and have a plan to make Cloud Identity the only IdP for all in-and-out of cloud authentication – possibly because of the following point…
- There may be no existing centralized, on-premises IdP, and this gives you the chance to implement one.
This is what the login process will look like to a user (unchanged):
- The user follows a link to a protected resource, such as Google Cloud Storage.
- If their browser isn’t already authenticated, then they are redirected to a standard Google sign-in screen where they enter their username and password. If 2SV is enabled, they are prompted to provide their key or code.
- If the user authenticates, then IAM decides whether they are authorized to access the requested resource, and if so, they are then redirected back to the service they requested – in our example, Cloud Storage.
As I mentioned, one of the downsides with this approach is that some HRISs, as well as a bunch of other third-party apps such as AD, can manage both users and identities. What if we want to integrate one of those third-party services into Google Cloud? Well, there are several ways we can go about it.
Cloud Identity delegates all IdP and user management to an external (non-AD) provider
The phrase we’re looking for here is: IDaaS provider. IDaaS providers range from specialized options, such as Okta or Ping, to some of the HRIS systems we discussed in the last section, such as SAP SuccessFactors or Workday, which can manage HR but also have components designed to handle IDaaS. Many of these Single Sign-On (SSO) services operate using an Extensible Markup Language (XML) standard called Security Assertion Markup Language (SAML), as shown in the following figure:
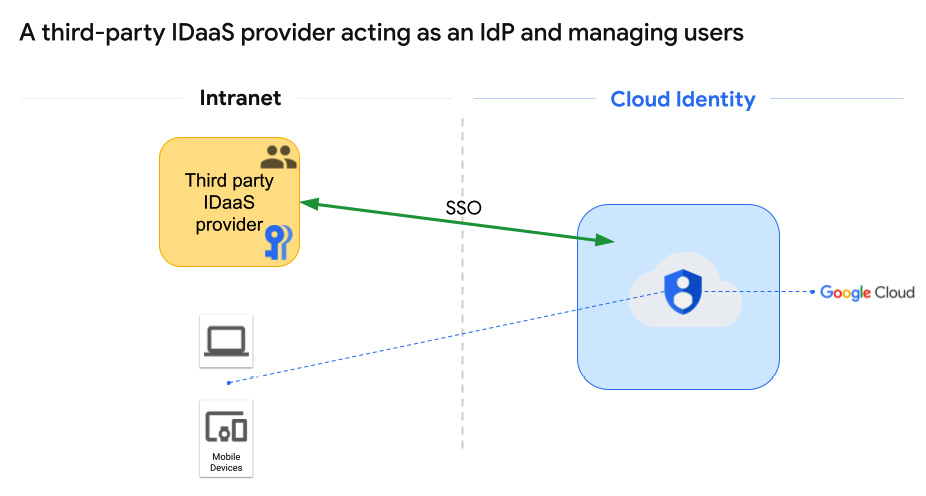
Figure 2.5 – A third-party IDaaS provider acting as an IdP and managing users
You know, I spent 4 years in the Marines, and I can tell you without any hesitation – the military has nothing on technology when it comes to acronyms.
For information on setting this option up, check out this link: https://support.google.com/cloudidentity/topic/7558767.
This is when you should use it:
- You already have an existing IDaaS provider with a set of users, and you don’t want to reinvent the user management or authentication wheel.
- You don’t need or want to synchronize passwords or other credentials with Google.
Behind the scenes, SAML works like this:
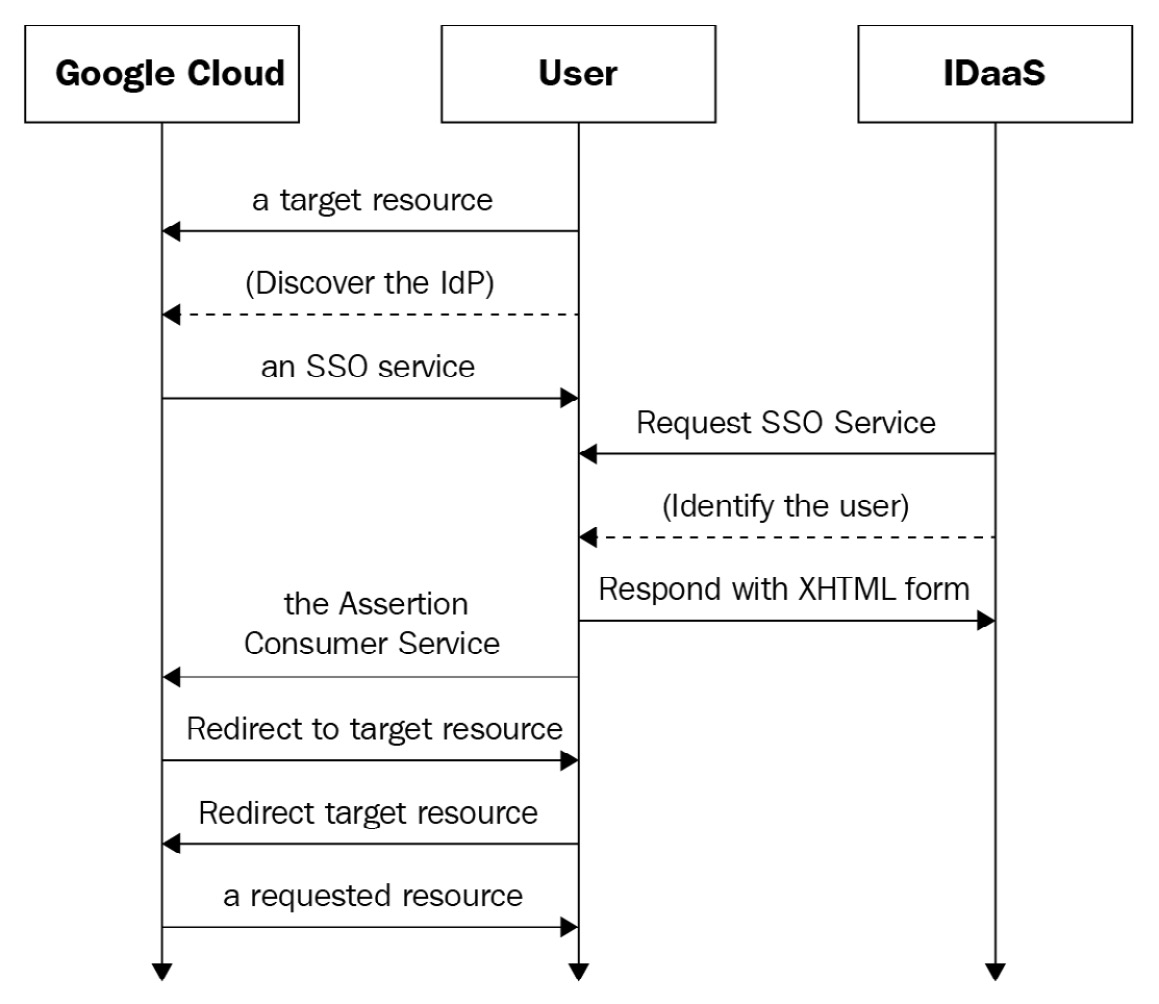
Figure 2.6 – SAML authentication
This is what the login process will look like to a user (SAML):
- You follow a link to a protected resource, say Google Cloud Storage.
- The browser gets redirected to the IDaaS provider.
- If you aren’t already authenticated, you log in at the SSO service, just like you do for everything else.
- The provider passes a SAML response back through the browser to Google’s Assertion Consumer Service (ACS). The ACS makes sure that the response is appropriate, figures out which user you are, and then Google Cloud IAM decides whether you have access to the individual resource you requested. If you do, you get access to Cloud Storage.
This all sounds good, but what if that third-party service is Microsoft’s AD? Well, that’s a different kettle of fish.
Integrating Cloud Identity with Microsoft AD
I read a study once that said something like 95% of Fortune 500 companies use Microsoft AD as their primary IdP. So, chances are, if you’re part of an established organization, you’re probably doing your user identity management and your login through AD. How can Google Cloud integrate with an existing AD environment? There are four main ways, and I want to take time to explore each. Let’s start with the two least commonly used options.
AD manages users and passwords on-premises, users are replicated to Google, and Cloud Identity then acts as the IdP for access to Google Cloud
This is probably the most simplistic form of AD integration. You let AD manage the users on-premises and use an automated tool from Google called Google Cloud Directory Sync (GCDS) to synchronize that user list with Google Cloud. Once Google Cloud Identity gets the user list, then users can log in and set up new passwords for use in Google Cloud. To be clear, this approach means that users have one username and password for everything on-premises, and then they will use the same username with a separate password to log into Google Cloud through Cloud Identity.
GCDS is software that you can download from Google: https://tools.google.com/dlpage/dirsync/. You provide a Windows or Linux server in your on-premises environment, install the software, connect it to Cloud Identity on one side using a new Cloud Identity superuser account (just used for GCDS), and connect it to AD using an account with minimal read-only permissions on the other. Then, you can use a User Interface (UI)-driven tool called Configuration Manager to set your configurations and let them run.
With GCDS, you can control the following:
- Synchronization frequency.
- Which part of your user domain gets synchronized, and within that, use rules to fine-tune the details.
- What user profile information will be passed to Cloud Identity when synchronization occurs.
All the data is passed to Google Cloud encrypted end to end. For more details, visit: https://support.google.com/a/answer/106368. Architecturally, this would look like the following figure:
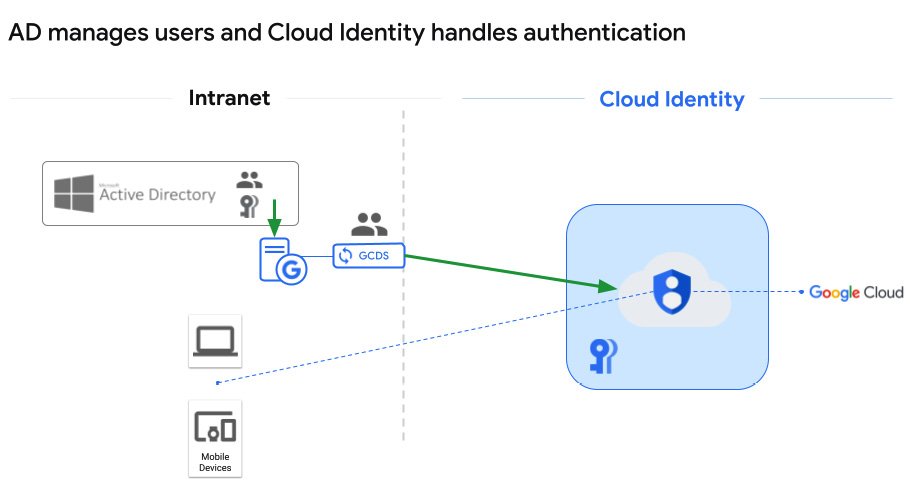
Figure 2.7 – AD manages users and Cloud Identity handles authentication
This is when you should use it:
- When you already have AD configured on-premises and the users who need to access Google Cloud are in it. So, AD is the one source of truth for which users exist, along with their group memberships, organizational structure, and so on.
- You are looking for the simplest AD to Cloud Identity integration, possibly because only a small subset of your users require Google Cloud access.
- You may want the Google access and IdP kept separate and external to your organization.
- You may be experimenting with integration and aren’t ready to go all in just yet.
This is what the login process will look like to a user (as with any of the options using Google as the IdP):
- The user follows a link to a protected resource, such as Google Cloud Storage.
- Google recognizes the user because GCDS populated the user list. The user is redirected to a standard Google sign-in screen where they enter their standard username and Google Cloud-specific password. If 2SV is enabled, they are prompted to provide their key or code.
- If the user authenticates, then IAM decides whether they are authorized to access the requested resource, and if so, they are then redirected back to the service they requested – in our example, Cloud Storage.
The issue here is the two sets of passwords. Even if a user manually sets them both to the same value, they aren’t managed in a single place. If you need to update your password, you’d have to do that in AD and then again in Google Cloud Identity. In some cases, this approach can allow for better separation between your on-premises environment and Google Cloud, but it’s also one more password to manage for your users.
If passwords being the same is your only worry, then you could synchronize them too.
AD manages users and passwords on-premises, users and passwords are replicated to Google, and Cloud Identity then manages access to Google Cloud
This is a slight variation on the last option. Here, you are still using GCDS to sync the users, but you’re adding a separate application from Google to your on-premises environment, Password Sync: https://support.google.com/cloudidentity/answer/2611842. The nice thing about Password Sync is that it auto-syncs the passwords the moment the user or admin changes them in AD. The concern with Password Sync is that it’s pushing all the passwords to Google. I know it’s encrypted, Google-secured, and all that good stuff, but just the idea makes me a little nervous.
It looks like this:
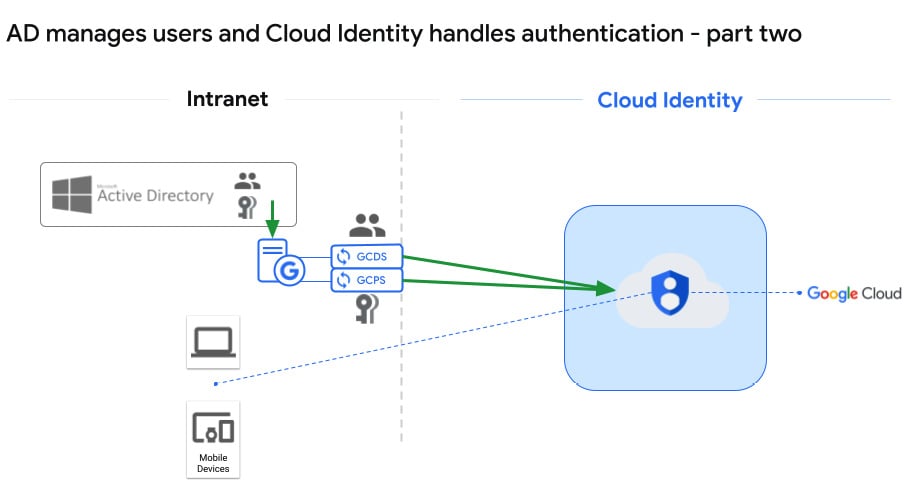
Figure 2.8 – AD manages users and Cloud Identity handles authentication – part two
This is when you should use it:
- When you already have AD configured on-premises and all the users who need to access Google Cloud are in it.
- You are looking for a basic AD to Cloud Identity integration, possibly because only a small subset of your users need Google access.
- You want the Google IdP part kept separate and external to your organization.
- You may be experimenting with integration and aren’t ready to go all in just yet.
This is what the login process will look like to a user:
- The user follows a link to a protected resource, such as Google Cloud Storage.
- Google recognizes the user because GCDS populated the user list, and this time, Password Sync provided the password. The user is redirected to a standard Google sign-in screen where they enter their username and password.
- If the user authenticates, then IAM decides whether they are authorized to access the requested resource, and if so, they are then redirected back to the service they requested – in our example, Cloud Storage.
Now that we have those two options out of the way, let’s talk about the two most commonly used ways to integrate AD with Google Cloud.
AD manages users and passwords on-premises, users are replicated to Google, and Cloud Identity uses on-premises AD FS SSO for authentication
That’s a mouthful, but it’s easier than it sounds. This option starts like the last two – you download, set up, and configure GCDS. It focuses on what it’s good at – replicating user information out of AD and into Google Cloud Identity. The big addition to the on-premises picture is Active Directory Federation Services (AD FS), which is a Microsoft SSO solution. So, Google knows you’re a user because GCDS replicated your user information into Cloud Identity, but the authentication is redirected back on-premises, where it’s handled by AD FS. It looks something like this:
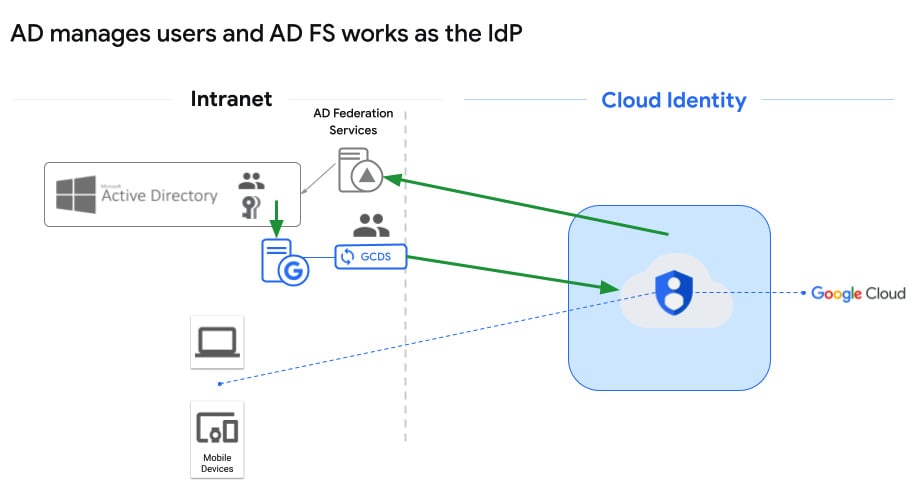
Figure 2.9 – AD manages users and AD FS works as the IdP
This is when you should use it:
- When you already have AD configured on-premises and the users who need to access Google Cloud are in it.
- You already have or are willing to set up AD FS to facilitate an on-premises SSO solution.
- You are looking for an AD-based solution where there aren’t separate passwords for the different environments, and you don’t want the passwords to be synchronized.
- You want to integrate Google into your existing AD FS SSO environment.
This is what the login process will look like to a user:
- You follow a link to a protected resource, such as Google Cloud Storage.
- If you are already authenticated into your on-premises AD environment, then SSO authenticates you behind the scenes. If not, then Google will redirect you to the AD FS authentication portal, as configured in your on-premises environment.
- Once you have authenticated, Google Cloud IAM will determine whether you can access the protected resource. If so, you are then automatically redirected to the originally requested resource – in our example, Cloud Storage.
As you might imagine, the devil tends to be in the details. For in-depth coverage of federating with AD, as we’ve seen in this section, take a look at https://cloud.google.com/architecture/identity/federating-gcp-with-active-directory-introduction.
Unfortunately, any of these options which depend on GCDS, may run into issues when migrating some of the accounts to Google.
GCDS challenges
Have you ever signed up for a Google-owned service using your work email address as your username? Perhaps before the organization decided to use Google Cloud, you created a trial account, or maybe you signed up for Gmail using your work email as a secondary address? I’ll lay odds that if you haven’t, someone else in your organization has, and to make matters worse, they may not even work for you anymore.
When it comes to Google, there are two types of accounts – managed and consumer. Managed accounts are fully managed by an organization, through Cloud Identity or Google Workplace, such as my gcp.how. Consumer accounts are owned and managed by the individuals who created them, and they are used to access general Google services such as YouTube or Google Cloud.
There are several possible issues here, depending on the exact circumstances. For a full discussion, see https://cloud.google.com/architecture/identity/assessing-existing-user-accounts. I’m going to look at just a couple.
In our first pain-point example, Bob signs up for an account in Google Cloud and uses his bob@gcp.how corporate email address as his username. gcp.how has decided to move forward and create an IT presence in Google Cloud, with Cloud Identity acting as the IdP. You’re in the process of setting up GCDS and you’re working on the users you’re going to migrate. Bob has an account in AD tied to bob@gcp.how, but Google already knows Bob as bob@gcp.how through the consumer account he created when he signed up as an individual GCP user.
The solution here isn’t too bad. First, make sure you add and validate any variations of your domain name to Cloud Identity so that it knows about them. So, if gcp.how is your main domain but your organization also sometimes uses gcp.help, then add them both to Cloud Identity, with .how being the primary. Next, Cloud Identity has a transfer tool you can access (https://admin.google.com/ac/unmanaged), which allows you to find employee accounts that already exist as consumer accounts. You might want to download the conflicts and reach out to them yourself before initiating the transfer so that they can watch for the transfer request email and know what it is (not spam!) before it arrives. When ready, the Google transfer tool can send a transfer request to the user. When they accept, their account then moves from consumer to managed, and it falls under the control of the organization. For more details, visit https://cloud.google.com/architecture/identity/migrating-consumer-accounts.
Another variation on this same theme relates to former employees. Before gcp.how decided to move to Google, Malo used to work for them, but he left after some unpleasantness. Before he left, he was doing some experimentation with a private Google Cloud account tied to his email address, malo@gcp.how.
Now, the Cloud Identity transfer tool doesn’t locate conflicting user accounts because they are in AD; it locates them because they are tied to a particular domain. You see the malo@ account and, after a little research, you realize that he no longer works for gcp.how. A real concern here is that since he has an account in Google Cloud tied to a gcp.how email address, he might try a form of social engineering attack, perhaps by requesting access to a corporate project, and hey – the request is associated with a gcp.how account, right?
This is a pain point. In this case, you should evict the malo@gcp.how consumer account. The steps aren’t bad and details can be found here: https://cloud.google.com/architecture/identity/evicting-consumer-accounts. Essentially, you create an account directly in Cloud Identity using the conflicting malo@gcp.how email account. You’ll get a warning prompting you to ask for a transfer or to go ahead and create a new user. Create the new user with the same email address, and then immediately delete it. By purposefully creating a conflict and then deleting it, you will trigger an automated Google process that will force the existing malo@gcp.how account to change its credentials.
There are a few more pain points related to individuals using Gmail accounts for personal and corporate purposes, such as accessing documents and individuals who might use their work email address as an alternative email address on a Gmail account. These may be harder to troubleshoot, and details on handling these situations and more can be found here: https://cloud.google.com/architecture/identity/assessing-existing-user-accounts.
The final AD-related user and identity solution that I’d like to discuss is Azure AD.
Cloud Identity delegates all IdP and user services to Microsoft’s Azure AD
There are a couple of reasons you might fall into this category. You may have moved some or all of your on-premises authentication into Azure as part of another cloud initiative, or you may still have on-premises AD, but at some point in the past, you set up federation from your on-premises AD instance to Azure AD. If this is the case, then Cloud Identity can pass the responsibility for all user management and IdP services to Azure AD:
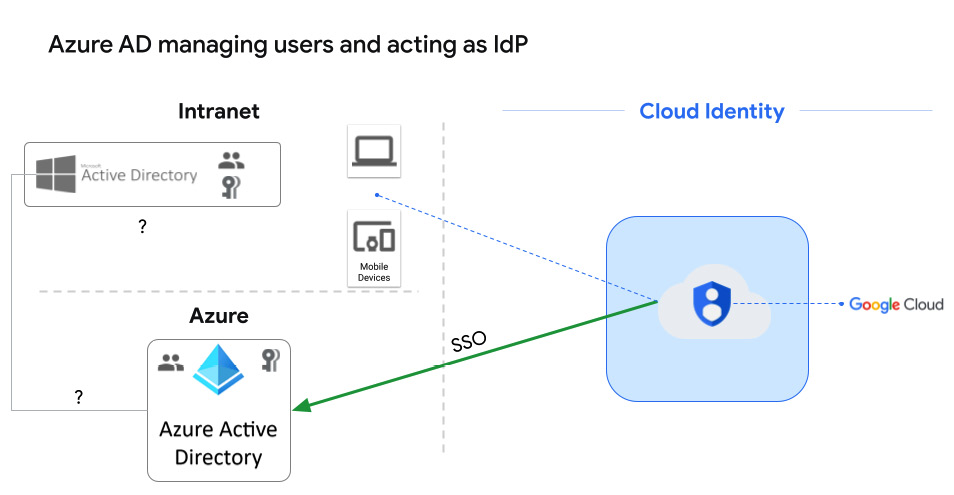
Figure 2.10 – Azure AD managing users and the IdP
For details on Azure AD federation, visit https://cloud.google.com/architecture/identity/federating-gcp-with-azure-active-directory.
This is when you should use it:
- You already have, or are planning to implement, Azure AD as your authoritative SSO service.
- You want to provide a seamless SSO experience to your users across the on-premises, Azure, and GCP environments. Even AWS can sync with Azure AD.
- You would prefer your SSO service to be managed by Azure AD, rather than setting up and managing it yourself in AD FS.
This is what the login process will look like to a user:
- You follow a link to a protected resource, such as Google Cloud Storage.
- If you are already authenticated into your Azure AD environment, then SSO authenticates you behind the scenes. If not, then Google will redirect you to the Azure AD authentication portal and you will log in there.
- Once you have been authenticated, Google Cloud IAM will determine whether you can access the protected resource. If so, you are then automatically redirected to the originally requested resource – in our example, Cloud Storage.
At this point, I’m going to assume that you’ve decided how you want to manage your users, what your IdP will be, and that you’ve created, or linked up at the very least, an initial set of key users. What constitutes a key user? Well, I’m about to tell you about a starter set of security groups that you need to create in Google Cloud. After I do, come back here and see whether you can find at least one user who would fit into each of those security groups.
Creating an initial set of security groups
Before we get to creating an initial set of groups and assigning users to them, let’s have a quick side discussion on two security-related concepts – the principle of least privilege and Role-Based Access Control (RBAC). These aren’t groundbreaking concepts to anyone familiar with security, but they are still worth mentioning.
The principle of least privilege is simply common sense – don’t give users permissions that they don’t need to do their jobs. If you work or have worked in an office building, then your swipe or key probably doesn’t open every door in the building. Why? Because most jobs don’t require a person to access more than a few specific building areas. If you’re part of building management, security, or maintenance, then you might need unfettered access, but those are a handful of specialized positions, not average workers. Why not let everyone access everything? Because you’re likely to get robbed if you do.
The same logic applies to Google Cloud. Remember in the previous chapter, when I talked about the huge list of services that Google Cloud offers? Well, you or someone in your organization is going to have to put in some time learning about how IAM security settings work in Google, and then research exactly what different roles in your organization need in terms of GCP access. We will discuss access control and IAM configurations in Chapter 5, Controlling Access with IAM Roles.
RBAC essentially says that when it comes to assigning security, think job roles instead of individuals. You might be your own special snowflake, but your job likely isn’t. Most people are one out of a set of employees who perform a similar job function within the organization. So, instead of setting security for developer Bob directly, and then turning around and implementing the exact same security settings for developer Lee, put Bob, Lee, and the other developers on team six in the dev-team-6 group, and set permissions for the group as a whole. It makes long-term management of security settings a whole lot easier. You’ve hired a new developer, Ada, into development team six? Just add her to the group, and bam – she gets the exact permissions she needs.
As far as the initial set of Google Cloud groups goes, Google recommends you start with six and that you eventually identify at least one initial user who you can slot into each. At this point, these groups won’t have the Google Cloud IAM access settings to perform the jobs being proposed, but we will add that in a later chapter. Also, there’s nothing that says you must use these exact groups, so feel free to tweak this initial list any way that you need. If you are looking for the wizard in Google Cloud to give you a nice green checkmark for completing this step, then you’ll have to create at least the first three:
gcp-organization-admins: Here will be your Google Cloud organization administrators, with full control over the logical structure of your organization in GCP. These are super-users, and there won’t be many.gcp-network-admins: This will be your highest-level network administrators. These are the people who, among other things, can create VPC networks, subnets, control network sharing, configure firewalls, set routing rules, and build load balancers.gcp-billing-admins: Someone needs to be able to view and pay the bills, right? At least they do if you want to keep the Google Cloud environment lights on. There also needs to be someone who pays attention to your level of spending.gcp-developers: Ah, this is my old job. Here’s where you’ll put your top-level developers, who will be busy designing, coding, and testing apps in Google Cloud.gcp-security-admins: The core security-related people, with top-level access to set and control security and security-related policies across the whole organization.gcp-devops: Lastly, here you have your highest level of DevOps engineers, responsible for managing end-to-end continuous integration and delivery pipelines, especially those related to infrastructure provisioning.
Again, this list of initial security groups is in no way designed to be exhaustive or mandatory; it’s just a nice place to start. If there are other high-level groups that would aid your organization in some way, you can add them now or at any time.
Now that you have a plan for your initial set of security groups, let’s create them in Google Cloud. You can either use Google’s new foundation wizard to create these groups (https://console.cloud.google.com/cloud-setup/users-groups) or you can manually create them yourself, perhaps adding a few groups that you’ve included in your plan. Here’s how:
- Log in to Google Cloud Console (https://console.cloud.google.com/) using your Cloud Identity super admin account created earlier in the chapter. If you followed my naming recommendation, then it’s something like
gcp-superadmin@<your-domain>. - Navigate to Navigation menu | IAM & Admin | Groups. The direct link is https://console.cloud.google.com/iam-admin/groups.
- At the top of the page, click Create.
- Provide a group name from your initial list; I’d recommend using the same name as the prefix for the group email address. That’s why all the suggested group names are email address-friendly. If you want to, add an appropriate description.
- Save.
- As soon as you save the group, the Group Details page for the new group will appear and show you as the only current member. You should be logged in as the first organization admin and as the group creator; that account automatically becomes the owner of the group.
- Use the Add Members button at the top of the page and add any users you have identified as members of this group.
- Repeat steps 1–7 until you have your initial set of groups created.
Very nice. At this point, you have your IdP and the user management figured out and set up, and you’ve created an initial set of high-level groups in Google Cloud, with a corresponding user or two in each. When ready, move on to step 3 and set up admin access to your organization.
Step 3 – enabling administrator access
Up to this point, we’ve been working in Cloud Identity and Google Cloud using the emergency-only initial user, your equivalent to my Cloud Identity/Google Workspace super admin – gcp-superadmin@gcp.how. Remember how I said that this account should be reserved for emergency recovery and the like? It’s now time to practice what I preached.
I’m a big fan of naming conventions. You come up with a convention that works, document it, and get everyone to use it. It helps with consistency and being able to identify what’s what. If I were you, I’d create a Google or Word document somewhere that’s accessible and sharable. Name it something like Google Cloud Naming Conventions and put a two-column table in it. Give the first column the heading Resource, and the second Naming Convention.
Next, add a row for the Cloud Identity super admins – Cloud Identity super admin has a nice ring. Next to it, come up with a naming convention such as superadmin-first.last@<your domain>. While you’re there and naming things, add a second entry for your GCP organization administrators – how about gcp-orgadmin-first.last@<yourdomain>?
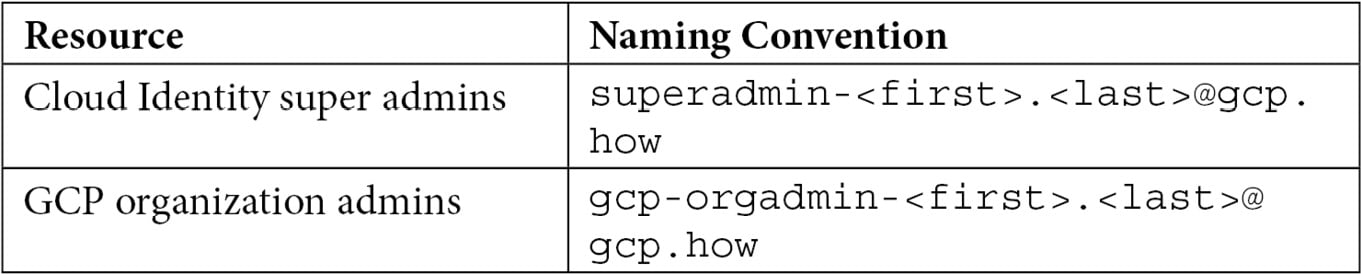
Table 2.1 – GCP naming conventions
While we’re moving through this book, I’m going to come back to our naming conventions document with a few other ideas about non-user-related resources.
Since a Cloud Identity super admin has more power than a GCP organization admin, I just followed my naming convention and created a pair of accounts for myself – superadmin-patrick.haggerty@gcp.how and gcp-orgadmin-patrick.haggerty@gcp.how. As, once again, these are high-security accounts, I enabled 2SV on both. As they are my personal accounts, instead of using a physical key, I configured my phone as a key. Modern phones, using Android and iOS (with the Google app installed), can act as keys (https://support.google.com/accounts/answer/185839). Be careful though – if you use the device as a key and the Google Authenticator app on the device as your backup, losing the device can lose both 2SVs at once. Make sure you get some recovery codes that you store securely. I use a password manager that can also store encrypted notes, and I store my recovery codes there. That way they are both encrypted and replicated across multiple devices.
Setting up the organization admin is something we’ll do over in Google Cloud in a moment, but setting up the new super admin account is accomplished in Cloud Identity (https://admin.google.com/). In the left-hand menu, head down to Account | Admin roles | Super Admin | Admins. You should get a list displaying your current super admins with your emergency account listed. Click Assign users, type the prefix for the super admin user you created for yourself (superadmin if you’re following my naming convention), and click Assign Role. Repeat the process if needed.
With the two new admin accounts created and with your new personal super admin up and running, log out from your emergency-use gcp-superadmin account and log back in under your personal super admin account (superadmin-<first>.<last>@<domain>).
Great! Your new Cloud Identity super admin is good to go, and you are ready to head to Google Cloud and get the corresponding organization administrator set up. Make sure that you are logged in as a Cloud Identity super admin and then head over to Google Cloud Console: https://console.cloud.google.com/. If you get a message about activating a trial account, dismiss it.
Now that we have our non-emergency accounts created and working, the enabling administrator access step of the Google Cloud foundational plan has three major things that you need to accomplish:
- Verify that your organization was created correctly in Google Cloud.
- Add your new organization admin account to the
gcp-organization-admins@<your-domain>group that you created back in the last section and configure the permissions on the group correctly. - Grant other permissions that will be used in future foundation-laying steps.
Let’s move through the list.
Verifying initial Google Cloud organization creation
Finishing the creation of your organization in Google Cloud is easy:
- Verify that you are logged into Google Cloud Console (https://console.cloud.google.com/) and that you are using your new personal super admin account. If you are looking at Google Cloud Console, you can mouse over the circular avatar picture in the upper-right corner at any time to see which account you are currently using.
- Navigate to Navigation menu | IAM & Admin | Identity & Organization and follow the instructions you find there.
Note
If you have just created this organization in Cloud Identity or Google Workspace, it may take a few minutes before it’s picked up by Google Cloud.
- In the project selector at the top of the page, verify that you can locate and select your organization, as shown in the following screenshot:

Figure 2.11 – Organization selected
With the creation of the organization verified, let’s set up our top-level organization administrator group.
Configuring organization administrator group access
In an earlier part of this chapter, we created a collection of starter groups, including one for our organization admins named gcp-organization-admins. Currently though, the group has no permissions associated with it. We will change that now.
Google recommends that your GCP organization administrators be granted a group of security roles. As we mentioned previously, a Google Cloud IAM role is essentially a set of individual permissions needed for a particular job, as it relates to a particular part of Google Cloud. Google recommends that organizational administrators are assigned the following IAM roles:
- Resource Manager - Organization Administrator
- Resource Manager - Folder Admin
- Resource Manager - Project Creator
- Billing - Billing Account User
- Roles - Organization Role Administrator
- Organization Policy - Organization Policy Administrator
- Security Center - Security Center Admin
- Support - Support Account Administrator
Make sure you have Google Cloud Console open, are logged in using your super admin account, and have your organization selected, as shown in Figure 2.11. Then, follow these steps:
- Navigate to Navigation menu | IAM & Admin | IAM | Add.
- Verify that the resulting dialog states that you are adding a permission to your organization and not to an individual project. Mine currently reads
Add principals to ‘gcp.how’. - When you created your groups, each one had an email address, and if you were following my advice, then that address takes the form of
<group-name>@<domain-name>, so for my organizational administrator’s group (gcp-organization-admins), the email address would begcp-organization-admins@gcp.how. Enter the email address for your organization admin group into the New principals textbox. - Use Select a role to grant the Resource Manager | Organization Administrator role. You can scroll to the Resource Manager category and then select the Organization Administrator role, or you can just enter
Organization Administratorin the search box. However, if you use the search box, be very careful when selecting the role, as many are named very similarly. - Click Add Another Role and grant the Resource Manager | Folder Admin role.
- Using the same process, also grant these roles:
- Resource Manager | Project Creator
- Billing | Billing Account User
- Roles | Organization Role Administrator
- Organization Policy | Organization Policy Administrator
- Security Center | Security Center Admin
- Support | Support Account Administrator
- Verify that your permissions assignment dialog resembles the following figure:
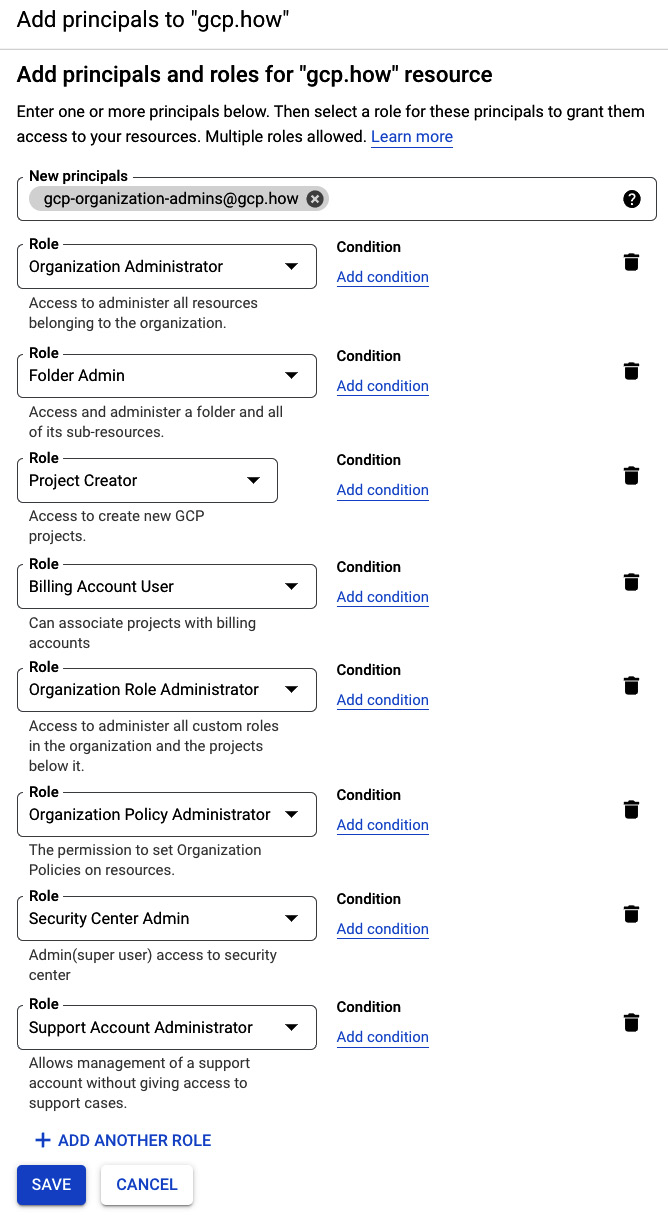
Figure 2.12 – New role assignments
- Save the new settings. Google Cloud Console will take you back to your main IAM page where again, you can see that the security roles have been assigned to the group:
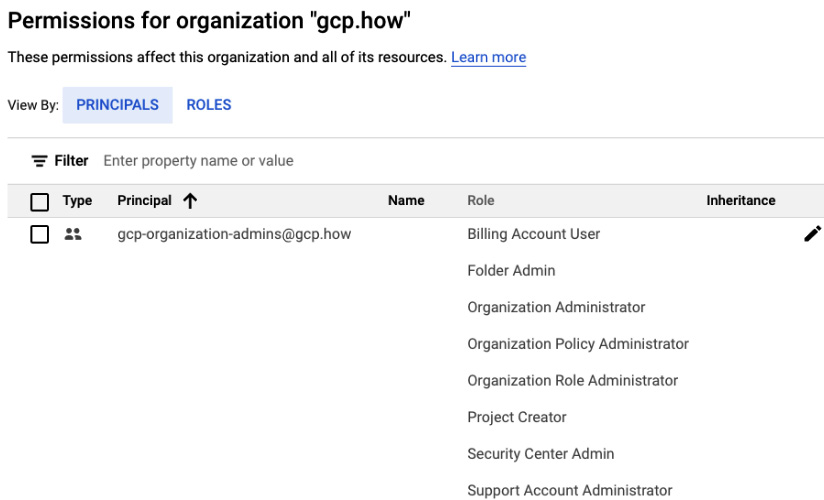
Figure 2.13 – The newly assigned security roles
Now that our gcp-organization-admins group is properly configured, let’s add our personal organization admin account as a member. Make sure that you have your personal organization admin account email address handy. If you’re following my naming scheme, it should be named in the (where is that naming convention document?… ah, here it is) gcp-orgadmin-<first>.<last>@<domain> format. So, I’m gcp-orgadmin-patrick.haggerty@gcp.how. To add the account to the group, follow these steps:
- Go to Navigation menu | IAM & Admin | Groups | gcp-organization-admins | Add Members.
- Enter the new organization admin email address and click Add.
- Repeat if there are any other organization admins that you’d like to assign.
Woo-hoo! Nice job. On Google’s 10-step checklist, you can check the top 3 off. If you’re using Google’s wizard, then you’ll see a way to mark each item as complete at the top of that step’s page. You aren’t done yet, but you’re making good progress. Keep reading because there are more steps to do!
Summary
In this chapter, we started laying our foundation in Google Cloud by completing the first 3 steps in Google’s 10-step recipe. Specifically, we set up our identity management in Cloud Identity, examined different ways to integrate external identity and user management systems such as AD with Google Cloud, created an initial set of security groups, and enabled administrator access to Google Cloud.
If you want to keep moving through the checklist steps with me, your personal tutor, keep on reading as we move on to Chapter 3, Setting Up Billing and Cost Controls.
