


 Download code from GitHub
Importing and Organizing Audio
Before you can start working with audio, you will need to import the media you want to work with into your Pro Tools session. Pro Tools offers several ways to bring in audio, and then organize them for better collaboration with others. In this chapter, you’ll learn about those methods, but also their impact on the project files and sessions. We’ll also discover how to import data from other file formats and sessions, and we’ll look at other tools that can assist with file management and organization.
This chapter will cover the following topics:
- Importing audio into a session with the Import Audio window
- Dragging audio directly into a session
- Importing audio from an AAF/OMF or another session
- Relinking broken audio
- Using the Clip List area for audio management
- Collaborating with others using session data
Technical requirements
The recipes in this chapter will require at least Pro Tools Artist, preferably Pro Tools Standard. The example sessions and audio files for each recipe can be found at https://github.com/PacktPublishing/The-Pro-Tools-2023-Post-Audio-Cookbook/.
Importing audio into a session with the Import Audio window
While there are several ways to import audio into Pro Tools, the method that provides the most control and options is through the File menu. Often, issues that arise from Pro Tools sessions are due to audio not being imported correctly; mastering this menu and its options will cause less frustration in the long run.
Getting ready
You will need an empty Pro Tools session and some audio files to import into it for this recipe.
How to do it…
For this recipe, we’ll import multiple files from different sources into Pro Tools. We’ll see what the different behaviors are, and how it affects the workflow:
- Go to the menu bar and select File | Import | Audio….

Figure 2.1: The Import Audio window
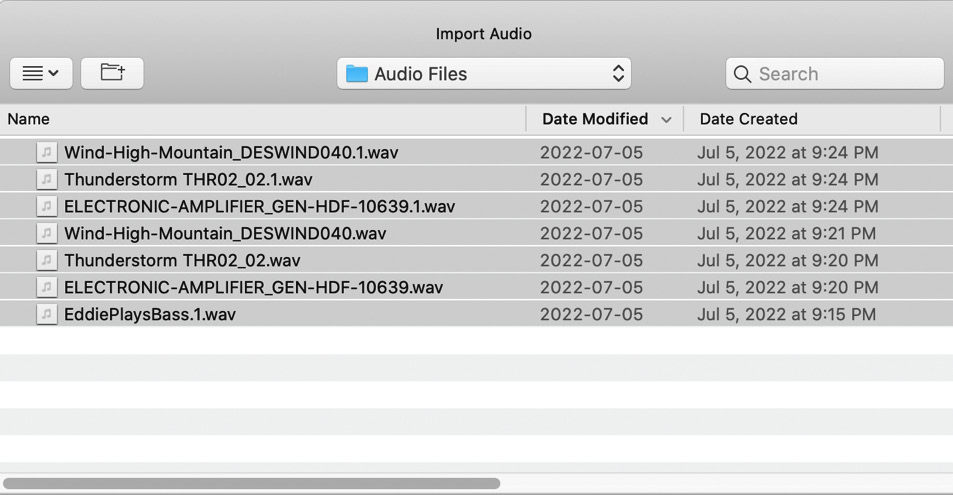
Figure 2.2: The Import Audio window’s File Navigator (top half)
- Click on the first audio file.
- Click the Copy button (Copy Files in Windows) (see Figure 2.3) – if you don’t see Copy, click Convert instead (Copy Files or Convert Files in Windows).
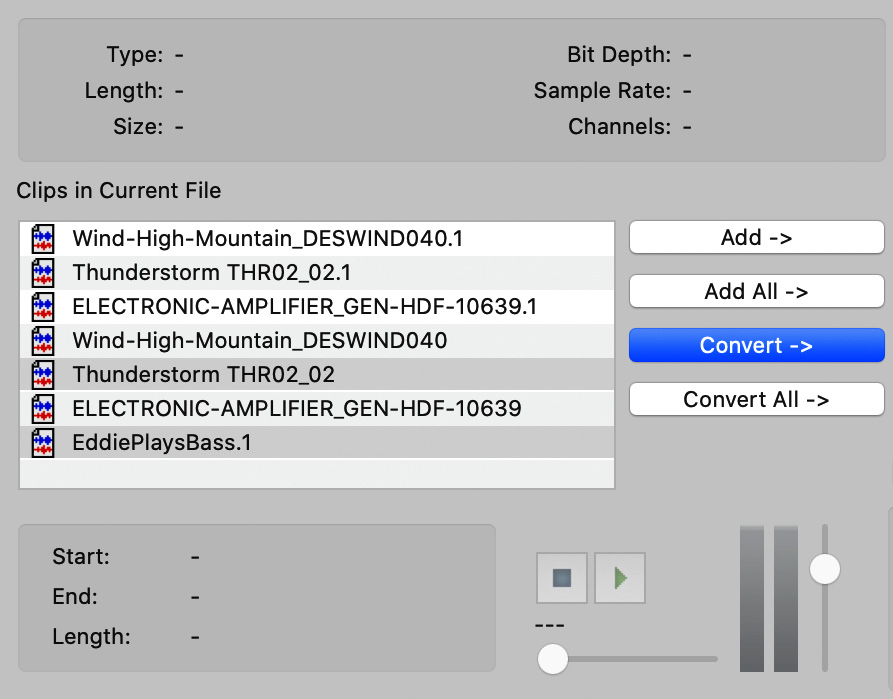
Figure 2.3: The Import Audio window’s clip preview (bottom left)
- Click the next audio file in the list.
- Click the Convert button.
- Click the next audio file in the list.
- Click the Add button (Add Files in Windows).
- Click the Open button (Done in Windows).
- When prompted to Choose a destination folder, click Open (Use current folder in Windows).
- In the Import Audio window, select Clip List:
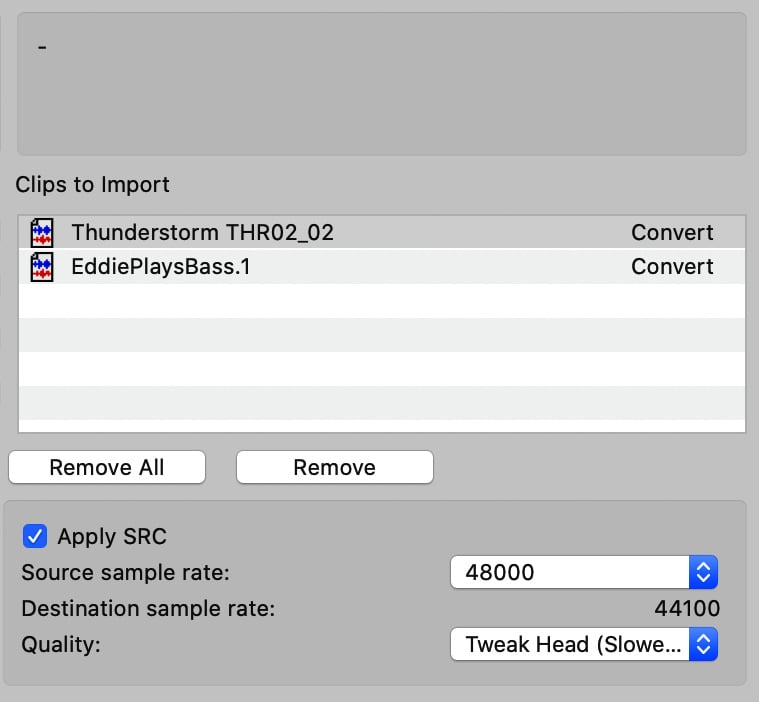
Figure 2.4: The Import Audio window’s import lift (bottom right)
How it works…
The audio import options might seem straightforward, but there are some nuances to consider that can greatly affect your project. The first thing you may have noticed is the fact that the Import Audio dialog lists Clips in Current File. Pro Tools can work with Clip Groups, which essentially are multiple clips within a file. While it can still be useful in modern audio production workflows, I rarely use this feature. It is still useful to be able to corral audio files from different sources and import them in essentially one step. Once a clip has been added to the Clips to Import area, you can navigate to other parts of your filesystem and find other audio files to import. Here are some notes about the different behaviors.
Copy
This will make a copy of the audio file(s) you’ve selected in the destination of your choice. By default, this is the Audio Files folder within your Pro Tools Session folder.
Convert
You will notice that the Copy button changes to Convert when there is a sample rate mismatch. As-s, the file should be converted to maintain the correct playback speed. You can see the options for Sample Rate Conversion (SRC) in the Apply SRC area of the import options. Pro Tools should automatically detect and select the correct settings to apply, but you could always choose alternative options if you want to have some fun with playback speed.
Add
The Add function will not copy the audio file into a destination folder; instead, it will leave it in the place you’ve selected it from and simply reference that location when playing back the clip. This can be advantageous if you prefer to not duplicate files or divide a project into multiple Pro Tools files and want to have them all reference the same source audio files. However, take caution if your audio files move, as this will break the reference and the files will show as missing. Also, if you attempt to add a file that is not the same sample rate as your project, Pro Tools will warn you that the playback speed will not sound correct.
Destination folder
As mentioned previously, all files that are copied or converted will be sent to a folder of your choosing. By default, this is the Audio Files folder within your Pro Tools Session folder, but you can select a different destination if you wish. You could, for instance, choose to create subfolders within your Audio Files folder for different categories of sounds. If you know that a file will be used by another project, you could also opt to change the destination to that project’s folder as well.
Clip List versus New Tracks
After the Processing Audio dialog is complete, you will get the Audio Import Options window. From here, you can choose to place these clips into New Tracks or the Clip List area. If you are receiving files from another session as stems or printed tracks that are all lined up, then New Tracks makes more sense. You have further options to place the audio clips at Session Start, which is the beginning of the session; Selection, the current selection in the timeline; or Spot, which opens another dialog window with specific timing options on where to place the clips.
The Clip List area is the best place to import audio clips that will be placed into another track within your session. If you don’t see the Clip List area after importing, click the small arrow in the bottom right of the Edit window (see Figure 2.5), or go to the menu bar and select View | Other Displays | Clip List:

Figure 2.5: The Clip List drawer’s Open/Close button
Dragging audio directly into a session
Depending on the scenario and how your files are organized, it’s sometimes advantageous to drag files directly into a Pro Tools session. Audio clips and tracks behave differently than using the Audio Import function, so it’s important to know the difference.
Getting ready
For this recipe, you will need a Pro Tools session and some audio files. To fully appreciate all the nuances, your session should have both mono and stereo tracks, and you should have both mono and stereo audio files.
How to do it…
In this recipe, we’ll drag several different audio files into a session in different ways and see how they behave. To do this, follow these steps:
- Navigate to a mono audio file in your filesystem and drag it into a mono track.
- Try dragging the same mono audio file into a stereo track.
- Find a stereo file and drag it into a stereo track.
- Try dragging the same stereo file into a mono track.
- Drag multiple audio files into the clip list.
- Drag multiple audio files into an empty area under the existing tracks.
How it works…
Dragging audio files into Pro Tools behaves differently, depending on the context. Let’s break down the different scenarios we played with previously.
Dragging in mono files
Mono audio files only have one audio channel. Attempting to drag a mono audio file into a mono track provides no issues as the channel counts are consistent. However, you will notice that you cannot do the same with stereo tracks. You will not see any clip audio at all, which is Pro Tools indicating to you that this is not possible.
Dragging in stereo files
Stereo files behave similarly to mono files in that it’s expected that a stereo clip is added to a stereo file. Unlike mono files, however, you can add a stereo file to mono tracks, if there are at least two consecutive mono tracks in your session. You will see that the left and right channels are separated into separate mono clips. This can be beneficial if you are working with audio files where the discrete audio channels of a stereo file are not stereo images – for example, if you’re working with audio that was recorded on set for a motion picture and the boom microphone was recorded to one channel, and the lavaliers to another.
Sample rates matter
When ingesting audio into your session through the Audio Import dialog, you can decide whether an audio clip is added or copied to a destination folder. When dragging audio files into a session directly, Pro Tools will automatically add the file (as in reference it in its original location) if the sample rate of the file matches that of the session. If you drag in a file that has a different sample rate, Pro Tools will automatically apply sample rate conversion to match that of the session and save the converted file in the Audio File folder in the project’s session folder.
Creating tracks as you drag
If you need a new track to place audio clips into, instead of creating the tracks first, you can drag them directly into a session. This is similar to using the import dialog and selecting New Track when prompted for Audio Import options. When using this method, the track name will be set to the filename, and its channel count will match the source file. This is a good method for importing stems from another project or music tracks that are already synchronized from the start of the file.
There’s more…
These methods and nuances are not exclusive to dragging audio files directly into Pro Tools. The same behavior can be expected when dragging clips into the session from the Clip List area. Knowing what to expect when bringing media into a track will prevent confusion when channel counts and sample rates don’t match.
Importing audio from an AAF/OMF or another session
Individual audio clips are great when you are creating a session from scratch, but much of the professional audio workflow expects collaboration between departments and delivery from one phase of production to the next. As such, you should expect to be handed audio session data either in special audio formats such as OMF or AAF or from another Pro Tools session entirely. Knowing what to expect when importing audio from one of these files is important if you want to succeed professionally.
Getting ready
This recipe requires either an AAF, OMF, or another Pro Tools session with audio data. Encapsulated files or files with separate audio are both acceptable. An example OMF has been provided on the GitHub page for this book: https://github.com/PacktPublishing/The-Pro-Tools-2023-Post-Audio-Cookbook/.
How to do it…
We are now going to import an OMF file from a short audio drama that has different types of audio tracks into a Pro Tools session. Follow these steps:
- Go to the menu and select File | Import | Session Data….
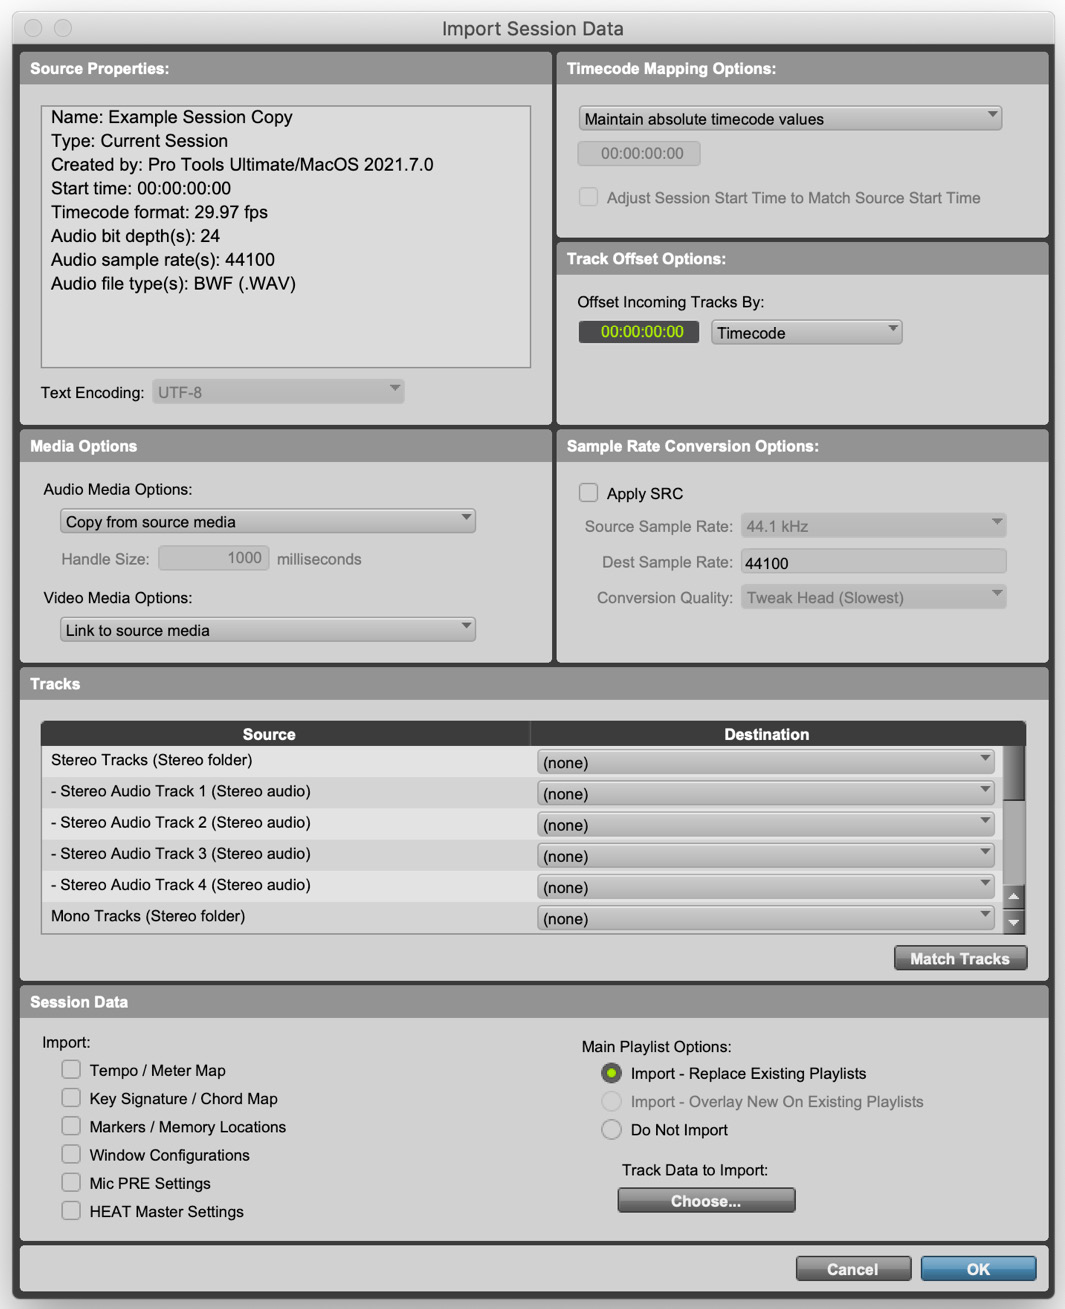
Figure 2.6a: The Import Session Data window
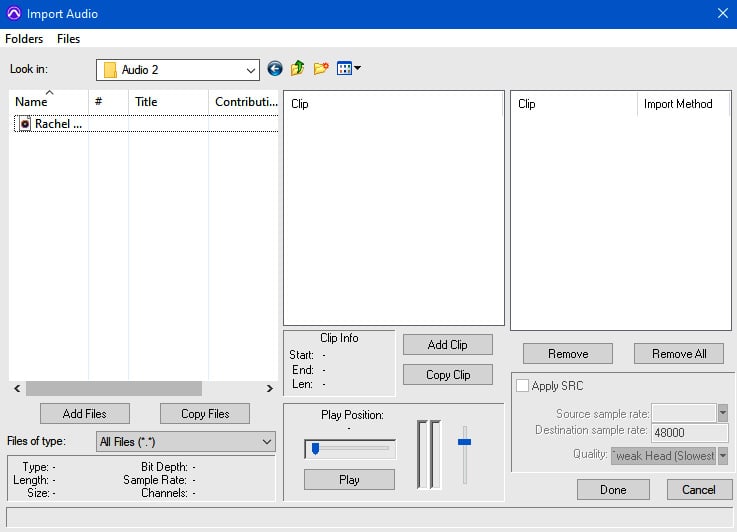
Figure 2.6b: The Import Audio dialog on a Windows system has a different layout, but functions the same way
- Find and select the OMF file and click Open.
- Under Timecode Mapping Options, select Maintain absolute timecode values.
- Under Media Options, set Audio Media Options to Copy from source media.
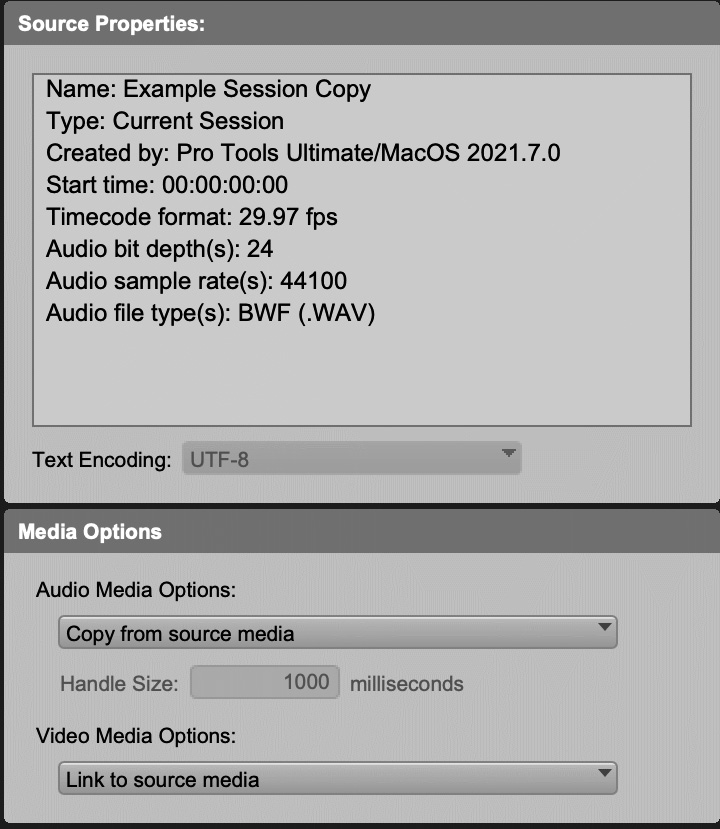
Figure 2.7: The Import Session Data window’s Source Properties and Media Options (top left)
- Under Tracks, make sure all sources are highlighted and Destination is set to New Track.
- Under Session Data, check Import Clip Gain and Import Volume Automation, and uncheck the other options.
- Under Main Playlist Options, select Import – Replace Exiting Playlists.
- Click OK.
How it works…
OMFs and AAFs are special files that are designed to allow media to be shared across different software applications. They both have different standards in terms of how they are created and read by the software, but at their core, they are text files that list all the clips used in a session, which track they go on, when they start, and when they stop. Both files can include media encapsulated within the file, but for larger sessions, having the media separate tends to cause fewer problems in the long run. Clips can also be trimmed so that only the audio used in the session is exported, which “handles” a little bit of extra audio both before and after the cut points to allow some flexibility. I typically ask for 3 seconds of handles, but I’ve seen some prefer more. AAF also allows for what is essentially only a text file and does not re-export the media. This can help you save on file space, but can lead to broken links when importing if file structures are changed (the next recipe goes over relinking broken audio).
There are a lot of different options to go over in the Import Session Data window, so let’s go over them.
Source Properties (Figure 2.7)
This is a simple text readout of the project you are importing. This is a good way to confirm that the project was delivered correctly and that the settings are accurate for what you are expecting. If you notice something is not correct, you can request changes from whoever delivered you the files, or you can change your project’s session settings to match. If it is a Sample Rate mismatch, you will either need to apply sample rate conversion or create a new session.
Media Options (Figure 2.7)
It’s usually a safe bet to copy the audio files from the source media, especially if the audio files are embedded or encapsulated within the OMF or AAF file. You can, however, choose to link to source media where possible or consolidate the files. Linking will work like adding files to a project and leaving the files in their original location by simply referencing them. Consolidating will trim the files to the size used within the clips embedded. You can set the number of handles in milliseconds that will be left, which is how much outside of the in and out points will be trimmed, allowing you to have some flexibility. Only in extreme cases in which copying all the data would be extremely taxing from a data standpoint would I opt for consolidating media, although in some scenarios, I have seen excessive amounts of audio data provided in a session, and consolidating made more sense.
Timecode Mapping Options (Figure 2.8)
If everything was done correctly, you will usually opt to maintain the absolute timecode values. However, in some scenarios, what was delivered is incorrect.
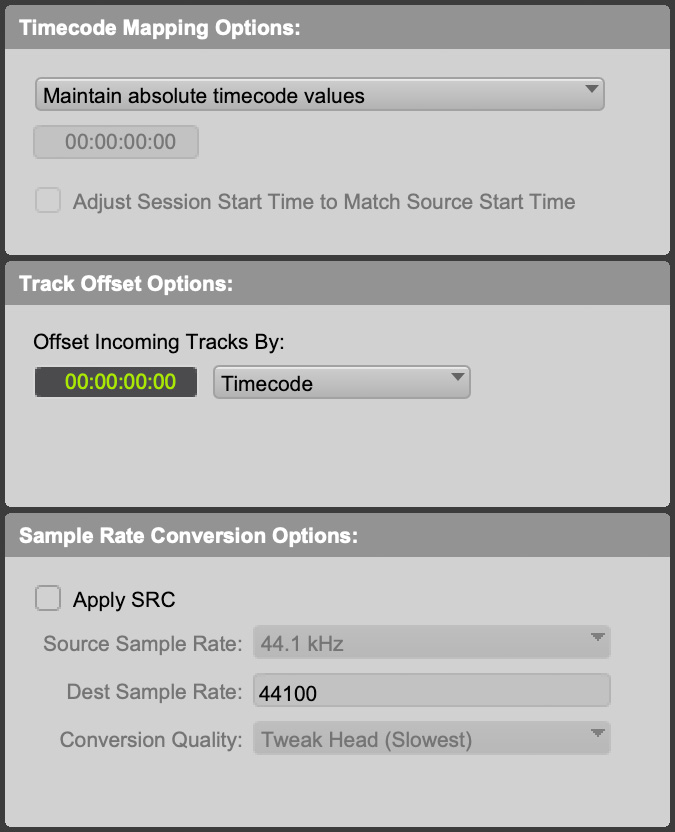
Figure 2.8: The Import Session Data window’s Timecode Mapping Options, Track Offset Options, and Sample Rate Conversion Options (top right)
For example, I request that the picture start begins at 01:00:00:00, which is standard in motion picture, but if the editor or production team is not familiar with this, they may simply have it start at 00:00:00:00, which is the default in most non-linear editing software. I can either attempt to educate them on how to properly set up their timeline before delivery – and in the case with clients where I wish there to be an ongoing relationship, I usually will take the extra effort – or I can simply remap their session data to the time I wish to use. Maintaining relative timecode values means that whatever your session start is will be remapped to the source files, or you can simply map the start time of their session to a specific value. Be warned that if you intend to send your audio project to another department or person, they should be aware of this.
Sample Rate Conversion Options (Figure 2.8)
If the source audio’s sample rate does not match the sessions, you can make some decisions in terms of how the sample rate conversion is handled. These are the same as the options that are available in the Audio Import dialog window (see the previous chapter for more details).
Tracks (Figure 2.9)
This is where most of your focus should be when importing session data. All the audio tracks from the source are listed here. Any track that is highlighted will have its audio imported into your session, whereas deselected tracks won’t, and consequently have their destination set to (none). You can choose to have tracks mapped to a New Track or select one of the existing tracks in your session from the dropdown. There is also a Match Tracks button, which you can use to attempt and automatically line up similarly spelled tracks.
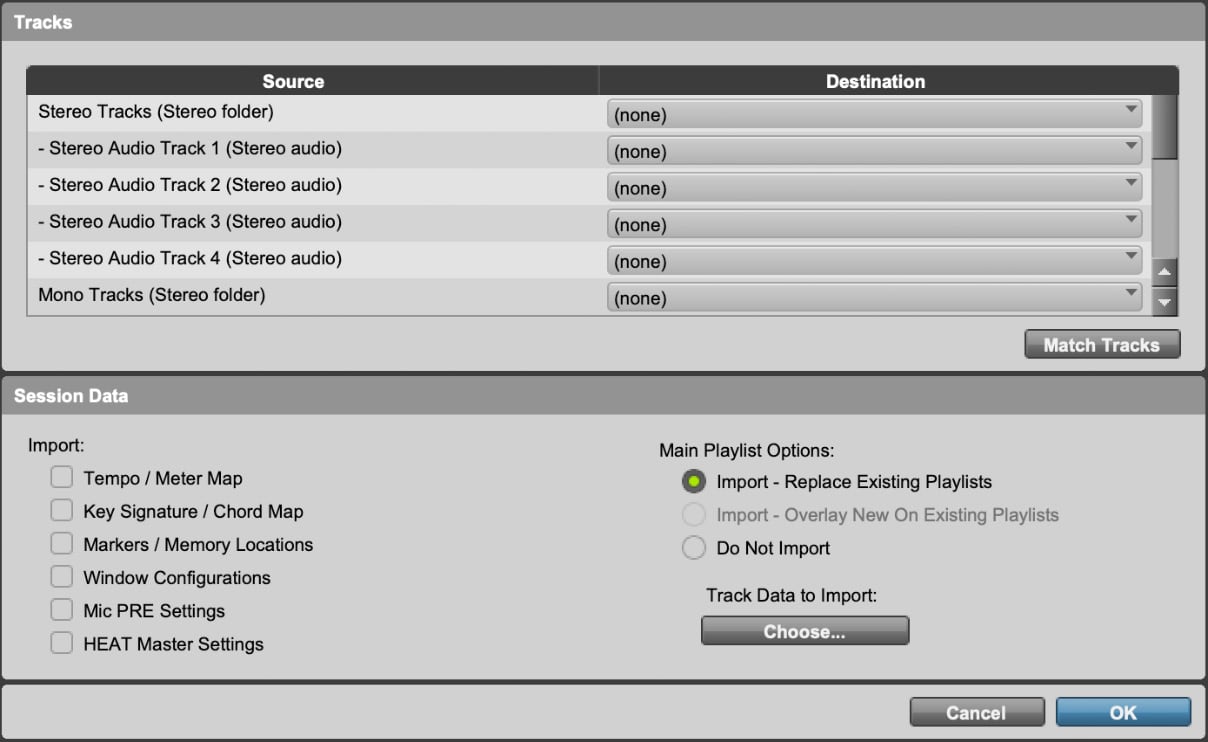
Figure 2.9: The Import Session Data window’s Tracks and Session Data (bottom half)
Be warned that the default behavior for matching a track is to overwrite and replace the data in that existing track. If you wish to retain that data, either set the source track to a New Track as its destination and manually move the audio after, or you can change Main Playlist Options to Import – Overlay New on Existing Playlists. This will retain existing clips in your track and insert new audio around them.
Session Data (Figure 2.9)
Besides Main Playlist Options, there are also several other checkboxes to look over in this section. These can change according to the type of file you are importing, but here are some common ones you might see:
- Import Rendered Audio Effects: This copies audio effects rendered over clips if selected or discards them and uses the original audio if unchecked (only available when importing from software that supports this option).
- Import Clip Gain: This retains the clip gain set in the previous project if checked or discards it if unchecked (again, not all software supports this).
- Import Volume Automation: This retains the volume automation as set when it was exported. Unchecking this will remove all automation and set the volume to 0 dB.
- Only Include Clips on Timeline: If the exported session allows for project data within the clip list or bin to be exported, then this will ignore those files and only bring in files that are on the timeline.
- Pan odd tracks left/even tracks right: This can be helpful if you are working with stereo tracks, as OMFs can only import mono tracks. By default, stereo tracks that are imported will be split into two tracks named TrackName L and TrackName R. Having them panned left/right makes sure they are panned correctly. This can confuse things if you’re importing a combination of mono and stereo tracks, though.
- Markers to Import: This allows you to select which (if any) markers you want to import.
- Track Data to Import: This allows you to get granular with what gets imported into a track – for example, whether you can import only plugin information or only input/output configuration. This can be useful for situations where you want to bring in specific data from a session, but not all the audio files.
With all these options, importing data from another session can be very flexible. For podcasts that use similar mic and audio setups routinely, you can set the source tracks to tracks in a template session with effects and routing already set and import only Clips and Media using the Track Data to Import options. This will leave all the other hard work intact and bring in only the audio. You can also import only session markers if you want to bring in notes from another collaborator.
There’s more…
Some DAWs allow audio clips with different channel counts to exist on the same timeline. When exporting OMF or AAF files, these clips should automatically be separated into different tracks. For example, you could have three tracks named Effects, Left Effects, and Right and Effects Mono to represent those different channels.
Figure 2.10: The Import Audio dialog on a Windows system has a different layout, but functions the same way
While rare, it is also possible for an issue to occur where tracks are not separated, and tracks try to contain both types of clips with mismatched audio channels. Pro Tools is not able to import these tracks correctly and will simply crash instead. If you have issues importing tracks into Pro Tools, the best method of solving the issue is to attempt importing only a few tracks at a time to isolate which tracks are causing the problem. If you can, you can ask the sender of the file to examine the tracks and see if there are channel mismatches or other possible causes of failure. It may also be possible to import the session data into another DAW to identify and rectify the issue.
Relinking broken audio
It’s a sad truth that everyone at some point or another will face this issue. Since Pro Tools references audio files in a specified location, any change in the filename or location can break the link, causing it to appear offline in the session. Pro Tools also uses a unique identifier for ensuring that similarly named files do not get mixed up. This can cause problems from time to time, especially with OMFs and AAF files. In most scenarios, Pro Tools will try to relink the audio when it detects that some files are missing, but you can also manually relink them. We’ll go over how to do that in this recipe.
Getting ready
For this recipe, you will need a Pro Tools session with some audio placed into tracks. The audio files will need to have their links broken. You can do this by relocating the audio files into a subfolder within the Audio Files folder. Make sure you do this with the Pro Tools session closed; otherwise, performing such a change while it’s open can crash Pro Tools. When you open a session with broken links, a warning will appear, asking you what you want to do with Missing Files. Select the Skip All option when prompted:
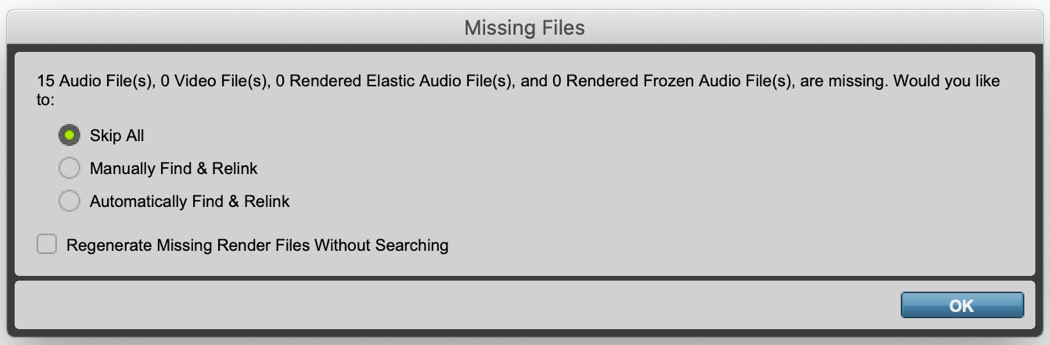
Figure 2.11: The Missing Files window
How to do it…
We’ll be using the workspace tool to manually relink some broken audio links for this recipe. You can do this by following these steps:
- In the menu, go to Window | New Workspace | Default.
- In the sidebar on the left (the area labeled Locations), click on the icon that specifies your session name.
- Double-click the folder named Session Audio Files (Audio Files on Windows).
- Locate audio files that are broken – they will be grayed out and in italics (see Figure 2.12):

Figure 2.12: The Workspace window showing missing files
- Shift or Command and click (Ctrl on Windows) to highlight them.
- Right-click (or Control and click on macOS) on any of the highlighted files and select Relink.
- In the Relink window, use the Select Areas to Search: area and navigate to your session’s audio files folder on your disk (this could be an internal or external hard drive or SSD; do not navigate to the session itself, which is denoted by a Pro Tools icon).
- Click the checkbox next to the
AudioFilesfolder. - Select all the files within the Search Files to Relink: area.
- Click the Find Links button toward the top of the window.
- When prompted for Linking Options, leave the default options enabled (Find By Name and File ID, Match Format, and Match Duration).
- Click OK.
- Click Commit Links.
- When asked to confirm, click Yes:
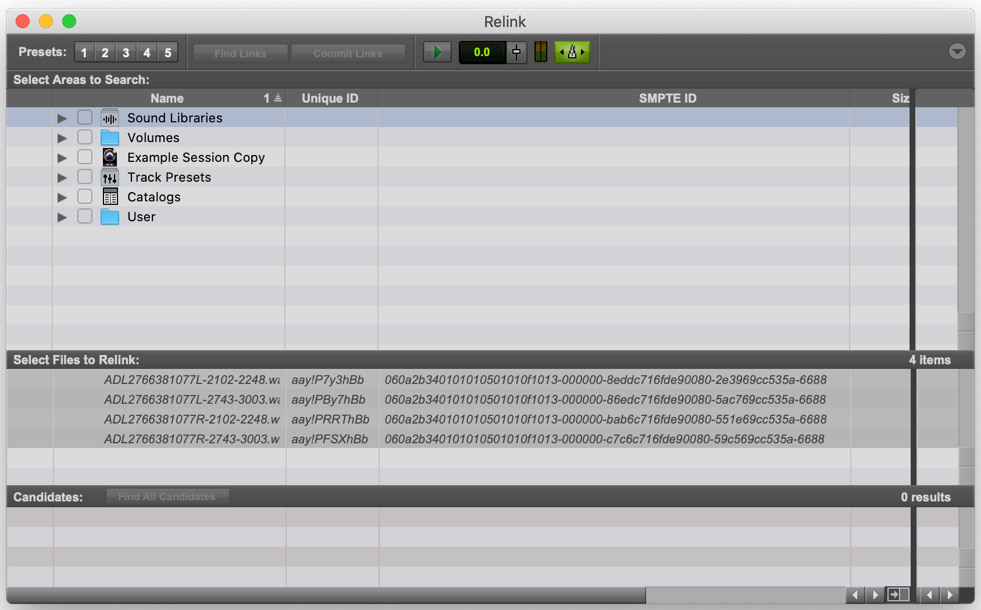
Figure 2.13: The Relink window
How it works…
Workspaces function like a file explorer and manager within Pro Tools. Tools such as Sound Libraries, Track Presets, and Catalogs can all be accessed here, but our focus is on the files within the open session. Examining the files listed here gives you a lot of information regarding the audio imported into your session and allows you to see which files are unlinked – the text is grayed out and in italics. You can then use the Relink command to open the relink window.
Within the Relink window, you can Find Links for specific files and in a specified location. You can also click on a higher-level folder or even entire volumes if you are unsure where the files could be located, but this takes significantly more time than locating the correct folder. You should always be cautious when moving files around or renaming files or folders with Pro Tools sessions, but it’s good to know where to solve linking errors if they come up.
There’s more…
As mentioned at the beginning of this recipe, it is sometimes possible to have linking errors appear when importing session data. If this is the case, Pro Tools might not recognize the audio files correctly, and it will remain this way unless you choose less restrictive forms of searching for files. After clicking the Find Links button, the Linking Options window will appear with the default options of finding File by Name and File ID, as well as Match Format and Match Duration selected. You can use Find by Name and deselect the other options to widen your search. Pro Tools will warn you about the dangers of linking a file that does not match the duration, so make sure you do link the correct file. This also reinforces the importance of good file naming.
You can also try the Find All Candidates button at the bottom. Instead of finding just one specific file, Pro Tools will offer you one or more files within the Candidates area of the window. Click the empty button to the left of the filename to see a Link icon appear – this denotes that this file will be used when relinking.
Using the Clip List area for audio management
The Clip List area is where all the audio files imported into a Pro Tools session are listed, whether they are used or not. Unlike other editing software, Pro Tools cannot organize files into folders within the Clip List area. This can be very daunting to use, but there are some tools available for users to get the most out of the Clip List area.
Getting ready
This recipe expects you to have a Pro Tools session with multiple audio files imported into it. Your session should also have the right-side drawer with the Clips List area visible. If you don’t see it, click the tiny arrow in the bottom right of the Edit window or go to the menu bar and select View | Other Displays | Clip List (see Figure 2.14):
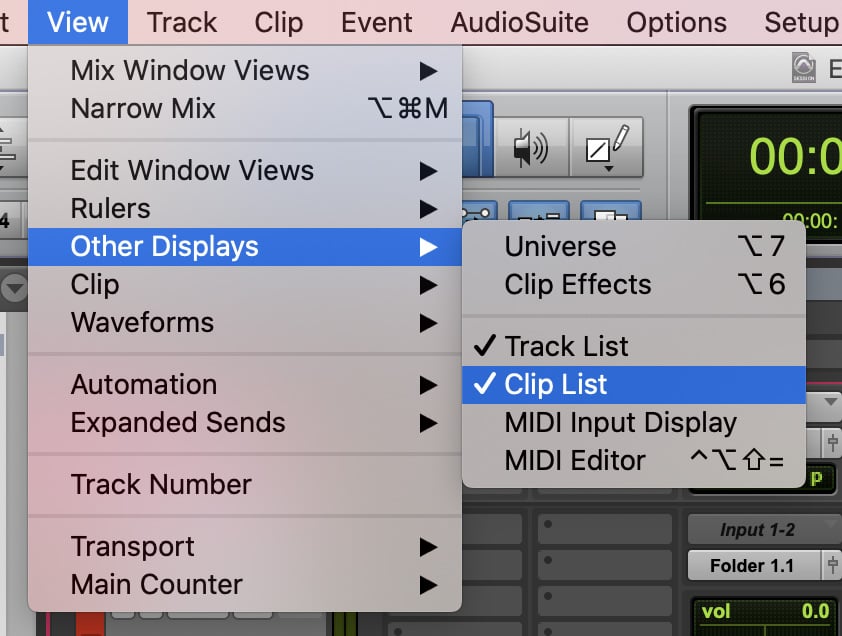
Figure 2.14: Enabling Clip List
How to do it…
This recipe will go over some of the commands you can use with Clip List to find audio clips and manage them. Follow these steps:
- In the Clip List area, click the triangle in the top right.
- Select Find….
- Start typing in some letters that match one of the filenames and observe how the Clip List area changes.
- Click the triangle to the right of the Name field and select Insert Entry.
- Type in another set of letters different from the first into the Name field.
- Click the triangle again and select Insert Entry once more.
- Click the triangle and toggle between the two entries.
- Select one of the entries and click OK.
- Back in the Clip List area, click the triangle at the top right and select Clear Find.
- Click the keyboard focus (the small az button at the top right).
- Type in a filename.
- Hold Option (Alt on Windows) and click on a file (audio warning – make sure your monitors/headphones are not set loud).
How it works…
As mentioned previously, the Clip List area is one large collection of all the audio clips and files in your session. This can make finding clips very frustrating if you don’t use the Find commands within the Clip List area. Find commands can also be hard to narrow down, but the fact that it updates the contents of the list live as you type in letters can help narrow things down, and using the entries to help sort things is another often used technique. Keyboard focus is also very helpful in that you can simply type in the filename, but that also removes the quick command functionality from the Edit window.
There’s more…
If you want to keep the keyboard focus on the Clip List area but have quick commands available for edit functions, simply hold Control (the Windows key on Windows) in combination with the keyboard letter to have that command work in the Edit window. For example, the letters r and t on your keyboard zoom out and in respectively when the keyboard focus is on the Edit window. If the keyboard focus is on the Clip List area, you can press Control + r and Control + t (the Windows key + r and the Windows key + t on Windows) for the same effect.
See also
There are many third-party tools available that provide extra functionality for organizing and finding media for your projects. See the Appendix for a list of them.
Collaborating with others using session data
While working alone is perfectly fine for many projects, most professional environments are collaborative. Being able to send projects and session data between collaborators with as little friction and issues as possible will prevent headaches and frustration. In this recipe, we’ll go over some best practices for saving your projects as standalone sessions and sending the data to other projects. Some workflows also benefit from having multiple separate sessions for different areas of work, so knowing how to save your session data to send to yourself for later is useful.
Getting ready
For this recipe, you will need a Pro Tools session open with audio clips imported and placed into tracks.
How to do it…
We’re going to take a Pro Tools session and save a copy to be imported into another session. Follow along with these steps:
- Go to File | Save Copy In….
- For Format, select Session (Latest).
- Leave Session Parameters at their defaults (the same as the original session).
- For Items to Copy, enable Audio Files.
- Click OK.
- In the Save window, navigate to a location you’d like to save the session in and give it a name.
- Click Save:
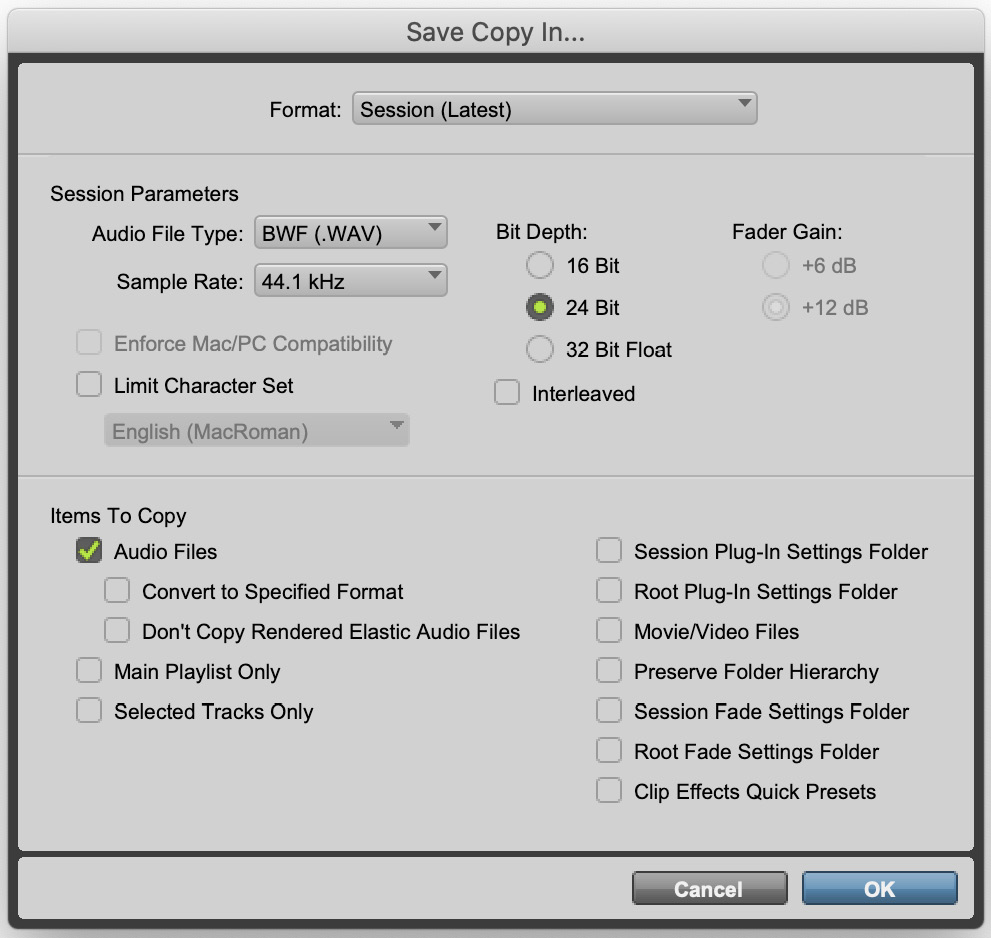
Figure 2.15: The Save Copy In… window
How it works…
What we just did was save a copy of our session with all the audio files copied into its Audio Files folder. This is important as a way of collaborating between sessions since Pro Tools can either copy audio files into a project session’s Audio Files folder or simply reference the files added to it from another location. When using the Save Copy In… command and selecting the audio files to copy, it will ensure that all files present in the Clip List area are copied to the new session’s Audio Files folder. If you want to send this project somewhere else, make sure you include the entire folder, not just the Pro Tools session file (.ptx).
There’s more…
If you are sending a project to another system and need to have it in a specified format, the Save Copy In… command can do this for you. The Format option at the top of the window allows you to select an older version of Pro Tools from a dropdown (from versions 5.9-6.9 or 7-9). This will typically export a .ptf file, along with the other folders. These files can be opened in newer versions of Pro Tools, but newer files (such as .ptx) cannot be opened in older versions of Pro Tools. While you may think it wouldn’t be common to have to open in older versions of Pro Tools, the reality is that due to Avid’s business practices, many studios opt to “freeze” their software at a particular version. Most versions of Pro Tools are designed to work with specific operating systems and, by extension, certain hardware. If a large studio invests a large amount of money into high-end hardware, it would be impractical to refresh all that gear just to have it work with newer versions of Pro Tools.
The other options available also allow you to select a target Sample Rate and Bit Depth, and you can further narrow down the items you are saving by choosing to export only Selected Tracks or only Main Playlists.
One other important note about saving projects in this method is it also saves markers. If you have notes you want to provide to collaborators, you could create a session with just markers exported; then, those can be imported into another project.