


Taking a Quick Tour of Ableton Live 11
If you are reading this book, you’ve most probably already used Ableton Live and are here to brush up on the basics and sharpen your skills or even find the most suitable workflow for yourself. Or, you might have been using a different Digital Audio Workstation (DAW) and are looking to make the switch to the wonderful world of Ableton Live. Perhaps you are planning to dive into performing your music and you heard that Live is a popular choice among established live performers. Either way, you are in the right place!
The Live 11 update has definitely brought some amazing workflow improvements as well as some new devices to spike the community of users’ creativity.
In this book, we will be using the Live 11 Suite version, although there are other, more limited, versions available (Lite, Intro, and Standard). I will guide you through some best practices, tips, and tricks to show you how you can get the most out of the software to create the music you always wanted.
In this chapter, we will take a quick tour of Live 11. This should provide a refresher or an introduction to the interface so you can have a more comfortable music-making journey.
By the end of this chapter, you will know how to set up Live, have developed an understanding of Live’s linear and non-linear workflows, and understand how to save your projects, export your tracks, and work with Templates.
This will be important in order to find all the tools you need and develop a convenient and fast workflow that enables your creativity to flow.
We are going to cover the following topics in this chapter:
- Introduction to Live concepts
- The preferences
- A tour of the interface
- Session View versus Arrangement View
- Exporting audio, saving a project, and templates
Technical requirements
In order to follow along with this chapter, you will need the following:
- A computer with at least 8 GB of RAM and at least an Intel Core i5 processor
- A pair of headphones
- A copy of Live 11 Suite
- Chapter 1 Ableton Live project
Don’t own Live 11 Suite? You can download a fully functioning trial version from the Ableton website: https://www.ableton.com/en/trial/.
Introduction to Live concepts
Live originally started out as a loop arranger (or loop sequencer) before it became a fully realized DAW, and became popular upon its release in 2001.
Its unique approach to music-making can be a little intimidating to those coming from a traditional DAW background, especially when you first open the software. Sometimes, you might need to change your thinking and approach to producing music in this kind of environment; however, the workflow that you are about to embrace will definitely benefit your creativity in the long run.
Live is widely used among producers and performers due to its previously mentioned unique workflow. But what makes Live so unique? Well, I guess you already met Session View when you first opened up the program. This view will enable you to compose and perform your music in a non-linear environment (without a timeline) so you can just focus on your ideas and playing, in contrast to a grid-based timeline’s linear approach.
The time will come when you will need to lay down your ideas in a traditional linear way to form your final arrangement, but that’s why there is the other view – Arrangement View.
Furthermore, there is now MIDI Polyphonic Expression (MPE) support in Live 11, and we will also discover the amazing world of Racks (which will enable you to create complex and layered instruments, as well as providing you with track-based parallel effect processing, macro controls, and more), which can benefit both production and performance workflows.
Live also offers a bunch of tools to humanize your music (by adding further movement to sequences and fluctuation to values), generate ideas quicker, and even help you out with some areas that might not be your strongest suit, such as music theory.
You can carry out the entire production process in Live, from laying down your first initial ideas to forming your arrangement and doing your final mixdown.
Of course, you will not have to stop there. Once you are finished with your tracks, you can use Live to take them to the stage or design a set specifically for a live performance.
Let’s have a look at how to set up Live’s preferences in the best possible way to suit your workflow. To follow along in this chapter, you can use the Chapter 1 Ableton Live project. You can also access the same project from within Ableton Live itself:
- Navigate to Help | Help View
- Click on What's New in Live 11 on the right side of the screen in the Help View.
- Click on Live Set within the first paragraph of text in the Help View.
Live will automatically open up the demo project.
Setting up the preferences
In the preferences, you can set up how Live operates on its own or with external devices that you connect to the computer.
The first thing that we will have to set up is the audio preferences:
- Navigate to Live | Preferences... (Options | Preferences... on Windows) or use the key command, Cmd + , (Ctrl + , for Windows).
- Click on the Audio tab.
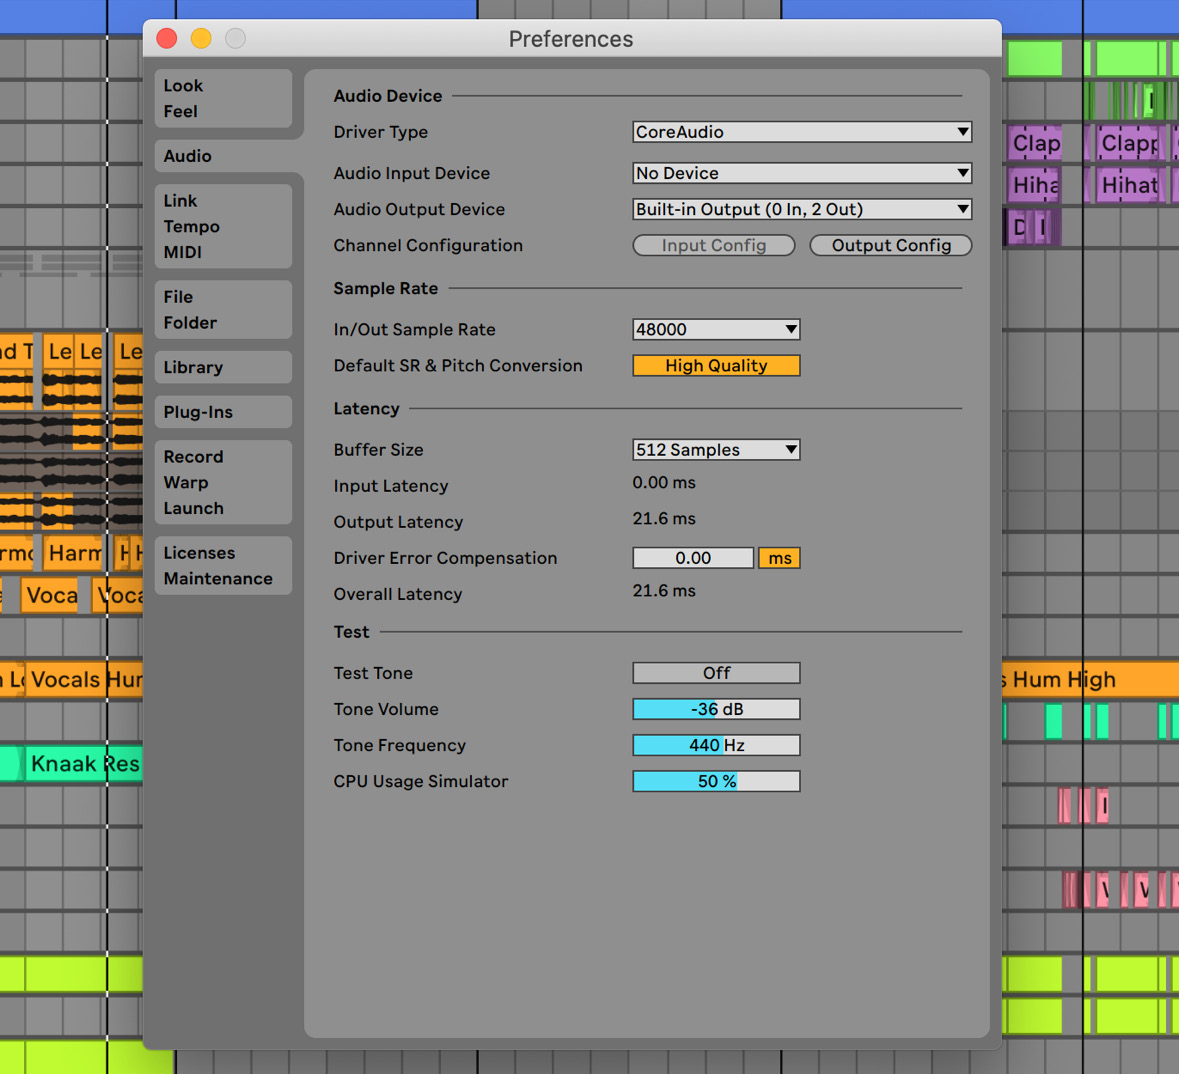
Figure 1.1 – Audio preferences
- For Audio Output Device, you should choose the device that you want to use to play sound through. This could be external headphones, your audio interface, or your computer’s built-in output.
- You can define the Sample Rate that you’d like to use (generally, for music, 44.1 kHz is fine. If you are working on audio for a motion picture or other multimedia, then choose 48 kHz, but this would be in your project brief anyway). We will revisit the sample rate in Chapter 2, Recording Audio in Ableton Live 11.
- Buffer Size is related to latency. The lower the buffer size, the more pressure you are putting on the CPU, so the sooner you will experience audio dropouts. However, the higher the buffer size, the more latency you are introducing. For now, we can set the buffer size to 256 Samples. We will come back to this again in Chapter 2, Recording Audio in Ableton Live 11.
You should now be set to hear sounds in Live.
Let’s just briefly look at what you can set in the other tabs within Preferences; however, don’t worry too much about remembering what these do as we will keep on coming back to Preferences throughout this book:
- Look Feel: You can set up different and customize functions such as playback head behavior, display zoom, track and clip color assignments, and change the theme of the software interface.
- Link Tempo MIDI: You can set up Ableton Link and Tempo Follower here. You can also find the MIDI preferences here.
- File Folder: Here, you will find file management functions related to things such as analysis files, the temporary audio recordings folder, and cache.
- Library: You can set browser behavior and library content locations here, both for Packs and User Library.
What are Packs?
Packs are curated content libraries, which can be one-shot samples, device presets, or loops. You can find many of them to purchase on the Ableton website. Alternatively, the ones that are part of Live Suite will show up in your browser to be downloaded directly from there.
- Plug-Ins: This is the place where you can manage your third-party plugins’ behavior and location.
If your third-party plugins are not showing up, you should check whether their folder is set properly here and then rescan them.
- Record Warp Launch: Under this tab, you can set up functions such as the recorded file type, the bit depth, count-in, Exclusive Arm and Solo (this function will define whether you are able to arm or solo multiple tracks at the same time. If you set them to Exclusive, you can still solo and arm multiple tracks while holding down the Cmd (Ctrl for Windows) key), how session automation is being recorded, warping behavior, fades, launch modes, and global quantize.
- Licenses Maintenance: Here, you can authorize Live, set automatic software updates, and send usage data.
Now that the preferences have been covered, we can take a look at the different elements of the interface so you will be able to navigate Live quickly.
Tour of the interface
Let’s begin to take a tour of Live!
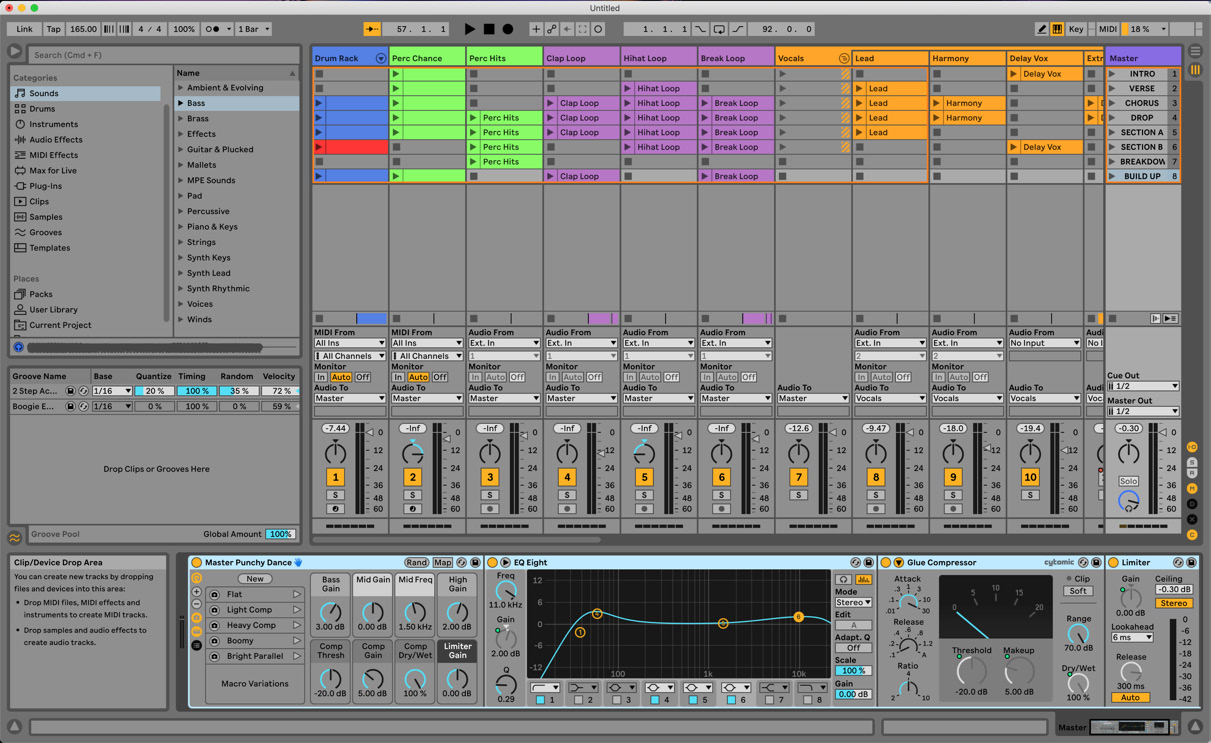
Figure 1.2 – Session View accessible by the Tab key
We are going to go through all the crucial parts of the interface, and in the next section, we will conclude with how Session View and Arrangement View operate in this parallel workflow.
But first, let’s look at the parts of the interface that you can display regardless of whether you are working in Session View or Arrangement View.
The browser
In the browser, we can access all our samples, loops, synthesizers, samplers, audio and MIDI effects, as well as third-party plugins, grooves, Packs, templates, Max for Live devices, User Library content, project content, and custom collections of these.
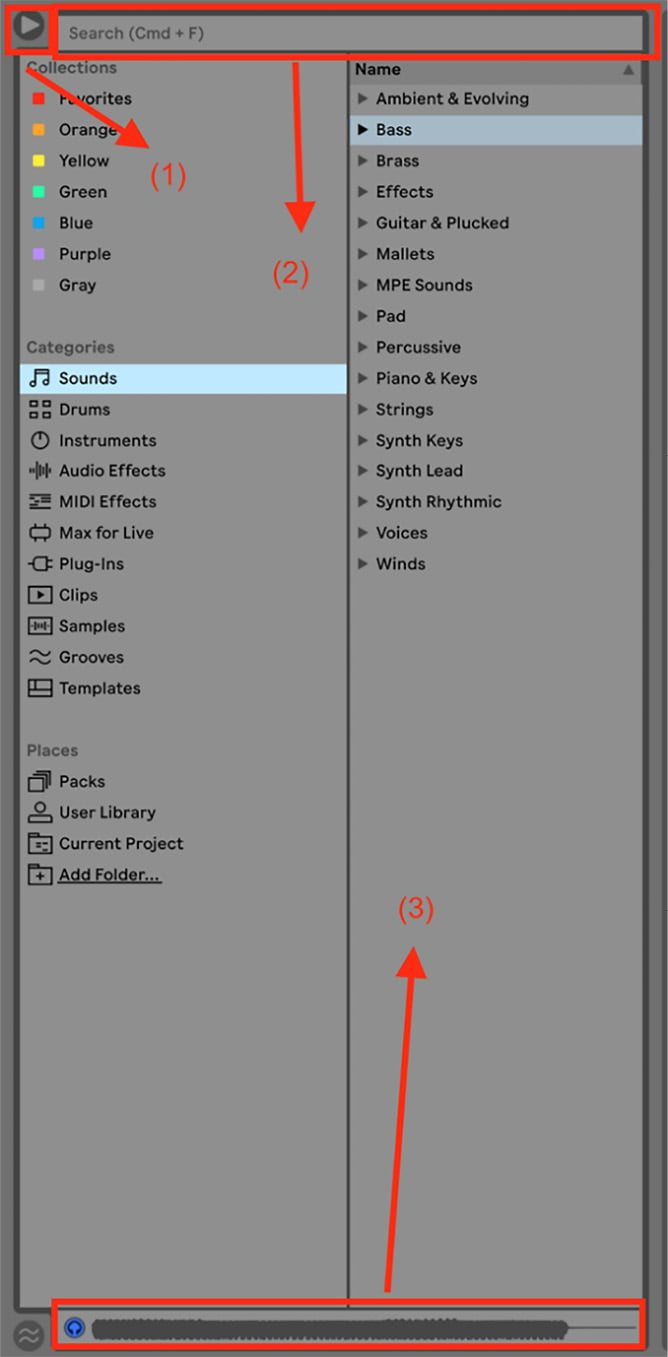
Figure 1.3 – The browser
This is where you are going to start your music-making. The unfold button (triangle) shown in Figure 1.3(1) shows and hides the browser.
Categories
There are two columns in the browser: the browser sidebar on the left and the content panel. When we click on something under Categories, it will expand the content of that category and show subfolders in the content panel.
For example, if you click on the Instruments category, Live will show you all the available instrument devices you can use. Furthermore, each of these devices will have a small triangle next to them, which will further expand the instrument types and presets (Figure 1.4).
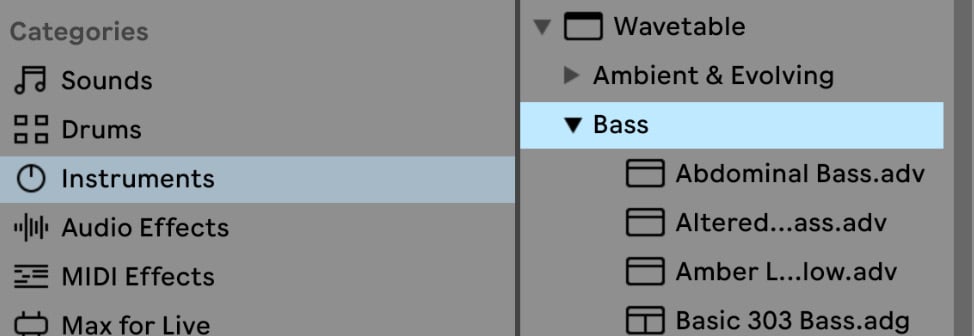
Figure 1.4 – Bass presets of the Wavetable instrument
Let’s briefly cover the different categories:
- Sounds: Instrument presets, categorized by sound type rather than instrument type
- Drums: Drum presets/drum racks
- Instruments: Instrument devices and presets, categorized by instrument type
- Audio Effects: Audio effect devices and presets
- MIDI Effects: MIDI effect devices and presets
- Max for Live: Max for Live devices and presets
- Plug-Ins: Third-party AU/VST/VST3 instruments and effects
- Clips: Clips installed in Live
- Samples: Audio files
- Grooves: Live’s grooves
- Templates: Different project templates
Places
Now that we’ve looked at the categories, let’s go through what we can find under Places:
- Packs: Library content and installed content of Live which we looked at under Preferences already.
- User Library: Your own content. Your personal, saved presets of devices and effects, for example, will be found here.
- Current Project: You can access here all the files that are part of the currently active project that you are working on and open them.
- Add Folder…: Here, you can add custom folders to Live’s browser. For example, if you have a personal samples folder on your computer, you can simply add it so that those external files will be part of your browser and you can take advantage of the Preview function (Figure 1.3(3)).
Preview will enable you to hear the selected media in the browser before loading it into your session. You can activate it with the small headphone button on the left of the waveform display (Figure 1.3(3)). You can preview the media in real time or synced with the current tempo of the project. The preview can also be routed to a separate output, so if you are looking for a sample, loop, or instrument preset in the browser when playing live, it will not interrupt the music playing through your main output.
Collections
Collections allows us to organize any media within the browser into custom-made folders, so if you are working on a project that requires you to use the same device, preset, or sample over and over again, it’s a good idea to tag those items into a collection folder.
You can simply navigate to the item, Ctrl + click (right-click for Windows), and choose the appropriate collection folder from the drop-down menu (Figure 1.5).
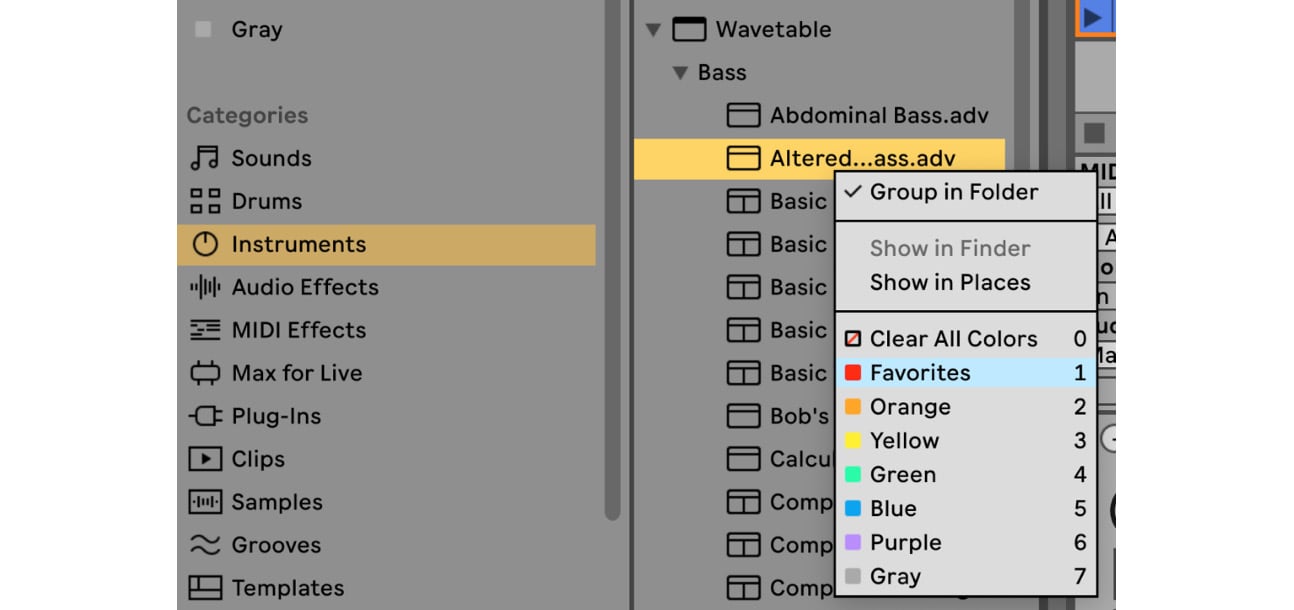
Figure 1.5 – Choosing a collection folder
You can also rename a collection folder by Ctrl + click (right-click for Windows) on it or selecting the folder and hitting Cmd + R/Ctrl + R (Figure 1.6):

Figure 1.6 – Renaming a collection folder
In order to speed up the browsing process, we can also use the Search field in the browser (Figure 1.3(2)).
We can type in bass, for example, and it will show us everything in the browser with this keyword within the selected category.
If we would like to browse in all the categories at the same time, then we can select All results, or press Cmd+F (Ctrl + F for Windows) (Figure 1.7).
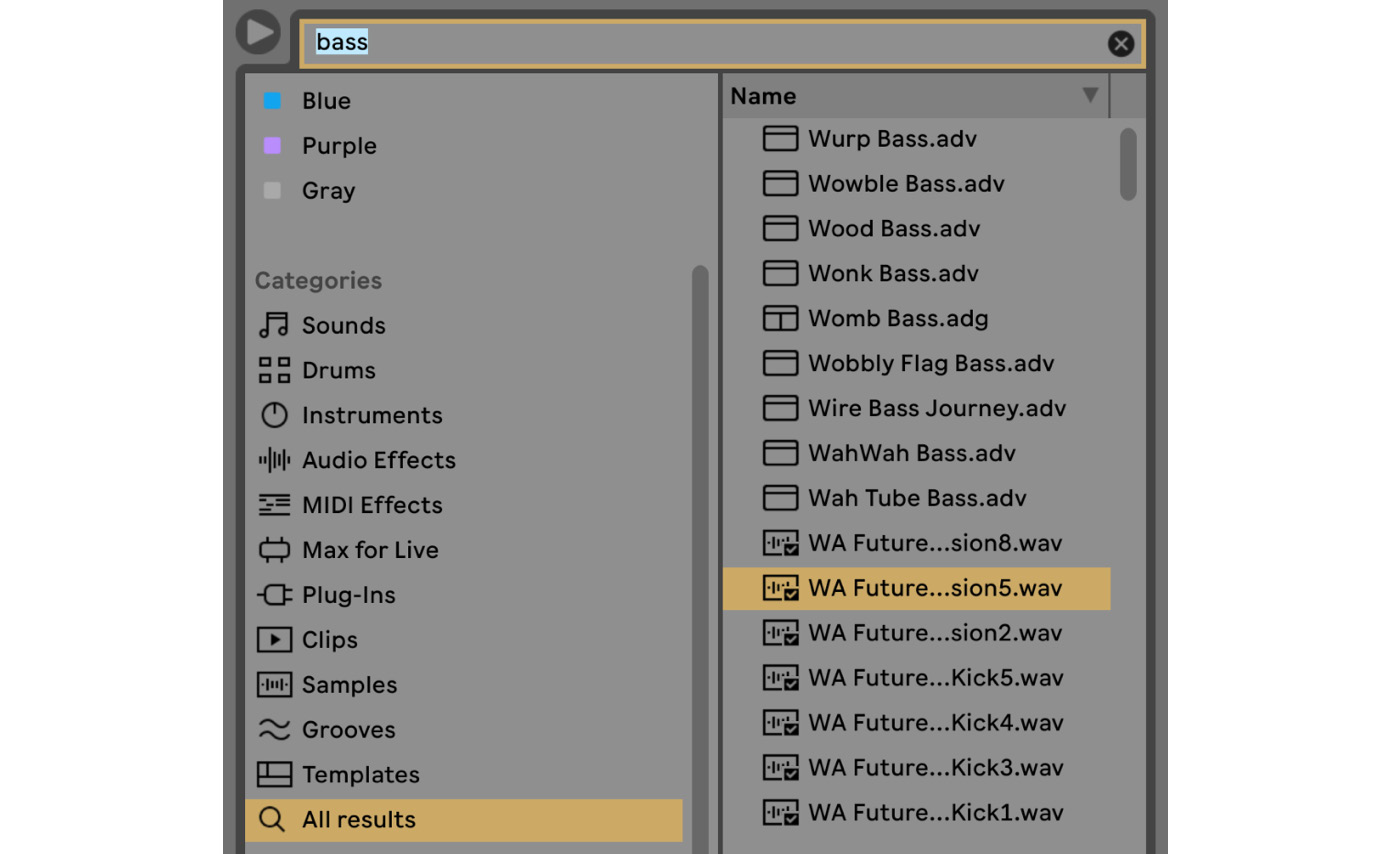
Figure 1.7 – Searching for bass in the browser
Now that we have gone through the browser, let’s have a look at the other areas of the interface…
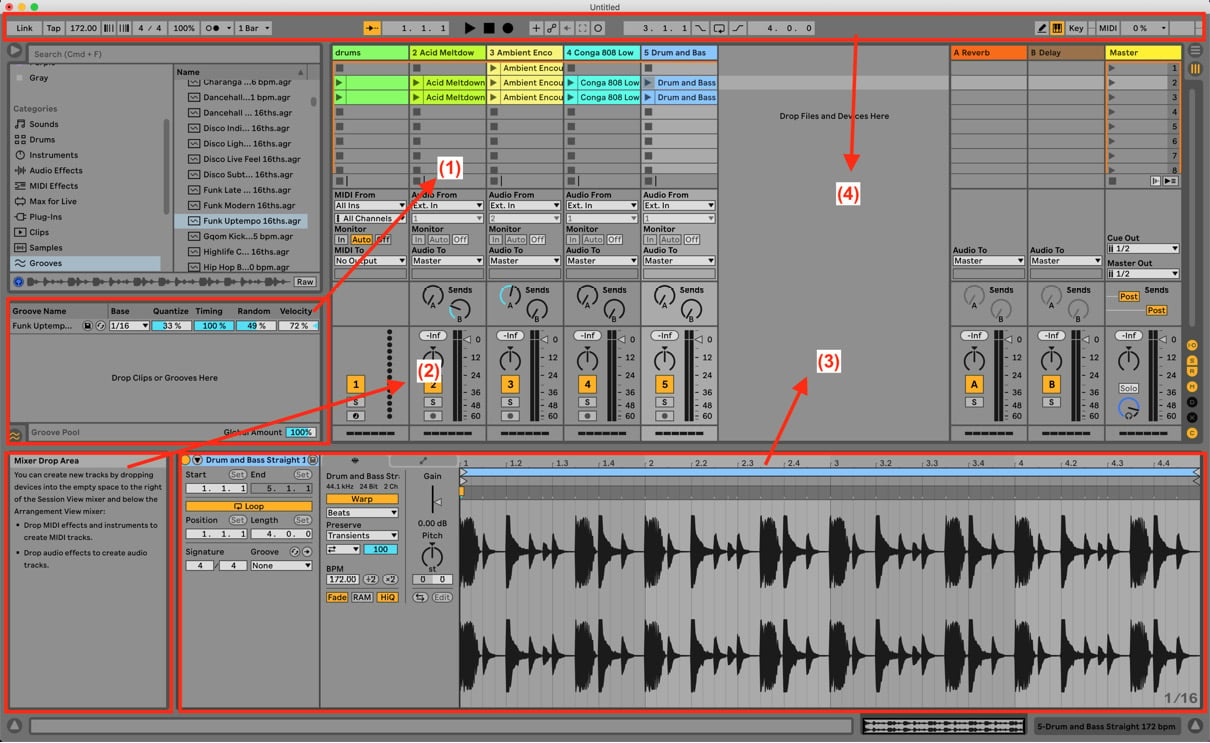
Figure 1.8 – The interface
Groove Pool
The Groove Pool (Figure 1.8(1)) allows you to add a more humanized feel (additional movement and fluctuation of values) to your clips by using grooves. Live comes with a rather large number of grooves, which you can either drop into the Groove Pool from the browser and then later add to your clips, or drop the Grooves straight onto a clip. They will appear in the Groove Pool, where you can adjust the parameters. More on this in Chapter 5, MIDI Editing and MIDI Effects.
Help View
Now, this is a quite crucial area if you are only beginning your journey in Live.
The Help View (Figure 1.8(2)) explains the functionality of each parameter in Live. You simply need to hover your mouse over the parameter and the Help View will display the appropriate information regarding the chosen parameter.
I strongly suggest displaying the Help View, as even for a seasoned Live user, it can be useful when the time comes to provide a little reminder of some functionalities.
You can hide and show the Help View by simply clicking on the small triangle button underneath the Help View box.
Clip View/Device View
This area (Figure 1.8(3)) will display either the device chain on the chosen track or the Clip View, which will be either the sample editor or the MIDI editor, depending on the chosen track’s type.
You can simply double-click on the track head to display the Device View or double-click on the audio or MIDI clip to display the Clip View. Additionally, you could use the Clip View selector or Device View selector, as shown in Figure 1.9.

Figure 1.9 – Clip View Selector and Device View Selector
Control Bar
In the Control Bar, you can find the transport controls (Figure 1.8(4)). This area holds crucial functions, such as start playback, stop, and record, in both Session View and Arrangement View. Additionally, you can set the tempo here and switch on and off the metronome, among other functions.
Let’s quickly have a look at these:

Figure 1.10 – Control Bar and transport controls
- The Follow button will make the screen scroll along with the position of the playback head to always display the current play position of the song (Figure 1.10(1)).
- Arrangement Position will display the current position of the playback head in the arrangement (Figure 1.10(2)).
- The Play button (Figure 1.10(3)).
- The Stop button (Figure 1.10(4)).
- The Arrangement Record button, when pressed, records clips in Arrangement View. There's more on this in Chapter 2, Recording Audio in Ableton Live 11, Chapter 4, Exploring MIDI Sequencing Techniques, and Chapter 10, Utilizing Arrangement and Organization Techniques in our Ableton Live project (Figure 1.10(5)).
- When the MIDI Arrangement Overdub button is enabled, recording MIDI over an already existing MIDI clip will add the new notes to the clip, not overwrite them. There's more on this in Chapter 4, Exploring MIDI Sequencing Techniques (Figure 1.10(6)).
- When the Automation Arm button is enabled, manual parameter changes will be recorded to the clips in Session View and Arrangement View. There's more on this in Chapter 11, Implementing Automation and Modulation (Figure 1.10(7)).
- The Re-enable Automation button will re-enable manually overridden inactive automation. There's more on this in Chapter 11, Implementing Automation and Modulation (Figure 1.10(8)).
- The Capture button pre-records MIDI and “captures” the notes you just played, even if you didn’t hit the record button. There's more on this in Chapter 4, Exploring MIDI Sequencing Techniques (Figure 1.10(9)).
- The Session Record button enables you to record (and overdub MIDI) audio and MIDI clips in Session View (Figure 1.10(10)).
- Loop Start/Punch in Point in Arrangement View displays the start of the Arrangement loop or Punch recording. More on this in Chapter 2, Recording Audio in Ableton Live 11 (Figure 1.10(11)).
- Punch-In Switch in Arrangement View will prevent Live recording anything prior to the punch in point. There's more on this in Chapter 2, Recording Audio in Ableton Live 11 (Figure 1.10(12)).
- Loop Switch in Arrangement View activates the Arrangement loop. There's more on this in Chapter 2, Recording Audio in Ableton Live 11 (Figure 1.10(13)).
- Punch-Out Switch in Arrangement View will prevent Live recording anything after the punch out point. There's more on this in Chapter 2, Recording Audio in Ableton Live 11 (Figure 1.10(14))
- Loop/Punch-In Region Length in Arrangement View displays the length of the Arrangement loop or punch-region. More on this in Chapter 2, Recording Audio in Ableton Live 11 (Figure 1.10(15)).
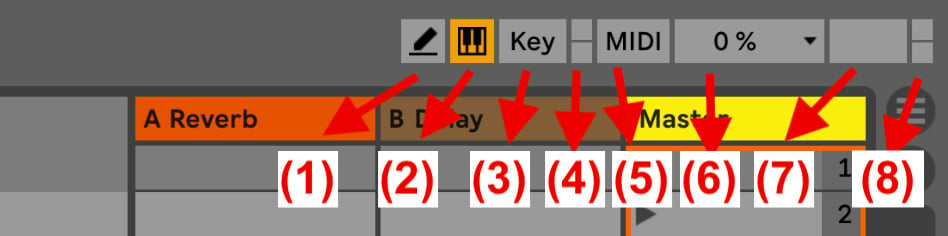
Figure 1.11 – Control Bar
- Draw Mode Switch is useful for drawing in MIDI notes as well as envelopes for automation and modulation. This can be also turned on and off by pressing the B button (Figure 1.11(1)).
- Computer MIDI Keyboard enables you to use your computer keys to input MIDI notes (Figure 1.11(2)).
- Key Map Mode Switch enables you to map Live’s parameters to your computer keys (Figure 1.11(3)).
- Key/MIDI In and Out Indicators will flash when Live is sending or receiving MIDI messages belonging to remote control assignments made in Key and MIDI Map Modes. There's more on this in Chapter 14, Exploring MIDI Mapping, External Instruments, and MIDI CCs (Figure 1.11(4)).
- MIDI Map Mode Switch, when turned on, enables you to carry out MIDI mapping. There's more on this in Chapter 14, Exploring MIDI Mapping, External Instruments, and MIDI CCs (Figure 1.11(5)).
- CPU Load Meter can be seen in Figure 1.11(6). Clicking on the small arrow will give you additional options, such as switching the CPU load meter between Average and Current and configuring your audio preferences (Figure 1.12).
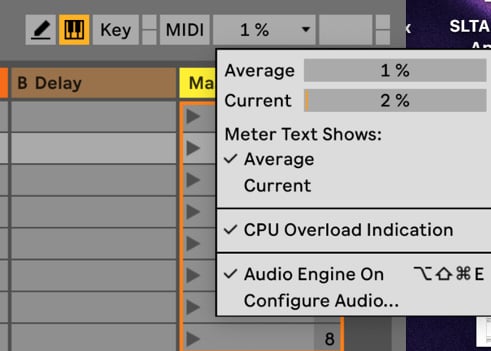
Figure 1.12 – CPU Load Meter
- Overload Indicator: This lights up when the CPU is overloaded because Live was not able to load audio fast enough. When this happens you will experience audio dropouts. It might be because your computer is not powerful enough to handle all the audio processing you are trying to do, or you need to increase your buffer size because it is currently set too low (Figure 1.11(7)).
- MIDI Track In Indicator/MIDI Track Out Indicator: These will flash when Live’s tracks are receiving or sending out MIDI messages (Figure 1.11(8)).
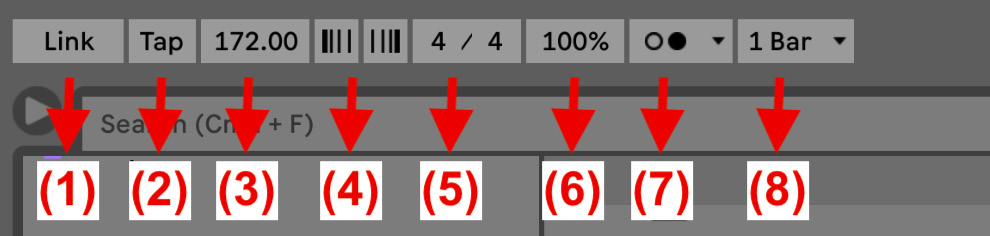
Figure 1.13 – Control Bar
- The Link On/Off switch triggers Ableton Link on and off. There's more on this in Chapter 15, Playing Live (Figure 1.13(1)).
- Tap Tempo is where you can set the tempo, by tapping this button. Live’s playback will follow the tempo of your tapping (Figure 1.13(2)).
- Tempo is where you can manually type in the tempo for your project (Figure 1.13(3)).
- Phase Nudge Down/Up can be useful when you are trying to synchronize Live to a source that isn’t locked to one tempo, to temporarily increase or decrease the tempo of Live (Figure 1.13(4)).
- Time signature Numerators will allow you to type in the time signature of your song (Figure 1.13(5)).
- Global Groove Amount defines the global intensity of all grooves in the Groove Pool (Figure 1.13(6)).
- Figure 1.13(7) shows Metronome and Metronome Settings. Here, you can enable and disable the metronome. By clicking on the small arrow, you can also enable count-in and apply further settings to the metronome, such as sound and rhythm.
- Figure 1.13(8) shows Quantization Menu. This is the magical function that keeps everything in time in your session. Global Quantize controls the global launching behavior of Live. We will be looking at this in more detail a bit later in this chapter.
So, now that we have had our first proper tour of Live, we can continue to have a look at Session View and Arrangement View. This is super important in order to take full advantage of the creative workflow that Live has to offer.
Session View versus Arrangement View
The time has come; we can begin to discover the magic of the non-linear Session View, the linear Arrangement View (Figure 1.14), and their relationship in Live.
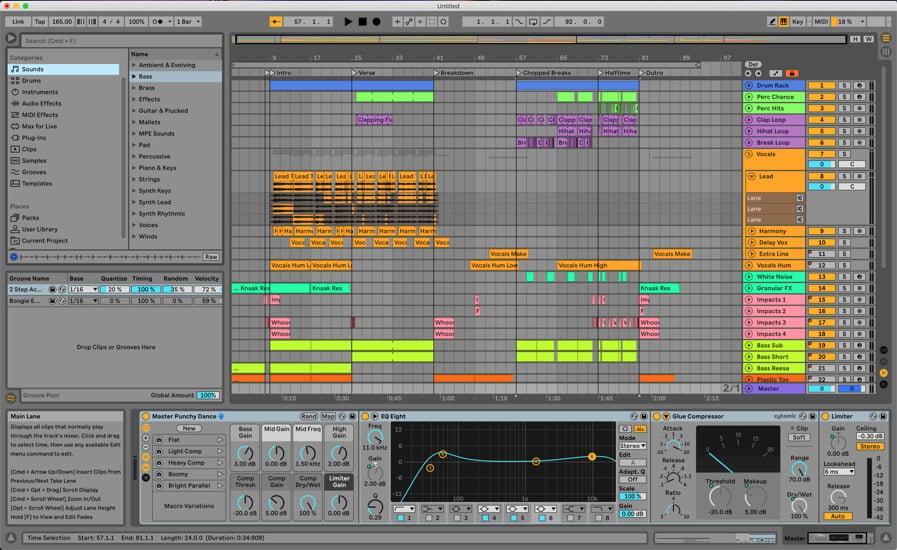
Figure 1.14 – Arrangement View
Session View
Let’s quickly take a tour of Session View!

Figure 1.15 – Session View
Track Title Bar and clip slots
In Figure 1.15, for example, under the Ambient Enco track, there are three clips that belong to the track and will play back Ambient Enco. These clips can be triggered by the small launch button with the play symbol on it. Each track can have one clip triggered at a time. So, for instance, if you’d like the Ambient Enco track to play two different clips at the same time, you would have to duplicate the track so the two clips are placed on two different tracks. How the clips will be launched timing-wise will be defined by the Global Quantize settings. If Global Quantize is set to 1 Bar, as in Figure 1.16, then Live will always wait for the next bar before it triggers the clip and plays it back.
This way, you can’t fall out of time and clips will stay in sync within Session View.

Figure 1.16 – Global Quantize is set to 1 Bar
Each clip slot without a clip has a small square symbol instead of the launch (play) button. These squares are small “stop” buttons, so when you press on one of them, the clip that is currently playing on that track will stop. The timing of the clip-stopping during playback will also be defined by the global quantize settings, so even this will happen “on time.”
Give this a try:
- Go to the browser and navigate to Samples.
- Type
druminto the search bar and find a drum loop. - Preview a few loops until you find something decent.
- Drag and drop a drum loop from the browser to an empty clip slot on an empty audio track.
- Make sure the Global Quantize setting is set to 1 Bar.
- Now, launch the clip with the launch button on the clip slot.
- Once you have heard it play through, at any time, press on the stop button underneath an empty clip slot.
You should hear that the loop playback stopping is synced to your tempo at the next bar.
Clip Stop button and Track Status Display
Here, you will also find another Clip Stop button, which if you press will stop the playback of the currently triggered clip of the track (Figure 1.15(2)). Now, if you’re wondering why we need multiple stop buttons, well, just imagine a simple scenario. What if there are no more empty clip slots displayed in Session View? You might still need to stop the playback on that track. So, you can use this Clip Stop button, which is always displayed and available.
The Track Status Display will show you the status of your currently triggered clip.
This is super useful as you will be able to see when the clip that you triggered is about to end so you can trigger the next clip at the right time.
In and Out section
This is where you can route your inputs and outputs for both MIDI and audio on the tracks (Figure 1.15(3)). This is also where you can set up input monitoring. There's more on this in Chapter 2, Recording Audio in Ableton Live 11.
Sends section
You can use this section to send the signal to a return track for parallel processing. We will come back to this in later chapters of this book (Figure 1.15(4)).
Mixer section
Here, you will find the Track Volume Fader, the Meter, Track Pan, the Track Activator (which you might know as “mute”), the Solo button, and the Arm (record enable) button (Figure 1.15(5)).
Track Delay, Crossfade Assign, and CPU Load Meter
Track Delay (Figure 1.15(6)) allows you to pre-delay or delay the track output.
With Crossfade Assign, you You could actually set up Live for Djing, mimicking two decks. You could have one track that you assign as Deck A and another track that you assign as Deck B. The crossfade setting to transition between the two “decks” can be found in the same section but on the Master track. If the track isn’t assigned to any “decks,” the crossfade has no effect.
CPU Load Meter allows you to display how much CPU an individual track is consuming. This is super useful when you start experiencing audio dropouts due to CPU overload as you can easily find which track is contributing most to the dropouts and deal with it.
Hide Show section
You can customize what you are displaying by hiding some of the previously listed controls (Figure 1.15.(7)). You can hide and show the I/O, sends, returns, the mixer, Track Delay, crossfade, and track CPU metering.
Return Tracks
You can have up to 16 Return Tracks in Live Suite (Figure 1.15(8)). When you create a new Return Track, the corresponding Send will be created on the tracks. This is a concept that you might come across in other DAWs, Return Tracks popularly being called as AUXes and the Sends “Buses.”
I/O on the Master track
Let’s look at Figure 1.15(9). I wanted to talk about this separately so we can discuss the Cue. Again, this is something that can be extremely useful for performing. We will come back to this when we look at live performances later in this book, but since you use the Cue to control the output of the browser’s Preview function, it is important to know about it. You can route out the Master to, for example, your speakers, which are your main outputs, but you can also route out the Cue to a separate pair of outputs. Besides the Preview of the browser, you can decide whether you want to hear other tracks in the Cue too. Once you have sorted the routing, then you can click on the Cue button. This will turn the Solo buttons on the tracks into little headphone buttons, which will send the tracks into the Cue when you select them. You can then switch it back to Solo when you want to. See Figure 1.17. We will come back to Cue again in Chapter 15, Playing Live.

Figure 1.17 – Cue and Solo buttons
Scenes, Scene Tempo, and Scene Time Signature
Let’s look at Figure 1.15(10). Scenes represent a selection of clips across all the tracks. Take a look at Figure 1.18.

Figure 1.18 – Scene
You will see that we have three different scenes. The first one was renamed Intro (you can right-click (Ctrl + click for Windows) on a Scene and choose the Rename option, or select the Scene and press (Cmd + R (Ctrl + R for Windows) and type in the name) and it only has one clip to play back on the Ambient Enco track. The next Scene, named Intro pt2, has three different clips across three different tracks to be played back, and the Verse Scene has even more. When you press the Launch button on the Scene, it will launch all the clips that are part of that Scene. This is how you will be able to progress your ideas into some sort of structure before moving to Arrangement View. Or you can structure a live performance where you will be launching clips, scenes to have a little jam session.
But how do we create these Scenes?
Well, you can use a simple copy-paste technique to insert the clips into the clip slots to form scenes, or you can do the following. If you have clips in Session View that you you have launched and you would like to form a Scene out of these triggered clips you can simply Ctrl + click (right-click for Windows) on the last engaged Scene and chose Capture and Insert Scene from the contextual menu (Figure 1.19):
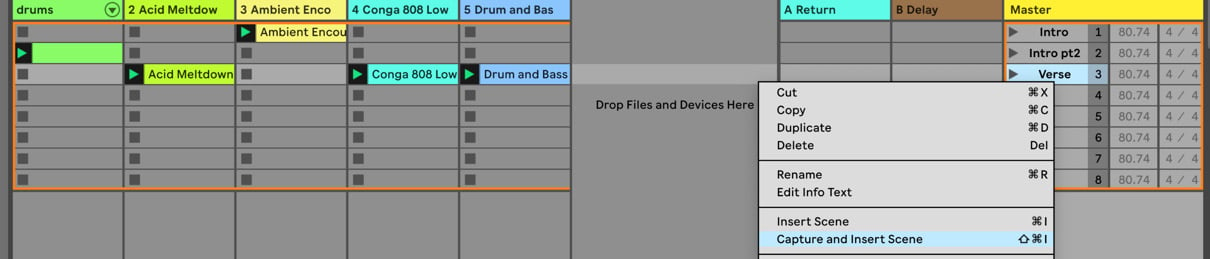
Figure 1.19 – Capture and Insert Scene
This will form a brand-new Scene, including all the clips that were launched across multiple Scenes (Figure 1.20).

Figure 1.20 – Brand-new Scene formed after selecting the Capture and Insert Scene option
You can always copy and paste or duplicate previous Scenes (see from the contextual menu in Figure 1.19) in order to add a new clip from an additional track to the copied or duplicated Scene to progress your ideas/track.
We will be working in Session View quite a bit throughout this book, so you will get to understand the full potential of this workflow!
Scenes can represent a part of your track, but when you are preparing a Set for a live performance, sometimes a Scene will represent full tracks. For example, Scene 1 will hold all the elements of Track 1, and Scene 2 will hold all the elements of Track 2. The two tracks you are performing might have totally different tempos. Obviously, you wouldn’t want to spend time on stage typing in the tempo of the next Scene/track. You would essentially want the Scene to switch to the appropriate tempo for the track when you trigger it. This is exactly why there is the option to enter the tempo separately for each Scene. This works the same for time signature changes too; each Scene can have its own Scene Time Signature.
Even in production, sometimes you might want to switch things up with a cheeky tempo change, such as dropping to half-time after the breakdown and then going back to the original tempo in the next section, or having a lovely middle-8 with a time signature change. Being able to change the tempo for each Scene will enable you to do these kinds of things.
Stop All Clips, Enable Follow Actions Globally, and Back to Arrangement
Let’s have a look at what functions we can access on Figure 1.15(11).
The Stop All Clips button will globally stop playing back all clips in Session View.
The Enable Follow Action Globally button allows you to enable Follow Action. Follow Action is a rather large topic. We will be looking at it in Chapter 13, Exploring Tempo Follower, Follow Action, Max for Live, Working with Video, and Ableton Note.
We then have the Back to Arrangement button. This is the right time to start talking about Arrangement View. A pretty standard workflow can be that you start laying down your ideas in Session View’s non-linear loop-based environment, where you can focus on playing live and quickly capturing your idea without worrying abot the timline.. But eventually, you will want to move into Arrangement View to form a full arrangement in a linear environment where you can just press play at the beginning of the track and it will play through from left to right. The Arrangement View is also where you would do your micro-edits and add additional ear candy. Once you’ve done that, move your clips to Arrangement View; the original clips you started out with will still remain in Session View too. When any clips in Session View are triggered, the Back to Arrangement button will light up to indicate that you aren’t playing back your arrangement in Arrangement View (Figure 1.21). If you press this orange button, Live will only play back whatever is supposed to be playing in Arrangement View. So, you can only play back a given track in either Arrangement View or Session View; otherwise, you would have some serious chaos.

Figure 1.21 – Back to Arrangement button
If you don’t know already, I am sure you are dying to know how to get the clips and Scenes from Session View into Arrangement View. Hold your horses; we will get to that a little later!
Arrangement View and Session View selectors
Let’s have a look at the preceding functions shown in Figure 1.15(12).
So, you have probably figured out by now that the Ableton logo is actually made out of the symbols of Session View and Arrangement View. Pretty amazing, eh?
If you press one of these buttons (in the top-right corner of the screen below the CPU Load Meter), it will switch between the two views. There is another, perhaps more convenient, way to toggle between the views, by simply pressing the Tab key on your computer keyboard.
So, let’s click the Arrangement View selector and take a look at Arrangement View (Figure 1.22)!
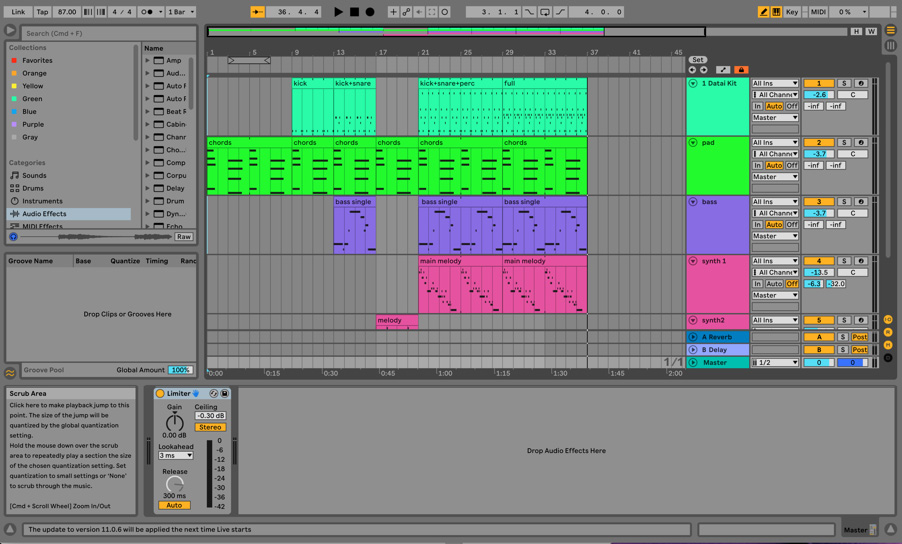
Figure 1.22 – Arrangement View
Now, I want you to look at Figure 1.22 and Figure 1.23. Hopefully, you have clocked that the tracks are the same in both views, just in a non-linear manner and a linear manner. The elements of this track were composed in Session View and then the Scenes were transferred into Arrangement View, where the idea can be further developed.
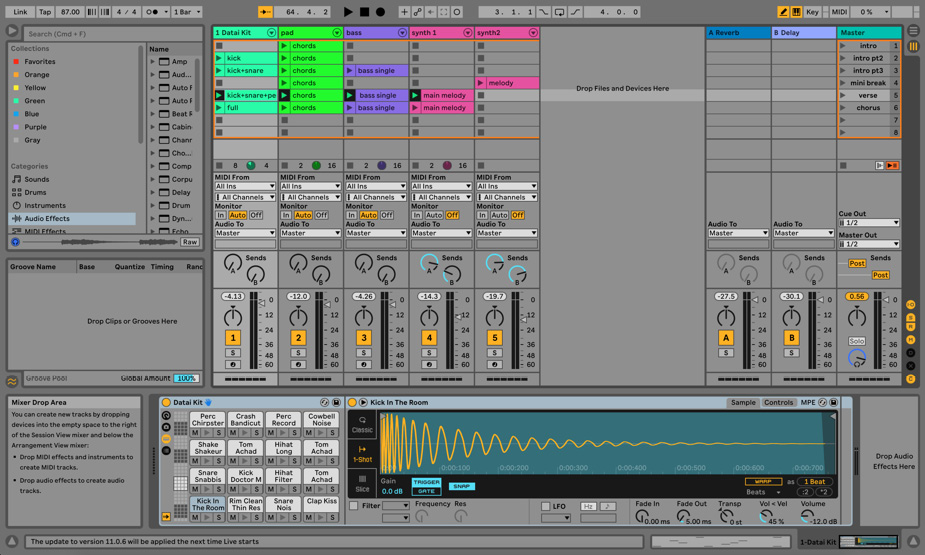
Figure 1.23 – Session View
You can get your clips and Scenes into Arrangement View from Session View by either simply copy-pasting them or actually recording them in real time into Arrangement View by pressing the Arrangement Record button in the Control Bar and launching the Scenes or clips. You are basically jamming out your arrangement and capturing it in real time (Figure 1.24)!
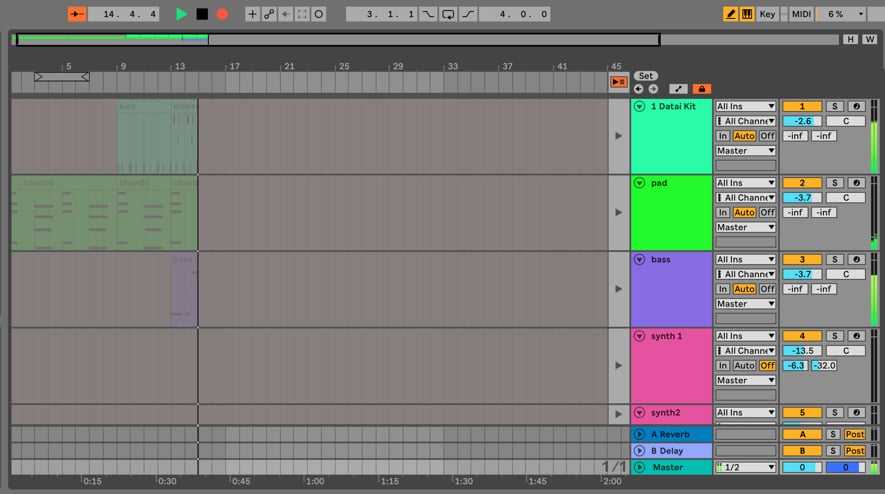
Figure 1.24 – Capturing an arrangement in real time
This is something that we are going to cover in depth in Chapter 10, Utilizing Arrangement and Organization Techniques in Our Ableton Live Project.
Arrangement View
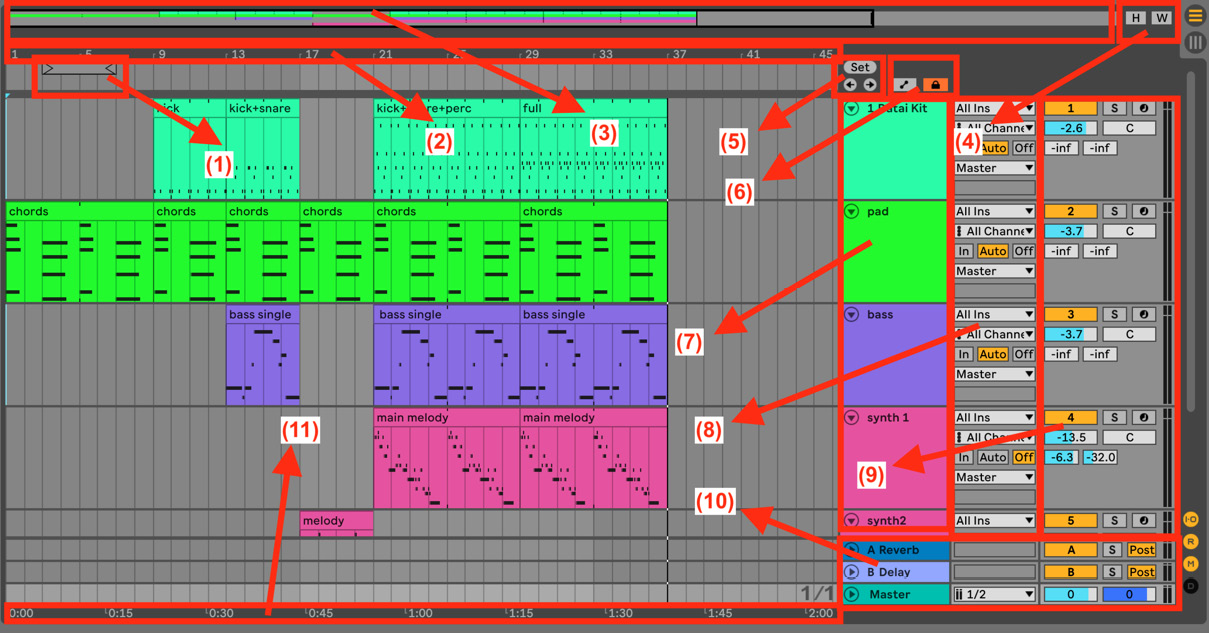
Figure 1.25 – Arrangement View
For now, we are going to quickly explore the controls in Arrangement View.
- Figure 1.25(1) shows Loop/Punch-Recording Region. You can drag left and right to extend this selection.
- Figure 1.25(2) shows Beat-Time Ruler. If you hover your mouse over this area and start dragging up and down, it will allow you to zoom in and out. Alternatively, if you click into the clip area, you can use the - and + symbols to zoom in and out. You can also move your mouse left and right over this area in order to scroll over the timeline.
- Figure 1.25(3) shows Clip Overview/Zooming Hot-Spot. You can resize this view by dragging the view’s edge up and down, just like the majority of the areas in Live. This view will give you an overview of the clips in your timeline.
- Figure 1.25(4) shows Optimize Arrangement Height and Width. If you click on these, the tracks’ height and width will be optimized so they can fit into Arrangement View.
- Figure 1.25(5) shows Set/Delete Locator, Previous, and Next Locator. These buttons will allow you to create and delete locators to organize your arrangement’s structure, and also navigate between them.
- Figure 1.25(6) shows Automation Mode and Lock Envelopes. These switches will enable you to display the automation lanes for all tracks or the track content, as well as be able to copy clips without or with their automation.
- Figure 1.25(7) shows Track Name.
- Figure 1.25(8) shows In/Out Section. This is the same as in Session View; here is where you can perform signal routing and choose monitoring options.
- Figure 1.25(9) shows Mixer Section. Again, the same as in Session View, the only difference being the design of the parameter controls. Instead of a pan pot, fader, and send pots, you can see sliders here, but they control the same parameters.
- Figure 1.25(10) shows Return Tracks and Master. Once again, they are the same tracks that you see in Session View, but they will always be placed at the bottom of the screen permanently.
- Figure 1.25(11) shows Time Ruler.
Of course, there will be times when you go straight to Arrangement View to start a project and do not use Session View. In this case, just like in Session View, you can drag and drop media from the browser to the appropriate track, but this time not to a clip slot but into the timeline.
Now, you should feel more comfortable with Live 11’s interface. In the next section, we are going to look at how we can export audio out of Live, save our work, and use templates before we can dive in and start making music.
Getting your work out
This section is super important in order to speed up your workflow with templates, to save your project properly so you never lose any files, and, of course, to export your track so it can see the light of day.
Exporting audio
In order to export your audio from Live’s Arrangement View, take the following steps:
- Select the desired portion of audio (perhaps the whole track). Make sure if it is the whole track that you leave some extra space at the end for any time-based effect tail (such as reverb and delay).
- Then, you can either go to File | Export Audio/Video… or use the Cmd + Shift + R (Ctrl + Shift + R for Windows) key command to bring up the Export Audio/Video window (Figure 1.26).
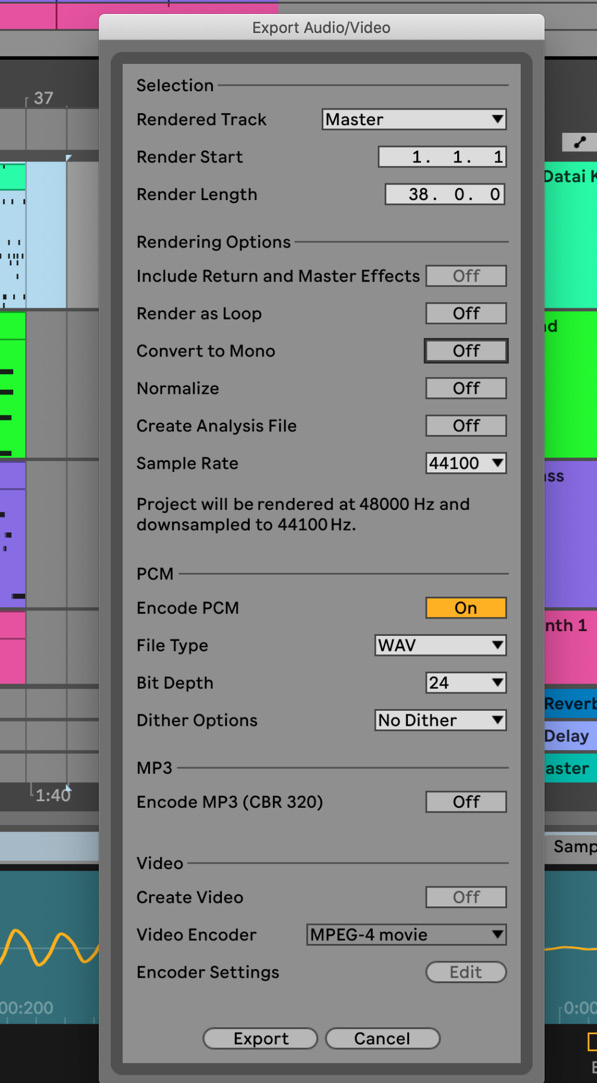
Figure 1.26 – Export Audio/Video window
- Under the Selection section, the first option you can set is Rendered Track. Here, if you’d like to render your whole track, then you’d select Master.
- Make sure that Render Start and Render Length match your desired selection, and that you don’t have any clips selected in Track Display. You can also choose to render any of your Return Tracks, a single track of your project, only selected tracks, or all individual tracks, which allows you to export stems.
- You will also find additional rendering options, such as Include Return and Master Effects, which you can select when you are rendering single, selected, or all individual tracks. You can also enable Convert to Mono. If you are looking to export something as a mono signal, you have control over creating an analysis file with the export, changing the sample rate, rendering as a loop, and normalizing.
- In this window, you can also choose your desired file type, change the bit depth, and set Dither Options if you need to. You can also export an additional MP3 file at the same time.
Live can be used to edit audio for videos, and can actually host video in the timeline. Therefore, you have options for exporting your video work from here too.
- Once you are happy with your settings, just hit the Export button and sit back while the magic happens.
It’s always a good practice to check your exported audio by playing it back, to make sure everything is included that you want to export, because an accidental timeline selection or a muted or soloed track can mess up your exporting.
Saving your work
When you start working in Live, you create a Set, which is an .als file. This file can be found inside the Project folder (Figure 1.27).
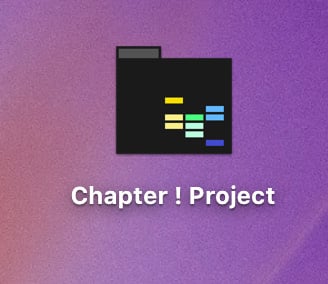
Figure 1.27 – Project folder
This will include other crucial media related to your Set (Figure 1.28) or multiple Sets in the Project folder.
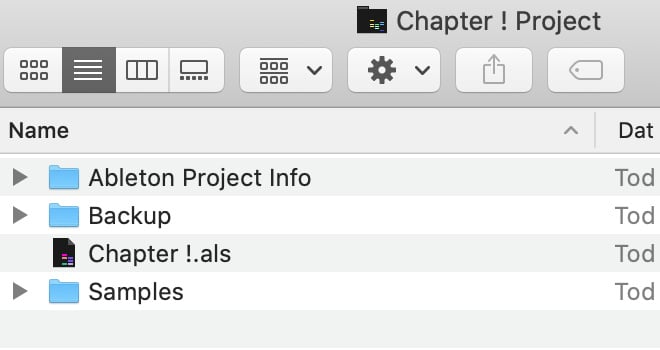
Figure 1.28 – Crucial files in the Project folder
It is extremely important that when you are transferring your work to a USB stick, an external hard drive, or another computer, you move the Project folder, not the Set .als file. If you move the Set, you will end up with loads of offline/missing files. If that happens though, don’t worry; we will cover what to do in Chapter 17, Troubleshooting and File Management. Your project folder will include, of course, the Set(s), the Samples folder (including imported, recorded, and processed files), the Backup folder, and the Ableton Project Info folder.
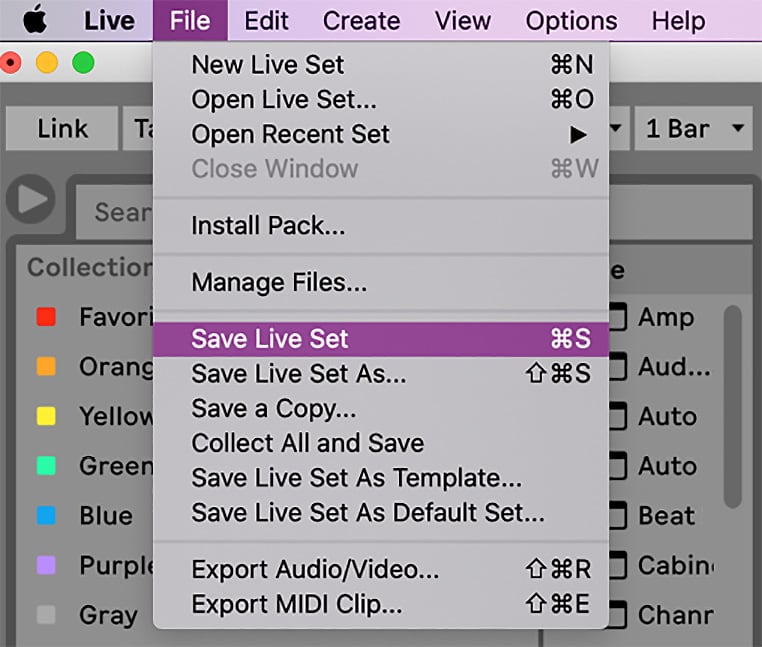
Figure 1.29 – Saving a Live Set
Let’s investigate the saving options (Figure 1.29):
- Save Live Set allows you to save the Set to a location on your computer or portable drive. You can set the location, and a Project folder will be created. However, the samples you are using in your project will not be saved in the Project folder. So, if you move the project, or the folder that holds the samples that you are using in your Set, to a different computer, those files will be missing and will need to be relocated.
Additionally, you can use this option to save minor changes you last made to your already existing project as long as that change didn’t include bringing in any new media into the Set.
- Save Live Set As… allows you to save the current version of your Set to a new location or save it into the same Project folder under a different name, even if you are working on an already existing project. In doing so, you would have two different Sets within the same Project folder.
- Save a Copy… allows you to save a copy of your current Set.
- Collect All and Save is probably the most important saving option. This is the function that will allow you to save your Set and collect all the corresponding media with the Set into its Project folder. In order to avoid missing files, it is recommended to always use Collect All and Save when you finish your work for the day. It is especially important to do this before you try to move your work to portable data storage or send it to someone.
Upon clicking Collect All and Save, the following dialog box will appear (Figure 1.30):
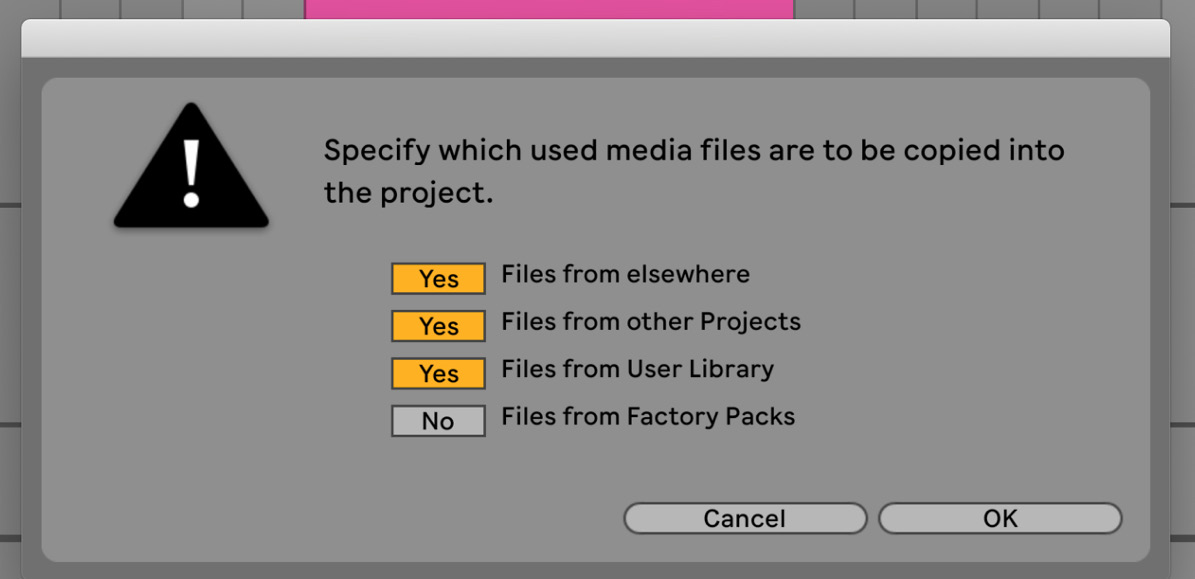
Figure 1.30 – Collect All and Save window
Here, you can select where exactly you’d like to collect the files from.
Saving your work might seem a very easy task but it is definitely something you should do properly to avoid lost work and disappointment. File management is a crucial part of any media work, regardless of whether you are a hobbyist or a professional.
Saving templates
Templates can really speed your workflow up for specific types of work!
If you are, for example, editing loads of voice-overs for videos or recording loads of vocals and you find yourself having to set up the same chain of devices on tracks for your session, that’s when it’s probably a good idea to save a template. You could have one for all your voice-over work and all your vocal recording work. When you open these templates, the saved data will automatically be loaded up, so you don’t have to set up the same track count and devices over and over again.
If you look at Figure 1.29, you can see that you also have options to save templates.
Save Live Set As Template… will save your set into your User Library (Figure 1.31).
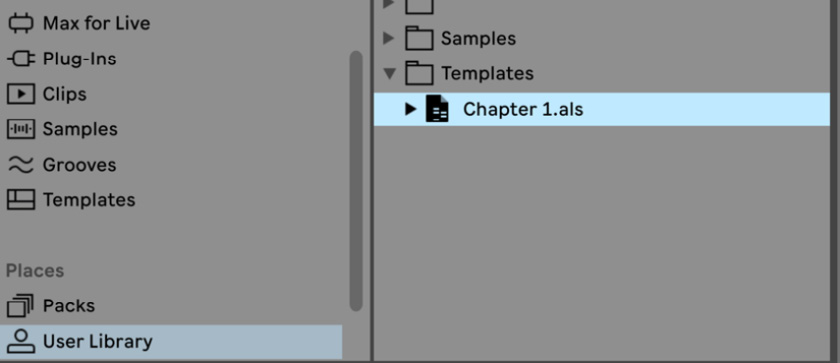
Figure 1.31 – Saved template in User Library
Ableton also provides some of its own templates that are already made for you, which you can find in your browser, under the Templates tab (Figure 1.32).
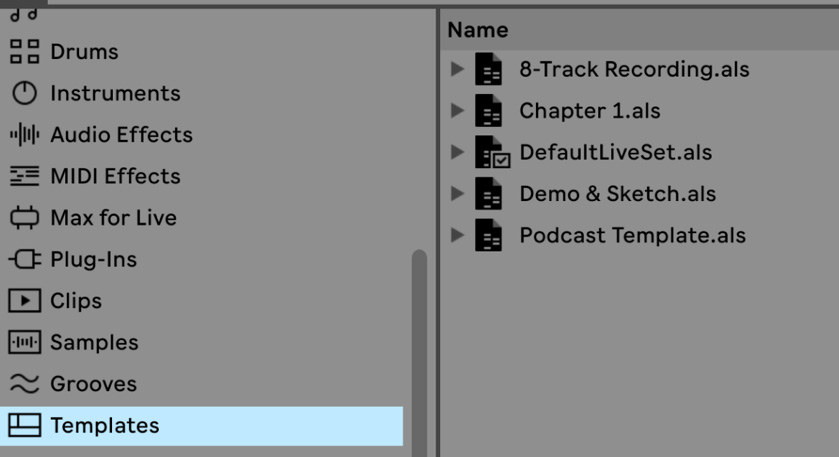
Figure 1.32 – Premade templates in the browser
Lastly, you can also select Save Live Set As Default Set…, which means every time you open Live, this Set will load up by default.
This is something that should you also consider doing if you find yourself always using the same devices on your Master track (of course, with different settings) or if you have a specific reverb device preference for your Return Track, so each time you sit down to produce, all of these settings will be automatically loaded for you.
Summary
This brings us to the end of Chapter 1. By now, you should be comfortable with finding your way around the Live interface, have a solid idea of the Live workflow, know how Session View and Arrangement View work, and know how to finish up your work by exporting and saving it.
In the next chapter, we are going to take a look at how we can record audio in both Session View and Arrangement View.
