


 Download code from GitHub
Setting up a Server
Welcome to The Essential Guide to Creating Multiplayer Games with Godot 4.0. In this hands-on book, you are going to learn the core concepts used to create online multiplayer games using the Godot Engine 4.0 Network API.
Firstly, we are going to understand some fundamental aspects of how computers communicate through a network and the main protocols, including which ones are more relevant for making online multiplayer games.
After that, we will understand how Godot Engine 4.0 uses and provides both low- and high-level implementations for networking using its network API. We’ll understand some core classes that we can use to pass data around to multiple computers on the same network. And then we’ll focus on the high-level API known as ENetMultiplayerPeer.
With the fundamentals in place, we’ll use the knowledge we just learned to turn local gameplay features into online gameplay features. To do that, we will develop five game projects:
- An online quiz game
- Checkers
- Pong
- A co-op platformer
- A top-down adventure
Then, we’ll learn some techniques we can use to improve our players’ experience by optimizing how their game sends, receives, and processes network data. We’ll understand that we don’t need constant updates and that we can do most of the gameplay with small bits of data and let the clients’ computers fill the gaps on their own.
Throughout each chapter, you’re going to do a role play of a network engineer working for a fictional, independent game development studio. In each chapter, you will apply your recently learned knowledge to a fictional problem presented by your studio’s peers. You’ll focus on the network aspect of each project they present, so you don’t waste your precious time trying to understand unnecessary aspects.
In this chapter, you are going to learn the most important aspect of establishing a network of computers: to connect them all together. You’ll see how this process happens, the reason for doing this, what’s required to establish this connection, and how we can do that using the API that Godot Engine provides.
We will cover the following topics in this chapter:
- Introduction to a network
- Understanding the Godot Engine Network API
- Setting up the client side
- Setting up the server side
- Making your first handshake
By the end of the chapter, you’ll have a client and server version of an application that establishes the connection of two or more computers. This is the very core of everything that we are going to see throughout the book, and with that knowledge, you’ll understand how you can start making computers communicate within a network, which is exactly what you need to do in online multiplayer games.
Technical requirements
Godot Engine has its own standalone text editor, which is what we are going to use to code all our practical lessons.
As mentioned earlier, in this book you will do a role play of a network engineer of a fictional indie game studio. So, we will provide pre-made projects with all the non-network-related work ready. You can find them in the book’s GitHub repository: https://github.com/PacktPublishing/The-Essential-Guide-to-Creating-Multiplayer-Games-with-Godot-4.0.
With the project properly added to your Godot Engine’s project manager, open the project and move on to the res://01.setting-up-a-server folder. Here, you'll find what you need to follow this chapter (later part).
Introduction to a network
Making a network of connected computers is quite a task. In this chapter, we’ll understand the core concepts of online networks. We’ll also cover how Godot Engine provides solutions to each of the problems we may face in our quest to make online multiplayer games.
A network is a collection of interconnected devices that communicate with each other. In this communication, these devices exchange information and share resources with each other. You can have a local network, such as in a house or office, or a global network, such as the internet. The idea is the same.
For these devices to communicate they need to perform what we call a handshake. A handshake is how one device recognizes another device and establishes their communication protocols. This way, they know what they can request, what they expect to get, and what they need to send to one another.
A handshake begins with one device sending a message to another device. We call this message a handshake request. The devices use this message to start the handshake process. The one that sent the request waits for a message from the one that received it. We call this second message a handshake response.

Figure 1.1 – The handshake procedure
When the requested device sends the confirmation through the handshake response, they establish their communication. After that, the devices start exchanging data. This wraps up the handshake process. We usually call the device that requests data the client. As for the one that provides data, we call it the server.
Note that we use these names for the very first interaction. After this first interaction, it is common that these roles change. In that sense, communication is dynamic. The server may request data from the client, and the client may provide data to the server.
In this chapter, we are going to make our first handshake using the Godot Engine Network API. We’ll also create and synchronize players’ data across the network. So, hold tight, as you’ll learn the following:
- What the ENet library is and why we use it for games
- How we can make a handshake using the
ENetMultiplayerPeerclass
For that, you’ll create a Godot project that lists connected players and allows them to edit and sync a line of text. It’s a simple but elegant project that covers the basics of setting up an online multiplayer environment in Godot Engine.
Understanding the ENetMultiplayerPeer class
One of the Godot Engine Network API’s core features is the ENetMultiplayerPeer class. By using this class, we can perform a handshake between our game server and clients.
The ENetMultiplayerPeer class is a high-level implementation of the ENet library. Let’s understand this library and why we use it in online multiplayer games.
What is the ENet library?
ENet is a lightweight, open source networking library that is widely used in the game development industry. It is designed to be a high-performance, reliable, and easy-to-use library for creating multiplayer games and other networked applications. One advantage of the ENet library is that it’s cross-platform and written in C. So, it’s efficient with a small footprint and low overhead.
The library provides a simple and easy-to-use API that makes it easy for developers to create and manage network connections, send and receive packets, and handle network events such as disconnections and packet loss.
Packets, in this context, are small units of data that servers and clients transmit over the network. We use them to transmit information such as game state, player input, and other types of data between different devices on the network.
The ENet library offers support for multiple channels that allow us to easily create multiple streams of data, such as voice and video, within a single connection. This is excellent for many multiplayer games.
Another reason to use ENet in multiplayer games is its easy-to-use networking library that is based on the UDP protocol. This is a good chance to understand one of the main network protocols, so let’s do it.
What is the UDP protocol?
The UDP protocol is a connectionless protocol that is well suited for real-time, high-bandwidth applications such as online gaming. This is because it has low latency and is able to handle high throughput. Just so we are on the same page, in the world of network terms, latency refers to the time between the transmission and receiving of data through the network.
For instance, it’s very common to talk about lag in online multiplayer games: the time between the player performing an action and the game reacting to it. The next figure illustrates how latency works and is calculated:

Figure 1.2 – Visual demonstration of latency
It’s basically how much time it takes for data to cross the network, be properly handled by the server, and to provide a response to the client.
Throughput refers to how much data we can send through a given network route within a time period before it gets overwhelmed. For instance, this is a fundamental concept when we talk about DDoS attacks, where hackers overwhelm the server with an immense number of unsolved requests, preventing other clients from accessing the service. In the following figure, you can see a visual representation of the throughput concept:

Figure 1.3 – Visual demonstration of throughput
The bandwidth is how big the available channel of communication in the network is. You can think of it as a pipe that streams data. A bigger pipe allows a lot of data, and big data, to be transmitted at any given time, while a small pipe may not even allow any data, of any size, to be transmitted. You can see this concept illustrated in the following figure:

Figure 1.4 – Visual demonstration of bandwidth
Unlike the more commonly used Transmission Control Protocol (TCP), User Datagram Protocol (UDP) does not establish a dedicated connection between two devices before transmitting data. Instead, it simply sends packets of data to a specified destination address without ensuring that the packets have been received or acknowledged.
Sounds… bad, right? But it’s quite the opposite.
This lack of reliability is often seen as a drawback of UDP, but in the context of online multiplayer games, it can actually be an advantage. In games, where responsiveness and low latency are critical, the overhead of establishing and maintaining a connection can be a significant bottleneck.
By not requiring a dedicated connection, UDP allows for faster and more efficient transmission of data. Additionally, since UDP does not require the receiver to acknowledge receipt of packets, it is less affected by network congestion or delays, which can be critical for maintaining a stable and responsive connection in a high-bandwidth, high-latency environment such as online gaming.
Furthermore, the lack of reliability of UDP can actually be beneficial in the context of online multiplayer games. In games, where a small amount of packet loss or delay can have a large impact on the players’ experience, it’s important that the game can adapt to these types of network conditions. By not providing guarantees on packet delivery, UDP allows the game to handle packet loss and delay in a way that is most appropriate for the specific game and its mechanics.
Think about the following situation.
We establish a connection. In this connection, we update all players in the network about all other player avatars’ positions in the world. This way, everyone shares the same world state.
If we use a TCP protocol, everyone will have to wait for every other player to send their position and confirm that they have received every change in every other player’s position, while also trying to maintain the correct chronological order in which the positions have changed.
So, in this example, if a player moves five units to the left and sends 15 packets with all the movement data, including being idle, all other players must confirm that they have received all those 15 packets.
Using UDP, players can ignore every update but the latest one, which is the only relevant piece of information in real-time experience: what is the game-world state now? It doesn’t matter how it gets to this point; it only matters that it is there at this very moment.
We are going to see that this causes some trouble as well. But we can create methods and understand techniques to mitigate those issues. We are going to talk about that in further chapters.
How does this connection happen?
To establish a UDP connection, we need two core things:
- The IP address of the peers, mainly the server
- The port over which they will exchange data
For test purposes, on all our projects we are going to use the localhost IP address. This is a shortcut to your local IP address mask. An IP address is like a house or apartment address. It is the exact location to which a given packet should be delivered and represents the address of the computer in the network. A port is essentially a specific channel in which the host allows a given communication to be established; we’ll use the 9999 as our default port. There’s nothing special about this one; it’s just an arbitrary pick.
With this in mind, let’s see for the first time the ENetMultiplayerPeer class in action. As you can imagine, this setup requires a two-sided approach. We need to set up a game architecture for our server and a different architecture for our client.
Let’s start with the server architecture.
Creating the server
The ENetMultiplayerPeer class in the Godot Engine provides a convenient way to create and manage network connections for online multiplayer games. One of the most important methods of this class is the create_server() method, which is used to create a new server that can accept connections from clients. This method is simple to use and, besides having five arguments, it only requires one to get started:
- The first argument of the
ENetMultiplayerPeer.create_server()method is the port on which the server will listen for incoming connections. This is the port number that clients will use to connect to the server. For example, if you want the server to listen on port9999, you would callENetMultiplayerPeer.create_server(9999). This is the only mandatory argument to call this method. - The second argument is
max_clients, which is the maximum number of clients that the server will allow to connect at the same time. This argument is optional, and if not specified, the server will allow up to 4,095 clients to connect. - The third argument is
max_channels, which is the maximum number of channels we allow the server to use per client. Channels are used to separate different types of data, such as voice and video, and are useful for creating multiple streams of data within a single connection. This argument is optional, and if not specified, the server will allow an unlimited number of channels. - The fourth argument is
in_bandwidth, which is the maximum incoming bandwidth that the server will allow per client. This argument is optional, and if not specified, the server will allow unlimited incoming bandwidth. - The fifth argument is
out_bandwidth, which is the maximum outgoing bandwidth that the server will allow per client. This argument is optional, and if not specified, the server will allow unlimited outgoing bandwidth.
Let’s create our server in Godot Engine. Open up the project provided in the GitHub link given previously. After opening the project, execute the following steps:
- Create a new scene and use a
Nodeinstance as the root. - Attach a new GDScript to this node, and name it
Server.gd. - Save the scene and open the script.
- Define a constant called
PORTand set it to our default port number so the server can listen to it:const PORT = 9999
- Create a new
ENetMultiplayerPeerusing thenew()constructor. Let’s store it in a variable calledpeer:var peer = ENetMultiplayerPeer.new()
- In the
_ready()function, call thecreate_server()method on thepeervariable, passing in thePORTconstant as an argument:func _ready(): peer.create_server(PORT)
- Still in the
_ready()callback, assign thepeervariable to the built-inmultiplayermember variable of this node:multiplayer.multiplayer_peer = peer
- Connect the
peer_connectedsignal of themultiplayervariable to a function called_on_peer_connected. We’ll create this callback method next:multiplayer.peer_connected.connect(_on_peer_connected)
- Create a new method called
_on_peer_connected(), which should receivepeer_idas the argument:func _on_peer_connected(peer_id):
- In the
_on_peer_connected()function, useprint()to print the passedpeer_idargument on the console:print(peer_id)
The complete script should look like this:
extends Node
const PORT = 9999
var peer = ENetMultiplayerPeer.new()
func _ready():
    var error = peer.create_server(PORT)
    multiplayer.multiplayer_peer = peer
    multiplayer.peer_connected.connect
        (_on_peer_connected)
func _on_peer_connected(peer_id):
    print(peer_id)
It’s important to note that this script uses the built-in multiplayer member variable that every Node instance has on Godot Engine 4.0 Network API, which is an instance of the MultiplayerAPI class.
Done: we have our server ready. Told you it would be simple!
Creating the client
Next up, let’s create our client. The process is quite similar. The major difference is that the client needs the server IP address to find it on the network.
We use the ENetMultiplayerPeer.create_client() method to connect a client to a server. This method is very simple to use and requires only two arguments to work:
- The first argument of the
create_client()method is the address of the server. This can be either the server’s IP or hostname. For instance, if you want the client to connect to a server with the IP address192.168.1.1, you would callcreate_client("192.168.1.1"). But to make things simpler, we’ll use"localhost", which is a shortcut to our own IP address mask. - The second argument of the
create_client()method is the port on which the server is listening for incoming connections. This is the port number that the client will use to connect to the server. For example, if the server is listening on port9999, you would callcreate_client("192.168.1.1", 9999). - The third argument of the
create_client()method ischannel_count, which is the number of channels that the client will use to communicate with the server. Channels are used to separate different types of data, such as voice and video, and are useful for creating multiple streams of data within a single connection. This argument is optional, and if not specified, the client will use a default value of1channel. - The fourth argument of the
create_client()method isin_bandwidth, which is the maximum incoming bandwidth that the client will allow per connection. This argument is optional, and if not specified, the client will use a default value of0, allowing an unlimited incoming bandwidth. - The fifth argument of the
create_client()method isout_bandwidth, which is the maximum outgoing bandwidth that the client will allow per connection. This argument is optional, and if not specified, the client will use a default value of0, allowing an unlimited outgoing bandwidth. - The sixth argument of the
create_client()method islocal_port, which is the local port that the client will bind to. This argument is optional, and if not specified, the client will use a default value of0.
Now, let’s see how we can create the client side of this connection so it can connect with our server and establish their handshake:
- Create a new scene and add a
Nodeinstance as the root. - Attach a new script to it.
- Save the script as
Client.gd. - In the script, define a constant called
ADDRESSand set it to the server’s IP. In this case, we are going to use"localhost":const ADDRESS = "localhost"
- Define a constant called
PORTand set it to be our default port number. It’s very important that this matches the number we used inServer.gd, otherwise these peers won’t be able to find each other:const PORT = 9999
- Create a new
ENetMultiplayerPeerusing thenew()constructor and store it in a variable calledpeer:var peer = ENetMultiplayerPeer.new()
- In the
_ready()callback, call thecreate_client()method on thepeervariable, passing in theADDRESSandPORTconstants as arguments:func _ready(): peer.create_client(ADDRESS, PORT)
- Assign the
peervariable to the built-inmultiplayermember variable of the node:multiplayer.multiplayer_peer = peer
The complete script should look like this:
extends Node
const ADDRESS = "localhost"
const PORT = 9999
var peer = ENetMultiplayerPeer.new()
func _ready():
    peer.create_client(ADDRESS, PORT)
    multiplayer.multiplayer_peer = peer
Alright, we have our server and our client ready. Now, how do we test them?
Testing our handshake
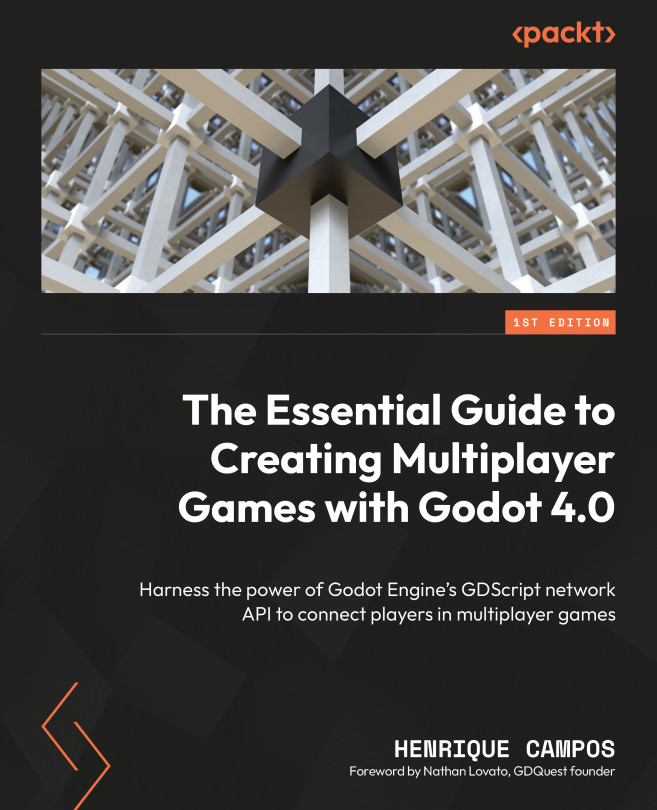
Godot Engine 4.0 has a useful feature for debugging: the ability to open multiple independent instances of the game. This feature allows us to test different scenes at the same time, making the debugging process much easier and faster.
To open multiple instances of the game, we need to select one option from up to four options in the Debug | Run Multiple Instances menu.
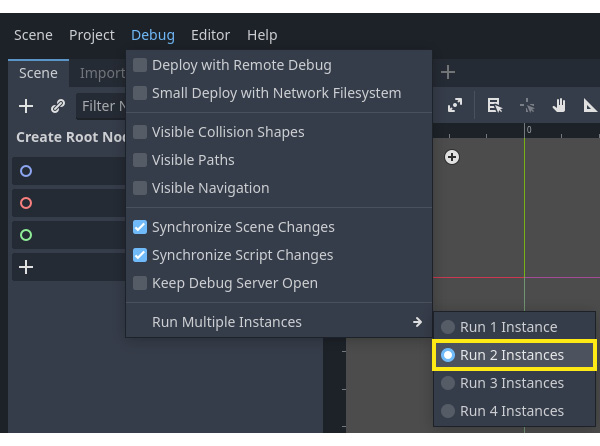
Figure 1.5 – The Run Multiple Instances menu
Then, as soon as we press the Run Project or Run Current Scene button, Godot will launch the instances we’ve set previously. Let’s stick with two instances for this project.
This feature is incredibly useful for testing online multiplayer games, as it allows us to open a server and a client in the same run. But, as you can see, it’s not very straightforward. When we run the project, it actually opens two instances of the same scene.
Let’s create a minimal menu where we can select whether we are a client or a server:
- Create a new scene and use
Controlas the root and name itMainMenu. - Add a
Labelnode as a child of the root node. - Add two
Buttonnodes as children of the root node. - Give the first
Buttonthe nameClientButtonand the second oneServerButton:
Figure 1.6 – MainMenu’s Scene tree structure
- Set the
Buttonnodes’textproperties to I’m a client and I’m a server respectively and position them side by side in the middle of the screen. - Set the
Labelnode’stextproperty to Are you a… and position it in the middle of the screen.
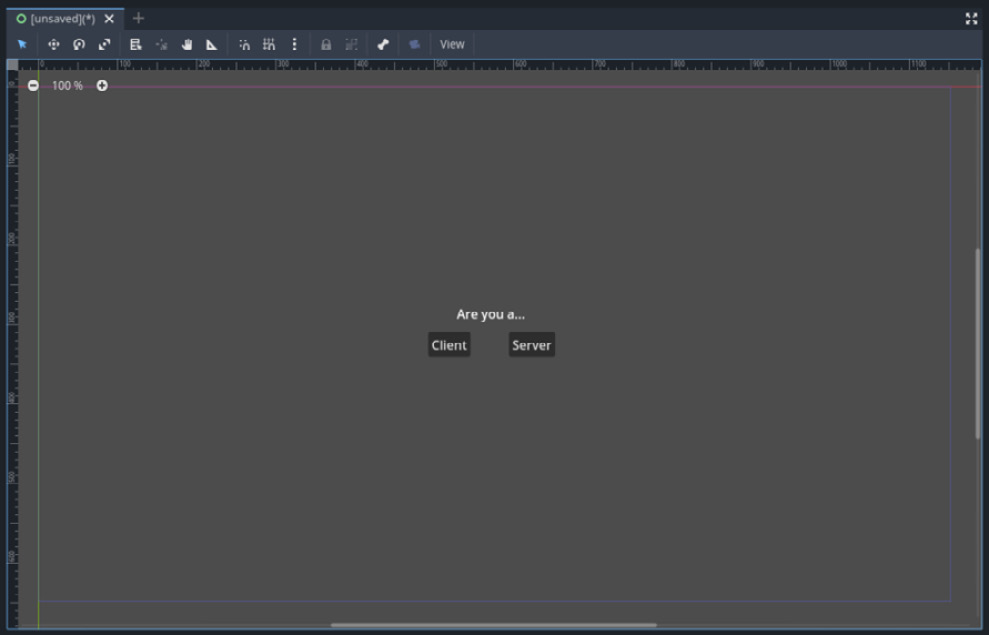
Figure 1.7 – MainMenu’s scene UI
- Attach a new GDScript instance to the
MainMenunode and open it. - Connect the ClientButton’s pressed signal to a function called
_on_client_button_pressed.
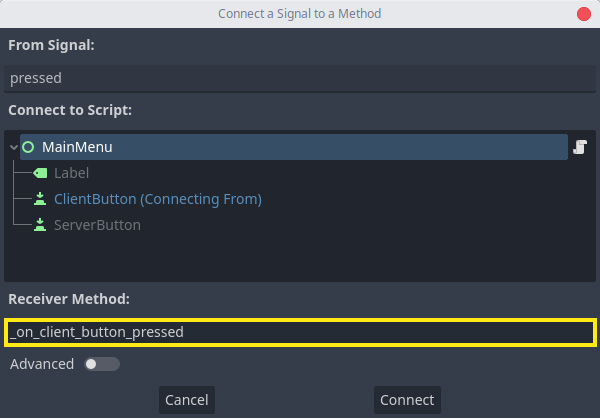
Figure 1.8 – ClientButton’s pressed signal connection
- Connect the pressed signal of the ServerButton to a function called
_on_server_button_pressed. - In the
_on_client_button_pressed()callback, let’s call thechange_scene_to_file()method on theget_tree()instance, passing in"res://Client.tscn"as the argument:extends Control func _on_client_pressed(): get_tree().change_scene_to_file ("res://Client.tscn") - In the
_on_server_button_pressed()callback, do the same as before, passing"res://Server.tscn"instead.The complete script should look like this:
extends Control func _on_client_pressed(): get_tree().change_scene_to_file ("res://Client.tscn") func _on_server_pressed(): get_tree().change_scene_to_file("res://Server.tscn")
Now, let’s make sure we save the scene before we test it. After that, all we need to do is hit the Run Current Scene button and watch the scene come to life. All the hard work has been done, and now all that’s left is to appreciate the results.
Once we have the two debug instances running, we need to pick one to be the server first. For that, we can press ServerButton. This will launch our Server.tscn scene and start listening for incoming connections.
Then, in the other instance, we need to press ClientButton. This will launch the Client.tscn scene and try to connect to the server. If everything goes as expected, we should get peer_id printed in the console of the server instance.
This means that the client and the server have successfully established a connection and are now ready to start exchanging messages. Congratulations, you’ve just created your first handshake!
Summary
In this chapter, we went through the fundamentals of network connections, which is to establish the connection through a procedure known as the handshake.
The handshake ensures that two computers recognize each other in a network and establish the protocols of this communication. This is important to understand, as it is the core of all our further endeavors. Without this at our disposal, our players and our server would be disconnected. One would be sending data to the void, while the other would be infinitely waiting for something to arrive.
Talking about sending data, now that we have our computers connected and open to receive and send data back and forth, it’s time to see how to do that. Throughout this chapter, you saw how you can properly establish a connection using the ENet library and how Godot Engine provides a high-level approach to handshaking, to the point that we can barely see if there was an actual handshake or not.
In the next chapter, we are going to use the UDP protocol to also establish a connection between client and server. But this time, we are going to dig a bit further and actually send data both from the client to the server and the other way around.
It’s important to use the UDP protocol to understand what might be happening under the hood when we finally start to get used to the Godot Engine ENetMultiplayer API.
Now let’s see the dirty and messy world of low-level data transmission in the next chapter, so we can understand later how much easier our lives are made with the new high-level network API!