


TextMate is an extremely powerful and highly extensible GUI text editor for Mac OS X. Since its release in 2004, it has garnered a huge community of supporters, won awards, and is considered one of the best coding platforms on the Mac for web developers, designers, and serious programmers. This How-To will guide you through the best techniques to hit the ground running and code like a professional.
This task will quickly go through some of the more helpful configuration options, including some Preference and View settings. Note that these settings are purely my preferences and are only meant to show where to find them. You should set up TextMate however you feel comfortable, and based upon your particular project.
To configure Line Numbers:
From the menu, select View | Gutter | Line Numbers (Option + Command + L) to toggle them on and off.
To configure Soft Tabs:
From the status bar, located at the bottom of the document window, click on the Tab Size pop-up menu, and select Soft Tabs.
From the same pop-up menu, select the desired tab size (usually 2 or 4).
To configure Soft Wrap:
From the menu, select View | Soft Wrap (Option + Command + W).
To choose the width of the wrap, from the menu select View | Wrap Column. Selecting Use Window Frame will change the wrap width depending on the overall width of the document window.
To configure the Show Invisibles option:
From the menu, select View | Show Invisibles (Option + Command + I). Two examples are shown in the following screenshot:

To configure Check Spelling as You Type:
From the menu, select Edit | Spelling | Check Spelling as You Type (Option + Command + ;).
Selecting Highlight current line, Show right margin indicator, and Highlight right margin:
From the menu, select TextMate | Preferences (Command + ,).
In Preferences, under the General tab, check Highlight current line, Show right margin indicator, and Highlight right margin.

Now, let's go through why you may want to use these settings:
Line Numbers: They are helpful to establish where you are in a document. If you'd rather have fewer margin distractions, then you can also determine your cursor's current line and column position in the status bar at the bottom of the document window.
Soft Tabs: Soft tabs versus hard tabs are somewhat controversial (do a Google search and you'll see). You should really use what you're most comfortable with or what conforms to the project or document style rules.
Soft Wrap: This will wrap lines based on your margin column width settings. If this is not set and there's a line that goes beyond the document window's view, scrolling will be necessary to view the rest of the line.
Show Invisibles: This will show tabs and line returns. Sometimes, this is helpful for troubleshooting some oddities in your document, such as why a tab isn't lining up properly. They are also helpful to get a complete picture of your code. However, if you would rather not have the clutter, it's perfectly reasonable to turn this setting off.
Check Spelling as You Type: This will provide the familiar wiggly red line under misspelled words. Right-clicking on the words will provide alternate word options. It's only necessary when composing written words, but TextMate is smart enough to determine when you're writing code and won't try to spell check everything.
Highlight current line: This will provide a horizontal highlight to indicate in which line your cursor is located. The right margin indicator option will provide a vertical line to indicate the right margin, and the Highlight right margin option will highlight the right margin. These visual indicators, or ornaments, will help show you where your cursor is in the document, as well as where the right margin is located. Knowing where the right margin is can be helpful for keeping code readable and well styled. For example, if some of your fellow coders are accessing the files via shell editors (that is, vim, emacs, nano, and so on), they may have limited document width based on their particular terminal program.
Included with the TextMate application is a command-line tool, which can be used in Terminal to open files. In addition, it's quite important to learn the keyboard shortcuts, which will help you do things quickly and efficiently. However, in order to learn the shortcuts, it is vital to learn what the keyboard symbols look like.
When you run TextMate for the first time, you will be prompted to install the shell command mate. Installing this tool will allow you to open files into TextMate from Terminal, for example, mate example.html or mate project/. There is more on opening files in the Traversing files recipe.
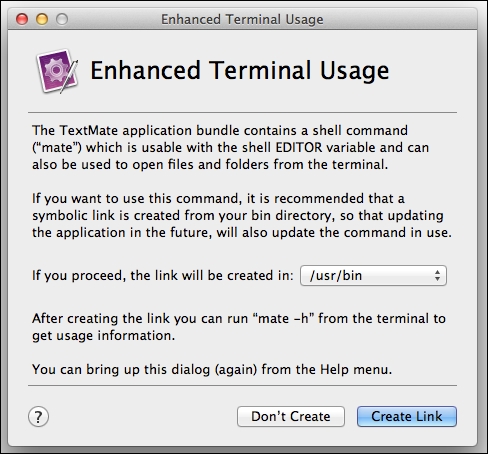
You can open the install dialog at any time from the menu; select Help | Terminal Usage.
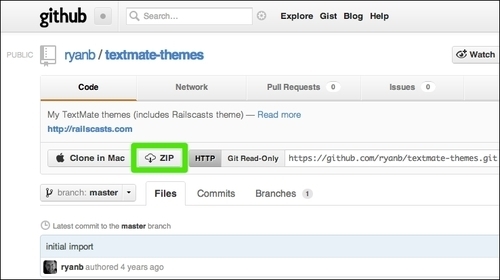
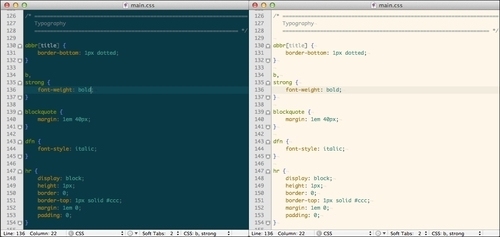
Though it doesn't do much for the actual usage of the application, themes and code coloring will help with understanding and interpretation of any text or code you'll be dealing with. TextMate comes with a number of themes already installed (accessible via Preferences), but if you can't find one that suits your particular tastes, this task will go through downloading and installing a theme, specifically the popular and freely available RailsCasts theme.
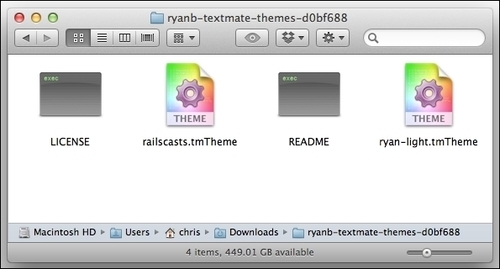
Download the ZIP file at https://github.com/ryanb/textmate-themes. This is shown in the following screenshot:
Once the ZIP file is downloaded, extract it and double-click on the theme files which have the .tmTheme extension to install and switch to the theme. The theme files are shown in the following screenshot:
Made famous by Ryan Bates' screencasts (http://www.railscasts.com), RailsCasts is a great and aesthetically pleasing theme that can be used for a number of languages, including PHP, Ruby, HTML, and JavaScript.
You will notice that the RailsCasts theme ZIP file contains two versions. The one labeled ryan-light.tmTheme has a white background. The original has a dark background and is also the version used for most of the screenshots in this guide. Whichever you choose to use is purely your preference, but there is no harm in installing and trying both.
You can switch themes by going to File | Preferences (Command + ,) and selecting the Fonts & Colors tab, as shown in the following screenshot:

In case the included or RailsCasts theme doesn't adhere to your particular tastes, there are many other popular themes available.
Another freely available theme is called Solarized, and can be found at https://github.com/deplorableword/textmate-solarized. The Solarized theme is stated to be specifically useful on calibrated and non-calibrated displays alike, as well as in a variety of lighting conditions. Since the theme consists of a simple color palette, it's easily translatable to terminal emulations and therefore highly versatile between applications.
You can find out more about the Solarized theme, including themes for additional applications, at http://ethanschoonover.com/solarized.
There are many more themes available on the Macromates wiki:
This task will show you how to navigate the document and text, in most cases without reaching for the mouse or track pad.
The two available options to quickly navigate to the text are as follows:
Go to Line... will move your cursor to the specified line number. From the menu, select Navigation | Go to Line… (Command + L).
Go to Symbol... will move your cursor to the beginning of a function, method, or other symbol. From the menu, select Navigation | Go to Symbol… (Shift + Command + T).
Go to Line... (Command + L) is very useful for situations where you know the precise line you want to edit. For example, when you're debugging some code and the error message code gives the problem line number.
Go to Symbol... (Shift + Command + T) is mainly used for programming languages such as JavaScript and PHP, where functions or methods are defined in the document. When this is invoked, a window will appear with the names of the functions or methods available, as shown in the following screenshot:
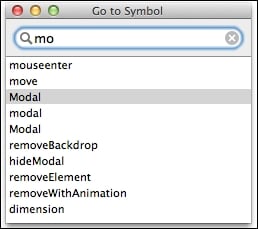
Start entering the method name and it will match and filter the list based on what you enter. Go to Symbol... (Shift + Command + T) is extremely helpful for long documents of code where scrolling and navigating line by line is unreasonable.
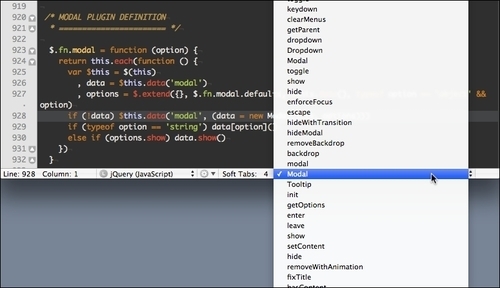
You can also open the function pop up in the status menu (located at the bottom of the document window) to display all of the functions or methods in your document. This is shown in the following screenshot:
Along with the quick navigation shortcuts, there are also ways to move the cursor and scroll the document easily without using the mouse.
The following keyboard shortcuts will move your cursor:
|
Shortcut |
Description |
|---|---|
|
Shift + F |
One character forward. |
|
Shift + B |
One character backward. |
|
Shift + P |
Up one line. |
|
Shift + N |
Down one line. |
|
Shift + A |
Beginning of line. |
|
Shift + E |
End of line. |
|
Option + right arrow |
Right one word (Mac convention). |
|
Option + left arrow |
Left one word (Mac convention). |
Note that the first four movements can be accomplished by using the arrow keys, but sometimes it's faster to keep your fingers on the keyboard home row.
In the situation where you want to take a peek within the document without moving the cursor, you can use the keyboard shortcut Command + Option + Control plus the arrow keys. For example, to scroll up, you would press Command + Option + Control + up arrow. Your cursor will stay put and you can go back to it by using the Command + J (that is, select Edit | Find | Jump to Selection) keyboard shortcut.
This task will demonstrate how to convert text in various ways.
TextMate provides the following text conversions:
Uppercase: This will convert the entire selected text to uppercase letters. From the menu, select Text | Convert | to Uppercase (Control + U).
Lowercase: This will convert the entire selected text to lowercase letters. From the menu, select Text | Convert | to Lowercase (Control + Shift + U).
Title case: This will convert the first letter of each word in the selection to uppercase. From the menu, select Text | Convert | to Title case (Option + Control + U).
Opposite case: This will swap the case of each letter of the selection (for example, lowercase will become uppercase and uppercase will become lowercase). From the menu, select Text | Convert | to Opposite case (Control + G).
Spaces to Tabs: This will convert spaces to tabs (as defined in Tab Size). From the menu, select Text | Convert | Spaces to Tabs.
Tabs to Spaces: This will convert tabs to spaces (as defined in Tab Size). From the menu, select Text | Convert | Tabs to Spaces.
Transpose: This will output the selection backwards. From the menu, select Text | Convert | Transpose (Control + T).
Most of these conversions should be self-explanatory. Some text conversions are shown in the following screenshot:

Tabs to Spaces (or Spaces to Tabs) is helpful if you decide later on to change to or from Soft Tabs. It's also useful if you want to play a practical joke on a colleague who is vehemently against either soft or hard tabs.
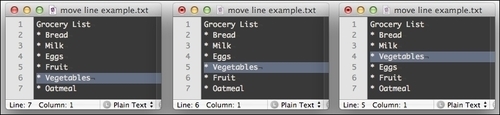
This task will show you how to move text around, whether you want to move a selection of text up, down, or align it.
The different options used to move and align text are as follows:
Moving a selection up a line will insert the selected text into the previous line. From the menu, select Text | Move Selection | Line Up (Command + Control + up arrow).
Moving a selection down a line will insert the selected text into the next line. From the menu, select Text | Move Selection | Line Down (Command + Control + down arrow).
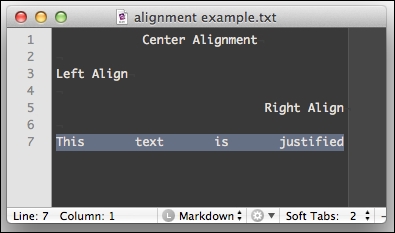
Left aligning will align text to the left. From the menu, select Text | Align | Left.
Right aligning will align text to the right margin based on the Wrap Column setting. From the menu, select Text | Align | Right.
Center aligning will center text using the Wrap Column setting as a guide. From the menu, select Text | Align | Center.
Justifying will space out the text evenly using the Wrap Column setting as a guide. From the menu, select Text | Align | Justify.
Moving selections: When you are moving a selection of text, it is just as if you are dragging the text around with your mouse cursor (see Moving text with the mouse/track pad in the There's more… section). Don't be afraid. As you'll see in the following screenshot, it will not overwrite the line you are moving your selection to:
Aligning text: An important thing to note is that the alignment is based on the Wrap Column size (select View | Wrap Column).
Since TextMate is a full-featured GUI text editor, you may also move text with the mouse or track pad. Plus, we'll look at a tip for moving entire lines up or down.
You can also move the text around by clicking and dragging a selection with your mouse or track pad, just like most other word processors. However, keeping your hands on the keyboard is faster and reduces repetitive strain (that is, carpal tunnel syndrome), and is typically preferred by hardcore coders.
You can also move the entire line with the cursor, not by making a selection, but rather by invoking Line Up (Command + Control + up arrow) or Line Down (Command + Control + down arrow). However, notice that your cursor will stay positioned on the previous line. Therefore, you may prefer to select the line (Command + Shift + L) and then move it around as you please.
This is a more advanced task that will show how to select and edit multiple lines and columns of text.
Since this task is most useful with a list or multiple columns of text, you'll want to start out with something like the following:

The steps to manipulate multiple lines and multiple columns of text are as follows:
Make a selection, ending the selection after the final character of the last row, as shown in the following screenshot:

Switch to Column Selection by pressing the Option key, or from the menu, select Edit | Change to Column Selection:

Edit the selection by holding down the Shift key and moving with the arrow keys. In this case, hold Shift and tap the right arrow key once to complete the full column selection:

While the column is selected, you can move it by selecting Text | Move Selection | Column Left (Command + Control + left arrow) or by selecting Text | Move Selection | Column Right (Command + Control + right arrow).
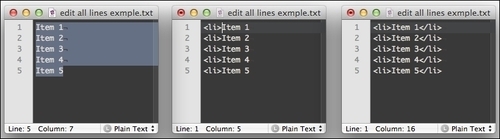
To edit all of the lines in a selection, make your selection, and from the menu, select Text | Edit Each Line in Selection (Command + Option + A). Once this is done, start typing and each line will be changed:

Though the column manipulation is mainly used for data organization, the Edit all lines in a selection option has some very practical use cases for editing code. For example, if you have a list of items in HTML but don't want to copy and paste list item tags (that is, <li>) for each line, you can use the following set of keystrokes to quickly surround all of the items in <li> tags.
Select all of the lines, press Command + Option + A, and start typing the opening tag (<li>), followed by Command + right arrow (to move to the end of the line), and type the closing tag (</li>):
This task will show you how to find text in the document using a string or a regular expression, as well as replace the text you find.
The different Find options are explained as follows:
The Find option will search for any occurrence of a specified string. From the menu, select Edit | Find | Find… (Command + F). For finding a normal string, uncheck the Regular expression checkbox:

The Find option with the Regular expression checkbox checked will search for any occurrence using regular expressions. To do this, select Edit | Find | Find...:

The Find Next option will search for the next occurrence. From the menu, select Edit | Find | Find Next (Command + G).
The Find Previous option will search for the previous occurrence. From the menu, select Edit | Find | Find Previous (Command + Shift + G).
The Use Selection for Find option will search for the selected text. From the menu, select Edit | Find | Use Selection for Find (Command + E).
The Replace text functionality is included in the Find dialog box (select Edit | Find | Find… or Command + F). You can use Replace, Replace All, or Replace & Find, which are described in more detail in the How it works… section.

The Find dialog box has some very helpful options. These are as follows:
Ignore case will perform a find irrespective of case.
Replace will replace the currently selected find occurrence.
Replace All will replace all find occurrences in the document.
Replace & Find is useful to test out your find occurrences before using Replace All and is also useful when you're not quite certain if you want to replace everything.
-
The
 button will output the number of occurrences of the find string or regular expression. This is helpful to do before a full replacement. Also, you can gauge the extent of the upcoming changes and make edits to your find text, if needed.
There are some extended features of the find functionality that are useful if you do a lot of searching or if you need to find and/or replace multiple lines.
In case you want to repeat a past Find and Replace search, there's a history drop-down you can use by clicking on the downward-facing triangle next to the input boxes.

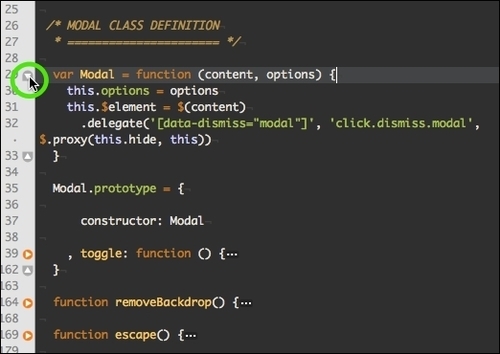
Folding is a great way to organize your code as well as hide lines in order to focus on the current task at hand.
To use folding, you'll need to make sure it's enabled. You can toggle it by going to View | Gutter | Foldings from the menu.
Folding actually happens automatically as long as you have the proper language selected via the status bar pop-up:

As with most of TextMate's functions, learning the keyboard shortcuts for folding is key to working with your document.
|
Shortcut |
Description |
|---|---|
|
F1 |
Fold current block. |
|
Option + Command + 0 |
Fold All Levels toggle. |
|
Option + Command + 1–Option + Command + 9 |
Fold at level (1-9). |
But, you can also use the mouse and click the arrows to fold the code, as shown in the following screenshot:
It's important that your document is set to the correct language for folding and other features, such as bundle snippets and shortcuts, to work properly. You can quickly change languages using keyboard shortcuts.
Notice the keyboard shortcuts next to the language selection pop-up. These can be very helpful in quickly switching languages (for example, between HTML and PHP or HTML and JavaScript).
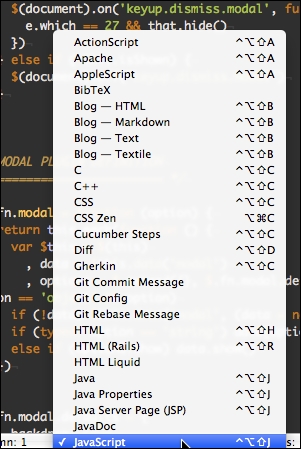
Sometimes the document is coded in two languages (for example, HTML and PHP) and you need certain bundle functionality, depending on the setting (bundles will be discussed further in the Bundles recipe).
Bookmarking is a great way to save a line of code so that you can navigate back to it later or cycle among all of your bookmarks.
You can use the following methods to bookmark a line:
From the menu, select Navigation | Add Bookmark and Navigation | Remove Bookmark.
The keyboard shortcut Command + F2
Click on the gutter next to the line in order to toggle the bookmark:

A star indicator in the gutter signifies when a line has been bookmarked.
The Next Bookmark option is used to go to the next bookmark in the document. From the menu, select Navigation | Next Bookmark (F2).
The Previous Bookmark option is used to go the previous bookmark in the document. From the menu, select Navigation | Previous Bookmark (Shift + F2).
This task will cover creating and saving projects through various methods, including opening directories, drag-and-drop, and by using the command line.
If you would like to use the drag-and-drop to dock method, you will need to copy the TextMate application to the dock.
If you would like to use the command-line method, you will need to install the mate command-line executable, which you are prompted to do during the first run of TextMate. You may also install it from the File menu (select Help | Terminal Usage…) at any time. See the Configuring TextMate section explained earlier in the chapter, for more information.
Let's cover the typical ways to create projects in TextMate:
Create a new project through the menu (select File | New Project) or with the keyboard shortcut (Command + Control + N). You can then add files to it by dragging and dropping from the Finder or by adding existing files from the Project Drawer toolbar, as shown in the following screenshot:

Opening a folder or multiple files will also create a project. You can do this from the menu by selecting File | Open (Command + O).
Dragging and dropping a folder or multiple files to a TextMate dock item will open those files into a new project. This is shown in the following screenshot:

Command line is also available if you're comfortable in the Terminal. You can create new projects via the
mateshell command. Some examples are as follows:mate howto.txt notes.txt # Open multiple files mate textmate-howto/ # Open a folder mate . # Open current directory
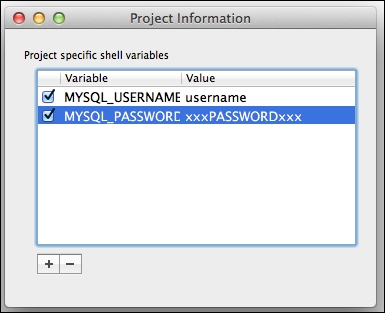
Projects allow you to quickly work with multiple files. Once created, you can quickly search for and open files (see the Traversing Files section), create new files, organize files into groups, create project-specific shell variables, and more.
Once you open a project, you can easily save it by selecting File | Save Project (Command + Control + S) or by selecting File | Save Project As… (Command + Control + Shift + S). The latter will allow you to rename a previously saved project.
Let's cover how to exclude files or folders from your projects, as well as why you may want to do so.
Sometimes excluding files will speed up search time, for example, if your project includes long logfiles with the extension .log. Unfortunately, the process to exclude files requires knowledge of regular expressions, which is a bit out of the scope of this book.
However, you can find where to exclude files by going to File | Preferences (Command + ,), navigating to the Advanced tab, and selecting the Folder References section. There you will edit the File Pattern and Folder Pattern fields:

Taking the example I gave previously regarding excluding any files with the extension .log, the File Pattern field would look as follows:
!(/\.(?!htaccess)[^/]*|\.(tmproj|o|pyc)|/Icon\r|/svn-commit(\.[2-9])?\.tmp|\.log)$
Note the |\.log at the end. If you aren't familiar with regular expressions, note that this says to exclude files that end in .log (along with excluding .htaccess, files ending in .tmproj, .o, .pyc, and so on).
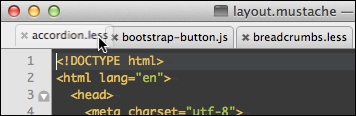
This task is a run-through of the various ways to navigate tabs, mostly via keyboard shortcuts.
Open or create a new project with multiple files. Clicking on any of the files in the Project Drawer will open those files in new tabs.
Navigate to Next File Tab: From the menu, select Navigation | Next File Tab (Command + } or Command + Option + right arrow)
Navigate to Previous Tab: From the menu, select Navigation | Previous Tab (Command + { or Command + Option + left arrow)
Go to Tab: From the menu, select Navigation | Go to Tab (or Command + 1 through Command + 9, with the tabs ordered from left to right)
Navigating through the tabs with the keyboard shortcuts will speed up your editing time. Once you learn these shortcuts, you can quickly go back and forth between two (or three, or four, or more) files you need to reference or edit.
Organizing your tabs is important for an efficient workflow. This includes moving tabs around, closing tabs, and viewing the overflow of opened tabs.
You can move between tabs very easily by clicking and holding the mouse cursor on the tab and dragging it to a new location.
Closing tabs is as easy as clicking the X on the tab or using the keyboard shortcut Command + W. You can also use the File menu; select File | Close Tab.
When you have more tabs open than the document window can show, you'll notice some double-right arrows. Clicking on these will drop down a menu with the rest of the open tabs, as shown in the following screenshot:
If you navigate through the tabs using Next File Tab (Command + } or Command + Option + right arrow) and Previous Tab (Command + { or Command + Option + left arrow), you will navigate to the unseen tabs as well.
This task will teach you how to quickly and easily open files within a project without reaching for the mouse.
You may navigate to files within your project in two main ways:
The Project Drawer menu: This is the most obvious way to select a file to open. Once clicked, the file will open a new tab in the document window.

The Go to File... option: From the menu, select Navigation | Go To File… (Command + T).
The Project Drawer menu should be self-explanatory as it's simply a list of the files and folders in a project.
If you already know the name of the file you want to open, the Go To File... (Command + T) option saves a great amount of time. When you use this option, a pop-up box will appear with a list of the files in the project, as shown in the following screenshot:
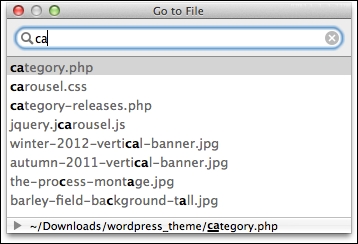
Start typing to filter the files by what you enter in the search box. Press Tab and then the up or down arrow to navigate your selection to the file you wish to open. Press Enter or Return to open the file in the document window and close the Go to File... pop-up box.
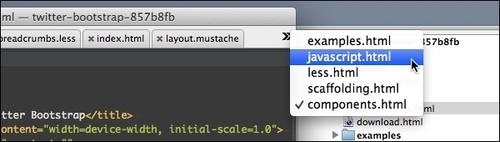
You can toggle the Project Drawer at any time as well as specify which file extensions you want to open in TextMate.
From the menu, select View | Show/Hide Project Drawer (Command + Option + Control + D).
The Project Drawer will attempt to open on the left-hand side by default. However, if there's no room, it will open on the right side. TextMate will remember which side it last opened on. So, in a scenario where Project Drawer opened on the right-hand side, was hidden, and then reopened with enough room on both sides, it will open on the right-hand side again.
When you open projects, unless you exclude certain files, TextMate will also pull in any images or executables. Though you may not mean to, you can open these files in the document window.
If you'd rather not have TextMate read these files when you click on them (usually by accident), then you can right-click on the files in the Project Drawer and select Treat Files with ".xxx" Extension as Binary. An example of this is shown in the following screenshot:
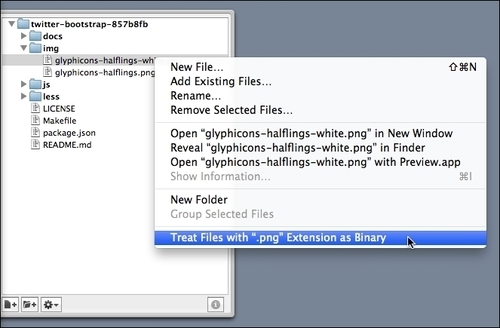
You can undo this by right-clicking on the file and selecting Treat Files with ".xxx" Extension as Text.
This task describes another way to find text, this time searching through your entire project. This task will also include some tips on how to speed up your search and even cover some caveats for larger projects.
To pull up the Find in Project dialog window, from the menu, select Edit | Find | Find in Project… (Command + Shift + F).

The Find function works in very much the same way as Find in a File (Command + F). However, it will return the locations of all of the occurrences of your find in every file of your project, except for the binary files.
Go to occurrence: If you'd like to open the file and go to the occurrence of the find, just click on the occurrence in the list as shown in the following screenshot:

The Replace Selected option: This option will only replace the occurrences of the find with the replace string for the current selection of occurrences. You can select multiple occurrences by holding down the Shift or Command keys while selecting. This is shown in the following screenshot:

The Replace All option: As expected, this will replace all of the occurrences of the find with the replace string regardless of what files are selected.
Let's look at how to hide extraneous find results and speed up searching in large projects.
If you get a lot of results back and want to hide some occurrences to make it easier to replace selected occurrences, you can fold or collapse those results by clicking on the triangle next to the file, as shown in the following screenshot:

As mentioned in the Creating projects section, you can speed up searches by excluding files from your project. One method to do this is to create a new project with only the files you wish to search (for example, a particular folder or group of folders). The steps to implement for faster searching are as follows:
Select the folders and/or files you wish to search in Project Drawer.
Create a new project (Command + Control + N).
Drag-and-drop the selected files and/or folders into the new project's Project Drawer menu, as shown in the following screenshot:

Perform a Find in Project (Control + Shift + F) action on the new project, as shown in the following screenshot:

Installing bundles can be a bit daunting if you're not used to working in the Terminal. This task will cover finding and installing bundles with GetBundles, which is a bundle that allows you to install other publicly available bundles.
Installing GetBundles is much like installing bundles manually, which we will go over later in this task. It's more complicated than installing themes and requires you to use the Terminal application. The steps to install are as follows:
Open the Terminal application, which is located in your
Applicationsfolder under theUtilitiesfolder.From the Terminal, enter the following commands:
mkdir -p ~/Library/Application\ Support/TextMate/Bundles
cd ~/Library/Application\ Support/TextMate/Bundles
svn co http://svn.textmate.org/trunk/Review/Bundles/GetBundles.tmbundle/
osascript -e 'tell app "TextMate" to reload bundles'
Now that you have GetBundles installed, you can open the GetBundles window via the menu by selecting Bundles | GetBundles | Get Bundles.
Once you open the GetBundles bundle, you can install any bundle by selecting one or more bundles and clicking the Install Bundles button:

The GetBundles bundle has a simple interface that lists bundles and their descriptions with the search option, filters, and tools:

Some of the features of GetBundles are explained in the following section:
Filtering: This allows you to filter the bundles by Official, Under Review (as in under review by Macromates), 3rd Party, and All.
Searching: You can search for a bundle using two methods—literal or with a regular expression. The search will apply to the current filter you have selected. It will also search both the bundle name and the description.
Tools: The tools drop-down menu (that is, the gear icon in the bottom left-hand side of the window) will allow you to use options such as Reload Bundles List, Refresh Local Bundle List, Install all Updates for your currently installed bundles, view the log, and more. You can also see information about the bundle, show the currently installed bundles in Finder, and open the bundle source in Textmate with the icon tools located at the top of the GetBundles window. The tools drop-down menu options are shown in the following screenshot:

Installed bundles: All properly installed bundles have a status of Ok.
Sorting: All the columns in the bundle list are sortable. For example, if you want to sort by installed bundles, click on the Status column header until the arrow is pointed down, as shown in the following screenshot:

Uninstalling bundles: Removing bundles is as easy as selecting an installed bundle and clicking the Delete button, which is shown in the following screenshot:

If you'd like to install bundles manually, you can check out the source files directly from Macromate's subversion repository.
If you're comfortable using the Terminal, you can manually install bundles using subversion (SVN) or git (via Github):
Subversion (SVN): The official TextMate bundles can be found in an SVN repository hosted by Macromates at http://svn.textmate.org/trunk/.
Git: The official TextMate bundles are mirrored on Github at https://github.com/textmate/. TextMate bundles are typically listed in Github. Since it's a common convention, search the site for repositories with
tmbundlein the name.
This task will quickly cover the use of bundles, including the beauty of tab completions and how to easily find the bundle item you're looking for along with the tab completion abbreviation or the keyboard shortcut.
Tab completion: Type in a tab trigger, for example,
divin an HTML document, and press the Tab key. The following screenshot shows how the code is auto-completed:
Opening bundle actions: You can open the bundle actions by clicking on the gear icon in the status menu or with the keyboard shortcut Control + Escape.
The Select Bundle Item window: This window allows you to quickly find a particular bundle action, whether it's a tab-completed snippet or a keyboard shortcut. You can open the window from the menu by selecting Bundles | Select Bundle Item… or use the keyboard shortcut Command + Control + T. This window is shown in the following screenshot:

Tab completion is one of many ways in which bundles can help with writing and code development. They are very useful shortcuts that will greatly speed up your coding.
Opening bundle actions is just like opening the bundles menu item, but with the benefit of easier access through a simple keyboard shortcut.
The Select Bundle Item window is used just like the Go to File... option with projects. You can type in the search bar to quickly filter all of the bundle actions.
If you want to dig deeper into learning more about a particular bundle, Bundle Editor is the place to go.
You can filter and view many other bundle items, such as commands and macros, in the Bundle Editor (select Bundles | Bundle Editor | Show Bundle Editor or Command + Option + Control + B). If you want to know how a particular bundle item works, find it here. The Bundle Editor window is shown in the following screenshot:
This task will utilize the official TextMate TODO bundle to display a to-do list compiled directly from your project using common comment keywords such as TODO, FIXME, CHANGED, and RADAR.
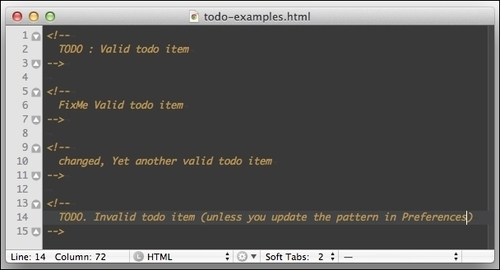
Insert a TODO item by typing a
TODO,FIXME,CHANGED, orRADARkeyword anywhere in the comments of your document. You may also use tab completion by typingtodoand then pressing Tab, which will automatically create a new comment. The different types of comments are shown in the following screenshot:
You can view the TODO list for the current document through the menu by selecting Bundles | TODO | Show TODO List or via the keyboard shortcut Control + Shift + T. The list is shown in the following screenshot:

As you may have surmised, the TODO bundle will search through your current document or project for the TODO, FixMe, changed, and RADAR keywords. Note that the keyword is not case sensitive and can be followed by a whitespace character, a comma, or a colon. This is shown in the following screenshot:
To search through multiple files or folders in your project, you need to select those files and/or folders in the Project Drawer menu. For example, to search the entire project select the top-level folder and click on Show TODO List (Control + Shift + T).
You may customize the TODO bundle to suit your color and pattern preferences as well as add more markers. We'll also cover the Tasks bundle, which will help you create well-formatted to-do lists.
You can choose what words count as TODO keywords. To do this, go to TODO Preferences via the File menu by selecting Bundles | TODO | Preferences. This window is shown in the following screenshot:
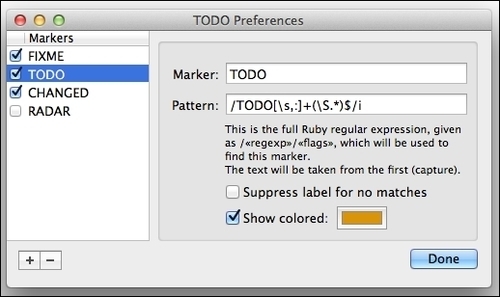
You may also change the color and regular expression pattern of the keywords, making this bundle quite versatile.
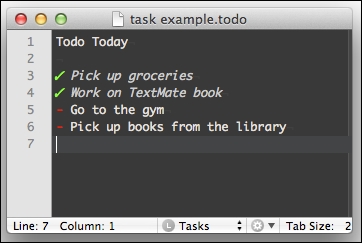
If you love to-do lists, a similar bundle called Tasks is also available for installation via GetBundles. The Tasks bundle allows you to easily create simple to-do items (Ins or fn + return on laptops to create a task) and mark them as complete (Command + D). An example of a to-do list is shown in the following screenshot:
The other official TextMate bundles are extremely helpful. However, this book will attempt to show you bundles and tools about which you might not already be aware. You can read about some highlights of the other bundles in the TextMate manual at http://manual.macromates.com/en/bundles.
Zen Coding is a method to code HTML at top speed through the use of CSS selectors and other abbreviations. This task will briefly cover the philosophy and use of the most common bundle items.
In order to expand a Zen Coding abbreviation or alias, you need to use the keyboard shortcut Command + E, or from the menu select Bundles | Zen Coding | Expand Abbreviation.
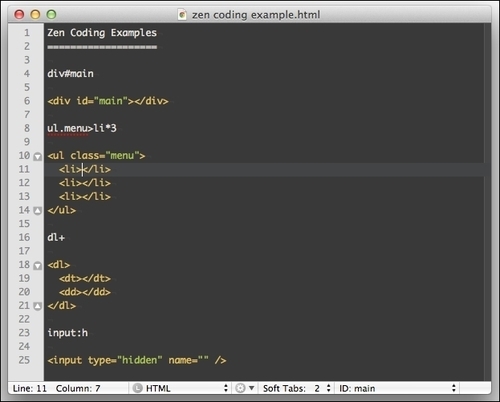
For example, div#main will expand to <div id="main"></div>
Here are some more examples:
On the Zen Coding website, at http://code.google.com/p/zen-coding/, Zen Coding is defined as an editor plugin for high-speed HTML, XML, and XSL (or any other structured code format) coding and editing. The core of this plugin is a powerful abbreviation engine, which allows you to expand expressions—similar to CSS selectors—into HTML code.
Zen Coding can greatly expedite HTML development. There are some other helpful actions included in this bundle:
The Increment/Decrement number by 1 action (Command + ?): Add or subtract 1 from the number to the left of the cursor. An example use case would be if you duplicate a line (Control + Shift + D) and then want to increase the ID by 1.
The Remove Tag action (Command + Shift + K): Remove the tag surrounding the text.
The Wrap with Abbreviation action (Command + Shift + A): Wrap current selection with the abbreviation you enter into the pop-up dialog after running this action.
There are more actions, so definitely explore all of them. A handy cheat sheet is available at http://code.google.com/p/zen-coding/wiki/CheatSheets.
The purpose of covering Zen Coding in this book is to highlight the power of TextMate as a full-featured coding tool. It will save you a lot of time if you do a lot of HTML and CSS coding.
To find out more information about Zen Coding, the philosophy, and more actions, you should visit the official website at http://code.google.com/p/zen-coding/. Listed at this website are a number of plugins available for other applications, should your friends and colleagues be jealous of your fast HTML coding abilities.
Along the same lines as Zen Coding for HTML, there is also Zen Coding for CSS, which mostly utilizes short-form abbreviations for CSS properties.
Find out more by going to this wiki page at http://code.google.com/p/zen-coding/wiki/ZenCSSPropertiesEn.
With the popularity of WordPress and other Content Management Systems (CMS) that incorporate What You See Is What You Get (WYSIWYG) editors, such as TinyMCE and auto-saving, writing in separate editors seems a bit unnecessary or "old school". However, I still often prefer to work remotely, which sometimes means no Internet and makes TextMate a perfect offline utility. This task will cover a few of the more useful blogging bundles: Blogging and Hyperlink Helper.
The Hyperlink Helper option:
The Wrap selection with link option: Wrap a hyperlink tag no matter what kind of document you're in (HTML, Markdown, Textile, and so on) by using Control + Shift + L or from the menu by selecting Bundles | Hyperlink Helper | Wrap selection as link.
Search for selection and wrap with link: Use the keyboard shortcut Command + Control + Shift + L (or select Bundles | Hyperlink Helper | Lookup word on Google and link) to search for the selected text and wrap that text with the first result from Google.
The Blogging option:
The Setup option: First you must define your list of blogs by entering the blog name and XML-RPC (that is, Remote Procedure Call using XML) URL. From the menu select Bundles | Blogging | Setup. This is shown in the following screenshot:

Fetching blogs: In order to start editing blog posts, you'll need to fetch a list of the blog entries. From the menu select Bundles | Blogging | Fetch Post. The Fetch Post window is shown in the next screenshot.
The most common XML-RPC locations are as follows:
Moveable Type:
http://username@myblogdomain.com/mt-xmlrpc.cgi#1WordPress:
http://username@myblogdomain.com/xmlrpc.phpTypo:
http://username@myblogdomain.com/backend/xmlrpc
Edit and save the blog: Edit the blog entry in Markdown (see the Markdown and Textile section later in this chapter) and save blog as you normally would (Command + S). Once you're done editing, post to the blog with the keyboard shortcut Command + Control + P (or select Bundles | Blogging | Post to Blog).
The Hyperlink Helper option is quite useful when you want to quickly insert references into your documents without having to go back and forth between your browser, search for the address, and then paste it into your document.
It also has some further functionality, such as searching for word definition links in Wikipedia and more advanced Yahoo! search engine searches.
The Help documentation for the Blogging bundle is quite helpful, so you should read it if you have any issues. From the menu select Bundles | Blogging | Help.
Markdown and Textile are plain text file formats that can easily be converted to HTML (and other formats) through the use of easily accessible libraries. This task will cover both formats and explain why you may want to use one over the other depending on your project.
It's as simple as selecting the file format from the document status menu. The following screenshot is an example of using the Markdown bundle:

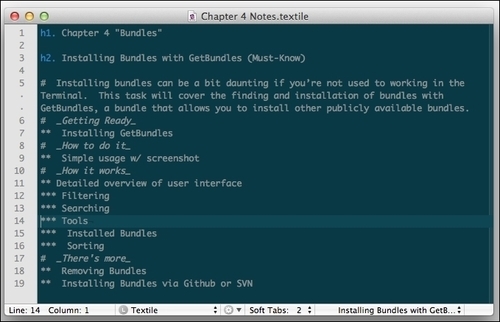
The following screenshot is an example of using the Textile bundle:
Though both the Markdown and Textile bundles make it easier to utilize these lightweight markup languages, the real power lies within the syntax. Both bundles provide easy access to the documentation with the keyboard shortcut Control + H. The following screenshot is an example of the Markdown documentation:

The following screenshot is an example of the Textile documentation:
With Markdown, if you are currently making edits, you may instead see a tooltip with helpful instructions to speed up your editing. This is shown in the following screenshot:

You can find out more about these formats and their syntaxes at the following sites:
For Markdown use http://daringfireball.net/projects/markdown/, and for Textile use http://redcloth.org/hobix.com/textile/.
You may be asking yourself, "Should I use Textile or Markdown?" The answer to this question largely depends on the project at hand.
Developed by John Gruber and Aaron Swartz, Markdown was meant to allow a format that is easy to write, read, and convertible into a structured format such as HTML.
Textile is similar in nature but focuses more on marking up the language. Originally developed by Dean Allen, it is regarded as a "humane web text generator".
History aside, it really comes down to your particular needs. I typically use Textile when I want greater control over the markup's end result. Textile is also used for a lot of wikis and blogs. I use Markdown whenever I want to format plain text in a pretty way and want the document to be easily convertible into HTML (for example, my resume or notes). They can both do about the same amount things, so it's purely up to you.
Macros make it easy to record several actions or keystrokes and then replay them multiple times. This task will provide an overview of how to record and subsequently execute macros in your document.
You can start (and stop) a macro recording by using the keyboard shortcut Command + Option + M (or select Bundles | Macro | Start Recording/Stop Macro). Once enabled, you will notice a red recording dot in the bottom-right corner of the document window, as shown in the following screenshot:

Once you've stopped recording (Option + Command + M), you can save the macro by using the keyboard shortcut Control + Command + M (or select Bundles | Macro | Save Last Recording), which will open the Bundle Editor window. Enter a name for the macro and choose an activation method of either a keyboard shortcut or tab trigger, as shown in the following screenshot:

Once named and set up with an activation method, you can use your newly created macro! The following screenshot shows a macro being used in PHP:

Macros are best used for keystrokes that you keep repeating. In the previous example, I made a macro out of a common pattern I use in PHP development (WordPress, CakePHP, and so on) to print out a string, which typically includes a variable (for example, for debugging purposes).
If you just want to use your macro without saving it long-term, you can use the previously recorded macro by hitting the keyboard shortcut Shift + Command + M, or from the menu by selecting Bundles | Macros | Replay Last Recording.
Editing your macro requires a little bit of XML knowledge, but it is easily done using TextMate to open the bundle source files.
Sometimes it can be difficult to record a macro perfectly the first time. The bad news is that TextMate doesn't currently support editing macros. The good news is that if you're comfortable with XML, you can edit the .plist file by opening it in TextMate. The steps for editing macros are as follows:
Open a file (Command + O).
Select the Show Hidden Files checkbox as shown in the following screenshot:

Navigate to your
Homefolder, thenLibrary/Application Support/TextMate/Bundles, then select the bundle name and click on Open, as shown in the following screenshot:
The
.tmbundlefile will open as a project. You will find your macros in the Macros folder, as shown in the following screenshot:
Once you edit your bundle, don't forget to select the Reload Bundles option (select Bundles | Bundle Editor | Reload Bundles).
This task will cover how to execute shell commands directly from the current document.
The steps to execute shell commands directly from the current document are as follows:
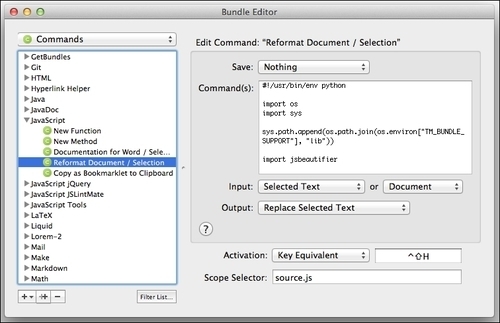
Add a new command into the Bundle Editor window (Control + Option + Command + B) by clicking on the plus (+) icon and selecting New Command:

Fill in the Command(s) text field with the commands you wish to execute, along with the Input, Output, and Activation options. You can also select this option via the Bundles menu.
For the Command(s) text field, enter curl -sSd "css=$TM_SELECTED_TEXT" \http://prefixr.com/api/index.php for the Input option, set Selected Text or Document; for the Output option, set Replace Selected Text; and for the Activation option, set Key Equivalent and Control + Option + Command + U, as shown in the following screenshot:

Execute the command by selecting the text you wish to input. This is shown in the following screenshot:

And then use the chosen activation action (the keyboard shortcut Control + Option + Command + U in this example):

The example in this task uses Jeffery Way's Prefixr (http://www.prefixr.com/), which is a fantastic utility to make the CSS cross-browser compatible quickly and easily.
From the previous example, when you use the keyboard shortcut, the selected text (the input) will be sent to Prefixr via cURL (http://curl.haxx.se/), which is a command-line utility that transfers data from a variety of protocols, such as HTTP. The returned data (the output) will then replace the selected text.
Let's also look at how to execute commands from the document editor. Plus, we'll find out how to set environment variables to aid in development.
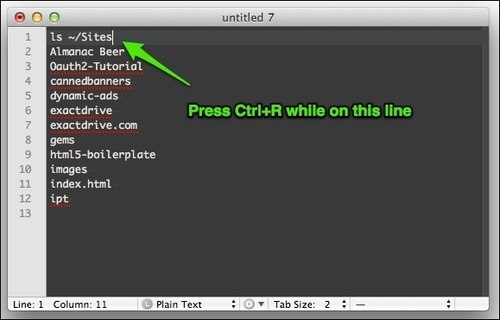
Another way to execute commands in TextMate is to execute the current line and return the results. This can be done from the menu (select Text | Execute Selection Inserting Result) or the keyboard shortcut Control + R:
In this section's example, we made use of the TextMate environment variable $TM_SELECTED_TEXT. There are a number of other similar environment variables that can be used for commands and more complex bundle operations. A full list of the variables can be found on Macromate's TextMate wiki:
http://manual.macromates.com/en/environment_variables.html
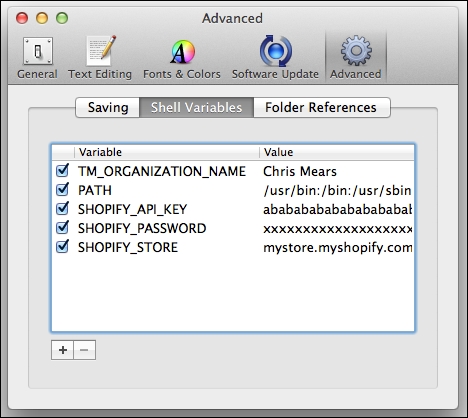
You may also wish to utilize static shell variables (select Preferences | Advanced | Shell Variables), which you can use to declare usernames and passwords to your MySQL database or services such as Shopify (http://www.shopify.com/). The Shell Variables window is shown in the following screenshot:
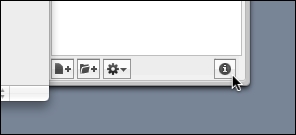
You can also specify shell variables at the project level by clicking on the information icon in the Project Drawer menu, as shown in the following screenshot:
The Project Information window is shown in the following screenshot, where usernames and passwords of services such as MySQL can be set: