


In this chapter we will cover the following recipes:
Installing TestComplete
Creating your first project
Choosing a scripting language for the project
Recording your first test
Modifying the recorded test
Saving and restoring user settings
Creating code templates
Delaying script execution
Adding and removing project items
Understanding how TestComplete interacts with tested applications
Understanding Object Browser
Using Object Spy
TestComplete is one of the most popular commercial tools for automation testing. It allows us to automate testing of wide variety different applications (such as Win32, .NET, Java, Web, Delphi, and many others) using the same testing methodologies and similar programming approaches.
TestComplete supports testing on all Windows platforms being supported by Microsoft (both 32- and 64-bit configurations) and allows using several scripting languages for creating scripts as well as nonscripting tests for users who do not have programming experience (keyword-driven testing).
Recommended system requirements for TestComplete are:
Processor: Intel Pentium 4 (3 GHz) or Intel Core 2 Duo (2 GHz or higher)
RAM: 2 GB
HDD: 700 MB free space
Monitor: 1280 x 1024 or higher resolution
You can find the full list of requirements on the SmartBear website (http://smartbear.com/products/qa-tools/automated-testing-tools/testcomplete-specifications/testcomplete-system-requirements).
In this book we use the following configuration:
Microsoft Windows 7 x86 (32-bits) operating system installed on a virtual PC
1 GB of RAM
TestComplete Version 9.30 (most examples will also work in TestComplete 7.x and 8x)
Most examples in this book use standard Windows applications (Notepad, Internet Explorer, and Paint). Additionally, you will need to install free Microsoft Calculator Plus application, which can be downloaded from the Microsoft's website (http://www.microsoft.com/en-us/download/details.aspx?id=21622). Standard calculator application of the Windows Vista/7/8 will not work as its controls are recognized differently and require additional adjustment.
In this chapter, we are going to cover the basic actions one can perform with TestComplete in order to get acquainted with TestComplete IDE and its tools.
Before getting down to TestComplete, make sure it is installed to begin with.
Installing TestComplete is quite simple; it is no different from installing most Windows applications.
To install TestComplete, we will need to download installation file from the SmartBear website:
If you are up for using a trial version of TestComplete, please follow the link http://smartbear.com/products/qa-tools/automated-testing-tools/free-testcomplete-trial, enter all the required data (name, e-mail, company, and so on), and click on the Sign Up Now button. Thus, you will receive a letter with a download link and activation code for a 30-days trial version of TestComplete.
If you are registered as a SmartBear client and have an account on their website, please follow the link https://my.smartbear.com/login.asp, enter your account data, and click on the Login button. After this, you will be redirected to the page with available programs to download and install. Clicking on the link with the version near the TestComplete, you will find yourself on the page for the download with the link and the license key.
After this you will have an installation file named TestCompleteXYY.exe (where XYY stands for the current TestComplete version).
To accomplish successful TestComplete installation, follow these steps:
Launch the downloaded
.exefile and wait for the InstallShield Wizard window to appear.Click on Next.
In the License Agreement window, check the I agree… option and then click on Next.
In the Customer Information window enter a user name and that of a company (it may be arbitrary, not necessarily corresponding with the information from the TestComplete license). Select the type of installation (for any users or only for the current one), and then click on Next.
In the Choose Destination Location window, select the destination folder to install TestComplete and then click on Next.
In the Select Program Folder window, signify the folder in the main menu to target the shortcut of the program and click on Next.
In the Select Features window, select necessary components to install and click on Next. If you are not sure which components to install, leave all the options by default.

Click on Next in the Start Installation window and wait for the installation to complete.
Click on Finish.
Now, all we have got left to do is activate the TestComplete. In order to do so launch TestComplete application.
In the new popped-up window, click on the Activate license button.
Check the Automatic activation option and then click on Next.
Enter your data (name, company, e-mail, and key) that you signified for the registration and activation code that you have received by the e-mail. Click on Next.
If necessary, input the parameters of your proxy server and click on the Activate button.
In a matter of several minutes, necessary to connect to the server and validate registration data, you will receive the notification: Your license has been activated successfully. Thank you.. Click on the Finish button. TestComplete will fire up to the starting pane. Now you are able to begin your working expertise.
During the installation process TestComplete verifies programs installed on your computer. The Select Features window displays only components which are installable at the moment. All other features (which are not accessible at the moment) will be turned off.
So far, we have considered the simplest method of activation: automatic activation of the trial TestComplete license on the SmartBear server. Automatic activation of the node-locked license is not complex either.
TestComplete uses two license types:
Node-locked license : This type of license is attached to one computer and cannot be used on virtual machines
Floating license : This type of license allows running several copies on multiple workstation in the local network (the number of copies is determined by the license key) and can be used on virtual machines
If you are occupied as a system administrator in your company and need to install TestComplete on several computers, you can cut back on the installation time by using silent installation mode from command prompt.
In order to do that, you should extract the content of the downloaded archive TestCompleteXYY.exe and launch the installation file Setup.exe with the /r parameter:
<path_to_extracted_files>\Setup.exe /r
The downloaded archive file can be opened with the help of any archiver that supports RAR SFX formats (for example, WinRAR or 7-Zip).
Having done so, you should carry out the previously listed steps. As a result, there will appear the Setup.iss file in the Windows folder. Move this file to the folder with the files for TestComplete installation and copy the content of the folder to the targeted computers for TestComplete installation. Launch the installation file with the /s parameter:
<path_to_extracted_files>\Setup.exe /s
As a result of this TestComplete will be installed with the same settings as the first installation.
Similar to many other IDEs, TestComplete binds all the elements together in a single project; and the projects, in their due turn, are joined into project suites.
First and foremost, it is necessary to create a project suite and then create one or more projects in it to be able to add all the necessary elements for the project.
In order to create a project we need to perform the following steps:
Select the following menu item File | New | New Project Suite.
In the Create Project Suite window signify the name of the project suite and the path to it.
Click on OK. In the result, there will appear the created project suite on the Project Explorer panel in the left part of the TestComplete window.
Right-click on the created project suite and select menu item Add | New Item, as shown in the following screenshot:
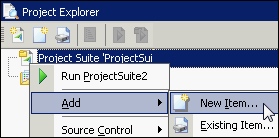
In the opened Create New Project window enter the name of the project and the path to it, as you have just done in the previous instance.
In the Language drop-down menu select the necessary programming language of your choice and click on the Create button (if you do not know which language to choose, please read the Choosing scripting language for the project recipe).
In the result, a project will be created into which we will be able to write the testing scripts.
Each project suite and project has corresponding files in the XML format with the extensions of .pjs and .mds respectively. In these files, all the necessary information is stored: elements that are constituent parts of the project at hand or a number of projects, paths to them, their parameters, and so on.
Usually, the folders with the projects are stored in the same folder with the project suite. This is quite handy since the same TestComplete structure is stored on your hard disk drive (HDD) as well.
If, in any event or reason, you need to store the project separately from the project suite where it is located, it is sufficient at the point of creation to signify a different path. Please note, however, that in case of moving projects to another computer in the future, you will come up against another problem: migrating all the projects together with the project suite, which are located in different folders or even on separate discs. In this case, when opening the project suite, TestComplete will prompt you with an error message Project not found.
Try to give the projects and project suites some sensible names; do not use the default names (Project1, Project2, and so on). Otherwise, you will forget which project stands for which data.
The names of the projects and project suites are also used at the point of launching tests from the command prompt.
Choosing a scripting language for the project is the first important choice to make before creating a project. Choosing a language should be a careful and circumspect process, since it shall not be possible to change the choice in the future. If you would like to change the selected project's scripting language, you would have to redo the project from scratch!
In order to select a scripting language for a new project we need to perform the following steps:
TestComplete provides a possibility of choice from the following three programming languages: JScript, VBScript, and DelphiScript. Apart from these three languages, the following two are also available: C++Script and C#Script. The latter two languages are in fact the same as JScript, with somewhat modified syntax. That's why everything that goes for JScript is just as applicable for these two scripting languages also.
Note
The C++Script and C#Script scripting languages have nothing in common with C++ and C#! It's the same JScript with a slightly changed syntax. By using C#Script you will not have the possibilities extended in the C#! The same goes for C++Script.
The next important thing: if you are planning to create tests only in TestComplete and then launch them with the help of TestComplete (or with the help of TestExecute – a command-prompt utility), you can select absolutely any language, regardless of the application that you are about to test.
For example, you may use VBScript language to test applications coded in C#, or select DelphiScript to test web-applications. In any case, you will enjoy complete access to all the TestComplete possibilities. For example, to access standard .NET classes in TestComplete, there is a special dotNET object up for grabs. This object can be used in any programming language.
If you are already familiar with one of the languages suggested by TestComplete, selecting just that will be better for you. If none of the languages are familiar to you, the following tips may come in mighty handy:
VBScript : This language is very simple to learn, and therefore is recommended for beginners who are not proficient in programming.
JScript: This language (JavaScript engine from Microsoft) is a more powerful and flexible language in comparison to the VBScript; it also has more compact syntax and its code constructions are shorter and faster to type. JScript is recommended for those who have some programming background.
DelphiScript: This language is a procedural scripting language used only in TestComplete. Its syntax resembles a skimpy version of Delphi. It is recommended only for creation of connected and self-tested applications (see later in this chapter).
Now, we shall consider why we need such languages as DelphiScript, C++Script, and C#Script.
TestComplete allows scripting in more advanced languages (C#, C++, Delphi, and Visual Basic). Meanwhile, you are using all the functionalities of a given language, writing up tests in any appropriate IDE, using the functionalities extended by TestComplete to gain access to the tested application. If you plan to record scripts with the help of TestComplete first and then convert them to tests in more advanced languages, you will need to apply these three languages. You can select a scripting language to comply with what it will be converted to (for example, C++Script to convert to C++code, DelphiScript for converting to Delphi). Having resolved that, the process of converting becomes hands-down easy. You will only need to make several similar changes in the code. In other cases, usage of the languages DelphiScript, C++Script, and C#Script is usually not considered expedient.
Of course, each language has its flaws. A complete listing of limitations can be found at http://support.smartbear.com/viewarticle/32212/.
Differences in the scripting tests and tests written in advanced-level languages is explained at http://support.smartbear.com/viewarticle/27178/.
Recording is the simplest way to create you first auto test. No programming skills are required as it is extremely simplistic to go about and execute. In this recipe, we will make a recording of the first executable test to be launched to make sure it is workable.
Before recording the first test, we need to perform some prerequisite steps:
Create a new project in TestComplete, as described in the Creating your first project recipe.
Download the Calculator Plus application from the Microsoft website, if you have not yet done so, and install it (http://www.microsoft.com/en-us/download/details.aspx?id=21622). This application will be needed for many examples in the book.
Launch the Calculator Plus and opt for the View | Classic View menu, so that the Calculator Plus could look like a no-frill Windows application, without bells and whistles.
Select the View | Standard menu item. Having done so, Calculator is switched to the Standard working mode.
Note
If you are working in the Windows XP or Windows Vista operation systems, you can get by with a usual calculator that comes along as an embedded system component. For Windows 7 and later, the embedded calculator will not work to handle the examples at hand, because it is much harder to obtain the calculus results from its text output field.
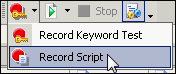
In order to record a test we need to perform the following steps:
Select the Test | Record | Record Script menu item or go for the appropriate option from the drop-down menu on the toolbox, as shown in the following screenshot:
At this point, we would have a floating window widget Recording with the buttons Rec., Stop, and Pause.
In the Calculator Plus window, click on the buttons 2, +, 2, *, 5, and =. In the end result, the result of the calculation will appear in the text output to the following effect: 2+2*5 = 20. This is a standard calculation mode for the calculator where operation priorities are not accounted for.
Click the Stop button in the Recording window, as shown in the following screenshot:

If you have the Create Project Item window opened afterwards, prompting for adding the NameMapping element to the project, click on the Cancel button, as shown on the following screenshot:

In the result, the TestComplete editor will contain the following script:
function Test1()
{
  var wndSciCalc;
  var btn2;
  wndSciCalc = Sys.Process("CalcPlus").Window("SciCalc", "Calculator Plus");
  btn2 = wndSciCalc.Window("Button", "2");
  btn2.ClickButton();
  wndSciCalc.Window("Button", "+").ClickButton();
  btn2.ClickButton();
  wndSciCalc.Window("Button", "**").ClickButton();
  wndSciCalc.Window("Button", "5").ClickButton();
  wndSciCalc.Window("Button", "=").ClickButton();
}
Now, we can go ahead and double-check if the recorded script works as it's been intended. For this purpose, we right-click on any spot in the
Test1function, and from the context menu select the Run Current Routine menu item:
As a result, the script will launch and execute all the prerecorded actions.
All the actions made during the script recording are transformed by TestComplete to the corresponding scripting commands, that is, mouse-clicks, text input, and selection of elements from a drop-down list; all these actions are covered by specific corresponding commands.
In our example:
In the first two lines, there appear variables for the calculator window and the button 2.
In the following two lines these variables are initialized and they have specific objects assigned.
Now, it is possible to carry out different actions with these objects.
In the further six lines of code, we reproduce one and the same action with the help of several buttons, that is, the button-click, in particular.
Please note that the button 2 has become peculiar. Only for this button do we have a variable (
btn2) declared, while other buttons are handled through the window variable (wndSciCalc). This happens because the button 2 is being used more than once, which was duly recognized by TestComplete and further on transmuted into the recursively applied code in view.
Although TestComplete is generating a readable code at the point of recording, all the recorded scripts are the least readable and not easily maintainable. Sometimes, in case of changes in the tested application, the prerecorded scripts should be redone from the scratch rather than unraveled or modified to fit new conditions. Hence, the recording technicalities are not recommended to be applied to create scripts that should be workable recursively with intention to be applied for regression testing.
However, there are several cases when recording is useful, for example:
To learn and understand how TestComplete interacts with a tested application and controls within it
To quickly implement a simple script for a one-time task
To record several actions for future modifications
Recording scripts is just a first step towards creating effective scripts. To learn how to improve your tests, read the Modifying the recorded test recipe.
If you want to better understand how TestComplete works with windows and controls, refer to the Understanding how TestComplete interacts with tested applications recipe.
Running functions is explained in detail in Chapter 4, Running Tests.
As we have seen in the previous recipe, a script can be recorded automatically; however, in the result of such recording, an unreadable code will be generated, which is difficult to modify.
Let's suppose that in the result of requirements for the tested application altering, we have to add 20 more button-clicks to various buttons. The simplest way is to copy the last line of code (in which the = button is clicked), however, the size of our script will increase significantly, which will worsen the readability.
In this recipe, we will modify the recorded code in such a way that we will minimize the necessitated actions to append the new Calculator Plus button-clicks.
In order to modify a test we need to perform the following steps:
First and foremost, we will make the code conformable to a unified style so that button-clicks appear in the same way in any given case. To this end, we should get rid of the variable
btn2; and the code that stands for the button-click should be re-written in exactly the same manner that the button-clicks for the rest of the buttons have been coded.Together with that, we will join declaration of the
wndSciCalcvariable with its initialization and assign the variable a different name. In the result, the code will appear as follows:function Test1Modified1() { wndSciCalc = Sys.Process("CalcPlus").Window("SciCalc", "Calculator Plus"); wndSciCalc.Window("Button", "2").ClickButton(); wndSciCalc.Window("Button", "+").ClickButton(); wndSciCalc.Window("Button", "2").ClickButton(); wndSciCalc.Window("Button", "**").ClickButton(); wndSciCalc.Window("Button", "5").ClickButton(); wndSciCalc.Window("Button", "=").ClickButton(); }Tip
Downloading the example code
You can download the example code files for all Packt books you have purchased from your account at http://www.PacktPub.com. If you purchased this book elsewhere, you can visit http://www.PacktPub.com/support and register to have the files e-mailed directly to you.
The same repetitive actions are best to be coded as loops. In the given case, we will use the
forloop, and the text of the major buttons will be announced as an array:function Test1Modified2() { var aButtons = ["2", "+", "2", "**", "5", "="]; var wCalcPlus = Sys.Process("CalcPlus").Window("SciCalc", "Calculator Plus"); for(var i = 0; i < aButtons.length; i++) { wCalcPlus.Window("Button", aButtons[i]).ClickButton(); } }Lastly place code for button-clicks into a separate function:
function clickCalcButton(caption)
{
  var wCalcPlus = Sys.Process("CalcPlus").Window("SciCalc", "Calculator Plus");
  wCalcPlus.Window("Button", caption).ClickButton();
}
  function Test1Modified3()
{
  var aButtons = ["2", "+", "2", "**", "5", "="];
  for(var i = 0; i < aButtons.length; i++)
  {
    clickCalcButton(aButtons[i]);
  }
}
We have completed the modification of the recorded code within the three steps:
On the first step we simply arranged the code so that it followed the same style. These changes are cosmetic; we need them just to simplify the following modifications.
On the second step we made a serious change: made an addition of the loop to iterate through the repetitive actions of the button-click. As a result, first of all, we reduced by half the size of the function; secondly, we facilitated further work. Now, if we need to add new button-clicks, it would be enough to add the heading of the button to the array, and the loop will automate any further actions with the button.
Finally, on the third step, we have organized the calculator into a separate function. Thus, we have concealed the details of the realization of these actions by leaving only high-level actions in the testing function
Test1Modified3. This three-step accomplishment is called functional decomposition.
The Organizing script code in the project and Creating framework using the OOP approach recipes in Chapter 3, Scripting, will help you to arrange you modifications in script code
In TestComplete there are three types of customizable settings:
The first two types of the settings are easy to save and restore at any time.
The following steps should be performed to save and restore settings:
In order to save the settings from the Tools | Options menu, opt for the Tools | Settings | Export Settings menu item, and in the opened window signify which settings you would like to save and the name of the file to save them into; then, click on the Export button.
To upload the settings saved earlier, opt for the Tools | Settings | Import Settings menu item, and in the opened window opt for the file of the settings and click on the Import button. All the settings will be uploaded in the same format they had been initially saved in.
To save the settings of the external view (panels and toolbars), opt for the View | Desktop | Save Desktop As menu item and input the name of the file which you would like to save the settings of the external view.
In order to upload the previously saved settings, opt for the View | Desktop | Load Desktop menu item, and select the earlier saved file, and then click on the Open button. All the settings of the interface will return to the earlier saved variation.
Depending on the type of settings, they will be saved into the file with different extensions (.desktop for the settings of the interface and .acnfg for the settings of the program). If you're working on different computers and wish to work everywhere with the same habitual selection of settings, you can implement this, but also make it so it only takes a couple of seconds to restore previous settings on other computers. The same can be done after TestComplete has been re-installed or in case these files are stored in the source control along with the project suite; updating local copy of the project affects TestComplete's appearance.
Sometimes, it comes to pass that by experimenting with the re-positioning of various panes or control panels, you cannot restore their initial positions. In order to resolve this problem, there are respective options View | Desktop | Restore Default Docking (restoring initial view of the panes and panels) and View | Toolbars | Restore Default Toolbar (restoring toolbars).
These two options can sometimes become a point-of-care rescue if you have no saved settings.
Although we have no method to save and upload settings of a separate project, we can clone the existing project (it will be copied completely, including its settings), and then remove the unnecessary elements from the new project.
To clone a project, right-click on its name and opt for the Clone Project menu. Then, enter the name and path for the new project and click on the OK button.
Apart from this, we can assign the initial settings of the project (that is, the settings by default). This can be done via the Tools | Default Project Properties menu option.
When coding tests, we are using different programming constructs (for example, if…else, try…catch, and so on). Some of them are used rarely, while others, conversely, are used very often.
TestComplete allows us to accelerate input of some of the programming constructs with the help of so called code templates.
Several of the templates are already predefined in TestComplete; however, they do not always suffice for the job. That is why we will learn how to apply the preset templates and to create some of our own.
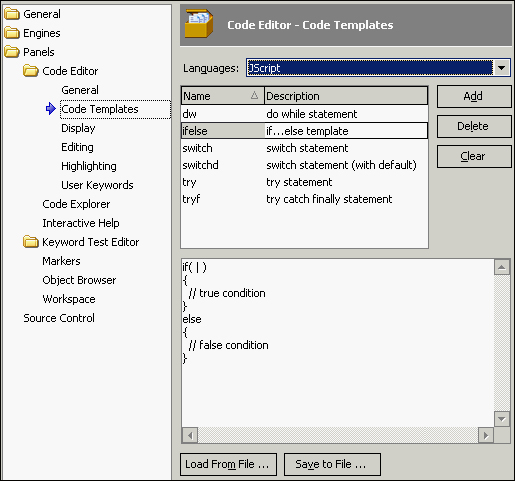
Suppose we would like to create a template of our own for the if…else block of JScript code:
Select the Tools | Options menu item, and in the opened dialog window, select the Panels | Code Editor | Code Templates option.
In the opened right-hand window panel select the target language that we want to add a new template for.
Click on the Add button.
Enter the name and description of the new template in the list of templates (to change the inputted values into the table, it is enough to make a single mouse-click on the cell).
In the field under the list, enter the code of the script that should correspond with the template in view.
Click on the OK button.
Now, proceed to open any unit and press the following keys combination: Ctrl + J. You will see a listing of available templates on the screen.
Select the newly created template
ifelseto witness exactly the same code appear in the editor as previously inputted in the listing of the templates.
We have added a new code template for the if...else construction for JScript language, and it can now be used in any TestComplete project.
Please note that code templates are different for all languages, so if you want to add the same construction for C++Script language, you need to repeat the preceding steps again.
In the following screenshot you can see how our template will look after performing all these steps:
Sometimes, there is a need to suspend script execution for some time to allow for synchronization with the work of the application. In this recipe, we will deal with the simplest method to provide such a timeout.
In order to demonstrate the delay, we will use the Test1Modified2 function from the Modifying the recorded test recipe:
Modify the
Test1Modified2function by adding one line into it:for(var i = 0; i < aButtons.length; i++) { wCalcPlus.Window("Button", aButtons[i]).ClickButton(); aqUtils.Delay(2000); }If you launch the function
Test1Modified2, it will be apparent that upon each Calculator Plus button-click TestComplete will delay execution of the script at the rate of 2 seconds, and then continues with the flow of execution.
The aqUtils.Delay method pauses script execution for a specific range of milliseconds (for example, 2000 milliseconds equals 2 seconds).
This delay does not account for any factors (for example, CPU speed of the computer or network connectivity speed), which means one and the same delay can be too large or too small in different conditions. In first case, we will continually have errors in the log; while in the second case, scripts will have a useless standstill over the given period of time.
There's one case when usage of the method aqUtils.Delay method is mandatory: when we expect a specific event in the loop to be triggered. Let's say we need to wait for the creation of the c:\somefile.txt file. In this case, the code will be as follows:
while(!aqFile.Exists("c:\\somefile.txt"))
{
    aqUtils.Delay(500, "Waiting for file...");
}
If the delay is not added to this code, TestComplete will keep checking too often, driving the CPU usage up to 100 percent, and thereby significantly slowing down work of other applications.
You can learn more about synchronization in scripts in the Waiting for an object to appear and Waiting for a property value recipes in Chapter 5, Accessing Windows, Controls, and Properties
In TestComplete, a lot of features are implemented as project items, which implies the need to add a corresponding element to the project prior to using "this or that" functionality.
In this recipe, we will look into an example for adding a Manual Tests element to the project (the element is meant to store the tests that are necessary to run manually). Additions of other elements to the project are done similarly.
In order to add a project item, we need to perform the following steps:
Right-click on the name of the project in the Project Explorer panel and select the Add | New Item menu item:
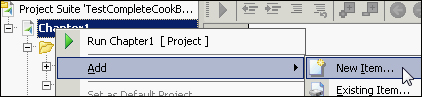
In the opened Create Project Item dialog window, select the necessary element (Manual Tests in our case):

As a result there will appear in our project a new element Manual Tests, which is workable as if from within TestComplete as well as directly from the scripts (if such a possibility is in store for the element in view).
To delete the project item from the project, right-click on it and select the Remove menu item.
In the opened window, select one of the removal methods: Remove or Delete.
It is necessary to use the same action (Add | New Item) for adding elements to the project and for addition of other sibling elements. For example, to add a new test to the Manual Tests group, right-click on the Manual Tests element and go for the Add | New Item menu item.
The Remove operation removes only the element of the project, while the element itself remains on your HDD. Later on, it could be added back into the project by selecting Add | Existing Item from the contextual menu of the project.
The Delete operation will remove the elements of the project and all the project-related files.
Support of different components (.NET, Java, Win API, and others) as well as of third-party controls (Infragistics, DevExpress, and others) is implemented in TestComplete with the help of extensions. To look up the list of supported and included extensions, and to disable those which you don't use, opt for the File | Install Extension menu item and uncheck the unnecessary ones.
In this recipe we will deal with TestComplete workings with various windows and control elements.
Launch the Calculator Plus application (C:\Program Files\Microsoft Calculator Plus\CalcPlus.exe) and make sure it is in Standard mode (the View | Standard menu item is checked).
In order to learn how TestComplete works with tested applications we need to perform the following steps:
Let's make a simple test and run it.
function Test2()
{
  var pCalc = Sys.Process("CalcPlus");
  var wCalc = pCalc.Window("SciCalc", "Calculator Plus", 1);
  wCalc.Activate();
  wCalc.Window("Button", "2").Click();
  wCalc.Window("Button", "+").Click();
  wCalc.Window("Button", "2").Click();
  wCalc.Window("Button", "=").Click();
  var result = wCalc.Window("Edit", "").wText;
  Log.Message(result);
}
In the result of the calculus, the log will have several messages on the buttons that have been clicked and the result of the add-up equation 2+2 from the text field.
In the first line, we initialize the pCalc variable and assign it with the object that is returnable by the Process method. The Process method takes two parameters: the name of the process and its index. By default, the index is equal to 1 and can be omitted.
In the next line, we initialize a new variable wCalc, while using the previously created variable pCalc this time around.
The wCalc variable will have a value assigned that is returned by the Window method. This method takes in three parameters:
WndClass: This parameter specifies the window class. The value of this property is viewable in Object Browser (theWndClassproperty).WndCaption: This parameter specifies a heading of the window, as seen by the user. The value of this property is also viewable in Object Browser.GroupIndex: This parameter specifies the current state of the window among the other windows of the same class (the so called, Z ordering). TheGroupIndexparameter can also be omitted in case of unique control.
In the four lines to follow, we are working with the control elements of the type Button, while using the same Window method.
In the last line but one, we are working with a new control element Edit, by respectively signifying such a class for it. Since this element has no heading at all, the second parameter is an empty string.
In this same string, we go about creating a new variable result and assigning it with a value of the wText property of the text field—in order to have this value outputted to the log.
Tip
Please note that access to any control element, regardless of its class and level of hierarchy, is carried out with the help of the Window method! This is true only for Win32 applications.
If you do not know which class or heading of the necessary control element is to be taken up, make use of the Object Spy utility and look up the corresponding properties of the control element of choice.
In our examples we are handling an ordinary Win32 application.
Apart from this, there is a good deal of other types of applications (.NET, Java, Delphi, and so on), and for each type there are proprietary methods of access and control. For example, for .NET applications it is the WinFormsObject method, for Delphi applications it is the VCLObject method, and so on.
Hence, if you have, say, a control element, that is identifiable by TestComplete as
Sys.Process("myapp").WinFormsObject("DotNetWinClass", "App Caption")you will not be able to address it with the help of the Window method:
Sys.Process("myapp").Window("DotNetWinClass", "App Caption") // <= WRONG!
This is incorrect and will not work! For each type of application, correct methods should be used (they can be looked up in Object Browser).
Usage of the
Log.Messagemethod is considered in greater detail in Chapter 6, Logging Capabilities, that is dedicated to working with the log
In this recipe we will get familiar with an important TestComplete tool – namely, the Object Browser panel.
The Object Browser panel represents all the processes and objects visible for TestComplete in the system, which are workable from within TestComplete.
We will need to run Calculator Plus as a target application to learn on (C:\Program Files\Microsoft Calculator Plus\CalcPlus.exe).
In order to get acquainted with Object Browser we need to perform several steps:
Click on the Object Browser tab in the left part of the TestComplete window (near the Project Workspace pane) or press the following key combination: Ctrl + Alt + O.
In the collapsible list, expand the node Sys, and then the Process ("CalcPlus") node.
In the opened node, click on Window("SciCalc", "Calculator Plus", 1).
On the right-hand panel click on the link View more members (Advanced view):
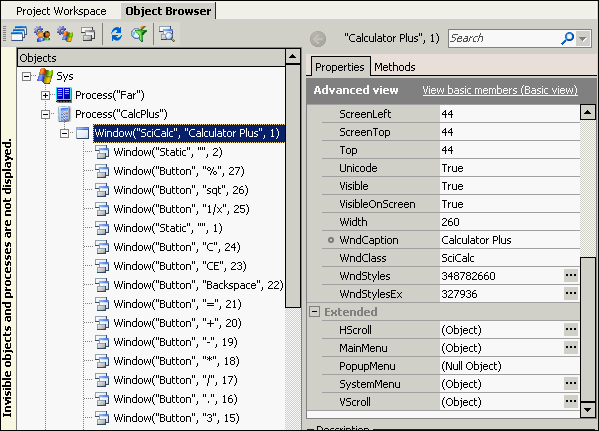
The Object Browser tab displays all the system nodes within immediate access. On the Objects panel in the left-hand part of the collapsible list, all the system objects are shown. The root node Sys is the main object in the given hierarchy; it is particularly instrumental for accessing all the system nodes.
Sibling nodes of the Sys object are the processes. Each process, in its turn, has child elements, the windows. Also, the main window has child elements, the controls, with which we are working (buttons, data input, lists, toolbars, and others).
Depending on the application type, its complexity, and the customizable settings of the project, this hierarchy may be quite sophisticated. The matter is that TestComplete represents all the application elements, even invisible ones (which are used for positioning controls).
Each item of the Objects tree is an object itself (including the Sys object) with various properties and methods. By default, a short-list view is enabled for the displayed properties. By clicking on the View more members (Advanced view) link we have displayed a complete list without any exceptions.
Properties and methods of the selected item are displayed on the corresponding tabs in the right-hand part of the TestComplete window. Every element has several standard properties always available (such as width, ID, and class); also, the extended properties may be available.
The majority of properties are read-only; however, some of them can be accessed in read-write mode to have them changed. If that's the case, we will see a small circle near the name of the property (for example, the WndCaption property of the main Calculator Plus window). Such properties can be modified from the scripts directly.
Apart from simple properties there are compound properties with values as objects. In this case, in the property-value field, the value of (Object) will be signified. In order to view the value of such property, it is necessary to double-click on its name; this will cause the list to update by displaying properties and methods of the viewed compound property.
For example, double-clicking on the MainMenu property, we will see a list from two properties: the number of child elements and the menu items.
In this example, the Items property is also a compound one, meanwhile this is a property with parameters. Clicking on the Params button, we can have either the index of the menu item assigned or its caption and once more the compound property that corresponds the menu item.
In the process of work (especially, with complex control items), we will be working with Object Browser in order to locate the necessary properties.
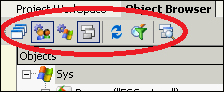
In the topmost part of the Object Browser panel above the Objects tree, there are several buttons which make it possible to filter the displayed, processed, and other objects. For example, it is possible to hide invisible objects, system processes, and so on; and even selectively display the processes with the help of the filter.
The fewer processes and objects displayed on the Objects panel, the faster the information is updated for all the objects in view.
We recommend usage of the Show Tested Applications Only mode when it is possible. If necessary, one can connect, with the help of the filter window, only those processes with which you are currently working.
Tested applications are considered in greater detail in the next chapter.
If you are unable to find necessary control within the Object Browser tree, read the Using Object Spy recipe.
The complexity of object hierarchy may be changed by modifying the Object Tree Model option. The Choosing Object Tree Model recipe in Chapter 5, Accessing Windows, Controls, and Properties, will help you to learn more about it.
The following two recipes will give even more useful information on controls and windows:
The Understanding how TestComplete interacts with tested applications recipe
The Understanding the window's life cycle recipe in Chapter 5, Accessing Windows, Controls, and Properties
If the tested application is a quite complex one and contains many different controls, locating the necessary element in the Object Browser panel may be quite a challenge.
To facilitate the task at hand, we can use the Object Spy utility.
Note
If you are using TestComplete of Version 7 or below, Object Spy will go by the name of Object Properties, and is no different otherwise from Object Spy.
In order to get acquainted with Object Spy we need to perform several steps:
Click on the Display Object Spy button on the toolbar.

In the result, the TestComplete window will minimize and the screen will have the Object Spy window displayed.
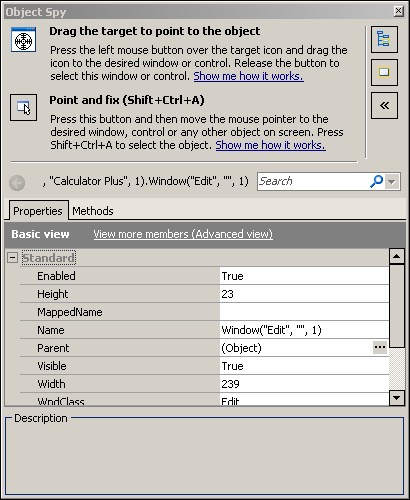
Now we need to signify the particularly necessary object in the Object Spy window. To this end, we have the following two methods:
Drag-and-drop by the mouse the sign of the target onto the necessary object and wait until the control element highlights it in red. Once this has occurred let go of the mouse button.
Press the Point and fix icon, hover the mouse cursor over the necessary object and press the following combination of keys: Shift + Ctrl + A.
In any case, in the list below, we will see a list of available properties similar to the list in Object Browser.
In order to see the selected element in Object Browser, click on the Highlight Object button in the Objects tree in the top-right corner of the Object Spy window.
TestComplete highlights the control elements, which it can identify. Do not be surprised if you happen to find out that some of the elements (for example, menu items, toolbar buttons, individual table elements, and so on) are not highlighted, while the whole group of elements is. Such behavior stands for either of the two:
This is a compound control element and TestComplete can't highlight its internal component, only a whole compound control can be recognized and highlighted
A given control element is not supported by TestComplete altogether
The Object Spy window displays information about controls the same way as Object Browser does. There is a tab control with available properties and methods at the bottom and a full name of the control above it. There is also a Search field, which allows us to quickly apply a filter to the list of properties and methods to find the necessary item in the list.
The Working with nonstandard controls recipe in Chapter 3, Scripting, will guide you on working with nonstandard controls which are not recognized by TestComplete
If you want to know how to find specific control by coded script, you can move to the Finding objects by properties' values recipe in Chapter 5, Accessing Windows, Controls, and Properties

